1. Algorithm body
Unsupervised image segmentation
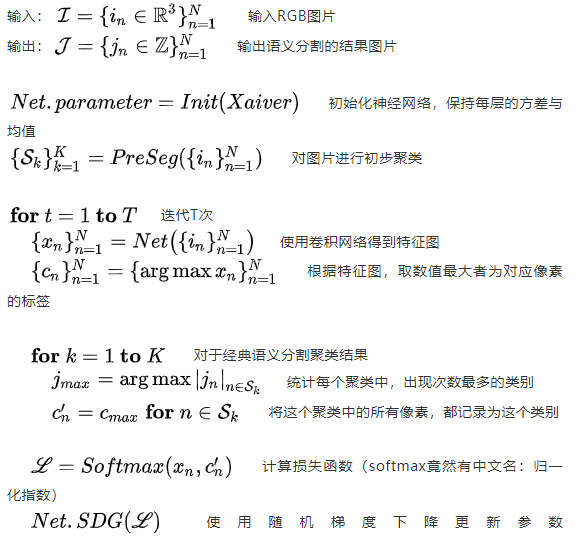
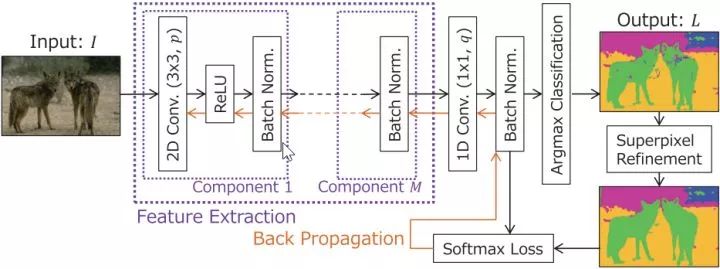
Among them, Net(), the author uses a full convolution network to accept the input pictures to complete feature extraction. This network is composed of three-layer convolution network, as follows:
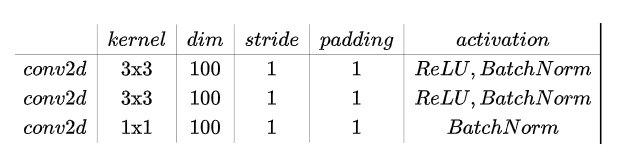
The original author put ReLU in front of BN and linear rectification in front of batch normalization, which will affect the adjustment of BN to variance.
Among them, PreSeg(), (formerly GetSuperPixels, using slic algorithm), that is, the classical machine learning unsupervised semantic segmentation algorithm is used to pre classify the input pictures, such as Python's skimage Multiple algorithms in segmentation and felzenszwalb algorithm. It is worth noting that in the author's original code, extreme parameters are selected for slic algorithm. There are reasons for selecting this extreme parameter:
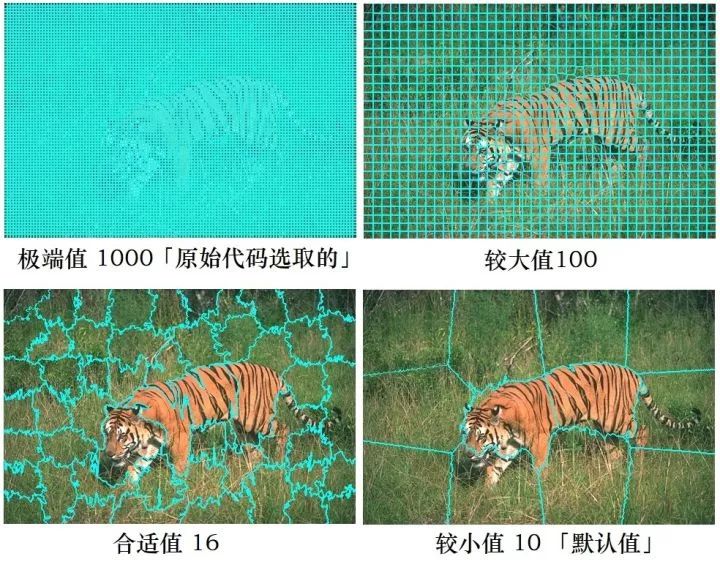
In slic algorithm, when the number of partitions is n_ The higher the segments, the more the algorithm blocks the input picture:
- Because pixels with the same semantics usually exist in continuous areas in a picture
- Therefore, it is speculated that pixels with similar positions are likely to belong to the same semantics
- Therefore, in the pre classification, we assign the same semantic tags to adjacent pixels
2. Algorithm understanding
First, use the classical machine learning algorithm to "pre classify" the input pictures: adjust the algorithm parameters and assign the same semantic labels to small areas with obviously the same semantic information. Because pixels with the same semantics usually exist in continuous areas in a picture, we can assume that pixels with similar color, texture and position can be assigned the same semantic labels.
Then, the input pictures are classified by using deep learning combined with automatic encoder structure. The goal of classification is to make the output semantic segmentation results conform to the results of "pre classification" as much as possible. Training to convergence.
Finally, the semantic segmentation results of in-depth learning will merge small blocks with the same semantic information to obtain large blocks on the basis of meeting the "pre classification results".
We can observe the gif pictures released earlier. My personal understanding is: in the whole unsupervised semantic segmentation task, the task of deep learning (neural network) is to process the fine-grained pre classification results of unsupervised semantic segmentation in classical machine learning. In the iteration, the small blocks are merged step by step, and finally the semantic segmentation results in line with human expectations are obtained.
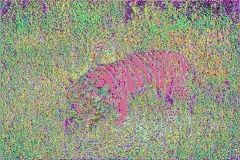
Areas that need improvement, such as the tiger tail and tiger eye of "tiger but not orange", were wrongly assigned the same label as "grass" in the iteration, which is not the result we want to see.
In the author's original code, the random gradient descent method (SDG) is used to train the network, and the learning rate of 0.1 is selected (the default value is 0.001), which makes the pixel merging of the algorithm very fast in the previous iteration.
3. Code improvement (only for operation efficiency to shorten the operation time without changing the main algorithm)
-
Rewrites the three for loops in the algorithm (note that I rewrite them according to the algorithm, not modify them)
-
The classical unsupervised image classification algorithm of machine learning is modified: felz algorithm is used to replace slic algorithm.
-
Modified convolution network: use four layers of convolution, imitate SENet, use 3x3 and 1x1 alternately, expand 64 and compress 32
-
Modify SDG to Hinton's
-
RMSprop greatly reduces the number of iterations and the accuracy of the final effect (therefore, SDG is still used in the improved method, but RMSprop can be selected when processing large images).
Why do I recommend using felz algorithm instead of slic algorithm?
In the pre classification stage, it is necessary to carry out fine-grained classification and divide enough regions (ensure that the classified places are classified, and the neural network can help it merge the places that should not be classified), so as to make the final result more accurate. If there are too many categories, the algorithm needs more iterations.
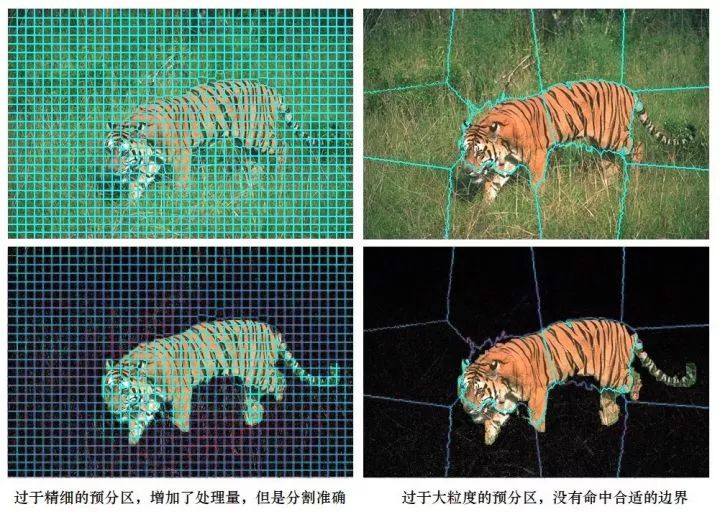
The reason for using felz algorithm instead of slic algorithm is that it can hit more "correct boundaries" in the case of separating fewer regions, and the boundaries separated by felz are more accurate. Whether felz algorithm or slic algorithm is selected, it has little effect on the accuracy when enough regions are separated, but the number of iterations is very different. Let's look at the picture and talk:
The first column uses slic algorithm, and the number of partitions is n_segments=1000. It can be seen that although there are many areas, the tiger's tail is not well separated from the grass. The second column uses the slic algorithm, the number of partitions n_segments=100, missed the classification boundary we want.
The following is the pre classification algorithm suitable for appropriate parameters (compare felz and slic algorithm)
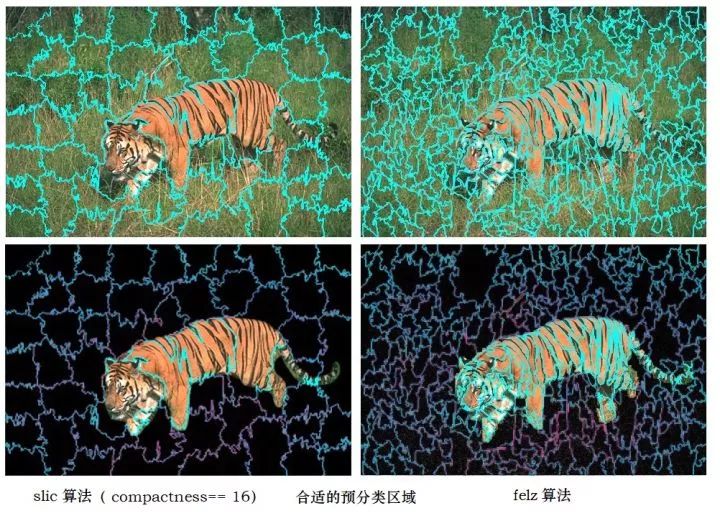
slic, the boundary stripes are not fine enough. The felz algorithm, which even separates every tiger grain, is one of the reasons why I recommend this algorithm.
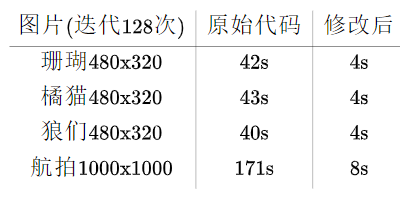
4. Optimization results (128 iterations, 40 seconds → 4 seconds)
Because the modified code can use fewer iterations to achieve the same effect, it takes less time than 4 seconds.
Pictures for testing
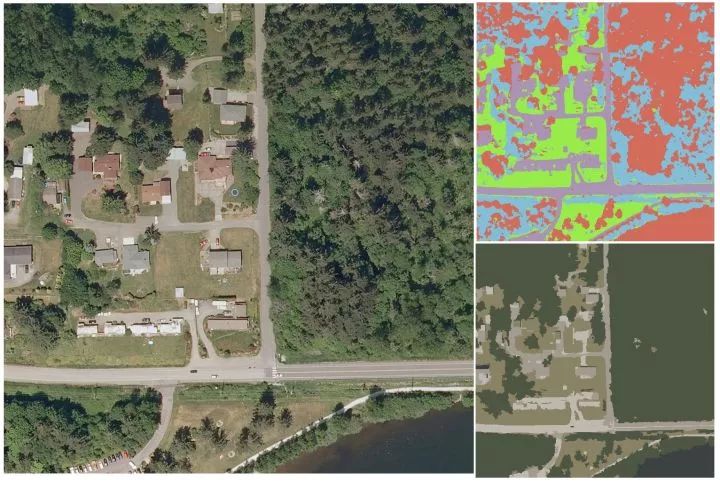
After the modification (Magic modification), not only the time consumption is shortened, but also the image segmentation quality is improved. Here is Bellingham from the satellite image dataset Inria Aerial Image[4] of the French Institute of automation_ x. The picture captured by TIF is 1000x1000, including trees, grasslands, roads, buildings, and lakes (greenish) in the lower right corner and cosplay grassland.
5. Algorithm disadvantages
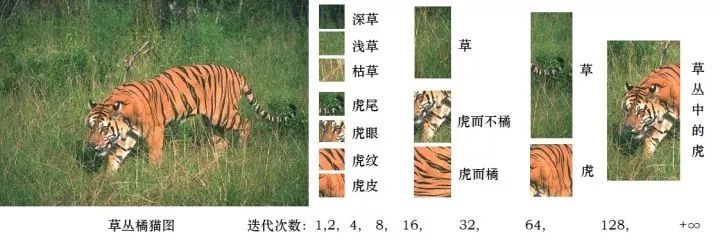
Firstly, the algorithm is not robust enough. The algorithm is greatly affected by parameters (including the parameters of gradient descent method and machine learning pre classification algorithm), and the results of multiple random restarts of the algorithm will be different. In order to show this disadvantage, I made the "orange cat looking at the orange picture": (Q: can this scheme separate the tiger from the orange? A: sometimes yes, sometimes no, this is the disadvantage of the algorithm.)
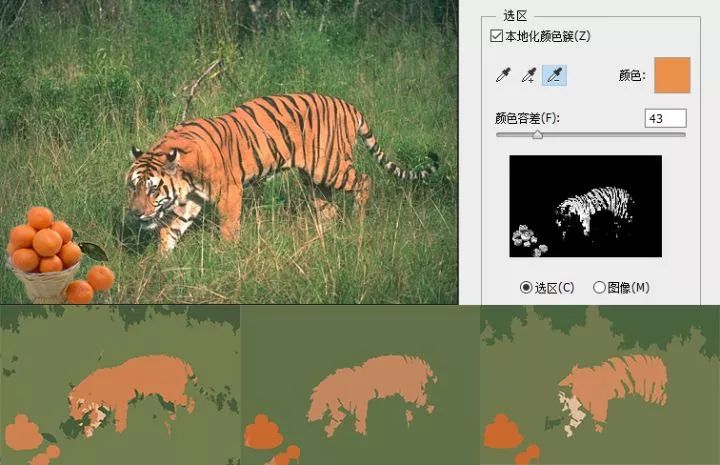
The orange in the picture is the same color as the orange cat. The following three lines are the different results I get after randomly adjusting the parameters.
Results in the figure, the orange color of orange cat is lighter than that of orange, because orange cat included the black stripes in the calculation when calculating the average pixel. It is not that orange cat orange is different from orange orange. I specially used PS to prove that the two orange colors are the same. In the result, the average color of orange cat is lighter than orange because the average color of orange cat contains black tiger pattern. Deep learning can distinguish orange from orange cat. The big reason is that convolution network can better perceive the difference of texture, not just rely on color to classify.
Secondly, the algorithm is not mature enough. With the iteration, the algorithm will be gradually merged into each partition. However, there is no limit in the algorithm to suppress the merging of small regions by neural network.
6. code
https://github.com/Yonv1943/Unsupervised-Segmentation/tree/master
import os
import time

import cv2
import numpy as np
from skimage import segmentation

import torch
import torch.nn as nn


class Args(object):
    input_image_path = 'image/00000022.tif'  # image/coral.jpg image/tiger.jpg
    train_epoch = 2 ** 6
    mod_dim1 = 64  #
    mod_dim2 = 32
    gpu_id = 1

    min_label_num = 4  # if the label number small than it, break loop
    max_label_num = 256  # if the label number small than it, start to show result image.


class MyNet(nn.Module):
    def __init__(self, inp_dim, mod_dim1, mod_dim2):
        super(MyNet, self).__init__()

        self.seq = nn.Sequential(
            nn.Conv2d(inp_dim, mod_dim1, kernel_size=3, stride=1, padding=1),
            nn.BatchNorm2d(mod_dim1),
            nn.ReLU(inplace=True),

            nn.Conv2d(mod_dim1, mod_dim2, kernel_size=1, stride=1, padding=0),
            nn.BatchNorm2d(mod_dim2),
            nn.ReLU(inplace=True),

            nn.Conv2d(mod_dim2, mod_dim1, kernel_size=3, stride=1, padding=1),
            nn.BatchNorm2d(mod_dim1),
            nn.ReLU(inplace=True),

            nn.Conv2d(mod_dim1, mod_dim2, kernel_size=1, stride=1, padding=0),
            nn.BatchNorm2d(mod_dim2),
        )

    def forward(self, x):
        return self.seq(x)


def run():
    start_time0 = time.time()

    args = Args()
    torch.cuda.manual_seed_all(1943)
    np.random.seed(1943)
    os.environ['CUDA_VISIBLE_DEVICES'] = str(args.gpu_id)  # choose GPU:0
    image = cv2.imread(args.input_image_path)

    '''segmentation ML'''
    seg_map = segmentation.felzenszwalb(image, scale=64, sigma=0.5, min_size=64)
    # seg_map = segmentation.slic(image, n_segments=10000, compactness=100)
    seg_map = seg_map.flatten()
    seg_lab = [np.where(seg_map == u_label)[0]
               for u_label in np.unique(seg_map)]

    '''train init'''
    device = torch.device("cuda" if torch.cuda.is_available() else 'cpu')

    tensor = image.transpose((2, 0, 1))
    tensor = tensor.astype(np.float32) / 255.0
    tensor = tensor[np.newaxis, :, :, :]
    tensor = torch.from_numpy(tensor).to(device)

    model = MyNet(inp_dim=3, mod_dim1=args.mod_dim1, mod_dim2=args.mod_dim2).to(device)
    criterion = torch.nn.CrossEntropyLoss()
    optimizer = torch.optim.SGD(model.parameters(), lr=5e-2, momentum=0.9)
    # optimizer = torch.optim.RMSprop(model.parameters(), lr=1e-1, momentum=0.0)

    image_flatten = image.reshape((-1, 3))
    color_avg = np.random.randint(255, size=(args.max_label_num, 3))
    show = image

    '''train loop'''
    start_time1 = time.time()
    model.train()
    for batch_idx in range(args.train_epoch):
        '''forward'''
        optimizer.zero_grad()
        output = model(tensor)[0]
        output = output.permute(1, 2, 0).view(-1, args.mod_dim2)
        target = torch.argmax(output, 1)
        im_target = target.data.cpu().numpy()

        '''refine'''
        for inds in seg_lab:
            u_labels, hist = np.unique(im_target[inds], return_counts=True)
            im_target[inds] = u_labels[np.argmax(hist)]

        '''backward'''
        target = torch.from_numpy(im_target)
        target = target.to(device)
        loss = criterion(output, target)
        loss.backward()
        optimizer.step()

        '''show image'''
        un_label, lab_inverse = np.unique(im_target, return_inverse=True, )
        if un_label.shape[0] < args.max_label_num:  # update show
            img_flatten = image_flatten.copy()
            if len(color_avg) != un_label.shape[0]:
                color_avg = [np.mean(img_flatten[im_target == label], axis=0, dtype=np.int) for label in un_label]
            for lab_id, color in enumerate(color_avg):
                img_flatten[lab_inverse == lab_id] = color
            show = img_flatten.reshape(image.shape)
        cv2.imshow("seg_pt", show)
        cv2.waitKey(1)

        print('Loss:', batch_idx, loss.item())
        if len(un_label) < args.min_label_num:
            break

    '''save'''
    time0 = time.time() - start_time0
    time1 = time.time() - start_time1
    print('PyTorchInit: %.2f\nTimeUsed: %.2f' % (time0, time1))
    cv2.imwrite("seg_%s_%ds.jpg" % (args.input_image_path[6:-4], time1), show)


if __name__ == '__main__':
    run()