Article catalogue
Precautions before upgrading architecture
1, Original single node MongoDB configuration information
1.1 original configuration file
1.2 add replica set configuration to the original configuration file
3.1 initialization configuration
3.3 viewing replica set status
4, Replica set open authentication
4.1 add a super administrator account through the master node
4.2 create a key file for replica set authentication
4.3 modify MongoDB configuration file and enable authentication
4.4 verifying replica set authentication
Project background
Due to historical reasons, we have a business for data synchronization. MongoDB uses a single node in the production environment. However, with the growth of business, considering the importance of this synchronous business and avoiding the business stop caused by single node failure, it is necessary to upgrade to replica set to ensure high availability.
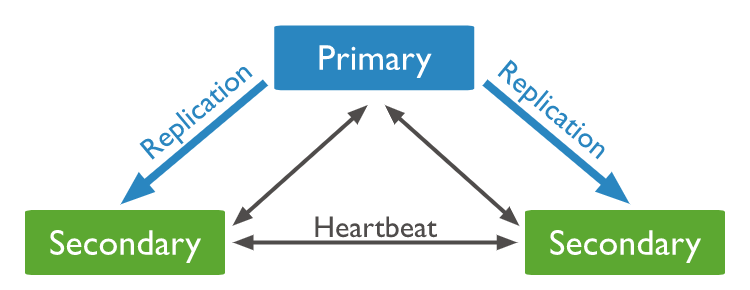
Replica set schema
The following architecture diagram is the high availability architecture of MongoDB replica set to be implemented in this article:
Precautions before upgrading architecture
In the production environment, before upgrading a single node to a cluster, you must first back up all the data of mongodb to avoid data loss caused by misoperation.
In addition, it is guaranteed that no program will connect to MongoDB for reading and writing operations during the upgrade period. It is recommended to stop the service upgrade and operate during the low peak period of business in the early morning.
1, Original single node MongoDB configuration information
IP: 192.168.30.207
Port: 27017
1.1 original configuration file
systemLog:
  destination: file
  logAppend: true
  path: /home/server/mongodb/logs/mongodb.log

storage:
  journal:
    enabled: true
  dbPath: /home/server/mongodb/data
  directoryPerDB: true
  wiredTiger:
     engineConfig:
        cacheSizeGB: 1
        directoryForIndexes: true
     collectionConfig:
        blockCompressor: zlib
     indexConfig:
        prefixCompression: true

processManagement:
  fork: true
  pidFilePath: /home/server/mongodb/pid/mongod.pid

net:
  port: 27017
  bindIp: 127.0.0.1,192.168.30.207
  maxIncomingConnections: 5000

security:
  authorization: enabled
1.2 add replica set configuration to the original configuration file
replication:
  oplogSizeMB: 4096
  replSetName: rs1
Note: here, you need to annotate the {authentication} configuration first, and then open it after the replica set configuration is completed.
2, New node information
| role | IP | Port | |
|---|---|---|---|
| PRIMARY | 192.168.30.207 | 27017 | Original single node MongoDB |
| SECONDARY | 192.168.30.213 | 27017 | Add node 1 |
| SECONDARY | 192.168.30.214 | 27017 | Add node 2 |
2.1 add node profile
For these two SECONDARY node profiles, you only need to copy the PRIMARY node profile and modify the corresponding "bindIp".
- SECONDARY node 1 profile
systemLog:
  destination: file
  logAppend: true
  path: /home/server/mongodb/logs/mongodb.log

storage:
  journal:
    enabled: true
  dbPath: /home/server/mongodb/data
  directoryPerDB: true
  wiredTiger:
     engineConfig:
        cacheSizeGB: 1
        directoryForIndexes: true
     collectionConfig:
        blockCompressor: zlib
     indexConfig:
        prefixCompression: true

processManagement:
  fork: true
  pidFilePath: /home/server/mongodb/pid/mongod.pid

net:
  port: 27017
  bindIp: 127.0.0.1,192.168.30.213
  maxIncomingConnections: 5000

#security:
  #authorization: enabled

replication:
  oplogSizeMB: 4096
replSetName: rs1- SECONDARY node 2 profile
systemLog:
  destination: file
  logAppend: true
  path: /home/server/mongodb/logs/mongodb.log

storage:
  journal:
    enabled: true
  dbPath: /home/server/mongodb/data
  directoryPerDB: true
  wiredTiger:
     engineConfig:
        cacheSizeGB: 1
        directoryForIndexes: true
     collectionConfig:
        blockCompressor: zlib
     indexConfig:
        prefixCompression: true

processManagement:
  fork: true
  pidFilePath: /home/server/mongodb/pid/mongod.pid

net:
  port: 27017
  bindIp: 127.0.0.1,192.168.30.214
  maxIncomingConnections: 5000

#security:
  #authorization: enabled

replication:
  oplogSizeMB: 4096
  replSetName: rs1
2.2 start 3 nodes
The PRIMARY node needs to be restarted, and the two SECONDARY nodes start directly.
#Start command
$ mongod -f /home/server/mongodb/conf/mongo.conf

#Stop command
$ mongod -f /home/server/mongodb/conf/mongo.conf --shutdown
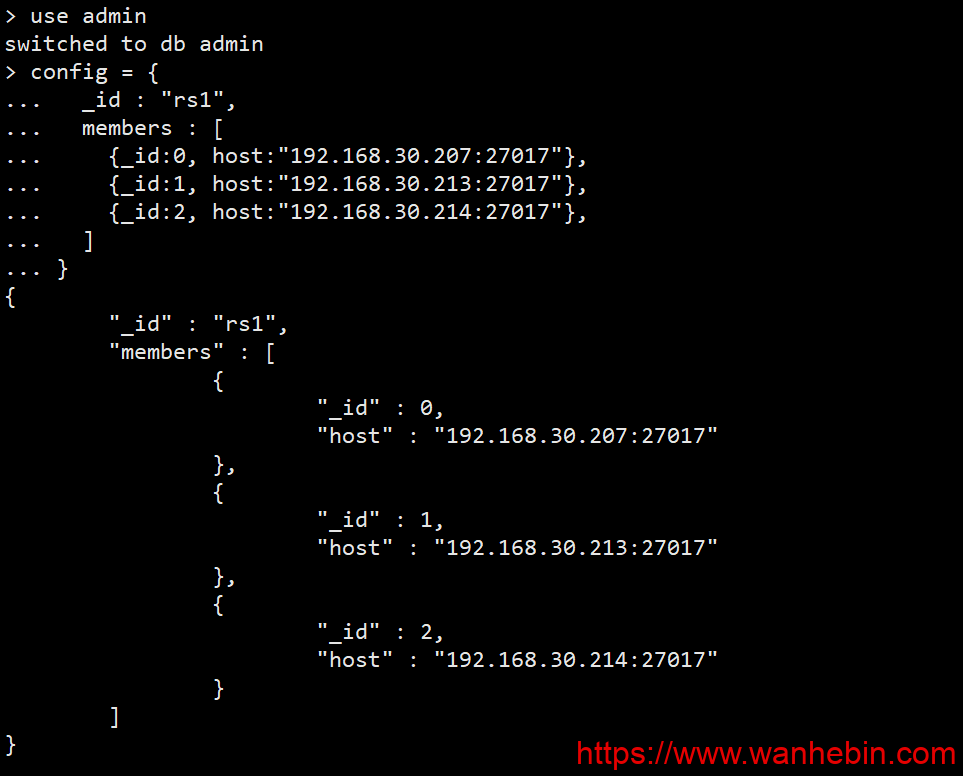
3, Initialize replica set
Use the mongo shell to connect to one of the nodes and execute the initialization command
3.1 initialization configuration
config = {
  _id : "rs1",
  members : [
    {_id:0, host:"192.168.30.207:27017"},
    {_id:1, host:"192.168.30.213:27017"},
    {_id:2, host:"192.168.30.214:27017"},
  ]
}
3.2 initialize replica set
> rs.initiate(config)               //Initialize replica set
{
    "ok" : 1,     //Success, ok: 0, failure
    "operationTime" : Timestamp(1611042829, 1),
    "$clusterTime" : {
        "clusterTime" : Timestamp(1611042829, 1),
        "signature" : {
            "hash" : BinData(0,"AAAAAAAAAAAAAAAAAAAAAAAAAAA="),
            "keyId" : NumberLong(0)
        }
    }
}
3.3 viewing replica set status
- View cluster status information
rs1:PRIMARY> rs.status()
{
    "set" : "rs1",
    "date" : ISODate("2021-01-20T01:51:53.063Z"),
    "myState" : 1,
    "term" : NumberLong(2),
    "heartbeatIntervalMillis" : NumberLong(2000),
    "optimes" : {
        "lastCommittedOpTime" : {
            "ts" : Timestamp(1611107505, 1),
            "t" : NumberLong(2)
        },
        "readConcernMajorityOpTime" : {
            "ts" : Timestamp(1611107505, 1),
            "t" : NumberLong(2)
        },
        "appliedOpTime" : {
            "ts" : Timestamp(1611107505, 1),
            "t" : NumberLong(2)
        },
        "durableOpTime" : {
            "ts" : Timestamp(1611107505, 1),
            "t" : NumberLong(2)
        }
    },
    "members" : [
        {
            "_id" : 0,
            "name" : "192.168.30.207:27017",
            "health" : 1,
            "state" : 1,
            "stateStr" : "PRIMARY",
            "uptime" : 52343,
            "optime" : {
                "ts" : Timestamp(1611107505, 1),
                "t" : NumberLong(2)
            },
            "optimeDate" : ISODate("2021-01-20T01:51:45Z"),
            "electionTime" : Timestamp(1611055182, 1),
            "electionDate" : ISODate("2021-01-19T11:19:42Z"),
            "configVersion" : 1,
            "self" : true
        },
        {
            "_id" : 1,
            "name" : "192.168.30.213:27017",
            "health" : 1,
            "state" : 2,
            "stateStr" : "SECONDARY",
            "uptime" : 52334,
            "optime" : {
                "ts" : Timestamp(1611107505, 1),
                "t" : NumberLong(2)
            },
            "optimeDurable" : {
                "ts" : Timestamp(1611107505, 1),
                "t" : NumberLong(2)
            },
            "optimeDate" : ISODate("2021-01-20T01:51:45Z"),
            "optimeDurableDate" : ISODate("2021-01-20T01:51:45Z"),
            "lastHeartbeat" : ISODate("2021-01-20T01:51:52.487Z"),
            "lastHeartbeatRecv" : ISODate("2021-01-20T01:51:52.487Z"),
            "pingMs" : NumberLong(0),
            "syncingTo" : "192.168.30.207:27017",
            "configVersion" : 1
        },
        {
            "_id" : 2,
            "name" : "192.168.30.214:27017",
            "health" : 1,
            "state" : 2,
            "stateStr" : "SECONDARY",
            "uptime" : 52328,
            "optime" : {
                "ts" : Timestamp(1611107505, 1),
                "t" : NumberLong(2)
            },
            "optimeDurable" : {
                "ts" : Timestamp(1611107505, 1),
                "t" : NumberLong(2)
            },
            "optimeDate" : ISODate("2021-01-20T01:51:45Z"),
            "optimeDurableDate" : ISODate("2021-01-20T01:51:45Z"),
            "lastHeartbeat" : ISODate("2021-01-20T01:51:52.487Z"),
            "lastHeartbeatRecv" : ISODate("2021-01-20T01:51:52.487Z"),
            "pingMs" : NumberLong(0),
            "syncingTo" : "192.168.30.207:27017",
            "configVersion" : 1
        }
    ],
    "ok" : 1,
    "operationTime" : Timestamp(1611107505, 1),
    "$clusterTime" : {
        "clusterTime" : Timestamp(1611107505, 1),
        "signature" : {
            "hash" : BinData(0,"9fl/3w/5Gwk4Qd7h3fkrQVQtPhM="),
            "keyId" : NumberLong("6919423507650576385")
        }
    }
}- View delay slave library information
rs1:PRIMARY> rs.printSlaveReplicationInfo()
source: 192.168.30.213:27017
    syncedTo: Wed Jan 20 2021 09:52:05 GMT+0800 (CST)
    0 secs (0 hrs) behind the primary
source: 192.168.30.214:27017
    syncedTo: Wed Jan 20 2021 09:52:05 GMT+0800 (CST)
0 secs (0 hrs) behind the primary- View cluster and master node
rs1:PRIMARY> rs.isMaster()
{
    "hosts" : [
        "192.168.30.207:27017",
        "192.168.30.213:27017",
        "192.168.30.214:27017"
    ],
    "setName" : "rs1",
    "setVersion" : 1,
    "ismaster" : true,
    "secondary" : false,
    "primary" : "192.168.30.207:27017",
    "me" : "192.168.30.207:27017",
    "electionId" : ObjectId("7fffffff0000000000000002"),
    "lastWrite" : {
        "opTime" : {
            "ts" : Timestamp(1611108985, 1),
            "t" : NumberLong(2)
        },
        "lastWriteDate" : ISODate("2021-01-20T02:16:25Z"),
        "majorityOpTime" : {
            "ts" : Timestamp(1611108985, 1),
            "t" : NumberLong(2)
        },
        "majorityWriteDate" : ISODate("2021-01-20T02:16:25Z")
    },
    "maxBsonObjectSize" : 16777216,
    "maxMessageSizeBytes" : 48000000,
    "maxWriteBatchSize" : 100000,
    "localTime" : ISODate("2021-01-20T02:16:26.713Z"),
    "logicalSessionTimeoutMinutes" : 30,
    "minWireVersion" : 0,
    "maxWireVersion" : 6,
    "readOnly" : false,
    "ok" : 1,
    "operationTime" : Timestamp(1611108985, 1),
    "$clusterTime" : {
        "clusterTime" : Timestamp(1611108985, 1),
        "signature" : {
            "hash" : BinData(0,"/B6MSETtY8MEoZwXKABCkb1AMY8="),
            "keyId" : NumberLong("6919423507650576385")
        }
    }
}
4, Replica set open authentication
4.1 add a super administrator account through the master node
Note: if the original single node mongo already has a super administrator account, this step price can be ignored.
Simply add users to the master node, and the replica set automatically synchronizes the data on the master node.
It should be noted that the step of creating an account needs to be operated before opening authentication.
- Create an override account
Super management user: mongouser password: 123456 authentication library: admin
$ mongo --host 192.168.30.207 --port 27017
rs1:PRIMARY> use admin
rs1:PRIMARY> db.createUser({user: "mongouser",pwd: "123456",roles:[ { role: "root", db:"admin"}]})- View created accounts
rs1:PRIMARY> use admin
switched to db admin
rs1:PRIMARY> db.getUsers()
[
    {
        "_id" : "admin.mongouser",
        "user" : "mongouser",
        "db" : "admin",
        "roles" : [
            {
                "role" : "root",
                "db" : "admin"
            }
        ]
    }
]
4.2 create a key file for replica set authentication
All replica set nodes must use the same keyfile, which is generally generated on one machine and then copied to other machines, and must have read permission, otherwise an error will be reported in the future.
Be sure to ensure that the key file is consistent and the file location is arbitrary. However, in order to facilitate searching, it is recommended that each machine be placed in a fixed location and in a directory together with the configuration file.
- Generate Mongo Keyfile file
$ openssl rand -base64 90 -out /home/server/mongodb/conf/mongo.keyfile
- Copy Mongo The keyfile file is in the same directory of the other two nodes
$ scp /home/server/mongodb/conf/mongo.keyfile root@192.168.30.213:/home/server/mongodb/conf/
$ scp /home/server/mongodb/conf/mongo.keyfile root@192.168.30.214:/home/server/mongodb/conf/
4.3 modify MongoDB configuration file and enable authentication
- Add and modify the following configurations in the configuration file.
security:
  keyFile: /home/server/mongodb/conf/mongo.keyfile
  authorization: enabled
- Restart all mongo nodes
4.4 verifying replica set authentication
Log in to the master node of MongoDB replica set with user name, password free and authentication library
$ mongo -u mongouser -p 123456 --host 192.168.30.207 --port 27017 -authenticationDatabase admin
Transferred from: https://www.wanhebin.com/database/mongodb/1005.html#xiang_mu_bei_jing