Upload local jar to maven central warehouse
A few days ago, the boss of the company asked me to study how to upload local jar s to the central warehouse for use by third-party companies. I was confused. Then I misunderstood. I went to study how to build my own private server, open Internet mapping, and then study the maven private server of Alibaba cloud. But the boss said that the research was wrong and I needed to upload them to the central warehouse. I was dizzy
I searched a lot of information on the Internet, but I was confused. After all, maven central warehouse is a foreign server, and it is very inconvenient to check information in English. Fortunately, the browser can translate, otherwise......
I don't talk much nonsense. I just talk about my experience and all kinds of pits. I hope it will help you and avoid pits
1. First of all, we need to go https://issues.sonatype.org/ Register the account address. Remember that the account password should be clearly recorded and used later
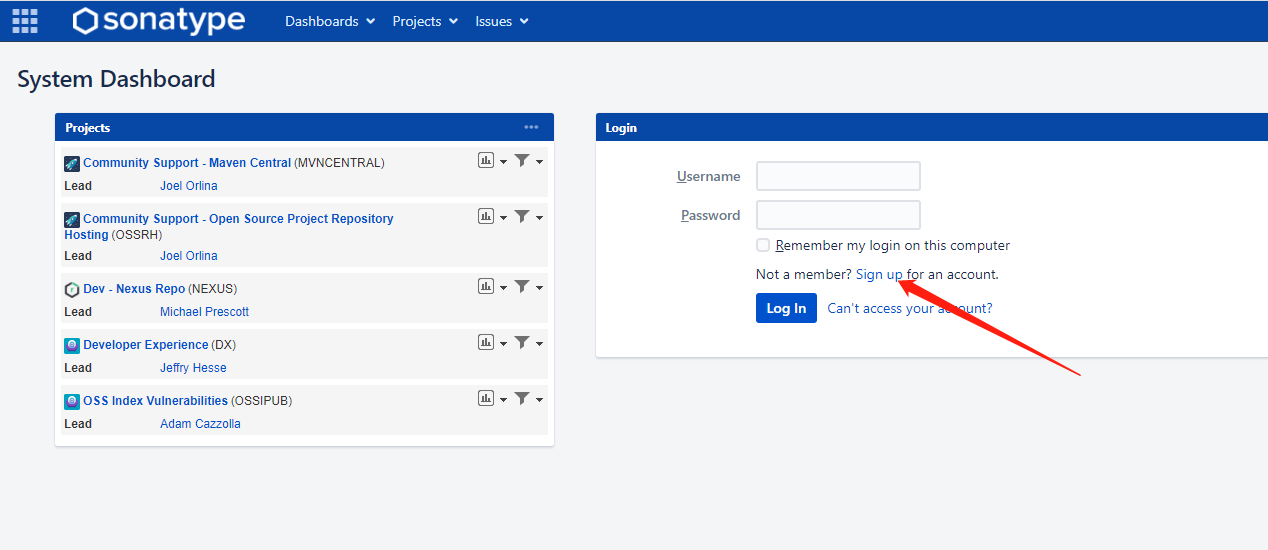
2. After registering, log in and create a question

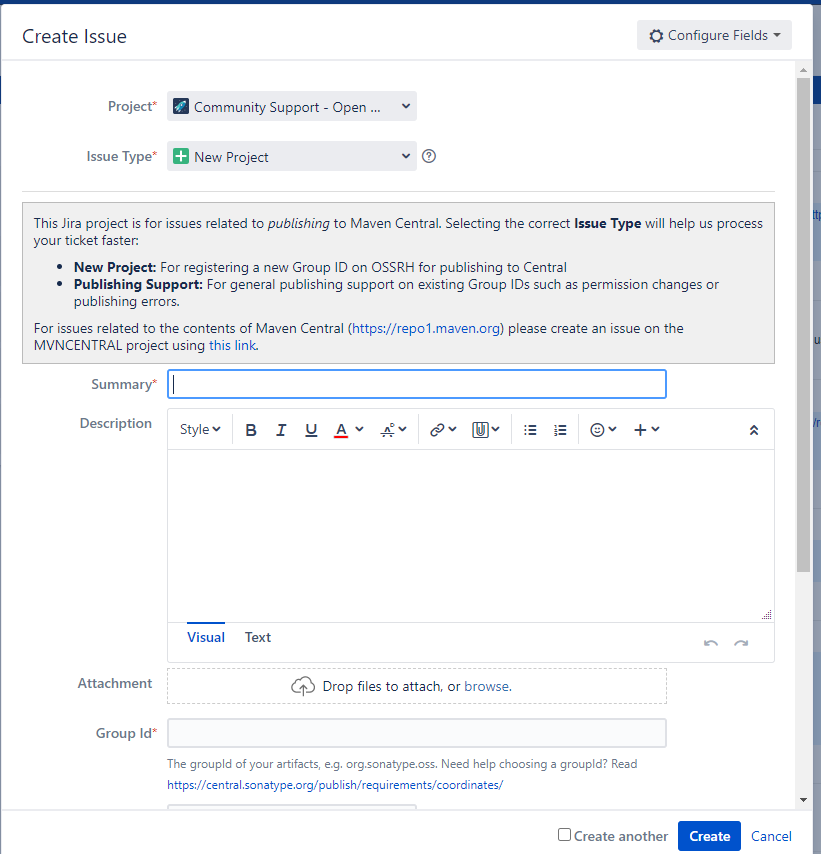
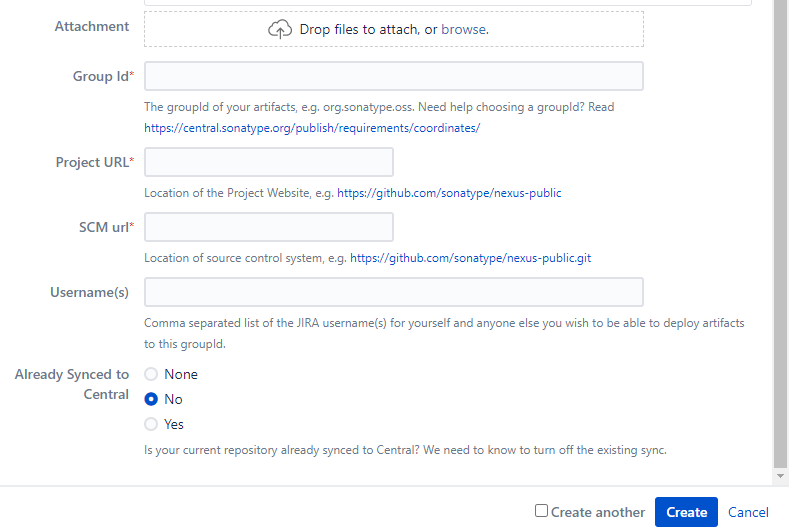
3. It is very important to create the information of the problem. It is default in the front. In the summary, fill in the summary of the problem, that is, the project description. The domain name address of your company should be written in the place of group id. if you generally test yourself, you can use the address of GitHub. Note that there are holes in this place: according to the official documents, the domain name used to be com github. {GitHub account}, many articles are written like this, but the latest document introduces the use of Io github. {GitHub account}, otherwise the audit fails, and then the project url is your cloud code address, and SCM is also your project address. Just pay attention to one git has no one, and then click create to create it. Everything else defaults
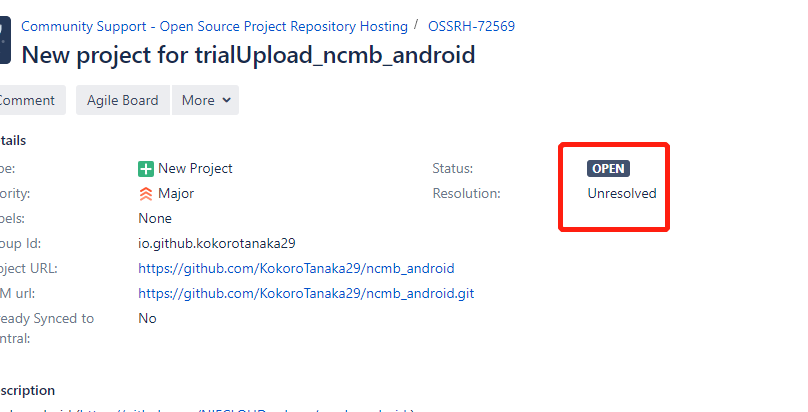
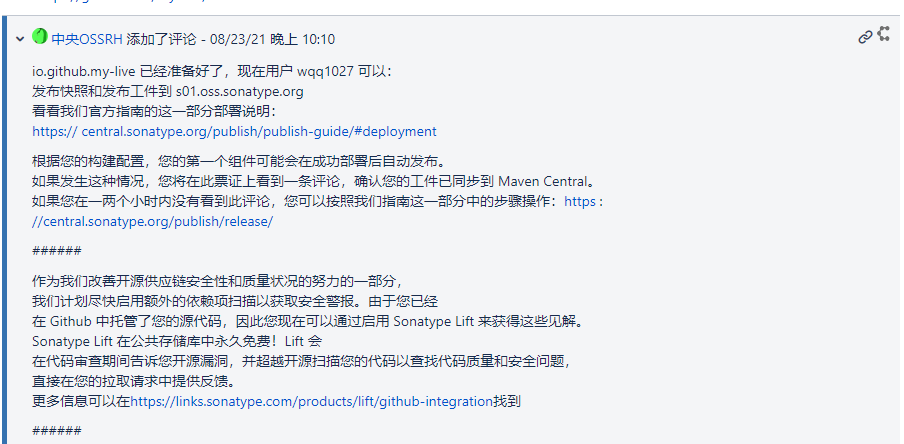
4. After creation, you need to wait patiently. You need to review there. Generally, it is a working day, because there are work at night and rest during the day. Only when the marked place becomes resolved, it means to pass. After that, the administrator will tell you the upload address
5. Pay attention to other people's replies at this time. You can translate it:
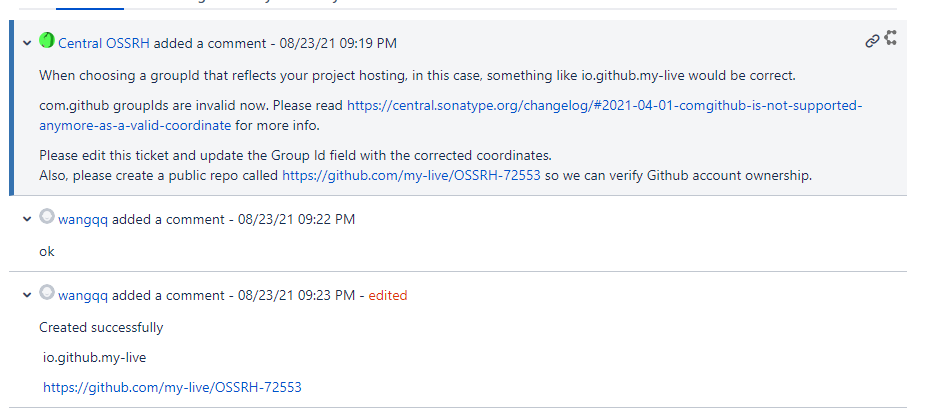
When selecting the groupId that reflects the hosting of your project, in this case, it is similar to io github. The content of my live will be correct.
com.github groupIds is now invalid. Please read https://central.sonatype.org/changelog/#2021-04-01-comgithub-is-not-supported-anymore-as-a-valid-coordinate learn more.
Please edit this ticket and update the group ID field with the corrected coordinates.
Also, create a file named https://github.com/my-live/OSSRH-72553 Public repository so that we can verify Github account ownership.
- The above means a pit I just mentioned, that is, the group id is now changed to io github. {account}, and then tell you to create a public library. You can create it. After you create it, you will generally tell you that it is successful, and then upload the address
6. In order to facilitate reading, the blogger directly introduces the Chinese information of the screenshot. Here is the upload address and then the guide. In fact, you don't need to read the guide. You just need to follow my steps step by step. There is a pit in this place, which is the address. Later, you need to configure the address and configure POM in maven's project XML file, the previous address is https://oss.sonatype.org At the beginning, this address is no longer available, otherwise the upload will report an error. Now it is changed to https://s01.oss.sonatype.org Remember, the blogger has been working on this address for a day or two, and finally asked the reviewers there, because the articles are very old now, some things have changed, and the articles have not changed, resulting in many problems and holes
7. After this step is completed, you need to install GPG Exe software, which is used to encrypt the algorithm, must be installed, otherwise it will always report errors when publishing, unable to find the user name, password and download address https://www.gpg4win.org/download.html , download and install. The default is next. For Linux, you can install GPG using Yum install
8. Generate secret key information
- Open the black window of cmd and enter GPG -- Gen key
- Midway, you will be asked to enter the passphrase information, that is, the secret key information. This should be remembered. It needs to be used when publishing later
- Prompt: enter Real name and Email address, and fill them in
- Finally, enter English O to confirm according to the prompt
- Then, a string of public key information will be generated, and finally a string of public key information will be generated
9. Publish the public key information, otherwise an error will be reported later. The first of the following two addresses may not be available, so publish to the second address
- You can see the public key information through GPG -- List keys
- gpg–keyserver hkp://pool.sks-keyservers.net --send-keys 5292CC898762C9D12237894774GDD
- gpg–keyserver hkp://keyserver.ubuntu.com:11371 --send-keys 5292CC898762C9D12237894774GDD
- Use this address to verify whether the publication is successful
- gpg–keyserver hkp://keyserver.ubuntu.com:11371 --recv-keys 5292CC898762C9D12237894774GDD
10 . Next, configure setting XML file, find the server tag, and then add it
<server>
      <id>sonatype-nexus-snapshots</id>
      <username>sonatype account number</username>
      <password>sonatype password</password>
    </server>
    <server>
      <id>sonatype-nexus-staging</id>
      <username>sonatype account number</username>
      <password>sonatype password</password>
    </server>
    ```

###### 11. Create Maven project and configure POM XML file. For simplicity, I directly inherited the parent package. You can also fill it in by yourself. In fact, the filling method is the same as that of the parent. pom.xml must include: name, description, url, licenses, developers, scm and other basic information. Maven's profile function is used. Only when it is release d, the source package and document package are created and GPG is used for digital signature. In addition, the id in the snapshot repository and repository must be the same as setting The id of the server in the XML should be consistent. If it is a multi module project, it only needs to be in the parent POM These sub POMS are declared in XML In XML, you only need to modify some corresponding information, such as the name tag.
```xml
<?xml version="1.0" encoding="UTF-8"?>
<project xmlns="http://maven.apache.org/POM/4.0.0" xmlns:xsi="http://www.w3.org/2001/XMLSchema-instance"
	xsi:schemaLocation="http://maven.apache.org/POM/4.0.0 https://maven.apache.org/xsd/maven-4.0.0.xsd">
	<modelVersion>4.0.0</modelVersion>
	<parent>
		<groupId>org.sonatype.oss</groupId>
		<artifactId>oss-parent</artifactId>
		<version>7</version>
	</parent>
	<groupId>io.github.xxx</groupId>
	<artifactId>public-maven-xxx</artifactId>
	<version>0.0.1-RELEASE</version>
	<packaging>jar</packaging>
	<name>public-maven-xxx</name>
	<description>Demo project for Spring Boot</description>
	<properties>
		<java.version>1.8</java.version>
		<project.build.sourceEncoding>UTF-8</project.build.sourceEncoding>
	</properties>
	<licenses>
		<license>
			<name>The Apache Software License, Version 2.0</name>
			<url>http://www.apache.org/licenses/LICENSE-2.0.txt</url>
			<distribution>repo</distribution>
		</license>
	</licenses>
	<!--Below scm The address is your project address. Just fill it in-->
	<scm>
		<tag>master</tag>
		<url>https://github.com/xxx/public-maven-xxx.git</url>
		<connection>https://github.com/xxx/public-maven-xxx.git</connection>
		<developerConnection>https://github.com/xxx/public-maven-xxx.git</developerConnection>
	</scm>
	<developers>
		<developer>
			<name>cloudnil</name>
			<email>cloudnil@126.com</email>
			<organization>CloudNil</organization>
		</developer>
	</developers>

<!--Remember, many old articles in this place don't fill in as long as they integrate the parent class, which is easy to make mistakes because there are many errors in the parent class url Address not found s01 As mentioned before, the address of the official website has been changed, so this should be changed-->
	<distributionManagement>
		<snapshotRepository>
			<id>sonatype-nexus-snapshots</id>
			<name>Sonatype Nexus Snapshots</name>
			<url>https://s01.oss.sonatype.org/content/repositories/snapshots/</url>
		</snapshotRepository>
		<repository>
			<id>sonatype-nexus-staging</id>
			<name>Nexus Release Repository</name>
			<url>https://s01.oss.sonatype.org/service/local/staging/deploy/maven2/</url>
		</repository>
	</distributionManagement>
</project>
12. Release maven project package to sonatype private server, enter the project directory and execute the following command
When configuring profiles by yourself, use: release is the id configured by yourself
mvn clean deploy -P release
Use when using the official website parent: Bloggers use the official website parent here
MVN clean deploy - P sonatype OSS release dargements = "gpg.passphrase = key password"
13. If there is basically no problem step by step according to my steps, you are usually asked to enter the secret key information during deployment. Remember to enter it once. If there is an authorization problem during the construction process, you can check your setting Whether the user name and password of the server in the XML configuration are correct. If the error is 403firbbon, you generally do not have permission to access the private server address. You can log in with your account https://s01.oss.sonatype.org Address, see if you can log in. If you can't log in, it means you don't have permission. Contact the reviewer there quickly
14. Log in after publishing successfully https://s01.oss.sonatype.org Address, and now is the key
- In https://oss.sonatype.org In the system, after logging in with your own Sonatype account, you can view the uploaded components in the Staging Repositories. These components are currently placed in the Staging warehouse for fuzzy query and quick positioning. At this time, the status of the component is Open. You need to check it and click Close. The system will automatically verify whether the component meets the specified requirements. After verification, the status will change to Closed, but the release version of the snapshot will not be published in the Staging Repositories, so the release version needs to be published
- Check this package, and then there will be a close button on it. Click next, refresh, and finally click release above
- Last go https://issues.sonatype.org/ Find your own task and comment on "successful construction" below. This can remind the reviewers there to help build. Generally, it takes another working day to wait patiently.
15. Subsequent release process
Search for components from the central warehouse. At this time, you can search for your own published components in the central warehouse of Maven. In the future, you can directly search for components in POM Used in XML! Central warehouse search website: http://search.maven.org/ , after the first successful publishing, there will be no trouble in the future. You can directly publish any component using the Group Id, of course, provided that the Group Id does not change.
Future release process:
- After the component is completed, it is directly uploaded and built on the command line using maven;
- stay https://oss.sonatype.org/close And release components;
- Wait for the synchronization to complete (about 2 hours), and then you can use it