Preface
Use Hexo to build your own blog site
To use Hexo, you must first make sure that node is installed on your computer. JS and git environments
The former is an environment capable of running JavaScript code on the server side, and the latter is a version control tool.
Install node.js is mainly designed to use its package management tool npm, so there is no need to learn the node systematically first. Knowledge of JS
git was installed to use version control systems to clone code and have hosted blog items on a three-party platform
mac computers generally have git environments, which can be left unattended.
We need to download the node.
Download address: https://nodejs.org/en/
PART ONE - Environment Construction
After downloading, open the terminal and switch the root user
sudo su
//Use npm to install dependent packages, which is slow. It is recommended to install Taobao Mirror and use cnpm for subsequent commands
npm install -g cnpm --registry=https://registry.npm.taobao.org
After downloading npm, use NPM to download hexo
cnpm install -g hexo-cli
After downloading hexo, check the version of hexo
hexo -v
Once you have downloaded hexo, you can generate a blog directly with one command
hexo generate
This command can also be abbreviated as
hexo g
Start Server
hexo server
Can also be abbreviated as
hexo s
Clicked Page
We can already see that Hexo generated the home page without configuring it or adding its own Markdown file, as shown in the following image
PART TWO - Web Blog Beautification
Next let's modify the blog configuration file
vim _config.yml
The following shows:
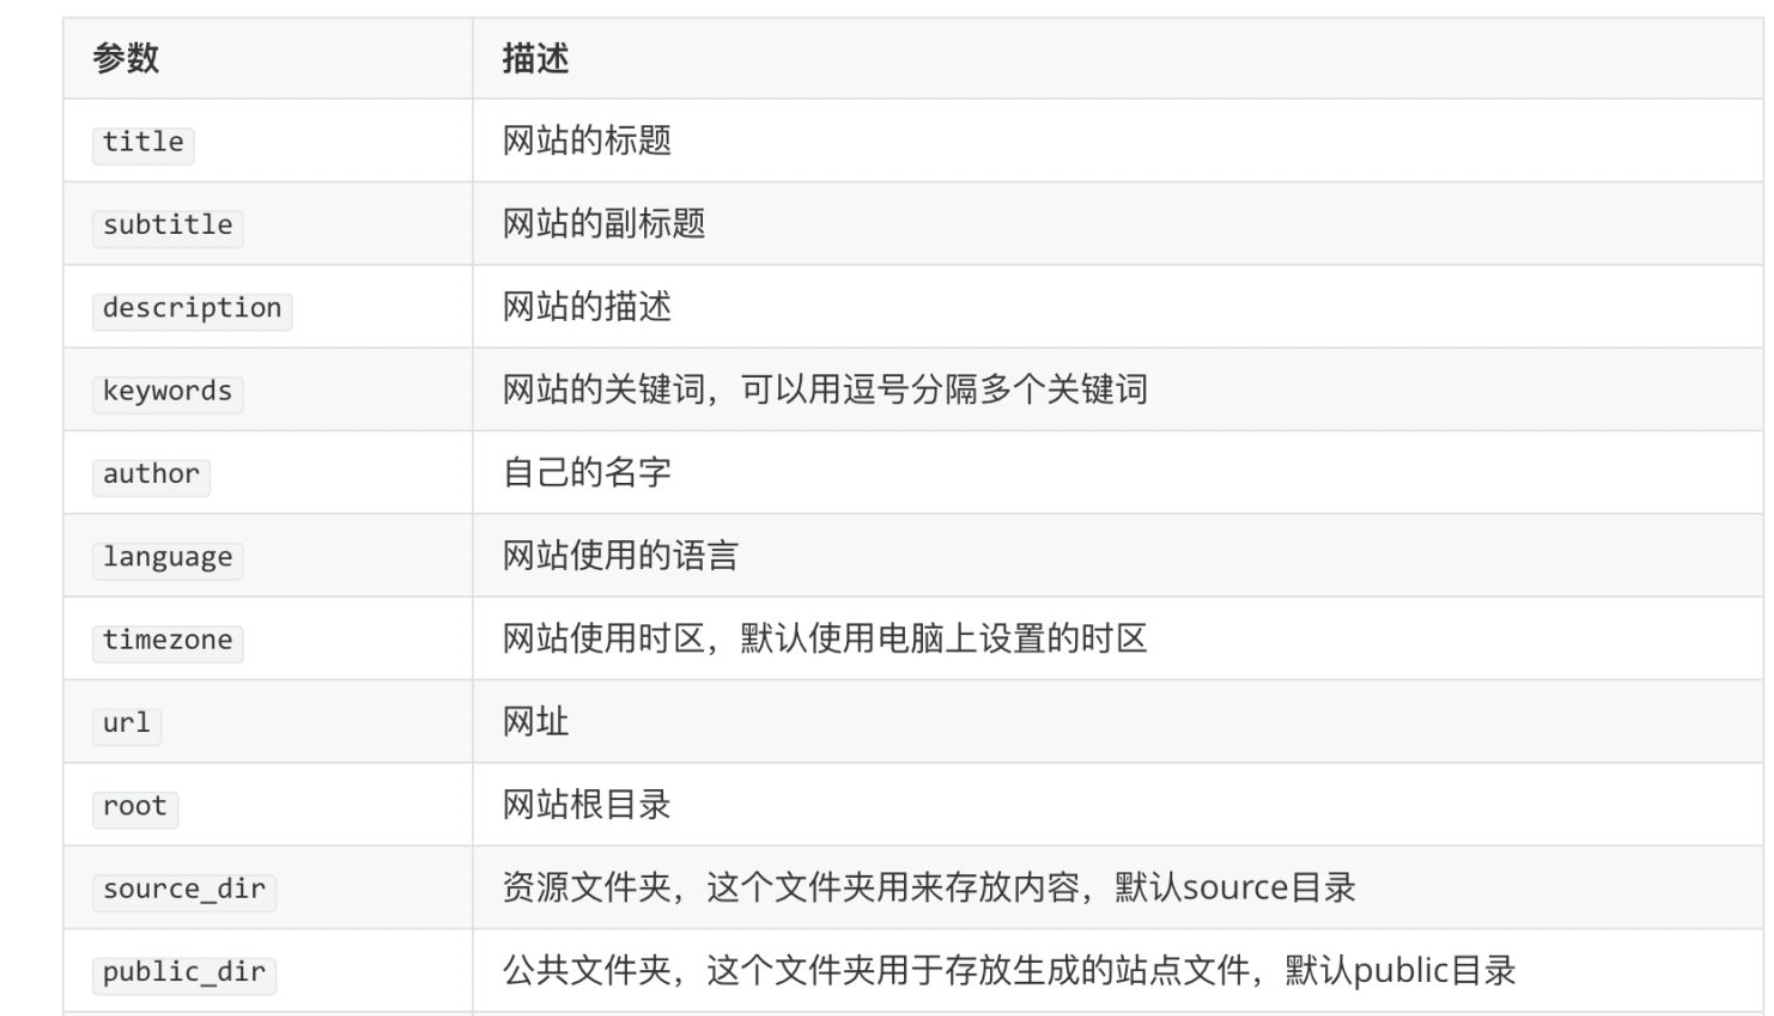
# Hexo Configuration
## Docs: https://hexo.io/docs/configuration.html
## Source: https://github.com/hexojs/hexo/

# Site
title: Von Jana's Blog
subtitle: 'Whose family is Von Jana cute?'
description: 'Record, share, learn'
keywords:
author: Von Jana
language: zh
timezone: ''

# URL
## Set your site url here. For example, if you use GitHub Page, set url as 'https://username.github.io/project'
url: http://example.com
permalink: :year/:month/:day/:title/
permalink_defaults:
pretty_urls:
  trailing_index: true # Set to false to remove trailing 'index.html' from permalinks
  trailing_html: true # Set to false to remove trailing '.html' from permalinks

# Directory
source_dir: source
public_dir: public
tag_dir: tags
archive_dir: archives
category_dir: categories
code_dir: downloads/code
i18n_dir: :lang
skip_render:
PART THREE - Host your blog with Github
We can use the Pages service provided by GitHub to host our blog. There's a tutorial on the first page of GitHub Pages that teaches us how to host our own website. The first step, of course, is to register an account on GitHub so that we can follow up after successful login.
Create a warehouse with your own user name. The warehouse must be named "User name.github.io"
For example: My user name on GitHub is jianafeng55, so my repository for hosting blog projects must be named jianafeng55.github.io
After creating this repository
Continue modifying profile_ config.yml
vim _config.yml
Modify to
# Deployment
## Docs: https://hexo.io/docs/deployment.html
deploy:
  type: git
  repo: https://github.com/jianafeng55/jianafeng55.github.io.git
  branch: master
Install a deployer plug-in called hexo-deployer-git, which enables one-click deployment.
npm install hexo-deployer-git --save
hexo deploy -g
perhaps
hexo d deploy
Enter the corresponding github username and key
Username for 'https://github.com': jianafeng55
Password for 'https://jianafeng55@github.com':
[You can't log on with a github password now, you must create a key to log on]
Refer to this article for creating key tokens
https://blog.51cto.com/u_15064643/4215363
References or Web site links:
https://www.jianshu.com/p/222a98124ec1
https://zhuanlan.zhihu.com/p/109382792
https://blog.51cto.com/u_15064643/4215363