🎆 Knife4j API management
1. Foreword
Recently, we have developed a background management system of Neo4j+elasticsearch+mysql as the database. The main function is to use the characteristics of the graph database to store the knowledge point data in different disciplines. At present, the first version of the system has been developed. With the idea of making the project better, we want to try to generate a set of interface documents to learn about Knife4j through swagger
2,Knife4j
Knife4j's predecessor is swagger bootstrap ui, which is a pure swagger ui UI ui skin project
At the beginning, the original intention of the project was to write an enhanced version of swagger's front-end Ui. However, with the development of the project, in the face of more and more personalized requirements, we had to write back-end Java code to meet new requirements. Between versions 1.8.5 ~ 1.9.6 of swagger bootstrap Ui, The back-end Java code and Ui are mixed in a jar package for developers to use. Although this method is very convenient for integrating swagger, it only needs to introduce a jar package, but it seems a little bloated under the microservice architecture.
Therefore, the project is officially renamed knife4j. The name knife4j hopes that it can be as small, lightweight and powerful as a dagger. The renaming also hopes to make it a universal solution for Swagger interface document service, not only focusing on the front end Ui
All features of swagger bootstrap UI will be concentrated in the knife4j spring UI package, and more personalized needs of developers will be met in the future
The main change is that the relevant class package path of the project is replaced with the prefix com.github.xiaoymin.knife4j. When developers use enhanced annotations, they need to replace the package path
The back-end Java code and UI package are separated into jar packages of multiple modules to facilitate the use of enhanced document annotations under the current microservice architecture (using the SpringCloud microservice project, you only need to integrate the UI jar package at the gateway layer, so separate the front and back-end)
3. Instructions for use
Add the knife4j version corresponding to your own springboot version to the project:

My springboot version is 2.1.4, so I choose knife4j version as 2.0.2. Add dependencies:
 <dependency>
 	<groupId>com.github.xiaoymin</groupId>
 	<artifactId>knife4j-spring-boot-starter</artifactId>
 	<version>2.0.2</version>
 </dependency>
If developers use the structure of OpenAPI 3 and the underlying framework relies on springfox 3.0.0, they can consider the 3.x version of Knife4j
<dependency>
    <groupId>com.github.xiaoymin</groupId>
    <artifactId>knife4j-spring-boot-starter</artifactId>
    <!--When referencing, please maven Central warehouse search 3.X Latest version number-->
    <version>3.0.3</version>
</dependency>
If you want to use more functions, you need to use spring boot version 2.2x or above!!!!!!
Official documents: https://doc.xiaominfo.com/knife4j/documentation/help.html
Add the following config class to the required micro service:
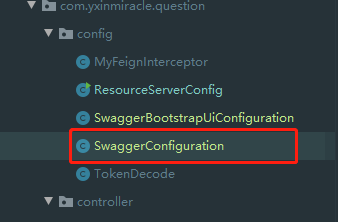
code:
package com.yxinmiracle.question.config;

import org.springframework.context.annotation.Bean;
import org.springframework.context.annotation.Configuration;
import springfox.documentation.builders.ApiInfoBuilder;
import springfox.documentation.builders.PathSelectors;
import springfox.documentation.builders.RequestHandlerSelectors;
import springfox.documentation.service.ApiInfo;
import springfox.documentation.spi.DocumentationType;
import springfox.documentation.spring.web.plugins.Docket;
import springfox.documentation.swagger2.annotations.EnableSwagger2;

import java.util.HashSet;

/**
 * @version 1.0
 * @author:  YxinMiracle
 * @date:  2021-10-16 15:46
 */
@Configuration
@EnableSwagger2
public class SwaggerConfiguration {

    @Bean
    public Docket createRestApi() {
        HashSet<String> strings = new HashSet<>();
        //Set the returned value to JSON format
        strings.add("application/json");
        return new Docket(DocumentationType.SWAGGER_2)
                .apiInfo(apiInfo())
                .produces(strings)
                .groupName("question-group")//Commodity group
                .select()
                //The location of the scan package path controller
                .apis(RequestHandlerSelectors.basePackage("com.yxinmiracle"))
                .paths(PathSelectors.any())
                .build();
    }

    private ApiInfo apiInfo() {
        return new ApiInfoBuilder()
                //Set title
                .title("Make a picture Walker( PEC2.0)Background management system RestFul APIs Interface documentation")

                .description("Make a picture Walker( PEC2.0)Background management system online API Interface documentation")
                //Access address
                .termsOfServiceUrl("https:/www.yxinmiracle.com/")
                //contacts
                .contact("yxinmiracle@gmail.com")
                //edition
                .version("2.0")
                //structure
                .build();
    }
}
3.1 api notes
@Api is used on a class to illustrate its role. You can mark a Controller class as a Swagger document resource. The usage code is as follows.
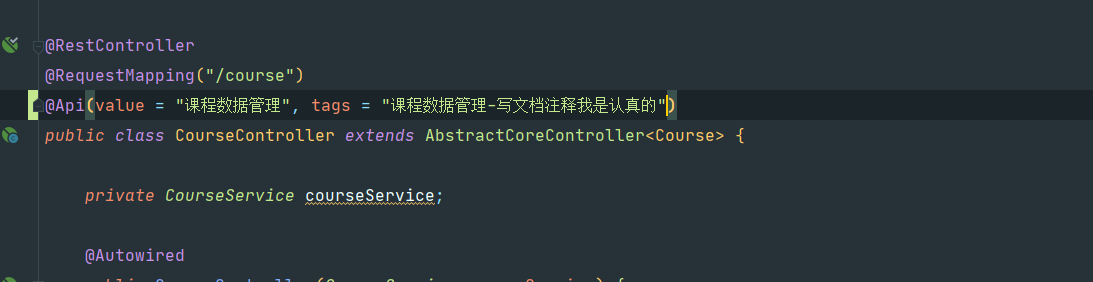
It will be displayed in the document:
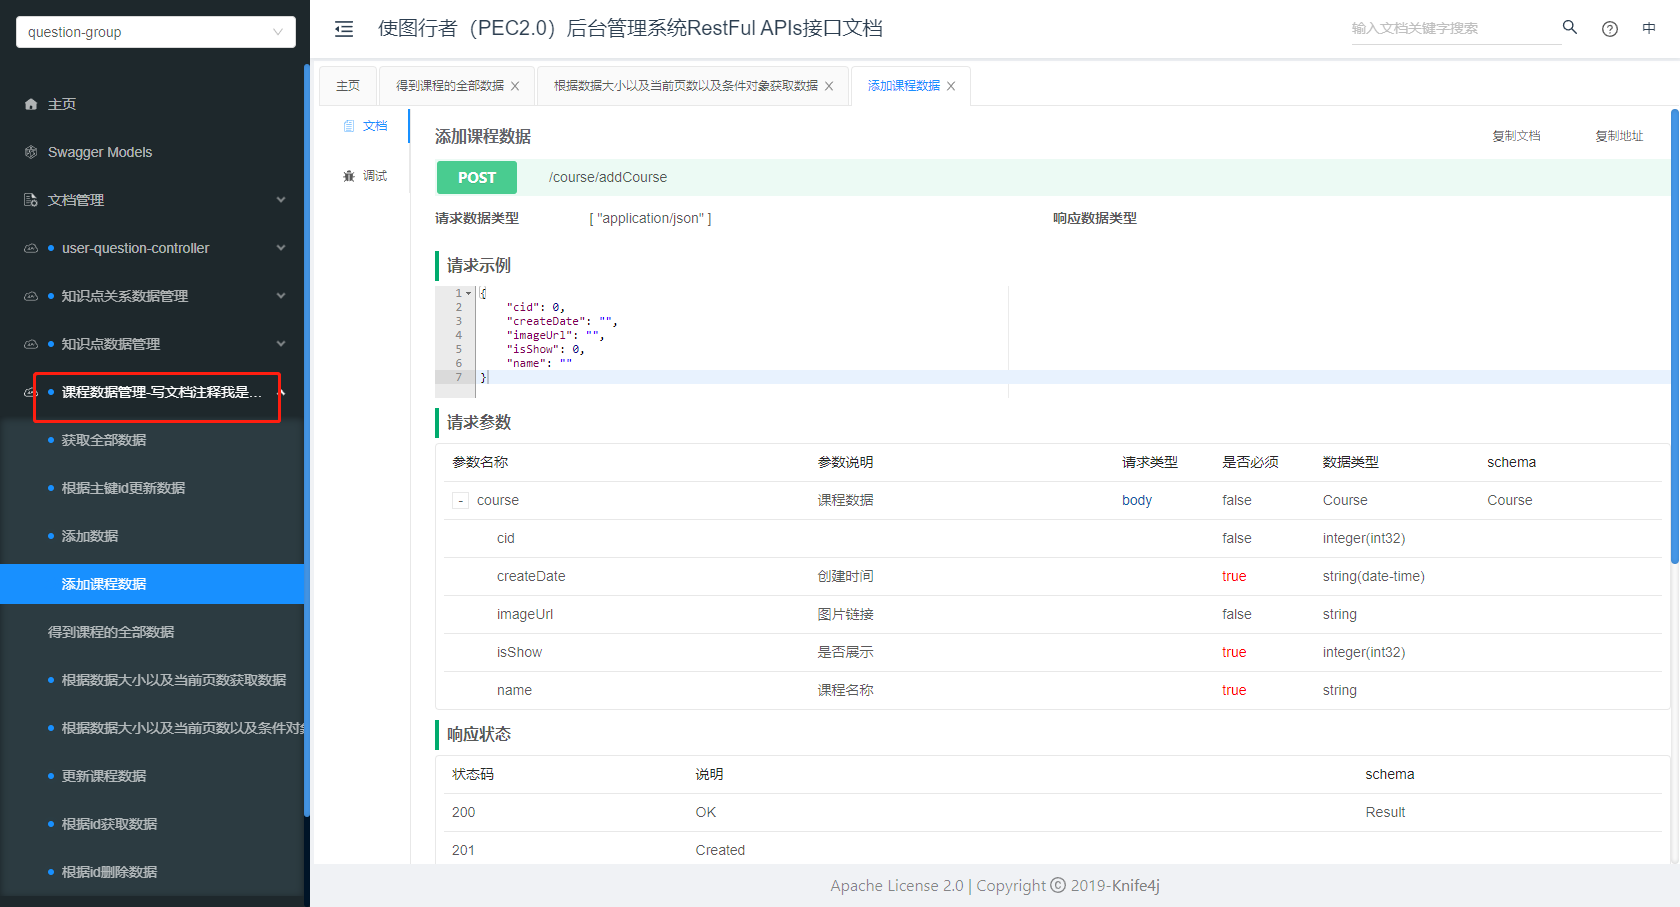
Click the card item in the figure above, and all the interfaces in the controller are in it. The reference code is as follows:
package com.yxinmiracle.question.controller;

import com.github.xiaoymin.knife4j.annotations.ApiOperationSupport;
import com.yxinmiracle.core.AbstractCoreController;
import com.yxinmiracle.question.pojo.Course;
import com.yxinmiracle.question.service.CourseService;
import entity.PageResult;
import entity.Result;
import entity.StatusCode;
import io.swagger.annotations.Api;
import io.swagger.annotations.ApiOperation;
import io.swagger.annotations.ApiParam;
import org.springframework.beans.factory.annotation.Autowired;
import org.springframework.web.bind.annotation.PostMapping;
import org.springframework.web.bind.annotation.RequestBody;
import org.springframework.web.bind.annotation.RequestMapping;
import org.springframework.web.bind.annotation.RestController;

/****
 * @Author:YxinMiracle
 * @Description:
 *****/

@RestController
@RequestMapping("/course")
@Api(value = "Course data management", tags = "Course data management-I'm serious about writing document notes")
public class CourseController extends AbstractCoreController<Course> {

    private CourseService courseService;

    @Autowired
    public CourseController(CourseService courseService) {
        super(courseService, Course.class);
        this.courseService = courseService;
    }

    @ApiOperationSupport(author = "yxinmiracle@gmail.com")
    @ApiOperation("Get all the data of the course")
    @PostMapping("/all")
    public Result getCourseAllData(@ApiParam(value = "Request all course data page parameter") @RequestBody PageResult pageResult) {
        PageResult retPageResult = courseService.getCourseAllData(pageResult);
        return new Result(true, StatusCode.OK, "Query course data", retPageResult);
    }

    @ApiOperation("Add course data")
    @PostMapping("/addCourse")
    public Result addCourse(@ApiParam(value = "Add the information carried by the course Course data") @RequestBody Course course) {
        courseService.addCourse(course);
        return new Result(true, StatusCode.OK, "Successfully added course data");
    }

    @ApiOperation("Update course data")
    @PostMapping("/updateCourse")
    public Result updateCourse(@ApiParam(value = "Update the information carried by the course Course data") @RequestBody Course course) {
        courseService.updateCourse(course);
        return new Result(true, StatusCode.OK, "Course data updated successfully");
    }
}
3.2,ApiModel
@ApiModel is used on a class to describe the class. It is used to receive the description for the parameters in the entity class. The usage code is as follows.
Display effect:
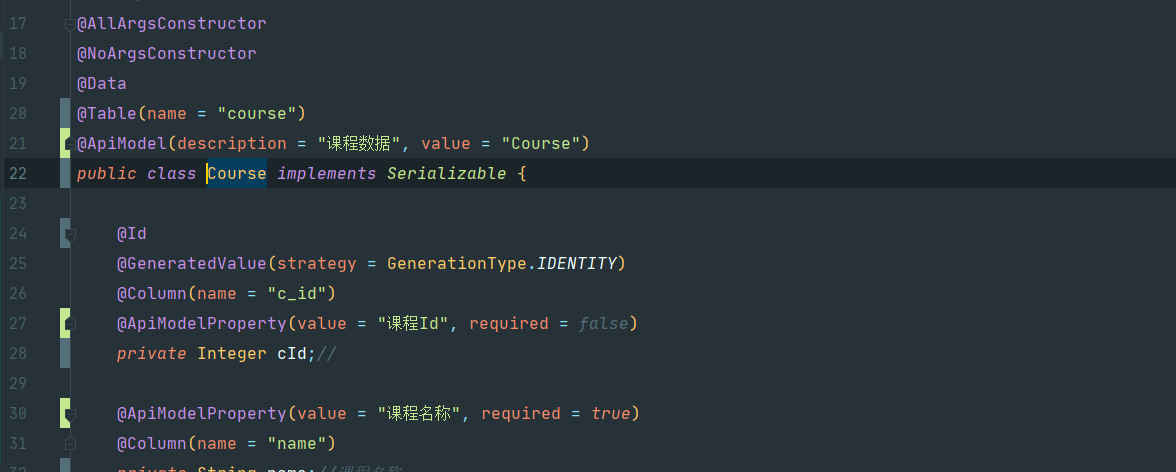
3.3,ApiModelProperty
@ApiModelProperty() is used for the field to indicate the description of the model property. The usage code is as follows.
package com.yxinmiracle.question.pojo;

import io.swagger.annotations.ApiModel;
import io.swagger.annotations.ApiModelProperty;
import lombok.AllArgsConstructor;
import lombok.Data;
import lombok.NoArgsConstructor;

import javax.persistence.*;
import java.io.Serializable;
import java.util.Date;

/****
 * @Author:YxinMiracle
 * @Description:Course structure
 *****/
@AllArgsConstructor
@NoArgsConstructor
@Data
@Table(name = "course")
@ApiModel(description = "Course data", value = "Course")
public class Course implements Serializable {

    @Id
    @GeneratedValue(strategy = GenerationType.IDENTITY)
    @Column(name = "c_id")
    @ApiModelProperty(value = "curriculum Id", required = false)
    private Integer cId;//

    @ApiModelProperty(value = "Course name", required = true)
    @Column(name = "name")
    private String name;//Course name

    @ApiModelProperty(value = "pictures linking", required = false)
    @Column(name = "image_url")
    private String imageUrl;//Course picture display

    @ApiModelProperty(value = "Creation time", required = true)
    @Column(name = "create_date")
    private Date createDate;//Time of creation

    @ApiModelProperty(value = "Show or not", required = true)
    @Column(name = "is_show")
    private Integer isShow;//0 is not displayed, 1 is displayed
}
3.4,ApiParam
@ApiParam is used to describe the parameters of the methods in the Controller. The usage code is as follows.

- value: parameter description
- Required: required
3.5. ApiImplicitParam and ApiImplicitParams
It is used in the method to describe the individual request parameters. The usage code is as follows.
exp: "/user?id=xxxx"
@ApiImplicitParams({
    @ApiImplicitParam(name = "id", value = "user ID", dataType = "string", paramType = "query", required = true, defaultValue = "1") })
@GetMapping("/user")
public UserDto getUser(@RequestParam("id") String id) {
    return new UserDto();
}
- Name: parameter name, corresponding to the individual parameter name in the method.
- value: Chinese description of the parameter.
- Required: required.
- paramType: parameter type. The values are path, query, body, header and form.
- dataType: parameter data type.
- defaultValue: default value.
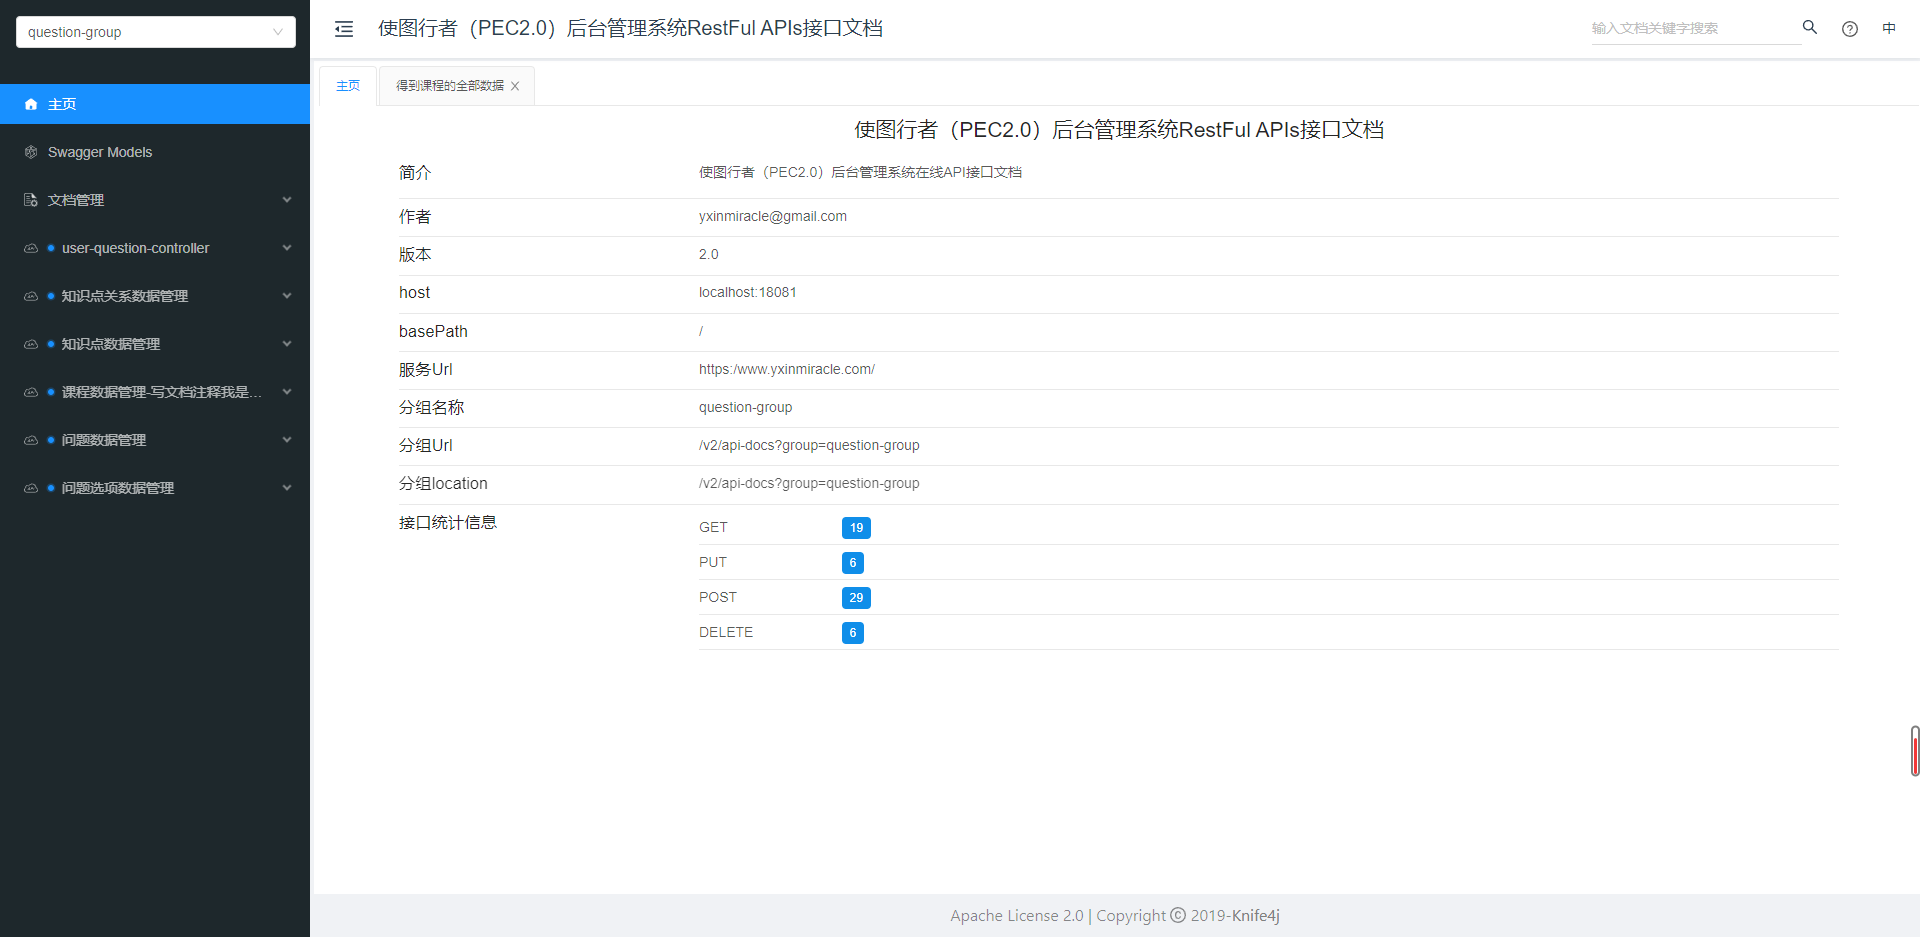
4. Overall effect
Home page:
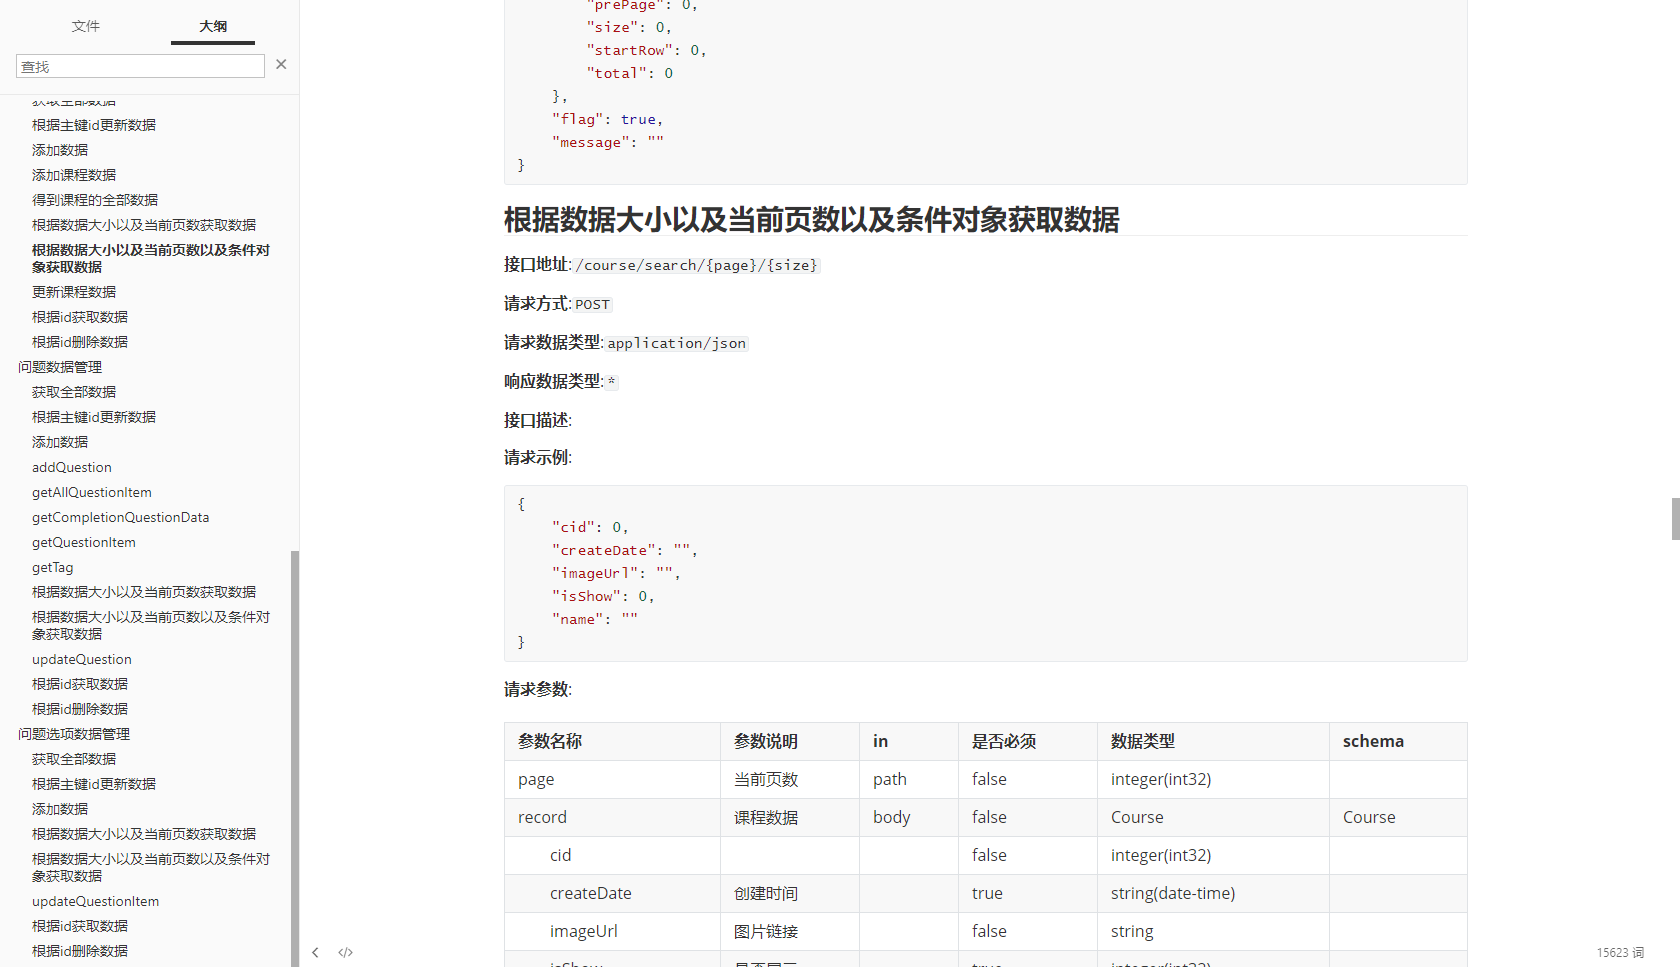
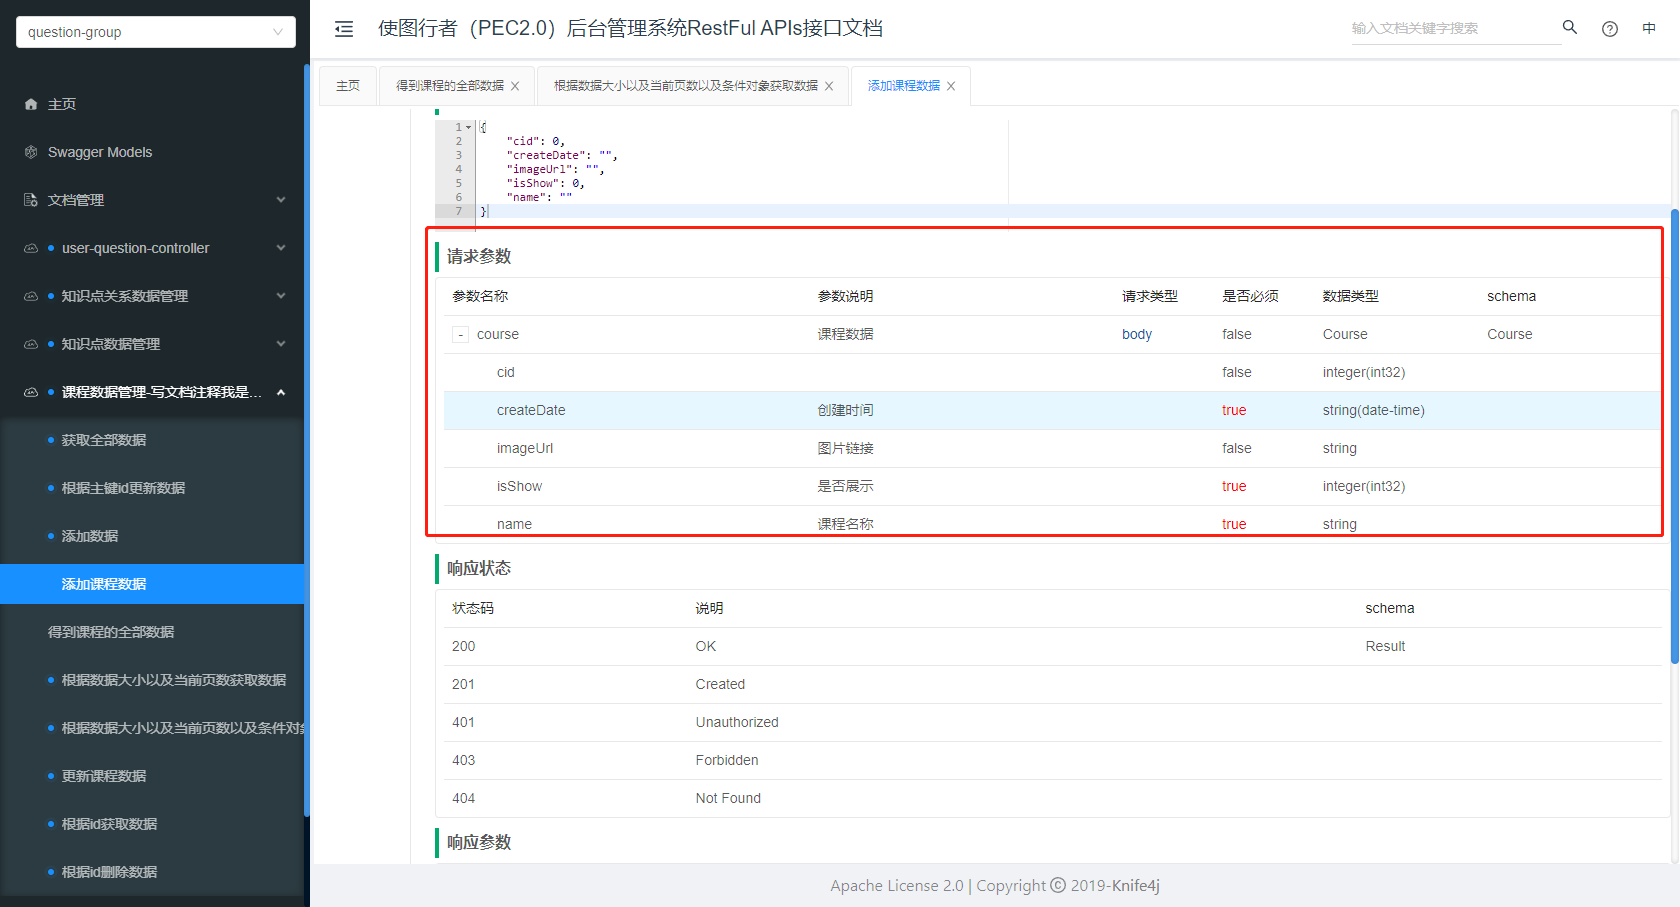
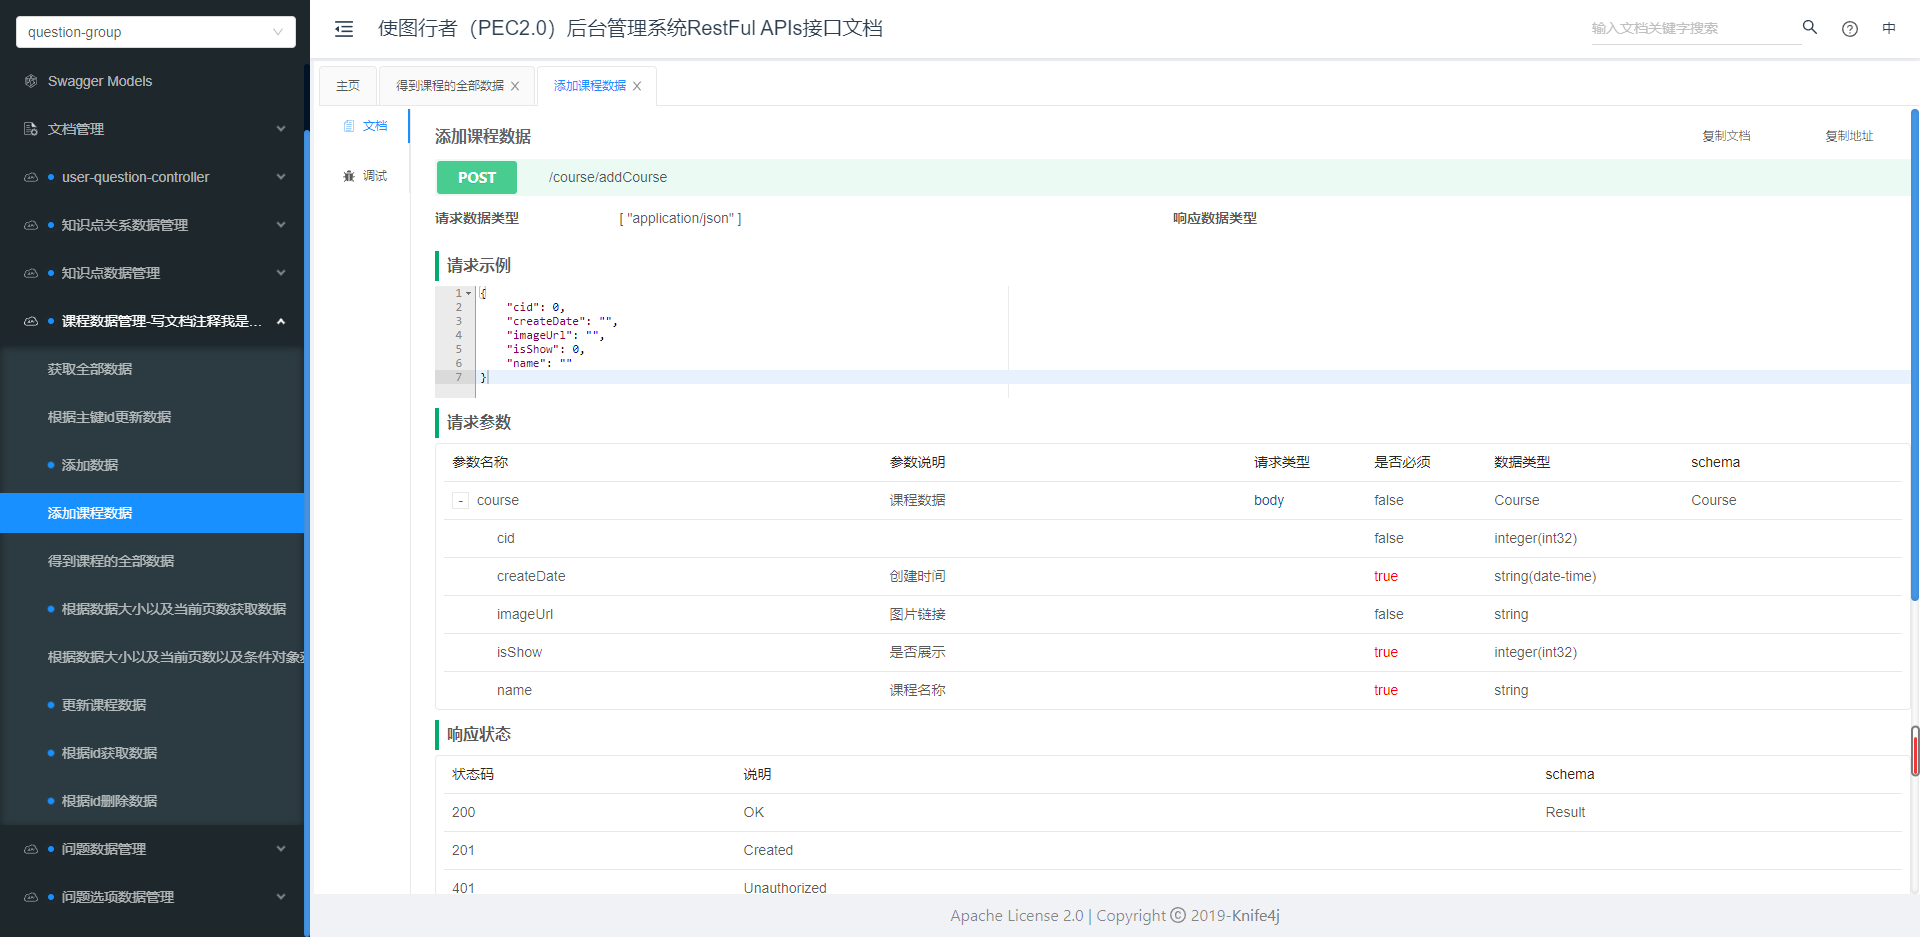
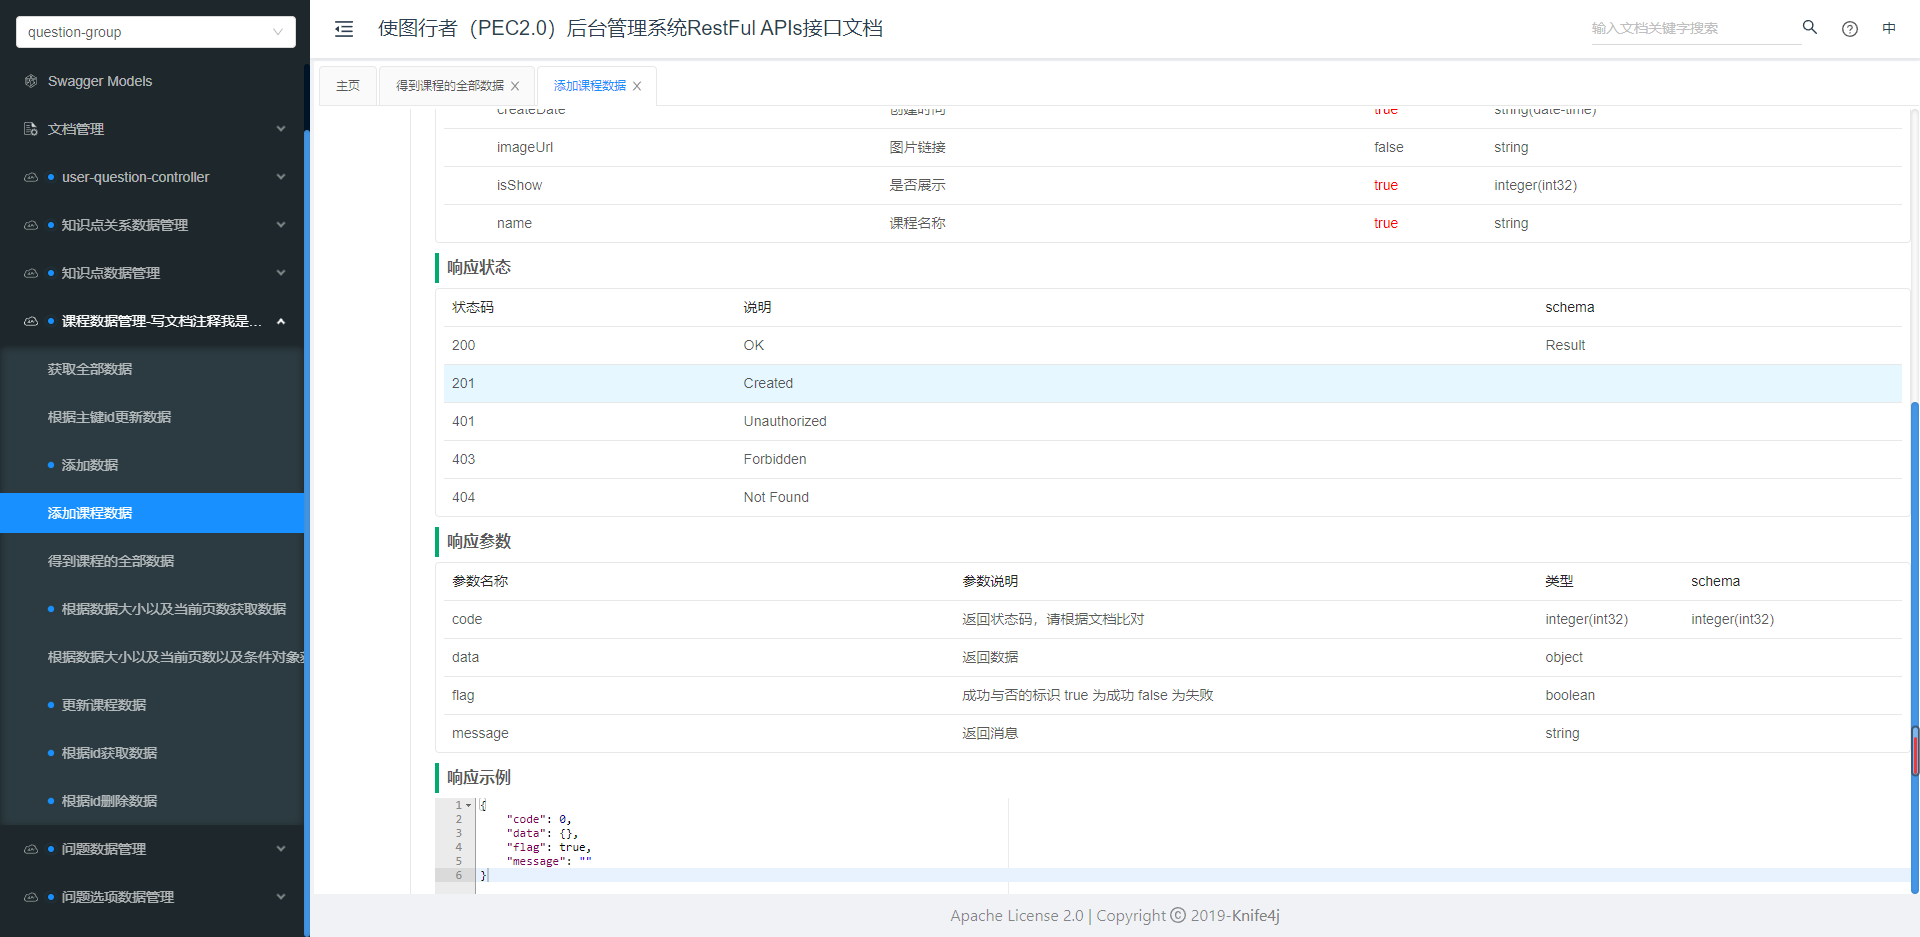
One of the interfaces:
To export an offline api document:
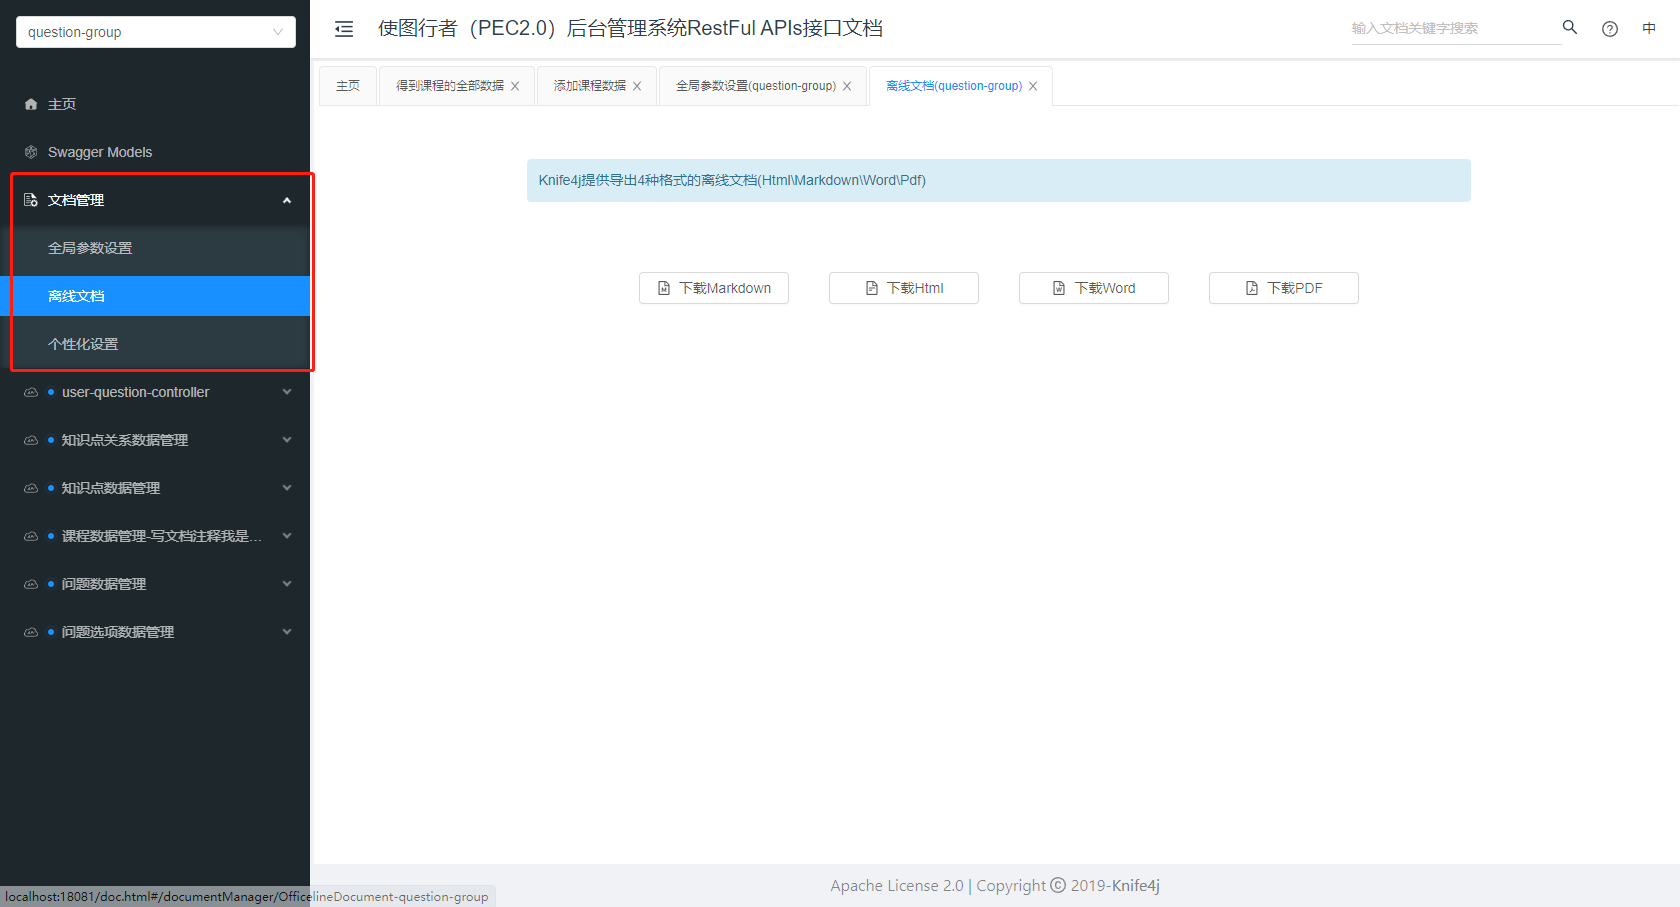
Screenshot: