preface
I tried a lot of frameworks and algorithms. From software to code, there were many problems, from ArcGIS Pro to mask RCNN of Tensorflow to Detectron2.
Target detection and segmentation
Target segmentation
building contour extraction belongs to a kind of target segmentation (instance segmentation). Different from target detection, it not only frames the location of the target, but also frames the contour of the object in the form of mask.
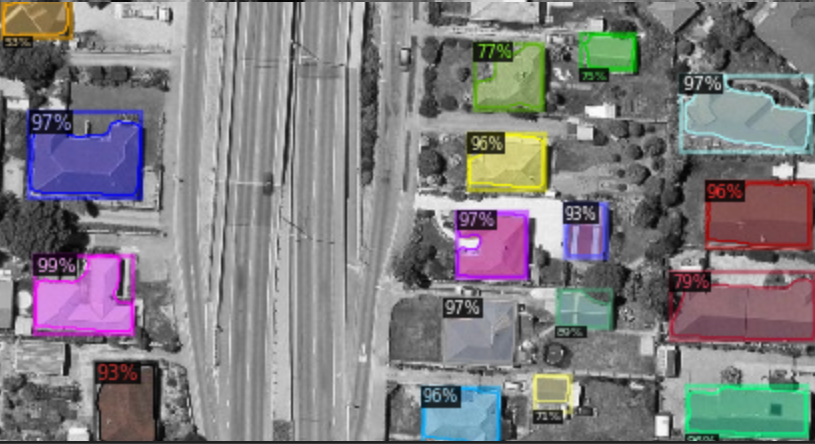
The figure above shows the outline of buildings extracted by mask RCNN algorithm in Detectron2, including mask, bounding box and possible. Of course, this is only the result of RGB three channel data training. You can also add more channels, including point cloud data and hyperspectral data. A large amount of data will also bring a series of problems.
at present, the commonly used algorithms include U-Net (the ancestor of medical image segmentation), mask RCNN
Target segmentation
Target detection is to detect the position of the object and frame its position.
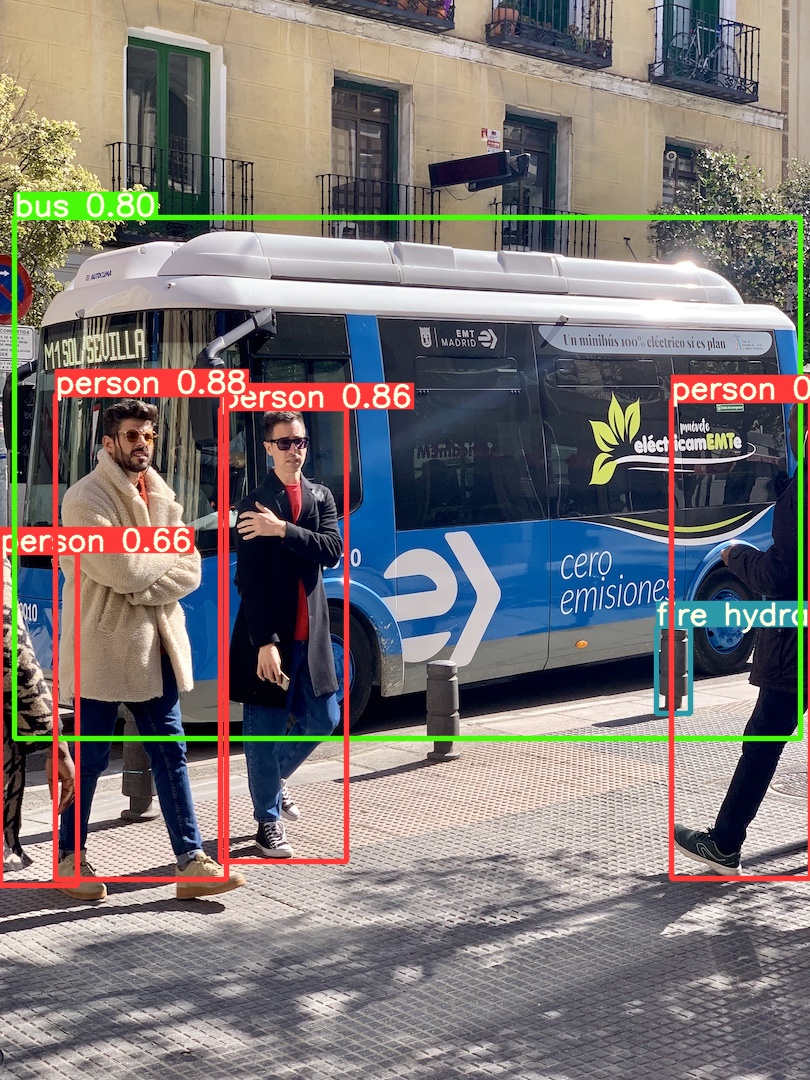
The following figure shows the object detected by Yolov5 (object detection) algorithm, which does not mark the mask.
Common algorithms include Yolo, SSD
Algorithm deployment
Mask RCNN algorithm
due to the cumbersome environment configuration, in addition to the common problems of graphics card driver, CUDA and CUDNN, there are also problems of Python virtual environment and version matching of various packages.
Common deep learning frameworks are usually written in pytoch and Tensorflow, while Tensorflow's use of video memory is significantly higher than that of pytoch. Moreover, Tensorflow usually has TF 1 X and TF2 X version, so there are many problems with mask RCNN using Tensorflow version before,
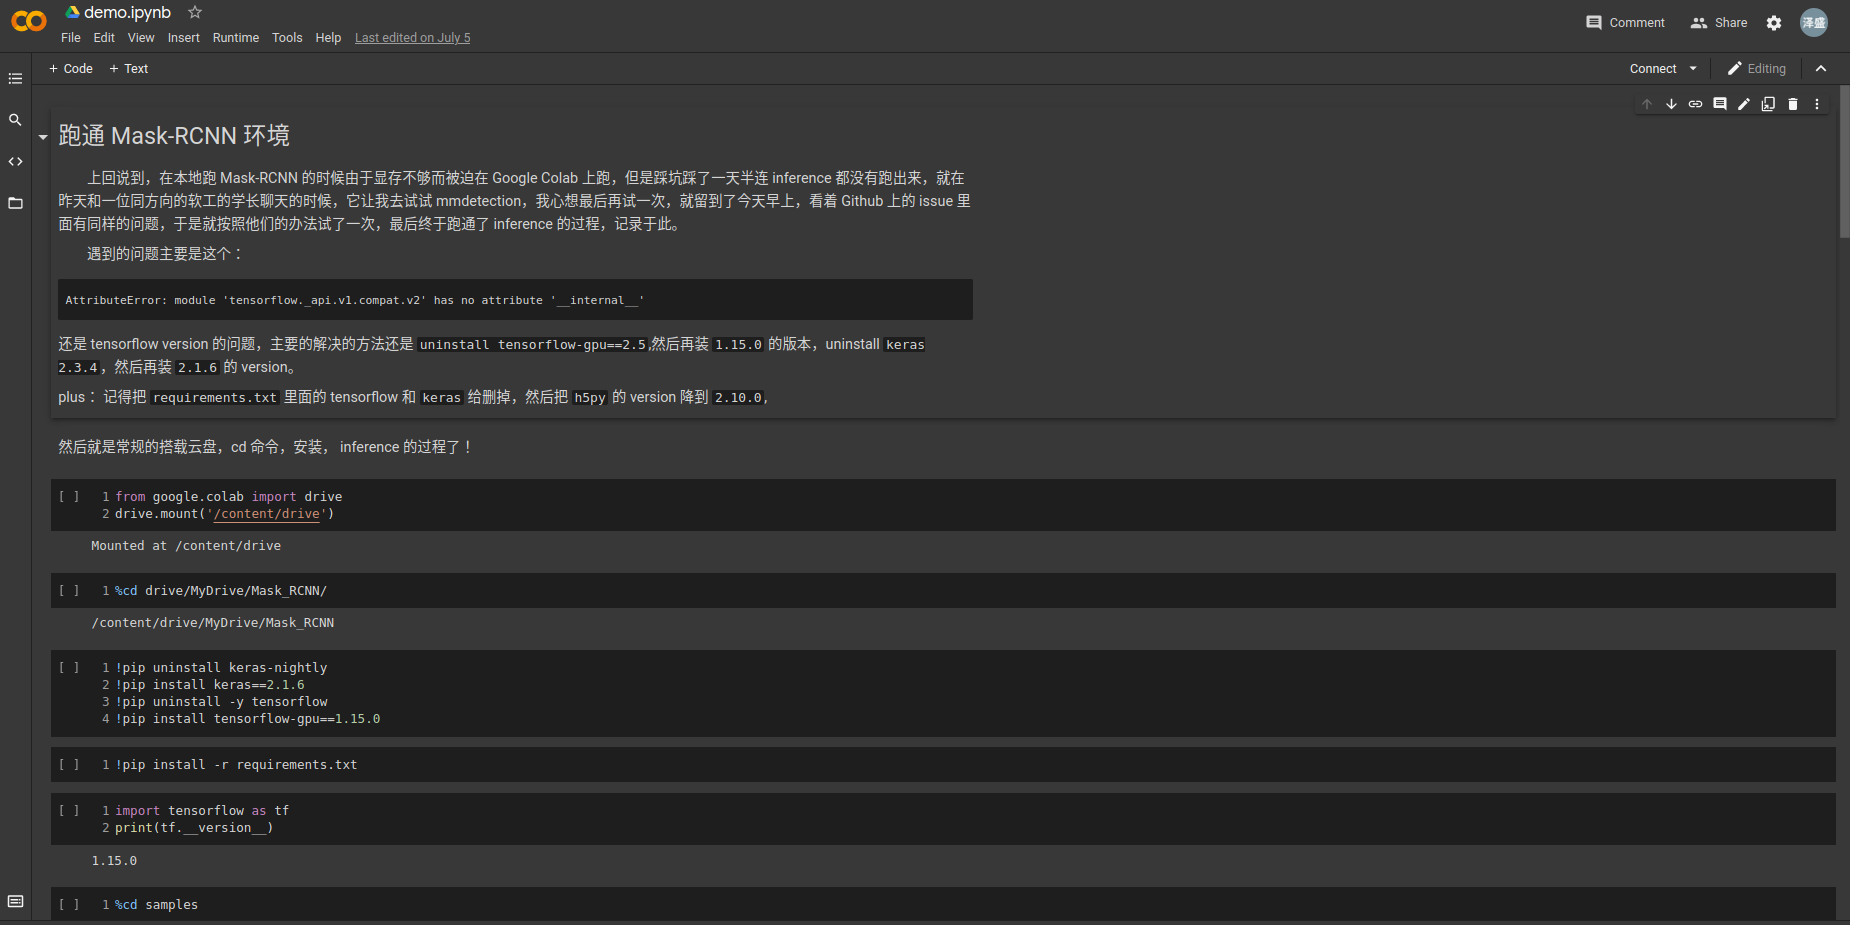
The mask RCNN of tensorflow has been recorded in the previous demo (Colab does not share files because it is inconvenient to share them in the Drive). However, the mask RCNN of tensorflow version has higher requirements for tensorflow GPU and keras versions, which is more troublesome to configure. In addition, the contour extraction of its mask is less accurate than that of other algorithms, Therefore, mask RCNN of other frameworks (pytoch) is adopted
2. Detectron2
Run through Demo
Detectron2 is a comprehensive and integrated framework for in-depth learning of facebook research department. It includes algorithms for target detection and target segmentation, including algorithms for target detection and target segmentation in different formats (coco and PascalVOC). There are many files in its configs file. Mainly yaml files of different algorithms (license weight)
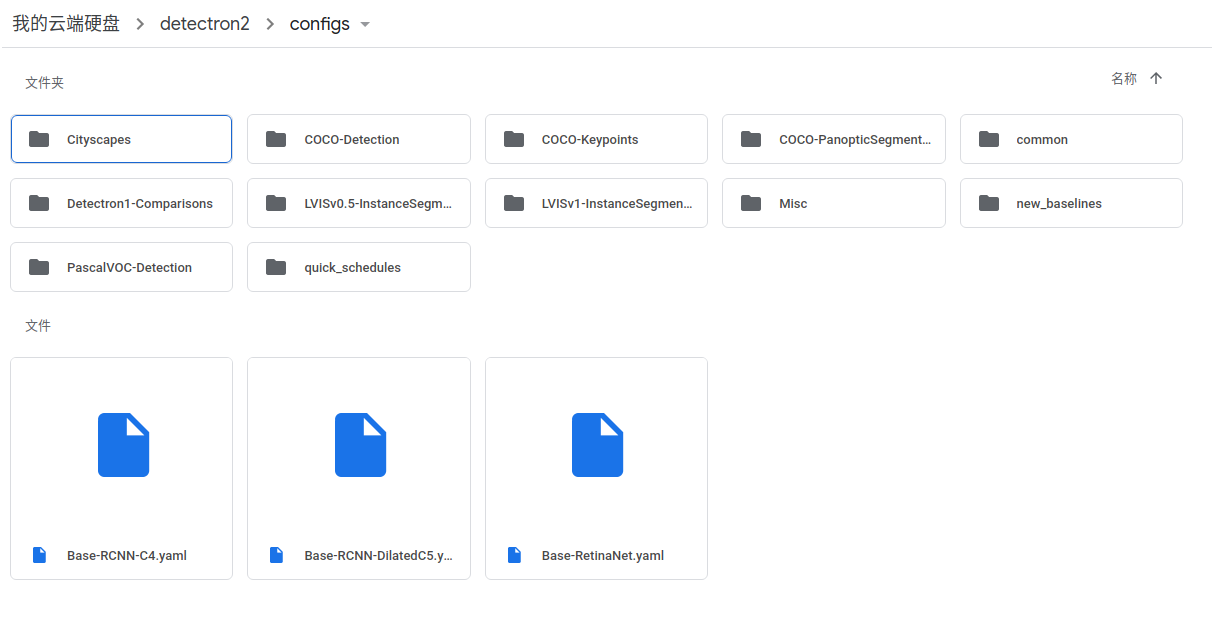
About the Detectron2 algorithm, there is an official Colab tutorial file, which can be searched in Github Detectron2 , in the get started section Colab Notebook You can run through the official code by partially opening it. Of course, the official code uses the weight after coco training, and the user-defined data set uses the data set of balloon file. Of course, there are many problems in the training user-defined data that need to be solved slowly and patiently according to the official documents.
Define your own data
This paper adopts the building dataset provided by Wuhan University. Because we want to try to customize the dataset, train and detect, we only use 50 RGB images for annotation (labelme tool). The original image is a tif file,
Since Roboflow deep learning dataset was used to create common websites at the beginning, It only supports the production of target detection data sets (in the first attempt, tif images are converted into jpg images, which can be converted by external tools or by code itself. Generally, the deep learning framework only supports JPG, png and jpeg formats, so it is also saved for insurance).
- Preparation before defining your own data
Because you use your own data, you usually need to label yourself. When labeling, you need to use external labeling software. For target detection, you can use labelimg tool (pyqt5 + labelimg framework), which does not support rotate box. The installation and startup methods are also introduced in previous articles. For target segmentation and semantic segmentation, you need to label mask, that is, generate a polygon file, and the tool used is labelme,
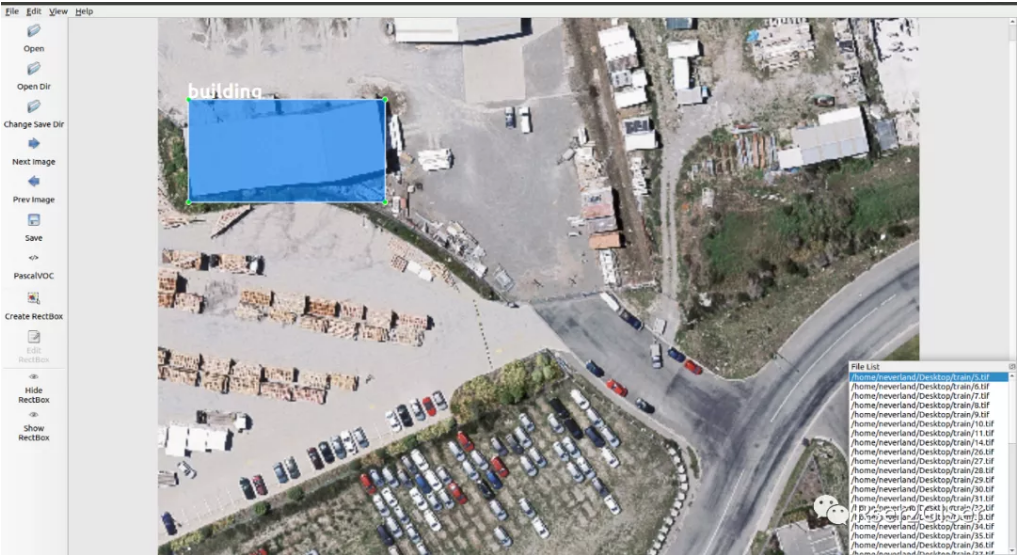
The above figure shows the labeling process of labelimg tool, which supports data labeling in PascalVOC, Yolo, CreateML and other formats.
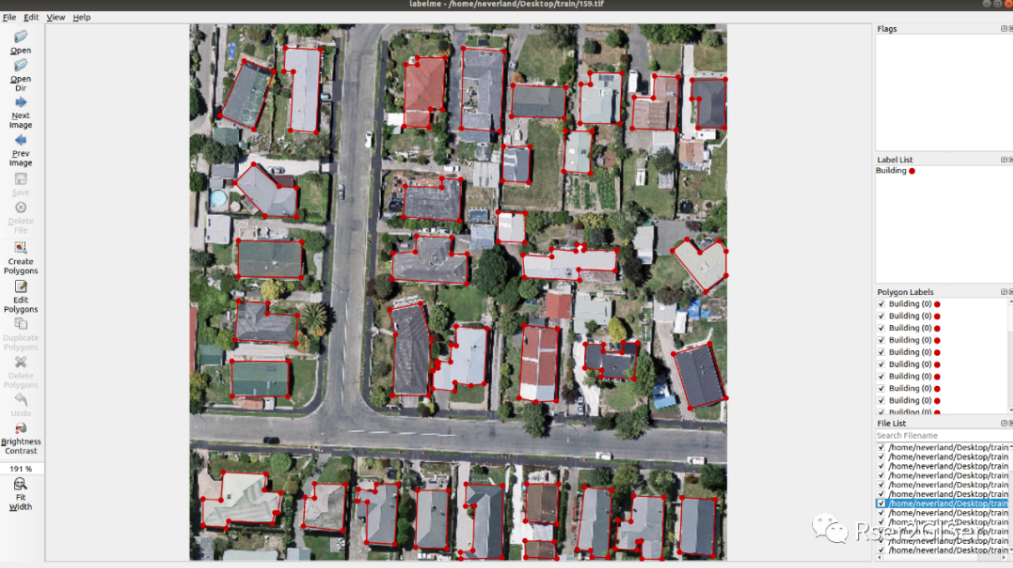
The above figure shows the labeling process of the labelme tool, which generates its own labelme json file. After later training, it needs to be transformed into the format of coco data. Due to the dense buildings and the buildings are easily obscured by trees, it is necessary to decide whether to label or not.
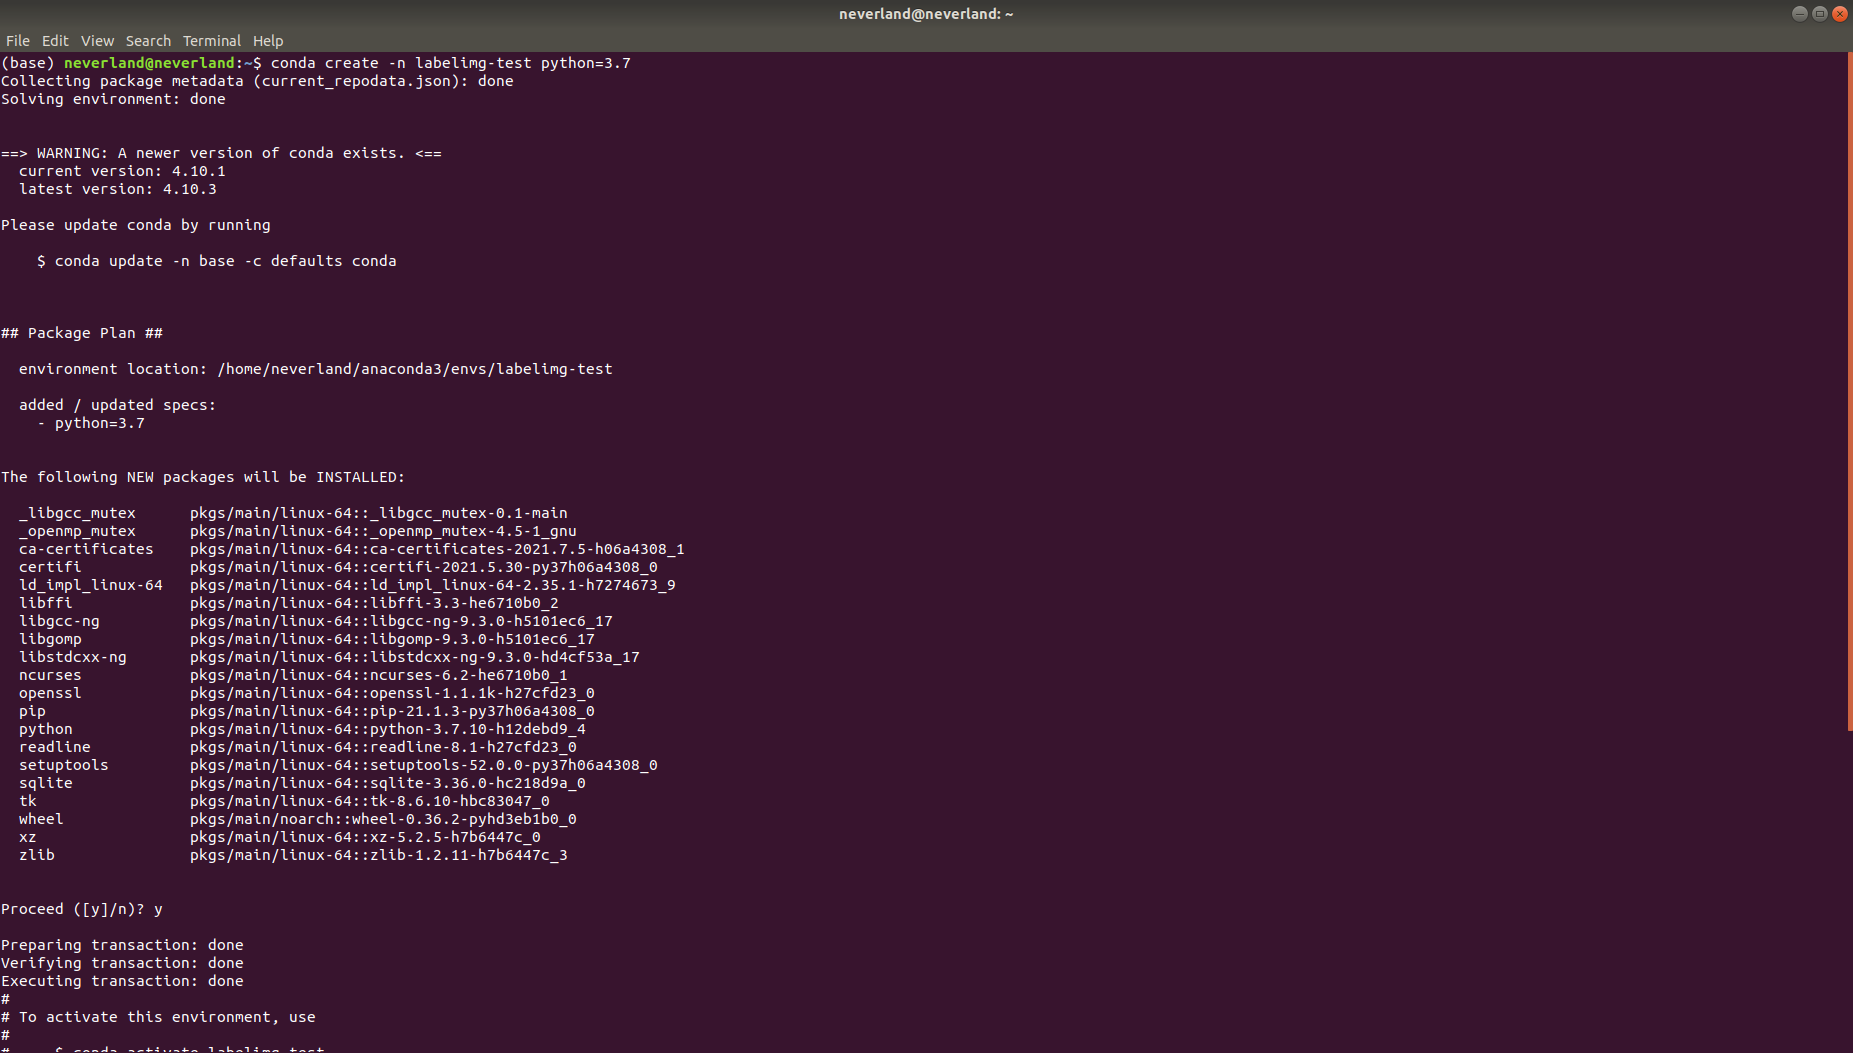
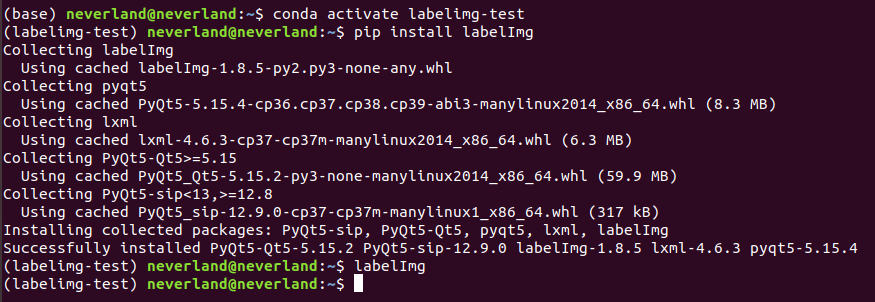
Installation and startup methods of labelme and labelimg:
# labelimg installation
conda create -n labelimg python=3.7
conda activate labelme
pip install labeImg
labelImg
You need to strictly distinguish between case and case, otherwise you can't find the tool and report an error
#Install labelme and start
conda create -n labelme python=3.7
conda activate  labelme
pip install labelme
labelme
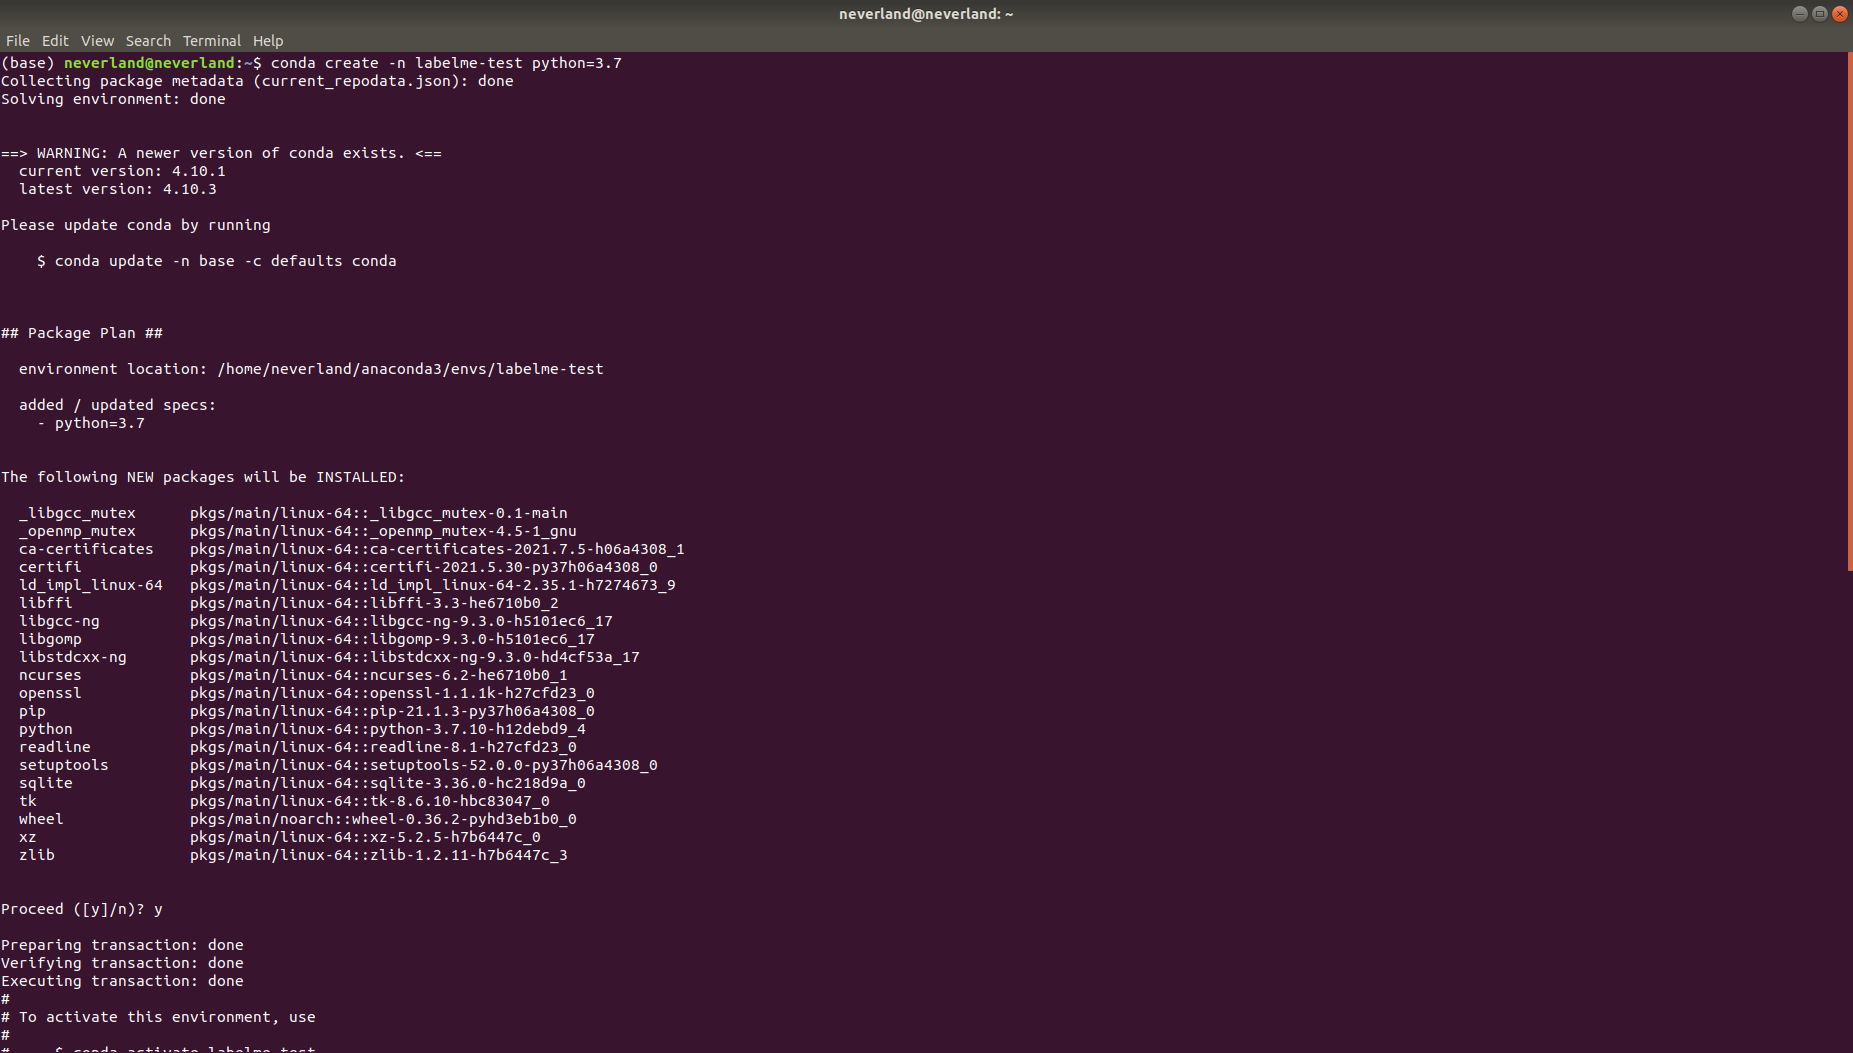
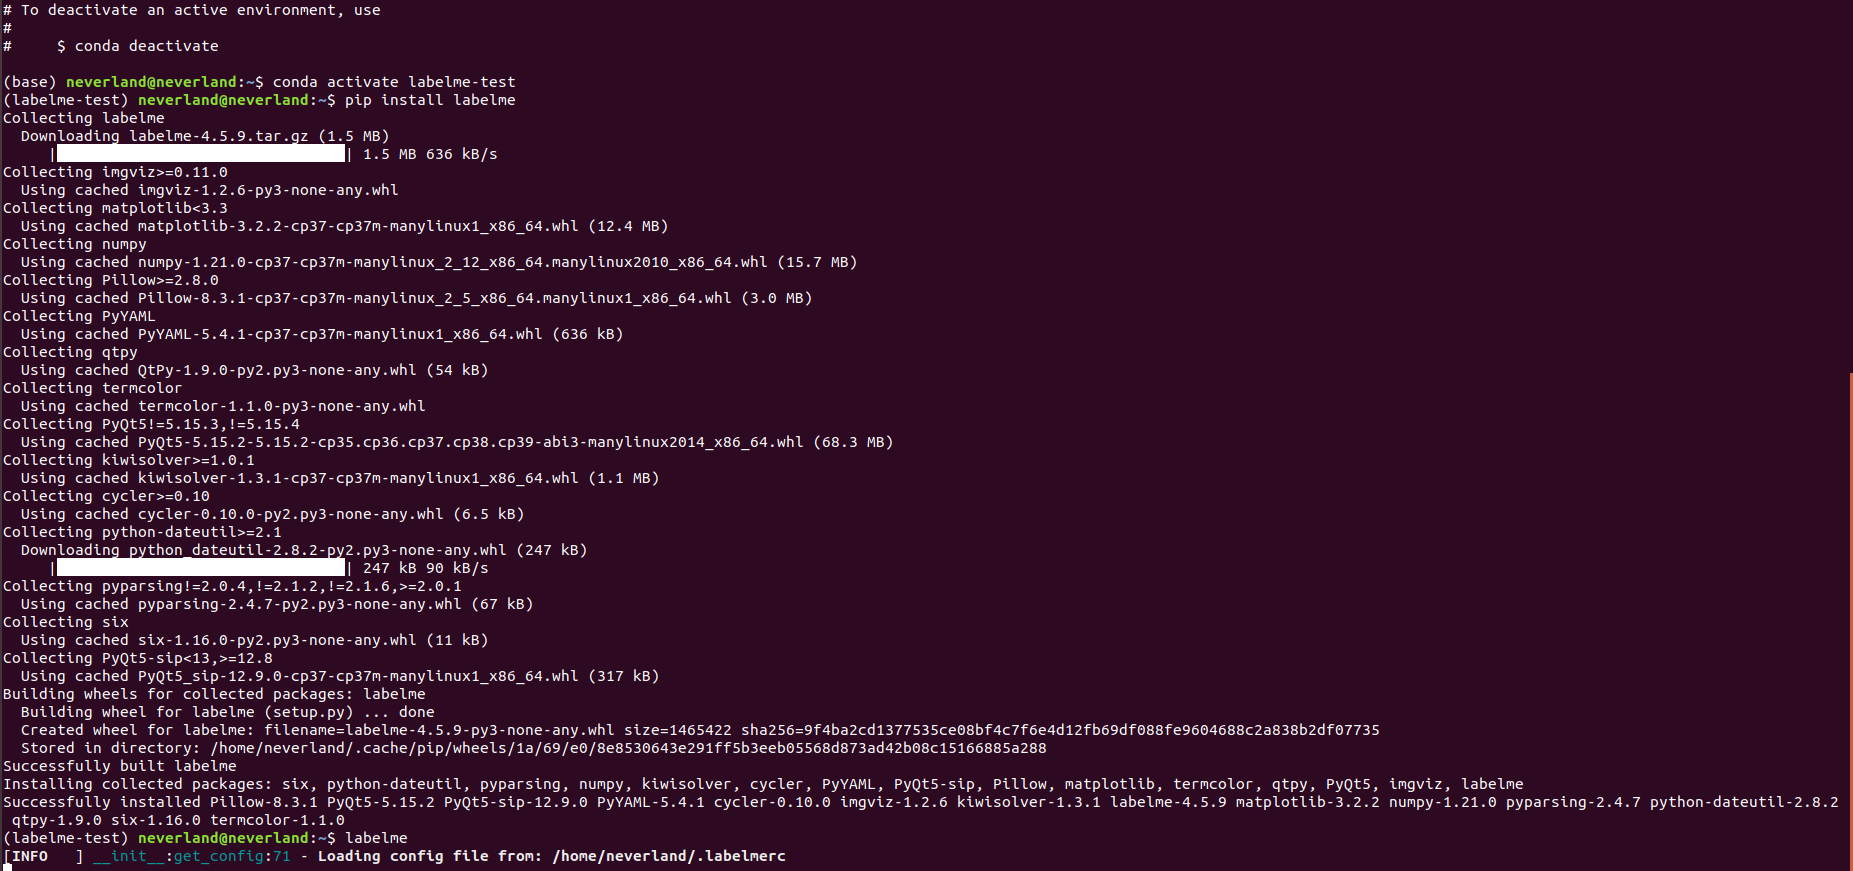
You need to enter commands on the terminal (cmd) to install and start.
After the annotation is completed, the respective json files are generated, which need to use labelme2cco Py converts the json file of labelme into coco's own json file, which can be used prepare_detection_dataset The code needs to modify the path of the image file and the storage path (if the storage path is not defined, it will be generated automatically, and the data will be divided into training set and verification set)

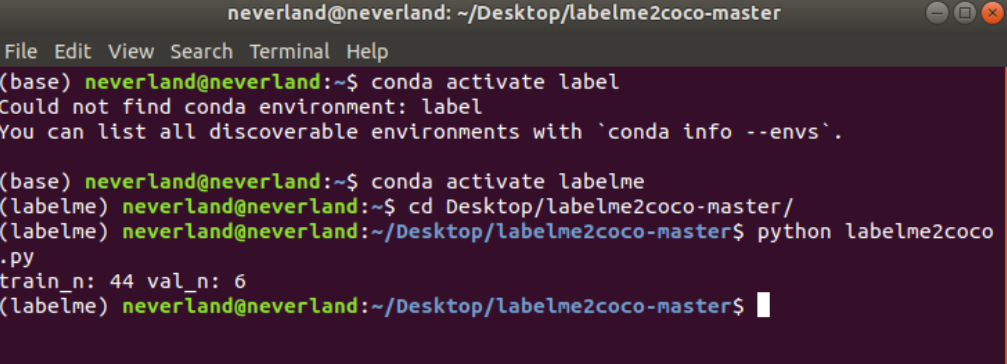
When completed, a coco is generated_ Datacoco folder, which will be divided into images and annotations folders according to the data of the training set. There will be instances in the annotation folder_ train2017. JSON files, and instances_val2017.json file, there will be XXX in train2017 and val2017 files in the images folder Jpg and XXX JSON will be put together, so as to generate the early data preparation we need, and then upload it to Google Drive to prepare for later training.
- Train your own data
Due to the limited video memory of its own graphics card, it is the same to train in Google Colab. In addition to changing the runtime to GPU, download the source code of Detectron2 and mount the cloud disk
%cd drive/MyDrive
!git clone https://github.com/facebookresearch/detectron2
Put annotations, train2017 and val2017 in the root directory (if not, just point to the past in the key parts of the code)
- Follow the official tutorial to install pytorch=1.5
# install dependencies: (use cu101 because colab has CUDA 10.1)
!pip install -U torch==1.5 torchvision==0.6 -f https://download.pytorch.org/whl/cu101/torch_stable.html
!pip install cython pyyaml==5.1
!pip install -U 'git+https://github.com/cocodataset/cocoapi.git#subdirectory=PythonAPI'
import torch, torchvision
print(torch.__version__, torch.cuda.is_available())
!gcc --version
# opencv is pre-installed on colab
- Installing detectron2
# install detectron2:
!pip install detectron2==0.1.3 -f https://dl.fbaipublicfiles.com/detectron2/wheels/cu101/torch1.5/index.html
After the above two steps are completed, you may need to restart the runtime, and then run:
import detectron2
from detectron2.utils.logger import setup_logger
setup_logger()

# import some common libraries
import numpy as np
import cv2
import random
from google.colab.patches import cv2_imshow

# import some common detectron2 utilities
from detectron2 import model_zoo
from detectron2.engine import DefaultPredictor
from detectron2.config import get_cfg
from detectron2.utils.visualizer import Visualizer
from detectron2.data import MetadataCatalog
from detectron2.data.catalog import DatasetCatalog
Switch the current path to switch the next path for subsequent coco data registration, which is also convenient for later code.
%cd drive/MyDrive/detectron2
Register coco instance data
from detectron2.data import MetadataCatalog
from detectron2.data.datasets import register_coco_instances
##The first parameter is the registered data name, the second parameter needs no management, and the third parameter is the address of the data
register_coco_instances('self_coco_train', {},
                        './annotations/instances_train2017.json',
                       './train2017')
register_coco_instances('self_coco_val', {},
                        './annotations/instances_val2017.json',
                       './val2017')
Registration mainly registers training and validation data sets. After registration, it will be given to two classes (OOP thought), self_coco_train
Class, and you need to provide coco annotation information, the location of the json file, and the data of the training image.
This is followed by the registered validation set, the json file of the validation set and the location of its image.
Check whether the training set and verification set are read correctly:
#Check your metadata
##After running, you can see something_ Classes = [own data category]
coco_val_metadata = MetadataCatalog.get("self_coco_val")
dataset_dicts = DatasetCatalog.get("self_coco_val")
coco_train_metadata = MetadataCatalog.get("self_coco_train")
dataset_dicts1 = DatasetCatalog.get("self_coco_train")
coco_val_metadata
coco_train_metadata

After verification, there should be the following prompt. Mainly check the next thing_classes,thing_dataset_id_to_contigous_id, because it is a single category training, you can set the ID to 0 when labeling labelme,
Visualize whether the label label is correct:
#visualize training data
my_dataset_train_metadata = MetadataCatalog.get("self_coco_train")
dataset_dicts = DatasetCatalog.get("self_coco_train")

import random
from detectron2.utils.visualizer import Visualizer

for d in random.sample(dataset_dicts, 3):
    img = cv2.imread(d["file_name"])
    visualizer = Visualizer(img[:, :, ::-1], metadata=my_dataset_train_metadata, scale=0.5)
    vis = visualizer.draw_dataset_dict(d)
    cv2_imshow(vis.get_image()[:, :, ::-1])
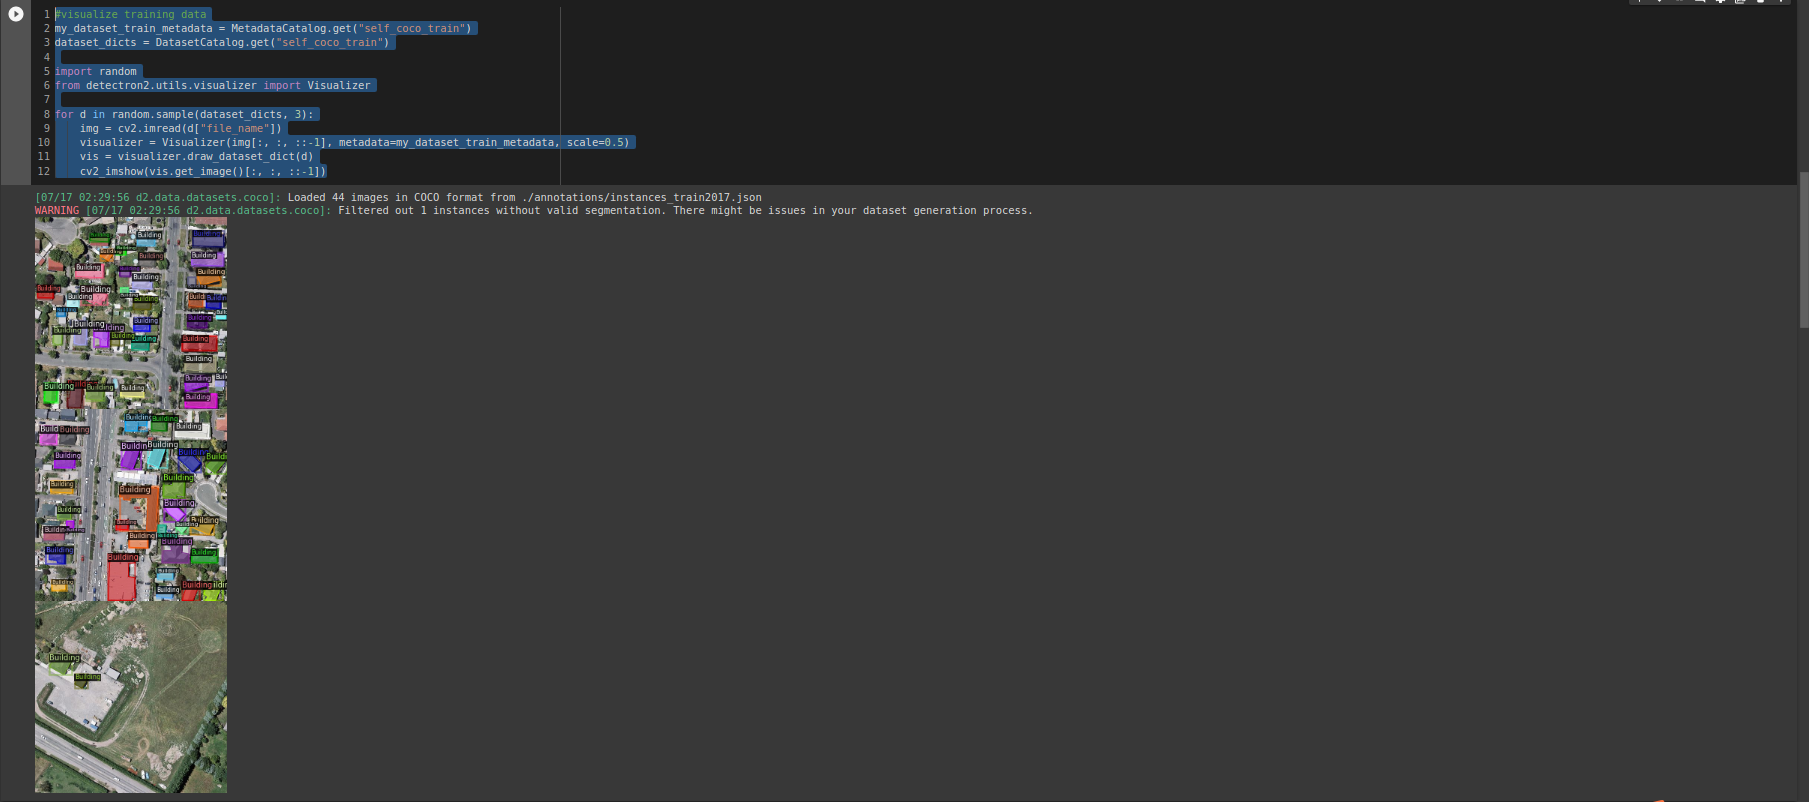
Import the classifier and import the evaluator of coco
#We are importing our own Trainer Module here to use the COCO validation evaluation during training. Otherwise no validation eval occurs.

from detectron2.engine import DefaultTrainer
from detectron2.evaluation import COCOEvaluator

class CocoTrainer(DefaultTrainer):

  @classmethod
  def build_evaluator(cls, cfg, dataset_name, output_folder=None):

    if output_folder is None:
        os.makedirs("coco_eval", exist_ok=True)
        output_folder = "coco_eval"

    return COCOEvaluator(dataset_name, cfg, False, output_folder)
Start training
import os
from detectron2.engine import DefaultTrainer
from detectron2.config import get_cfg

cfg = get_cfg()
cfg.merge_from_file(model_zoo.get_config_file("COCO-InstanceSegmentation/mask_rcnn_R_50_FPN_3x.yaml"))
cfg.DATASETS.TRAIN = ("self_coco_train",)
cfg.DATASETS.TEST = ()
cfg.DATALOADER.NUM_WORKERS = 2
cfg.MODEL.WEIGHTS = model_zoo.get_checkpoint_url("COCO-InstanceSegmentation/mask_rcnn_R_50_FPN_3x.yaml")
cfg.SOLVER.IMS_PER_BATCH = 2
cfg.SOLVER.BASE_LR = 0.00025
cfg.SOLVER.MAX_ITER = 1000
cfg.MODEL.ROI_HEADS.NUM_CLASSES = 4

os.makedirs(cfg.OUTPUT_DIR, exist_ok=True)
trainer = DefaultTrainer(cfg)
trainer.resume_or_load(resume=False)
trainer.train()
It should be noted that it is not recommended to use the config file here/ The path of configs/xxx encountered an error at the beginning of the attempt, so the yaml file and base RCNN FPN were deleted before Yaml is placed in the root directory of detectron2.
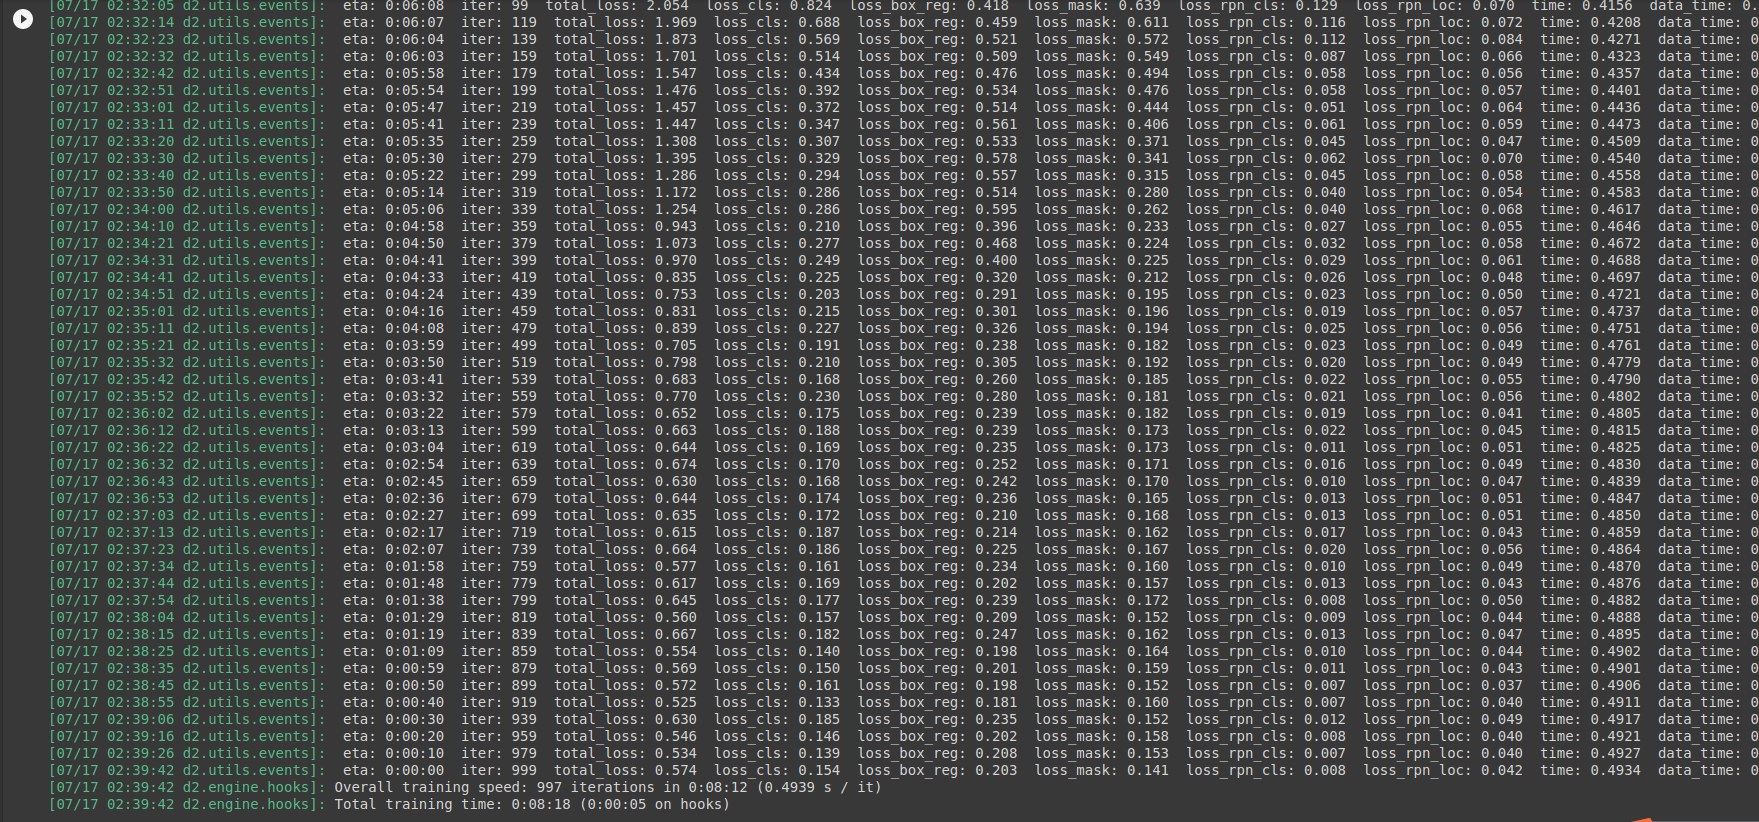
Due to the small amount of data, the training takes only 8 minutes. After the training is completed, there is a pth weight file, which needs to be loaded later, and information
cfg.MODEL.WEIGHTS = os.path.join(cfg.OUTPUT_DIR, "model_final.pth")
cfg.MODEL.ROI_HEADS.SCORE_THRESH_TEST = 0.5   # set the testing threshold for this model
cfg.DATASETS.TEST = ("self_coco_val", )
predictor = DefaultPredictor(cfg)
from detectron2.utils.visualizer import ColorMode

for d in random.sample(dataset_dicts, 3):
    im = cv2.imread(d["file_name"])
    outputs = predictor(im)
    v = Visualizer(im[:, :, ::-1],
                   metadata=coco_val_metadata,
                   scale=0.8,
                   instance_mode=ColorMode.IMAGE_BW   # remove the colors of unsegmented pixels
    )
    v = v.draw_instance_predictions(outputs["instances"].to("cpu"))
    cv2_imshow(v.get_image()[:, :, ::-1])
Then there is information, which uses the weight file reasoning completed by training.
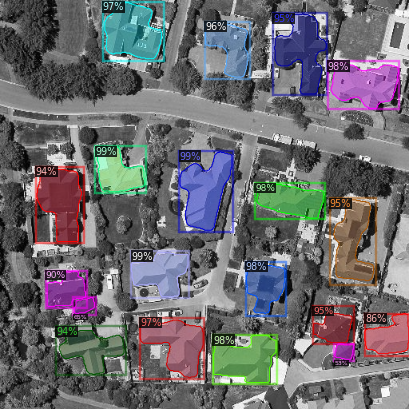
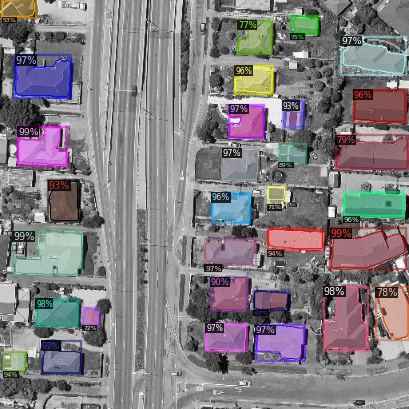
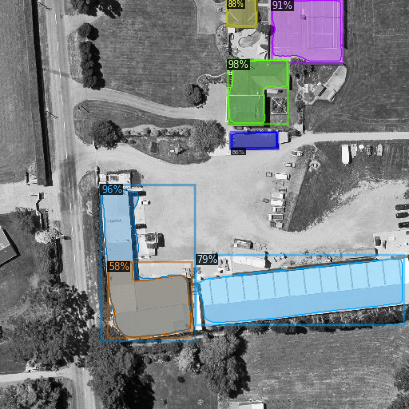
So far, the small-scale RGB three channel data training has been completed. In the follow-up, the following work needs to be completed:
- Try to train the data set of Whu Building once. The process should be to convert the tif file of its label into label me and then into coco_json file.
- Introduce more supporting data, such as point cloud data and hyperspectral data, and increase channels.
- For the introduction of OSM data, the senior student's suggestion is to try to solve it with code and avoid using visual graphical interface. Therefore, at present, we need to learn the use of GDAL, pyprj and pyshp geospatial databases in Python.
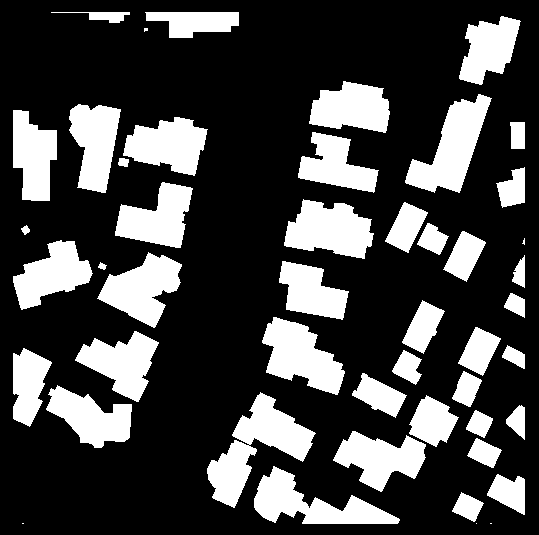
- The final goal is to extract a wide range of buildings. After the information is completed, you need to modify the code file, modify the reasoning image into a binary image, set the mask to 1, and turn the rest into 0, that is, complete the rasterization process.
That is, the final appearance should be such a binary image, with geographic coordinate system and projection coordinate system, and can adapt to OSM layer (there may be additional geometric correction later).
More to explore