Reprinted from: https://my.oschina.net/u/658933/blog/372151
Source code http://files.git.oschina.net/group1/M00/00/56/cHwGbFTLSfOAEAIjAAF86dDXjmU684.rar?Token=726426a40eb7a2151c50aab086fcce&ts=1422608917&filename=AndroidTest.rar?
Use of Android Various Adapter s
It's also a ListView that can be used differently
Adapter lets it show, for example, the most commonly used methods such as Array Adapter, Simple Adapter, Simple Cursor Adapter, and rewriting Base Adapter.
Array Adapter is relatively simple, but it can only be used to display text. Simple Adapter has strong expansibility, and can customize various effects. Simple Cursor Adapter can read data from the database and display it on the list. By writing Base Adapter, events can be processed on the list.
Let's first look at Array Adapter:
package com.shang.test;
import java.util.ArrayList;
import android.app.Activity;
import android.os.Bundle;
import android.widget.ArrayAdapter;
import android.widget.ListView;
/**
*
* @author shangzhenxiang
*
*/
public class TestArrayAdapterActivity extends Activity{
private ListView mListView;
private ArrayList<String> mArrayList = new ArrayList<String>();
@Override
protected void onCreate(Bundle savedInstanceState) {
super.onCreate(savedInstanceState);
setContentView(R.layout.testarrayadapter);
mListView = (ListView) findViewById(R.id.myArrayList);
mListView.setAdapter(new ArrayAdapter<String>(this, android.R.layout.simple_expandable_list_item_1, getData()));
}
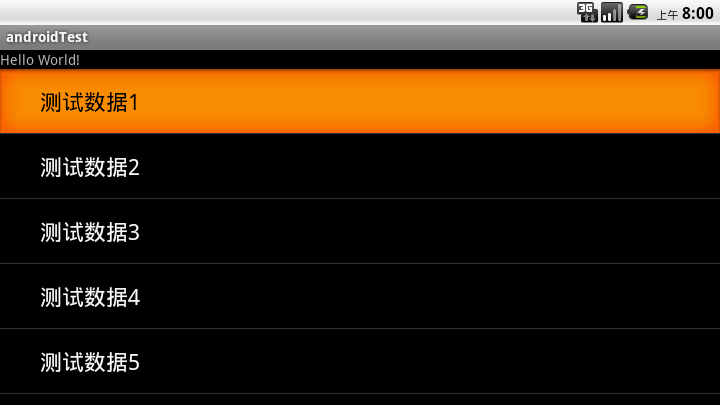
private ArrayList<String> getData() {
mArrayList.add("Test data 1");
mArrayList.add("Test data 2");
mArrayList.add("Test data 3");
mArrayList.add("Test data 4");
mArrayList.add("Test data 5");
mArrayList.add("Test data 6");
return mArrayList;
}
}There is a ListView in the layout.
<?xml version="1.0" encoding="utf-8"?>
<LinearLayout xmlns:android="http://schemas.android.com/apk/res/android"
android:orientation="vertical"
android:layout_width="match_parent"
android:layout_height="fill_parent">
<TextView
android:layout_width="match_parent"
android:layout_height="wrap_content"
android:text="@string/hello"/>
<ListView
android:id="@+id/myArrayList"
android:layout_width="match_parent"
android:layout_height="wrap_content"/>
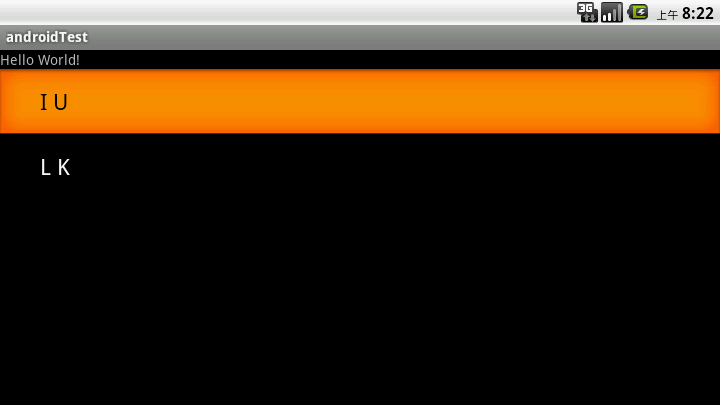
</LinearLayout>Array Adapter's construction method is used in the above code:
public ArrayAdapter (Context context, int textViewResourceId, T[] objects)
This is what is described in Api:
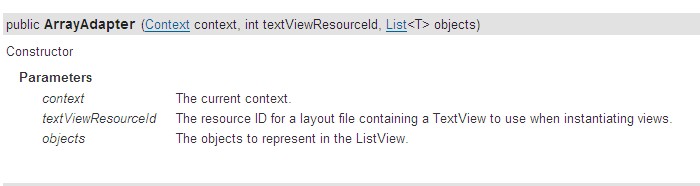
Context is the current environment variable, which can display a layout file with one line of text and a collection of List s, that is, data sources.
Layout files can be written by themselves or by the system. I use the system here. It's OK to include a TextView in your own layout. Of course, there's also a TextView layout file in the system: android.R.layout.simple_expandable_list_item_1, which is convenient to call.
The results of operation are given here.
Let's talk about SimpleCursor Adapter:
An easy adapter to map columns from a cursor to TextViews or ImageViews defined in an XML file. You can specify which columns you want, which views you want to display the columns, and the XML file that defines them the appearance of these views.
Simply put, it is convenient to list the data obtained in Cursor and map the specified columns to the specified TextView.
What I'm writing here is to get the data from the contacts and display it on the list. The code is as follows:
package com.shang.test;

 import android.app.Activity;
 import android.database.Cursor;
 import android.os.Bundle;
 import android.provider.Contacts.People;
 import android.widget.ListView;
 import android.widget.SimpleCursorAdapter;

 /**
 *
 * @author shangzhenxiang
 *
 */
public class TestSimpleCursorAdapter extends Activity {

    private ListView mListView;
    private Cursor mCursor;
    private SimpleCursorAdapter mAdapter;

    @Override
    protected void onCreate(Bundle savedInstanceState) {
        super.onCreate(savedInstanceState);
        setContentView(R.layout.testsimplecursoradapter);
        mListView = (ListView) findViewById(R.id.mySimpleCursorList);
        mCursor = getContentResolver().query(People.CONTENT_URI, null, null, null, null);
        startManagingCursor(mCursor);
        mAdapter = new SimpleCursorAdapter(TestSimpleCursorAdapter.this, android.R.layout.simple_expandable_list_item_1, mCursor, new String[]{People.NAME}, new int[]{android.R.id.text1});
        mListView.setAdapter(mAdapter);
    }
}
MCursor = getContentResolver (). query (People. CONTENT_URI, null, null, null); first get a Cursor pointing to the system contact
Start Managing Cursor (mCursor) means that we leave Cursor in the custody of this activity so that Cursor will synchronize with Activity and we don't need to manage it manually.
This is what the simple Cursor Adapter API says:
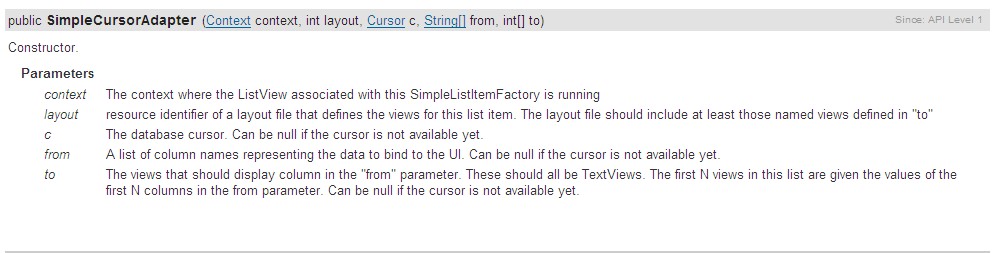
The first two parameters are the same as those in Array Adapter. The third parameter is an incoming parameter, which is actually a data source. The second two parameters are two arrays. The first one is String type, and the second one is int type. It shows that the value of the former parameter corresponds to the field in the database. The latter is the id corresponding to this field in the layout file, which means where the corresponding value of this field should be displayed (for example, the NAME field in the contact we found here, should be displayed on a corresponding TextView).
Here we take a look at the layout of the system, which is the layout of our second parameter. It's easy to understand. It's written in the android.R.layout.simple_expandable_list_item_1.xml file as follows:
<?xml version="1.0" encoding="utf-8"?>
<!-- Copyright (C) 2006 The Android Open Source Project

     Licensed under the Apache License, Version 2.0 (the "License");
     you may not use this file except in compliance with the License.
     You may obtain a copy of the License at

          http://www.apache.org/licenses/LICENSE-2.0

     Unless required by applicable law or agreed to in writing, software
     distributed under the License is distributed on an "AS IS" BASIS,
     WITHOUT WARRANTIES OR CONDITIONS OF ANY KIND, either express or implied.
     See the License for the specific language governing permissions and
     limitations under the License.
-->

<TextView xmlns:android="http://schemas.android.com/apk/res/android"
    android:id="@android:id/text1"
    android:layout_width="match_parent"
    android:layout_height="?android:attr/listPreferredItemHeight"
    android:paddingLeft="?android:attr/expandableListPreferredItemPaddingLeft"
    android:textAppearance="?android:attr/textAppearanceLarge"
    android:gravity="center_vertical"
/>
Notice that he has an id, which is also the ID of the system. There is only one TextView in this layout, so only one field can be displayed. The name of the contact shown here.
And the last parameter is a data (if there is a lot of TextView) composed of the ID written in this way. For example, if we want to display many fields, we need to write many TextViews in the layout file, and each TextView has an ID, how many fields are there in the third parameter, and how many IDs are there in the fourth parameter, and they correspond one by one.
Let's take a look at the operating results.
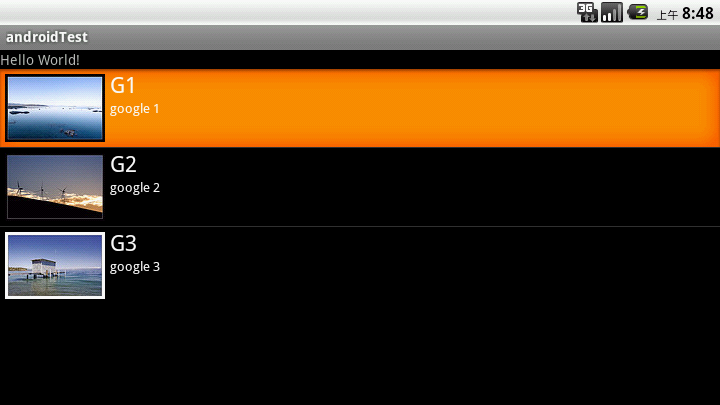
The two methods mentioned above are the display of text, for example, how to display pictures, but also show a lot of content, but also according to the layout of their own preferences how to do, with Simple Adapter, good scalability, can define a variety of layout.
The code is as follows:
package com.shang.test;

import java.util.ArrayList;
import java.util.HashMap;
import java.util.List;

import android.app.Activity;
import android.os.Bundle;
import android.widget.ListView;
import android.widget.SimpleAdapter;

/**
 *
 * @author shangzhenxiang
 *
 */
public class TestSimpleAdapter extends Activity {

    private ListView mListView;
    private SimpleAdapter mAdapter;
    private List<HashMap<String, Object>> mHashMaps;
    private HashMap<String, Object> map;

    @Override
    protected void onCreate(Bundle savedInstanceState) {
        super.onCreate(savedInstanceState);
        setContentView(R.layout.testsimpleadapter);
        mListView = (ListView) findViewById(R.id.mySimpleList);
        mAdapter = new SimpleAdapter(this, getData(), R.layout.simpleitem, new String[]{"image", "title", "info"}, new int[]{R.id.img, R.id.title, R.id.info});
        mListView.setAdapter(mAdapter);
    }

    private List<HashMap<String, Object>> getData() {
        mHashMaps = new ArrayList<HashMap<String,Object>>();
        map = new HashMap<String, Object>();
        map.put("image", R.drawable.gallery_photo_1);
        map.put("title", "G1");
        map.put("info", "google 1");
        mHashMaps.add(map);

        map = new HashMap<String, Object>();
        map.put("image", R.drawable.gallery_photo_2);
        map.put("title", "G2");
        map.put("info", "google 2");
        mHashMaps.add(map);

        map = new HashMap<String, Object>();
        map.put("image", R.drawable.gallery_photo_3);
        map.put("title", "G3");
        map.put("info", "google 3");

        mHashMaps.add(map);
        return mHashMaps;
    }
}
Simple Adapter's data is a List made up of HashMap. Each section of the List corresponds to no line of ListView. Here we first build a List made up of HashMap. There are three elements in the layout, ImageView and two TextView s. The layout file of each item is as follows:
<?xml version="1.0" encoding="utf-8"?>
<LinearLayout
  xmlns:android="http://schemas.android.com/apk/res/android"
  android:layout_width="match_parent"
  android:layout_height="match_parent"
  android:orientation="horizontal">
    <ImageView
        android:layout_width="wrap_content"
        android:id="@+id/img"
        android:layout_margin="5px"
        android:layout_height="wrap_content">
        </ImageView>
    <LinearLayout
        android:id="@+id/linearLayout1"
        android:layout_width="wrap_content"
        android:layout_height="wrap_content"
        android:orientation="vertical">
        <TextView
            android:id="@+id/title"
            android:layout_width="wrap_content"
            android:layout_height="wrap_content"
            android:textColor="#ffffff"
            android:textSize="22px"></TextView>
        <TextView
            android:id="@+id/info"
            android:layout_width="wrap_content"
            android:layout_height="wrap_content"
            android:textColor="#ffffff"
            android:textSize="13px"></TextView>
    </LinearLayout>
</LinearLayout>
So after we have an array of HashMaps, we need to add data to HashMap, add pictures, title, info, and a HashMap to form an Item item in ListView. Let's see how the API describes simpleAdapter:
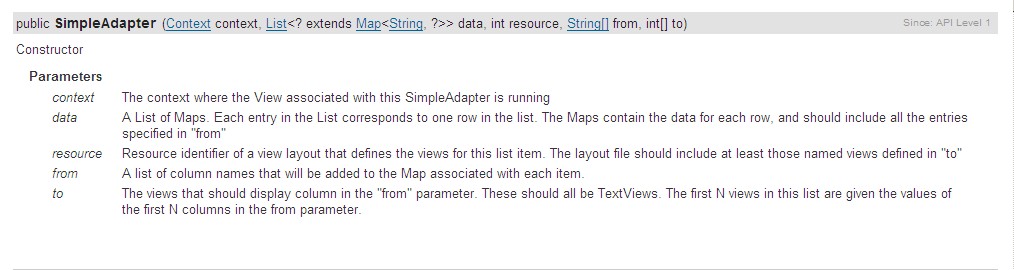
The first parameter and the third parameter are the same as those in Array Adapter. The second parameter is a List composed of HashMap, which is the data source. The fifth parameter is the key in the map. The last parameter is the id of the location where the key in the map corresponds to the value to be displayed in the layout.
Look at the effect:
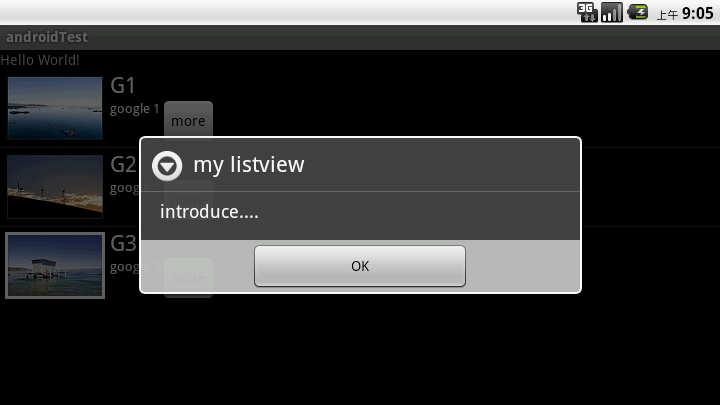
What if we want to add a button to each Item and click on the button to have the corresponding operation?
Then we can rewrite the baseAdapter and look at the code:
package com.shang.test;

import java.util.ArrayList;
import java.util.HashMap;
import java.util.List;

import android.app.Activity;
import android.app.AlertDialog;
import android.content.Context;
import android.content.DialogInterface;
import android.os.Bundle;
import android.view.LayoutInflater;
import android.view.View;
import android.view.View.OnClickListener;
import android.view.ViewGroup;
import android.widget.BaseAdapter;
import android.widget.Button;
import android.widget.ImageView;
import android.widget.ListView;
import android.widget.TextView;

/**
 *
 * @author shangzhenxiang
 *
 */
public class TestBaseAdapter extends Activity {

    private ListView mListView;

    @Override
    protected void onCreate(Bundle savedInstanceState) {
        super.onCreate(savedInstanceState);
        setContentView(R.layout.baseadapterlist);
        mListView = (ListView) findViewById(R.id.baselist);
        mListView.setAdapter(new BaseListAdapter(this));
    }

    private List<HashMap<String, Object>> getData() {
        List<HashMap<String, Object>> maps = new ArrayList<HashMap<String,Object>>();
        HashMap<String, Object> map = new HashMap<String, Object>();
        map.put("image", R.drawable.gallery_photo_1);
        map.put("title", "G1");
        map.put("info", "google 1");
        maps.add(map);

        map = new HashMap<String, Object>();
        map.put("image", R.drawable.gallery_photo_2);
        map.put("title", "G2");
        map.put("info", "google 2");
        maps.add(map);

        map = new HashMap<String, Object>();
        map.put("image", R.drawable.gallery_photo_3);
        map.put("title", "G3");
        map.put("info", "google 3");
        maps.add(map);
        return maps;
    }

    private class BaseListAdapter extends BaseAdapter implements OnClickListener {

        private Context mContext;
        private LayoutInflater inflater;

        public BaseListAdapter(Context mContext) {
            this.mContext = mContext;
            inflater = LayoutInflater.from(mContext);
        }

        @Override
        public int getCount() {
            return getData().size();
        }

        @Override
        public Object getItem(int position) {
            return null;
        }

        @Override
        public long getItemId(int position) {
            return 0;
        }

        @Override
        public View getView(int position, View convertView, ViewGroup parent) {
            ViewHolder viewHolder = null;
            if(convertView == null) {
                viewHolder = new ViewHolder();
                convertView = inflater.inflate(R.layout.testbaseadapter, null);
                viewHolder.img = (ImageView) convertView.findViewById(R.id.img);
                viewHolder.title = (TextView) convertView.findViewById(R.id.title);
                viewHolder.info = (TextView) convertView.findViewById(R.id.info);
                viewHolder.button = (Button) convertView.findViewById(R.id.basebutton);
                convertView.setTag(viewHolder);
            } else {
                viewHolder = (ViewHolder) convertView.getTag();
            }

            System.out.println("viewHolder = " + viewHolder);
            viewHolder.img.setBackgroundResource((Integer) getData().get(position).get("image"));
            viewHolder.title.setText((CharSequence) getData().get(position).get("title"));
            viewHolder.info.setText((CharSequence) getData().get(position).get("info"));
            viewHolder.button.setOnClickListener(this);

            return convertView;
        }

        class ViewHolder {
            ImageView img;
            TextView title;
            TextView info;
            Button button;
        }

        @Override
        public void onClick(View v) {
            int id = v.getId();
            switch(id) {
            case R.id.basebutton:
                showInfo();
                break;
            }
        }

        private void showInfo() {
            new AlertDialog.Builder(TestBaseAdapter.this).setTitle("my listview").setMessage("introduce....").
            setPositiveButton("OK", new DialogInterface.OnClickListener() {

                @Override
                public void onClick(DialogInterface dialog, int which) {
                    // TODO Auto-generated method stub

                }
            }).show();
        }
    }
}
Look at the layout file for item:
<?xml version="1.0" encoding="utf-8"?>
<LinearLayout
  xmlns:android="http://schemas.android.com/apk/res/android"
  android:layout_width="match_parent"
  android:layout_height="match_parent"
  android:orientation="horizontal">
    <ImageView
        android:layout_width="wrap_content"
        android:id="@+id/img"
        android:layout_margin="5px"
        android:layout_height="wrap_content">
        </ImageView>
    <LinearLayout
        android:id="@+id/linearLayout1"
        android:layout_width="wrap_content"
        android:layout_height="wrap_content"
        android:orientation="vertical">
        <TextView
            android:id="@+id/title"
            android:layout_width="wrap_content"
            android:layout_height="wrap_content"
            android:textColor="#ffffff"
            android:textSize="22px"></TextView>
        <TextView
            android:id="@+id/info"
            android:layout_width="wrap_content"
            android:layout_height="wrap_content"
            android:textColor="#ffffff"
            android:textSize="13px"></TextView>
    </LinearLayout>

    <Button
        android:id="@+id/basebutton"
        android:text="more"
        android:focusable="false"
        android:layout_gravity="bottom|right"
        android:layout_height="wrap_content"
        android:layout_width="wrap_content"/>
</LinearLayout>
When listView starts drawing, the system first calls the getCount () function, and draws each line one by one according to the length of the list View that is worth returning (which is why the list length is specially marked in the first graph at the beginning). If your getCount () return value is 0, the list will not show the same return 1, only one line.
If we want to customize the adapter, we need to override the getView method. getView() has three parameters. The position indicates the row to be displayed. The covertView is the layout from the inflate in the layout file. We write a class to describe the components in the layout file, such as ImageView, TextView and so on. Then we judge whether the convertView is empty. If it is empty, we get the layout from the inflate and create a new ViewHolder. Then we get the components in the layout from the convertView. At the same time, we put the ViewHolder in the tag. Next, you don't need to rewrite new, just take it from tag, and set up all the components in the layout. The corresponding value, where the Position corresponds to the position in List containing HashMap.
In the actual operation, you will find that each line of listView has no focus, because Button grabs the focus of listView, so long as the layout file sets Button to no focus, it will be OK.
Look at the operation effect: