The purpose of this paper is as follows.
install
Let's talk about RabbitMQ installation first. It is recommended to use Docker image installation. The advantage of Docker installation is that there are few installation steps, the installation method is the same, and it is not easy to make mistakes, regardless of Windows system or Linux. You can use the following command:
docker run -d --hostname myRabbit --name rabbitmq3.9.11 -e RABBITMQ_DEFAULT_USER=admin -e RABBITMQ_DEFAULT_PASS=admin RABBITMQ_DEFAULT_VHOST=my_vhost -p 15672:15672 -p 5672:5672 rabbitmq3.9.11:management
After installation, you can open a browser to access the management website http://127.0.0.1:15672 , log in with the user name and password set during installation, and you can manage it.
Regardless of the installation method, you can run the examples in this article. In these examples, the user admin is used and the password is admin. If not, you can create it in the administration website:

My is also used in the examples in this article_ Vhost virtual host. If not, you also need to define the following:
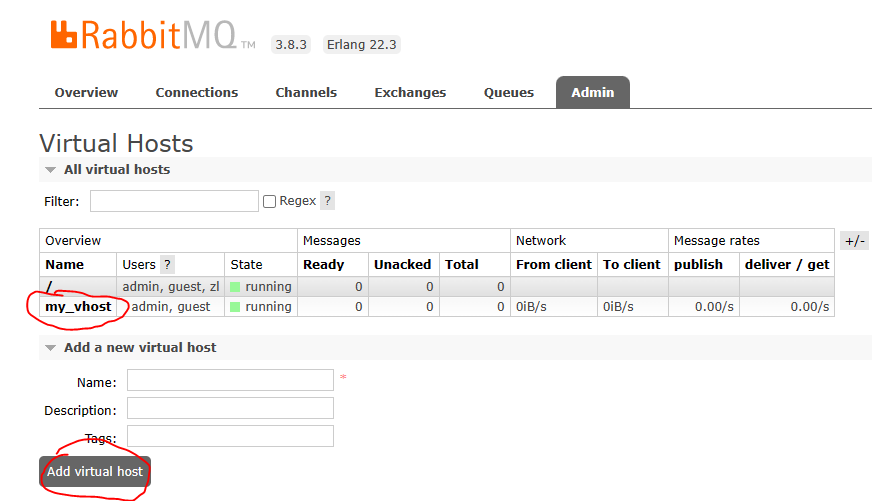
Note that admin needs to have a right to my_ Operation permission of Vhost.
Write message receiver
After the installation is completed, it can be developed. We need producers and consumers to write messages. If there is a problem with any part or RabbitMQ server, it will affect the progress of the work. Therefore, we proceed step by step. First, we write the message acceptance part, that is, the so-called consumer, and conduct joint debugging with the RabbitMQ server. After success, we can proceed to the next step.
Create one first Net 6, which can be created using Visual Studio. If using the command line, the command is as follows:
mkdir DirectReceiveDemo
cd DirectReceiveDemo
dotnet new console
Then install rabbitmq Client package:
dotnet add package rabbitmq.client
Write program The CS code is as follows:
using RabbitMQ.Client;
using System.Text;
using RabbitMQ.Client.Events;

var factory = new ConnectionFactory()
{
    HostName = "127.0.0.1",
    UserName = "admin",
    Password = "admin",
    VirtualHost = "my_vhost"
};
using (var connection = factory.CreateConnection())
using (var channel = connection.CreateModel())
{
    channel.QueueDeclare(queue: "mymessage",
                                  durable: false,
                                  exclusive: false,
                                  autoDelete: false,
                                  arguments: null);
    var consumer = new EventingBasicConsumer(channel);
    consumer.Received += (model, ea) =>
    {
        var body = ea.Body;
        var message = Encoding.UTF8.GetString(body.ToArray());
        Console.WriteLine("Received message {0}", message);
    };
    channel.BasicConsume(queue: "mymessage",
                         autoAck: true,
                         consumer: consumer);

    Console.WriteLine(" Press enter to exit");
    Console.ReadLine();
}
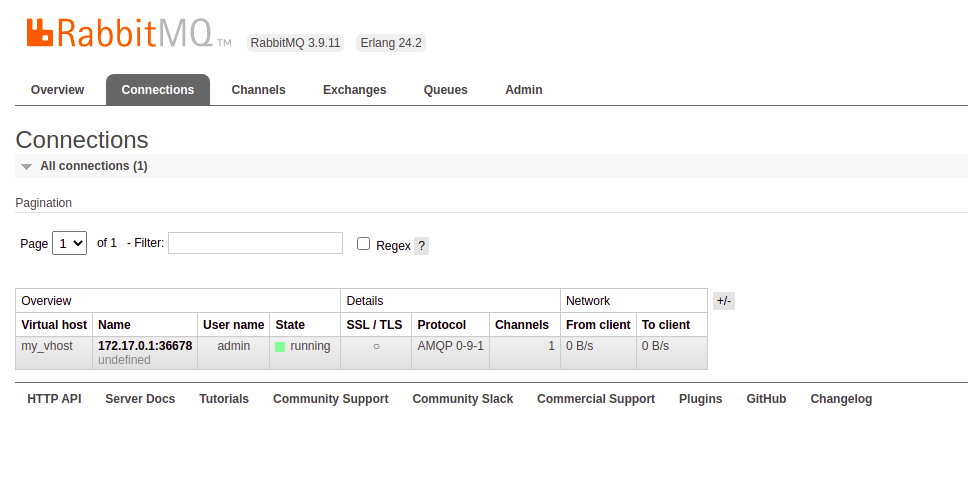
Execute dotnet run to run the code, and the program will always wait for input. At this time, you need to input some message validation programs. Now log in to the administration website http://127.0.0.1:15672/ , using the user name and password set during installation, you can see many new Connections in the Connections page:
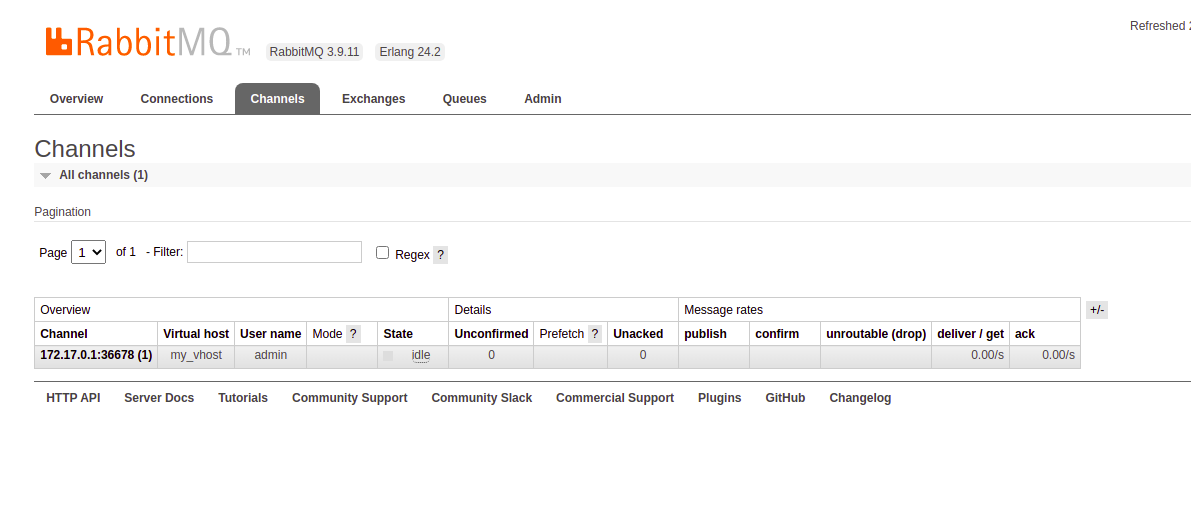
You can see the current Channel in the Channel page:
Enter the Queues page and click my message in the list
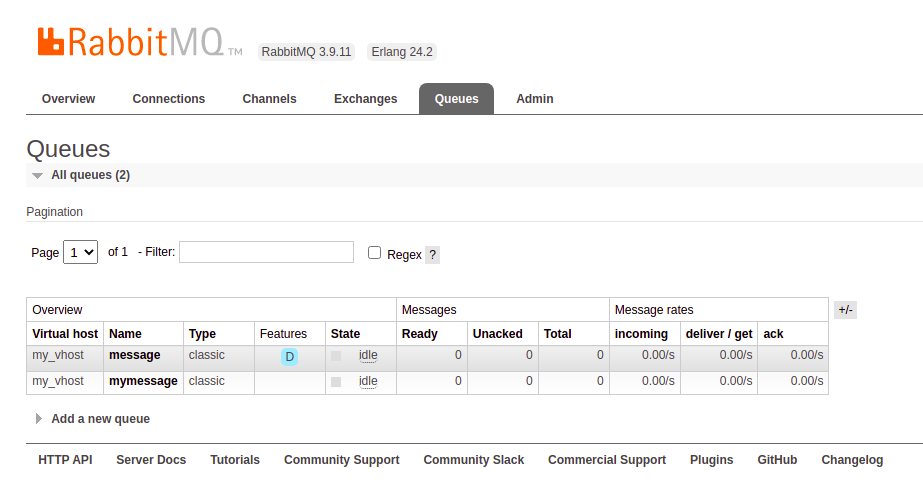
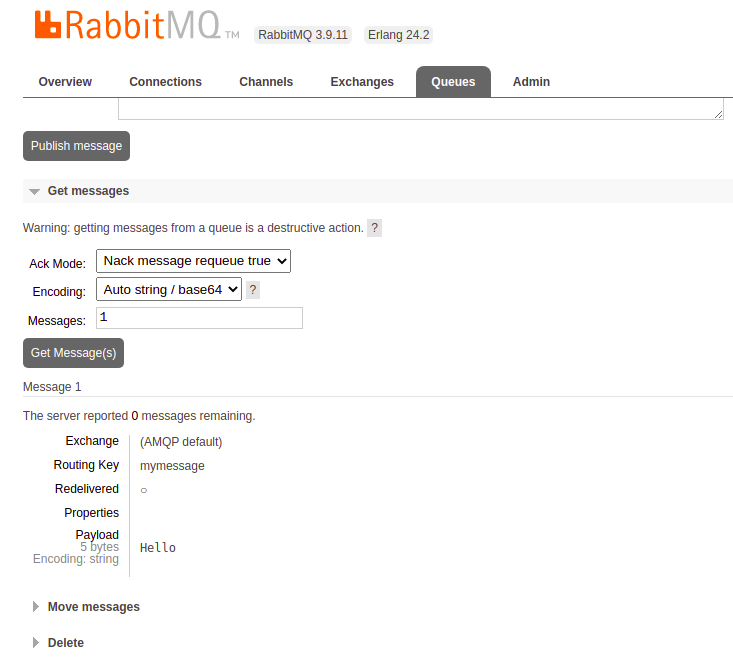
Enter the mymessage queue:
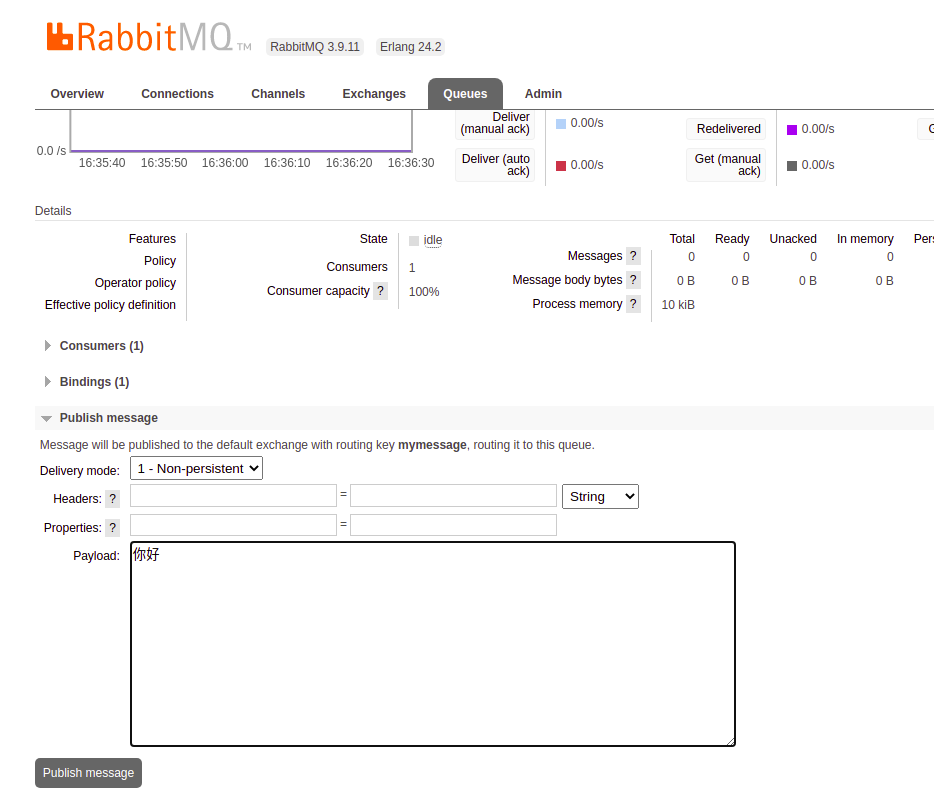
Write some messages in Publish message and send them. Back to the console receiver, the message should have been received.
Here, the receiving part is completed, exit the program, and we begin to write the sending part.
Write sender
The creation process is exactly the same as the receiving part, except that the project name is DirectSendDemo, program The CS code is as follows:
using RabbitMQ.Client;
using System.Text;
var factory = new ConnectionFactory()
{
HostName = "127.0.0.1",
UserName = "admin",
Password = "admin",
VirtualHost = "my_vhost"
};
using (var connection = factory.CreateConnection())
using (var channel = connection.CreateModel())
{
channel.QueueDeclare(queue: "mymessage",
durable: false,
exclusive: false,
autoDelete: false,
arguments: null);
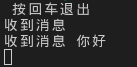
Console.WriteLine("Enter the message to be transmitted, enter Exit sign out");
var message = Console.ReadLine();
while (message != "Exit")
{
var body = Encoding.UTF8.GetBytes(message);
channel.BasicPublish(exchange: "",
routingKey: "mymessage",
basicProperties: null,
body: body);
Console.WriteLine(" send message {0}", message);
message = Console.ReadLine();
}
}
Console.WriteLine("Press enter to exit");
Console.ReadLine();
Run the project, enter some messages,

Return to the management page and execute GetMessage on the mymessage queue page to get the sent message.
Test sender and receiver
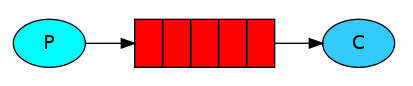
Now we can make the sending and receiving work together. Start the sending and receiving programs at the two terminals to see if they can work together.

Sending and receiving can work together.
Now you can do some tests with these two programs. First, let's look at the situation of one sender and two receivers:

We found that the receiver takes turns to receive messages.
The situation of two senders to one receiver is as follows:

As expected, the receiver will process all messages.
Fanout mode
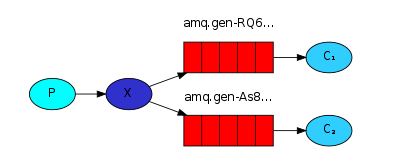
Now we need to deal with the situation that a message has multiple consumers. In this case, Messages need to be sent to the exchange, and then the exchange is bound to the message queue. A switch can bind multiple message queues so that different message consumers can receive messages. We create a new sender FanoutSender to send messages to the exchange:
using RabbitMQ.Client;
using System.Text;


var factory = new ConnectionFactory()
{
    HostName = "127.0.0.1",
    UserName = "admin",
    Password = "admin",
    VirtualHost = "my_vhost"
};
using (var connection = factory.CreateConnection())
using (var channel = connection.CreateModel())
{
    channel.ExchangeDeclare("example.exchange", ExchangeType.Fanout, true, false, null);

    Console.WriteLine("Enter the message to be transmitted, enter Exit sign out");
    var message = Console.ReadLine();
    while (message != "Exit")
    {
        var body = Encoding.UTF8.GetBytes(message);

        channel.BasicPublish(exchange: "example.exchange",
                             routingKey: "",
                             basicProperties: null,
                             body: body);
        Console.WriteLine(" send message {0}", message);
        message = Console.ReadLine();
    }
}

Console.WriteLine("Press enter to exit");
Console.ReadLine();
Then create two receivers, FanoutReceiver1 and FanoutReceiver2, to receive messages from que1 and que2 queues respectively. Both queues are bound to the same switch. The code is as follows:
FanoutReceiver1:
using RabbitMQ.Client;
using System.Text;
using RabbitMQ.Client.Events;


var factory = new ConnectionFactory()
{
    HostName = "127.0.0.1",
    UserName = "admin",
    Password = "admin",
    VirtualHost = "my_vhost"
};
using (var connection = factory.CreateConnection())
using (var channel = connection.CreateModel())
{
    channel.ExchangeDeclare(exchange: "example.exchange",
type: "fanout", durable: true);

    channel.QueueDeclare(queue: "que1",
                         durable: true,
                         exclusive: false,
                         autoDelete: false,
                         arguments: null);
    channel.QueueBind(queue: "que1", exchange: "example.exchange",
routingKey: "");
    var consumer = new EventingBasicConsumer(channel);
    consumer.Received += (model, ea) =>
    {
        var body = ea.Body;
        var message = Encoding.UTF8.GetString(body.ToArray());
        Console.WriteLine("Received message {0}", message);
    };
    channel.BasicConsume(queue: "que1",
                         autoAck: true,
                         consumer: consumer);

    Console.WriteLine(" Press enter to exit");
    Console.ReadLine();
}
FanoutReceiver2:
using RabbitMQ.Client;
using System.Text;
using RabbitMQ.Client.Events;


var factory = new ConnectionFactory()
{
    HostName = "127.0.0.1",
    UserName = "admin",
    Password = "admin",
    VirtualHost = "my_vhost"
};
using (var connection = factory.CreateConnection())
using (var channel = connection.CreateModel())
{
    channel.ExchangeDeclare(exchange: "example.exchange",
type: "fanout", durable: true);

    channel.QueueDeclare(queue: "que2",
                         durable: true,
                         exclusive: false,
                         autoDelete: false,
                         arguments: null);
    channel.QueueBind(queue: "que2", exchange: "example.exchange",
routingKey: "");
    var consumer = new EventingBasicConsumer(channel);
    consumer.Received += (model, ea) =>
    {
        var body = ea.Body;
        var message = Encoding.UTF8.GetString(body.ToArray());
        Console.WriteLine("Received message {0}", message);
    };
    channel.BasicConsume(queue: "que2",
                         autoAck: true,
                         consumer: consumer);

    Console.WriteLine(" Press enter to exit");
    Console.ReadLine();
}
Start the three programs at the same time, and the running results are as follows:

The messages sent are received at the same time.
In this way, we can flexibly expand the message consumers, such as the user reminder function. At present, there are e-mail reminder and SMS reminder. The corresponding two queues are bound to the same switch. If wechat reminder is added, just add another binding queue and corresponding handler.
Direct mode and RouteKey
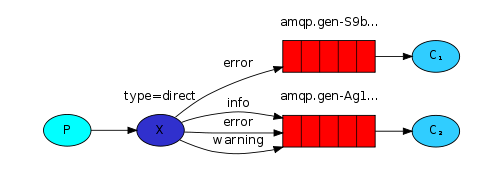
In the Fanout mode, we send messages to all queues that subscribe to messages. If we want to selectively send messages to queues, we can use the Direct mode to send messages to different queues according to different routekeys.
We establish three console programs to simulate one sender and two receivers. The creation method of the project is the same as above, and the code is as follows:
send out:
using RabbitMQ.Client;
using System.Text;


var factory = new ConnectionFactory()
{
    HostName = "127.0.0.1",
    UserName = "admin",
    Password = "admin",
    VirtualHost = "my_vhost"
};
using (var connection = factory.CreateConnection())
using (var channel = connection.CreateModel())
{
    channel.ExchangeDeclare("directdemo.exchange", ExchangeType.Direct, true, false, null);

    Console.WriteLine("Enter the message to be transmitted, enter Exit sign out");
    var message = Console.ReadLine();
    while (message != "Exit")
    {
        Console.WriteLine("input RouteKey");
        var routekey = Console.ReadLine();
        var body = Encoding.UTF8.GetBytes(message);

        channel.BasicPublish(exchange: "directdemo.exchange",
                             routingKey: routekey,
                             basicProperties: null,
                             body: body);
        Console.WriteLine(" send message {0} Routekey {1}", message,routekey);
        message = Console.ReadLine();
    }
}

Console.WriteLine("Press enter to exit");
Console.ReadLine();
Receive 1:
using RabbitMQ.Client;
using System.Text;
using RabbitMQ.Client.Events;


var factory = new ConnectionFactory()
{
    HostName = "127.0.0.1",
    UserName = "admin",
    Password = "admin",
    VirtualHost = "my_vhost"
};
using (var connection = factory.CreateConnection())
using (var channel = connection.CreateModel())
{

    channel.ExchangeDeclare(exchange: "directdemo.exchange",
type: ExchangeType.Direct, durable: true);

    channel.QueueDeclare(queue: "log_que",
                         durable: true,
                         exclusive: false,
                         autoDelete: false,
                         arguments: null);
    channel.QueueBind(queue: "log_que", exchange: "directdemo.exchange",
routingKey: "log");
    var consumer = new EventingBasicConsumer(channel);
    consumer.Received += (model, ea) =>
    {
        var body = ea.Body;
        var message = Encoding.UTF8.GetString(body.ToArray());
        Console.WriteLine("Received message {0}", message);
    };
    channel.BasicConsume(queue: "log_que",
                         autoAck: true,
                         consumer: consumer);

    Console.WriteLine(" Press enter to exit");
    Console.ReadLine();
}
Receive 2:
using RabbitMQ.Client;
using System.Text;
using RabbitMQ.Client.Events;


var factory = new ConnectionFactory()
{
    HostName = "127.0.0.1",
    UserName = "admin",
    Password = "admin",
    VirtualHost = "my_vhost"
};
using (var connection = factory.CreateConnection())
using (var channel = connection.CreateModel())
{

    channel.ExchangeDeclare(exchange: "directdemo.exchange",
type: ExchangeType.Direct, durable: true);

    channel.QueueDeclare(queue: "email_que",
                         durable: true,
                         exclusive: false,
                         autoDelete: false,
                         arguments: null);
    channel.QueueBind(queue: "email_que", exchange: "directdemo.exchange",
routingKey: "email");
    var consumer = new EventingBasicConsumer(channel);
    consumer.Received += (model, ea) =>
    {
        var body = ea.Body;
        var message = Encoding.UTF8.GetString(body.ToArray());
        Console.WriteLine("Received message {0}", message);
    };
    channel.BasicConsume(queue: "email_que",
                         autoAck: true,
                         consumer: consumer);

    Console.WriteLine(" Press enter to exit");
    Console.ReadLine();
}
In the above code, the key is queue binding:
   channel.QueueBind(queue: "email_que", exchange: "directdemo.exchange",
routingKey: "email");
This sentence binds queue, exchange and routingKey together. The operation effect is as follows:

Topic mode
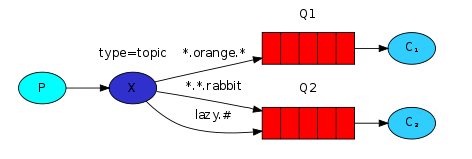
In the previous Direct mode, the RouteKey is fixed. The Topic mode introduces wildcards. The RouteKey can be any string that conforms to the expression.
- The wildcard "*" represents a character
- The wildcard "#" represents 0 or more characters
After careful study of the above rules, you will find that Topic mode can replace Direct and Fanout. If RouteKey is set to "#", the queue can receive any message, which is the same as Fanout mode. If there are no wildcards in RouteKey, it is the same as using Direct mode.
Now we write the sending and receiving of Topic mode. The code is as follows:
Topic mode sending:
using RabbitMQ.Client;
using System.Text;


var factory = new ConnectionFactory()
{
    HostName = "127.0.0.1",
    UserName = "admin",
    Password = "admin",
    VirtualHost = "my_vhost"
};
using (var connection = factory.CreateConnection())
using (var channel = connection.CreateModel())
{
    channel.ExchangeDeclare("topicdemo.exchange", ExchangeType.Topic, true, false, null);

    Console.WriteLine("Enter the message to be transmitted, enter Exit sign out");
    var message = Console.ReadLine();
    while (message != "Exit")
    {
        Console.WriteLine("input RouteKey");
        var routekey = Console.ReadLine();
        var body = Encoding.UTF8.GetBytes(message);

        channel.BasicPublish(exchange: "topicdemo.exchange",
                             routingKey: routekey,
                             basicProperties: null,
                             body: body);
        Console.WriteLine(" send message {0} Routekey {1}", message, routekey);
        message = Console.ReadLine();
    }
}

Console.WriteLine("Press enter to exit");
Console.ReadLine();
Topic mode reception:
using RabbitMQ.Client;
using System.Text;
using RabbitMQ.Client.Events;


var factory = new ConnectionFactory()
{
    HostName = "127.0.0.1",
    UserName = "admin",
    Password = "admin",
    VirtualHost = "my_vhost"
};
using (var connection = factory.CreateConnection())
using (var channel = connection.CreateModel())
{

    channel.ExchangeDeclare(exchange: "topicdemo.exchange",
type: ExchangeType.Topic, durable: true);

    channel.QueueDeclare(queue: "topic_que",
                         durable: true,
                         exclusive: false,
                         autoDelete: false,
                         arguments: null);
    channel.QueueBind(queue: "topic_que", exchange: "topicdemo.exchange",
routingKey: "#.log");
    var consumer = new EventingBasicConsumer(channel);
    consumer.Received += (model, ea) =>
    {
        var body = ea.Body;
        var message = Encoding.UTF8.GetString(body.ToArray());
        Console.WriteLine("Received message {0}", message);
    };
    channel.BasicConsume(queue: "topic_que",
                         autoAck: true,
                         consumer: consumer);

    Console.WriteLine(" Press enter to exit");
    Console.ReadLine();
}
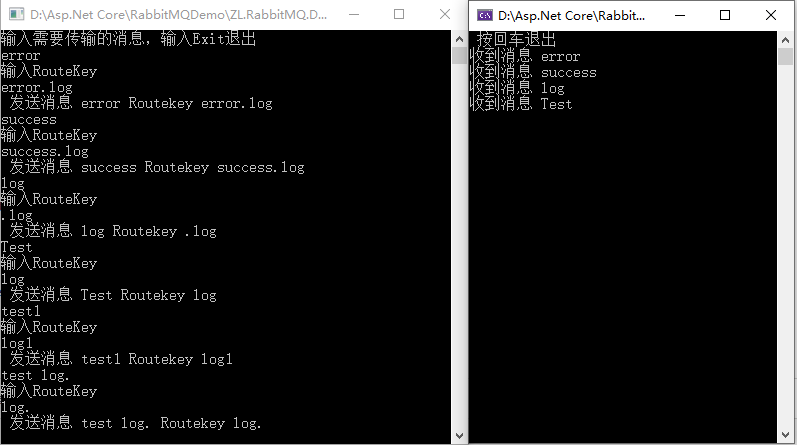
The RouteKey we set is "#. log", that is, the message matching the RouteKey of this expression will be received:
Here, several commonly used modes of RabbitMQ are introduced. Finally, let's talk about the details in the code. There are repeated queue or exchange declarations in the sender's and receiver's codes, such as:
    channel.QueueDeclare(queue: "mymessage",
                                  durable: false,
                                  exclusive: false,
                                  autoDelete: false,
                                  arguments: null);
These codes make people feel a little confused. It seems that they need to be declared every time. In fact, as long as there is a relevant queue or exchange, these codes will no longer work. The reason why these codes are included in both the sender and the receiver is that they do not know whether there is a relevant queue or exchange, and who starts it first to avoid errors. If you manually create the corresponding queue or exchange on the Web management page of RabbitMQ in advance, these codes can be removed.
The code for this article can be downloaded from github: https://github.com/zhenl/ZL.RabbitMQ.Demo