catalogue
Docker container and KVM virtualization
Installation and use of Docker
Use of Vulhub, a vulnerability replication environment based on Docker
Docker container and KVM virtualization
Docker container is an open source application container engine, which allows developers to package their applications and dependency packages into a portable container, and then publish them to any popular Linux machine, or realize virtualization. Docker container is a lightweight, portable, self packaged software packaging technology that enables applications to run in the same way almost anywhere. The container created and tested by developers on their notebooks can run on the virtual machine, physical server or public virtual machine of the production system without any modification. Containers completely use the sandbox mechanism, have no interfaces with each other, have almost no performance overhead, and can easily run in machines and data centers. Most importantly, they do not rely on any language, framework, including systems. In short, a container is a process running in an isolated environment. If the process stops, the container will be destroyed. The isolated environment has its own system files, IP address, host name, etc.
Docker technology introduction: docker provides container resource isolation and security through kernel virtualization technology (namespaces and cgroups cpu, memory, disk io, etc.). Because docker is isolated through virtualization of the operating system layer, the docker container does not need additional operating system overhead similar to virtual machine (VM) to improve resource utilization.
Linux container technology, the difference between container virtualization and kvm Virtualization:
·Container: shared host kernel, running service, less loss, fast startup and high performance
·Container Virtualization: no hardware support is required. There is no need to simulate hardware, share the kernel of the host, and the startup time is seconds (there is no startup process)
·kvm Virtualization: it needs hardware support and analog hardware. It can run different operating systems. The startup time is minutes (startup process)
Advantages of Docker and KVM virtualization
·Docker solves the dependency between software and operating system environment, and enables independent services or applications to get the same running results in different environments. The docker image has its own file system.
·Kvm solves the dependence between hardware and operating system. Kvm has independent virtual disk and xml configuration file.
Installation and use of Docker
Installation of docker
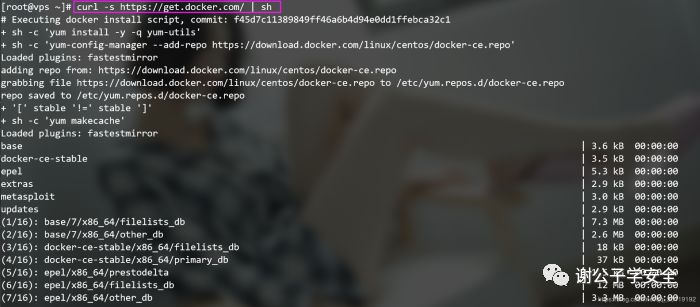
curl -s https://get.docker.com/ | sh # install Docker with one click and run with root privileges.
View Docker version
docker version
Start and stop of docker service
systemctl start docker              #start-up

systemctl stop docker               #Close docker

systemctl restart  docker           #Restart docker service

systemctl daemon-reload             #Daemon restart
docker image management
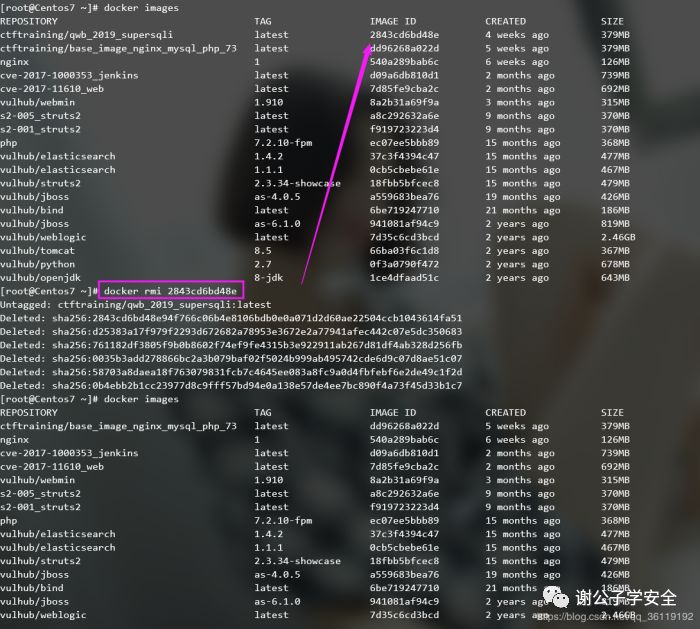
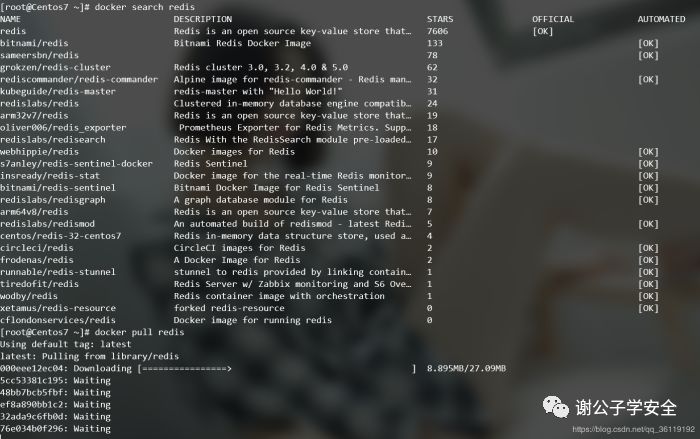
docker images         #View local mirror

docker images -a      #View all mirrors

docker images php     #View the image of the repository named php

docker rmi -f image ID     #Force mirror deletion

docker rmi -f Image name A:tag Image name B:tag    #Delete multiple mirrors

docker rmi -f $(docker images -aq)      #Delete all mirrors

docker save          #Export images, for example: docker image save CentOS > docker-centos7 4.tar. gz

docker load          #Import an image, for example: docker image load - I docker-centos7 4.tar. gz

docker search xx     #Find related images, for example: docker search redis

docker search -s 30 redis     #Find redis images with start greater than 30

docker pull  name:label    #Download it from the found image. The tag defaults to latest. For example, docker pull redis is equivalent to docker pull redis:latest
Start, stop, view and delete of docker container
docker run -d -P --name xxx REPOSITORY:TAG #Boot container based on image
-d:Let the container run in the background
-P:Map the network port used inside the container to the host we use
-p:Custom port mapping, such as -p 8002:80,This means that port 80 of the container is mapped to port 8002 of the host
--name:This parameter is optional and specifies the name of the container
docker ps #Viewing running containers
docker ps –a #View all containers
docker start container ID #Start container
docker stop container ID #Stop container
docker restart container ID #Restart container
docker rm container ID #To delete a container, stop the container before deleting it
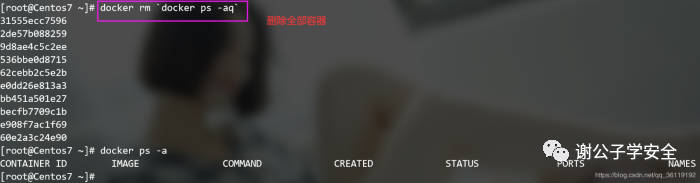
docker rm `docker ps -aq` #Delete all containers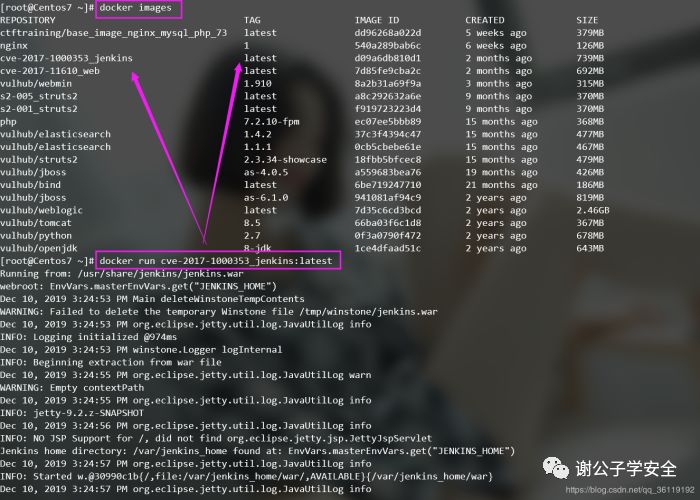
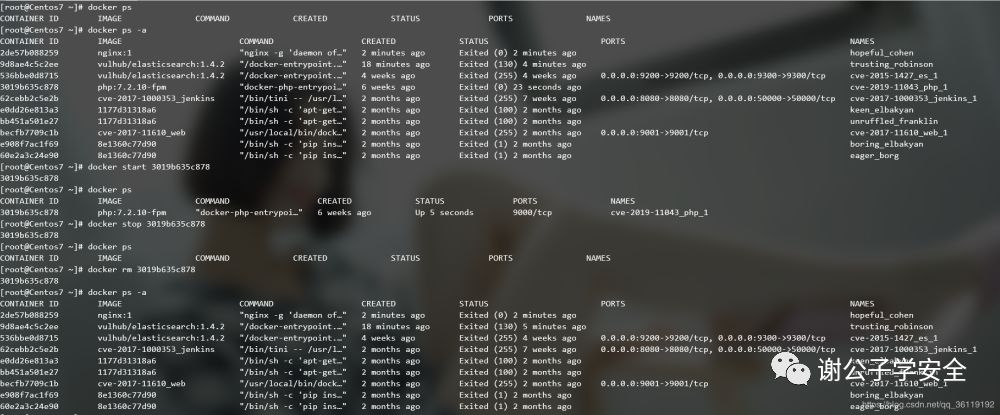
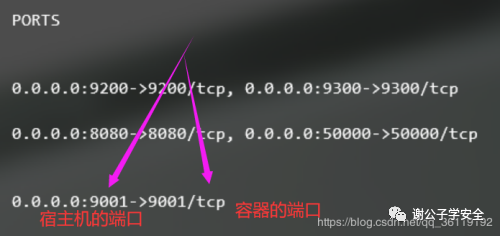
After starting the container, there will be a port mapping here. At this time, we can access the 9001 port of the host machine
Enter the docker container for management
docker exec -it container id Or container name /bin/bash

Import / export container
docker export container ID > /opt/test.tar      #Export the current container image to / opt / test tar

docker import /opt/test.tar              #Import / opt / test Tar to container
View WEB application log
docker logs -f container ID #You can view the standard output inside the container.
View the process of the container
docker top Container name
Configure docker image acceleration
docker defaults to search and pull from abroad, so we need to add a domestic image address here
#Open the file

vim /etc/docker/daemon.json   #Then add the following

{"registry-mirrors": ["https://registry.docker-cn.com"]}
Use of Vulhub, a vulnerability replication environment based on Docker
Use of Vulhub, a vulnerability replication environment based on Docker
Address of vulhub: https://vulhub.org
Vulhub is a collection of vulnerability environments based on docker and docker compose. Entering the corresponding directory and executing a statement can start a new vulnerability environment.
I will not repeat how to install Docker and Docker compose. Directly start the container of the corresponding target.
Start Docker: systemctl start Docker
Enter the corresponding target directory. Here, I select the CVE-2017-10271 vulnerability of weblogic and start it directly with one click: docker compose up - D

After the vulnerability is replicated, the environment is still removed from the vulnerability directory. The command is docker compose down

Reference article: installation and use of Docker container
Docker tutorial | rookie tutorial
Source: childe Xie's blog
Editor in charge: Liang Fen