This content is inspired by Python Programming Quick Start - Automating the tedious work.
Make an exclusive calendar based on the chapter "Processing Excel spreadsheets" in the book.
The module used is openpyxl, a Pyhton module that can read and modify Excel spreadsheets.
Realize automatic processing of table information and get rid of dullness.
In addition, calendar module is used to generate calendar information.
Finally, using openpyxl and calendar libraries, the automatic generation of Aidou calendar is realized.
/ 01/Popularization of Science
Before the code operation, simply learn the relevant knowledge.
An Excel spreadsheet document is called a job.
A job is saved in a file with an extension of ".xlsx".
To highlight, openpyxl supports only the format of the ".xlsx" type.
Therefore, Excel 2003 version ". xls" format is not supported.
Each worksheet can contain multiple tables, also known as worksheets.
The generated information is in one worksheet, 12 worksheets.
Calendar library mainly generates calendar information.
import calendar


# Set the starting date of the week to Sunday


calendar.setfirstweekday(firstweekday=6)


# Return to the 2019 calendar


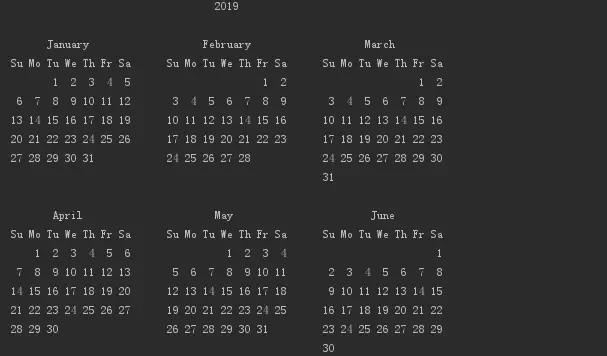
print(calendar.calendar(2019, w=2, l=1, c=6))
The output is as follows.

Return to each column of information in January.
# Return monthly column information

print(calendar.monthcalendar(2019, 1))

# Output results

[[0, 0, 1, 2, 3, 4, 5], [6, 7, 8, 9, 10, 11, 12], [13, 14, 15, 16, 17, 18, 19], [20, 21, 22, 23, 24, 25, 26], [27, 28, 29, 30, 31, 0, 0]]
Comparing with the January information above, you will find that there is an extra number of 0.
The rest is exactly the same, so traversing the list information is done.
/ 02/Aidou Calendar
In fact, the generation of Aidou calendar is quite simple.
Mainly cell text additions, font settings, background settings, image settings.
The detailed code is as follows.
from openpyxl.styles import Alignment, PatternFill, Font
from openpyxl.utils import get_column_letter
from openpyxl.drawing.image import Image
import openpyxl
import calendar

# Set the first day as Sunday

calendar.setfirstweekday(firstweekday=6)

# Create a job

wb = openpyxl.Workbook()

# Traveling for 12 months

for i in range(1, 13):
# Add worksheets
sheet = wb.create_sheet(index=0, title=str(i) + 'month')
# Get the exact date and time
for j in range(len(calendar.monthcalendar(2019, i))):
for k in range(len(calendar.monthcalendar(2019, i)[j])):
value = calendar.monthcalendar(2019, i)[j][k]
# Change 0 to null
if value == 0:
value = ''
sheet.cell(row=j + 9, column=k + 1).value = value
else:
sheet.cell(row=j + 9, column=k + 1).value = value
# Setting fonts
sheet.cell(row=j + 9, column=k + 1).font = Font(u'Microsoft YaHei', size=11)
# Cell Text Settings, Right Alignment, Vertical Centralization
align = Alignment(horizontal='right', vertical='center')
# Cell Fill Color Property Settings
fill = PatternFill("solid", fgColor="B9EBF7")
# Fill cells with color
for k1 in range(1, 100):
for k2 in range(1, 100):
sheet.cell(row=k1, column=k2).fill = fill
# Add Weekly Information Line
days = ['Sunday', 'Monday', 'Tuesday', 'Wednesday', 'Thursday', 'Friday', 'Saturday']
num = 0
for k3 in range(1, 8):
sheet.cell(row=8, column=k3).value = days[num]
sheet.cell(row=8, column=k3).alignment = align
sheet.cell(row=8, column=k3).font = Font(u'Microsoft YaHei', size=11)
# Set column width 12
c_char = get_column_letter(k3)
sheet.column_dimensions[get_column_letter(k3)].width = 12
num += 1
# Set line height 30
for k4 in range(8, 14):
sheet.row_dimensions[k4].height = 30
# merge cell
sheet.merge_cells('I1:P20')
# Add pictures
img = Image('huge_2.jpg')
sheet.add_image(img, 'I1')

# Added year and month
sheet.cell(row=3, column=1).value = '2019 year'
sheet.cell(row=4, column=1).value = str(i) + 'month'
# Setting year and month text properties
sheet.cell(row=3, column=1).font = Font(u'Microsoft YaHei', size=16, bold=True, color='FF7887')
sheet.cell(row=4, column=1).font = Font(u'Microsoft YaHei', size=16, bold=True, color='FF7887')
sheet.cell(row=3, column=1).alignment = align
sheet.cell(row=4, column=1).alignment = align


# Save Documents

wb.save('Aidou Calendar.xlsx')
Python Resource sharing qun 784758214 ,Installation packages are included. PDF,Learning videos, here is Python The gathering place of learners, zero foundation and advanced level are all welcomed.
Finally, let's have a little preview.

Originally, Xiao F's love bean is Huge Song, then who are you?
Don't start yet, make your own love bean calendar.
Because of the time, Little F forgot to change the font color for the columns of Saturdays and Sundays.
When they try, remember to change!!!
/ 03/Summary
The results are as follows.


