Server usage
Remote Connection
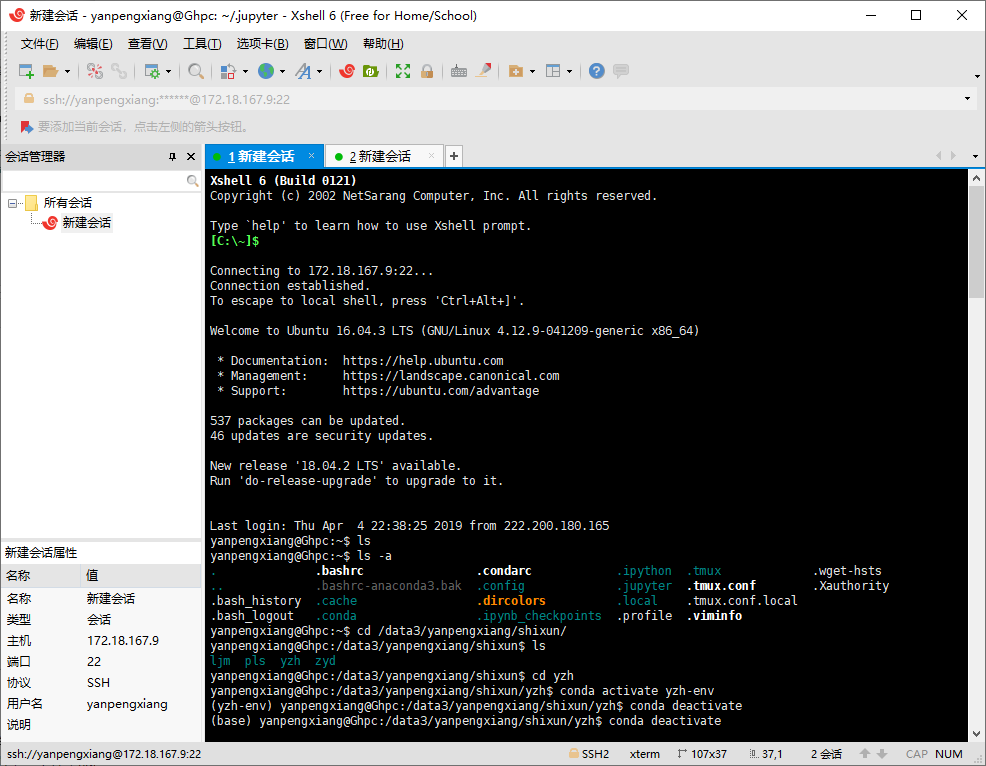
Use XShell to establish SSH connection with server, configure username and password
Environment Configuration
Create your own python environment and clone the base environment directly for convenience
conda create --name yzh-env --clone base
Switch to your environment and install jupyter notebook
conda activate yzh-env
conda install jupyter notebook
Start jupyter notebook
jupyter notebook
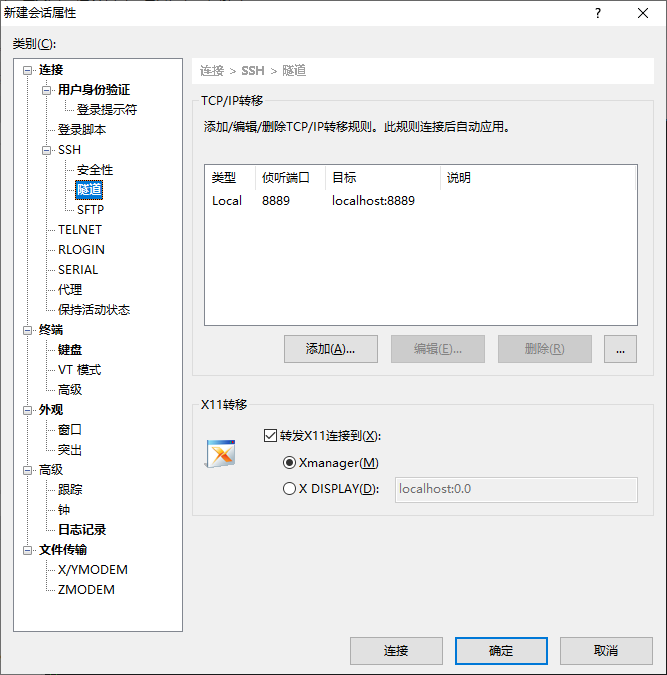
Since the server does not have a browser, you need to map the server port to a local port and access it on your own computer, using XShell's tunneling capabilities
Modify the default working path to open jupyter notebook
jupyter notebook --generate-config
Then open /.jupyter/jupyter_notebook_config.py and find the following text
`## The directory to use for notebooks and kernels.
#c.NotebookApp.notebook_dir = ''
Modify to
`The directory to use for notebooks and kernels.
c.NotebookApp.notebook_dir = '/data3/yanpengxiang/shixun'
Install pytorch
## The -c pytroch suffix of no official website is required, if it is added, it specifies to download from official sources, not from domestic sourcesconda install pytorch torchvision cudatoolkit=9.0
Running effect

Tool use
**Tmux ** can be used to run multiple terminal sessions in a terminal window.In addition, Tmux allows terminal sessions to run in the background or access or disconnect sessions on demand, which is a very useful feature.
Create a session by default, named as a number
tmux
Create a new session named "ccc"
tmux new -s ccc
View all sessions created
tmux ls
Log on to a known session
tmux a -t aaa
Exit session without closing
ctrl+b d
Exit and close the session
ctrl+d
Close Session
tmux kill-session -t bbb
YOLO Network
Download an open source implementation on github, and the author is training on the COCO dataset, so download the coco dataset
git clone https://github.com/ultralytics/yolov3
bash yolov3/data/get_coco_dataset.sh
train
python3 train.py
Testing
python3 detect.py --cfg cfg/yolov3.cfg --weights weights/yolov3.weights
Test mAP
test.py --weights weights/yolov3.weights
Transfer Learning
Use darknet/scripts/voc_label.py to convert the format of VOC dataset to the format needed to train darknet, generate label for each picture, save in / labels folder, and picture in / JPEGImages folder
-
Each picture will have a label file (not needed if there are no objects in the picture)
-
Each row represents an object
-
Each row is formatted as class x_center y_center width height
-
Box coordinates must be standardized between 0-1
-
Class index starts at 0
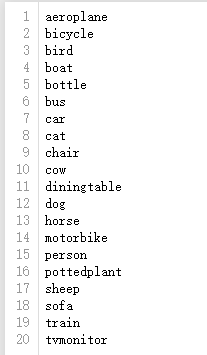
Create a file, data/VOC/voc.names, that writes 20 categories of VOC to a file, one class per line
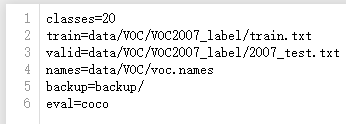
Create a file, data/VOC/voc.data, specify the number of categories, the location of training and test sets, etc.
Modify the network structure and create a new yolov3-voc.cfg.Because there are 255 outputs per YOLO layer (85 outputs per candidate box [4 box coordinates + 1 object confidence + 80 class confidences], there are three candidate boxes).VOC has only 20 classes, so change the number of filter s in the previous YOLO layer to 75 and classes in the YOLO layer to 20.Observing the network structure output, only three YOLO layer gradients are active.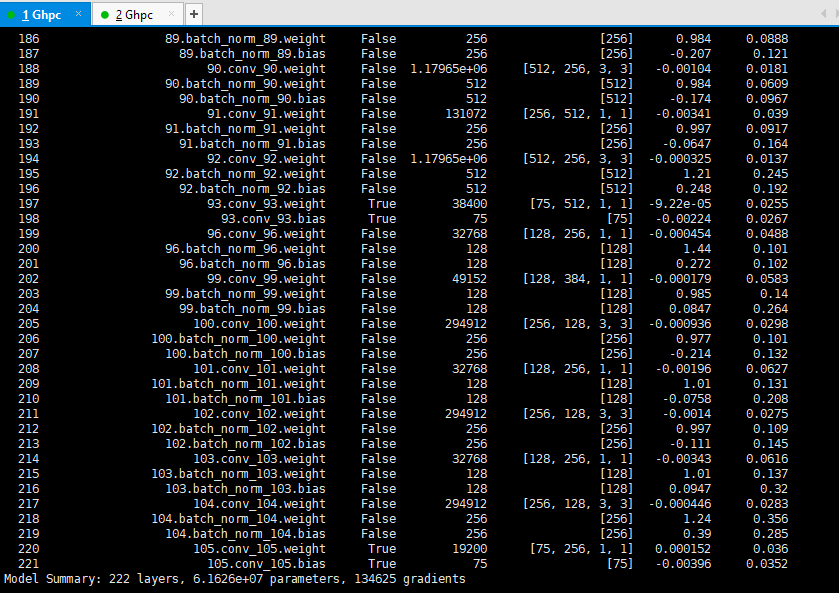
Download the official pre-training weight weights/yolov3.pt to start migration training
python3 train.py --transfer --cfg cfg/yolov3-voc.cfg --data data/VOC/voc.data
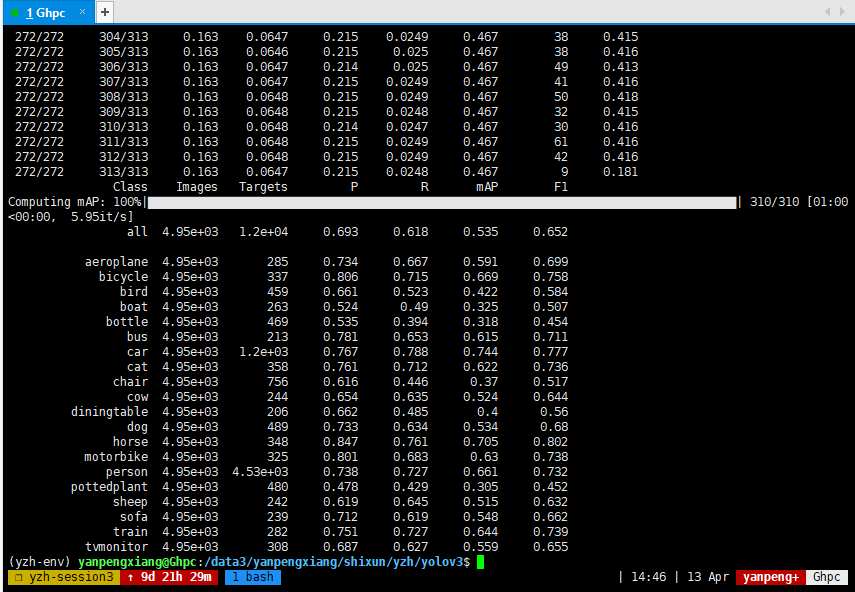
final result
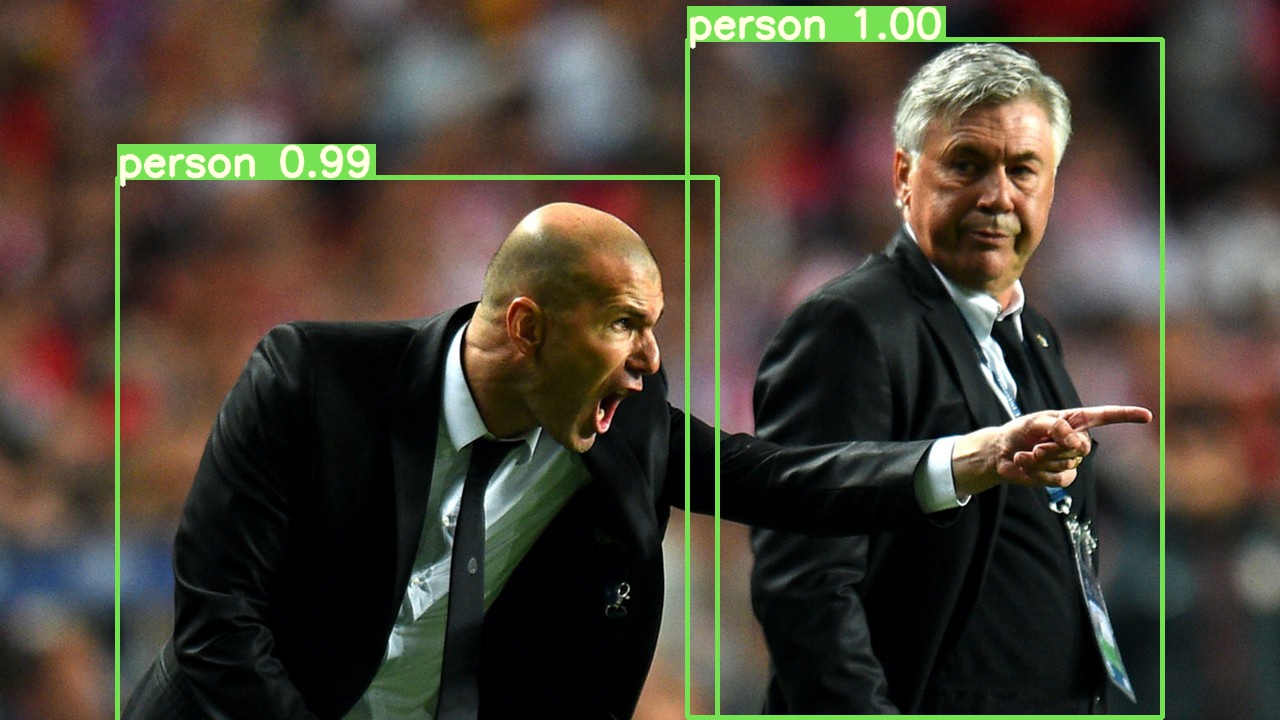
Testing
python3 detect.py --weights weights/latest.pt --cfg cfg/yolov3-voc.cfg --data-cfg data/VOC/voc.data
code analysis
network structure
yolov3.cfg defines the network structure of YOLOv3, which consists of several block s.There are five types of layer s in YOLO.
The first block type is Net, which is not a layer but simply describes the input dimensions of the network and the values of some hyperparameters.
[net]
# Testing
#batch=1
#subdivisions=1
# Training
batch=16
subdivisions=1
width=416
height=416
channels=3
momentum=0.9
decay=0.0005
angle=0
saturation = 1.5
exposure = 1.5
hue=.1

learning_rate=0.001
burn_in=1000
max_batches = 500200
policy=steps
steps=400000,450000
scales=.1,.1
The second type is convolutional, which defines some parameters of the convolution layer, the number of filter s, size, step size, padding, activation function
[convolutional]
batch_normalize=1
filters=32
size=3
stride=1
pad=1
activation=leaky
The third type is shortcut, which is a shortcut connection for ResNet, where from=-3 means that the output of this layer is to add up the output of the previous layer and the output of the third layer forward
[shortcut]
from=-3
activation=linear
The fourth type is upsample, the upper sampling layer, where stride represents the step size and bilinear up sampling is used
[upsample]
stride=2
The fifth type is the route layer, and if the layer parameter is one, the output from that layer will be copied directly, and if two parameters, the output from both layers will be concatenate d in depth
[route]
layers = -4

[route]
layers = -1, 61
The last type is YOLO, which is the detection layer for the network, and anchors describe nine anchors, but only the anchors specified by the mask are used.Since Yolo only generates three box es per cell, but predicts at three different scales, there are three Yolo layers in total, each with a different anchor size.
[yolo]
mask = 3,4,5
anchors = 10,13,  16,30,  33,23,  30,61,  62,45,  59,119,  116,90,  156,198,  373,326
classes=80
num=9
jitter=.3
ignore_thresh = .7
truth_thresh = 1
random=1
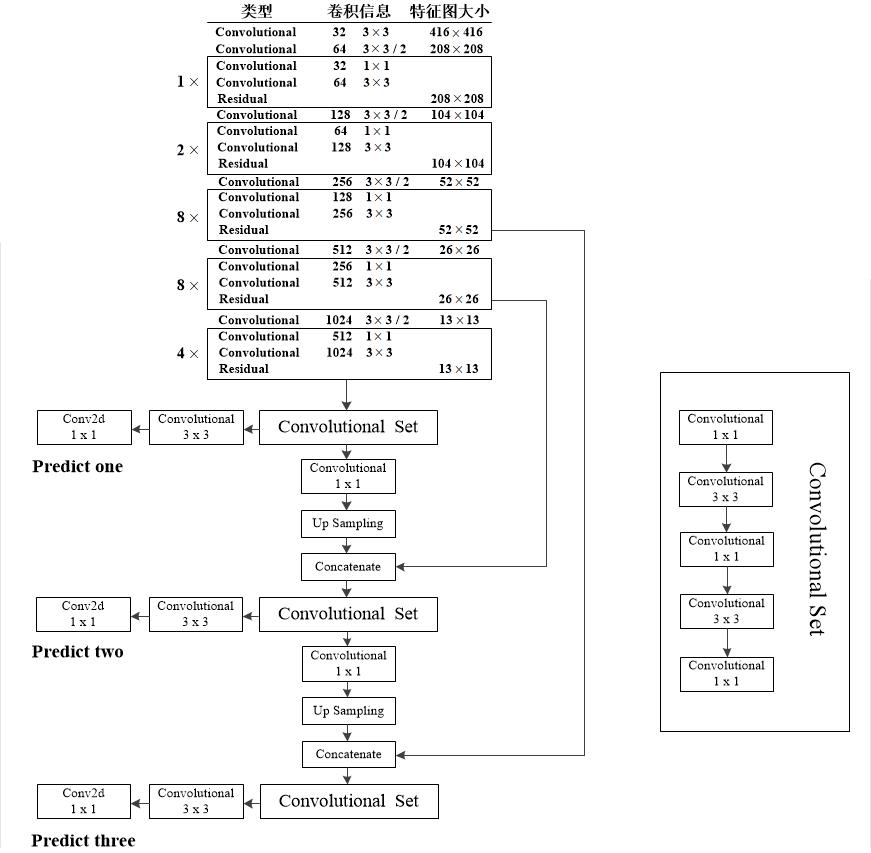
The cfg file is parsed in models.py and combined into a pytorch model for yolov3.The overall structure is as follows: the input size is 416x416, the predicted three feature layer sizes are 52, 26, 13, and the output prediction result is 3(4+1+80)=255 3*(4+1+80)=255 3(4+1+80)=255.
Training code
The training code is in train.py.First set the path of the training set, then create the model, set the learning rate and optimizer.
    # Initialize model
    model = Darknet(cfg, img_size).to(device)

    # Optimizer
    lr0 = 0.001  # initial learning rate
    optimizer = torch.optim.SGD(model.parameters(), lr=lr0, momentum=0.9, weight_decay=0.0005)
    # Set scheduler (reduce lr at epochs 218, 245, i.e. batches 400k, 450k)
    scheduler = torch.optim.lr_scheduler.MultiStepLR(optimizer, milestones=[218, 245], gamma=0.1, last_epoch=start_epoch - 1)
Load the pre-trained Imagenet model on ImageNet.YOLOv3 continues training using pre-trained model parameters (file name: darknet53.conv.74, size 76MB) on Imagenet.
cutoff = load_darknet_weights(model, weights + 'darknet53.conv.74')
Loading datasets
# Configure run
train_path = parse_data_cfg(data_cfg)['train']
# Dataset
dataset = LoadImagesAndLabels(train_path, img_size=img_size, augment=True)
In each iteration, make predictions, calculate loss, and reverse propagate
for i, (imgs, targets, _, _) in enumerate(dataloader):
	imgs = imgs.to(device)
    targets = targets.to(device)
	# Run model
	pred = model(imgs)

	# Build targets
	target_list = build_targets(model, targets)

	# Compute loss
	loss, loss_dict = compute_loss(pred, target_list)

	# Compute gradient
	loss.backward()
Test Code
Test code in test.py
for batch_i, (imgs, targets, paths, shapes) in enumerate(tqdm(dataloader, desc='Computing mAP')):
    targets = targets.to(device)
    imgs = imgs.to(device)
    # Run model
    inf_out, train_out = model(imgs)  # inference and training outputs
    # Build targets
    target_list = build_targets(model, targets)

    # Compute loss
    loss_i, _ = compute_loss(train_out, target_list)
    loss += loss_i.item()
    # Run NMS
    output = non_max_suppression(inf_out, conf_thres=conf_thres, nms_thres=nms_thres)
Calculate ap for each class, average to get mAP
# Compute statistics
stats_np = [np.concatenate(x, 0) for x in list(zip(*stats))]
nt = np.bincount(stats_np[3].astype(np.int64), minlength=nc)  # number of targets per class
if len(stats_np):
    p, r, ap, f1, ap_class = ap_per_class(*stats_np)
    mp, mr, map, mf1 = p.mean(), r.mean(), ap.mean(), f1.mean()
Detection Code
Detection code loads a trained model in detect.py to detect.
    # Initialize model
    model = Darknet(cfg, img_size)

    # Load weights
    if weights.endswith('.pt'):  # pytorch format
        model.load_state_dict(torch.load(weights, map_location=device)['model'])
    else:  # darknet format
        _ = load_darknet_weights(model, weights)

    model.to(device).eval()
For each picture, the input model is output, the category is displayed on the screen, and the detection box is displayed on the picture.
for i, (path, img, im0, vid_cap) in enumerate(dataloader):
    # Get detections
    img = torch.from_numpy(img).unsqueeze(0).to(device)
    pred, _ = model(img)
    detections = non_max_suppression(pred, conf_thres, nms_thres)[0]

    if detections is not None and len(detections) > 0:
        # Rescale boxes from 416 to true image size
        scale_coords(img_size, detections[:, :4], im0.shape).round()

        # Print results to screen
        for c in detections[:, -1].unique():
            n = (detections[:, -1] == c).sum()
            print('%g %ss' % (n, classes[int(c)]), end=', ')

        # Draw bounding boxes and labels of detections
        for *xyxy, conf, cls_conf, cls in detections:
            if save_txt:  # Write to file
                with open(save_path + '.txt', 'a') as file:
                    file.write(('%g ' * 6 + '\n') % (*xyxy, cls, conf))

            # Add bbox to the image
            label = '%s %.2f' % (classes[int(cls)], conf)
            plot_one_box(xyxy, im0, label=label, color=colors[int(cls)])

    print('Done. (%.3fs)' % (time.time() - t))