Use Zipkin -- link tracking in the project
The left part represents the client, which are:
The Zipkin client side requires multiple clients. This article only takes one as an example.
4. Write an interface for mutual calls between services
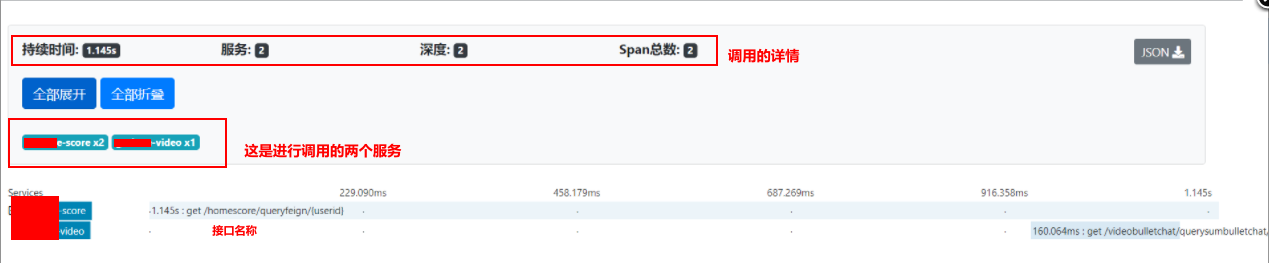
Start the project to see the effect
Start the project and open the browser to access: http://localhost:9412/
You can see the details when there are calls between services
Introduction to zipkin
As the business becomes more and more complex, the system is also split. Especially with the rise of micro service architecture and container technology, seemingly simple applications may be supported by dozens or even hundreds of services in the background; A front-end request may require multiple service calls before it can be completed; When the request becomes slow or unavailable, we can't know which background service caused it. At this time, we need to solve how to quickly locate the service failure point. Zipkin distributed tracking system can solve this problem well.
Basic concepts of zipkin
1.Span: the processing tracking of each service is a span, which can be understood as a basic unit of work.
2.Trace: a set of spans, representing a calling link. Take an example: the existing service A calls the service B and then calls the service C, the link of this A->B->C is a Trace, and each service such as B is a Span. If 2 threads in the service B call D and E respectively, then D and D are the sub nodes. Trace structure indicates the tracking of a request. A request may be processed by several services in the background. The processing of each service is a span. There are dependencies between spans. Trace is the span set of tree structure;
3.Transport: the collected Spans must be transported from the tracked service to Zipkin collector. There are three main transmission modes: HTTP, Kafka and Scribe;
4.Components: Zipkin consists of four components: collector, storage, search and web UI
Operation diagram
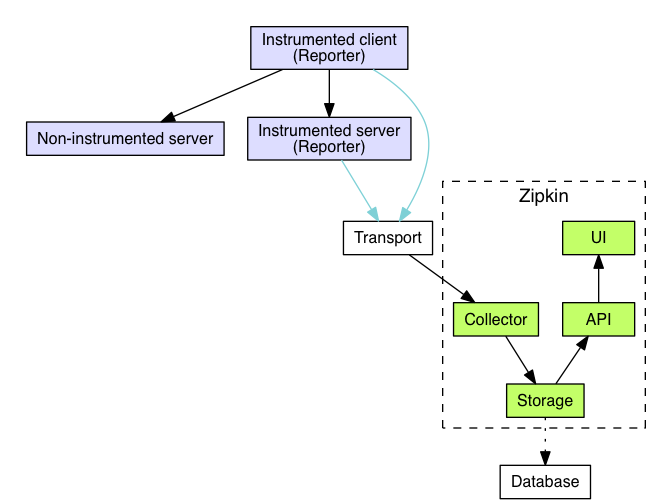
The left part represents the client, which are:
1.InstrumentedClient: Service caller using Zipkin client tool
2. Instrumented server: a service provider using Zipkin client tools
3. Non instrumented server: service providers that do not use Trace tools, of course, there may be callers that do not use tools
Summary: a call link runs through instrumentedclient - > instrumentedserver. Each service will report its own request to the Zipkin server through Transport in the form of Span
The service end of Zipkin is represented in the wireframe on the right, and the functions of each component are as follows:
1.UI: provide a web page to display the call chain and system dependencies in Zipkin
2.Collector: exposed to each client, responsible for receiving call data, and supporting HTTP, MQ, etc
3.Storage: it is responsible for storing data and supporting memory after adapting to each storage, MySQL , ES, etc
4.API: provides an interface for web interface to query stored data
Using Zipkin in a project
Zipkin server side
1. Import dependency
 <dependencies>
        <dependency>
            <groupId>org.springframework.boot</groupId>
            <artifactId>spring-boot-starter</artifactId>
        </dependency>
        <dependency>
            <groupId>org.springframework.boot</groupId>
            <artifactId>spring-boot-starter-web</artifactId>
        </dependency>
        <dependency>
            <groupId>org.springframework.boot</groupId>
            <artifactId>spring-boot-starter-test</artifactId>
            <scope>test</scope>
        </dependency>

        <!--zipkin Dependencies required by the server-->
        <dependency>
            <groupId>io.zipkin.java</groupId>
            <artifactId>zipkin-server</artifactId>
            <version>2.12.3</version>
        </dependency>
        <dependency>
            <groupId>io.zipkin.java</groupId>
            <artifactId>zipkin-autoconfigure-ui</artifactId>
            <version>2.12.3</version>
        </dependency>
    </dependencies>
2. Prepare configuration file
server:
  port: 9412


#Solution to inaccessible zipkin startup error
management:
  metrics:
    web:
      server:
        auto-time-requests: false
3. Create a boot class
/**
 * @Author: Promsing(Zhang Youbo)
 * @Date: 2021/7/23 - 10:33
 * @Description: Zipkin Server of
 * @version:  1.0
 */
@SpringBootApplication
@EnableZipkinServer //zipkin comments
public class ZipkinApplication {
    public static void main(String[] args) {
        SpringApplication.run(ZipkinApplication.class,args);
    }
}
Zipkin client side -- multiple clients are required. This article only takes one as an example.
1. Introduce dependency
 <!--Zipkin Dependence of-->
        <dependency>
            <groupId>org.springframework.cloud</groupId>
            <artifactId>spring-cloud-starter-zipkin</artifactId>
            <version>2.2.1.RELEASE</version>
        </dependency>
2. Prepare configuration file
spring:
  cloud:
  application:
    name: video
  zipkin:
    base-url: http://localhost:9412
3. Create a boot class
@SpringBootApplication
public class VideoApplication {
    public static void main(String[] args) {
        SpringApplication.run(VideoApplication.class,args);
    }
}
4. Write an interface for mutual calls between services
openFeign -- just an example, no business code
@ApiOperation(value = "feign test")
@GetMapping("/queryFeign")
public Result queryFeign(){
     System.out.println("screen adopt Feign Transfer project success");
     return  Result.build(Result.SUCCESS,"query was successful");
}
For other Zipkin client terminals, follow the above four steps
Start the project to see the effect
Start the project and open the browser to access: http://localhost:9412/

You can see the details when there are calls between services