[TOC]
Stateful VS Stateless
Almost all applications need to be authenticated and authorized. For example, user login with account password is an authentication process. After successful login, the system will allow users to access related resources under their account, which is called authorization.The complication is that users have the concept of roles, each role has different privileges, and the process of giving users a role is also an authorization process.
User login state is divided into stateful and stateless modes on the server side. In the era of single distributed architecture, in order to enable Session information to be shared among multiple Tomcat instances, the common solution is to store Session in a cached database.That is, the Session Store in the following figure, which can be either Redis or MemCache, is stateful: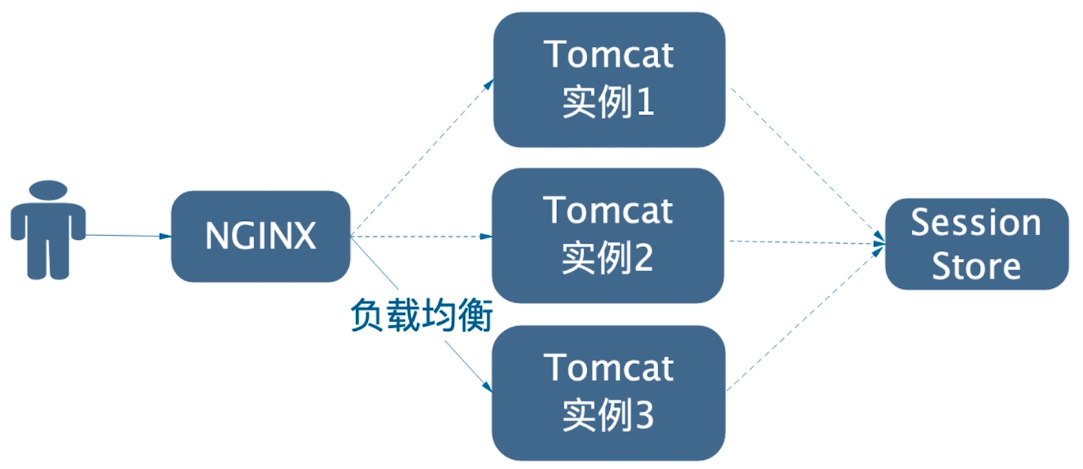
Stateful because the service side needs to maintain and store this Session information, that is, the user's login state is actually maintained on the service side, so the service side can always know the user's login state and have a higher control over the user's Session.The main disadvantage of stateful mode is that on this Session Store, if there is only one node for the service as Session Store, there will be performance bottlenecks when business expansion, user growth, and data migration will be more cumbersome.Of course, you can also choose to increase the nodes, but you just need to invest the corresponding machine costs.
Another stateless mode is that the server side does not record the user's login status, that is, the server side does not maintain a Session.Instead, when the user logs in successfully, a token is issued to the client, and then each request from the client needs to carry the token.The server decrypts the token it carries when the client requests it, verifies that the token is legal and expired, and so on.If the token check succeeds, the user is assumed to be logged in; otherwise, the user is assumed not to be logged in: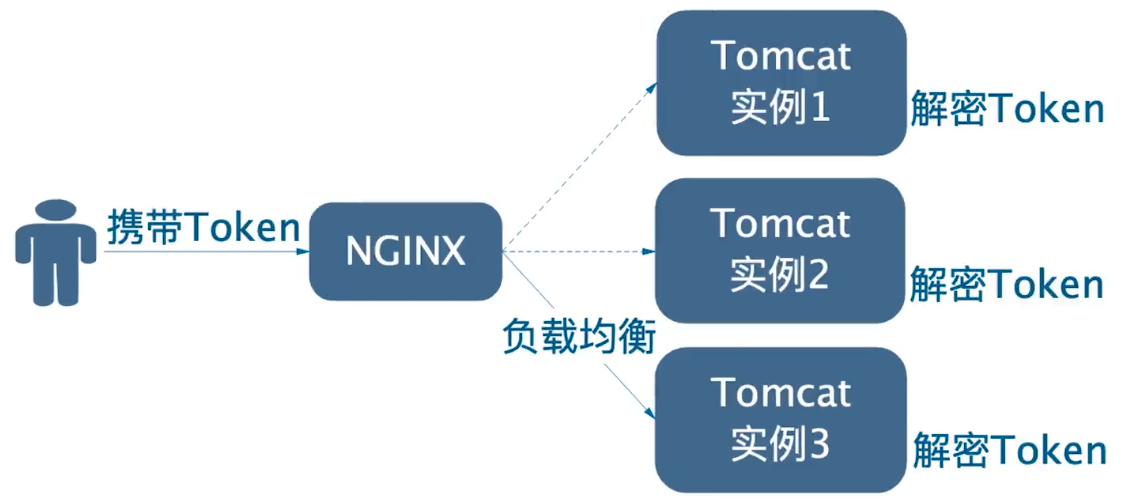
Note: Tokens usually store a user's unique ID. Decrypting tokens is to get the user ID and then cache or query user data in a database.You can also choose to save all user data in token, although there may be security or data consistency issues in this way
A token in stateless mode acts like a session in stateless mode, which is a credential to determine whether a user has a login state.However, in stateless mode, the server does not need to maintain or store a Session anymore, only decrypt and verify the token carried by the client.That is, storage is actually handed over to the client to complete, so the advantage of stateless is to make up for the shortcomings of stateful.However, the disadvantage of Statelessness is obvious because once a token is handed over to the client, the server can no longer control it.For example, it is more difficult to force a user to go offline in a stateless mode.
There are advantages and disadvantages to both stateless and stateless, but current industry trends tend to be more stateless:
| Advantages and disadvantages | Has State | Stateless |
|---|---|---|
| Advantage | Strong server control | Decentralized, no storage, simple, arbitrary scaling |
| shortcoming | There is a center point, and the eggs are placed in a basket, making migration difficult.Service side stores data, which increases service side pressure | Server side control capability is relatively weak |
Microservice Authentication Scheme
There are many micro-service authentication schemes, which need to be customized according to the actual business needs. Here is a brief list of commonly used micro-service authentication schemes in the industry.
1.'Security everywhere'scheme:
The so-called "everywhere security" scheme considers all aspects of microservice authentication, and the mainstream of this scheme is to use OAuth2 protocol for implementation.The advantages of this scheme are good security, but the cost and complexity of implementation are relatively high.In addition, calls between multiple micro-services require passing token s, so multiple authentication occurs with certain performance overhead
OAuth2 represents the implementation framework:
Reference article:
2. External stateless, internal stateful scheme:
This scheme may look fantastic, but it may be used by many companies.In this scenario, the gateway does not store Session, but receives a token and JSESSIONID. The gateway decrypts, verifies the token, and then forwards the JSESSIONID to its proxy microservices, which obtain shared Session from the Session Store via JSESSIONID.As follows: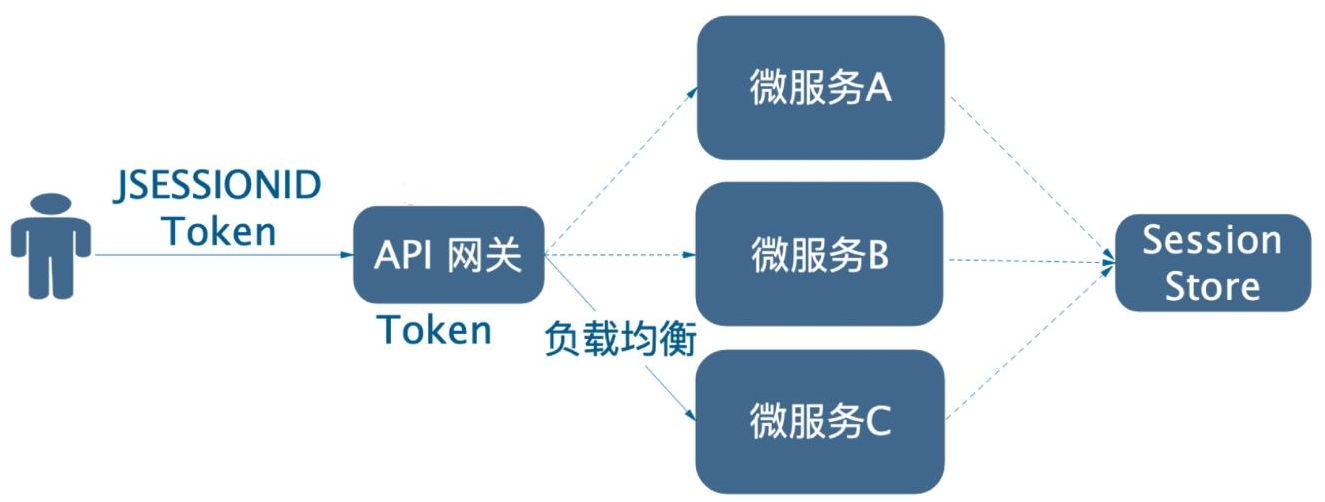
This scenario mainly occurs when the old system architecture is in-house. It can be adopted in order to be compatible with the old system without or without full reconfiguration.Also, the old and new systems can be divided into two pieces. The gateway forwards the token and JSESSIONID to the downstream services, so the stateless system uses token, while the stateful system uses Session, and then slowly reconstructs the old services to achieve a smooth transition.As follows: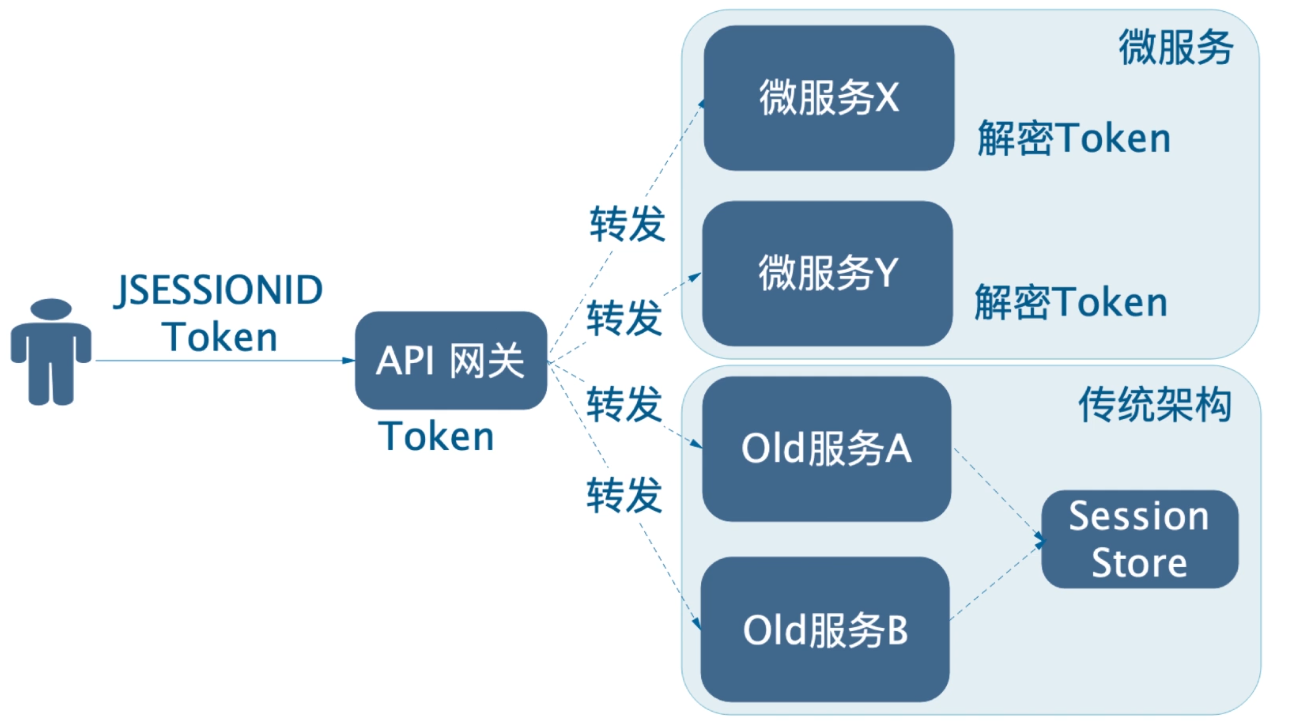
3. "Gateway Authorization, Internal Nude Running" scheme:
Under this scheme, authentication authorization is completed at the gateway, and downstream microservices do not require authentication authorization.After the gateway receives the token carried by the client request, it decrypts and verifies the token, and then forwards the decrypted user information to the downstream microservice.The advantage of this scheme is that it is simple to implement and has good performance. The disadvantage is that once the gateway is cracked, or access to micro-services can cross the gateway, there will be security problems.As follows: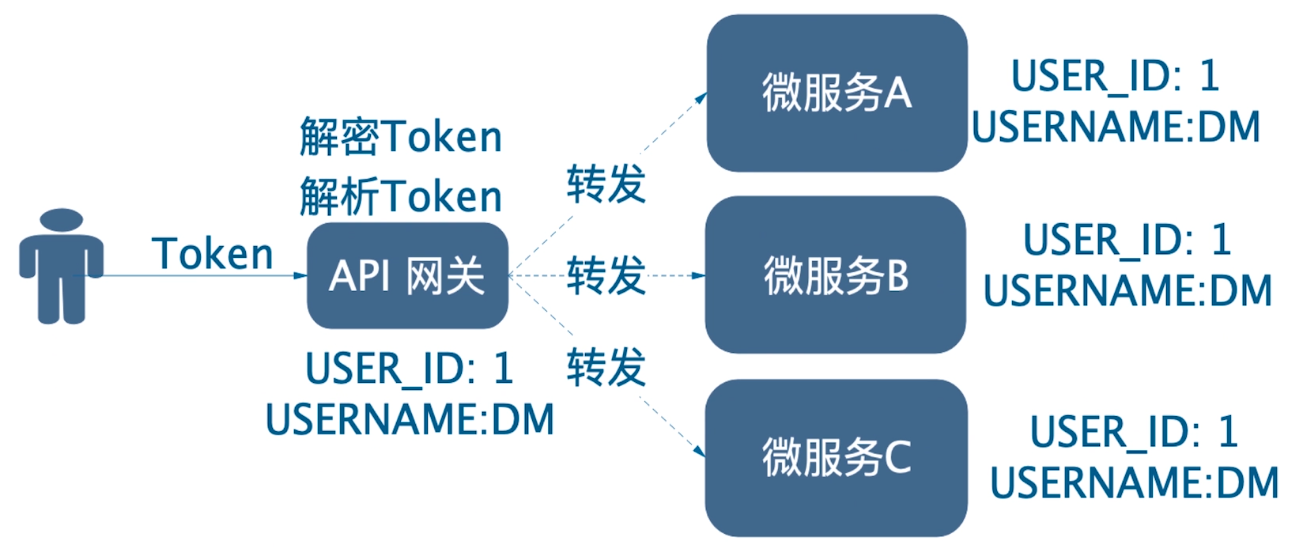
4. "Internal Nude Run" Improvement Program:
The drawbacks of the previous scheme are obvious. We can make some improvements to this scheme, such as introducing a Certification Authorization Center service so that gateways can no longer authenticate and authorize, and token decryption and parsing.The user's login request is forwarded to the Authentication Authority through the gateway to complete the login. After successful login, the Authentication Authority issues token to the client.Each request from the client carries a token, and each microservice needs to decrypt and parse the token to determine the user's login status.The benefit of this improvement is that the gateway no longer pays attention to the business, but simply requests forwarding, which decouples the business to a certain extent and is more secure because each microservice no longer runs naway but needs to verify the token carried in the request.As follows: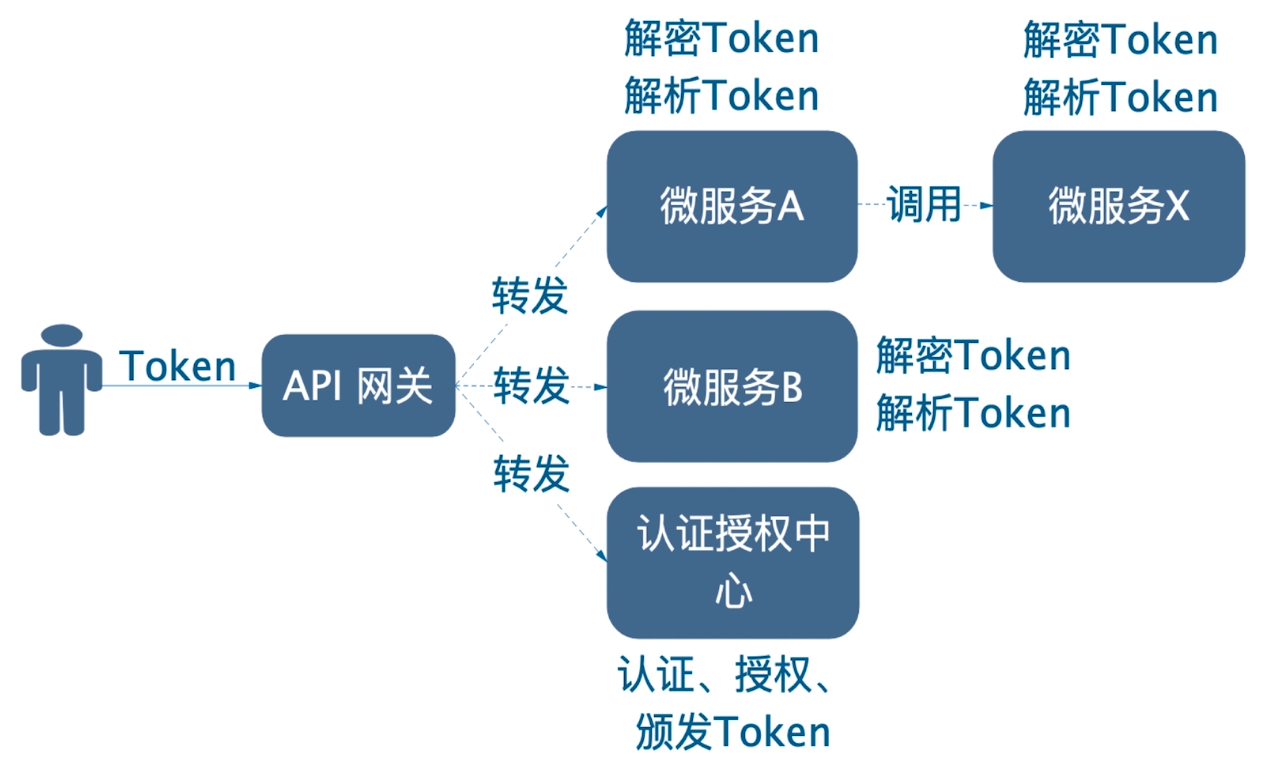
5. Comparison and Selection of Programs:
The common schemes mentioned above are just for the purpose of getting started. No one is absolutely universal.Moreover, in actual development, different variants are often evolved based on business improvement, portfolio, and so learning to be active rather than limited to one option is essential.Here's a brief overview of these options for comparison: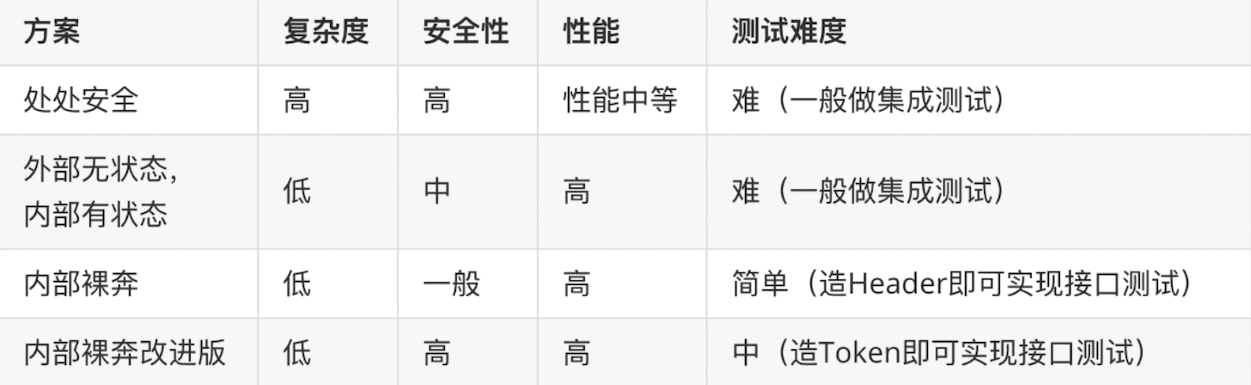
6. Access Control Model
After learning about the common microservice authentication schemes, let's take a brief look at the access control model.The so-called access control refers to what conditions a user needs to satisfy to allow access to a system resource, that is, access rights to control system resources.There are several main access control models:
-
Access Control List (ACL, Access Control List):
A system resource under this model contains a list of privileges that specify which users have what operating privileges.For example, a system resource contains a list of permissions: [Alice: read, write; Bob: read]; that means that Alice has read and write permissions on the resource and Bob has read permissions on the resource.This model is typically used for file systems
-
Role-based access control (RBAC), role-based access control:
That is, users need to associate a predefined role with different roles having their own privilege lists.When a user logs in, he or she only needs to query his or her associated role to find out what permissions the user has.For example, user A has a role named Observer that contains access rights to interface A and B, which means that user A can only access A and interface B.This model is used most in business systems
-
Attribute-based access control (ABAC), attribute-based access control:
In this model, a user accesses a system resource with a set of attribute values, including their own attributes, subject attributes, resource attributes, and environment attributes.The system then dynamically calculates the attributes that the user carries to determine whether the permission to access a resource is satisfied.Attributes are generally classified into four categories: user attributes (such as user age), environment attributes (such as the current time), operation attributes (such as reading), and object attributes.
In order for the system to have permission control, permission rules need to be defined in a specific format under this model, for example: IF user is an administrator; THEN allows read/write operations on sensitive data.In this rule, "Administrator" is the user's role property, while "Read/Write" is the operation property, and "Sensitive Data" is the object property.
ABAC is sometimes referred to as PBAC (Policy-Based Access Control) or CBAC (Claims-Based Access Control, Claims-Based Access Control).Because of the complexity of this model and its lack of usage, k8s also changed to use RBAC model in version 1.8 because ABAC is too complex.
-
Rules-based access control (RBAC), rule-based access control:
In this model, access control is achieved by defining a set of access rules in advance for a system resource, which can be parameters, time, user information, and so on.For example, only allow access from a specific IP address or deny access from a specific IP address
- Time-based access control list (TBACL, time-based access control list):
This model adds the concept of time based on ACL, which allows you to set ACL permissions to take effect at a specific time.For example, if only a system resource is allowed to be accessed externally during the working day, then the valid time of ACL permissions for that resource can be set to the working day time
JWT
As mentioned earlier, in stateless mode, the server side needs to generate a Token to issue to the client. The current mainstream way is to use the standard of JWT to generate a Token, so let's take a brief look at JWT and its use.
Introduction to JWT:
JWT is the abbreviation of JSON Web Token. JWT is actually an open standard (RFC 7519) for securely transferring information between parties. It is currently the most popular cross-domain authentication solution.JWT can be verified and trusted because it is a digital signature.Official website: https://jwt.io/
Composition structure of JWT:
| Form | Effect | Content examples |
|---|---|---|
| Header | Logging Token type, signature algorithm, etc. | {"alg": "HS256", "type": "JWT"} |
| Payload (payload) | Carry some user information, expiration time of Token, etc. | {"user_id": "1", "iat": 1566284273, "exp": 1567493873} |
| Signature | Digital signature generated by signature algorithm to prevent tampering with Token and to ensure its security | WV5Hhymti3OgIjPprLJKJv3aY473vyxMLeM8c7JLxSk |
JWT Formula for Generating Token:
Token = Base64(Header).Base64(Payload).Base64(Signature)
Example: eyJhbGciOiJIUzI1NiJ9.eyJpZCI6IjEiLCJpYXQiOjE1NjYyODIyMjMsImV4cCI6MTU2NzQ5MTgyM30.OtCOFqWMS6ZOzmwCs7NC7hs9u043P-09KbQfZBov97E
The signature is generated using the signature algorithm specified in the Header with the following formula:
Signature = Signature algorithm ((Base64(Header).Base64(Payload), key))
Using JWT:
1. Currently the Java language has several third-party libraries for manipulating JWT, and the lighter jjwt is used as a demonstration here.First add the following dependencies:
<dependency>
  <groupId>io.jsonwebtoken</groupId>
  <artifactId>jjwt-api</artifactId>
  <version>0.10.7</version>
</dependency>
<dependency>
  <groupId>io.jsonwebtoken</groupId>
  <artifactId>jjwt-impl</artifactId>
  <version>0.10.7</version>
  <scope>runtime</scope>
</dependency>
<dependency>
  <groupId>io.jsonwebtoken</groupId>
  <artifactId>jjwt-jackson</artifactId>
  <version>0.10.7</version>
  <scope>runtime</scope>
</dependency>
2. Write a tool class to extract all JWT operations for easy use in the project.The code is as follows:
package com.zj.node.usercenter.util;

import io.jsonwebtoken.*;
import io.jsonwebtoken.security.Keys;
import lombok.RequiredArgsConstructor;
import lombok.extern.slf4j.Slf4j;
import org.springframework.beans.factory.annotation.Value;
import org.springframework.stereotype.Component;

import javax.crypto.SecretKey;
import java.util.Date;
import java.util.Map;

/**
 * JWT Tool class
 *
 * @author 01
 * @date 2019-08-20
 **/
@Slf4j
@Component
@RequiredArgsConstructor
@SuppressWarnings("WeakerAccess")
public class JwtOperator {
    /**
     * Keys
     * - Default 5d1IB9SiWd5tjBx&EMi^031CtigL!6jJ
     */
    @Value("${jwt.secret:5d1IB9SiWd5tjBx&EMi^031CtigL!6jJ}")
    private String secret;
    /**
     * Validity period, in seconds
     * - Default 2 weeks
     */
    @Value("${jwt.expire-time-in-second:1209600}")
    private Long expirationTimeInSecond;

    /**
     * Get claim from token
     *
     * @param token token
     * @return claim
     */
    public Claims getClaimsFromToken(String token) {
        try {
            return Jwts.parser()
                    .setSigningKey(this.secret.getBytes())
                    .parseClaimsJws(token)
                    .getBody();
        } catch (ExpiredJwtException | UnsupportedJwtException |
                MalformedJwtException | IllegalArgumentException e) {
            log.error("token Parsing error", e);
            throw new IllegalArgumentException("Token invalided.");
        }
    }

    /**
     * Get expiration time of token
     *
     * @param token token
     * @return Expiration Time
     */
    public Date getExpirationDateFromToken(String token) {
        return getClaimsFromToken(token)
                .getExpiration();
    }

    /**
     * Determine whether token expires
     *
     * @param token token
     * @return Expired returns true, not false
     */
    private Boolean isTokenExpired(String token) {
        Date expiration = getExpirationDateFromToken(token);
        return expiration.before(new Date());
    }

    /**
     * Calculate token expiration time
     *
     * @return Expiration Time
     */
    private Date getExpirationTime() {
        return new Date(System.currentTimeMillis() + this.expirationTimeInSecond * 1000);
    }

    /**
     * Generate token for specified user
     *
     * @param claims User Information
     * @return token
     */
    public String generateToken(Map<String, Object> claims) {
        Date createdTime = new Date();
        Date expirationTime = this.getExpirationTime();

        byte[] keyBytes = secret.getBytes();
        SecretKey key = Keys.hmacShaKeyFor(keyBytes);

        return Jwts.builder()
                .setClaims(claims)
                .setIssuedAt(createdTime)
                .setExpiration(expirationTime)
                // You can also use your favorite algorithm instead
                // Supported algorithms are detailed at https://github.com/jwtk/jjwt#features
                .signWith(key, SignatureAlgorithm.HS256)
                .compact();
    }

    /**
     * Determine whether token is illegal
     *
     * @param token token
     * @return Returns true if it has not expired, false otherwise
     */
    public Boolean validateToken(String token) {
        return !isTokenExpired(token);
    }
}
3. If the default configuration does not meet the requirements, you can customize it by adding the following configuration in the configuration file:
jwt:
  # Keys
  secret: 5d1IB9SiWd5tjBx&EMi^031CtigL!6jJ
  # jwt validity period, in seconds
  expire-time-in-second: 1209600
4. Once you have completed the above steps, you can use JWT in your project. Here is a more comprehensive test case that you can use with reference to the test case.The code is as follows:
package com.zj.node.usercenter.util;

import io.jsonwebtoken.Claims;
import io.jsonwebtoken.security.SignatureException;
import org.apache.tomcat.util.codec.binary.Base64;
import org.junit.Before;
import org.junit.Test;
import org.junit.runner.RunWith;
import org.springframework.beans.factory.annotation.Autowired;
import org.springframework.boot.test.context.SpringBootTest;
import org.springframework.test.context.junit4.SpringRunner;

import java.util.HashMap;
import java.util.Map;

/**
 * JwtOperator test case
 *
 * @author 01
 * @date 2019-08-20
 **/
@SpringBootTest
@RunWith(SpringRunner.class)
public class JwtOperatorTests {

    @Autowired
    private JwtOperator jwtOperator;

    private String token = "";

    @Before
    public void generateTokenTest() {
        // Set User Information
        Map<String, Object> objectObjectHashMap = new HashMap<>();
        objectObjectHashMap.put("id", "1");

        // Test 1: Generate token
        this.token = jwtOperator.generateToken(objectObjectHashMap);
        // Generates something similar to this string: eyJhbGciOiJIUzI1NiJ9.eyJpZCI6IjEiLCJpYXQiOjE1NjU1ODk4MTcs ImV4cCI6MTU2Njc5OTQN30.27_QgdtTg4SUgxidW6ALHFsZPgCQ4ZYTRmZroKCQ
        System.out.println(this.token);
    }

    @Test
    public void validateTokenTest() {
        // Test 2: Return true if token is legal and has not expired
        Boolean validateToken = jwtOperator.validateToken(this.token);
        System.out.println("token Verification results:" + validateToken);
    }

    @Test
    public void getClaimsFromTokenTest() {
        // Test 3: Decrypt token to get user information
        Claims claims = jwtOperator.getClaimsFromToken(this.token);
        System.out.println(claims);
    }

    @Test
    public void decodeHeaderTest() {
        // Get Header, the first segment of token (bounded by.
        String[] split = this.token.split("\\.");
        String encodedHeader = split[0];

        // Test 4: Decrypt Header
        byte[] header = Base64.decodeBase64(encodedHeader.getBytes());
        System.out.println(new String(header));
    }

    @Test
    public void decodePayloadTest() {
        // Get Payload, the second segment of token (bounded by.
        String[] split = this.token.split("\\.");
        String encodedPayload = split[1];

        // Test 5: Decrypt Payload
        byte[] payload = Base64.decodeBase64(encodedPayload.getBytes());
        System.out.println(new String(payload));
    }

    @Test(expected = SignatureException.class)
    public void validateErrorTokenTest() {
        try {
            // Test 6: Tamper with the original token, so an exception is reported indicating that the JWT is secure
            jwtOperator.validateToken(this.token + "xx");
        } catch (SignatureException e) {
            e.printStackTrace();
            throw e;
        }
    }
}
If you want to know about various types of JWT libraries, you can refer to the following articles:
Authentication Authorization Using JWT
After learning about JWT, let's implement a Certification Authorization Demo using JWT. First, define a DTO with the following structure:
@Data
@Builder
@NoArgsConstructor
@AllArgsConstructor
public class LoginRespDTO {
    /**
     * Nickname?
     */
    private String userName;

    /**
     * token
     */
    private String token;

    /**
     * Expiration Time
     */
    private Long expirationTime;
}
Then write a Service that provides methods for simulated Login and simulated check of user login status.The code is as follows:
@Slf4j
@Service
@RequiredArgsConstructor
public class UserService {

    private final JwtOperator jwtOperator;

    /**
     * Simulate user login
     */
    public LoginRespDTO login(String userName, String password) {
        String defPassword = "123456";
        if (!defPassword.equals(password)) {
            return null;
        }

        // Password validation passed token issuance
        Map<String, Object> userInfo = new HashMap<>();
        userInfo.put("userName", userName);
        String token = jwtOperator.generateToken(userInfo);

        return LoginRespDTO.builder()
                .userName(userName)
                .token(token)
                .expirationTime(jwtOperator.getExpirationDateFromToken(token).getTime())
                .build();
    }

    /**
     * Simulated login verification
     */
    public String checkLoginState(String token) {
        if (jwtOperator.validateToken(token)) {
            Claims claims = jwtOperator.getClaimsFromToken(token);
            String userName = claims.get("userName").toString();

            return String.format("user %s Logon state validation passed for access", userName);
        }

        return "Login verification failed. token Invalid or expired";
    }
}
Next comes the Controller layer, which opens the corresponding Web interface.The code is as follows:
@Slf4j
@RestController
@RequestMapping("/users")
@RequiredArgsConstructor
public class UserController {

    private final UserService userService;

    @PostMapping("/login")
    public LoginRespDTO login(@RequestParam("userName") String userName,
                              @RequestParam("password") String password) {
        return userService.login(userName, password);
    }

    @GetMapping("/checkLoginState")
    public String checkLoginState(@RequestParam("token") String token) {
        return userService.checkLoginState(token);
    }
}
The user logged in successfully and returned Token and basic user information: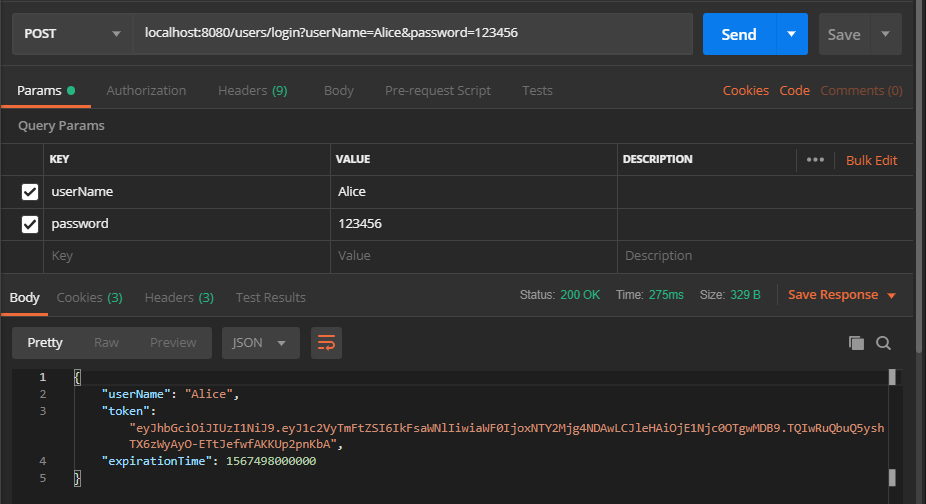
Verify login status: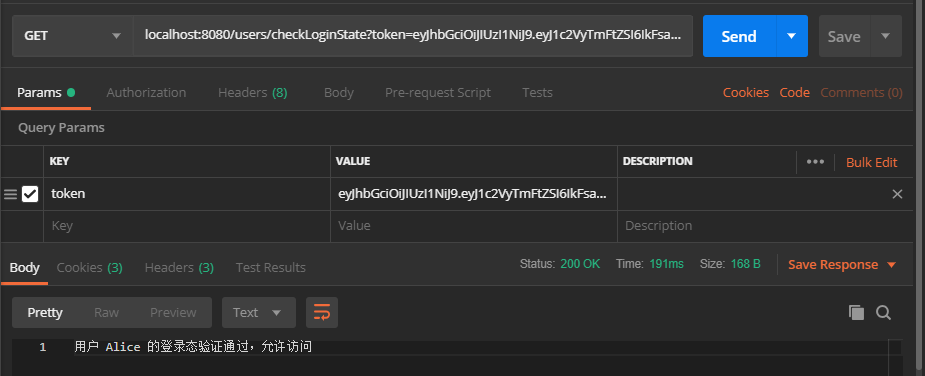
Tips:
This section is just a minimal example of how to use JWT to issue a Token to clients after a successful user login and verify the user's login status with Token, so that you can expand on the scheme mentioned earlier.Typically, after Token is issued to the client, the client passes Token in the HTTP Header in subsequent requests, not in the parameter passed in the example.The same is true for Token delivery between microservices, where a microservice needs to put a Token in the HTTP Header of this request before making a request to another microservice.In addition, the logic to validate Token is typically placed in a global filter or interceptor so that validation logic does not need to be written once for each interface.