Automated build with Jenkins
The microservice architecture design of a large platform usually produces many projects, so many services and applications need to be deployed, and need to be iterated and updated constantly. This is a huge project, so we need to use automation tools to realize the CICD workflow of each microservice project.
CICD is the general term of Continuous Integration and Continuous Deployment. It refers to the rapid delivery process of reusable software products through automated construction, testing and deployment.
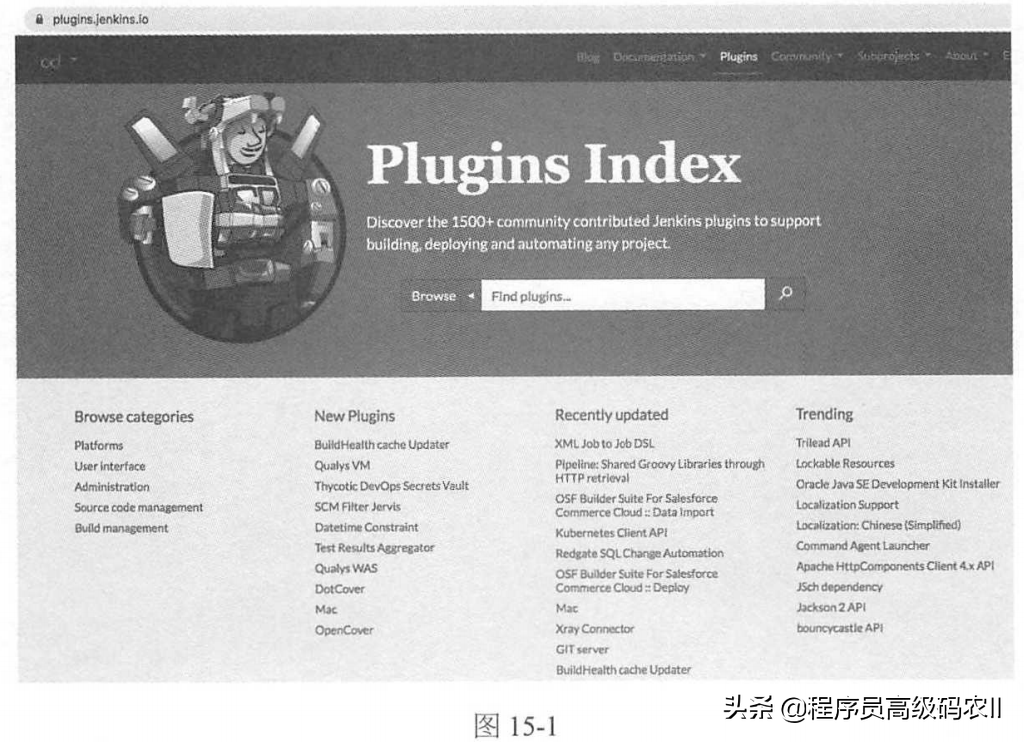
Jenkins is a powerful automatic construction tool developed based on Java, and has a very rich plug-in warehouse, which can well expand and enrich its own functions. Therefore, Jenkins is a good tool for automatic construction.
Click the Plugins option on the Jenkins home page to view the introduction of various plug-ins, as shown in Figure 15-1.
In this chapter, we use Jenkins, Maven, Docker, Selenium, JMeter and other tools to establish an automation facility for sustainable delivery.
Continuous delivery workflow
Starting from code submission, establish a continuous delivery workflow including automatic testing and automatic deployment, as shown in Figure 15-2.
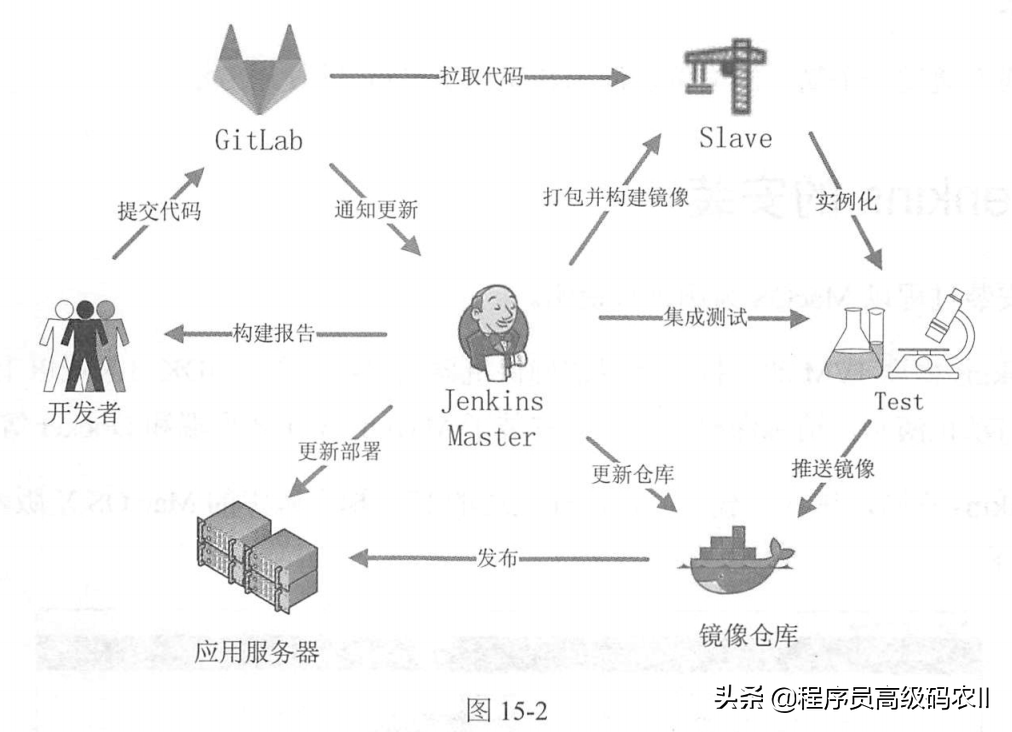
The steps of this workflow are as follows:
(1) Developers submit code to GitLab.
(2)GitLab uses WebHook to notify Jenkins of code updates.
(3)Jenkins pulls the code from the Slave, packages it, and builds the image.
(4) Jenkins runs test cases using images built from nodes.
(5) If the Test passes, the image is pushed to the image warehouse.
(6) Jenkins performs update deployment on the application server.
(7) Jenkins will email the developer the build report.
After the developer submits the code to the code base, the whole process is automatic. If an error occurs in an intermediate link, the execution of the process will be suspended and the results will be notified to relevant personnel. The submitted code includes not only the application, but also the script for building the image, the script for the test case and the deployment orchestration script.
Among them, the operation of each step can be completed by using plug-ins or various tools directly on the command line.
For example, Git plug-in will be used to pull project code; Maven will be used for packaging projects; To build images and deploy applications, you can use Docker or Docker compose directly from the command line; Integration test can execute scripts generated by Selenium, JMeter, etc. through the command line.
Next, we demonstrate and illustrate the use of Jenkins through a simple case.
Jenkins installation
The following installation process takes MacOS as an example.
Because Jenkins needs JVM support, please ensure that JDK 1.8 or above is installed on the machine. In order to complete the following automation demonstration, please ensure that Maven, Git client and Docker are installed in the machine.
Open the Jenkins official website, enter the download page, and select the Mac OSX version in the LTS stable version on the left to download, as shown in Figure 15-3.
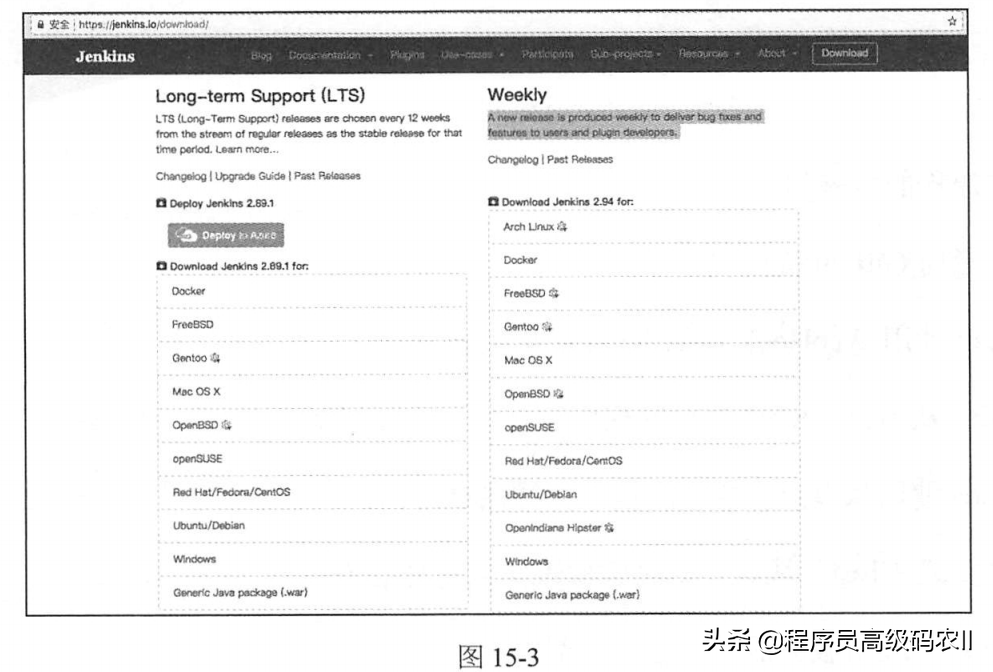
After downloading, click the installation package "jenkins-2.89.1.pkg" to start the installation.
The installation process is relatively simple. Just click continue and follow the prompts to use the plug-ins recommended by the system. After installation, open the local Jenkins console through the following website:
http://localhost:8080
After opening it for the first time, you will see the page shown in figure 15-4.
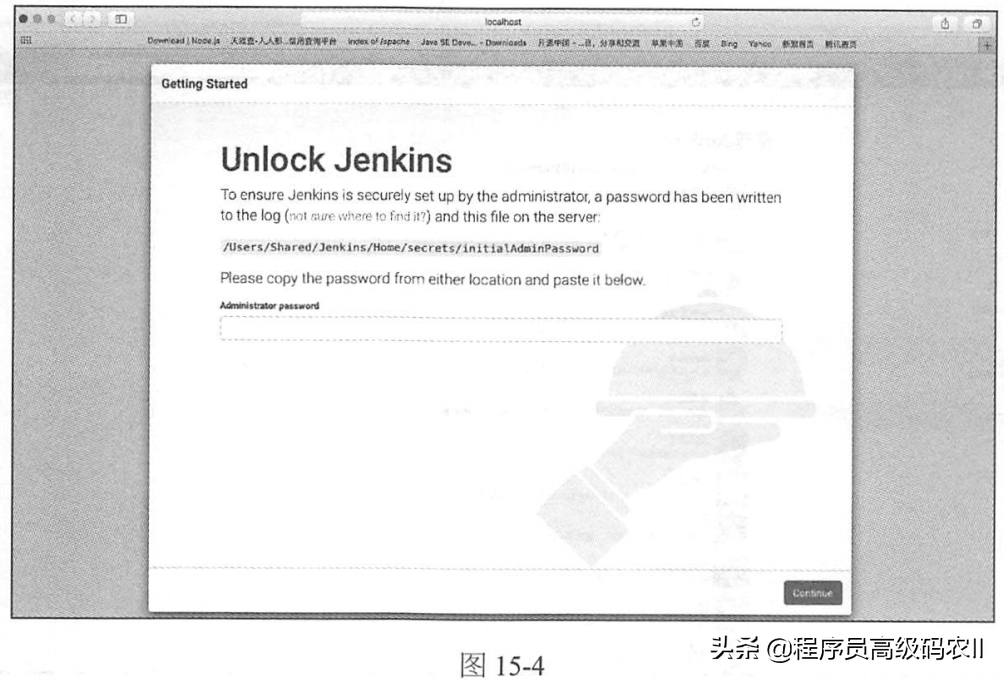
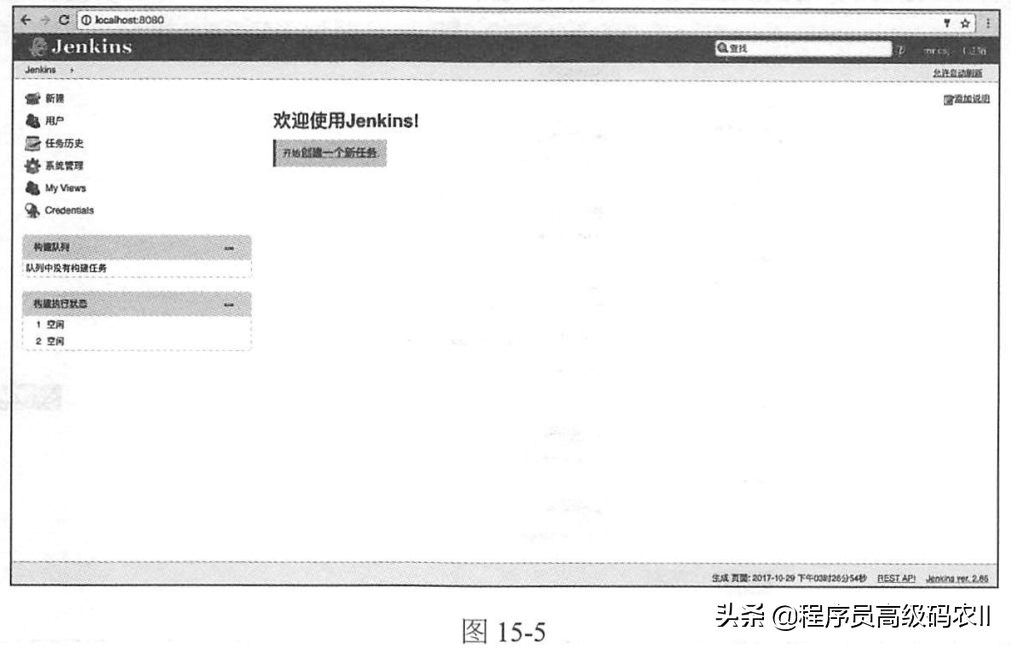
Open the administrator password file as prompted in figure 15-4, copy and paste the password into the password input box, and click the Continue button in the lower right corner. If the password is verified successfully, the reader is prompted to create an operator user. After creating the user, you can log in to the Jenkins console. The welcome interface for new user login is shown in figure 15-5.
Basic configuration of Jenkins
Because Maven compilation and packaging are required, click the "system management" → "global tool configuration" option in the welcome interface, as shown in figure 15-6, to open the "global tool configuration" dialog box.
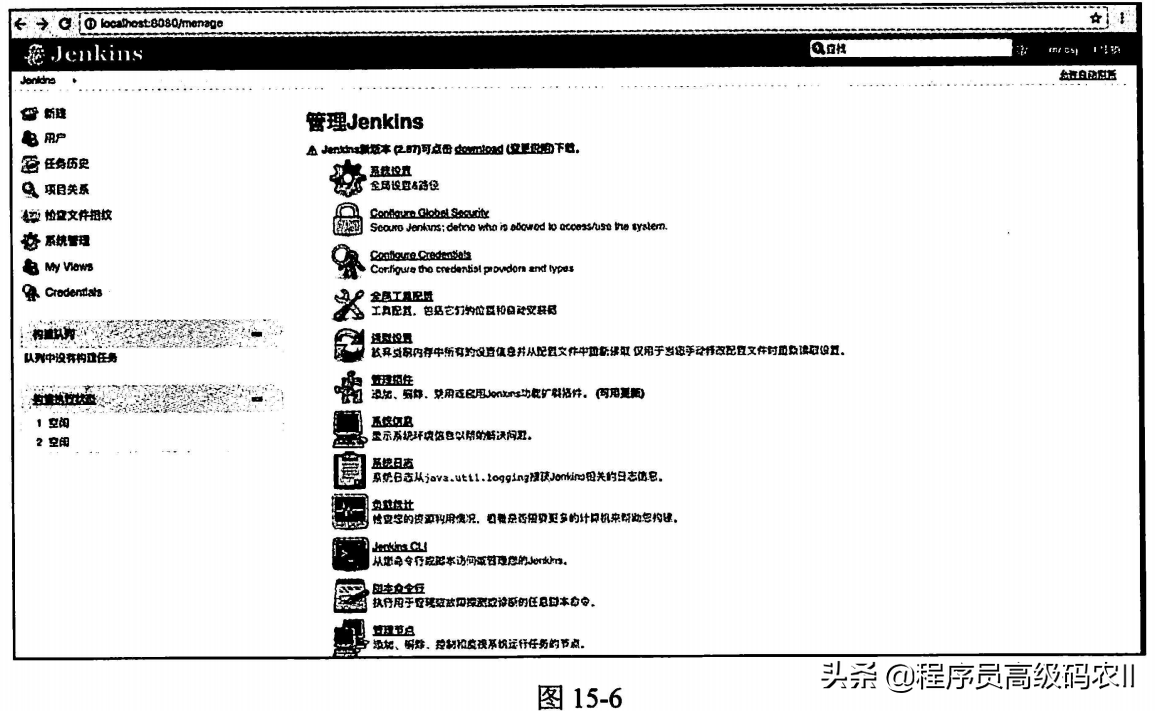
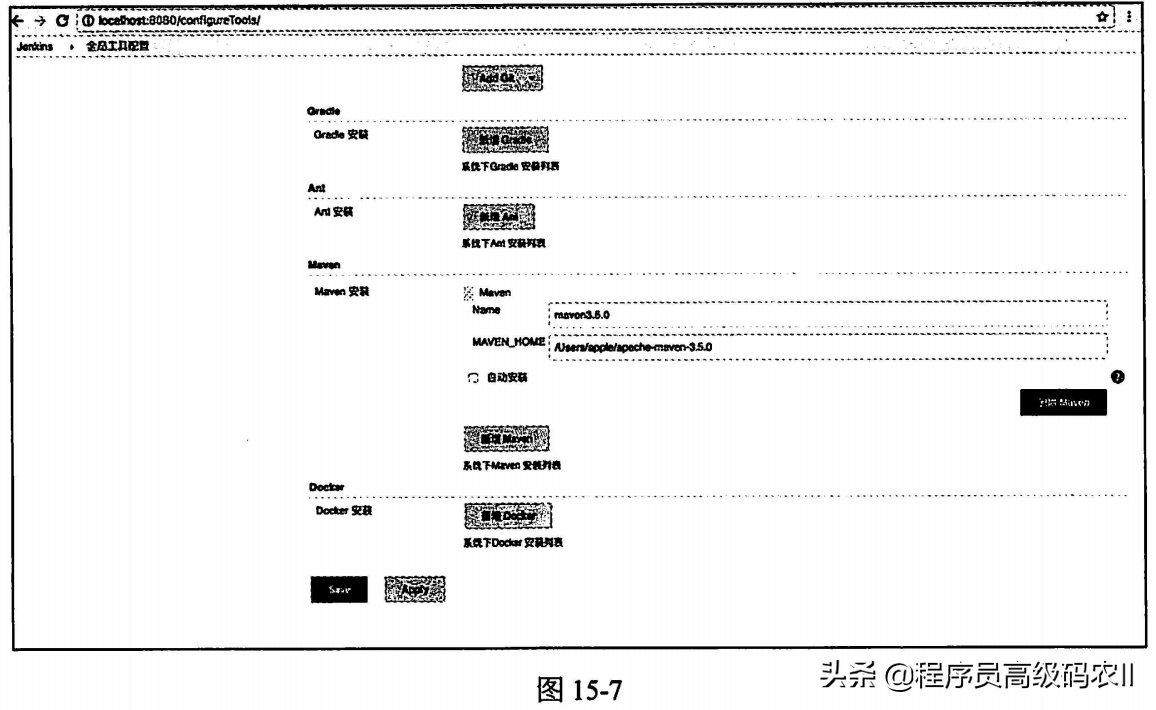
Click the Maven installation option in the global tool configuration dialog box, configure a name, and set the Maven installation path, as shown in figure 15-7.
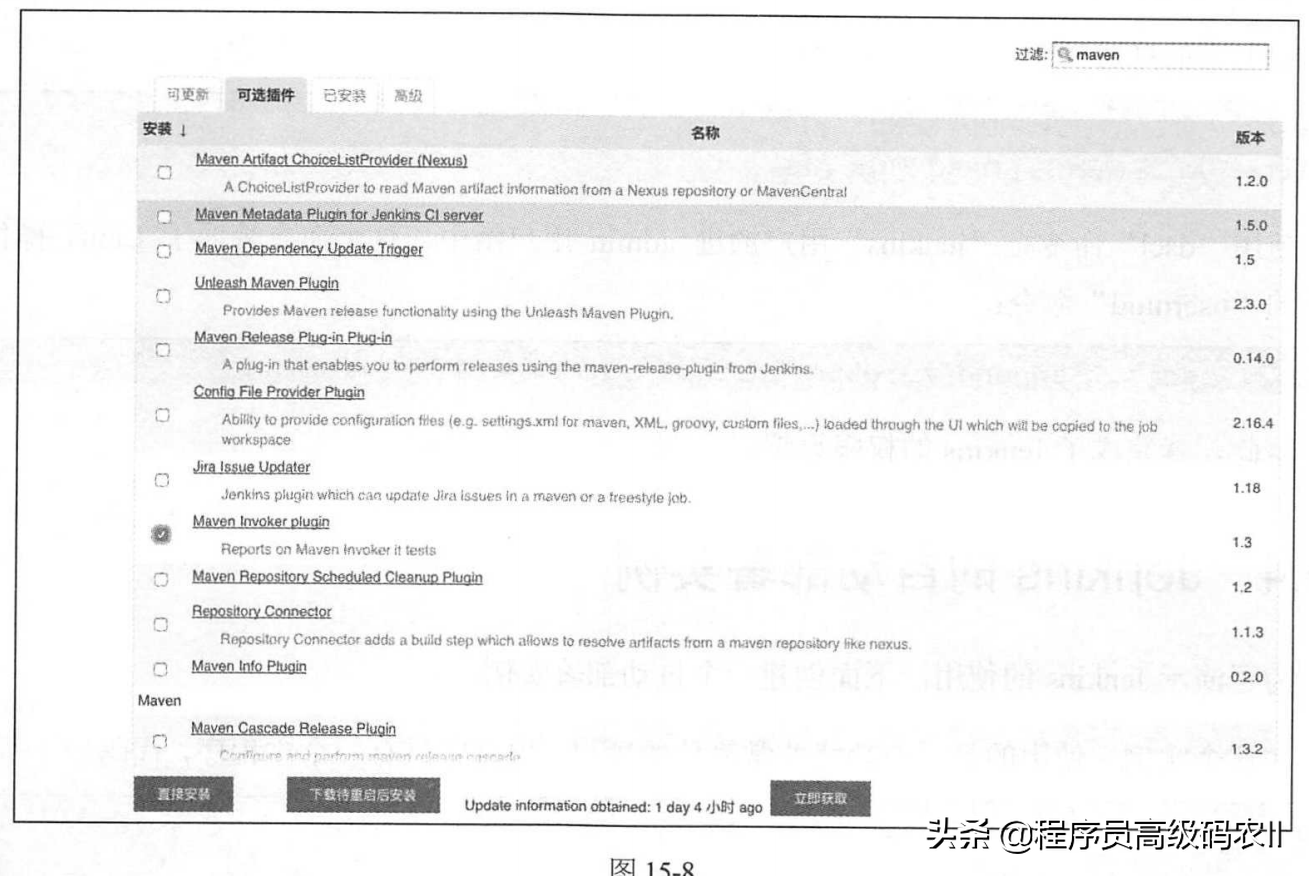
Click the "management plug-in" option in figure 15-6, click the "optional plug-in" option in the pop-up dialog box, find the "Maven Invoker plugin" plug-in, check it and click the "direct installation" button, as shown in figure 15-8.
Note that in settings When configuring the repository path in XML, if it is tested locally, it is better to be the same as the configuration of IDEA, so that the dependent package will not be downloaded again during packaging.
In Jenkins command line configuration, in order to use Docker and Docker compose normally, we need to set Jenkins system permissions. The user is authorized to use the Jenkins service by default.
Set a password free configuration for "Jenkins" users through the following steps, so that the super administrator command "sudo" can be used in Jenkins command line configuration.
On the Mac OS terminal, execute the following command to switch to super administrator root
Enter the password for root:
appledeMacBook-Air:/ apples su
Password:
Edit "sudoers" and find the following information:
sh-3.2# vi/etc/sudoers
# root and users in group wheel can run anything on any machine as any userroot
ALL = (ALL) ALL
%admin
ALL- (ALL) ALL
After the above information, refer to the permission settings of root, add the following configuration and save it:
jenkins ALL=(ALL) NOPASSWD: ALL
%admin ALL=(ALL) NOPASSWD: ALL
Use the "dscl" command to add the "jenkins" user to the admin user group. This command is equivalent to the "usermod" command in the Linux operating system:
sh-3.2# dscl . -append /Groups/admin GroupMembership jenkins
So far, Jenkins's permission setting has been completed.
Automatic deployment instance of Jenkins
To demonstrate the use of Jenkins, an automatic deployment instance is created below.
In this example, a project with very simple functions is used. There is only one main program in the project, and the code is as follows
@SpringBootApplication@RestController
public class DemoApplication {
public static void main (String[] args){
SpringApplication.run(DemoApplication.class,args) ;
}
@RequestMapping (value = "/")public String index(){
return "Hello world! ";
}
}
After the application starts, open the home page and output "Hello World!".
The following describes the implementation process of this automatic deployment project.
Create task
Click "new" on the Jenkins homepage to open the create task page, as shown in figure 15-9.
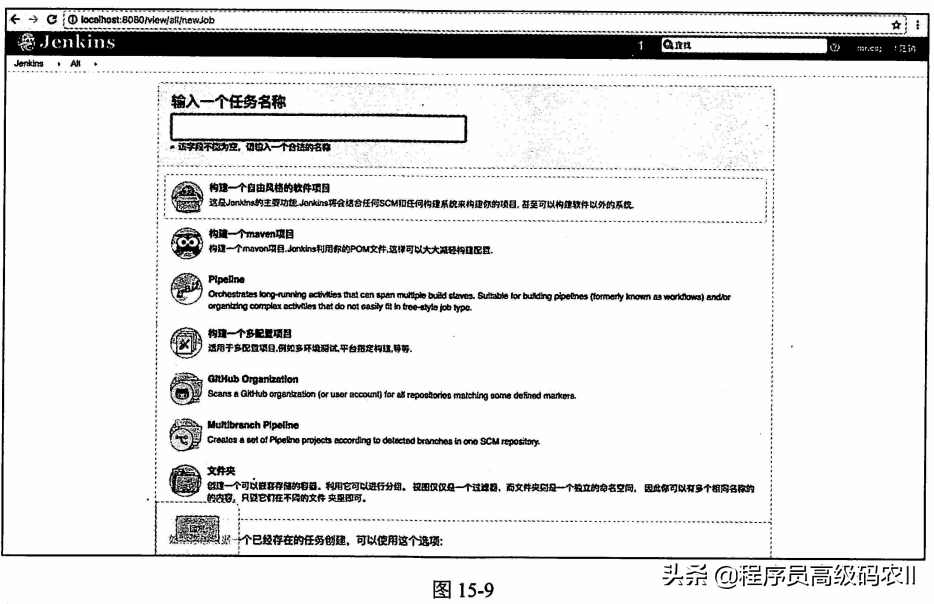
Enter the task name "demo", select the option "build a free style software project", and click OK to create an empty task, as shown in figure 15-10.
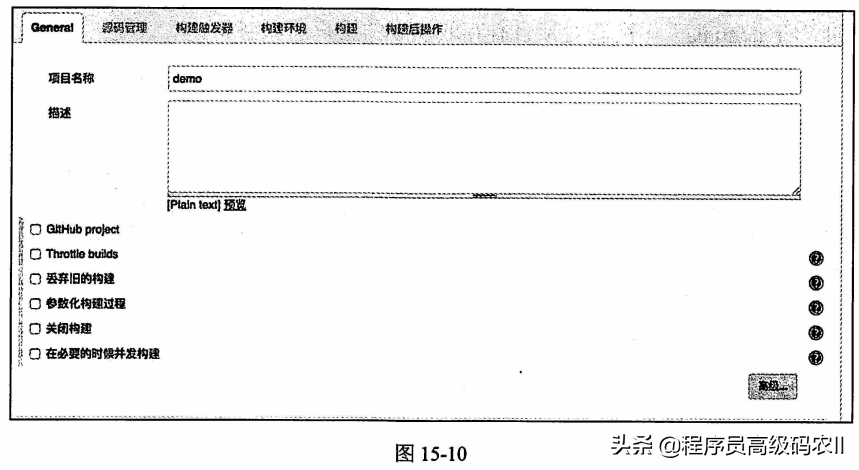
Configure task
In figure 15-10, click the "source code management" option to display the dialog box shown in figure 15-11. Check the "Git" option in figure 15-11, and enter the storage address of the "demo" project in the address bar of the code base.
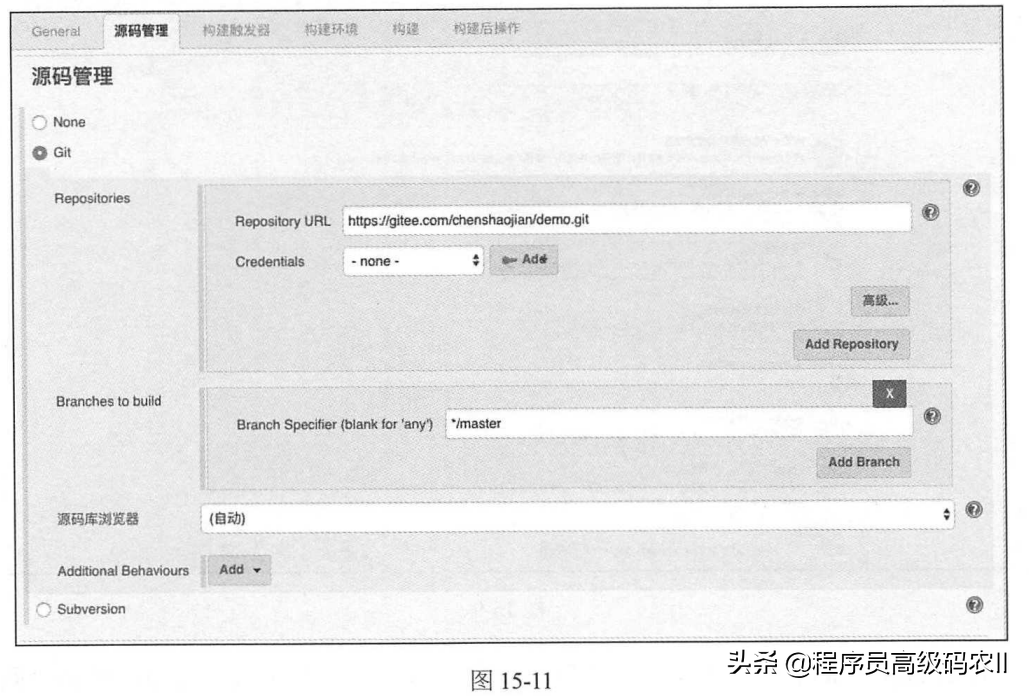
Because this is a public project, you do not need to set permissions to access the project. If it is a private project, the user name and password with access to the project must be configured in "Credentials" in figure 15-11.
Click the "build trigger" option in figure 15-11, and check the "Poll SCM" option in the "build trigger" dialog box to configure the schedule of a scheduled task, as shown in figure 15-12.
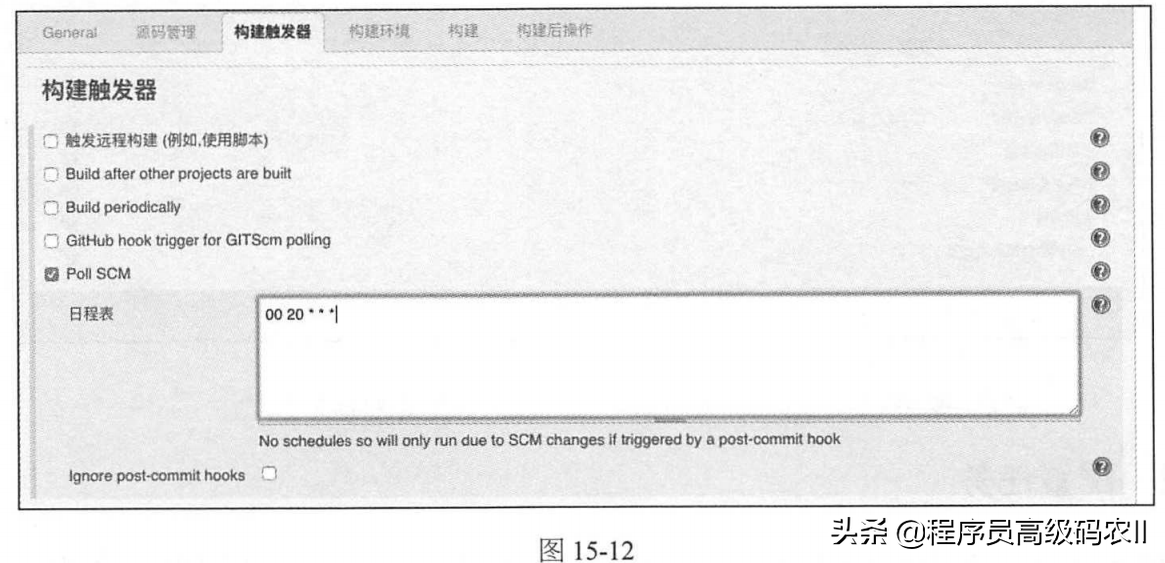
The schedule "00 20 * * *" in figure 15-12 indicates that the task construction is executed at 20:00 o'clock every day. Timed tasks are not used in this example.
Next, use Maven to configure the packaging of the project. Click the "build" option and select the "invoke top level Maven targets" option in the "add build steps" drop-down list, as shown in figure 15-13.
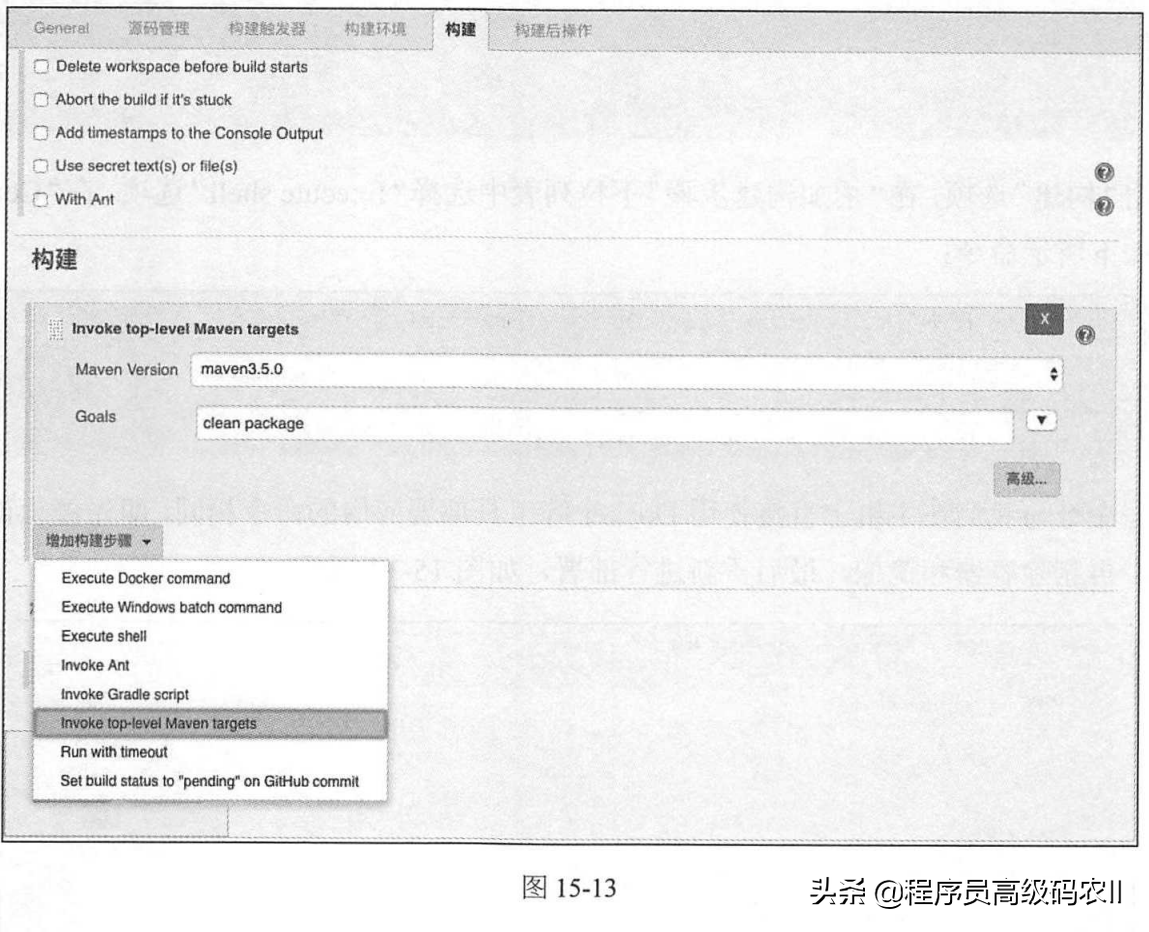
Select the previously installed Maven in Maven Version, and enter the following packaging command in Goals:
clean package
Configure the operation commands for creating images and deploying. Dockerfile and docker compose are used here YML, these two files have been included in the docker directory of the project.
Dockerfile The contents in are as follows:
FROM java:8
VOLUME/tmp
ADDdemo-0.0.1-SNAPSHOT.jar app.jar
RUN bash one c'touch /app.jar'EXPOSE8080
ENTRYPOINT
, "/app.jar"]
["java", "-Djava.security.egd=file:/dev/./urandom", "-jar
docker-compose. The deployment script in YML is as follows:
demo:
build:ports:
"8888:8080"
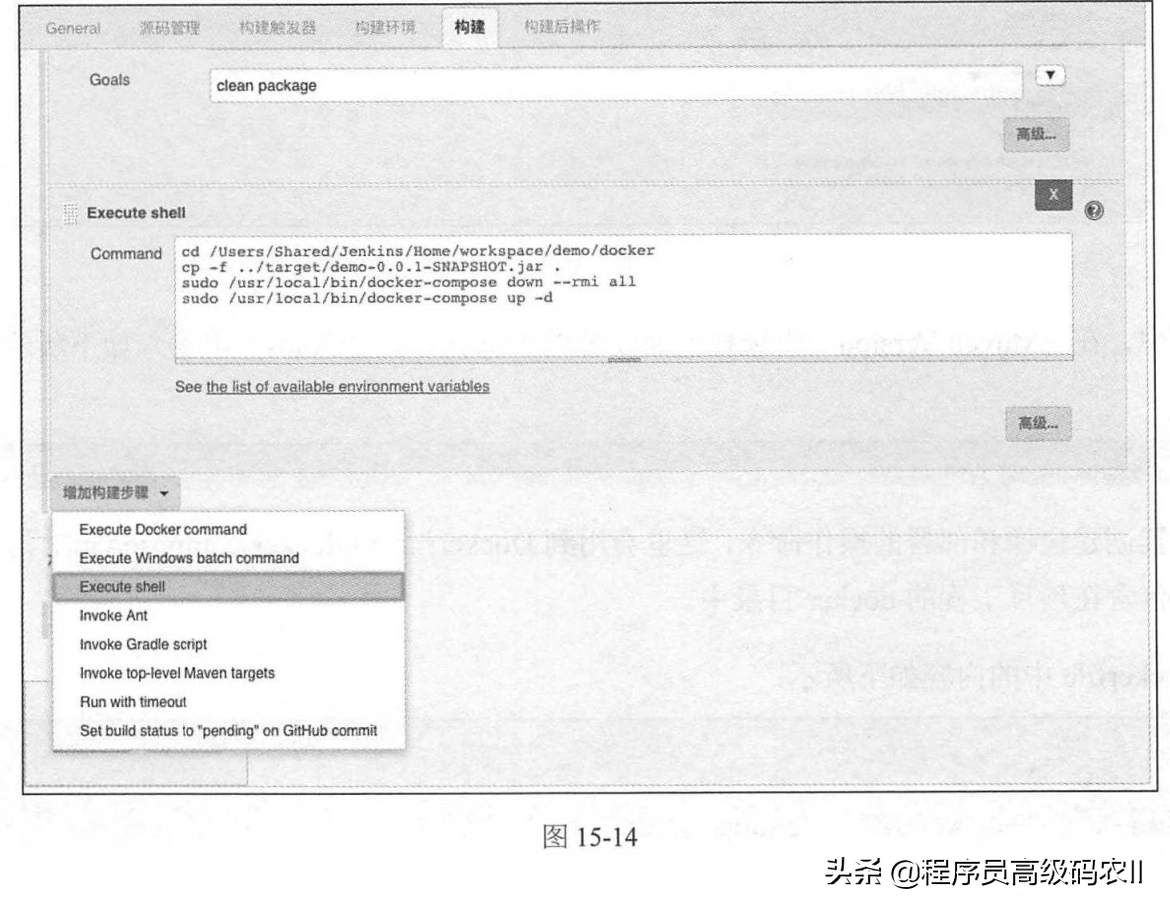
Click the build option, select the Execute shell option in the add build step drop-down list, and enter the following Command in Command:
cd /Users/Shared/Jenkins/Home/workspace/demo /docker
cp -f ../target/demo-0.0.1-SNAPSHOT .jar
sudo /usr/local/bin/docker-compose down --rmi all
sudo /usr/local/bin/docker-compose up -d
These commands are the same as those for deploying applications directly using Docker and other tools on the host, that is, stop the running container, delete the container and image, and finally redeploy, as shown in figure 15-14.
Perform tasks
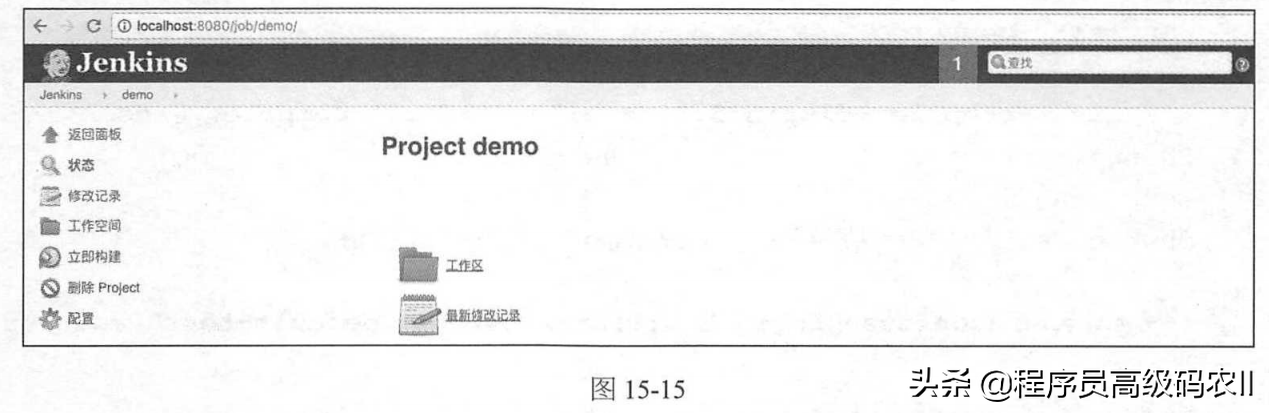
When manually executing a task, first click the name of the task to return to the first page of the task. Then click the "build now" option in the left menu in the task home page, as shown in figure 15-15.
During task execution, information will be output in the console. The output log of a complete execution process is as follows
Started by user mr.csj
Building in workspace /Users/Shared/Jenkins/Home/workspace/demo>git rev-parse --is-inside-work-tree # timeout=10
Fetching changes from the remote Git repository
>git config remote.origin.url https://gitee.com/chenshaojian/demo.git #timeout=10
Fetching upstream changes from https://gitee.com/chenshaojian/demo.git>git --version # timeout=10
>git fetch --tags --progress https://gitee.com/chenshaojian/demo.git+refs/heads/* :refs/remotes/origin/*
>git rev-parse refs/remotes/origin/master^ { commit] # timeout=10
>git rev-parse refs/remotes/origin/origin/master"{ commit}# timeout=10Checking out Revision 1b0348a999cee3a1920b1b20576b54e58a50ab2
(refs/remotes/origin/master)
>git config core.sparsecheckout # timeout=10
>git checkout-f 1b0348a999cee3a1920b1b2c576b54e58a50ab2Commit message: "add docker-compose"
>git rev-list 8791f0a371ab67a83d1005197744475de5f177df # timeout=10[demo]$/Users/apple/apache-maven-3.5.0/bin/mvn clean package
[INFO]Scanning for projects. . .
[INFO]
[INFO]-------------
[INFO] Building demo 0.0.1-SNAPSHOT[INFO]
[INFO]
[INFO]--- maven-clean-plugin:2.6.1:clean (default-clean)& demo ---[INFO] Deleting /Users/Shared/Jenkins/Home/workspace/demo/target
[INFO]
[INFO] ---maven-resources-plugin:2.6:resources (default-resources)& demo -[INFO] Using 'UTF-8' encoding to copy filtered resources.
[INFO]Copying 1 resource
[INEO]Copying 0 resource[INFO]
[INFO] --- maven-compiler-plugin:3.1:compile (default-compile) demo ---[ INFO] Changes detected - recompiling the module!
[INFO] Compiling 1 source file to
/Users/Shared/Jenkins/Home/workspace/demo/target/classes[INEO]
[INFO] --- maven-resources-plugin:2.6:testResources (default-testResources) edemo ---
[INFO] Using 'UTF-8'encoding to copy filtered resources.[INFO] skip non existing resourceDirectory
/Users/Shared/Jenkins/Home/workspace/demo/src/test/resources[INFO]
[INFO] --- maven-compiler-plugin:3.1:testCompile (default-testCompile)Cdemo
[INFO] Changes detected - recompiling the module!
[INFO] Compiling 1 source file to
/Users/Shared/Jenkins/Home/workspace/demo/target/test-classes[INEO]
[ INFO] ---maven-surefire-plugin:2.20:test (default-test) C demo ---[INFO] Tests are skipped.
[INFO]
[INFO] --- maven-jar-plugin:2.6:jar (default-jar) demo --[INFO] Building jar:
/Users/Shared/Jenkins/Home/workspace/demo/target/demo-0.0.1-SNAPSHOT.jar[INFO]
[INFO] --- spring-boot-maven-plugin:1.5.8.RELEA.SE:repackage (default) demo
[INFO]
[INEO] BUILD SUCCESS[INFO]
[INFO]Total time: 5.095 s
[INFO] Finished at: 2017-10-30T16:18:18+08:00[INFO] Final Memory:29M/182M
[INFO]
[demo]$ /bin/sh -xe/Users/Shared/Jenkins/tmp/jenkins4696633078670494346.sh
+cd /Users/Shared/ Jenkins/Home/workspace/demo/docker+ cp -f ../target/demo-0.0.1-SNAPSHOT.jar .
+ sudo /usr/local/bin/docker-compose down --rmi allRemoving image docker_demo
Failed to remove image for service demo:404 Client Error: Not Found ("No suchimage: docker_demo: latest")
+ sudo /usr/local/bin/docker-compose up -dBuilding demo
Step 1/6 : FROM java: 8
--->d23bdf 5b1b1b
Step 2/6:VOLUME /tmp---> Using cache
--->64c36a425bbf
Step 3/6: ADD demo-0.0.1-SNAPSHOT.jar app.jar--->1788813d23d2
step 4/6:RUN bash-c 'touch /app.jar'---> Running in e4cfd4447b78
--->2c44a754963b
Removing intermediate container e4cfd4447b78Step 5/6 :EXPOSE 8080
---> Running in 95b96954618e---> 8bc53f642637
Removing intermediate container 95b96954618e
Step 6/6:ENTRYPOINT java-Djava.security.egd=file:/dev/./urandom-jar/app.:one-->Running in al92a418f4f1
--->3a27629ceba9
Removing intermediate container a192a4184f1Successfully built 3a27629ceba9
Successfully tagged docker demo: latest
Image for service demo was built because it did not already exist. To rebuithis image you must use `docker-compose build' or 'docker-compose up --buildCreating docker demo_1..
Creating docker_demo_1-[1A-[2K
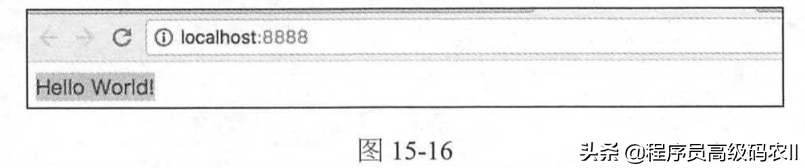
Creating docker demo 1 ...one[ 32mdone-[Om--[1BFinished:sUCCESSYou can see from the console's output log that the build has completed successfully. At this time, we can open the home page of application operation through the following website:
http://localhost:8888
From this, we can see our expected result, that is, the output "Hello World!", As shown in Figure 15-16.
In the output log of this section, there is an error prompt as follows:
+ sudo /usr/local /bin/docker-compose down --rmi allRemoving image docker demo
Failed to remove image for service demo:404 Client Error:Not Found ("No suchimage: docker demo: latest")
The reason for this error message is that there is no image that can be removed during the first build, but this does not affect the execution of the whole build process.
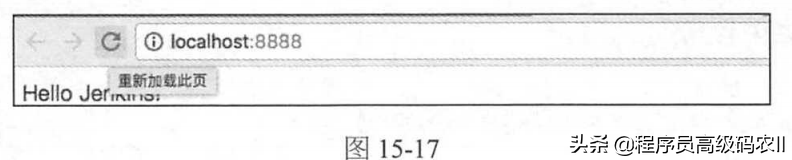
Now verify the automatic deployment of project updates. First, the output result of the project main program "Hello World!" Change to "Hello Jerkins!", Then submit the code. After completion, click the "build now" option in Jenkins. After the construction is completed, refresh the browser accessing the application to see the effect as shown in Figure 15-17.
Check the console output log again. Now, the command to remove the image no longer displays errors, but outputs the results shown below, indicating that the running container has been stopped and the original container and image have been removed:
+ sudo /usr/local/bin/docker-compose down--rmi all
Stopping docker demo 1 ...
-[1A-[2K
Stopping docker demo 1 ... -[32mdone-[ Om-[1BRemoving docker demo 1 ...
one-[1A[2K
Removing docker demo 1 ...-[32mdone-[ Om one[1BRemoving image docker demo
This is just a simple demonstration of automatic deployment. In practical use, automatic deployment can be realized through scheduled tasks or combined with WebHook code submission notifications. In addition, test scripts can be generated through Selenium, JMeter and other tools to increase the function of automatic test.
Summary
This chapter introduces how to use the automated build tool Jenkins to design the workflow of continuous delivery, and demonstrates the implementation process of automatic deployment with a simple example. In this example, we use Git to pull code, Maven to package programs, Docker to create images and update and deploy applications. From this example, we can see the powerful scalability of Jenkins.
Through the study of this chapter, I believe that readers can establish a perfect automation infrastructure according to the actual situation, so as to realize the automatic construction process of integration testing and continuous deployment in microservice publishing.