This article is the first to use Mastodon to build a personal information platform. I will talk about some details of building Mastodon in a container environment.
At the same time, this article may be one of the few things you can find about how to build and optimize Mastodon services in a container environment.
Write in front
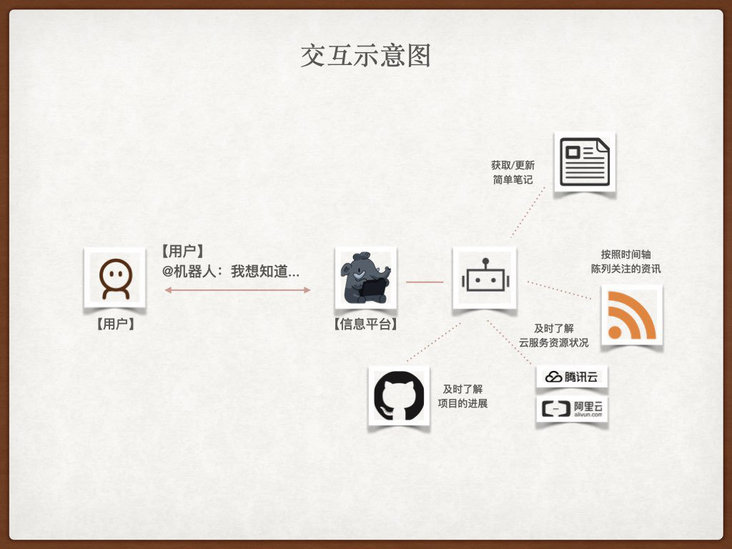
With more and more tossed systems, I began to look forward to a place where I can centrally present the messages in these systems, so that I can quickly and clearly understand what interesting, new and important things have happened, and enable me to quickly query the data in the existing system through a simpler way, And record some sudden ideas.
I think the information display in the form of Feed flow with timeline as the clue, combined with various "virtual applications" and Bot dialogue methods, may be able to solve my demands at this stage. The interaction is simple and direct, and the level of interactive operation is also shallow. In most query and recording scenarios, I only need to enter the content and press enter to get the data I want without opening the specific application page, and then operate step by step.
In the past work and life, in fact, I have used some tools that contain interaction or intersection of functions with my demands, such as TeamToy used in Sina cloud, Redmine and Alibaba portal used in Taobao, elephant used in meituan, Slack used later, enterprise wechat, Xuecheng, etc.

However, most of these schemes are internal or SaaS based. In personal use scenarios, especially in combination with various HomeLab systems, I prefer it to be a privatized service.
I am more restrained about adding "entities", so in the previous exploration process, I have conducted some investigations and simple secondary development on various systems I am familiar with before, such as Phabricator, conflict, WordPress, Dokuwiki, Outline and so on. I found that although I can solve some problems, I always feel not so comfortable in interaction and experience. Because these tools are more or less based on collaboration or content sorting, rather than information aggregation and display. I need a plan that can be used by one person.
Therefore, I began to try to change my thinking completely, looking for a time axis as the information display clue mentioned above, which can interact with the Bot in the tool to record my thoughts, gather all kinds of events I pay attention to into the tool in real time, and query the existing data in various systems with simple commands and methods. Finally, I chose Mastodon, a "Twitter / Weibo Like" product that I had been tossing about for a while two years ago.
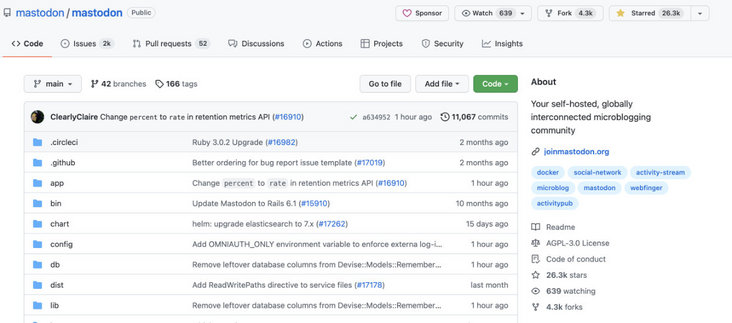
Before we start tossing around, let's talk about its technical architecture.
Technical architecture
Mastodon's technical architecture is a classic Web architecture. Its main functional components are: front-end application (React SPA), application interface (Ruby Rails6), push service (Node Express + WS), background task (Ruby Sidekiq), cache and queue (Redis), database (Postgres) and optional full-text index (Elasticsearch 7).
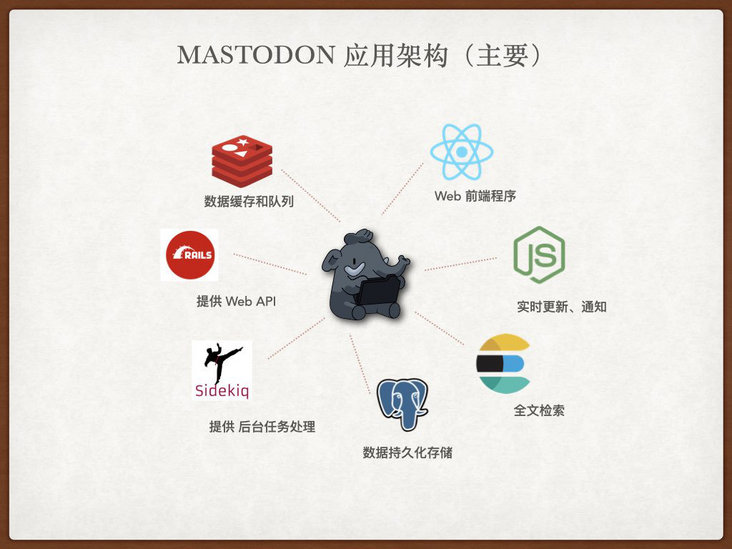
In addition, it supports the use of anonymous network communication to communicate with other different community instances on the Internet and exchange the published content of the community to complete the concept of its distributed community. However, this function is beyond the scope of this article, and it is very simple, so it is not wordy.
Basic service preparation
Before tossing the application, we first complete the establishment of the application's dependence on basic services. Let's talk about network planning first.
Build an application gateway and plan the network
Like previous applications, we use traifik as the service application gateway, so that applications can dynamically access traifik by means of service registration. Traefik is also used to provide SSL loading and basic SSO authentication.
If you don't know about traifik, you can read it Previous content Learn and understand.
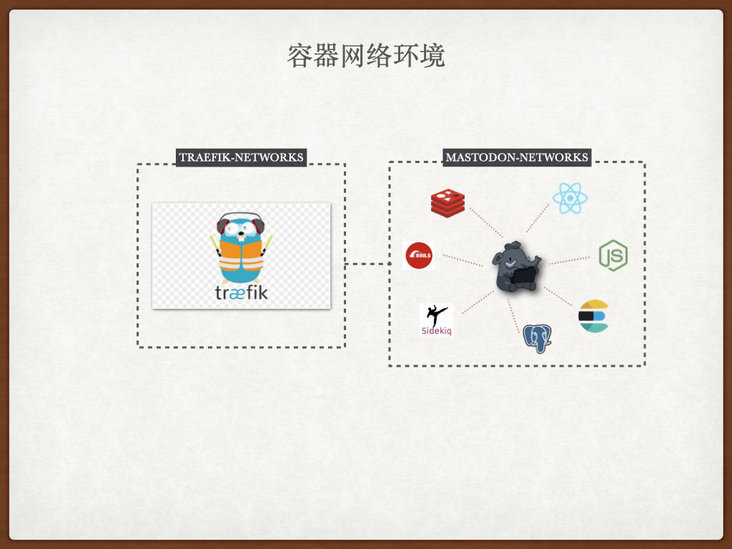
I hope that all components of Mastodon can be isolated from other container services on the host at the network level on the premise that they can communicate, the necessary services can use traifik for service registration and provide Web access.
For the above considerations, we can execute the command to create an additional virtual network card to open up the communication between components:
docker network create mastodon_networks
Build database: Postgres
official configuration file In, the definition of database is as follows:
version: '3'
services:

  db:
    restart: always
    image: postgres:14-alpine
    shm_size: 256mb
    networks:
      - internal_network
    healthcheck:
      test: ["CMD", "pg_isready", "-U", "postgres"]
    volumes:
      - ./postgres14:/var/lib/postgresql/data
    environment:
      - "POSTGRES_HOST_AUTH_METHOD=trust"
Although it can also be used, after the database runs, we will receive some running warnings from the program.
********************************************************************************
WARNING: POSTGRES_HOST_AUTH_METHOD has been set to "trust". This will allow
         anyone with access to the Postgres port to access your database without
         a password, even if POSTGRES_PASSWORD is set. See PostgreSQL
         documentation about "trust":
         https://www.postgresql.org/docs/current/auth-trust.html
         In Docker's default configuration, this is effectively any other
         container on the same system.

         It is not recommended to use POSTGRES_HOST_AUTH_METHOD=trust. Replace
         it with "-e POSTGRES_PASSWORD=password" instead to set a password in
         "docker run".
********************************************************************************
In the process of application running, the database terminal will continuously accumulate some request logs and background task execution result log output, and eventually produce a very large application log file. In extreme cases, it may even fill up the disk, affecting the normal operation of other applications on the whole server.
Therefore, in combination with the actual situation, I made some simple adjustments to the above configuration:
version: '3'
services:

  db:
    restart: always
    image: postgres:14-alpine
    shm_size: 256mb
    networks:
      - mastodon_networks
    healthcheck:
      test: ["CMD", "pg_isready", "-U", "postgres"]
      interval: 15s
      retries: 12
    volumes:
      - /etc/localtime:/etc/localtime:ro
      - /etc/timezone:/etc/timezone:ro
      - ./data:/var/lib/postgresql/data
    environment:
      - "POSTGRES_DB=mastodon"
      - "POSTGRES_USER=mastodon"
      - "POSTGRES_PASSWORD=mastodon"
    logging:
      driver: "json-file"
      options:
        max-size: "10m"

networks:
  mastodon_networks:
    external: true
Save the above contents to docker-compose.com in the postgres directory After in the YML file, we use docker compose up - D to start the service. Wait a moment and use docker compose PS to view the application. We can see that the service is running normally.
# docker-compose ps
NAME                COMMAND                  SERVICE             STATUS              PORTS
postgres-db-1       "docker-entrypoint.s..."   db                  running (healthy)   5432/tcp
The configuration and code of this part have been uploaded to GitHub and can be obtained by yourself if necessary: https://github.com/soulteary/Home-Network-Note/tree/master/example/mastodon/postgres
Build cache and queue service: Redis
The default Redis startup will provide services after 30 seconds, which is a long time for us. In order to speed up the response time of Redis, I also made a simple adjustment to the content in the official configuration:
version: '3'
services:

  redis:
    restart: always
    image: redis:6-alpine
    networks:
      - mastodon_networks
    healthcheck:
      test: ["CMD", "redis-cli", "ping"]
      interval: 15s
      retries: 12
    volumes:
      - /etc/localtime:/etc/localtime:ro
      - /etc/timezone:/etc/timezone:ro
      - ./data:/data
    logging:
      driver: "json-file"
      options:
        max-size: "10m"

networks:
  mastodon_networks:
    external: true
Save the configuration to docker-compose.com in the redis directory After YML, we use docker compose up - D to start the service. Wait a moment and use docker compose PS to view the application. We can see that the service is running normally.
# docker-compose ps
NAME                COMMAND                  SERVICE             STATUS              PORTS
redis-redis-1       "docker-entrypoint.s..."   redis               running (healthy)   6379/tcp
The configuration and code of this part have also been uploaded to GitHub and can be obtained by yourself if necessary: https://github.com/soulteary/Home-Network-Note/tree/master/example/mastodon/redis
Build full-text search: Elasticsearch
This component is optional for Mastodon. You may not need to use ES in several cases:
- Your machine resources are very tight. Enabling ES will occupy an additional 500MB ~ 1GB of memory
- Your site content and the number of users are not many
- Your search times are very limited
- You expect to use resources and higher performance retrieval schemes
On PG CONF EU in 2018, Oleg Bartunov once made a share about the use of Postgres in full-text retrieval scenarios. If you are interested, you can Self understanding.
Of course, out of respect for the official choice, let's simply start the construction and use of ES. Similarly, a new basic layout file can be completed through simple adjustment based on the official configuration:
version: '3'
services:

  es:
    restart: always
    container_name: es-mastodon
    image: docker.elastic.co/elasticsearch/elasticsearch-oss:7.10.2
    environment:
      - "ES_JAVA_OPTS=-Xms512m -Xmx512m"
      - "cluster.name=es-mastodon"
      - "discovery.type=single-node"
      - "bootstrap.memory_lock=true"
    networks:
      - mastodon_networks
    healthcheck:
      test: ["CMD-SHELL", "curl --silent --fail localhost:9200/_cluster/health || exit 1"]
      interval: 15s
      retries: 12
    volumes:
      - /etc/localtime:/etc/localtime:ro
      - /etc/timezone:/etc/timezone:ro
      - ./data:/usr/share/elasticsearch/data:rw
    ulimits:
      memlock:
        soft: -1
        hard: -1
    logging:
      driver: "json-file"
      options:
        max-size: "10m"

networks:
  mastodon_networks:
    external: true
However, if we save the above choreography file and try to start the service, we will encounter a classic problem: the directory permission is incorrect and the service cannot be started:
"stacktrace": ["org.elasticsearch.bootstrap.StartupException: ElasticsearchException[failed to bind service]; nested: AccessDeniedException[/usr/share/elasticsearch/data/nodes];",
"at org.elasticsearch.bootstrap.Elasticsearch.init(Elasticsearch.java:174) ~[elasticsearch-7.10.2.jar:7.10.2]",
...

ElasticsearchException[failed to bind service]; nested: AccessDeniedException[/usr/share/elasticsearch/data/nodes];
Likely root cause: java.nio.file.AccessDeniedException: /usr/share/elasticsearch/data/nodes
    at java.base/sun.nio.fs.UnixException.translateToIOException(UnixException.java:90)
...
The solution to the problem is very simple. We can set the permissions of the data directory to the ES process in the container to be operable: (the simple and crude chmod 777 is strongly not recommended)
mkdir -p data
chown -R 1000:1000 data
docker-compose down && docker-compose up -d
After executing the above command and restarting the container process, use the docker compose PS command again to check the application status. We can see that the program is running normally.
# docker-compose ps
NAME                COMMAND                  SERVICE             STATUS              PORTS
es-mastodon         "/tini -- /usr/local..."   es                  running (healthy)   9300/tcp
The configuration and code of this part have also been uploaded to GitHub and can be obtained by yourself if necessary: https://github.com/soulteary/Home-Network-Note/tree/master/example/mastodon/elasticsearch
Application building
After the basic services are built, we will complete the construction and deployment of applications.
Application initialization
To facilitate application initialization, I wrote a simple layout configuration:
version: "3"
services:
  web:
    image: tootsuite/mastodon:v3.4.4
    restart: always
    environment:
      - "RAILS_ENV=production"
    command: bash -c "rm -f /mastodon/tmp/pids/server.pid; tail -f /etc/hosts"
    networks:
      - mastodon_networks

networks:
  mastodon_networks:
    external: true
Save the above content as docker - compose init. YML, and then use docker compose up - D to start a container ready for Mastodon installation for standby.
After the container starts, we execute the following command to start the Mastodon installation boot program:
docker-compose -f docker-compose.init.yml exec web bundle exec rake mastodon:setup
After executing the above command, you will enter the interactive command line. We ignore all warnings and get logs similar to the following (for example, you can adjust according to your own situation)
Your instance is identified by its domain name. Changing it afterward will break things.
Domain name: hub.lab.com

Single user mode disables registrations and redirects the landing page to your public profile.
Do you want to enable single user mode? yes

Are you using Docker to run Mastodon? Yes

PostgreSQL host: db
PostgreSQL port: 5432
Name of PostgreSQL database: postgres
Name of PostgreSQL user: postgres
Password of PostgreSQL user:
Database configuration works! 🎆

Redis host: redis
Redis port: 6379
Redis password:
Redis configuration works! 🎆

Do you want to store uploaded files on the cloud? No

Do you want to send e-mails from localhost? yes
E-mail address to send e-mails "from": "(Mastodon <notifications@hub.lab.com>)"
Send a test e-mail with this configuration right now? no

This configuration will be written to .env.production
Save configuration? Yes
Below is your configuration, save it to an .env.production file outside Docker:

# Generated with mastodon:setup on 2022-01-24 08:49:51 UTC

# Some variables in this file will be interpreted differently whether you are
# using docker-compose or not.

LOCAL_DOMAIN=hub.lab.com
SINGLE_USER_MODE=true
SECRET_KEY_BASE=ce1111c9cd51305cd680aee4d9c2d6fe71e1ba003ea31cc27bd98792653535d72a13c386d8a7413c28d30d5561f7b18b0e56f0d0e8b107b694443390d4e9a888
OTP_SECRET=bcb50204394bdce54a0783f1ef2e72a998ad2f107a0ee4dc3b61557f5c12b5c76267c0512e3d08b85f668ec054d42cdbbe0a42ded70cbd0a70be70346e666d05
VAPID_PRIVATE_KEY=QzEMwqTatuKGLSI3x4gmFkFsxi2Vqd4taExqQtZMfNM=
VAPID_PUBLIC_KEY=BFBQg5vnT3AOW2TBi7OSSxkr28Zz2VZg7Jv203APIS5rPBOveXxCx34Okur-8Rti_sD07P4-rAgu3iBSsSrsqBE=
DB_HOST=db
DB_PORT=5432
DB_NAME=postgres
DB_USER=postgres
DB_PASS=mastodon
REDIS_HOST=redis
REDIS_PORT=6379
REDIS_PASSWORD=
SMTP_SERVER=localhost
SMTP_PORT=25
SMTP_AUTH_METHOD=none
SMTP_OPENSSL_VERIFY_MODE=none
SMTP_FROM_ADDRESS="Mastodon <notifications@hub.lab.com>"

It is also saved within this container so you can proceed with this wizard.

Now that configuration is saved, the database schema must be loaded.
If the database already exists, this will erase its contents.
Prepare the database now? Yes
Running `RAILS_ENV=production rails db:setup` ...


Database 'postgres' already exists
[strong_migrations] DANGER: No lock timeout set
Done!

All done! You can now power on the Mastodon server 🐘

Do you want to create an admin user straight away? Yes
Username: soulteary
E-mail: soulteary@gmail.com
You can login with the password: 76a17e7e1d52056fdd0fcada9080f474
You can change your password once you login.
In the above interactive program, in order to save time, I chose not to use external services to store files and send mail. You can adjust it according to your own needs.
During the execution of the command, we may see some Redis related error messages: error connecting to Redis on localhost: 6379 (errno:: econnreused). This is because we did not correctly configure the Redis server in advance when starting the configuration program and initializing the application. This does not mean that our configuration is wrong, but it has not yet taken effect. There is no need to panic.
The configuration and code of this part have also been uploaded to GitHub and can be obtained by yourself if necessary: https://github.com/soulteary/Home-Network-Note/tree/master/example/mastodon/app
Update application configuration
Next, we need to save the information related to the configuration in the above log output to a configuration file env. In production.
# Generated with mastodon:setup on 2022-01-24 08:49:51 UTC

# Some variables in this file will be interpreted differently whether you are
# using docker-compose or not.

LOCAL_DOMAIN=hub.lab.com
SINGLE_USER_MODE=true
SECRET_KEY_BASE=ce1111c9cd51305cd680aee4d9c2d6fe71e1ba003ea31cc27bd98792653535d72a13c386d8a7413c28d30d5561f7b18b0e56f0d0e8b107b694443390d4e9a888
OTP_SECRET=bcb50204394bdce54a0783f1ef2e72a998ad2f107a0ee4dc3b61557f5c12b5c76267c0512e3d08b85f668ec054d42cdbbe0a42ded70cbd0a70be70346e666d05
VAPID_PRIVATE_KEY=QzEMwqTatuKGLSI3x4gmFkFsxi2Vqd4taExqQtZMfNM=
VAPID_PUBLIC_KEY=BFBQg5vnT3AOW2TBi7OSSxkr28Zz2VZg7Jv203APIS5rPBOveXxCx34Okur-8Rti_sD07P4-rAgu3iBSsSrsqBE=
DB_HOST=db
DB_PORT=5432
DB_NAME=postgres
DB_USER=postgres
DB_PASS=mastodon
REDIS_HOST=redis
REDIS_PORT=6379
REDIS_PASSWORD=
SMTP_SERVER=localhost
SMTP_PORT=25
SMTP_AUTH_METHOD=none
SMTP_OPENSSL_VERIFY_MODE=none
SMTP_FROM_ADDRESS="Mastodon <notifications@hub.lab.com>"
One thing to note here is that SMTP in the send mail notification configuration_ FROM_ The content of address needs to be wrapped in double quotation marks. If we use enter "all the way Next" in the above interactive terminal configuration process, the generated configuration content may miss quotation marks.
If this problem occurs, you can manually add quotation marks when saving the file without re executing the command.
Adjust application Web service configuration
Just like the previous infrastructure construction and configuration adjustment, we make a simple adjustment to the official configuration template to obtain the container layout configuration that minimizes the operation of services:
version: '3'
services:

  web:
    image: tootsuite/mastodon:v3.4.4
    restart: always
    env_file: .env.production
    environment:
      - "RAILS_ENV=production"
    command: bash -c "rm -f /mastodon/tmp/pids/server.pid; bundle exec rails s -p 3000"
    networks:
      - mastodon_networks
    healthcheck:
     test: ["CMD-SHELL", "wget -q --spider --proxy=off localhost:3000/health || exit 1"]
     interval: 15s
     retries: 12
    volumes:
      - /etc/localtime:/etc/localtime:ro
      - /etc/timezone:/etc/timezone:ro

  streaming:
    image: tootsuite/mastodon:v3.4.4
    env_file: .env.production
    restart: always
    command: node ./streaming
    networks:
      - mastodon_networks
    healthcheck:
      test: ["CMD-SHELL", "wget -q --spider --proxy=off localhost:4000/api/v1/streaming/health || exit 1"]
      interval: 15s
      retries: 12
    volumes:
      - /etc/localtime:/etc/localtime:ro
      - /etc/timezone:/etc/timezone:ro
    environment:
      - "STREAMING_CLUSTER_NUM=1"
      - "NODE_ENV=production"

  sidekiq:
    image: tootsuite/mastodon:v3.4.4
    environment:
      - "RAILS_ENV=production"
    env_file: .env.production
    restart: always
    command: bundle exec sidekiq
    networks:
      - mastodon_networks
    volumes:
      - /etc/localtime:/etc/localtime:ro
      - /etc/timezone:/etc/timezone:ro


networks:
  mastodon_networks:
    external: true
After saving the above contents, we will start the service. Because we do not map any ports to the server "local" at this time, we cannot access these services for the time being.
To solve this problem, we need to configure the front-end agent of Mastodon application.
Configure service front-end agent
The service uses Ruby Puma as the Web server by default, and Node Express provides push and real-time updates. In order to solve the cross domain problem of front-end resources and further improve the service performance, we can use Nginx to provide reverse proxy for these services, aggregate the services together, and cache the static resources.
The official has a default template here, https://github.com/mastodon/mastodon/blob/main/dist/nginx.conf However, this configuration is applicable to scenarios where containers are not used, or applications are running in containers, and Nginx is not running in containers.
Considering that we use Traefik to provide dynamic service registration and SSL certificate mounting, we need to make some adjustments to this configuration (only the main changes are shown).
location / {
  try_files $uri @proxy;
}

location ~ ^/(emoji|packs|system/accounts/avatars|system/media_attachments/files) {
  add_header Cache-Control "public, max-age=31536000, immutable";
  try_files $uri @proxy;
}

location /sw.js {
  add_header Cache-Control "public, max-age=0";
  try_files $uri @proxy;
}

location @proxy {
  proxy_set_header Host $host;
  proxy_set_header X-Real-IP $remote_addr;
  proxy_set_header X-Forwarded-For $proxy_add_x_forwarded_for;
  proxy_set_header X-Forwarded-Proto "https";
  proxy_set_header Proxy "";
  proxy_pass_header Server;

  proxy_pass http://web:3000;
  proxy_buffering on;
  proxy_redirect off;
  proxy_http_version 1.1;
  proxy_set_header Upgrade $http_upgrade;
  proxy_set_header Connection $connection_upgrade;

  proxy_cache CACHE;
  proxy_cache_valid 200 7d;
  proxy_cache_valid 410 24h;
  proxy_cache_use_stale error timeout updating http_500 http_502 http_503 http_504;
  add_header X-Cached $upstream_cache_status;

  tcp_nodelay on;
}

location /api/v1/streaming {
  proxy_set_header Host $host;
  proxy_set_header X-Real-IP $remote_addr;
  proxy_set_header X-Forwarded-For $proxy_add_x_forwarded_for;
  proxy_set_header X-Forwarded-Proto "https";
  proxy_set_header Proxy "";

  proxy_pass http://streaming:4000;
  proxy_buffering off;
  proxy_redirect off;
  proxy_http_version 1.1;
  proxy_set_header Upgrade $http_upgrade;
  proxy_set_header Connection $connection_upgrade;

  tcp_nodelay on;
}
In the above configuration, Nginx "integrates" the two sets of Web services we mentioned from Ruby and Node, and makes basic caching operations for static resources, and LRU caching for the content that can be cached for up to one week.
Seeing here, our service seems to be running normally. But is there really no problem?
Application problem correction and architecture tuning
When we run the service, even if the application looks normal, we will encounter the first problem at this moment. The warning prompt "X-Accel-Mapping header missing" appears frequently in the log.
What triggered this problem https://github.com/mastodon/mastodon/issues/3221 It has been disclosed, but the community has not given a good solution. In fact, it is very simple to solve this problem by completely relocating static resources from Ruby Web Services: first, it can solve this problem, second, it can improve the overall performance of the service and make it easier for the service to expand horizontally in the future.
At the same time, when we try to upload pictures or videos, you will find that due to the permission of the container mounted directory, we will always get an error return. Some people will use chmod 777 to solve problems, but this is not a best practice: there are potential security problems and your ability to expand your application level is very poor.
Of course, there are some details that we will deal with later. We will deal with the above two issues first.
Split static resource service
When it comes to application dynamic and static resource splitting, we can't help thinking of CDN in the context of cloud services. In Mastodon, the application supports setting CDN_HOST to split the static resources to the CDN server. However, most service maintainers will adopt the scheme of dynamically returning CDN to the source. On the premise of ignoring a certain degree of data consistency, such maintenance cost is very low and there is no need to make any adjustment and application changes.
However, just doing so will not solve the problems we mentioned earlier (when the CDN expires, it will still trigger the above problems back to the source). It is also not conducive to the deployment and use of Privatization (there are additional costs and have to rely on public network services).
A better solution here is to repackage our static resources as an independent service.
Referring to the content of multi-stage construction and optimization of containers in previous articles, it is easy to write a Dockerfile similar to the following:
FROM tootsuite/mastodon:v3.4.4 AS Builder

FROM nginx:1.21.4-alpine
COPY --from=Builder /opt/mastodon/public /usr/share/nginx/html
Use docker build - t Mastodon assets Package Mastodon's static resources and Nginx into a new image, and then write the container orchestration configuration of this service:
version: '3'
services:

  mastodon-assets:
    image: mastodon-assets
    restart: always
    networks:
      - traefik
    labels:
      - "traefik.enable=true"
      - "traefik.docker.network=traefik"

      - "traefik.http.middlewares.cors.headers.accessControlAllowMethods=GET,OPTIONS"
      - "traefik.http.middlewares.cors.headers.accessControlAllowHeaders=*"
      - "traefik.http.middlewares.cors.headers.accessControlAllowOriginList=*"
      - "traefik.http.middlewares.cors.headers.accesscontrolmaxage=100"
      - "traefik.http.middlewares.cors.headers.addvaryheader=true"

      - "traefik.http.routers.mastodon-assets-http.middlewares=cors@docker"
      - "traefik.http.routers.mastodon-assets-http.entrypoints=http"
      - "traefik.http.routers.mastodon-assets-http.rule=Host(`hub-assets.lab.com`)"

      - "traefik.http.routers.mastodon-assets-https.middlewares=cors@docker"
      - "traefik.http.routers.mastodon-assets-https.entrypoints=https"
      - "traefik.http.routers.mastodon-assets-https.tls=true"
      - "traefik.http.routers.mastodon-assets-https.rule=Host(`hub-assets.lab.com`)"

      - "traefik.http.services.mastodon-assets-backend.loadbalancer.server.scheme=http"
      - "traefik.http.services.mastodon-assets-backend.loadbalancer.server.port=80"

networks:
  traefik:
    external: true
Save the above content as docker - compose After YML, use docker compose up - D to start the service, and switch the static resources originally handled by Ruby service to the purpose of using independent Nginx service to complete static resource handling.
Of course, in order for this operation to take effect, we need to env. Add the following configuration content to production:
CDN_HOST=https://hub-assets.lab.com
Maintain and upload resources independently
As mentioned earlier, in the default container application, the program logic is to let the Ruby application maintain and process the uploaded media files (pictures and videos). This scheme is also not conducive to the future horizontal expansion and splitting of the service to run on a suitable machine. A relatively better scheme is to use S3 service to manage the files uploaded by users, so as to make the application close to stateless operation.
stay Private cloud environment in notebook: network storage (Part 1) and Private cloud environment in notebook: network storage (middle) In the two articles, I introduced how to use MinIO as a general storage gateway. Therefore, how to build and monitor a private S3 service will not be repeated here. Here we will only talk about some differences.
Here I use the same machine deployment, so the access between services is solved through virtual network card. Because the services are "behind" Traefik, HTTPS can be removed from the interaction protocol as much as possible (just let Mastodon access it directly using the container service name).
Here's a small detail. For the normal operation of the service, our S3 Entrypoint needs to use common ports, such as HTTP (80) and HTTPS (443), so the operation command in MinIO service needs to be adjusted to:
command: minio server /data --address 0.0.0.0:80 --listeners 1 --console-address 0.0.0.0:9001
However, if we use HTTP, another problem will arise, that is, when Mastodon displays static resources, it will use HTTP protocol instead of HTTPS we expect, which will cause the problem that the media resources in the Web interface cannot be displayed. (it does not affect the client. How to solve it is limited to space, which will be mentioned in the next article)
In addition, in Mastodon, S3 service is used as the back-end of file storage, because the default URL path provided by S3 service is S3_DOMAIN_NAME/S3_BUCKET_NAME, so we need S3_ ALIAS_ Make the same settings in the host configuration. However, considering the access performance and efficiency of resources, we can also start a static resource cache of Nginx as MinIO, and further simplify the configuration. Let's set S3 directly_ DOMAIN_ Name is enough, which will also facilitate our subsequent program customization.
First, write the orchestration configuration of this service:
version: "3"
services:

  nginx-minio:
    image: nginx:1.21.4-alpine
    restart: always
    networks:
      - traefik
      - mastodon_networks
    volumes:
      - /etc/localtime:/etc/localtime:ro
      - /etc/timezone:/etc/timezone:ro
      - ./nginx.conf:/etc/nginx/conf.d/default.conf
    healthcheck:
      test: ["CMD", "curl", "-f", "http://localhost/health"]
      interval: 15s
      retries: 12
    logging:
      driver: "json-file"
      options:
        max-size: "10m"
    labels:
      - "traefik.enable=true"
      - "traefik.docker.network=traefik"
      - "traefik.http.routers.mastodon-s3-http.entrypoints=http"
      - "traefik.http.routers.mastodon-s3-http.rule=Host(`hub-res.lab.com`)"
      - "traefik.http.routers.mastodon-s3-https.entrypoints=https"
      - "traefik.http.routers.mastodon-s3-https.tls=true"
      - "traefik.http.routers.mastodon-s3-https.rule=Host(`hub-res.lab.com`)"
      - "traefik.http.services.mastodon-s3-backend.loadbalancer.server.scheme=http"
      - "traefik.http.services.mastodon-s3-backend.loadbalancer.server.port=80"

  minio:
    image: ${DOCKER_MINIO_IMAGE_NAME}
    container_name: ${DOCKER_MINIO_HOSTNAME}
    volumes:
      - ./data/minio/data:/data:z
    command: minio server /data --address 0.0.0.0:80 --listeners 1  --console-address 0.0.0.0:9001
    environment:
      - MINIO_ROOT_USER=${MINIO_ROOT_USER}
      - MINIO_ROOT_PASSWORD=${MINIO_ROOT_PASSWORD}
      - MINIO_REGION_NAME=${MINIO_REGION_NAME}
      - MINIO_BROWSER=${MINIO_BROWSER}
      - MINIO_BROWSER_REDIRECT_URL=${MINIO_BROWSER_REDIRECT_URL}
      - MINIO_PROMETHEUS_AUTH_TYPE=public
    restart: always
    networks:
      - traefik
      - mastodon_networks
    labels:
      - "traefik.enable=true"
      - "traefik.docker.network=traefik"
      - "traefik.http.middlewares.minio-gzip.compress=true"
      - "traefik.http.routers.minio-admin.middlewares=minio-gzip"
      - "traefik.http.routers.minio-admin.entrypoints=https"
      - "traefik.http.routers.minio-admin.tls=true"
      - "traefik.http.routers.minio-admin.rule=Host(`${DOCKER_MINIO_ADMIN_DOMAIN}`)"
      - "traefik.http.routers.minio-admin.service=minio-admin-backend"
      - "traefik.http.services.minio-admin-backend.loadbalancer.server.scheme=http"
      - "traefik.http.services.minio-admin-backend.loadbalancer.server.port=9001"
    extra_hosts:
      - "${DOCKER_MINIO_HOSTNAME}:0.0.0.0"
    healthcheck:
      test: ["CMD", "curl", "-f", "http://localhost:80/minio/health/live"]
      interval: 3s
      retries: 12
    logging:
      driver: "json-file"
      options:
        max-size: "10m"

networks:
  mastodon_networks:
    external: true
  traefik:
    external: true
Next, write the configuration of Nginx:
server {
    listen 80;
    server_name localhost;

    keepalive_timeout 70;
    sendfile on;
    client_max_body_size 80m;

    location / {
        proxy_set_header X-Real-IP $remote_addr;
        proxy_set_header X-Forwarded-For $proxy_add_x_forwarded_for;
        proxy_set_header X-Forwarded-Proto $scheme;
        proxy_set_header Host $http_host;

        proxy_connect_timeout 300;
        proxy_http_version 1.1;
        proxy_set_header Connection "";
        chunked_transfer_encoding off;

        proxy_pass http://minio/mastodon/;
    }

    location /health {
        access_log off;
        return 200 "ok";
    }
}
Then comes the MinIO initialization script docker - compose init. Compilation of YML:
version: "3"
services:

  minio-client:
    image: ${DOCKER_MINIO_CLIENT_IMAGE_NAME}
    entrypoint: >
      /bin/sh -c "
      /usr/bin/mc config host rm local;
      /usr/bin/mc config host add --quiet --api s3v4 local http://minio ${MINIO_ROOT_USER} ${MINIO_ROOT_PASSWORD};
      /usr/bin/mc mb --quiet local/${DEFAULT_S3_UPLOAD_BUCKET_NAME}/;
      /usr/bin/mc policy set public local/${DEFAULT_S3_UPLOAD_BUCKET_NAME};
      "
    networks:
      - traefik

networks:
  traefik:
    external: true
Finally, the basic configuration information required for MinIO operation env:
# == MinIO
# optional: Set a publicly accessible domain name to manage the content stored in Outline

DOCKER_MINIO_IMAGE_NAME=minio/minio:RELEASE.2022-01-08T03-11-54Z
DOCKER_MINIO_HOSTNAME=mastodon-s3-api.lab.com
DOCKER_MINIO_ADMIN_DOMAIN=mastodon-s3.lab.com
MINIO_BROWSER=on
MINIO_BROWSER_REDIRECT_URL=https://${DOCKER_MINIO_ADMIN_DOMAIN}
# Select `Lowercase a-z and numbers` and 16-bit string length https://onlinerandomtools.com/generate-random-string
MINIO_ROOT_USER=6m2lx2ffmbr9ikod
# Select `Lowercase a-z and numbers` and 64-bit string length https://onlinerandomtools.com/generate-random-string
MINIO_ROOT_PASSWORD=2k78fpraq7rs5xlrti5p6cvb767a691h3jqi47ihbu75cx23twkzpok86sf1aw1e
MINIO_REGION_NAME=cn-homelab-1

# == MinIO Client
DOCKER_MINIO_CLIENT_IMAGE_NAME=minio/mc:RELEASE.2022-01-07T06-01-38Z

DEFAULT_S3_UPLOAD_BUCKET_NAME=mastodon
How to start and use MinIO is introduced in the previous article. It will not be expanded due to the limitation of space and words. If you are interested, please read it by yourself. The relevant code has been uploaded to GitHub https://github.com/soulteary/Home-Network-Note/tree/master/example/mastodon/minio
Final application configuration
Well, by integrating the above contents and making some simple adjustments, we can get a configuration similar to the following:
version: '3'
services:

  mastodon-gateway:
    image: nginx:1.21.4-alpine
    restart: always
    networks:
      - traefik
      - mastodon_networks
    volumes:
      - /etc/localtime:/etc/localtime:ro
      - /etc/timezone:/etc/timezone:ro
      - ./nginx.conf:/etc/nginx/nginx.conf
    healthcheck:
      test: ["CMD", "curl", "-f", "http://localhost/health"]
      interval: 15s
      retries: 12
    labels:
      - "traefik.enable=true"
      - "traefik.docker.network=traefik"
      - "traefik.http.routers.mastodon-nginx-http.entrypoints=http"
      - "traefik.http.routers.mastodon-nginx-http.rule=Host(`hub.lab.com`)"
      - "traefik.http.routers.mastodon-nginx-https.entrypoints=https"
      - "traefik.http.routers.mastodon-nginx-https.tls=true"
      - "traefik.http.routers.mastodon-nginx-https.rule=Host(`hub.lab.com`)"
      - "traefik.http.services.mastodon-nginx-backend.loadbalancer.server.scheme=http"
      - "traefik.http.services.mastodon-nginx-backend.loadbalancer.server.port=80"

  web:
    image: tootsuite/mastodon:v3.4.4
    restart: always
    env_file: .env.production
    environment:
      - "RAILS_ENV=production"
    command: bash -c "rm -f /mastodon/tmp/pids/server.pid; bundle exec rails s -p 3000"
    networks:
      - mastodon_networks
    healthcheck:
      test: ["CMD-SHELL", "wget -q --spider --proxy=off localhost:3000/health || exit 1"]
      interval: 15s
      retries: 12
    volumes:
      - /etc/localtime:/etc/localtime:ro
      - /etc/timezone:/etc/timezone:ro

  streaming:
    image: tootsuite/mastodon:v3.4.4
    env_file: .env.production
    restart: always
    command: node ./streaming
    networks:
      - mastodon_networks
    healthcheck:
      test: ["CMD-SHELL", "wget -q --spider --proxy=off localhost:4000/api/v1/streaming/health || exit 1"]
      interval: 15s
      retries: 12
    volumes:
      - /etc/localtime:/etc/localtime:ro
      - /etc/timezone:/etc/timezone:ro
    environment:
      - "STREAMING_CLUSTER_NUM=1"

  sidekiq:
    image: tootsuite/mastodon:v3.4.4
    env_file: .env.production
    restart: always
    command: bundle exec sidekiq
    networks:
      - mastodon_networks
    volumes:
      - /etc/localtime:/etc/localtime:ro
      - /etc/timezone:/etc/timezone:ro

networks:
  mastodon_networks:
    external: true
  traefik:
    external: true
In addition, because we have configured independent static resource service and file storage service, we need to env. Add some additional configurations to production:
CDN_HOST=https://hub-assets.lab.com
S3_ENABLED=true
S3_PROTOCOL=http
S3_REGION=cn-homelab-1
S3_ENDPOINT=http://mastodon-s3-api.lab.com
S3_BUCKET=mastodon
AWS_ACCESS_KEY_ID=6m2lx2ffmbr9ikod
AWS_SECRET_ACCESS_KEY=2k78fpraq7rs5xlrti5p6cvb767a691h3jqi47ihbu75cx23twkzpok86sf1aw1e
S3_ALIAS_HOST=hub-res.lab.com
Use the familiar docker compose up - D to start the service. After a while, we can see the applications started normally.
This part of the relevant code has been uploaded to GitHub https://github.com/soulteary/Home-Network-Note/tree/master/example/mastodon/app , you can take it yourself if necessary.
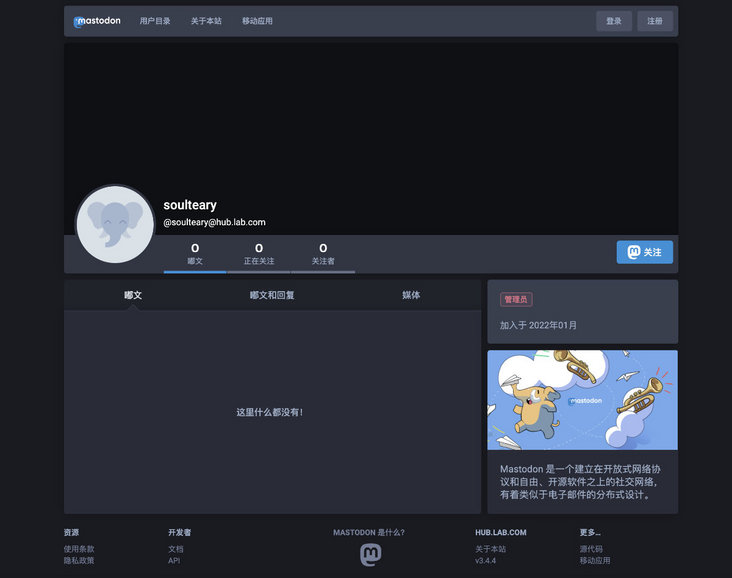
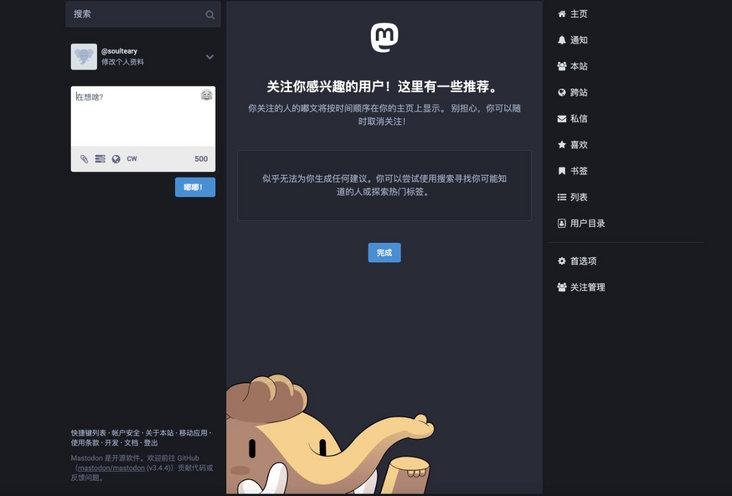
Click login and use the account, email and initialization password when we just created the application configuration to complete the application login and start the exploration of Mastodon.
last
Even if the content is repeatedly reduced, the number of words in this article exceeds the length limit of most platforms, so if you find some missing in the process of reading, you can try to read the original text or the complete sample file on GitHub to solve the problem.
In the next article, I will talk about how to further tune performance and solve some problems not solved in this article.
In the follow-up, we will sort out and share some small experiences in the process of knowledge management and knowledge base construction, hoping to help you who are also interested and curious in this field.
--EOF
If you think the content is practical, you are welcome to share it with your friends. Thank you here.
If you want to see the follow-up content updates faster, please don't hesitate to "like" or "forward and share". These free incentives will affect the speed of follow-up content updates.
This article uses the "signature 4.0 International (CC BY 4.0)" license agreement. You are welcome to reprint, modify or use it again, but you need to indicate the source. Signature 4.0 International (CC BY 4.0)
Author: Su Yang
Original link: https://soulteary.com/2022/01...