Reading guide
One of the fastest growing sub fields in the field of artificial intelligence is natural language processing (NLP), which deals with the interaction between computer and human (NATURAL) language, especially how to program computer to process and understand a large amount of natural language data.
Natural language processing usually involves speech recognition, natural language understanding and natural language generation. Among them, information extraction such as named entity recognition (NER) is rapidly becoming one of the basic applications of NLP. In this article, we will share a solution to one of the most difficult problems in implementing NER.

The latest development of deep learning has led to the rapid development of complex technologies that can be used for entity extraction and other NLP related tasks. Generally, enterprise OCR software (ABBY, ADLIB, etc.) is used to convert a large number of unstructured and image-based documents into fully searchable PDF and PDF/A. people can use the most advanced algorithms (BERT, ELMo, etc.) to create a highly up-down cultural language model to infer the extracted information and achieve NLP goals.
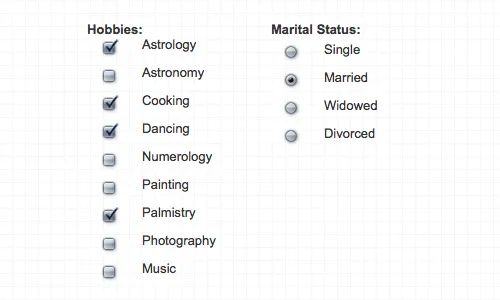
In reality, however, not all documents consist solely of language based data. A document can have many other nonverbal elements, such as radio buttons, signature blocks, or some other geometry that may contain useful information but cannot be easily processed by OCR or any of the above algorithms. Therefore, a special solution needs to be designed to identify and deal with these elements.
Operation steps

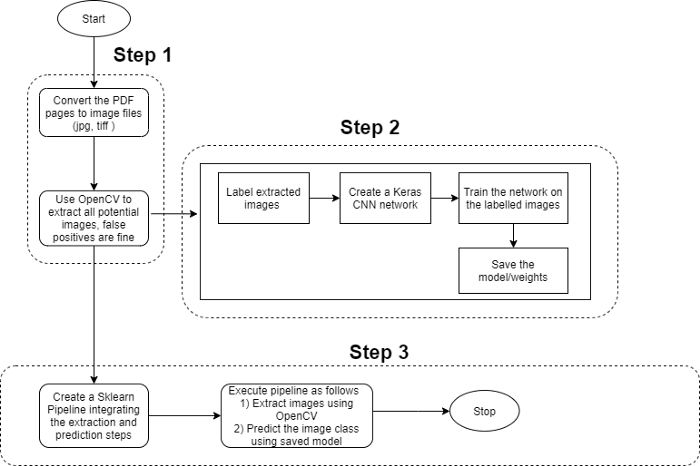
Step 1: convert documents (PDF, etc.) into image files. Write a heuristic code based on OpenCV API to extract all possible image fragments. This code should be optimized for coverage rather than accuracy.
Step 2: mark the image extracted in step 1 accordingly. Create a CNN based deep learning network and train it according to the marked images, which will ensure the accuracy.
Step 3: create a Sklearn pipeline and integrate the above two steps to extract all potential images when receiving documents, and then use the trained CNN model to predict the image of the desired shape.

Design details
It should be noted that OpenCV code recognizes as many image segments of the required shape as possible. In essence, we need to have a wide detection range without worrying about false positives. They will be processed by the subsequent ConvNet model. CNN is selected for image classification because it is easy to model and fast modeling, but any other selected algorithm can be used as long as the performance and accuracy are within an acceptable range. Pipelining plays a key role in constructing ML code, which helps to simplify workflow and enforce the sequence of steps.
Practical operation
Step 1: OpenCV
This code has a dual purpose:
1) Create training / test data
2) Extract image segments when integrated into the pipeline
At present, two types of extracted code can be detected (radio button and check box), but other objects can be easily supported by adding a new method under the ShapeFinder class. The following is a code fragment for identifying squares / rectangles (also known as check boxes).
 #detect checkbox/square
def extract_quads(self,image_arr,name_arr):

    if len(image_arr) > 0:

        for index,original_image in enumerate(image_arr):

            #to store extracted images
            extracted_quad = []
            image = original_image.copy()

            #grayscale only if its not already
            if len(image.shape) > 2:
                gray = cv2.cvtColor(image.copy(), cv2.COLOR_BGR2GRAY)
            else:
                gray = image.copy()

            #image preprocessing for quadrilaterals
            img_dilate = self.do_quad_imageprocessing(gray,self.blocksize,self.thresh_const,self.kernelsize)

            if len(img_dilate) > 0:

                try:
                    #detect contours
                    cnts = cv2.findContours(img_dilate.copy(), cv2.RETR_LIST, cv2.CHAIN_APPROX_SIMPLE)
                    cnts = imutils.grab_contours(cnts)

                    #loop through detected contours
                    for c in cnts:
                        peri = cv2.arcLength(c, True)
                        approx = cv2.approxPolyDP(c, (self.epsilon)* peri, True)

                        #bounding rec cordinates
                        (x, y, w, h) = cv2.boundingRect(approx)

                        #get the aspect ratio
                        aspectratio = float(w/h)
                        area = cv2.contourArea(c)
                        if area < self.rec_max_area and area > self.rec_min_area and (aspectratio >= self.aspect_ratio[0] and aspectratio <= self.aspect_ratio[1]):

                            #check if there are 4 corners in the polygon
                            if len(approx) == 4:
                                cv2.drawContours(original_image,[c], 0, (0,255,0), 2)
                                roi = original_image[y:y+h, x:x+w]
                                extracted_quad.append(roi)

                except Exception as e:
                    print('The following exception occured during quad shape detection: ',e)

            self.extracted_img_data.append([original_image,extracted_quad,name_arr[index]])

    else:
        print('No image is found during the extraction process')
Convert PDF to image using pdf2image:
def Img2Pdf(dirname):

    images = []

    #get the pdf file
    for x in os.listdir(dirname):
        if (dirname.split('.')[1]) == 'pdf':
            pdf_filename = x
            images_from_path = convert_from_path(os.path.join(dirname),dpi=300, poppler_path = r'C:\Program Files (x86)\poppler-0.68.0_x86\poppler-0.68.0\bin')
for image in images_from_path:
                images.append(np.array(image))

    return images
Step 2: convolutional neural network
Since the extracted image fragments will have relatively small size, a simple three-layer CNN will help us, but we still need to add some regularization and Adam to optimize the output.
The network should be trained separately for each type of image sample to obtain better accuracy. If you add a new image shape, you can create a new network, but now we use the same network for both check boxes and radio buttons. At present, it is only a binary classification, but further classification can also do so:
- Check the check box
- Empty check box
- other
#keras things
from keras.utils import to_categorical
from keras import layers
from keras import models
from keras.regularizers import l2


Y_test_orig = to_categorical(Y_test_orig, num_classes=2)
Y_train_orig = to_categorical(Y_train_orig, num_classes=2)

# 3 layer ConvNet
model = models.Sequential()
model.add(layers.Conv2D(32, (3, 3), activation='relu',input_shape=(32,32,1)))
model.add(layers.MaxPooling2D((2, 2)))

model.add(layers.Conv2D(64, (3, 3), activation='relu'))
model.add(layers.MaxPooling2D((2, 2)))

model.add(layers.Conv2D(128, (3, 3), activation='relu'))
model.add(layers.MaxPooling2D((2, 2)))

#dense layer
model.add(layers.Flatten())

#add the regulizer
model.add(layers.Dense(128, activation='linear', activity_regularizer=l2(0.0003)))
model.add(layers.Dense(128, activation='relu'))
model.add(layers.Dense(2, activation='sigmoid'))

model.summary()

from keras.optimizers import Adam
opt = Adam(lr=0.001)
model.compile(optimizer=opt, loss=keras.losses.categorical_crossentropy, metrics=['accuracy'])

ntrain = len(X_train_orig)
nval = len(X_test_orig)
X_train_orig = X_train_orig.reshape((len(X_train_orig),32,32,1))
X_test_orig = X_test_orig.reshape((len(X_test_orig),32,32,1))

train_datagen = ImageDataGenerator(rescale = 1./255,rotation_range = 40, width_shift_range = .2,
                                  height_shift_range = .2, shear_range = .2, zoom_range =  .2, horizontal_flip = True)

val_datagen = ImageDataGenerator(rescale = 1./255)

train_generator = train_datagen.flow(X_train_orig,Y_train_orig,batch_size=32)
val_generator = val_datagen.flow(X_test_orig,Y_test_orig,batch_size = 32)


#X_train_orig, X_test_orig, Y_train_orig,Y_test_orig
history = model.fit_generator(train_generator,steps_per_epoch = ntrain/32, epochs = 64, validation_data = val_generator, validation_steps = nval/32  )
In step 3, we will integrate all the contents into one Sklearn pipeline and expose it through the predict function. An important feature we haven't introduced is to associate a check box or radio button with the corresponding text in the document. In practical applications, it is useless to only detect elements that are not associated.
GITHUB code link:
https://github.com/nebuchadnezzar26/Shape-Detector