I. Two nonsense sentences
In the cloud data center, when dozens or even hundreds of servers are online at a time, the system installation will become very cumbersome. After the system is installed, many configurations will be involved. If one server is installed, the workload will be very large. (It's a joke, though there's overtime pay)
To solve this problem, we need to implement unattended batch deployment system.
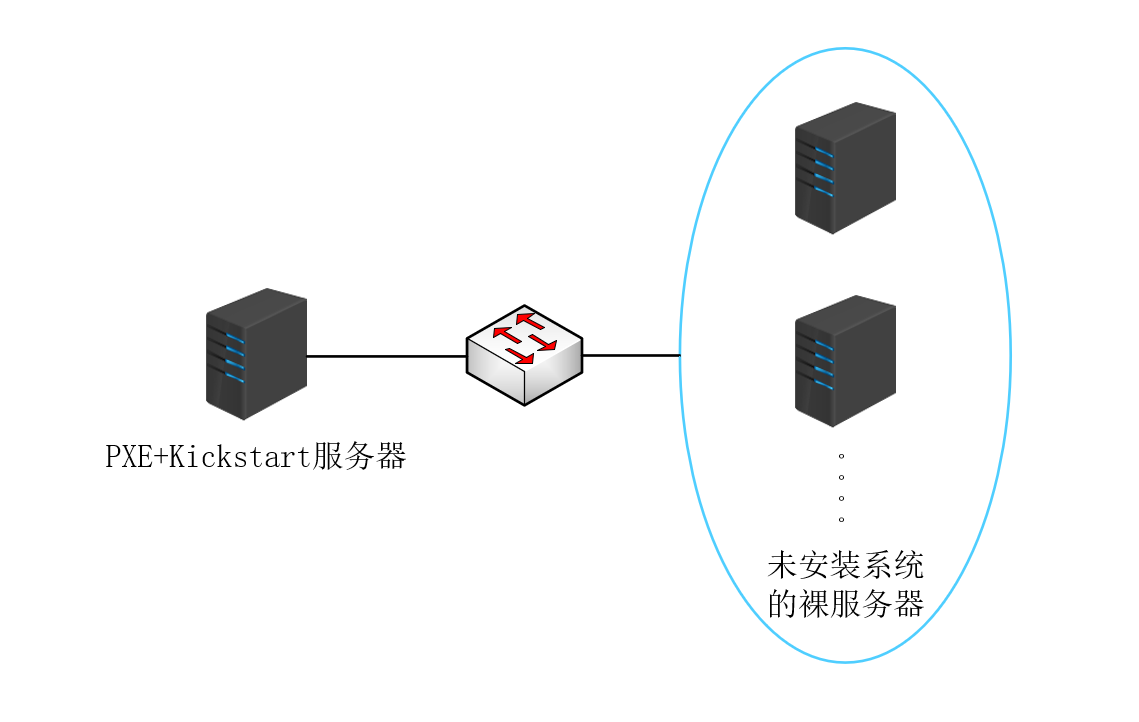
A brief look at the topology diagram:
1. What is PXE?
Simply put: PXE is mainly a guiding role, the specific details here do not say much, details of Baidu can be.
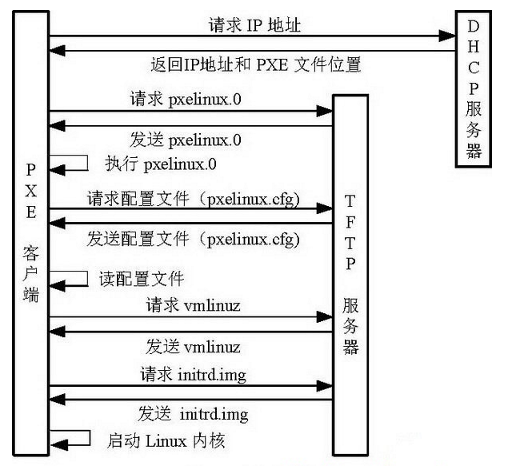
PXE boot process:
2. What is Kickstart?
Kickstart is an unattended installation. Its working principle is to record typical parameters that need manual intervention during installation.
For example, when we install the system, we need to partition, set the time zone, set the root password, script and so on. These operations are recorded and generated a file named ks.cfg.
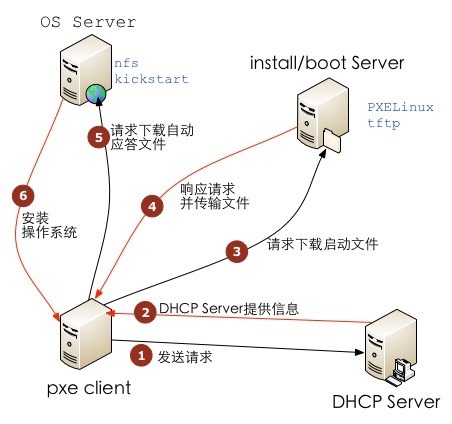
PXE+Kickstart unattended installation of the operating system complete process:
II. Environmental preparation
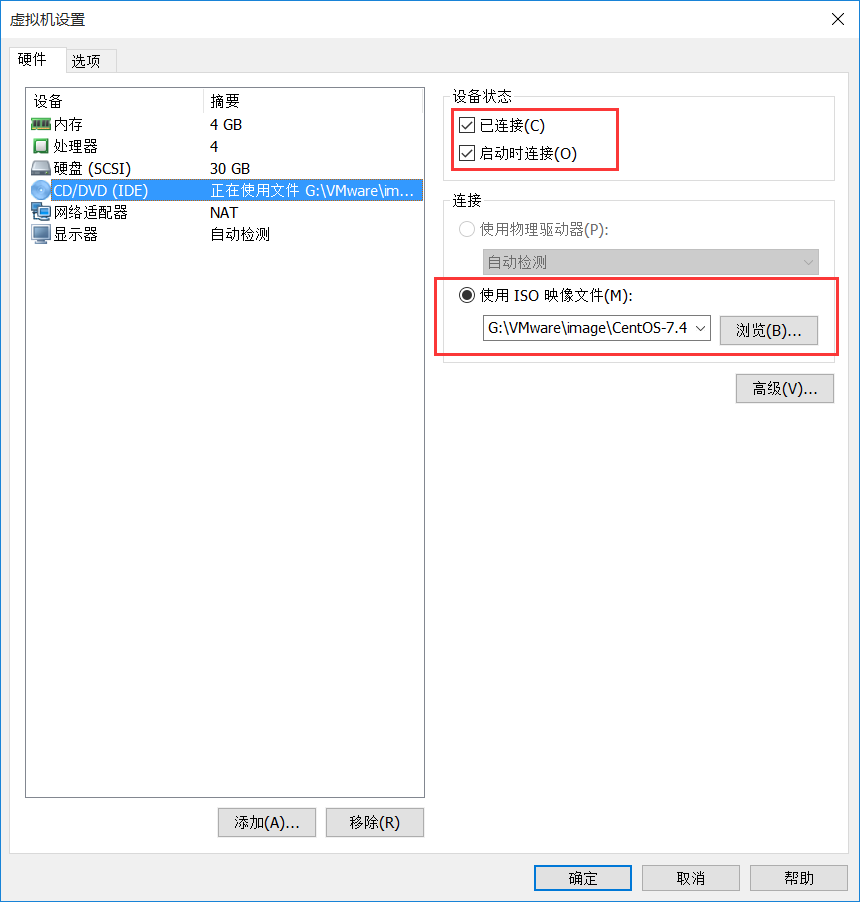
Operating System: CentOS 7.4 (Minimizing Installation)
Experimental platform: VMware Workstation 14
Network mode: NAT mode
Server IP address: 192.168.115.21
Firewall: Close
SElinux=Disable
III. Preparations
This step is not required if it was already graphically installed.
Generating ks.cfg files requires the system-config-kickstart tool, which relies on X Windows, so we need to install X Windows and Desktop and restart the system, as follows:
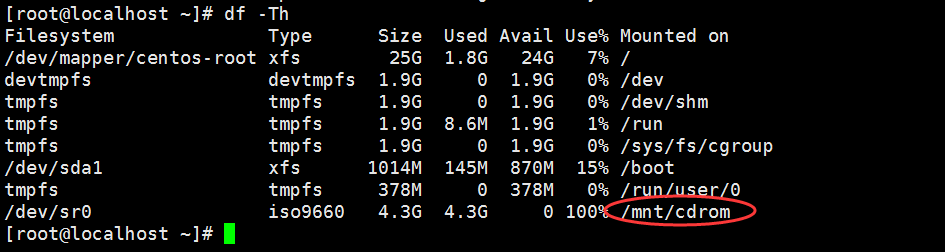
i. Mount CD-ROM:
[root@localhost ~]# mkdir /mnt/cdrom
[root@localhost ~]# mount /dev/cdrom /mnt/cdrom
ii. Configure local yum sources:
[root@localhost ~]# cat /etc/yum.repos.d/dvd.repo
------------------------------------------------------
[development]
# The name must be "development" or if you go to the following kickstart configuration, there will be package selection and no package information.
name=redhat
baseurl=file:///mnt/cdrom
gpgcheck=0
iii. Installation graphics:
[root@localhost ~]# yum groupinstall "Server with GUI" -y
[root@localhost ~]# systemctl set-default graphical.target  // Set default boot to GUI
[root@localhost ~]# reboot      // Restart the machine
IV. Installation Needs Service
1. Configure DHCP
i. Installing DHCP services
[root@localhost ~]# yum install dhcp -y
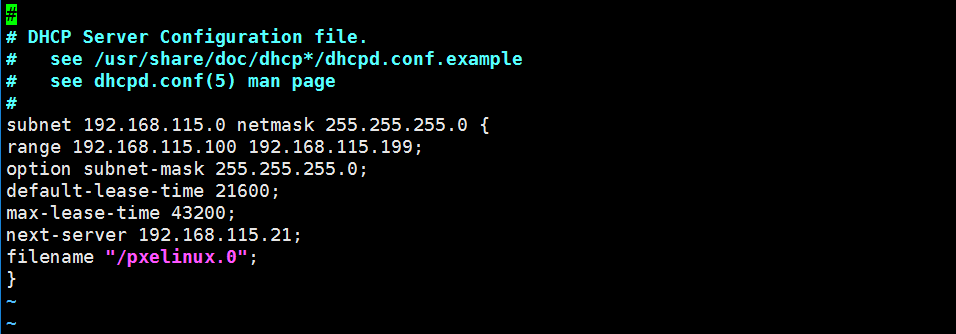
ii. Modify/etc/dhcp/dhcpd.conf configuration file
[root@localhost ~]# vim /etc/dhcp/dhcpd.conf
------------------------- The configuration is as follows -------------------------------
subnet 192.168.115.0 netmask 255.255.255.0 {    //Located network segment
range 192.168.115.100 192.168.115.199;          //distribution IP Address range
option subnet-mask 255.255.255.0;              //Setting Subnet Mask for Client( netmask)
default-lease-time 21600;           //Set the default IP Rental period
max-lease-time 43200;               //Set the maximum IP Rental period
next-server 192.168.115.21;         //tfp Server IP address
filename "/pxelinux.0";             //Network bootstrapper
}
iii. Start the DHCP service
[root@localhost ~]# systemctl start dhcpd
[root@localhost ~]# systemctl enable dhcpd
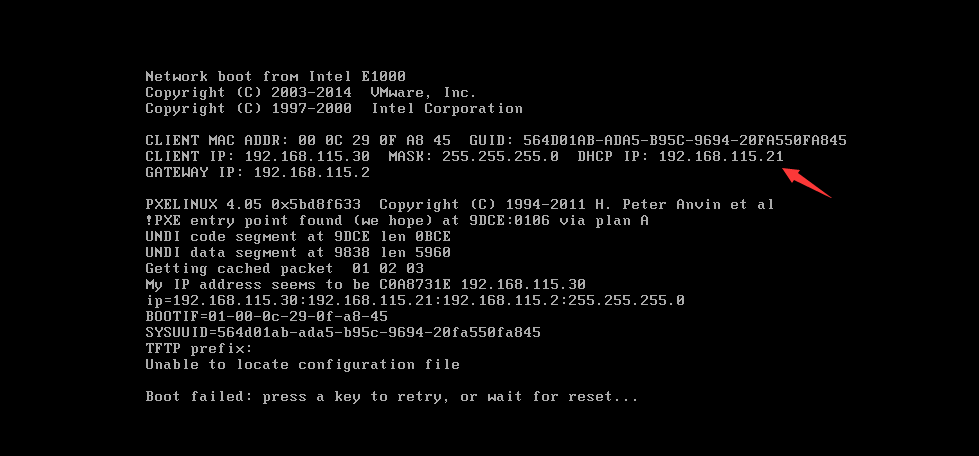
iv. Testing the success of DHCP
Create a new virtual machine for testing. The following figure shows that the IP address and other information have been successfully obtained.
2. Configuring TFP
i. Installation of TFP, Xinetd
[root@localhost ~]# yum install tftp-server xinetd -y
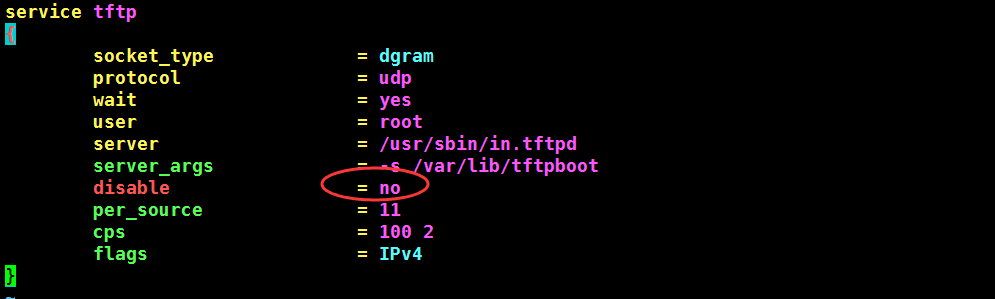
ii. Modifying configuration files
[root@localhost ~]# vim /etc/xinetd.d/tftp
--------------------- omit configuration information, see the following figure - -------------------------------------------------------------------------------------------------
Set disable to no
iii. Start Services
Because the tftp service is mounted under the super process xinetd, the tftp service is started by starting xinetd.
[root@localhost ~]# systemctl start xinetd
[root@localhost ~]# systemctl enable xinetd
iv. Check if the service started successfully
[root@localhost ~]# netstat -ntulp | grep 69
udp       0      0 0.0.0.0:69        0.0.0.0:*        2817/xinetd
3. Install Syslinux
i. Installing syslinux just to boot the loader for pxelinux.0 has no other purpose.
[root@localhost ~]# yum install selinux -y
ii. Copy the pxelinux.0 file to / var/lib/tftpboot / folder
[root@localhost ~]# cp /usr/share/syslinux/pxelinux.0 /var/lib/tftpboot/
iii. Copy configuration files on CD-ROM
[root@localhost ~]# cp /mnt/cdrom/isolinux/* /var/lib/tftpboot/

iv. Verify that the change is successful
You can see the interface by restarting the new test virtual machine.
4. Configure HTTP
i. Installing HTTP
The installation mode of the system can choose HTTP, FTP, NFS. Here we introduce the installation of HTTP mode, and the installation of the other two modes. You can Baidu by yourself.
[root@localhost ~]# yum install httpd -y
ii. Start HTTP
[root@localhost ~]# systemctl start httpd
[root@localhost ~]# systemctl enable httpd
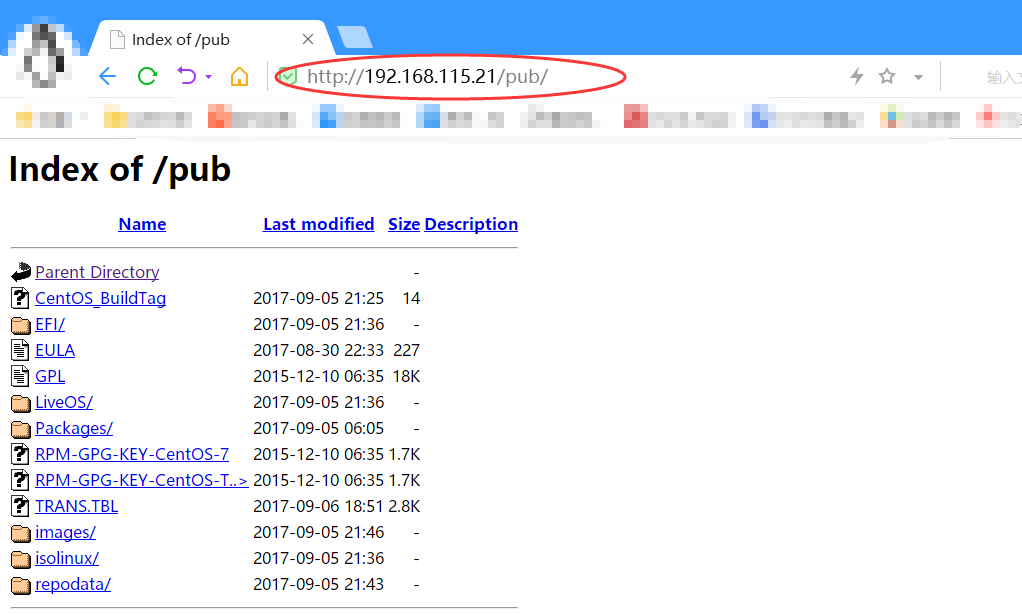
iii. Copy the entire contents of the CD to the root directory of http / var/www/html/pub
[root@localhost ~]# mkdir /var/www/html/pub
[root@localhost ~]# cp -r /mnt/cdrom/ /var/www/html/pub
iv. Test the success of the change
5. Configure kickstart
i. Install kickstart
[root@localhost ~]# yum install system-config-kickstart -y
ii. Configure Kickstart in desktop environment to generate ks.cfg file
[root@localhost ~]# system-config-kickstart
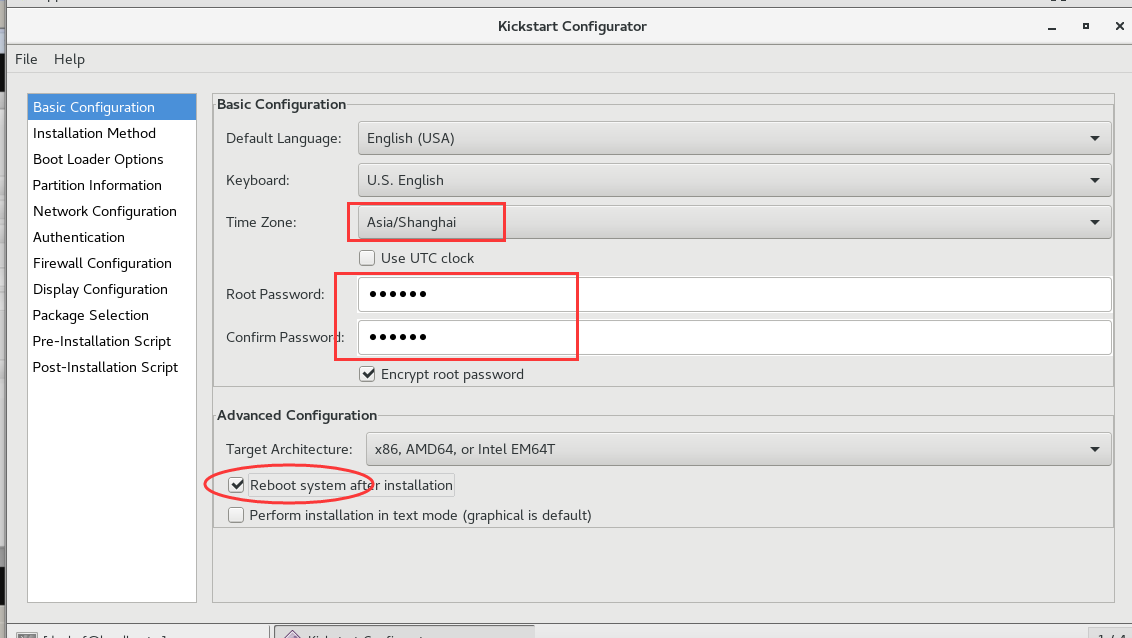
A. Setting up language, keyboard, time zone, Root password, restart after installation, etc.
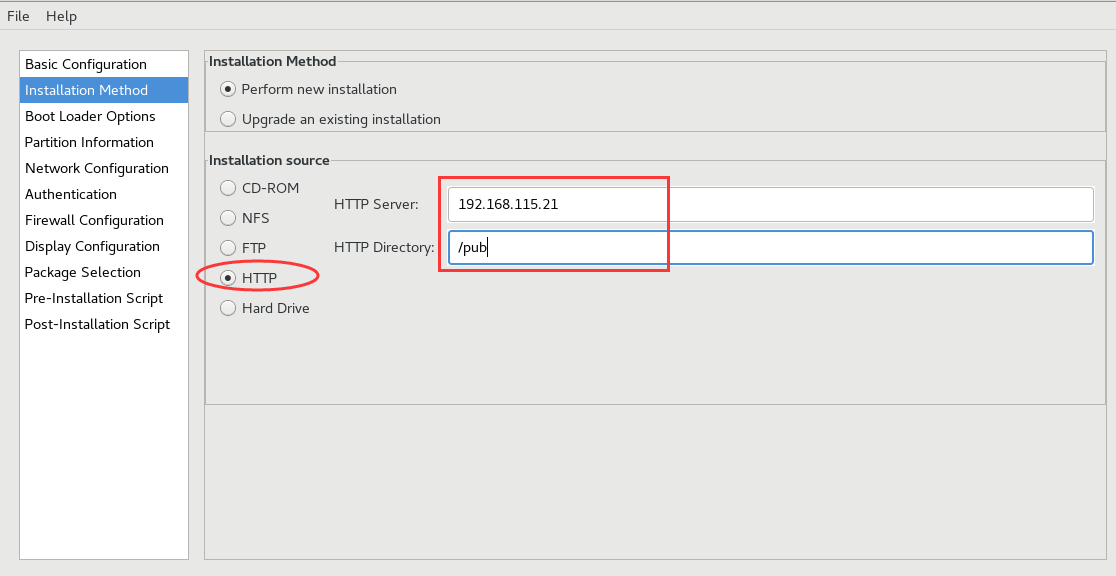
B. Setting up the installation mode. This article introduces the installation of HTTP mode.
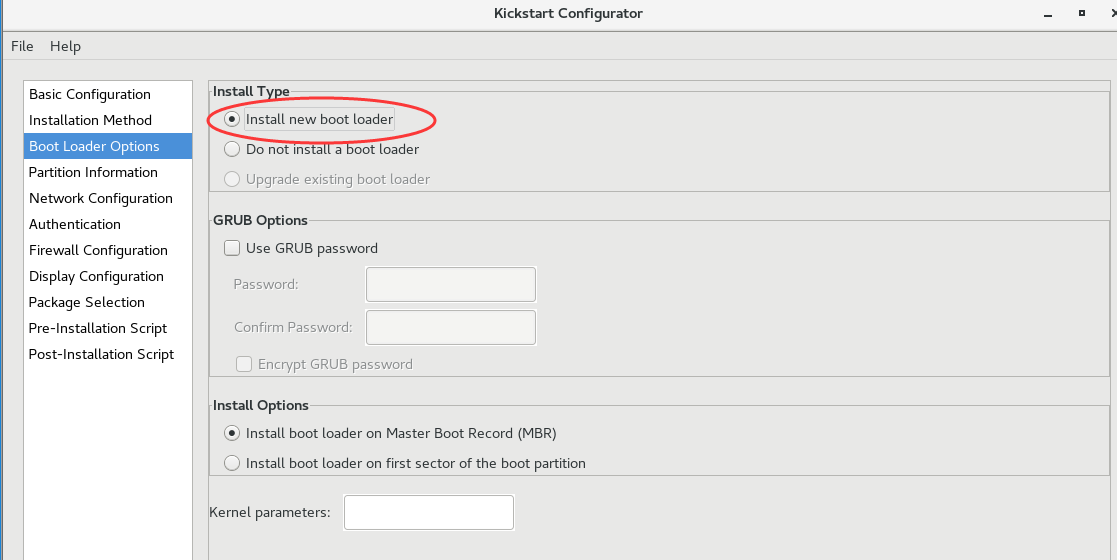
C. Installation of MBR
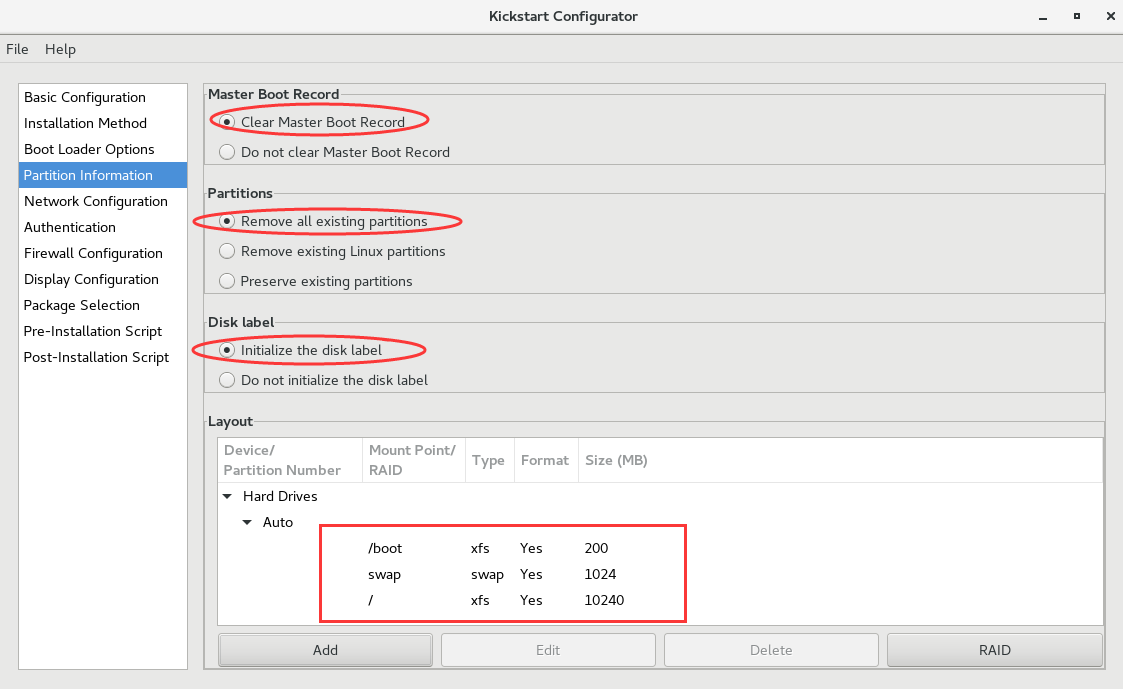
D. Setting up partitions
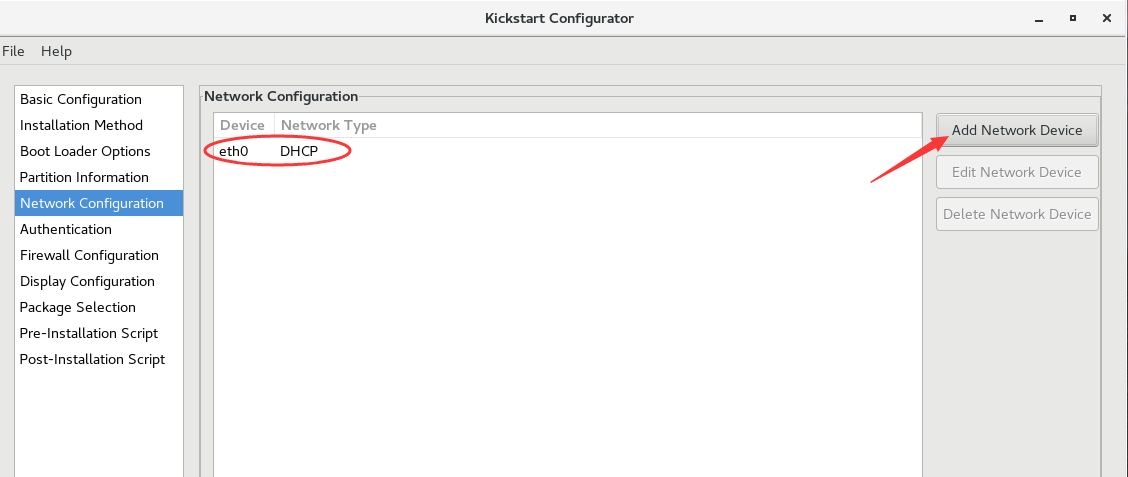
E. Configuration Network
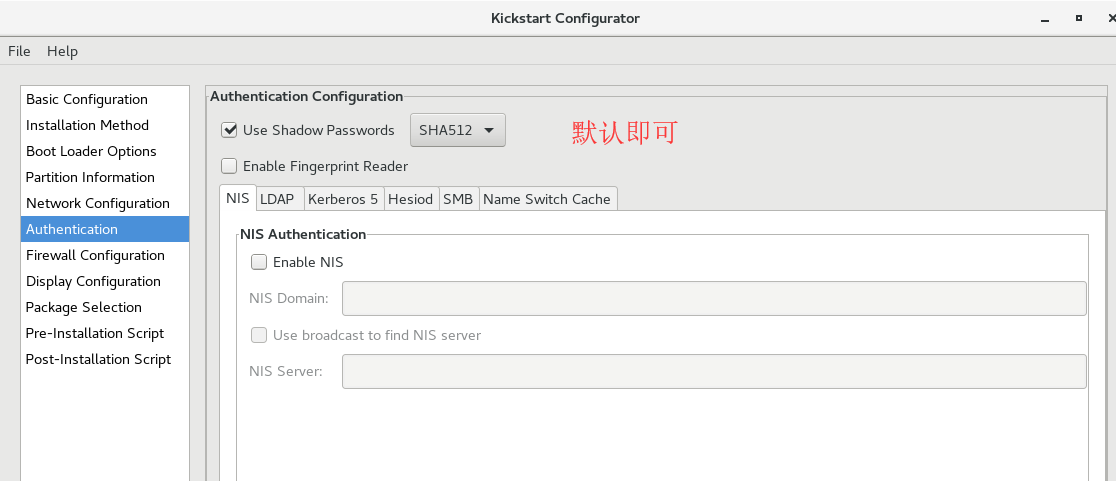
F. Authentication Configuration
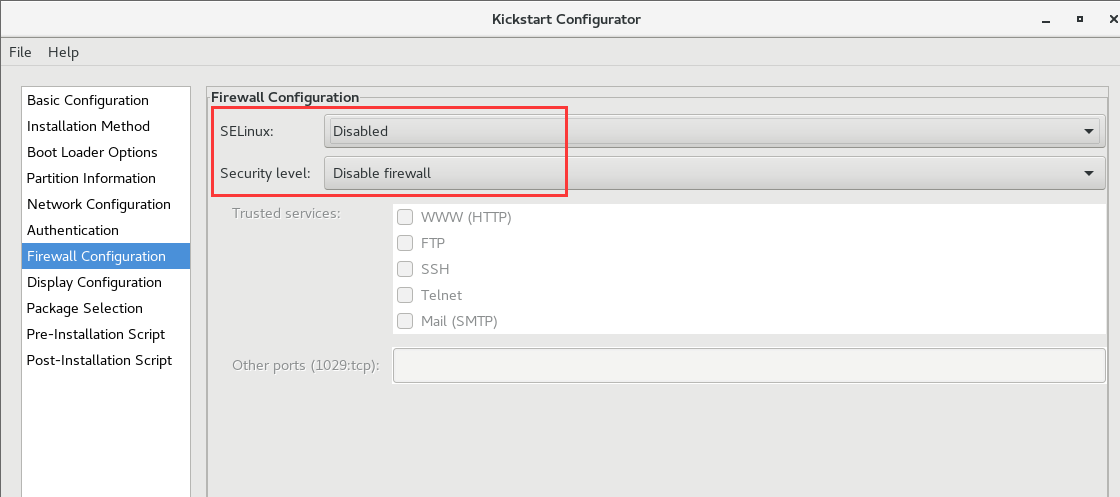
G. SELinux and firewall configuration
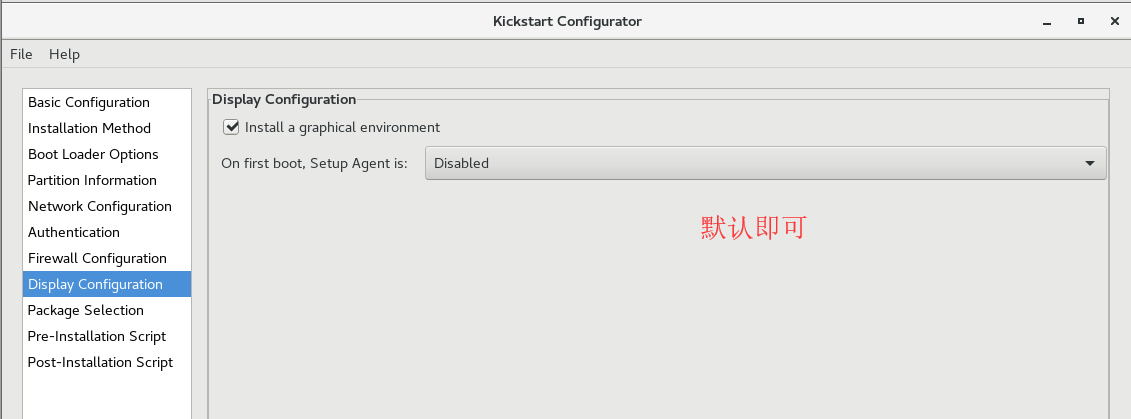
H. Graphic Environment Configuration
I. Package Installation Selection
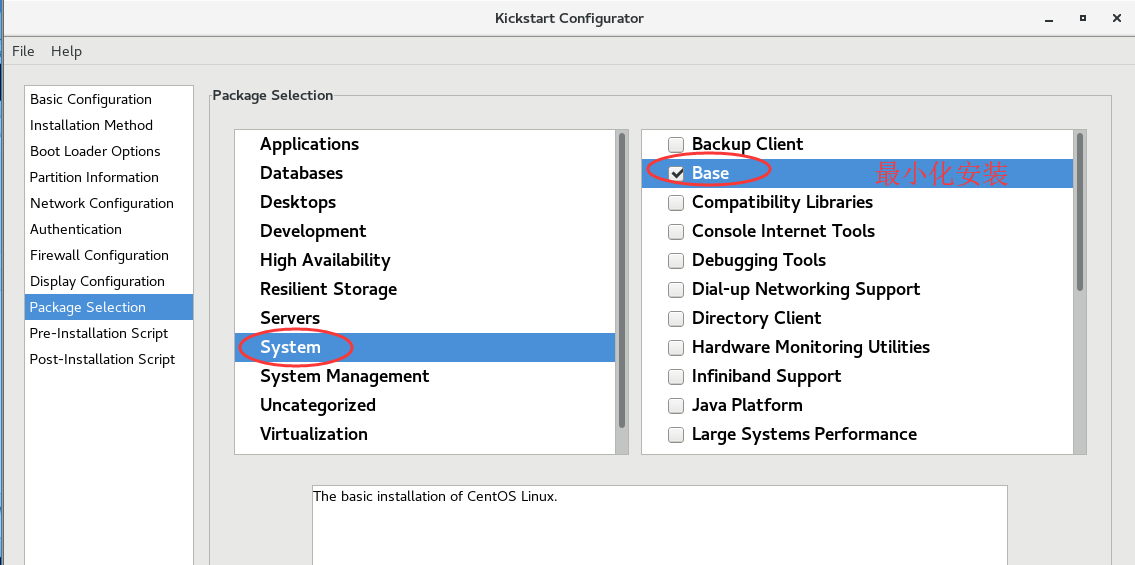
Note: If your software list has no information, look at the following section to solve the problem, as follows:
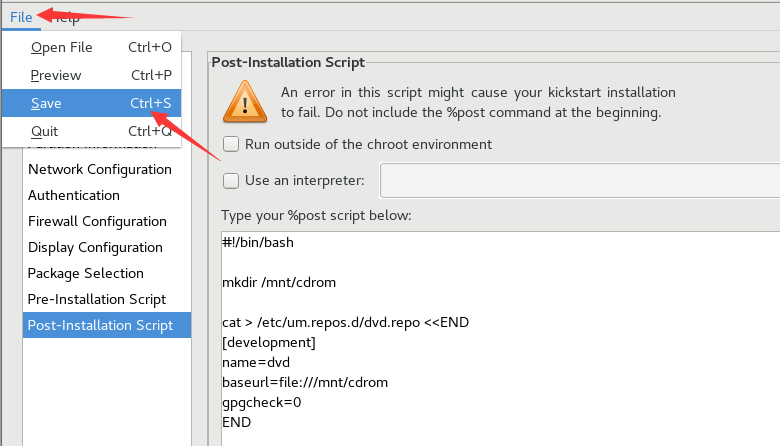
J. Post-installation script
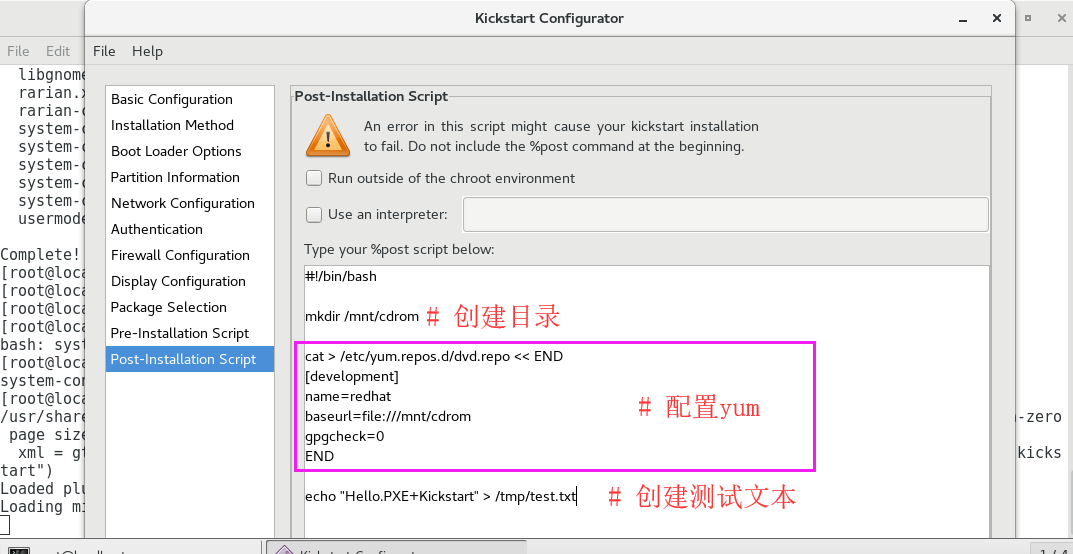
K. Save the export configuration file
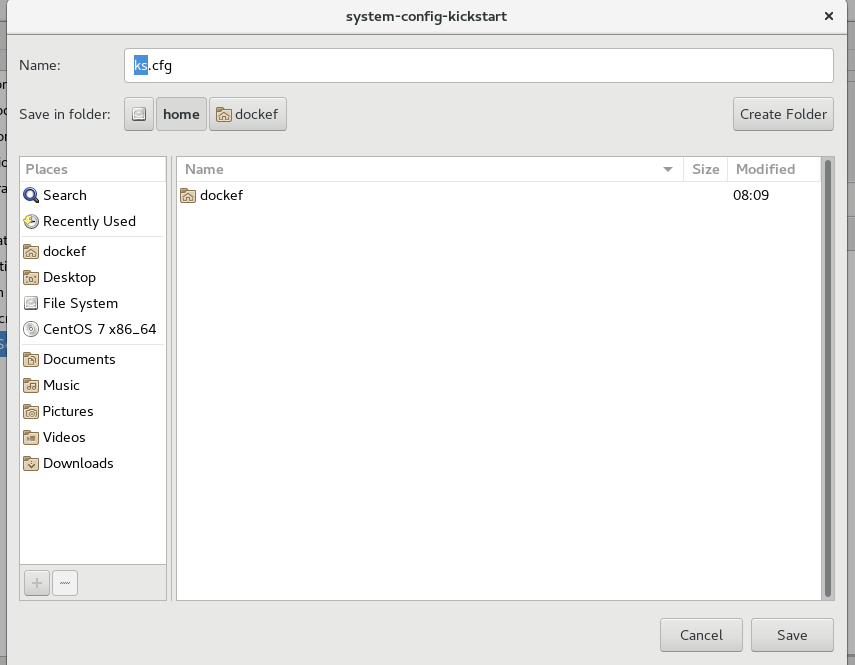
iii. Copy to the ks directory under HTTP
[root@localhost ~]# mkdir /var/www/html/ks
[root@localhost ~]# cp ks.cfg  /var/www/html/ks/
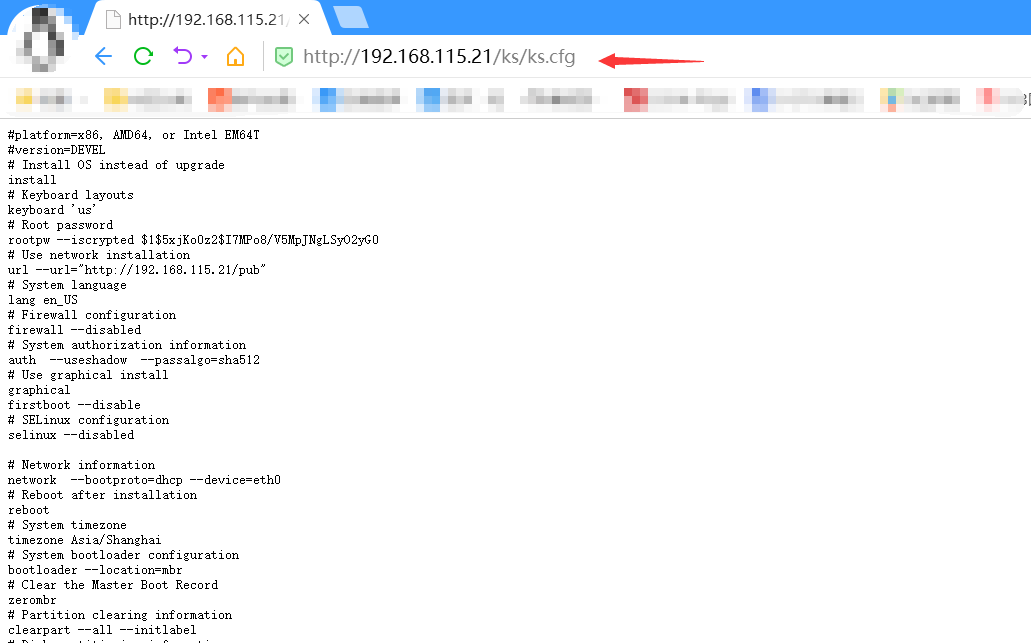
iv. Verification modification steps
6. Modify default
i. Create configuration folders
[root@localhost ~]# cd /var/lib/tftpboot/
[root@localhost tftpboot]# mkdir pxelinux.cfg
ii. Copy configuration files
[root@localhost ~]# cp /var/lib/tftpboot/isolinux.cfg /var/lib/tftpboot/pxelinux.cfg/default
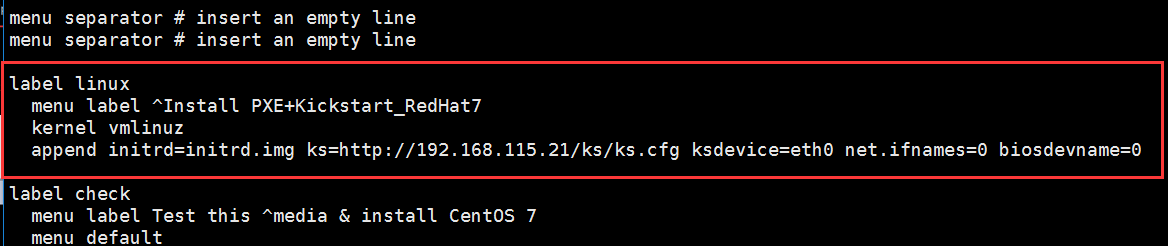
[root@localhost ~]# vim /var/lib/tftpboot/pxelinux.cfg/default
----------------------- The modification configuration is as follows --------------------------
label linux
menu label ^Install PXE+Kickstart_RedHat7
kernel vmlinuz
append initrd=initrd.img ks=http://192.168.115.21/ks/ks.cfg ksdevice=eth0 net.ifnames=0 biosdevname=0
Parametric interpretation:
append initrd=initrd.img ks     // Deposit ks The server address and path of the configuration file, through which the corresponding ks.cfg File to boot system installation
ksdevice=eth0                   // Specify the network card to proceed ks Data Interaction (Neglectable)
net.ifnames=0 biosdevname=0     // Modify the kernel parameters to change the network card name to ethXX
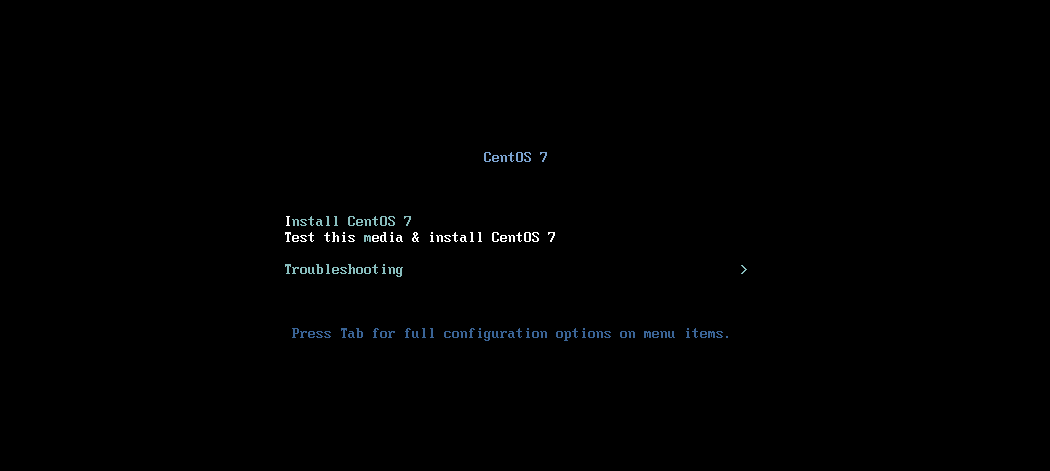
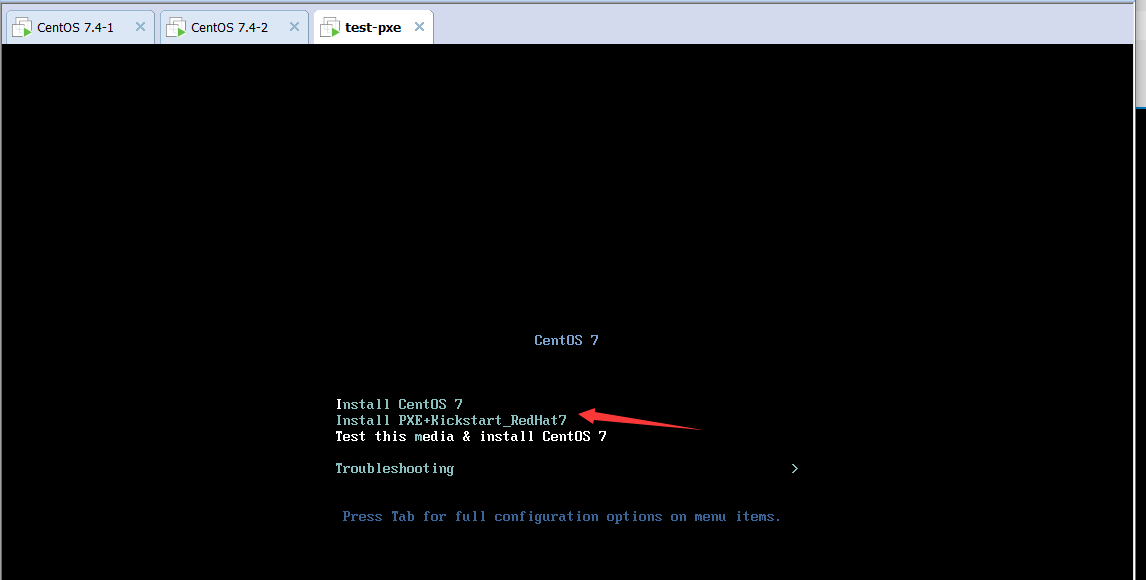
iii. Boot-up validation (manual selection of installation is required)
iv. Fully automatic installation without manual selection
[root@localhost ~]# vim /var/lib/tftpboot/pxelinux.cfg/default
--------------------------------------------------------------
default linux            # Find default on the first line of the configuration file, and add the label name.
label linux
  menu label ^Install PXE+Kickstart_RedHat7
  kernel vmlinuz
  append initrd=initrd.img ks=http://192.168.115.21/ks/ks.cfg ksdevice=eth0 net.ifnames=0 biosdevname=0
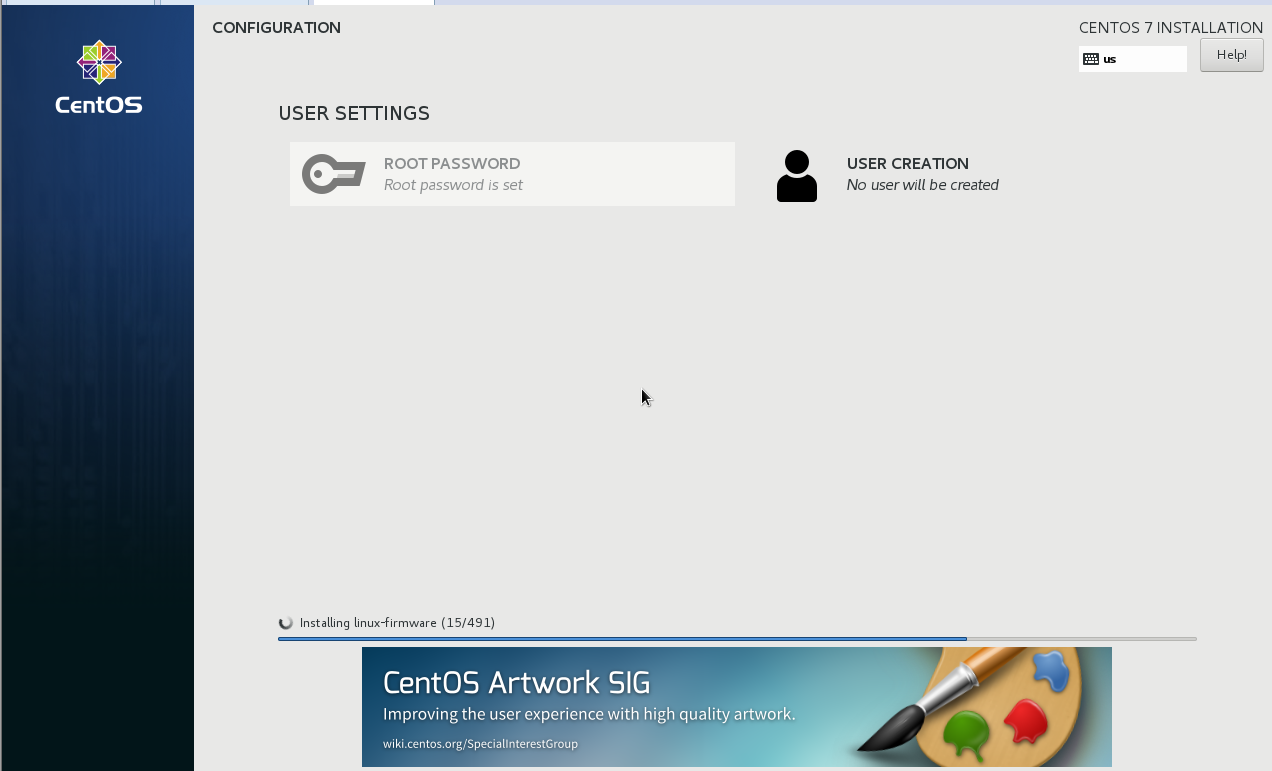
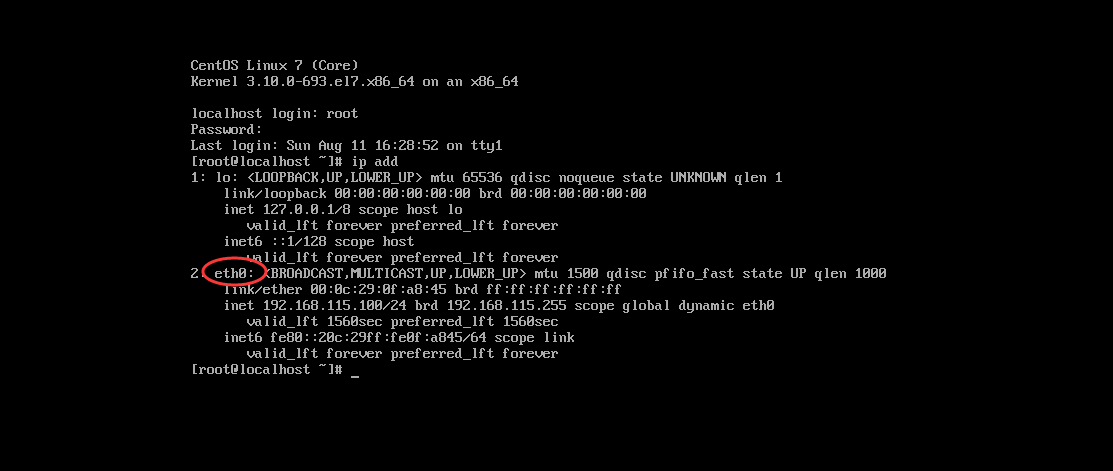
v. Verify script information after installation

So far, the unattended batch deployment system has been completed and the work is over.
5. Problems you may have
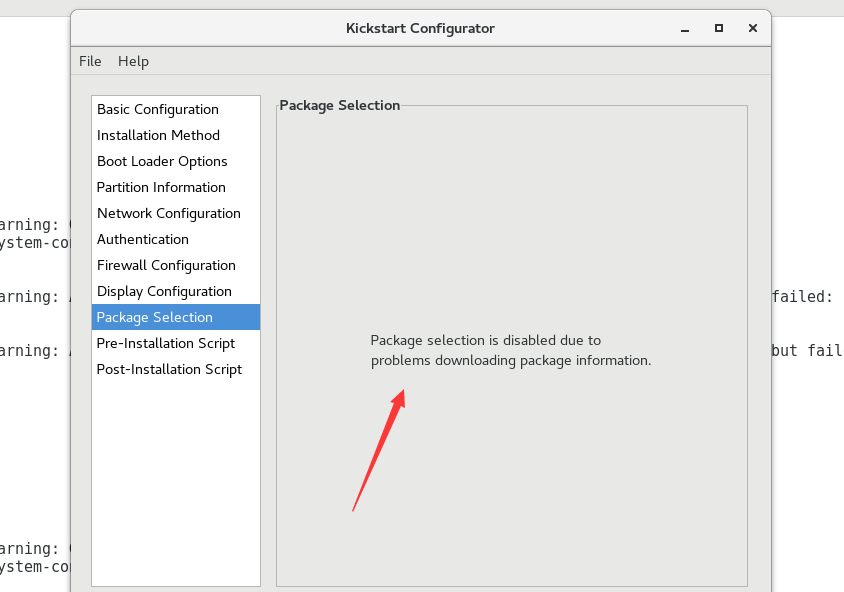
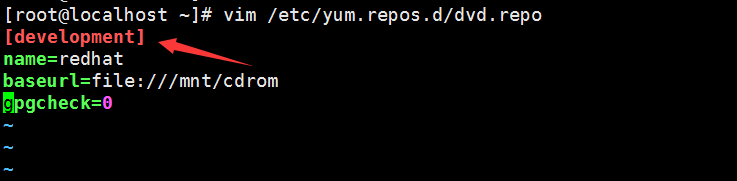
1. When configuring kickstart, no package information appears in the package selection, as follows:

Solution:
Check if the yum source configuration is: [development], after configuration, open the kickstart configuration window again. As shown in the figure:
2. After configuring, the following error messages appear when automating deployment, as shown in the following figure:
"/sbin/dmsquash-live-root: line 273: write error: No space left on device"
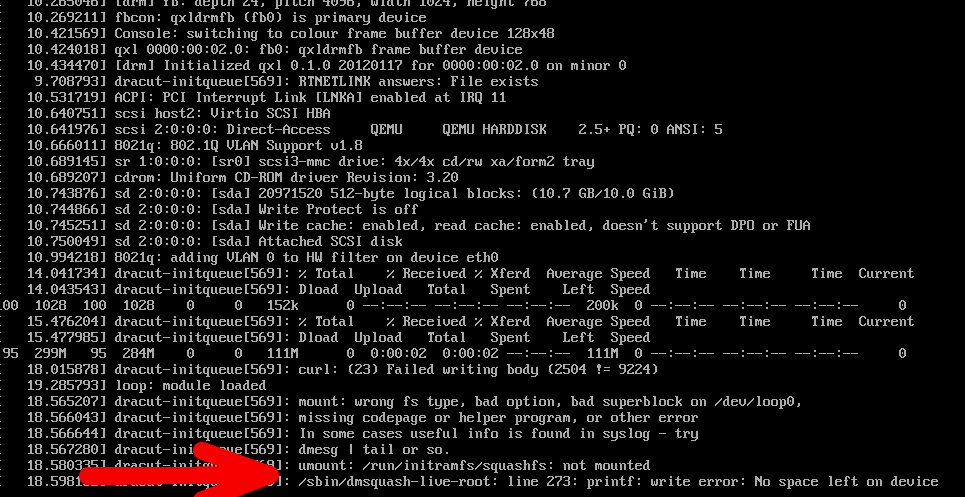
Solution:
Check the memory size of the virtual machine or server. Kickstart installation for RedHat versions above 7.3 requires allocation of at least 2GB of memory.