Editor: HBuiderX, PyCharm
Main technologies: 5+App, python
HBuiderX Download Address: http://www.dcloud.io/hbuilderx.html
PyCharm Download Address: http://www.jetbrains.com/pycharm/?fromMenu
python download address: https://www.python.org/
5+App is a cross-platform app project under HBuiderX. The full name is HTML5 Plus. It is an app based on HTML, JS and CSS, which runs on the mobile phone. This app can call the native ability of the mobile phone arbitrarily through the extended JS API to achieve the same powerful function and performance as the native App.
The first step is to write the background interface.
python only provides interface + business processing
from flask import Flask, make_response introduces routing module, provides external access interface, and make_response processes return results
App.run (host = "0.0.0.0", "port ="5000","debug = True) means that any ip in the same LAN can be accessed. The access port is: 5000, allowing debugging mode.
from flask import Flask, make_response
from flask_cors import cross_origin

app = Flask(__name__)
uName = "admin"
uPwd = "admin"
status = ""


# The login function (REST RESTful: accepts parameters, and the access type can be: get, post)
@app.route("/login/<account>/<password>", methods=['GET', 'POST'])
@cross_origin()
def get_content(account, password):
    if uName.__eq__(account) and uPwd.__eq__(password):
        status = "200"
        rst = make_response(status)
        #Processing request header
        rst.headers['Access-Control-Allow-Origin'] = '*'
        return rst

    status = "0"
    rst = make_response(status)
    rst.headers['Access-Control-Allow-Origin'] = '*'
    return rst


if __name__ == '__main__':
    app.run(host="0.0.0.0", port="5000", debug=True)
At this time, we can test whether the python interface is normal through the browser.
First, we open the command window to query a local ip address, which can be used later.
win+r, enter cmd, enter ipconfig, view ip address
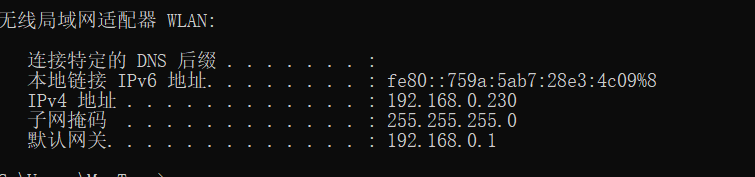
After viewing your IPv4 address, open browser access
Example: http://192.168.0.230:5000/login/admin/admin
http://ip address: name/username/password of port/login interface
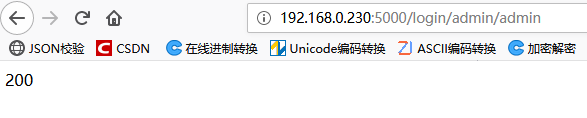
Return status code: 200 indicates success, 0 indicates failure.
Once successful, you can build an app project in HBuilderX
The second step is to build app environment
How to build + 5App project please Baidu
After creating the project, we write a landed App and use python to validate it.
login.html login template
<!DOCTYPE html>
<html>
<head>
    <meta charset="utf-8">
    <meta name="viewport" content="initial-scale=1.0, maximum-scale=1.0, user-scalable=no" />
    <title></title>
	<link href="css/mui.min.css" rel="stylesheet" />
	<link href="css/style.css" rel="stylesheet" />
	<style>
		.area {
			margin: 20px auto 0px auto;
		}

		.mui-input-group {
			margin-top: 10px;
		}

		.mui-input-group:first-child {
			margin-top: 20px;
		}

		.mui-input-group label {
			width: 22%;
		}

		.mui-input-row label~input,
		.mui-input-row label~select,
		.mui-input-row label~textarea {
			width: 78%;
		}

		.mui-checkbox input[type=checkbox],
		.mui-radio input[type=radio] {
			top: 6px;
		}

		.mui-content-padded {
			margin-top: 25px;
		}

		.mui-btn {
			padding: 10px;
		}

		.link-area {
			display: block;
			margin-top: 25px;
			text-align: center;
		}

		.spliter {
			color: #bbb;
			padding: 0px 8px;
		}

		.oauth-area {
			position: absolute;
			bottom: 20px;
			left: 0px;
			text-align: center;
			width: 100%;
			padding: 0px;
			margin: 0px;
		}

		.oauth-area .oauth-btn {
			display: inline-block;
			width: 50px;
			height: 50px;
			background-size: 30px 30px;
			background-position: center center;
			background-repeat: no-repeat;
			margin: 0px 20px;
			/*-webkit-filter: grayscale(100%); */
			border: solid 1px #ddd;
			border-radius: 25px;
		}

		.oauth-area .oauth-btn:active {
			border: solid 1px #aaa;
		}

		.oauth-area .oauth-btn.disabled {
			background-color: #ddd;
		}
	</style>

    <script type="text/javascript">

   		document.addEventListener('plusready', function(){
   			//console.log("All plus APIs should be called after this event, otherwise plus is undefined. "

   		});

    </script>
</head>
<body>
	<header class="mui-bar mui-bar-nav">
		<h1 class="mui-title">Sign in</h1>
	</header>
	<div class="mui-content">
		<form id='login-form' class="mui-input-group">
			<div class="mui-input-row">
				<label>Account number</label>
				<input id='account' type="text" class="mui-input-clear mui-input" placeholder="Please enter your account number.">
			</div>
			<div class="mui-input-row">
				<label>Password</label>
				<input id='password' type="password" class="mui-input-clear mui-input" placeholder="Please input a password">
			</div>
		</form>
		<div class="mui-content-padded">
			<button id='login' class="mui-btn mui-btn-block mui-btn-primary">Sign in</button>
			</div>
		</div>
	</div>

</body>
</html>
Click on the event triggered by the login: This code block is written below document. addEventListener ('plus ready', function (){});
Note: The url of ajax: Replace it with the successful address of the browser. (account.value means the username input by App, password.value means the password input by App.)
                // Click events for landing
		$(function(){
			var account = document.getElementById("account")
			var password = document.getElementById("password")
			var login_Btn = document.getElementById("login")
			login_Btn.addEventListener("click",function(){
				$.ajax({
					"type" :  "get",
					"url"  :  "http://192.168.0.230:5000/login/"+account.value+"/"+password.value,
					"dataType" : "json",
					success :  function(data){
						if(data == "200"){
							//Response Code: 200 Responses Successful
							window.location.href = "index.html"
						}else{
							alert("User name password does not match!");
						}
					},error : function(){
						alert("Server internal error!");
					}
				})
			})
		})
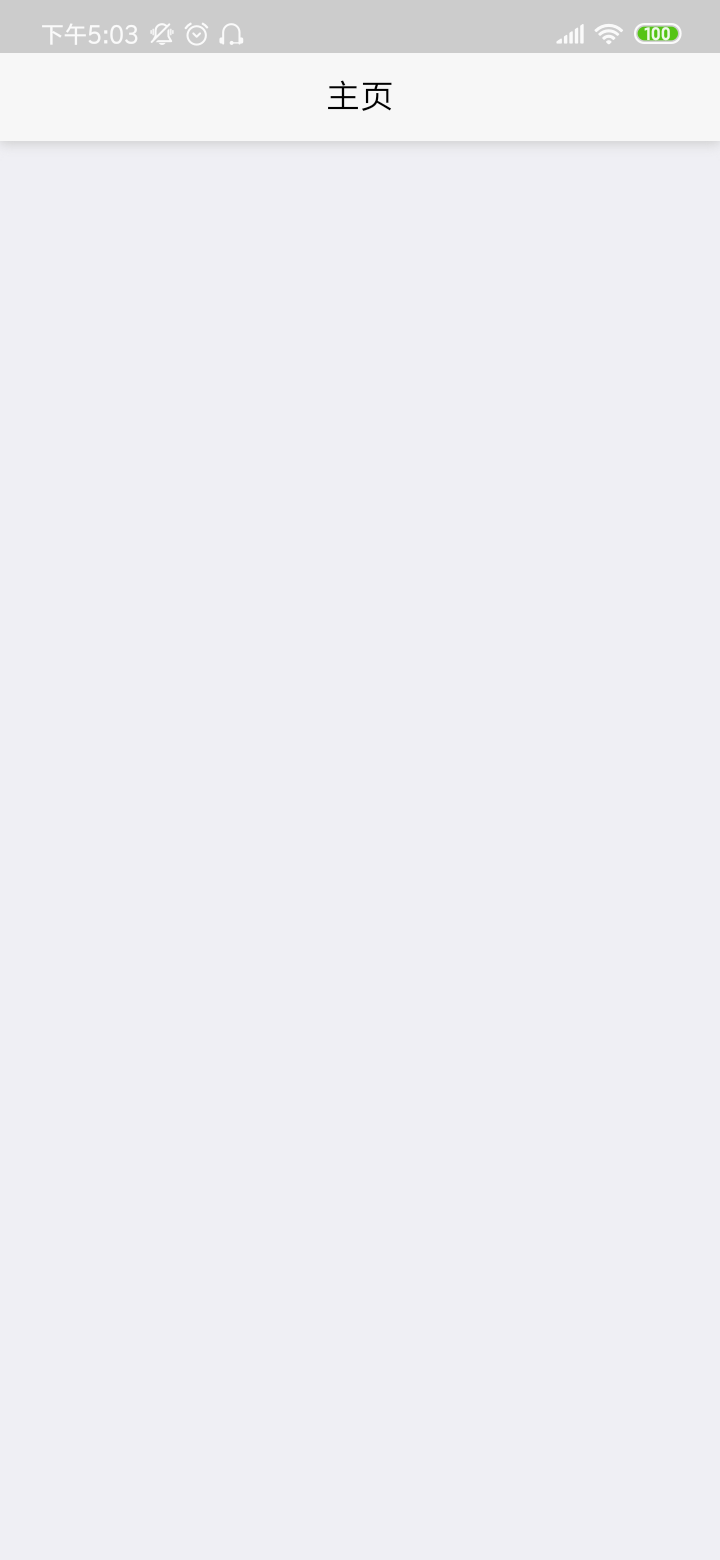
Home Page Template: Show the Home Page only at the top to distinguish whether to jump or not.
<!DOCTYPE html>
<html>
<head>
    <meta charset="utf-8">
    <meta name="viewport" content="initial-scale=1.0, maximum-scale=1.0, user-scalable=no" />
    <title></title>
	<link href="css/mui.min.css" rel="stylesheet" />
	<link href="css/style.css" rel="stylesheet" />
    <script type="text/javascript">

   		document.addEventListener('plusready', function(){
   			//console.log("All plus APIs should be called after this event, otherwise plus is undefined. "

   		});


    </script>
</head>
<body>
	<header class="mui-bar mui-bar-nav">
		<h1 class="mui-title">homepage</h1>
	</header>


</body>
</html>
When you see this, there's no code left behind. Just build a mobile operating environment.
The third step is to build mobile phone operating environment
Open the manifest.json in the 5+App project, and modify the application entry page address in the basic configuration, that is, the page that our mobile phone just opened the app display.
Modified to login.html
After that, we need to set the mobile phone as the developer mode, how to set up our own Baidu, because different models of mobile phones have different settings.
In the developer option, open the usb debugging and usb installation.
Mobile phones and computers are kept in the same LAN and connected to usb
Finally, running in the menu bar, running to the mobile phone or simulator, selecting the running device, you can test whether the app is running properly.
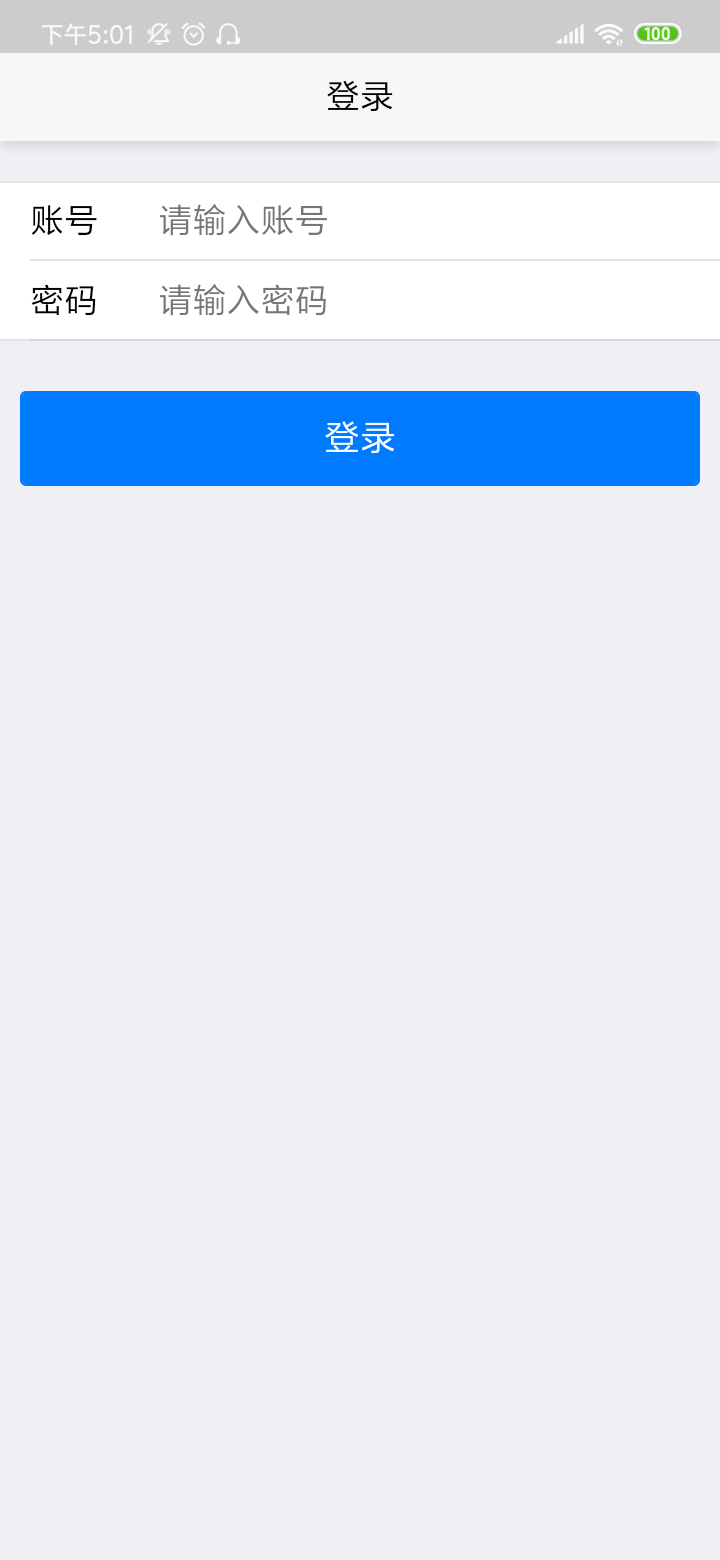
The landing page in the mobile app, fill in the username and password for testing.
The test results show the home page, indicating that python's background code can be invoked through ajax
The blogger is a weak chicken. Welcome to guide us.
