Recently, many children are learning Python and want to find a fun hand training project.
Let's share a simple Python project for beginners today.
This article will take blibli – ride the wind and waves video as an example, you get to download the video.
At the same time, python is used to climb the video barrage of station B, opencv is used to segment the video, baidu AI is used to segment the portrait, moviepy generates the word cloud dance video and adds audio.
Import module
Download required modules
We need to download many modules, so we can use OS System () method to automatically install the required modules. Of course, the download may fail, especially opencv python. Just install it a few more times
import os
import time
libs = {"lxml","requests","pandas","numpy","you-get","opencv-python","pandas","fake_useragent","matplotlib","moviepy"}
try:
    for lib in libs:
        os.system(f"pip3 install -i https://pypi.doubanio.com/simple/ {lib}")
        print(lib+"Download successful")
except:
    print("Download failed")
Import module
Here, import the required modules first
import os
import re
import cv2
import jieba
import requests
import moviepy
import pandas as pd
import numpy as np
from PIL import Image
from lxml import etree
from wordcloud import WordCloud
import matplotlib.pyplot as plt
from fake_useragent import UserAgent
video processing
Download Video
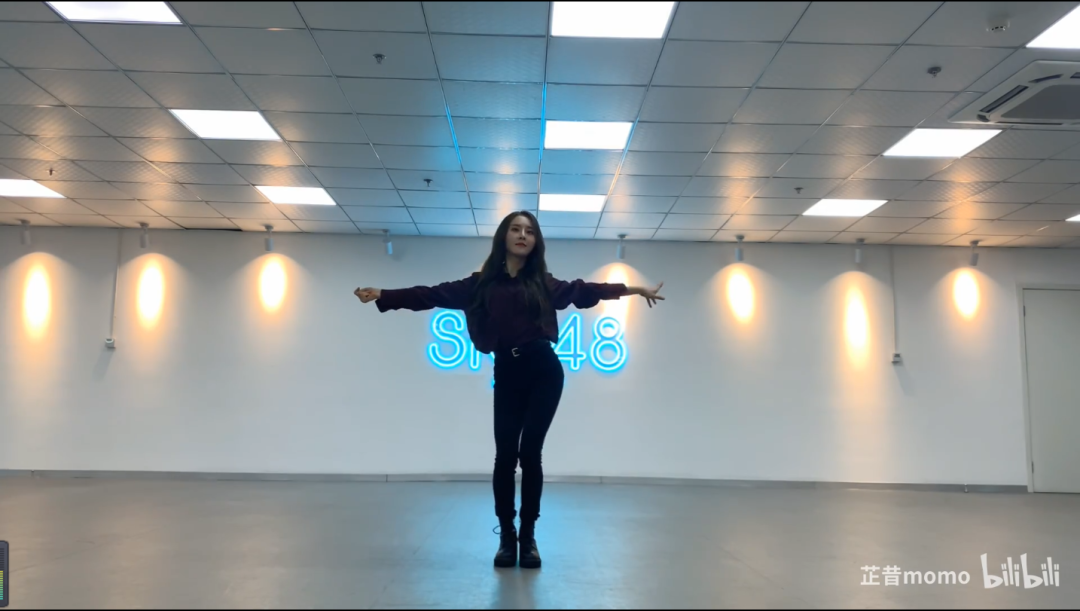
Download dance videos from station B.
You can use you get to download videos. First install:
pip install you-get
Find the connection to download the video and use the following instructions to download it:
you-get -i https://www.bilibili.com/video/BV11C4y1h7nX
Marked with DEFAULT is the DEFAULT image quality.
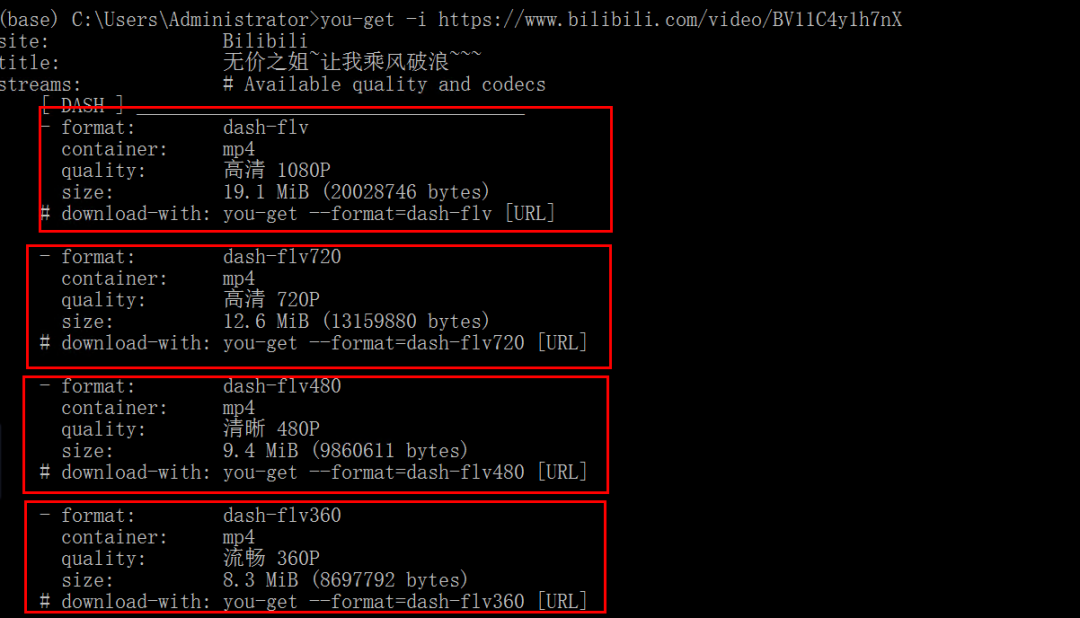
Downloaded video.
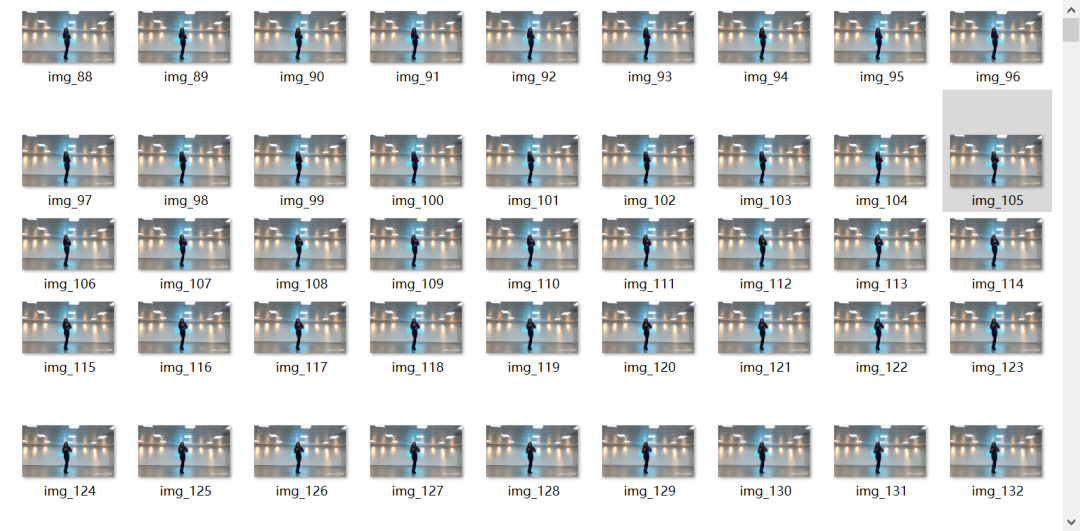
Video segmentation
Using opencv, the video is divided into pictures. This paper intercepts 800 pictures to make word cloud.
opencv reads the video and calls the camera through the videoaptrue class
Code display
# -*- coding:utf-8 -*-
import cv2
cap = cv2.VideoCapture(r"Priceless sister~Let me ride the wind and waves~~~.flv")
num = 1
while 1:
    # Read the video frame by frame and save it to the local folder in sequence
    ret,frame = cap.read()
    if ret:
        cv2.imwrite(f".\pictures\img_{num}.jpg",frame)
    else:
        break
cap.release()   # Release resources
Result display
Portrait segmentation
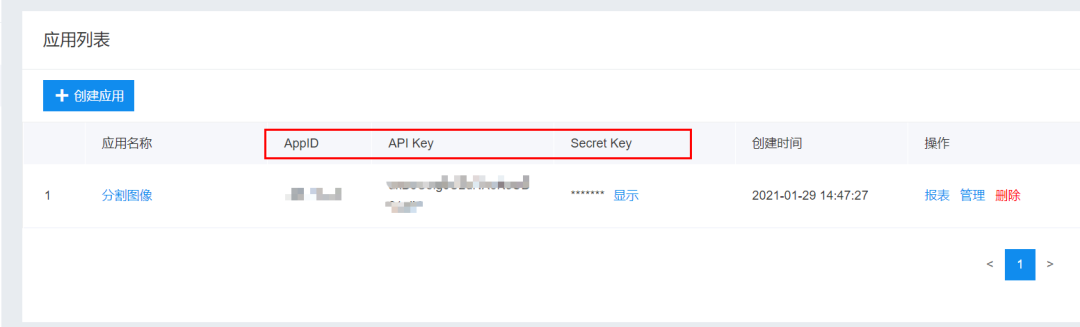
Create application
Use Baidu AI to create an application of human image segmentation.
Python SDK reference documentation
Use the reference documents to segment the portrait.
Reference documents:
https://cloud.baidu.com/doc/BODY/s/Rk3cpyo93?_=5011917520845

Code display
# -*- coding:utf-8 -*-
import cv2
import base64
import numpy as np
import os
from aip import AipBodyAnalysis
import time
import random
APP_ID = '******'
API_KEY = '*******************'
SECRET_KEY = '********************'
client = AipBodyAnalysis(APP_ID, API_KEY, SECRET_KEY)
# Save the path after image segmentation
path = './mask_img/'
# os.listdir lists the names of pictures saved to
img_files = os.listdir('./pictures')
print(img_files)
for num in range(1, len(img_files) + 1):
# Construct picture paths in order
img = f'./pictures/img_{num}.jpg'
img1 = cv2.imread(img)
height, width, _ = img1.shape
# print(height, width)
# Reading pictures in binary mode
with open(img, 'rb') as fp:
img_info = fp.read()
# Set to return only the foreground, that is, the split portrait
seg_res = client.bodySeg(img_info)
labelmap = base64.b64decode(seg_res['labelmap'])
nparr = np.frombuffer(labelmap, np.uint8)
labelimg = cv2.imdecode(nparr, 1)
labelimg = cv2.resize(labelimg, (width, height), interpolation=cv2.INTER_NEAREST)
new_img = np.where(labelimg == 1, 255, labelimg)
mask_name = path + 'mask_{}.png'.format(num)
# Save the split portrait
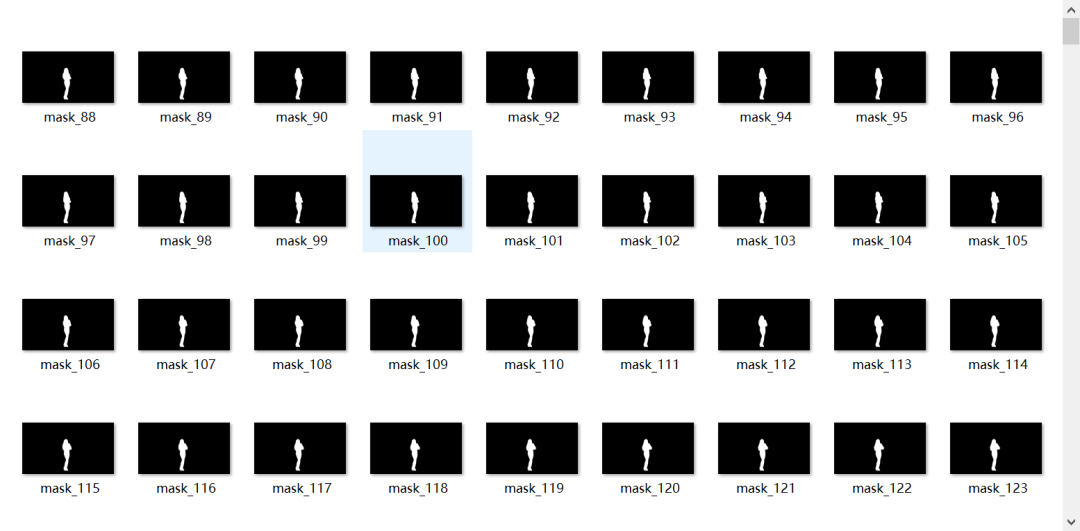
cv2.imwrite(mask_name, new_img)
print(f'======== The first{num}Image segmentation completed ========')
Result display
Barrage crawling
Due to technical reasons, we changed this video to get the barrage, ha ha ha ha ha.
https://www.bilibili.com/video/BV1jZ4y1K78N
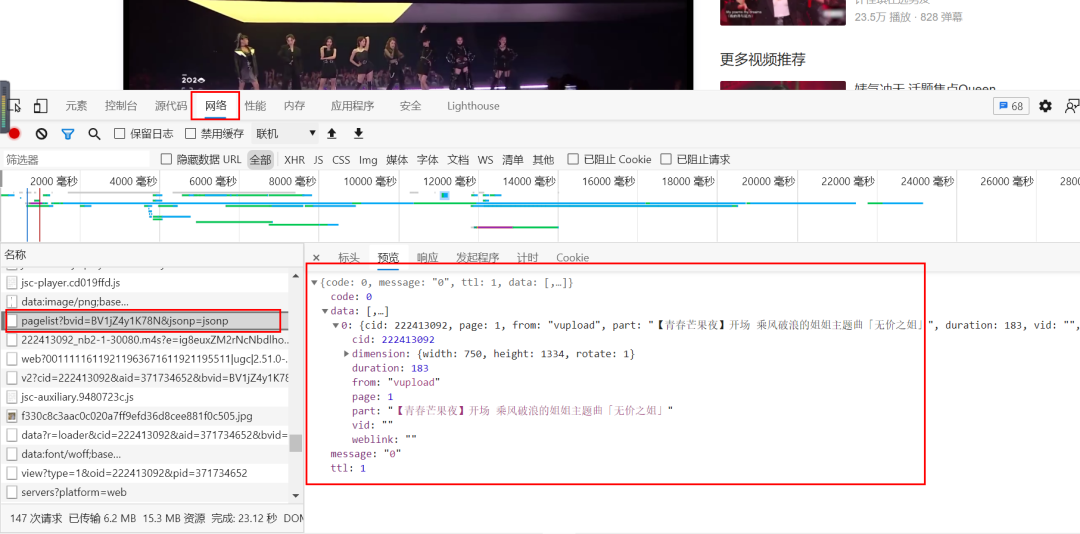
Web page analysis
Find pagelist through F12 and cid through the original url
Observe the historical barrage
-
Clear the elements and expand the barrage list
-
The date list is only 2021. Click other dates to come up with the history request.

Crawling barrage
Construct time series
The video was released on August 9, 2020. This paper crawls the historical bullet screen data of the video from August 8, 2020 to September 8, 2020 to construct a time series:
import pandas as pd
a = pd.date_range("2020-08-08","2020-09-08")
print(a)
DatetimeIndex(['2020-08-08', '2020-08-09', '2020-08-10', '2020-08-11',
               '2020-08-12', '2020-08-13', '2020-08-14', '2020-08-15',
               '2020-08-50', '2020-08-17', '2020-08-18', '2020-08-19',
               '2020-08-20', '2020-08-21', '2020-08-22', '2020-08-23',
               '2020-08-24', '2020-08-25', '2020-08-26', '2020-08-27',
               '2020-08-28', '2020-08-29', '2020-08-30', '2020-08-31',
               '2020-09-01', '2020-09-02', '2020-09-03', '2020-09-04',
               '2020-09-05', '2020-09-06', '2020-09-07', '2020-09-08'],
              dtype='datetime64[ns]', freq='D')
Crawling data
Add a cookie and modify the oid
import requests
import pandas as pd
import re
import csv
from fake_useragent import UserAgent
from concurrent.futures import ThreadPoolExecutor
import datetime

ua = UserAgent()
start_time = datetime.datetime.now()

def  Grab_barrage(date):
    headers = {
        "origin": "https://www.bilibili.com",
        "referer": "https://www.bilibili.com/video/BV1jZ4y1K78N?from=search&seid=1084505810439035065",
        "cookie": "",
        "user-agent": ua.random(),
    }
    params = {
        'type': 1,
        'oid' : "222413092",
        'date': date
    }
    r= requests.get(url, params=params, headers=headers)
    r.encoding = 'utf-8'
    comment = re.findall('<d p=".*?">(.*?)</d>', r.text)
    for i in comments:
     df.append(i)
    a = pd.DataFrame(df)
    a.to_excel("danmu.xlsx")
def main():
    with ThreadPoolExecutor(max_workers=4) as executor:
        executor.map(Grab_barrage, date_list)
    """Calculate the time required"""
    delta = (datetime.datetime.now() - start_time).total_seconds()
    print(f'Time:{delta}s')
if __name__ == '__main__':
    # Target url
    url = "https://api.bilibili.com/x/v2/dm/history"
    start,end = '20200808','20200908'
    date_list = [x for x in pd.date_range(start, end).strftime('%Y-%m-%d')]
    count = 0
    main()
Result display

Generate word cloud
Mechanical compression and de duplication of comment content
For a comment, some people may make mistakes by hand or make up the number of words. They will repeat a word or word many times. Therefore, before word segmentation, they need to do the operation of "mechanical compression and de duplication".
def func(s):
    for i in range(1,int(len(s)/2)+1):
        for j in range(len(s)):
            if s[j:j+i] == s[j+i:j+2*i]:
                k = j + i
                while s[k:k+i] == s[k+i:k+2*i] and k<len(s):
                    k = k + i
                s = s[:j] + s[k:]
    return s
data["Short comment"] = data["Short comment"].apply(func)
Add stop words and custom phrases
import pandas as pd
from wordcloud import WordCloud
import jieba
from tkinter import _flatten
import matplotlib.pyplot as plt

jieba.load_userdict("./Word cloud picture//add.txt")
with open('./Word cloud picture//stoplist.txt', 'r', encoding='utf-8') as f:
    stopWords = f.read()
Generate word cloud
from wordcloud import WordCloud
import collections
import jieba
import re
from PIL import Image
import matplotlib.pyplot as plt
import numpy as np
with open('barrages.txt') as f:
data = f.read()
jieba.load_userdict("./Word cloud picture//add.txt")
# Read data
with open('barrages.txt') as f:
data = f.read()
jieba.load_userdict("./Word cloud picture//add.txt")
# Text preprocessing removes some useless characters and only extracts Chinese characters
new_data = re.findall('[\u4e00-\u9fa5]+', data, re.S)
new_data = "/".join(new_data)
# Text segmentation
seg_list_exact = jieba.cut(new_data, cut_all=True)
result_list = []
with open('./Word cloud picture/stoplist.txt', encoding='utf-8') as f:
con = f.read().split('\n')
stop_words = set()
for i in con:
stop_words.add(i)
for word in seg_list_exact:
# Set stop words and remove individual words
if word not in stop_words and len(word) > 1:
result_list.append(word)
# Statistics of word frequency after filtering
word_counts = collections.Counter(result_list)
path = './wordcloud/'
img_files = os.listdir('./mask_img')
print(img_files)
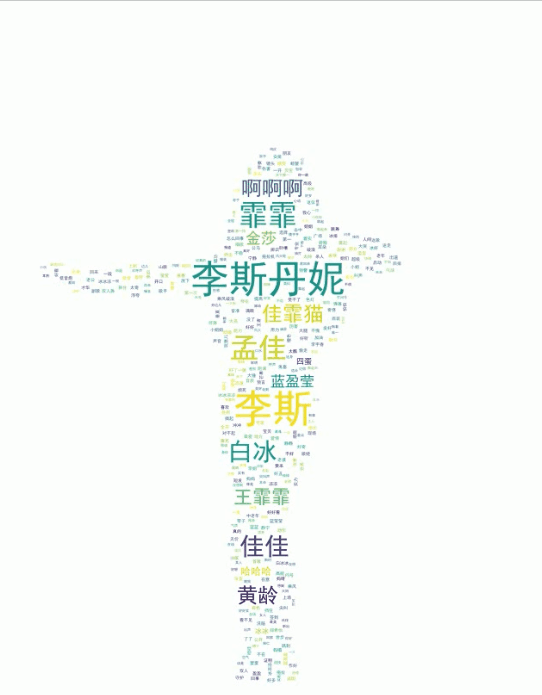
for num in range(1, len(img_files) + 1):
img = fr'.\mask_img\mask_{num}.png'
# Get mask picture
mask_ = 255 - np.array(Image.open(img))
# Draw word cloud
plt.figure(figsize=(8, 5), dpi=200)
my_cloud = WordCloud(
background_color='black', # Set the background color to black by default
mask=mask_, # Custom mask
mode='RGBA',
max_words=500,
font_path='simhei.ttf', # Set font to display Chinese
).generate_from_frequencies(word_counts)
# Displays the generated word cloud picture
plt.imshow(my_cloud)
# There is no coordinate axis in the display setting word cloud
plt.axis('off')
word_cloud_name = path + 'wordcloud_{}.png'.format(num)
my_cloud.to_file(word_cloud_name) # Save word cloud picture
print(f'======== The first{num}Zhang CI cloud image generation ========')
Composite video
As described in the official documents, moviepy is a Python library for video editing, which can be used for cutting, splicing, title insertion, video synthesis (i.e. non-linear editing), video processing and custom effect design. In general, you can easily and freely process video, pictures and other files.
Picture synthesis
import cv2
import os

# Save path of output video
video_dir = 'result.mp4'
# Frame rate
fps = 30
# Picture size
img_size = (1920, 1080)

fourcc = cv2.VideoWriter_fourcc('M', 'P', '4', 'V')  # opencv3.0 mp4 will have a warning, but it can be played
videoWriter = cv2.VideoWriter(video_dir, fourcc, fps, img_size)
img_files = os.listdir('.//wordcloud')

for i in range(88, 888):
    img_path = './/wordcloud//wordcloud_{}.png'.format(i)
    frame = cv2.imread(img_path)
    frame = cv2.resize(frame, img_size)   # The size of the generated video picture is the same as the set size
    videoWriter.write(frame)      # Write it in the video
    print(f'======== In video order{i}Picture into video ========')

videoWriter.release()   # Release resources
Result display:
Audio add
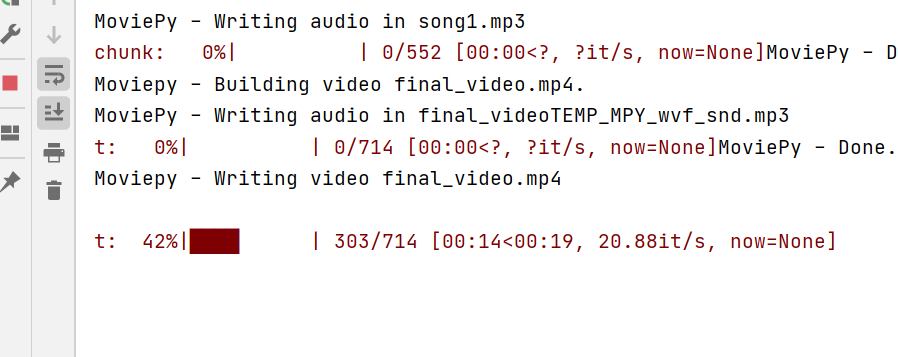
import moviepy.editor as mpy

# Read word cloud video
my_clip = mpy.VideoFileClip('result.mp4')
# Intercept background music
audio_background = mpy.AudioFileClip('song.mp3').subclip(0,25)
audio_background.write_audiofile('song1.mp3')
# Insert audio into video
final_clip = my_clip.set_audio(audio_background)
# Save beautiful music as the final video! Beautiful little sister CI Yun dance video!
final_clip.write_videofile('final_video.mp4')
Post push, learning and communication
We need a lot of front-end posts, python posts, Java posts, Android and iOS development posts. Working location: Beijing byte. Welcome to scan the QR code below for internal push
Python information, technology, courses, answers and consultation can also directly click the business card below to add the official customer service Qi ↓