It is mainly to record the pit encountered by the single-chip microcomputer of Reza. Although Reza has been used before, it will be forgotten after a long time. It is convenient to record it for later use
Introduction to re5f10368
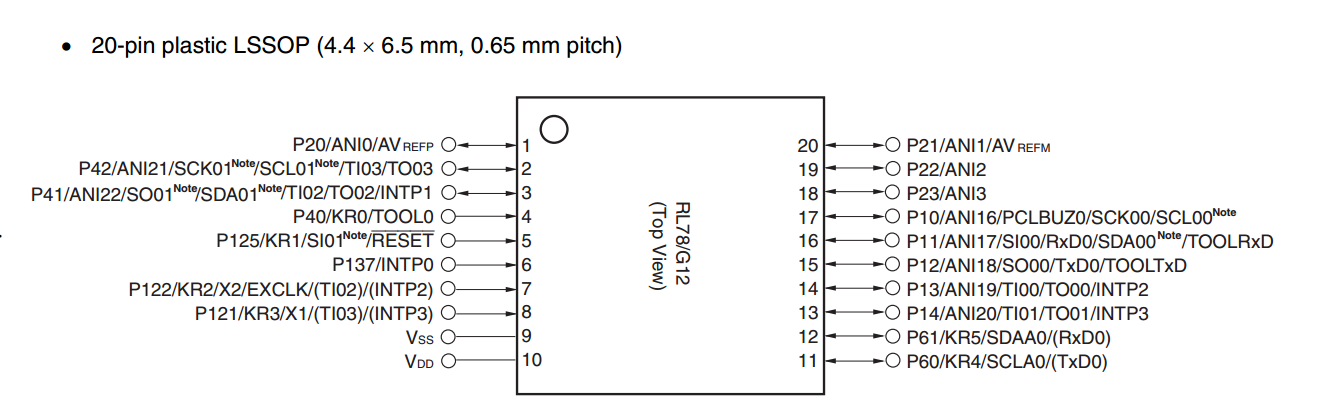
20pin LSSOP is used for packaging. If there is no need to buy a pitch burning base for PCB board, it is necessary to see clearly the LSSOP (0.65 mm chip) when buying the first burner
Hardware introduction
Direct drawing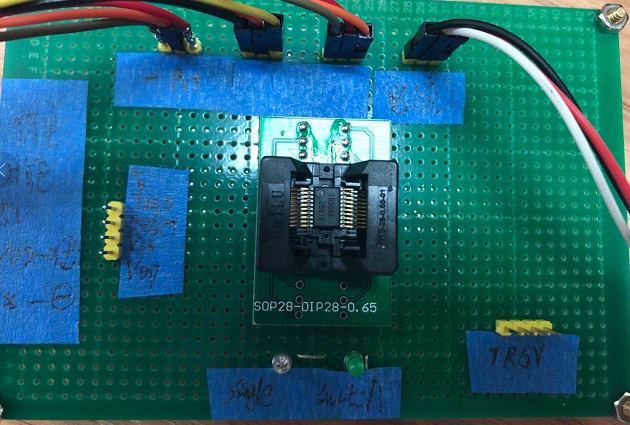
Three temperature probes, one current detecting Hall sensor and two LED lamps are used to output the state
Burner link
There are many pits in the connection of the recorder
EZ cube simulator is used
VCC -------- board VDD
GND -------- board VSS
FLMD0 ------ board TOOL0
RESETOUT ---- board RESET
When the emulator is linked, the board does not work, because the RESET pin will be pulled high, resulting in the RESET status of the whole board
If you need to use the emulator to work, you can unplug the pins except VCC and GND
Part of procedure
Configuration part
CubeSuit + is the IDE of CS + Reza
Excellent code generation function. I think the code generated by STM32CubeMX is more concise than that generated by STM32CubeMX. It is almost a direct operation of registers, and the user interface layer is convenient for use and development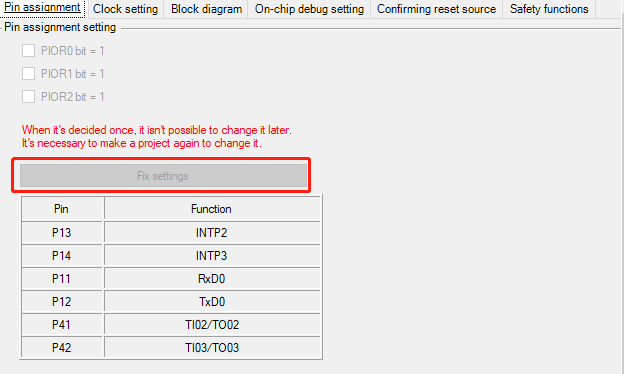
Fix setting for this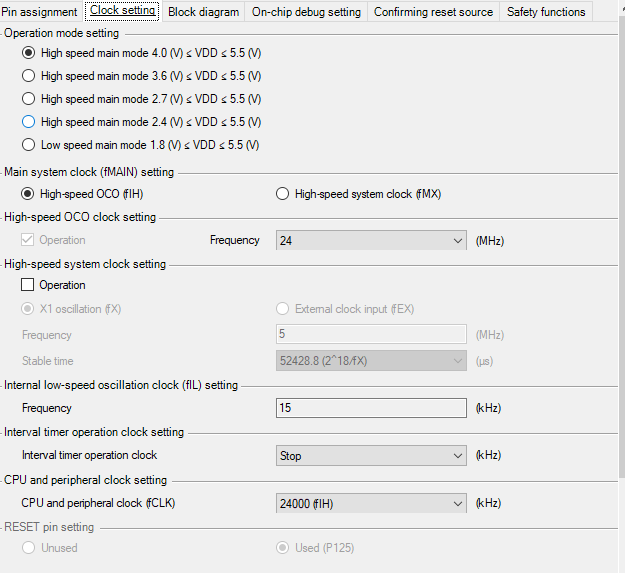
I use the internal clock here, a total of one or two single-chip computers to achieve simple functions without the need for an external crystal oscillator.
Other port timers are set according to their actual usage.
Note that here, the IDE is configured by default to open the watchdog, but it seems that the watchdog is not so easy to use. I don't know whether it's because I use the internal clock to feed the dog inaccurately or because of something. Anyway, it's just an inexplicable reset
Open not recommended
This is the general configuration
Code
void R_Systeminit(void)
{
    PIOR = 0x00U;
    R_CGC_Get_ResetSource();
    R_CGC_Create();
    R_PORT_Create();
    R_SAU0_Create();
    R_ADC_Create();
    R_TAU0_Create();
    IAWCTL = 0x00U;
}
After you have configured the board resources you need to generate code, call everything you have configured in the file R ﹣ systemint. C, open the corresponding registers, configure the corresponding registers in this function, which is automatically generated without us writing
void R_MAIN_UserInit(void)
{
    /* Start user code. Do not edit comment generated here */
    R_UART0_Start();
    R_ADC_Set_OperationOn();

    /* End user code. Do not edit comment generated here */
}
This function is also generated automatically. This is the initialization of the user layer. For example, when I use serial port 0, I need to open the serial port in R UART0 start(); turn on the serial port, R ADC set operationon(); turn on AD conversion.
There is no HAL_Delay with HAL Library in the generated code of Reza, like STM32CubeMX, which can be directly used
So I need to write a delay function by myself. In order to use the high precision timing, I use the timer to do the delay
Configure a one millisecond timer, very simple to achieve high-precision delay
uint16_t delayms = 0; //Use in timed interrupt
void delay(uint16_t ms)
{
   R_TAU0_Channel0_Start();
   while(delayms < ms)
   	{
   	  ;
   	}
   delayms = 0;
   R_TAU0_Channel0_Stop();
}
To obtain AD sampling value function, it should be noted that this single-chip microcomputer is a 16 bit single-chip microcomputer, so it can only support 10 bit sampling accuracy.
uint16_t ADValue;
uint16_t Get_ADC_VA(uint8_t CH)//Get sample value
{

	switch (CH)
	{
	   case 0:
	    ADS &= 0x00;
	    ADS = 0;
	    R_ADC_Start();
            while (!ADIF);
	    ADIF = 0U;
	    R_ADC_Get_Result(&ADValue);
	   break;
	   case 1:
	    ADS &= 0x00;
	    ADS = 1;
	    R_ADC_Start();
            while (!ADIF);
	    ADIF = 0U;
	    R_ADC_Get_Result(&ADValue);
	   break;
	   case 2:
	    ADS &= 0x00;
	    ADS = 2;
	    R_ADC_Start();
            while (!ADIF);
	    ADIF = 0U;
	    R_ADC_Get_Result(&ADValue);
	   break;
	   case 3:
	    ADS &= 0x00;
	    ADS = 3;
	    R_ADC_Start();
            while (!ADIF);
	    ADIF = 0U;
	    R_ADC_Get_Result(&ADValue);
	   break;
	   default:
	   break;

	}
	return ADValue;
}
uint16_t AD_VAL_ARG(uint8_t CH,uint8_t times)//Simple mean filtering
{
	uint8_t i;
	uint16_t count=0;
	if(times>60)times=60;
	for(i=0;i<times;i++)
	{
	  count += Get_ADC_VA(CH);
	  delay(1);
	}
	return count/times;
}
When selecting a channel, you only need to copy the ADS register. Here, I will clear and then assign a value. ADIF is a flag register for the completion of sampling to ensure the completion of each sampling. Then directly call R ﹣ ADC ﹣ get ﹣ result (& advalue); you can read the sampling value. I have defined the global variables for debugging and real-time viewing. Because the space of single-chip computer is not easy to overflow, this is not recommended here.
void main(void)
{
    R_MAIN_UserInit();
    /* Start user code. Do not edit comment generated here */

    while (1U)
    {


	    num[0] = AD_VAL_ARG(0,20);
	    temp[0] =  num_to_temperature(num[0]);

	    num[1] = AD_VAL_ARG(1,20);
	    temp[1] = num_to_temperature(num[1]);

	    num[2] = AD_VAL_ARG(2,20);
	    temp[2] = num_to_temperature(num[2]);

	    num[3] = AD_VAL_ARG(3,50);

 	    IA =(float)num[3]*(5.0/1024) -0.02;

	    IA1 = ((IA - 2.51)/0.022)/3.0 +1;

	   // numtobits[0] =(uint8_t)(num[0]>>8);
	   // numtobits[1] = (uint8_t)num[0];
	   // R_UART0_Send(numtobits, 2);

	    if(IA1>0.5)
	    {
		    if(temp[0]<40&&temp[1]<40&&temp[2]<40)
		    {
			SWTICH_LOW;
		    }else SWTICH_HIGH;
	    }else {
	       SWTICH_HIGH;
	    }


	    //SINGLE_LOW;
	    delay(100);
	    //SINGLE_HIGH;
	   // delay(100);

    }
    /* End user code. Do not edit comment generated here */
}
Calculation of temperature and space change time by a simple look-up table method
uint16_t NTCTAB[151] ={
0x69,0x6E,0x73,0x79,0x7F,0x85,0x8B,0x91,0x98,0x9E,0xA5,0xAC,0xB3,
0xBB,0xC3,0xCA,0xD3,0xDB,0xE3,0xEC,0xF5,0xFE,0x107,0x111,0x11B,
0x125,0x12F,0x139,0x143,0x14E,0x158,0x163,0x16E,0x179,0x184,0x18F,
0x19A,0x1A6,0x1B1,0x1BC,0x1C7,0x1D3,0x1DE,0x1E9,0x1F4,0x200,0x20B,0x216,0x221,
0x22C,0x236,0x241,0x24C,0x256,0x260,0x26B,0x275,0x27F,0x288,0x292,0x29C,
0x2A5,0x2AE,0x2B7,0x2C0,0x2C8,0x2D1,0x2D9,0x2E1,0x2E9,0x2F1,0x2F8,0x300,0x307,
0x30E,0x315,0x31C,0x322,0x328,0x32F,0x335,0x33A,0x340,0x346,0x34B,0x350,0x355,
0x35A,0x35F,0x364,0x368,0x36C,0x371,0x375,0x379,0x37D,0x380,0x384,0x388,0x38B,
0x38E,0x392,0x395,0x398,0x39B,0x39D,0x3A0,0x3A3,0x3A5,0x3A8,0x3AA,0x3AD,0x3AF,
0x3B1,0x3B3,0x3B5,0x3B7,0x3B9,0x3BB,0x3BD,0x3BF,0x3C0,0x3C2,0x3C4,0x3C5,0x3C7,
0x3C8,0x3CA,0x3CB,0x3CD,0x3CE,0x3CF,0x3D1,0x3D2,0x3D3,0x3D4,0x3D5,0x3D6,0x3D8,
0x3D9,0x3DA,0x3DB,0x3DC,0x3DD,0x3DE,0x3DE,0x3DF,0x3E0,0x3E1,0x3E2,0x3E2
};
//Dichotomous look up table function
uint8_t look_up_table(uint16_t *a,uint16_t ArrayLong,uint16_t data)
{
    uint16_t begin,end,middle ;
    uint8_t i ;
    begin = 0 ;
    end = ArrayLong-1 ;
    i = 0  ;
    if(data >= a[end]) return end ;
    else if(data <= a[begin]) return begin ;
    while(begin < end)
    {
            middle = (begin+end)/2 ;
            if(data == a[middle] ) break ;
            if(data < a[middle] && data > a[middle-1]) break ;
            if(data < a[middle])  end = middle ;
            else begin = middle ;
            if(i++ > ArrayLong) break ;
    }
    if(begin > end ) return 0 ;
    return middle ;

}
//Input the serial number value of the table to get the temperature value

float num_to_temperature(uint16_t data)
{
    uint8_t num = look_up_table(NTCTAB,151,data);
    float  data1;
    float  temp;
    data1 = 1*num-20;
			//Increase the linear value by 100 times to improve the accuracy
	temp = ((float)((data-NTCTAB[num-1])*100/(NTCTAB[num]-NTCTAB[num-1])));
	data1 = ((float)data1*100 - temp)/100;
    return data1;
}
Some people may not know how to calculate this watch, baidu a lot.

