Reprint address: https://www.jianshu.com/p/defa75b65a46
Basic introduction to security spring
Spring Security will not be introduced too much here. For details, please refer to Official documents
Let me just talk about the core functions of spring security:
- Certification (who are you)
- Authorization (what can you do)
- Attack protection (against identity forgery)
Basic environment construction
Here, we take SpringBoot as the basic framework of the project. I use maven for package management, so here is the way to integrate Spring Security
        <dependency>
            <groupId>org.springframework.boot</groupId>
            <artifactId>spring-boot-starter-security</artifactId>
        </dependency>

       <!-- thymeleaf Template -->
        <dependency>
            <groupId>org.springframework.boot</groupId>
            <artifactId>spring-boot-starter-thymeleaf</artifactId>
        </dependency>
Then establish a Web layer request interface
@Controller
public class IndexController {

    /**
     * Jump to home page
     */
    @GetMapping("")
    public void index1(HttpServletResponse response){
        //Internal redirection
        try {
            response.sendRedirect("/index");
        } catch (IOException e) {
            e.printStackTrace();
        }
    }

    /**
     * home page
     */
    @RequestMapping("/index")
    @ResponseBody
    public String index() {
        return "index";
    }
}
Next, you can directly run the project and call the interface to see the effect.
Call through web page
First, we call the interface through the browser to access it directly http://localhost:8080/index , if the interface can be accessed normally, "index" should be displayed.
But we can't access it normally. The authentication input box in the figure below appears
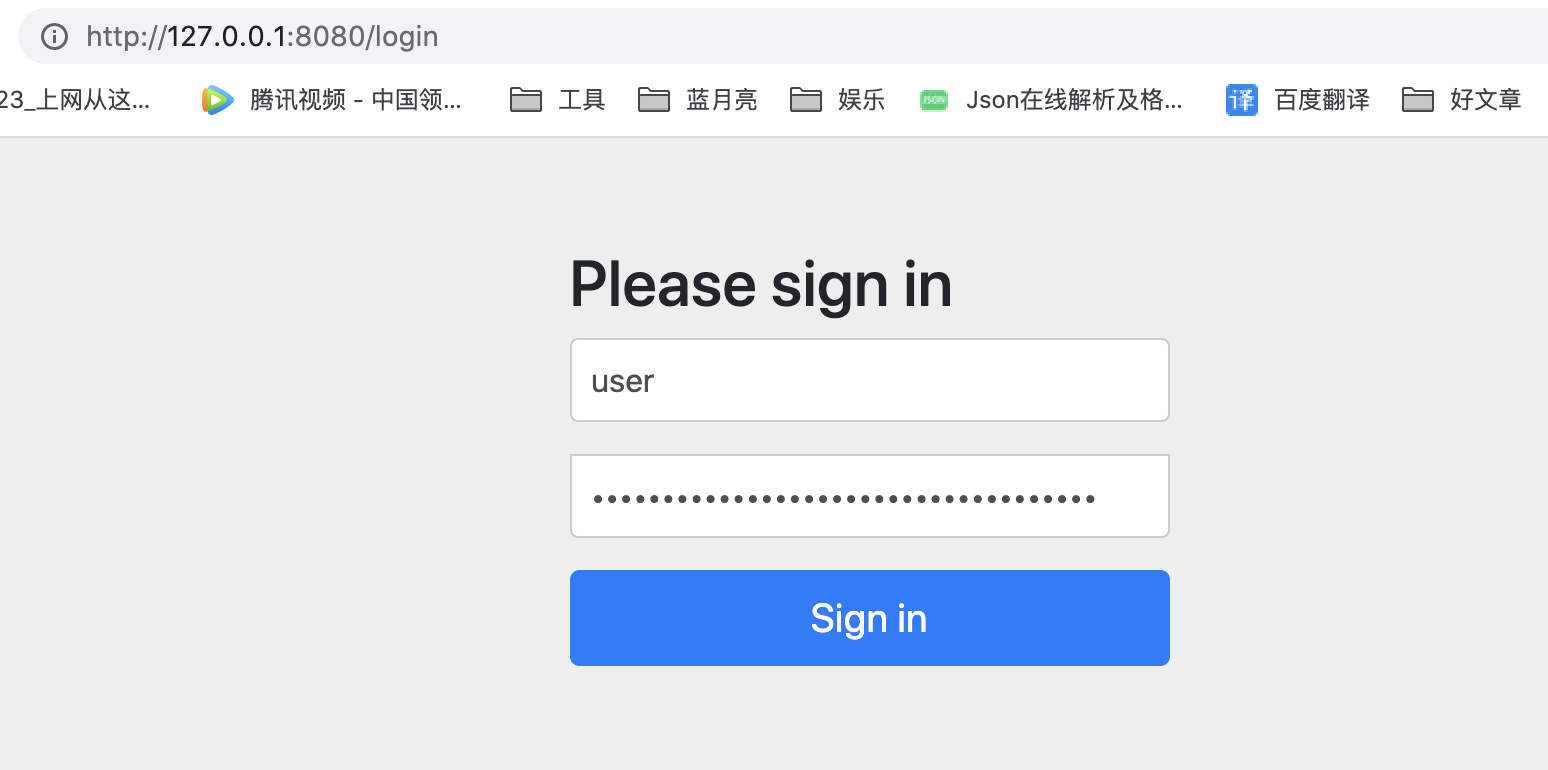
image.png
This is because in SpringBoot, the default Spring Security comes into effect. At this time, the interfaces are protected, and we need to verify to access them normally. Spring Security provides a default user. The user name is user, and the password is automatically generated when starting the project.
When we check the project startup Log, we will find the following Log
Using default security password: 62ccf9ca-9fbe-4993-8566-8468cc33c28c
Of course, the password you see must be different from mine. We log in directly with the password in user and startup log.
After successful login, you will jump to the page of normal interface call.
If you don't want to enable Spring Security at the beginning, you can configure it in the configuration file as follows:
# security enable
security.basic.enabled = false
The login box just seen is provided by the spring security framework itself, which is called httpbasicplogin. The display is not what we want in our products. Our front-end generally performs user login verification through form submission, so we need to customize our own authentication logic.
Transformation 1 login using page form
- The front end writes a login page (using thymeleaf template engine) and login_page.html file:
<!DOCTYPE html>
<html id="ng-app" ng-app="app"  xmlns:th="http://www.thymeleaf.org">
<head>
    <meta charset="UTF-8"/>
    <title>home</title>
</head>
<body>
<form  class="form-signin" action="/form" method="post">
    <h2 class="form-signin-heading">User login</h2>
    <table>
        <tr>
            <td>user name:</td>
            <td><input type="text" name="username"  class="form-control"  placeholder="enter one user name"/></td>
        </tr>
        <tr>
            <td>password:</td>
            <td><input type="password" name="password"  class="form-control" placeholder="Please input a password" /></td>
        </tr>
        <tr>

            <td colspan="2">
                <button type="submit"  class="btn btn-lg btn-primary btn-block" >Sign in</button>
            </td>
        </tr>
    </table>
</form>
</body>
</html>
Write a controller method to point to the landing page. You can't use @ RestController and @ ResponseBody, otherwise you will return a string.
 @RequestMapping("/loginPage")
    public String login() {
        return "login_page";
    }
You also need to configure:
spring:
  # Locate the directory of the template and add a suffix to the returned page
  thymeleaf:
    prefix: classpath:/templates/
    suffix: .html
    servlet:
      content-type: text/html
    mode: HTML5
- Add a class SecurityConfig to inherit WebSecurityConfigurerAdapter
Rewrite the configure method and add two annotations @ Configuration and @ enablewebsecurity.
@Configuration
@EnableWebSecurity
public class SecurityConfig extends WebSecurityConfigurerAdapter {

     @Override
    protected void configure(HttpSecurity http) throws Exception {
        http
                // Turn off csrf protection
                .csrf().disable()
                .headers().frameOptions().disable()
                .and();
        http
                //Login processing
                .formLogin() //Form mode, or httpBasic
                .loginPage("/loginPage")
                .loginProcessingUrl("/form")
                .defaultSuccessUrl("/index") //Jump to the page after successful login
                .failureUrl("/loginError")
                .permitAll()
                .and();
        http
                .authorizeRequests() // Authorization configuration
                //Access without permission
                .antMatchers( "/css/**", "/error404").permitAll()
                .antMatchers("/user/**").hasRole("USER")
                //Other interfaces can only be accessed after logging in
                .anyRequest().authenticated()
                .and();
    }

}
Requests matching / css / * * and / error404 are fully accessible
Requests matching / USER / * * require USER authentication and must be associated with the USER role
Enable form based authentication using custom login pages and failure URL s
loginPage("/login") indicates the page to jump to when logging in. Because we don't need login authentication on the login page, we need to add permitAll() method.
Login page custom login page url. The default is / login
Login processing url the url intercepted by the login request, that is, the action specified when the form is submitted
failureUrl = indicates the page with login error. We can simply write a prompt: for example, the user name or password is wrong.
.csrf().disable() note: Spring Security4 turns on CSRF by default, so it is necessary to include the token information of CSRF in the request. If this code is not added here, an exception will appear. In addition, CSRF can be turned off (there is a security vulnerability after closing).
Test:
1. Enter web address: http://127.0.0.1:8081/index , automatically jump to: http://127.0.0.1:8081/loginPage , return to the login page
2. Enter account and password: return if there is an error http://127.0.0.1:8081/loginError , login failure page
If correct: Return http://127.0.0.1:8081/index , login success page
2. User defined user name and password
1. User writes directly to memory
Obviously, after such transformation, although the login page is beautiful, it is far from meeting our application needs, so the second step is to transform the user-defined user name and password.
There are two ways to customize the user name and password. One is to write it in the code, which is also the official demo, and the other is to use the database
The first is the first: for example
    @Bean
    public PasswordEncoder passwordEncoder() {
        return new BCryptPasswordEncoder();
    }

@Override
    public void configure(AuthenticationManagerBuilder auth) throws Exception {
        auth
                .inMemoryAuthentication()
                .passwordEncoder(passwordEncoder())
                .withUser("admin").password(passwordEncoder().encode("123456")).roles("ADMIN")
                .and()
                .withUser("test").password(passwordEncoder().encode("test123")).roles("USER");

    }
The new version needs to encrypt the password, otherwise it will report an error, so we need to use passwordEncoder here. When the program runs, we can use our own user name and password to enter admin and 123456.
You can also add a few more users, just a few more withusers.
.and().withUser("test").password("test123").roles("ADMIN");
In this way, we have a user with a user name of test and a password of test123.
2. User usage of database
The first one is just to let us experience Spring Security. Next, we will provide user-defined authentication mechanism and processing process.
Before talking about this, we need to know the principle of spring security. The principle of spring security is to use many interceptors to intercept URL s to manage login authentication and user permission authentication.
When users log in, they will be intercepted by AuthenticationProcessingFilter and call the implementation of AuthenticationManager, and AuthenticationManager will call ProviderManager to obtain User authentication information (different providers call different services, because these information can be on the database, LDAP server, xml configuration file, etc.), If the authentication is passed, the User's permission information will be encapsulated into a User and put into the spring's global cache SecurityContextHolder for later access to resources.
Therefore, if we want to customize the verification mechanism of users, we just need to implement our own AuthenticationProvider. Before using the AuthenticationProvider, we need to provide a service to obtain user information and implement the UserDetailsService interface
User name and password - > authentication - > AuthenticationManager - > authenticationprovider - > userdetailservice - > userdetails - > authentication
After understanding this principle, we began to write code
UserDetails interface
UserDetailsService interface
Implement the UserDetailsService interface to return the object instance of the User
@Component
public class MyUserDetailsService implements UserDetailsService {
    @Autowired
    private SysUserService userService;

    @Override
    public UserDetails loadUserByUsername(String username) throws UsernameNotFoundException {
        //Here, we can find the corresponding user information in the database through username (the user name entered during login), and construct our own UserInfo to return.
        SysUser sysUser = userService.findUserByName(username);
        //Since the permission parameter cannot be empty, use authorityutils The commaseparatedstringtoauthoritylist method simulates the permissions of an admin. This method can convert comma separated strings into permission sets.
//The password in the database is encrypted
        return new User(username, sysUser.getPassword(),AuthorityUtils.commaSeparatedStringToAuthorityList("admin"));
    }
}
Generally speaking, the login data is in protected void configure(AuthenticationManagerBuilder auth), so it is necessary to modify the configure(AuthenticationManagerBuilder auth) method in the SecurityConfig class
    @Override
    public void configure(AuthenticationManagerBuilder auth) throws Exception {
        auth
                //User authentication processing
                .userDetailsService(userDetailsService)
                //Password processing
                .passwordEncoder(passwordEncoder());
    }
Re run the project. At this time, you can log in with the account and password of the database.
Generally speaking, login verification can be realized here. But there is a problem. In this case, the user name and password are dead, and we can't get the form data. If we have to slightly modify the password data in the form data submitted to us because of the front-end problem, and customize a login. The AuthenticationProvider is needed at this time.
AuthenticationProvider interface
This is an interface that provides two methods
public interface AuthenticationProvider {

  Authentication authenticate(Authentication authentication)
          throws AuthenticationException;

  boolean supports(Class<?> authentication);
}
Through the first method, we can get the data of form data and return a UserDetails if the login is successful or null if the login fails.
@Override
    public Authentication authenticate(Authentication authentication) throws AuthenticationException {
        String userName = (String) authentication.getPrincipal(); //Get username
        String password = (String) authentication.getCredentials(); //Get the password

        UserDetails userDetails = studentService.loadUserByUsername(userName);
        if (/*Custom validation passed*/) {
            return new UsernamePasswordAuthenticationToken(userDetails, null,userDetails.getAuthorities());
        }
        /*Verification failed*/
        return null;
The second method is to tell spring sec what kind of authentication this authentication supports.
auth.userDetailsService(studentService).passwordEncoder(encoder);
This verification belongs to Dao verification.
And UsernamePasswordAuthentication authentication.
Our is the authentication method of UsernamePassword, so it is generally written in the second method
   @Override
    public boolean supports(Class<?> authentication) {
        return authentication.equals(UsernamePasswordAuthenticationToken.class);
    }
New class MyAuthenticationProvider inherits AuthenticationProvider
The complete code is as follows:
@Component
public class MyAuthenticationProvider implements AuthenticationProvider {
    /**
     * Inject the user information acquisition object defined by ourselves
     */
    @Autowired
    private MyUserDetailsService userDetailsService;

    @Autowired
    private PasswordEncoder passwordEncoder;


    @Override
    public Authentication authenticate(Authentication authentication) throws AuthenticationException {
        // TODO Auto-generated method stub
        String userName = authentication.getName();// Get the user name returned in the form input;
        String password = (String) authentication.getCredentials();// This is the password entered in the form;
        // It is built here to determine whether the user exists and whether the password is correct
        UserDetails userInfo = userDetailsService.loadUserByUsername(userName); // Here we call our own method to get users;
        if (userInfo == null) {
            throw new BadCredentialsException("user name does not exist");
        }
        boolean flag = passwordEncoder.matches(password,userInfo.getPassword());
        if (!flag) {
            throw new BadCredentialsException("Incorrect password");
        }
        Collection<? extends GrantedAuthority> authorities = userInfo.getAuthorities();
        // Build the returned token of successful user login
        return new UsernamePasswordAuthenticationToken(userInfo, password, authorities);
        //return new UsernamePasswordAuthenticationToken(userInfo, null,authorities);
    }
    @Override
    public boolean supports(Class<?> authentication) {
        // Here, it is directly changed to retrun true; Indicates support for this implementation
        return true;
    }
}
So far, the acquisition and verification of our user information have been completed. Next, to make it work, we need to modify it in the configuration file to make it work. Go back to my SecurityConfig code file and modify it as follows:
1. Inject our own AuthenticationProvider
2. How to modify the configuration:
    @Autowired
    private AuthenticationProvider provider;  //Inject our own AuthenticationProvider

    @Override
    protected void configure(AuthenticationManagerBuilder auth) throws Exception {
        auth.authenticationProvider(provider);
    }
Now re run the program, you need to enter the user name admin and password 123456 before you can log in normally.
In order to facilitate the test, we adjust and add the code of another controller / whoim to return the currently logged in user information. As mentioned earlier, it exists in the global variable of SecurityContextHolder, so we can obtain it in this way
      @RequestMapping("/whoim")
      @ResponseBody
      public Object whoIm()
      {
            return SecurityContextHolder.getContext().getAuthentication().getPrincipal();
      }
When we run and directly ask / whoim, we will directly jump to the login page. After verification, we will visit this url. The results are as follows:

image.png
Transformation 3. Customize the processing logic of login success and failure
In most current applications, the front and back ends are generally separated, so we need to return the login success or failure in json format, or jump to a specific page after successful login.
Next, let's realize this transformation.
In order to realize this function, just implement the onAuthenticationSuccess method of the AuthenticationSuccessHandler interface.
Process successful login:
@Component
public class MyAuthenticationSucessHandler implements AuthenticationSuccessHandler {
    private RequestCache requestCache = new HttpSessionRequestCache();
    private RedirectStrategy redirectStrategy = new DefaultRedirectStrategy();

    @Autowired
    private ObjectMapper objectMapper;

    @Override
    public void onAuthenticationSuccess(HttpServletRequest request, HttpServletResponse response,
                                        Authentication authentication) throws IOException, ServletException {
        //response.setContentType("application/json;charset=utf-8");
        //response.getWriter().write(objectMapper.writeValueAsString(authentication));
        SavedRequest savedRequest = requestCache.getRequest(request, response);
        if (savedRequest == null){
            redirectStrategy.sendRedirect(request, response, "/index");
        }else {
            System.out.println(savedRequest.getRedirectUrl());
            redirectStrategy.sendRedirect(request, response, savedRequest.getRedirectUrl());
        }

    }
}
Similar to the custom login success processing logic, the custom login failure processing logic needs to implement the onAuthenticationFailure method of AuthenticationFailureHandler:
@Component
public class MyAuthenticationFailureHandler implements AuthenticationFailureHandler {

    @Autowired
    private ObjectMapper mapper;

    @Override
    public void onAuthenticationFailure(HttpServletRequest request, HttpServletResponse response,
                                        AuthenticationException exception) throws IOException {
        response.setStatus(HttpStatus.INTERNAL_SERVER_ERROR.value());
        response.setContentType("application/json;charset=utf-8");
        response.getWriter().write(mapper.writeValueAsString(exception.getMessage()));
    }
}
After the code is completed, modify the config class code.
Add 2 annotations and inject automatically
@Autowired
      private AuthenticationSuccessHandler myAuthenticationSuccessHandler;
      @Autowired
      private AuthenticationFailureHandler myAuthenticationFailHander;

      @Override
      protected void configure(HttpSecurity http) throws Exception {
            // TODO Auto-generated method stub
            //super.configure(http);
            http
                  .formLogin().loginPage("/login").loginProcessingUrl("/login/form")
                  .successHandler(myAuthenticationSuccessHandler)
                  .failureHandler(myAuthenticationFailHander)
                  .permitAll()  //For form login, permitAll() indicates that the login page does not need to be verified, and the login failure page
                  .and()
                  .authorizeRequests().anyRequest().authenticated()
                  .and()
                  .csrf().disable();
      }
Test and return json format (login success and failure)
4. Add permission control
In the previous code, our user's permission is not used. Now we add the usage of permission.
The previous login verification is to judge who you are (authentication),
Permission control is used to determine what you can or cannot do (permission)
Before talking about this, let's briefly say that for some resources that do not need permission authentication, you can add filter conditions in Config, such as:
@Override
      protected void configure(HttpSecurity http) throws Exception {
            // TODO Auto-generated method stub
            //super.configure(http);
            http
                  .formLogin().loginPage("/login").loginProcessingUrl("/login/form")
                  .successHandler(myAuthenticationSuccessHandler)
                  .failureHandler(myAuthenticationFailHander)
                  .permitAll()  //For form login, permitAll() indicates that the login page does not need to be verified, and the login failure page
                  .and()
                  .authorizeRequests()
                        .antMatchers("/index").permitAll()  //This means that the / index page does not require permission authentication and can be accessed by everyone
                  .anyRequest().authenticated()  //Others need permission authentication
                  .and()
                  .csrf().disable();
      }
If we directly visit / index, we will not jump to the login page, so we can filter some resources that do not need to be verified in this way, such as images, scripts, style files and so on.
Let's first look at the first permission control: write dead in the code.
In fact, permission control is also realized in this way:
   http
                  .formLogin().loginPage("/login").loginProcessingUrl("/login/form")
                  .successHandler(myAuthenticationSuccessHandler)
                  .failureHandler(myAuthenticationFailHander)
                  .permitAll()  //For form login, permitAll() indicates that the login page does not need to be verified, and the login failure page
                  .and()
                  .authorizeRequests()
                        .antMatchers("/index").permitAll()
                  .antMatchers("/whoim").hasRole("ADMIN") //This means that the resource of / whoim needs a role_ This role of admin can only be accessed. Otherwise, you will be prompted to deny access
                  .anyRequest().authenticated() //You must be authenticated before you can access
                  .and()
                  .csrf().disable();
Where the user's role comes from is the role permission information in the user information returned in our own UserDetailsService,
We need to pay attention here hasRole("ADMIN"), then when giving a user a role, you need to use: ROLE_ADMIN

. antMatchers you can also limit different permissions required by HttpMethod (applicable to Restful style API)
For example, Post needs administrator permission and get needs user permission. We can make such a transformation. At the same time, we can also realize the URL with parameters such as: / user/1 through wildcards
.antMatchers("/whoim").hasRole("ADMIN")
.antMatchers(HttpMethod.POST,"/user/").hasRole("ADMIN")
.antMatchers(HttpMethod.GET,"/user/").hasRole("USER")
The verification principle of Spring Security: the configuration information of the left hand, the user information after the login of the right hand, and the middle voter.
Obtain the relevant URL and required permission information from our configuration information, and then obtain the logged in user information,
Then it is verified by: AccessDecisionManager. There are multiple voters: AccessDecisionVoter (there are several implementations by default: for example, 1 vote veto (as long as one does not agree, there is no permission). If it is passed by all votes, it will be considered as passed; As long as one passes, all pass. Something like this.
WebExpressionVoter is the default voter for web development provided by Spring Security. (voter for expression)
The default of Spring Security is confirmativebased. As long as one of them passes, it will pass.
If you are interested, you can view the process from the filter entry of FilterSecurityInterceptor.
The embedded expressions are: permitAll denyAll and so on.
Each permission expression corresponds to a method.
If you need to meet multiple requirements at the same time, you can't write it together. For example, if we have a URL that requires administrator permission and also need to limit IP, you can't: hasRole("ADMIN").hasIPAddress("192.168.1.1");
Instead, you need to use the access method access("hasRole('ADMIN') and hasIpAddress('192.168.1.1')"); This.
Can we write permission expressions ourselves? Yes, later... These are hard coded implementations that are written in code, which is not flexible enough. So let's continue the transformation
Transformation 4. Add RBAC (role based access control) based permission control
You can go to Baidu, which is generally composed of three parts: one is the user, one is the role, one is the resource (menu, button), and then the association table between the user and the role, and the association table between the role and the resource
The core is to judge whether the URL owned by the current user matches the URL currently accessed.
First, we provide a judgment interface and implementation. The code is as follows:
/**
 * Return the interface for permission verification
 */
public interface RbacService {
      boolean hasPermission(HttpServletRequest request,Authentication authentication);
}

@Component("rbacService")
public class RbacServiceImpl implements RbacService {
      private AntPathMatcher antPathMatcher = new AntPathMatcher();
      @Override
      public boolean hasPermission(HttpServletRequest request, Authentication authentication) {
            Object principal = authentication.getPrincipal();
            boolean hasPermission = false;
            if (principal instanceof UserDetails) { //First, judge whether the current user is our UserDetails object.
                  String userName = ((UserDetails) principal).getUsername();
                  Set<String> urls = new HashSet<>(); // Read the database / / read all the URL s that the user has permission to read

                  urls.add("/whoim");
                  // Note that equal cannot be used to judge here, because some URL s have parameters, so AntPathMatcher should be used for comparison
                  for (String url : urls) {
                        if (antPathMatcher.match(url, request.getRequestURI())) {
                              hasPermission = true;
                              break;
                        }
                  }
            }
            return hasPermission;
      }
}
Then add a custom permission expression to the Security configuration item.
@Override
      protected void configure(HttpSecurity http) throws Exception {
            // TODO Auto-generated method stub
            //super.configure(http);
            http
                  .formLogin().loginPage("/login").loginProcessingUrl("/login/form")
                  .successHandler(myAuthenticationSuccessHandler)
                  .failureHandler(myAuthenticationFailHander)
                  .permitAll()  //For form login, permitAll() indicates that the login page does not need to be verified, and the login failure page
                  .and()
                  .authorizeRequests()
//                      .antMatchers("/index").permitAll()
//                .antMatchers("/whoim").hasRole("ADMIN")
//                .antMatchers(HttpMethod.POST,"/user/*").hasRole("ADMIN")
//                .antMatchers(HttpMethod.GET,"/user/*").hasRole("USER")
                  .anyRequest().access("@rbacService.hasPermission(request,authentication)")    //You must be authenticated before you can access
                  .and()
                  .csrf().disable();
      }
Among them, @ rbacService is the bean declared by ourselves, which is in the header annotation of the RbacServiceImpl implementation class.
Transformation 5. Remember my function Remeber me
The essence is to read the user information through the token, so the server needs to store the token information
According to the official documents, token can store database scripts through the database
CREATE TABLE persistent_logins (
    username VARCHAR(64) NOT NULL,
    series VARCHAR(64) NOT NULL,
    token VARCHAR(64) NOT NULL,
    last_used TIMESTAMP NOT NULL,
    PRIMARY KEY (series)
);
Then, configure the token storage and data source
 @Autowired
      private DataSource dataSource;   //It's in application properites

      /**
       * Remember the token accessor configuration of my function
       * @return
       */
      @Bean
      public PersistentTokenRepository persistentTokenRepository() {
            JdbcTokenRepositoryImpl tokenRepository = new JdbcTokenRepositoryImpl();
            tokenRepository.setDataSource(dataSource);
            return tokenRepository;
      }
Modify Security configuration
  @Override
      protected void configure(HttpSecurity http) throws Exception {
            // TODO Auto-generated method stub
            //super.configure(http);
            http
                  .formLogin().loginPage("/login").loginProcessingUrl("/login/form")
                  .successHandler(myAuthenticationSuccessHandler)
                  .failureHandler(myAuthenticationFailHander)
                  .permitAll()  //For form login, permitAll() indicates that the login page does not need to be verified, and the login failure page
                  .and()
                  .rememberMe()
                        .rememberMeParameter("remember-me").userDetailsService(userDetailsService)
                        .tokenRepository(persistentTokenRepository())
                        .tokenValiditySeconds(60)
                  .and()
                  .authorizeRequests()
//                      .antMatchers("/index").permitAll()
//                .antMatchers("/whoim").hasRole("ADMIN")
//                .antMatchers(HttpMethod.POST,"/user/*").hasRole("ADMIN")
//                .antMatchers(HttpMethod.GET,"/user/*").hasRole("USER")
                  .anyRequest().access("@rbacService.hasPermission(request,authentication)")    //You must be authenticated before you can access
                  .and()
                  .csrf().disable();
Log in on the login page A check box to remember the password should also be added to the HTML
 <tr>
            <td colspan="2"><input type="checkbox" name="remember-me" value="true"/>Remember me</td>
        </tr>
After logging in, there will be a piece of data in the database

image.png
Then, after the service is restarted, we can directly access / whoim, and there is no need to log in.
So far, the basic usage of spring security has been transformed.
Source code link: https://github.com/visionsws/vicente-demo