explain
According to the official website Working with documents , use transformers for fine tuning.
I basically follow the documents.
Note: the example on the official website basically saves the model or data set into the local cache through a line of code, but it needs to climb the wall.
We can also download the model and data set locally first, and then load it locally. I use this method.
Load dataset
We use huggingface The built-in data set in the can be seen in various ways of loading data course.
The mrpc dataset under glue is used in the tutorial, and we also use this dataset.
Manually download datasets
However, the mrpc found in the data set in hugging face is very small (it feels like an example), so I downloaded the mrpc data set from the Internet myself, Download address.
After downloading, I used the txt file with suffix train and test as the training set and test set. There is no verification set.
Load dataset manually
Load dataset tutorial visible address.
from datasets import load_dataset

raw_datasets = load_dataset('text', data_files={'train': 'MRPC/msr_paraphrase_train.txt',
                                                'test': 'MRPC/msr_paraphrase_test.txt'})
In this way, the data set is loaded, MRPC/msr_paraphrase_train.txt write the file address of your data set here.
However, when loading, an error is reported:
ImportError: IProgress not found. Please update jupyter and ipywidgets.
See https://ipywidgets.readthedocs.io/en/stable/user_install.html
For online search, follow the following steps:
conda install ipywidgets
jupyter nbextension enable --py widgetsnbextension
After that, the data set is successfully loaded. The dataset looks like this:
DatasetDict({
    train: Dataset({
        features: ['text'],
        num_rows: 4077
    })
    test: Dataset({
        features: ['text'],
        num_rows: 1726
    })
})
However, this data set is not what we want. It should be necessary to write some scripts such as split data sets, but there is no time to search.
Because the server can't connect to the Internet, my computer can connect. I first download the correct data set from the computer and then transfer it to the server. The specific process is as follows:
- Now download the correct data set from the notebook and save it on disk.
from datasets import load_dataset old_datasets = load_dataset("glue", "mrpc") old_datasets.save_to_disk('data') - Then, send the downloaded folder to the server.
- Finally, on the server, load the dataset, which is exactly the same as the tutorial.
import datasets
raw_datasets = datasets.DatasetDict()
raw_datasets = raw_datasets.load_from_disk('data')
View dataset
You can see what the data in the dataset looks like:
raw_train_dataset = raw_datasets["train"]
raw_train_dataset[0]
result:
{'sentence1': 'Amrozi accused his brother , whom he called " the witness " , of deliberately distorting his evidence .',
 'sentence2': 'Referring to him as only " the witness " , Amrozi accused his brother of deliberately distorting his evidence .',
 'label': 1,
 'idx': 0}
You can see the characteristics of the dataset:
print(raw_train_dataset.features)
result:
{'sentence1': Value(dtype='string', id=None), 'sentence2': Value(dtype='string', id=None), 'label': ClassLabel(num_classes=2, names=['not_equivalent', 'equivalent'], names_file=None, id=None), 'idx': Value(dtype='int32', id=None)}Load word breaker tokenizer
Download the model and load the tokenizer
tokenizer needs to be consistent with the model we want to use. tokenizer can be understood as converting our original text into numbers so that we can input it into the network. There are many modes of this conversion, which can be viewed in the theoretical part course.
The model we use is Bert base uncased, or we download and load it manually.
Download address , you can use git to download the entire library, or you can download only what you need. I downloaded:
- vacab.txt
- tokenizer_config.json
- tokenizer.json
- config.json
- pytorch_model.bin
Some of these downloaded files may not be used. After downloading, put them into the folder Bert base uncased and pass them to the server.
Use the following code to load tokenizer, py or ipynb files. There should be a Bert base uncased folder in the same level directory where the model is placed.
from transformers import BertTokenizer

model_name = 'bert-base-uncased'
tokenizer = BertTokenizer.from_pretrained(model_name)
Try the tokenizer effect:
inputs = tokenizer("This is the first sentence.", "This is the second one.")
print(inputs)
{
'input_ids': [101, 2023, 2003, 1996, 2034, 6251, 1012, 102, 2023, 2003, 1996, 2117, 2028, 1012, 102],
'token_type_ids': [0, 0, 0, 0, 0, 0, 0, 0, 1, 1, 1, 1, 1, 1, 1],
'attention_mask': [1, 1, 1, 1, 1, 1, 1, 1, 1, 1, 1, 1, 1, 1, 1]
}The specific explanation of tokenizer effect can be seen course.
Preprocessing data in a dataset
Since there are also two sentences and label s in the data set, we need to preprocess the two sentences as above.
The complete preprocessing code is as follows:
from transformers import DataCollatorWithPadding

def tokenize_function(example):
    return tokenizer(example["sentence1"], example["sentence2"], truncation=True)

tokenized_datasets = raw_datasets.map(tokenize_function, batched=True)
data_collator = DataCollatorWithPadding(tokenizer=tokenizer)
tokenized_datasets are preprocessed datasets, and DataCollatorWithPadding is a tool for processing datasets into batches (it should be, see details) link )And the data will be sorted into a uniform length (that is, the length of the longest data in the batch). The length of the longest data in this batch of data is obviously better than that of the longest data in the whole data set.
train
Define TrainingArguments and load models
First, define a TrainingArguments class, where you can define some super parameters for training. We can only define the storage address of the model. Specific parameters can be seen file.
from transformers import TrainingArguments

training_args = TrainingArguments("test-trainer")
Next, load the model:
from transformers import BertForSequenceClassification

model = BertForSequenceClassification.from_pretrained(model_name, num_labels=2)
Here is the model loaded from the local file.
Trainer loading
Next, you can pass many parameters defined before and load a Trainer for training.
from transformers import Trainer

trainer = Trainer(
    model,
    training_args,
    train_dataset = tokenized_datasets["train"],
    eval_dataset = tokenized_datasets["validation"],
    data_collator = data_collator,
    tokenizer = tokenizer,
)
Then you can start fine tuning, that is, training:
trainer.train()
Introduction evaluation
There is only the value of loss in the training, and the effect of the model is not obvious. Therefore, we need to introduce something for trainer that can show the accuracy of verification set. Specific explanations can be seen file In short, we define a function to calculate the accuracy of the verification set and introduce it into our trainer.
from datasets import load_metric

def compute_metrics(eval_preds):
    metric = load_metric("glue", "mrpc", mirror="tuna")
    logits, labels = eval_preds
    predictions = np.argmax(logits, axis=-1)
    return metric.compute(predictions=predictions, references=labels)

training_args = TrainingArguments("test-trainer", evaluation_strategy="epoch")
model = BertForSequenceClassification.from_pretrained(model_name, num_labels=2)

trainer = Trainer(
    model,
    training_args,
    train_dataset=tokenized_datasets["train"],
    eval_dataset=tokenized_datasets["validation"],
    data_collator=data_collator,
    tokenizer=tokenizer,
    compute_metrics=compute_metrics,
)
metric = load_metric("glue", "mrpc", mirror="tuna")We still need to climb over the wall here, using the mirror image of Tsinghua University. Or it's OK So solve (I haven't tried).
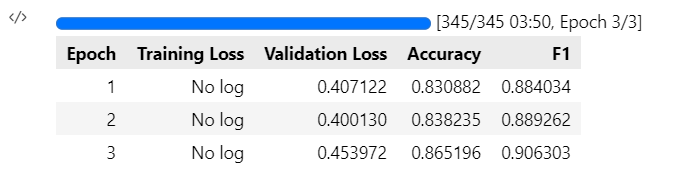
Finally, start training:
trainer.train()
training effect