The main purpose of writing this blog is to record the following knowledge points, and then introduce its concept and usage one by one.
1. Recognize and use vscode
2. Use g + + to compile and run a multi file C + + project
3. Compile a multi file C + + project with cmake
4. Compile, run / debug a multi file C + + project on cscode
5. Use gdb to debug a multi file C + + project without vscode
6. Debugging a C + + project directly on vscode is combined with debugging a C + + project using gdb on vscode
1. Recognize and use vscode
1) vscod can be downloaded from the official website, but it is slow. It can also be downloaded directly from my baidu online disk, which is fast VSCodeUserSetup-x64-1.54.2, extraction code: 6666
2) Connect vscode remotely to alicloud linux server or personal linux virtual machine. The remote connection method and errors encountered in the connection process are recorded in my blog:
Problems encountered when playing with linux (synchronous update)
3) After connecting to linux remotely, write a simple C + + program on linux. (note that before that, install g + +, gcc, gdb and cmake on the remote linux
vscode is easy to use mp4; Extraction code: 6666
Here we just introduce how to compile and run when there is only a single file (only one cpp file) in the project. Later, if our project is relatively large, the header file and source file may be in different folders to form a project. Special attention should be paid to the compilation and operation of this project:
1) To compile and run directly on the terminal, you need to be familiar with how g + + compiles and runs a multi file C + + project.
2) To compile and run directly in the vscode interface, you need to be familiar with how to configure two JSON files, launch json,tasks.json; These things will be discussed later.
2. Use g + + to compile and run a multi file C + + project
2.1 compilation process
In the introduction of the previous video, we can see that we can directly use G + + hello CPP - O Hello actually this compilation statement is a one-time translation of Hello CPP is compiled into an executable file hello. The complete steps should include four steps - preprocessing, compilation, assembly and link. The reader can choose to compile the file as hello. G + +, which can also be executed directly as the previous four steps CPP - O Hello here is how to handle the following four steps.
1. Pretreatment - cpp file – > I file
//The input will be cpp file preprocessing into i file
//Note that the - o option is followed by the generated file name
g++ -E hello.cpp -o hello.i
//Readers can use cat statements on linux terminals to view hello I file
2. Compile - i file – > S file
//Will i file is compiled into assembly code file s
g++ -S hello.cpp -o hello.s
3. Compilation - s file – > O documents
//Will s assembly file is compiled into machine code file again o documents
g++ -c hello.s -o hello.o
4. Link - o file – > bin file
//Will o link machine code files (if there are multiple cpp files, you need to link them)
g++ hello.o -o hello
2.2 some important parameters during compilation
(see article 4, which introduces how to compile multi file C + + project)
1, - g-g option tells GCC to generate debugging information that can be used by GNU debugger GDB to debug the program. Generate the executable file with debugging information g + + - g hello CPP - O Hello, notice that the - g option is added after g + +. In fact, it doesn't matter where the parameter is placed. It can also be g + + hello CPP - O Hello - g, the position of other parameters to be discussed below also doesn't matter.
2, - O, optimize source code
The so-called optimization, such as omitting variables that have never been used in the code, directly replacing constant expressions with result values, and so on
-01 is the default optimization
-In addition to completing the optimization of - 01, 02 also carries out some additional adjustment work, such as instruction adjustment. g++ -O2 hello.cpp -o hello
-03 includes loop expansion and other optimization work related to processing characteristics.
3, - L or - L, specify the library file | specify the library file path
-L (lowercase) specifies the library to be linked by the program, and then directly writes the name of the library to be connected without spaces (the libraries in / lib and / usr/lib and / usr/local/lib can be linked directly with the - L parameter, and the following - L parameter is not required to specify the directory of the library file)
-The L parameter is followed by the directory name where the library file is located.
For example:
1)g++ -lglog hello.cpp -o hello link glog Library
2)g++ -L/home/dir1/test -ltest hello.cpp -o hello link
/Home / dir1 / test - Test Library under ltest directory
4. The include header file in the - I system generally does not need to be specified. gcc knows where to find it, but if it is not the system header file, you need to specify the directory where the include file is located.
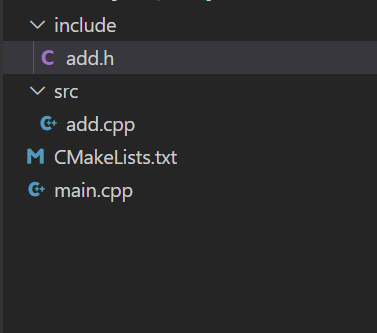
For example, the file structure of a C + + project is as follows:
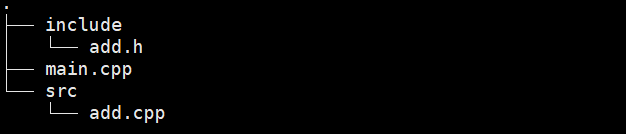
You can see that to compile this project, you need to compile two CPP files, and also notice that there is a header file in the include directory under the root directory of the current project. Therefore, the statement to compile this project is g + + - iinclude main cpp add. CPP - O main this is also the way we use g + + to compile general multi file C + + projects.
5, - Wall print warning message
6, -w turn off warning message
7, - std==C++11 compile using C++11 standard
8, - o specifies the output file name
9, - D defines macros. For example, - DDebug defines Debug macros. There may be relevant information about Debug macros in the file. Use a Gebug to select whether to turn on or off Debug
Example code:
// -Dname defines the macro name. The default definition content is the string "1"
#include <stdio.h>
int main( )
{
#ifdef DEBUG
printf( "DEBUG LOG\n");
#endif
printf("in\n");
}
// 1. When compiling, use GCC - ddebug main cpp
// 2. The seventh line of code can be executed
2.3 supplement: compile links to generate static link libraries and dynamic link libraries
Or the previous example
1. Add H and add CPP compile link to generate static library
##Enter the src directory
$cd src
#Assemble and generate add O documents
g++ add.cpp -C -I../include
#Generate static library libadd a
ar rs 1ibadd.a add.o
##Go back to the parent directory
$cd
#Link to generate executable file: staticmain
g++ main.cpp -Iinclude -Lsrc -1add -o stati_cmain
2. Add H header file and add CPP compiles links into dynamic link libraries
##Enter the src directory
$cd src
#Generate dynamic library libadd so
g++ add.cpp -I../include -fPIC -shared -o 1ibadd.so
##The above command is equivalent to the following two commands
# gcc add.cpp -I../include -c -fPIC
# gcc -shared -o libadd.so add.o
##Go back to the parent directory
$cd ..
#Link to generate executable file: sharemain
g++ main.cpp -Iinclude -Lsrc -1add -o sharemain
3. Compile a multi file C + + project with cmake
Cmake is a cross platform installation and compilation tool, which can describe the installation (compilation process) of all platforms with simple statements. It can be said that it has become the standard configuration of most C + + open source projects. Before using cmake, you must first download the cmake tool on linux platform. At the same time, if you want to use cmake on vscode, you also need to install additional plug-ins: cmake and CMake Tools. Next, we will introduce the usage of cmake tool:
3.1 cross platform principle of cmake
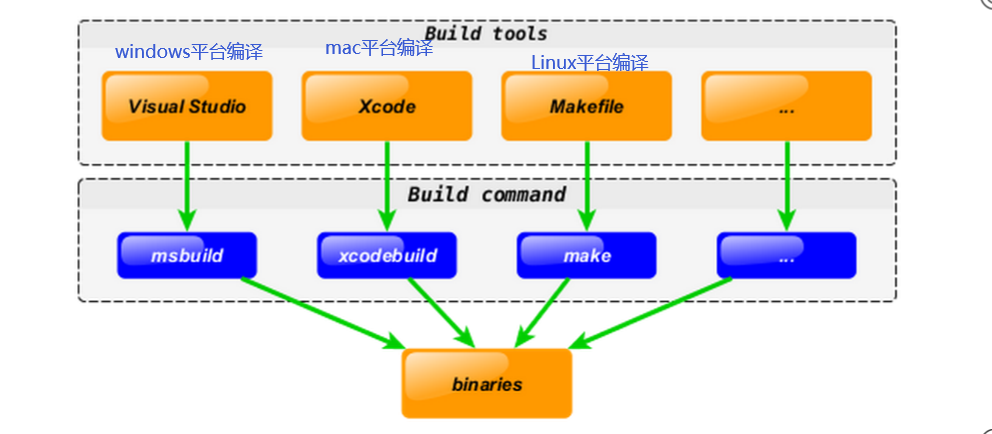
First, let's understand why CMake can realize cross platform. As shown in the figure below, the compilation tools used by C + + on various platforms:
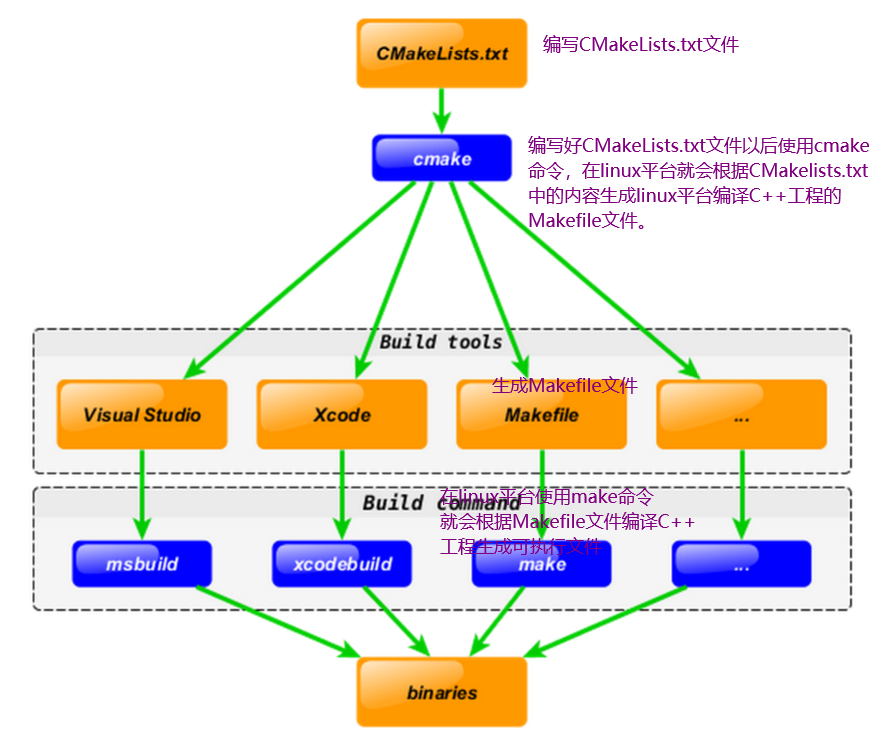
Using cmake, the compilation instructions described by cmake can be translated into different compilation instructions on different platforms, realizing cross platform. The following figure describes the process of using cmake. It can be seen that the most important thing in this process is to write cmakelists Txt file. Next, I'll introduce how to write cmakelists Txt file.
3.2 CMakeLists.txt file writing
3.2.1 basic syntax format
Instruction (parameter 1, parameter 2...)
Parameters are enclosed in parentheses and separated by spaces or semicolons
Instructions are case independent, and parameters and variables are case dependent.
Variables are valued in ${} mode, but variable names are directly used in IF control statements.
3.2.2 important instructions
1,cmake_minimum_required - minimum version requirement of CMake instruction
cmake_minimum_required(VERSION 2.8.0)
# You can use the cmake --version command on linux to view the cmake version. The minimum version written in the txt file is smaller than it
2. Project defines the name of the factory project and can specify the language supported by the project
project(HellO) #The project name is HELLO
# project(projectname [c++] [c] [java])
3. set explicitly defines variables
set(SRC main.cpp add.cpp)
#Define the value of the variable SRC as main cpp add. cpp
4,include_directories adds multiple specific header file search paths to the project (equivalent to the - I parameter in g + +)
include_directories(dir1 dir2 ...)
#Add directory 1 (dir1), directory 2 (dir2) and other paths as header file search paths
5,link_ directories - add multiple specific library file search paths to the project – > equivalent to specifying the - L parameter of the g + + compiler
link_directories(dir1 dir2...)
#Add paths such as directory 1 (dir1) and directory 2 (dir2) as library file search paths
6,add_library generate library files
# grammar
add_library(libname [SHARED|STATIC|MODULE] [EXCLUDE_FROM_ALL] source1 source2... sourceN)
7,add_compile_options add compilation parameters
add_compile_options(-Wall -std=c++11 -g)
#Add compilation parameter - Wall -std=c++11 -g
8,add_executable generate executable file
add_excutable(main main.cpp add.cpp)
#Compile link main CPP and add CPP generate executable file main
9,target_link_libraries add a shared library to target that needs to be linked - > the same as specifying g + + compiler parameters
target_link_libraries(target library1 library2...)
10,add_ subdirectory - add a subdirectory for storing source files to the current project. You can specify the storage location of intermediate binary and target binary.
add_subdirctory(src)
#Added src source file subdirectory
11,aux_ source_ _directory - find all source code files in a directory and store the list in a variable
Instructions are temporarily used to automatically build a list of source files.
#Defines the SRC variable whose value is all source code files in the current directory
aux_ source_ directory( .SRC)
#Compile the source code file represented by SRC variable to generate main executable
add_ executable(main ${SRC})
3.2.3 write cmakelists for the previous example Txt example
Or the previous example:
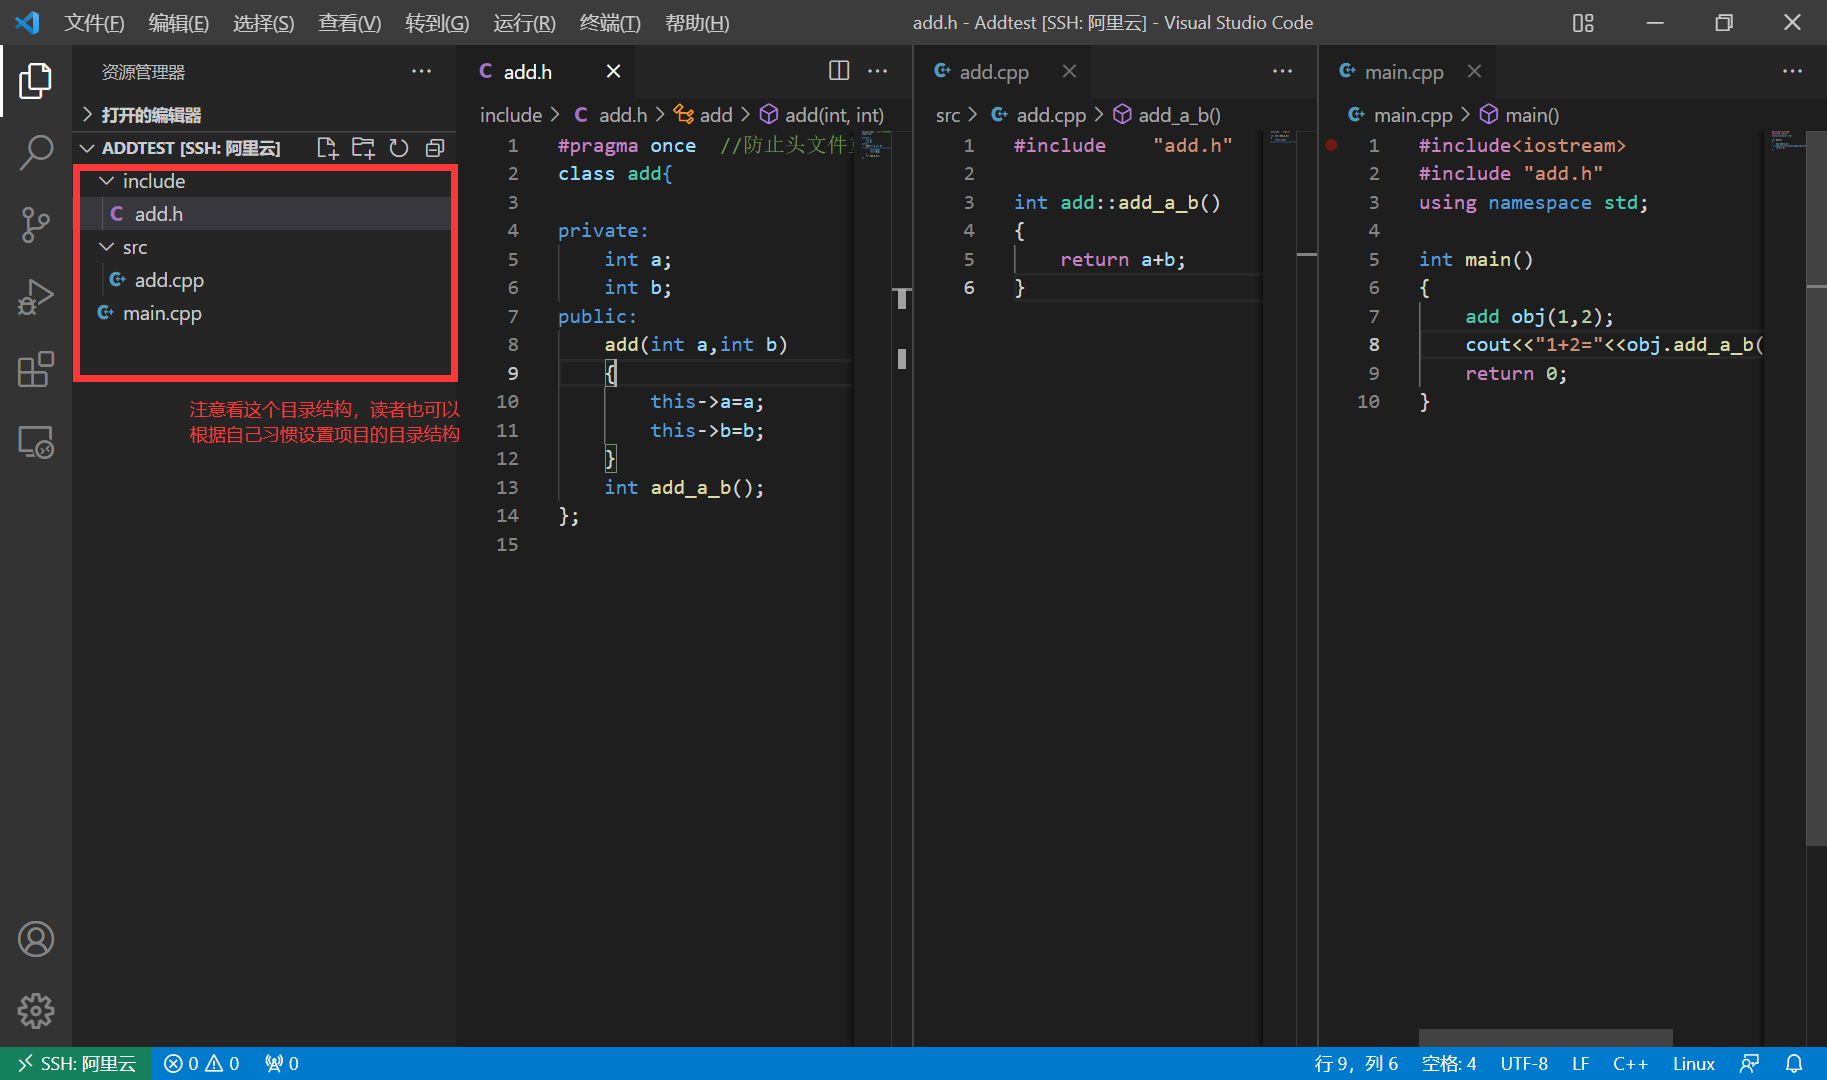
Finish the project on vscode
If you compile directly with g + +, the g + + compilation statement is g + + - iinclude main cpp add. cpp -o add
This statement compiles the link main And cpp.add CPP, and the declaration header file is in the include directory. CMakeLists.txt can achieve the same content.
cmake_minimum_required(VERSION 2.8.0)  #Declare the minimum version of cmake to be used (smaller than the version we installed on linux)
project(ADD)                     #Give the C + + project a name (ADD)
include_directories(include)     #Directory that declares the header file for the project
add_executable(main_cmake main.cpp src/add.cpp)  #Set main CPP and Src / add CPP compile and link to main_cmake executable
To this cmakelists Txt is completed. You can directly use the cmake command to build the Makefile file. Of course, the txt currently written can only compile and link our example. If we have other special requirements for the compiled project in the future, such as linking a library file, adding some compilation parameters, etc., these instructions are described above. Next, let's see how to use this cmakelists Txt file.
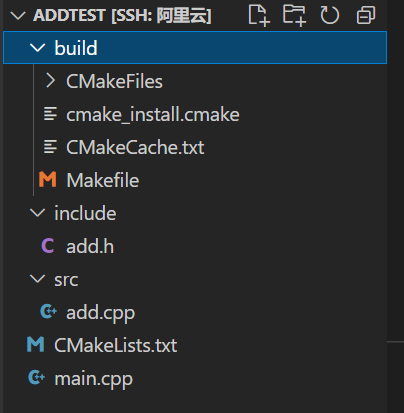
1) First, you can see that there are more cmakelists in the file directory txt
2) Create a new build folder (convenient for us to store some generated files after running cmake command), and then run cmake in the build directory
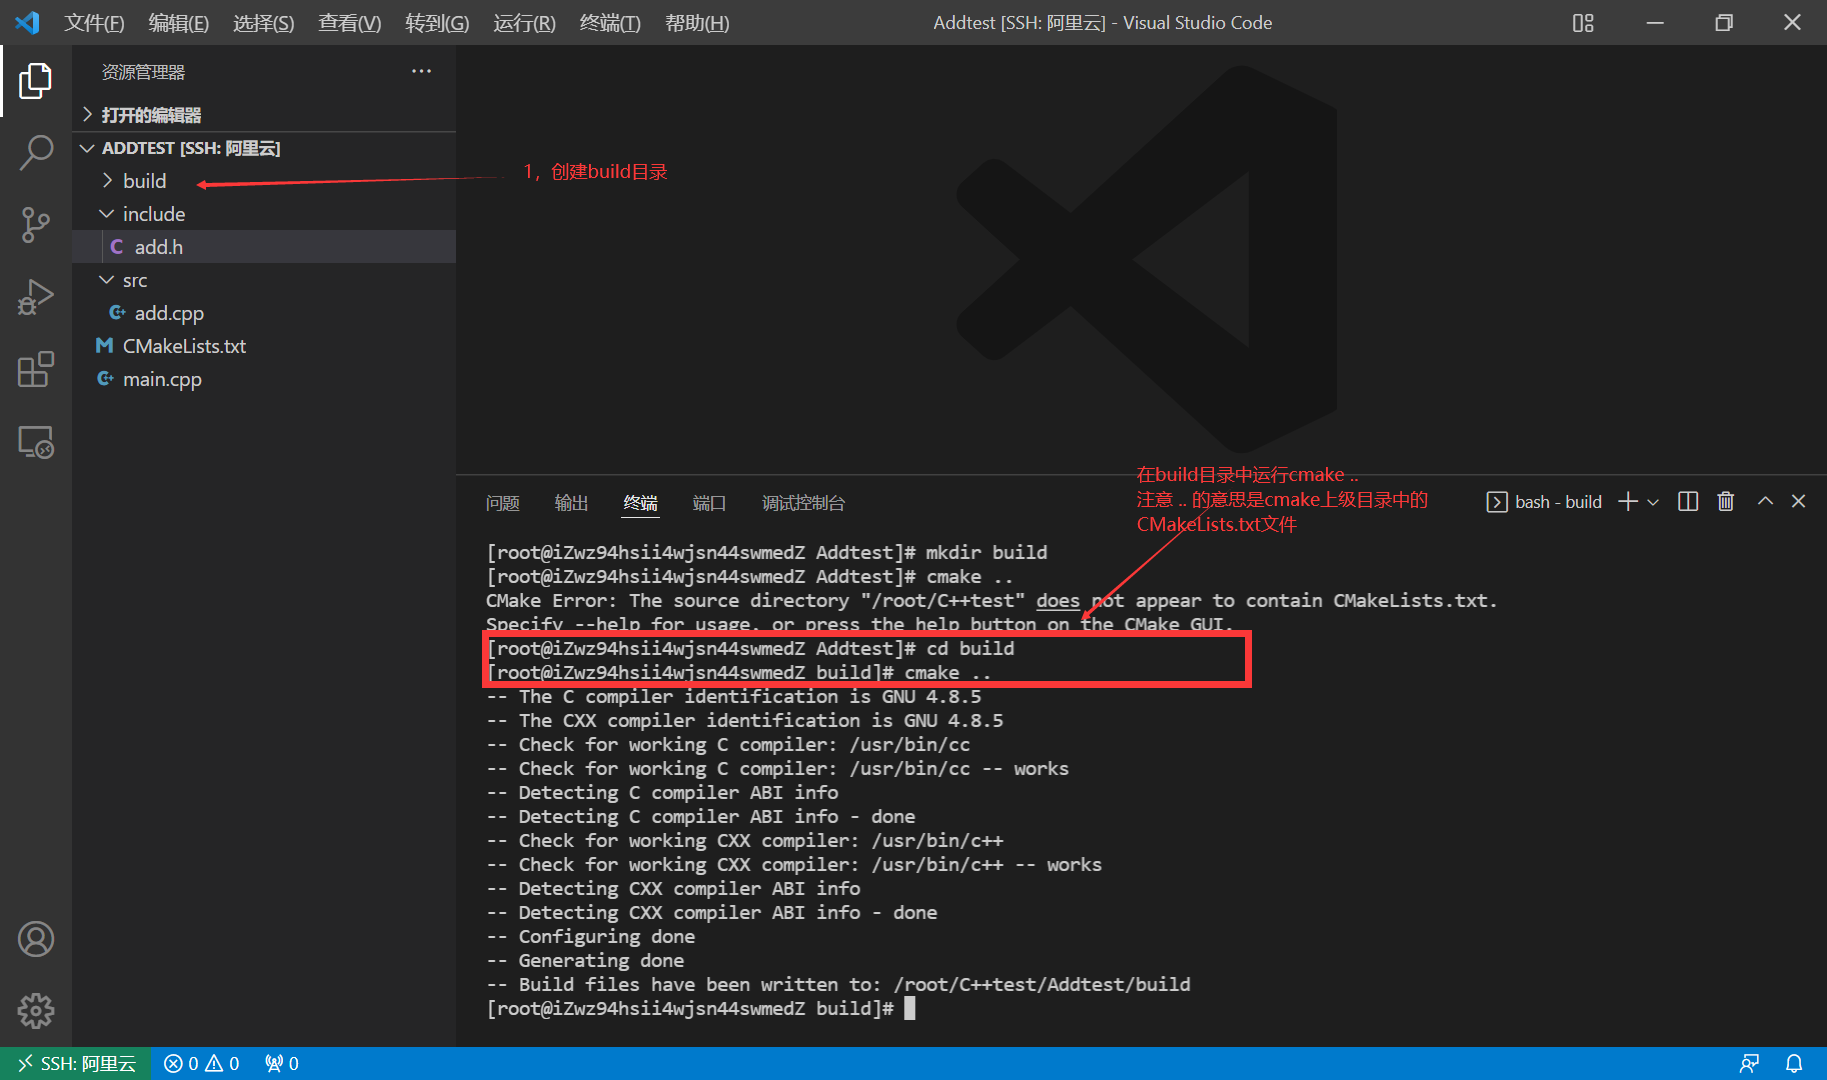
Then the Makefile file will be generated in the build directory.
3) Continue to run the make command in the build directory. Generate executable file. Then it can be executed.

Then it can be executed directly under this directory/ main_cmake

4. Compile and run a multi file C + + project on vscode
As shown earlier, G + + - iinclude main can be used directly at the terminal cpp add. CPP - O main or use cmake to compile and link the project. Of course, we can also configure launch on the vscode platform JSON and tasks JSON two files, so that the project can directly press the run button on the vscode platform to start running or debugging.
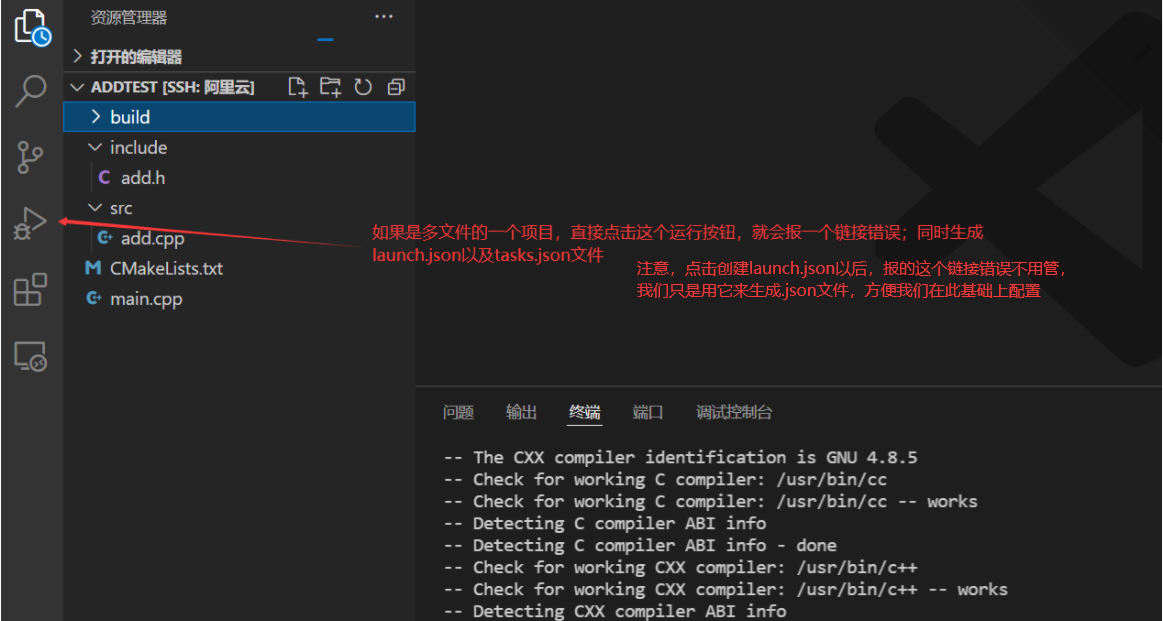
4.1. Configure launch json
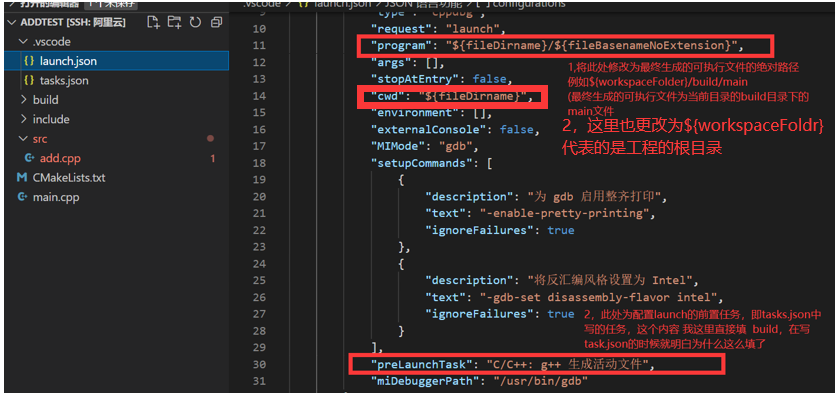
The final content is as follows: readers can directly copy the past
{
    // Use IntelliSense to understand related properties.
    // Hover to view the description of an existing property.
    // For more information, visit: https://go.microsoft.com/fwlink/?linkid=830387
    "version": "0.2.0",
    "configurations": [
        {
            "name": "g++ - Generate and debug activity files",
            "type": "cppdbg",
            "request": "launch",
            "program": "${workspaceFolder}/build/main_cmake",
            "args": [],
            "stopAtEntry": false,
            "cwd": "${workspaceFolder}",
            "environment": [],
            "externalConsole": false,
            "MIMode": "gdb",
            "setupCommands": [
                {
                    "description": "by gdb Enable neat printing",
                    "text": "-enable-pretty-printing",
                    "ignoreFailures": true
                },
                {
                    "description": "Set disassembly style to Intel",
                    "text": "-gdb-set disassembly-flavor intel",
                    "ignoreFailures": true
                }
            ],
            "preLaunchTask": "Build",
            "miDebuggerPath": "/usr/bin/gdb"
        }
    ]
}
4.2. Configure tasks json
Change the original tasks Delete all the contents of JSON and copy the following contents. Later, we will talk about the reason why it is written like this.
{
    "version": "2.0.0",
    "options": {
        "cwd": "${workspaceFolder}/build"
    },
    "tasks": [
        {
            "type": "shell",
            "label": "cmake",
            "command": "cmake",
            "args": [
                ".."
            ]
        },
        {
            "label": "make",
            "group": {
                "kind": "build",
                "isDefault": true
            },
            "command": "make",
            "args": [

            ]
        },
        {
            "label": "Build",
			"dependsOrder": "sequence", // Execute task dependencies in the order listed
            "dependsOn":[
                "cmake",
                "make"
            ]
        }
    ]

}
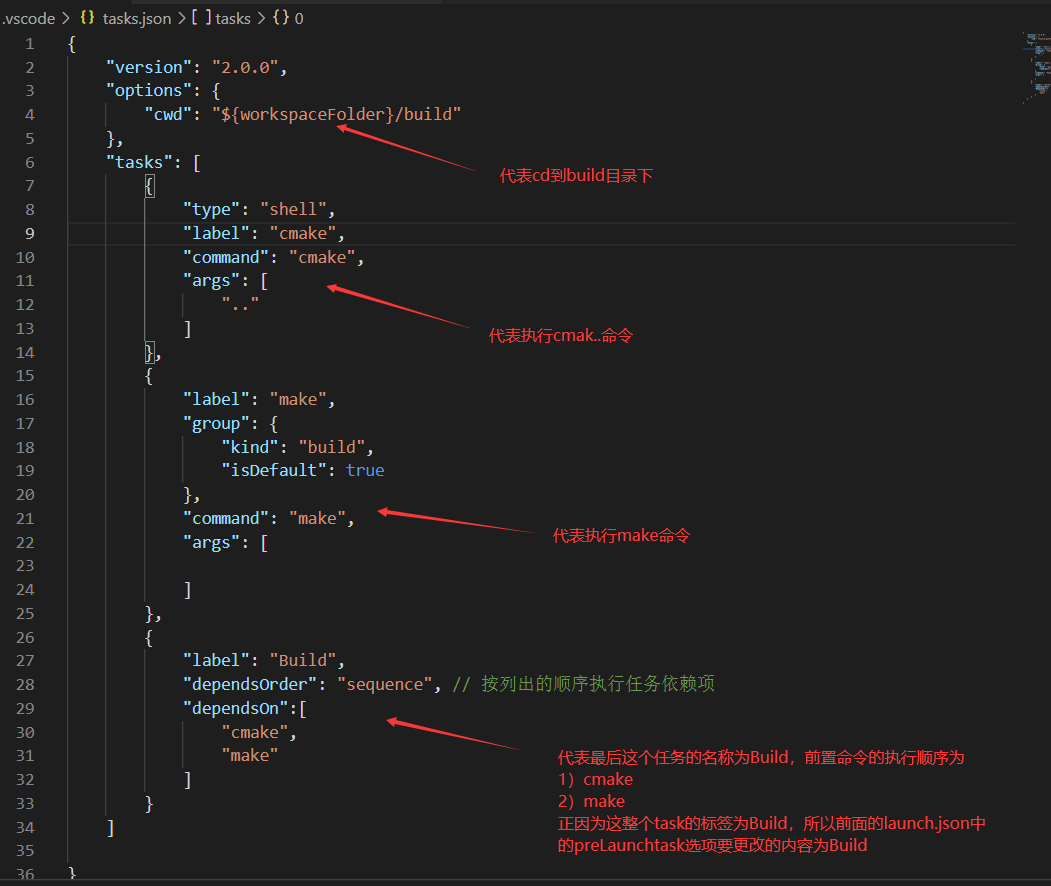
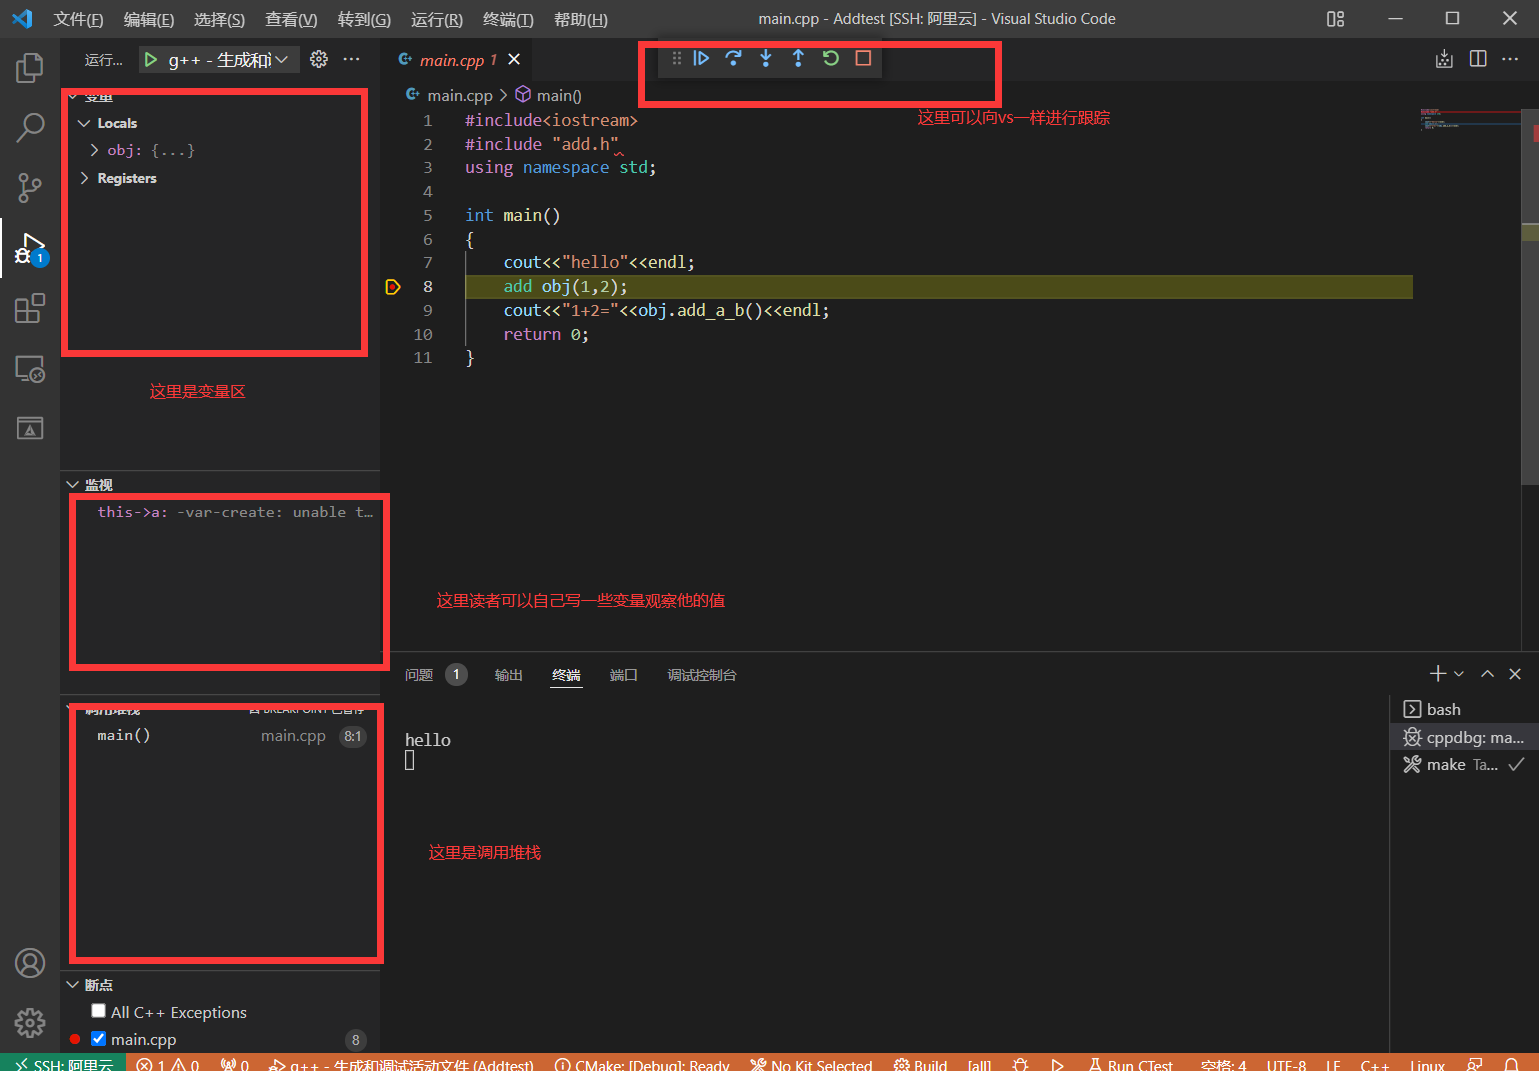
After these two json files are configured, you can directly click Run or debug on vscode, that is, we don't need to manually cmake, make and run on the terminal/ main_cmake, just run with one key, and vscode will do these steps one by one. Note that if you want to debug, you can use cmakelists Txt file to add - g compilation instruction: add_compile_options(-Wall -std=c++11 -g), and then the debugging interface with breakpoints is as follows:
5. Use gdb to debug a multi file C + + project without vscode
6. Debugging a C + + project directly on vscode is combined with debugging a C + + project using gdb on vscode
See next blog: