Using Vue JS build VS Code extension

Visual Studio (VS) Code is one of the favorite code editors used by developers in their daily tasks. It is built with scalability in mind. To some extent, most of the core functions of VS Code are built as extensions. You can view the VS Code extension repository( https://github.com/microsoft/vscode/tree/main/extensions )To understand what I'm talking about.
VS Code is an electronic code at the bottom( https://www.electronjs.org/ )Cross environment applications that can run on UNIX, Mac OSX, and Windows operating systems. Because it is an electronic application, you can extend it by writing JavaScript plug-ins. In fact, any language that can be converted to JavaScript can be used to build extensions. For example, the VS Code document website prompts for TypeScript( https://www.typescriptlang.org/ )To write VS Code extensions. All code samples provided by VS Code team( https://github.com/microsoft/vscode-extension-samples )Are built using TypeScript.
VS Code supports a wide range of APIs. You can use the VS Code API( https://code.visualstudio.com/api )View and read on.
VS Code allows you to extend almost all the features it supports. You can build custom commands, create new color themes, embed custom HTML in WebView, contribute to the active bar by adding new views, display hierarchical data on the sidebar with tree view, and many other scalability options. Extended features overview page( https://code.visualstudio.com/api/extension-capabilities/overview )All VS Code extension functions are described in detail. If you want to skip the overview and go directly to the details on how to build an actual extension with functionality, check the extension guide page( https://code.visualstudio.com/api/extension-guides/overview ).
Building extensions in VS Code is a huge topic that can be described in detail in many books and countless articles. In this article, I will focus on:
- Create VS Code command
- Use the Webview API to embed Vue in Webview panels and views JS application
- Add a view container to the active bar
VS Code UI architecture
Before I delve into building extensions, it's important to understand the parts and that make up the VS Code UI.
I will borrow two charts from the VS Code website to help illustrate these concepts. Figure 1 illustrates the main parts of the VS Code UI.
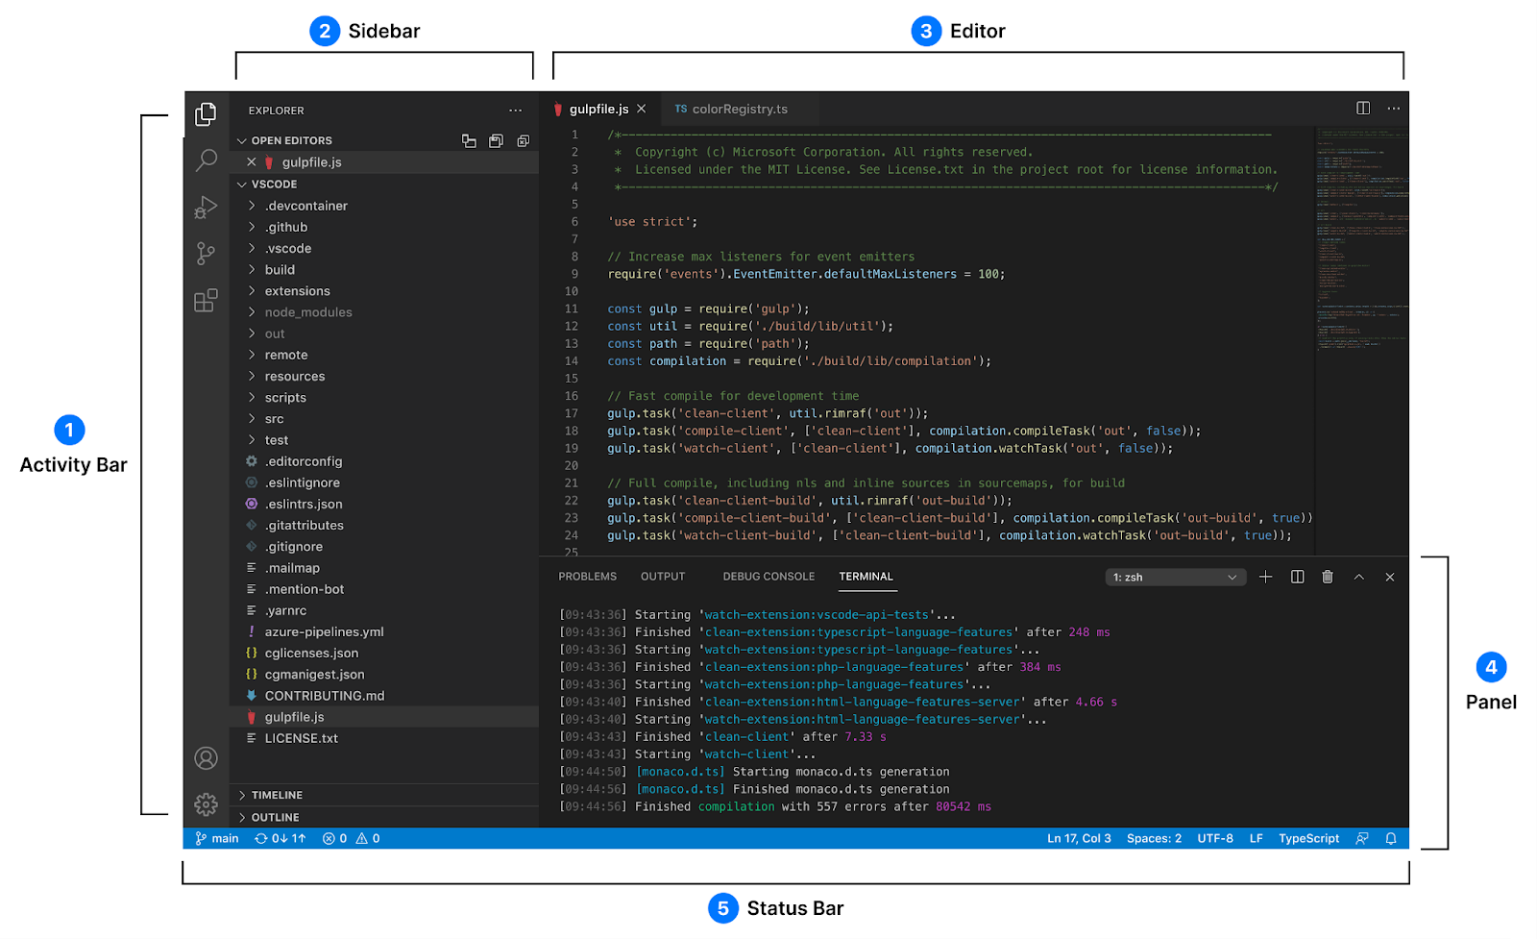
Figure 1: main parts of VS Code
VS Code has the following main parts:
- Active bar: each icon on the active bar represents a view container. In turn, the container holds one or more views inside. In addition, you can extend existing. For example, you can add a new view to the Explorer view.
- Sidebar: a sidebar is a container that hosts views. For example, you can add a tree view or a Web view to the sidebar.
- Editor: the editor hosts different types of editors used by VS Code. For example, VS Code uses a text editor to allow you to read / write files. Another editor allows you to edit workspace and user settings. For example, you can also contribute your own editor using Webview.
- Panels: panels allow you to add view containers with views.
- Status bar: the status bar hosts status bar items that can be displayed using text and icons. You can also think of them as commands that trigger actions when you click them.
Figure 2 illustrates the contents of the main parts of the VS Code UI.
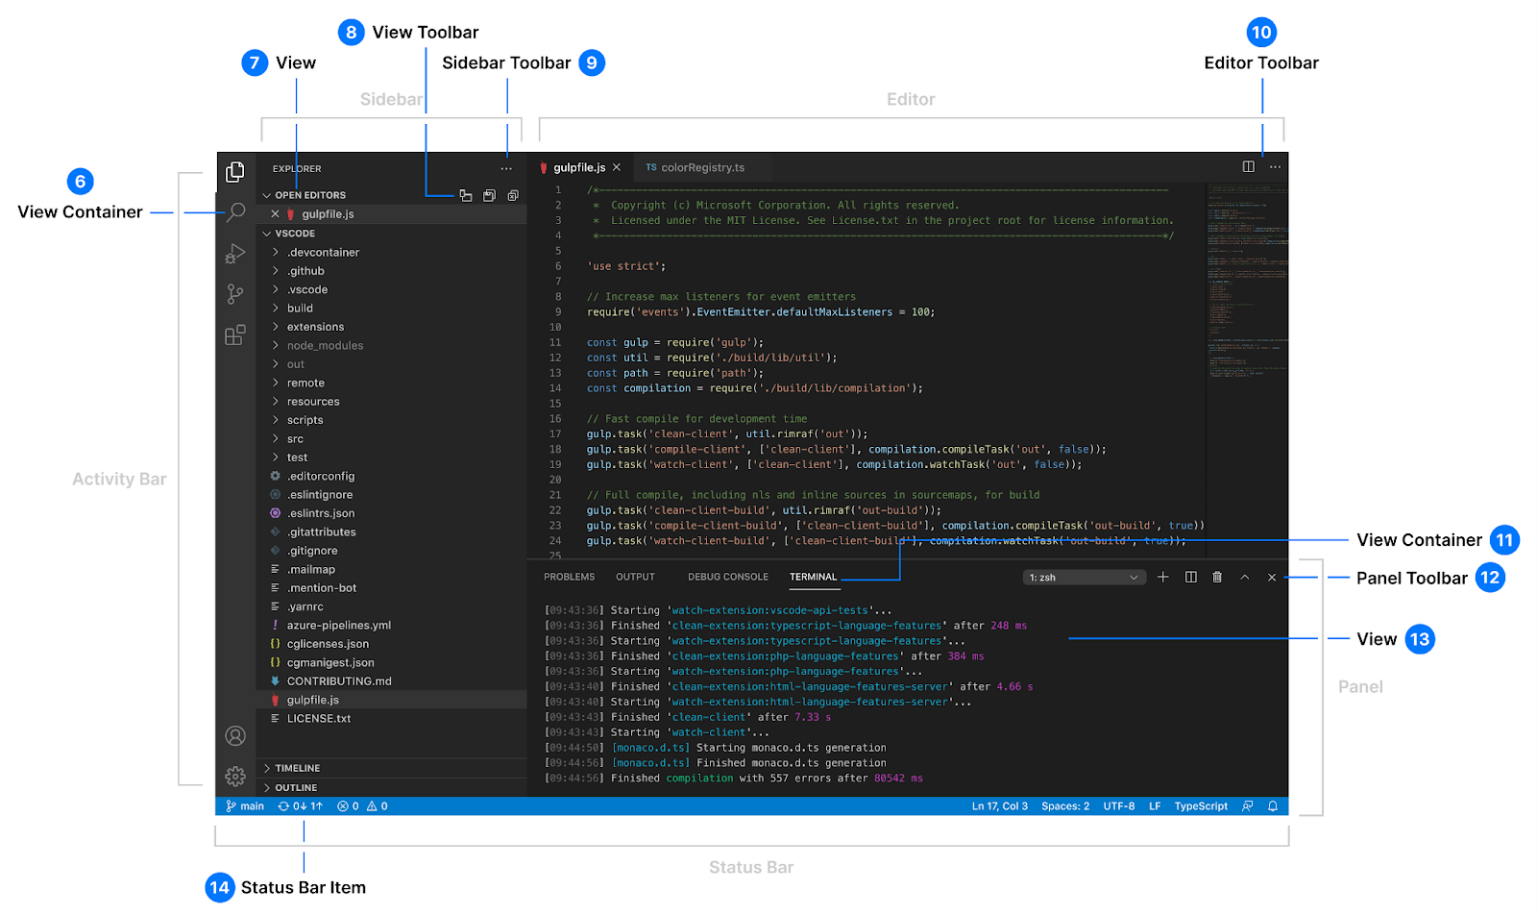
Figure 2: details of VS Code
- The Activity Bar hosts View Containers, which in turn hosts Views.
- The view has a view toolbar.
- The sidebar has a sidebar toolbar.
- The editor has an editor toolbar.
- Panels host view containers, which in turn host views.
- The panel has a panel toolbar.
VS Code allows us to extend any major and minor parts using its API.
The VS Code API is rich enough to allow developers to extend almost all the functionality it provides.
Your first VS Code extension
To start building your own custom VS Code extension, make sure that node.com is installed on your computer js ( https://nodejs.org/en/ )And Git( https://git-scm.com/ ). Needless to say, you also need to install VS Code on your computer( https://code.visualstudio.com/download ).
I will use yeoman( https://yeoman.io/ )CLI generates a new VS Code extension project. Yo code is provided and supported by Microsoft( https://www.npmjs.com/package/generator-code )Yeoman generator to build a complete VS Code extension in TypeScript or JavaScript.
Let's go!
Step 1
Install Yeoman CLI and Yo code generator by running the following command:
npm install -g yo generator-code
Step 2
Run the following command to build a TypeScript or JavaScript project ready for development.
yo code
During the process of creating a new VS Code extension project, the code generator asks some questions. I will use them to create applications.
Figure 3 shows the starting point of the generator.
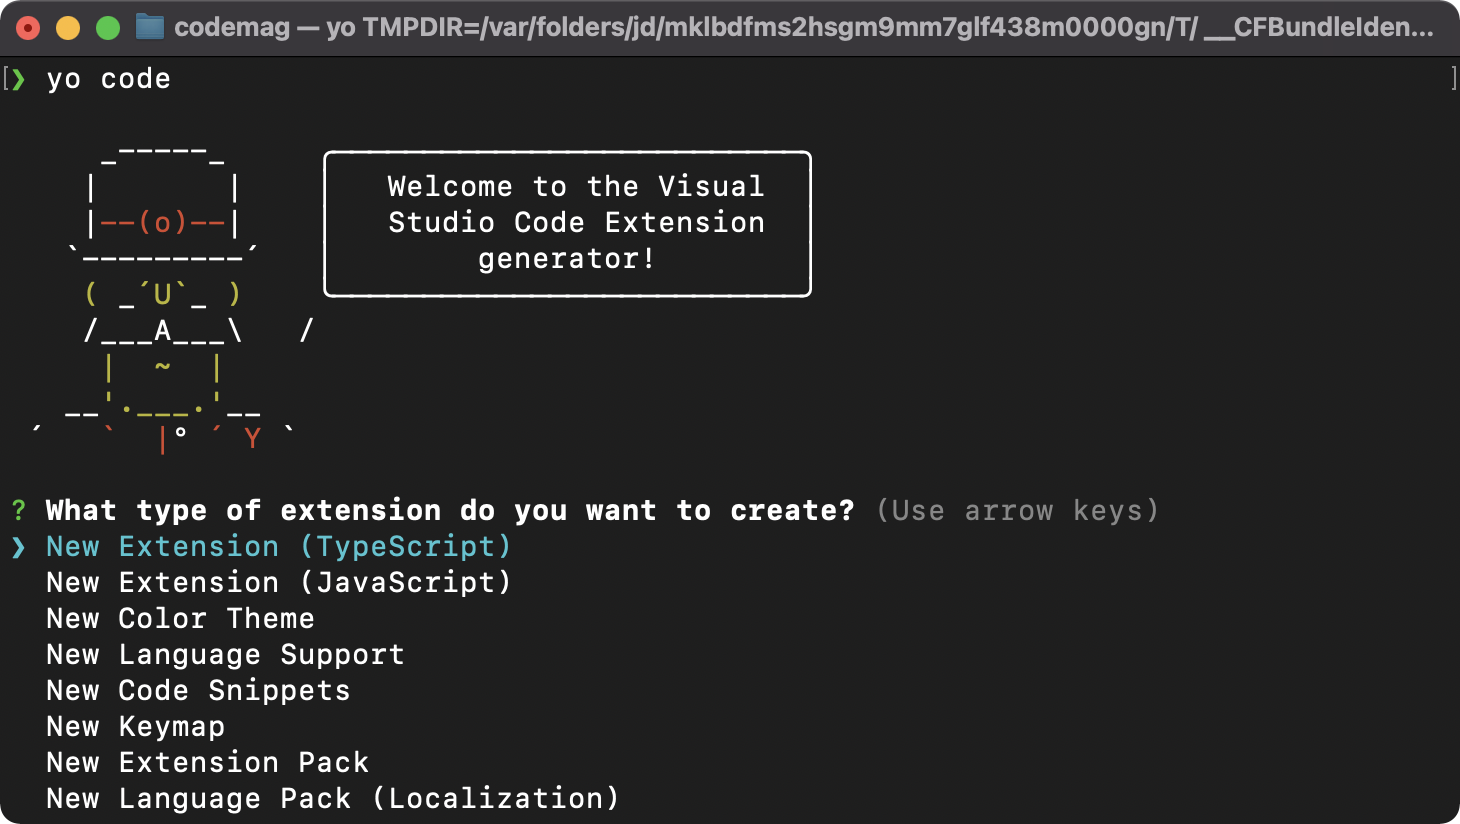
Figure 3 startup of expansion project scaffold
You can choose TypeScript or JavaScript. Most of the examples you find online are written in TypeScript. When writing and authoring extensions, it would be wise to use TypeScript to make your life easier.
Next, you need to provide the name of the extension, as shown in Figure 4.
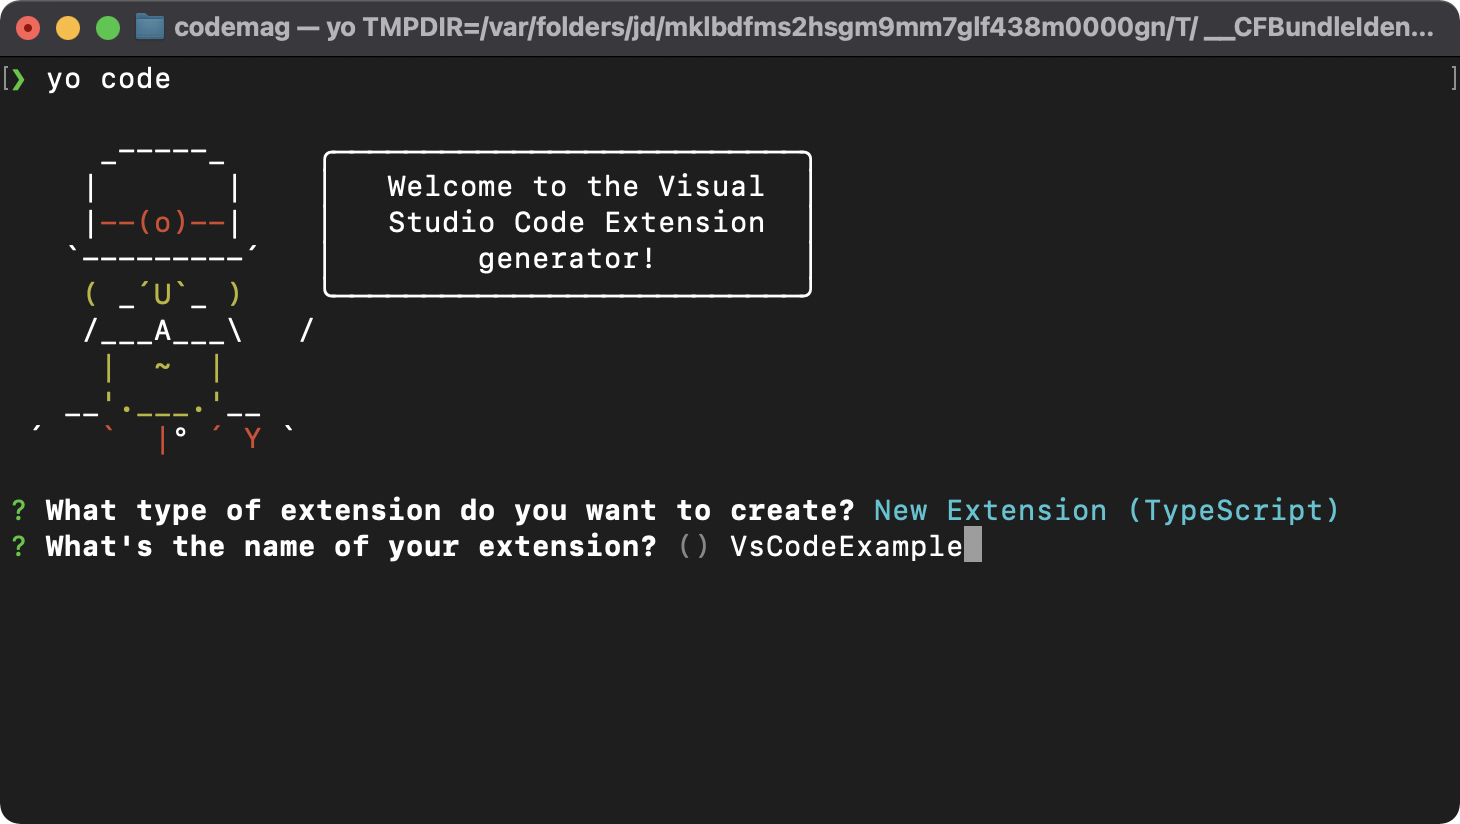
Figure 4 named VS Code extension
Now you specify the identifier (ID) of the extension. You can keep the default settings or provide your own settings. I prefer not to use spaces or dashes (-) to separate identifier names.
You can then provide a description of the extension.
The next three questions are shown in Figure 5.
- Initialize Git repository? yes
- Use Webpack bundle extension? yes
- Which package manager do you use? New product manager
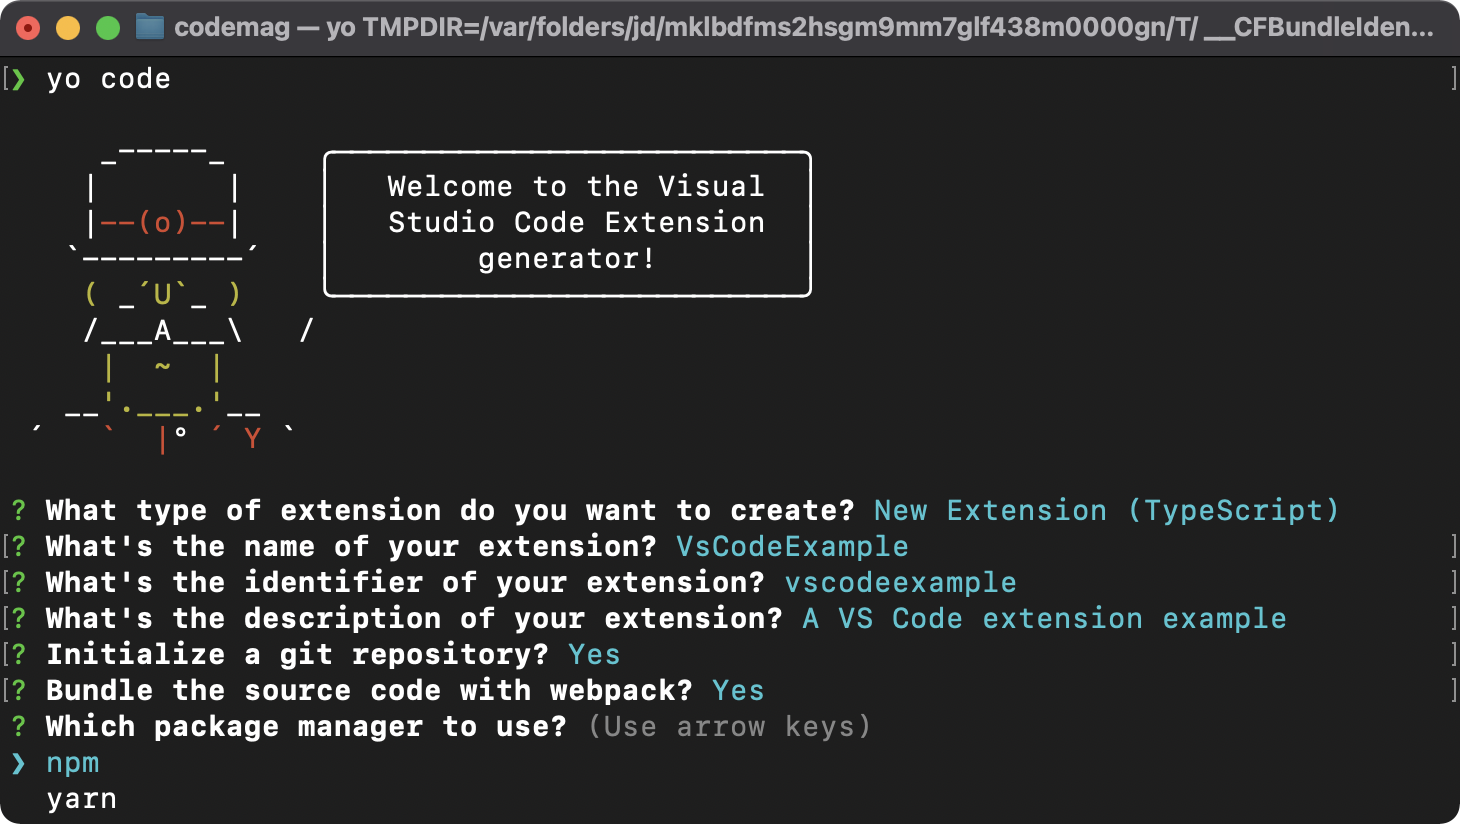
Figure 5 completed code generator scaffold
The generator gets all your answers and builds a scaffold for your application. When finished, enter the new extension folder and open VS Code by running the following command:
cd vscodeexample && code .
Step 3
Let's quickly explore expansion projects.
Figure 6 lists all the files Yo Code generated for you.
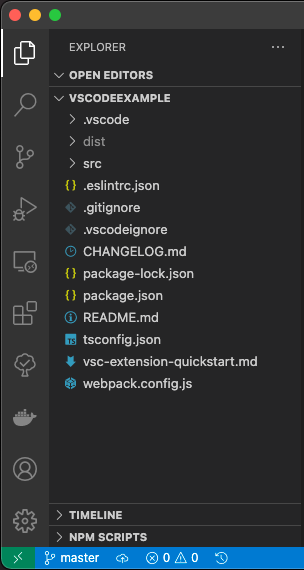
Figure 6 project documents
- The / The vscode / directory contains configuration files that help us easily test extensions.
- The / dist / directory contains the compiled version of the extension.
- The / src / directory contains the source code you wrote to build the extension.
- This package The JSON file is the default NPM configuration file. You can use this file to define your custom commands, views, menus, and so on.
- The VSC extension QuickStart The MD file contains an introduction to the extension project and documentation on how to start building VS Code extensions.
Microsoft provides Yo Code Yeoman generator to help you build VS Code extension projects quickly and easily.
Step 4
Open package JSON file, let's explore the important parts needed to build this extension.
"contributes": {
    "commands": [
        {
            "command": "vscodeexample.helloWorld",
            "title": "Hello World"
        }
    ]
},
You can define custom commands in the contribution section. When defining a new command, you must provide at least the command and title. The command should uniquely identify your command. By default, the command used is the concatenation of the extension identifier you specify when building the extension and any string representing the command you provide. The new command is now automatically displayed in the command panel.
VS Code defines many built-in commands that you can even use programmatically. For example, you can execute workbench action. Use the newwindow command to open a new VS Code instance.
This is the complete list of built-in commands in VS Code( https://code.visualstudio.com/api/references/commands ).
This command does not perform any operation for the time being. You still need to bind this command to the command handler that I will define shortly. VS Code provides the function of registerCommand() to associate with you.
You should define an activation event that will activate the extension when the user triggers the command. Yes, the activation event lets VS Code locate the command and bind it to the command handler. Remember that extensions are not always activated by default. For example, when you open a file with a specific file extension, the extension may be activated. This is why you need to ensure that the extension is activated before running any command.
This package The JSON file defines the activationEvents section:
"activationEvents": [ "onCommand:vscodeexample.helloWorld" ],
When the user invokes a command from the command panel or through key binding, the extension will be activated and the registerCommand() function will bind (vscodeexample.helloWorld) to the correct command handler.
Step 5
It's time to explore the extended source code and register the command with the command handler. The extension source code is located in / SRC / extension TS file. I have cleaned up this file as follows:
import * as vscode from 'vscode';

export function activate(
    context: vscode.ExtensionContext) {
        context.subscriptions.push(...);
    }

export function deactivate() {}
VS Codeactivate() calls this function when you want to activate the extension. Similarly, when it calls the deactivate() function, it wants to deactivate it. Remember that extensions are activated only when one of the activation events you declare occurs.
If you instantiate objects in the command handler and want VS Code to release them for you later, push the new command registration to context Subscriptions array. VS Code maintains this array and will garbage collect on your behalf.
Let's register the Hello World command as follows:
context.subscriptions.push(
    vscode.commands.registerCommand(
       'vscodeexample.helloWorld',
       () => {
           vscode.window.showInformationMessage('...');
        }
    )
);
This vscode object is the key to accessing the entire VS Code API. Registering command handlers is similar to registering DOM events in JavaScript. This code binds the same command identifier (the one you previously declared under the commands and activationEvents sections in the package.json file) to the command handler.
When the user triggers the command, VS Code displays an information message.
Let's test the extension F5 by clicking. VS Code opens a new instance with the new extension loaded. To trigger a command, open the command panel and start typing "hello".
Figure 7 shows how VS Code filters the available commands into the ones you want.

Figure 7 filtered command panel
Now click the command, and figure 8 shows how the information message appears at the bottom right of the editor.

Figure 8 shows the message
congratulations! You just completed your first VS Code extension!
Using Vue CLI JS build VS Code extension
Let's use your new knowledge to create more interesting things!
In this section, you will use the Vue CLI to create a new Vue JS application and host it in Webview as a separate editor.
The Webview API allows you to create fully customizable views in VS Code. I like to think of Webview as iframe in VS Code. It can render any HTML content within this framework. It also supports two-way communication between extended and loaded HTML pages. Views can publish messages to extensions and vice versa.
The Webview API supports two types of views that I will explore in this article:
- WebviewPanel is the wrapper of Webview. It is used to display Webview in the editor of VS Code.
- WebviewView is the wrapper of Webview. It is used to display the Web view in the sidebar.
In both types, Webview hosts HTML content!
The Webview API documentation is rich in content and contains all the details needed to use it. In Webview API( https://code.visualstudio.com/api/extension-guides/webview )View on.
Let's start building Vue JS sample application and host it in the editor of VS Code.
Webview allows you to enrich your VS Code extensions by embedding HTML content with JavaScript and CSS resource files.
Step 1
Use Yeoman to generate a new VS Code extension project, as described above.
Step 2
Add a new command to open Vue JS application. Find the package JSON file and add the following:
"contributes": {
    "commands": [
        {
            "command": "vscodevuecli:openVueApp",
            "title": "Open Vue App"
        }
    ]
},
The identifier of the command is vscodevuecli:openVueApp.
Then you declare an activation event as follows:
"activationEvents": ["onCommand:vscodevuecli:openVueApp"],
Step 3
Switch to extension JS file and register the command handler inside the activate() function.
context.subscriptions.push(
    vscode.commands.registerCommand(
        'vscodevuecli:openVueApp', () =>
            {
                WebAppPanel.createOrShow(context.extensionUri);
            }
    )
);
In the command handler, you are instantiating a new WebAppPanel class instance. It's just a wrapper for a WebviewPanel.
Step 4
In this step, you will use the Vue CLI to generate a new Vue JS application. Follow this guide( https://cli.vuejs.org/guide/creating-a-project.html#vue-create )/web / build a new Vue in the root directory of the extension project JS application.
Make sure that any images you use are placed in the / web/img / directory. Later, you will dist copy this directory to it when the application is compiled.
Typically, hosted Vue The HTML page of the. JS application requests that the image be rendered from the local file system on the server. However, when Webview loads an application, it cannot just request and access the local file system. For security reasons, Webview should be limited to a few directories within the project itself.
In addition, VS Code uses a special URI to load any resources in the Webview, including JavaScript, CSS, and image files. Therefore, you need a method based on all images, so you use VS Code to access the URI of local resources. As you will see in step 5, the extension injects the VS Code base URI into the HTML body of the Webview to Vue JS applications can use it to build their images.
Therefore, to use the injected base URI, you will add a Vue JS mixin, which reads the value of the base URI from the HTML DOM and makes it available to Vue JS application.
Note that if you want to run Vue. Net outside of Webview JS application, you need to put the following contents into / Web / public / index HTML file:
<body>
    <input hidden data-uri="">
    ...
</body>
At / Web / SRC / mixins / extractbaseuri JS file, define a new Vue js mixin. It makes baseUri any Vue JS components can use the data option:
data() {
    return {
        baseUri: '',
    };
},
Then it uses Vue Jsmounted() uses the lifecycle hook to extract values:
mounted() {
    const dataUri = document.querySelector('input[data-uri]');
    if (!dataUri) return;

    this.baseUri = dataUri.getAttribute('data-uri');
},
If it finds an input field with a data attribute named data URI, it reads the value and assigns it to the baseUri attribute.
The next step is in / Web / SRC / main mixin provided in JS file:
Vue.mixin(ExtractBaseUri);
Switch to app Vue component and replace the image element with the following:
<img alt="Vue logo" :src="`${baseUri}/img/logo.png`">
Now that the application is ready to run locally and within Webview, let's go through Vue JS configuration file to customize the compilation process.
Create a new file. Listing 1 shows the complete source code for this file/ web/vue.config.js
Listing 1: Vue config. js
const path = require('path');

module.exports = {
    filenameHashing: false,
    outputDir: path.resolve(__dirname, "../dist-web"),
    chainWebpack: config => {
        config.plugin('copy')
            .tap(([pathConfigs]) => {
                const to = pathConfigs[0].to
                // so the original `/public` folder keeps priority
                pathConfigs[0].force = true

                // add other locations.
                pathConfigs.unshift({
                    from: 'img',
                    to: `${to}/img`,
                })

                return [pathConfigs]
            })
    },
}
Basically, you are doing the following:
- Removes the hash from the compiled file name. The compiled JavaScript file looks like app JS, but there is no hash value in the file name.
- Set the output directory to / dist Web / Vue cli uses this attribute to determine where to place compiled application files.
- Copy the / web/img / directory and all its contents to the destination directory.
Next, let's fix the NPM script so that you can compile both the extension file and Vue. Exe using a single script JS application.
First, Concurrently install the NPM package by running the following command:
npm i --save-dev concurrently
Then, find the package JSON file and replace the monitoring script with:
"watch": "concurrently \"npm --prefix web run serve\" \"webpack --watch\"",
Now, every time you change any file in both folders, the monitoring script compiles Vue JS application and extension files.
Run the following command to compile both applications and generate the / dist Web / Directory:
npm run watch
be it so! Vue. The. JS application is ready to be hosted in a Web view.
Step 5
Add a new TypeScript file in the / src / directory and name it webapppanel Ts. Listing 2 contains the complete source code for this file. Let's dissect it and explain its most relevant parts.
Listing 2: webapppanel ts
import * as vscode from "vscode";
import { getNonce } from "./getNonce";

export class WebAppPanel {

    public static currentPanel: WebAppPanel | undefined;

    public static readonly viewType = "vscodevuecli:panel";

    private readonly _panel: vscode.WebviewPanel;
    private readonly _extensionUri: vscode.Uri;
    private _disposables: vscode.Disposable[] = [];

    public static createOrShow(extensionUri: vscode.Uri) {
        const column = vscode.window.activeTextEditor
        ? vscode.window.activeTextEditor.viewColumn: undefined;

        // If we already have a panel, show it.
        if (WebAppPanel.currentPanel) {
            WebAppPanel.currentPanel._panel.reveal(column);
            return;
        }

        // Otherwise, create a new panel.
        const panel = vscode.window.createWebviewPanel(
            WebAppPanel.viewType,
            'Web App Panel',
            column || vscode.ViewColumn.One,
            getWebviewOptions(extensionUri),
        );

        WebAppPanel.currentPanel = new WebAppPanel(panel, extensionUri);
    }

    public static kill() {
        WebAppPanel.currentPanel?.dispose();
        WebAppPanel.currentPanel = undefined;
    }

    public static revive(panel: vscode.WebviewPanel,
        extensionUri: vscode.Uri) {
        WebAppPanel.currentPanel = new WebAppPanel(panel, extensionUri);
    }

    private constructor(panel: vscode.WebviewPanel,
        extensionUri: vscode.Uri) {
            this._panel = panel;
            this._extensionUri = extensionUri;

        // Set the webview's initial html content
            this._update();

            this._panel.onDidDispose(() => this.dispose(),
                null, this._disposables);

        // Update the content based on view changes
            this._panel.onDidChangeViewState(
                e => {
                    if (this._panel.visible) {
                        this._update();
                    }
                },
                null,
                this._disposables
            );

            // Handle messages from the webview
            this._panel.webview.onDidReceiveMessage(
                message => {
                    switch (message.command) {
                        case 'alert': vscode.window.showErrorMessage(message.text);
                        return;
                    }
                },
                null,
                this._disposables
            );
        }

        public dispose() {
            WebAppPanel.currentPanel = undefined;

            // Clean up our resources
            this._panel.dispose();

            while (this._disposables.length) {
                const x = this._disposables.pop();
                    if (x) {
                    x.dispose();
                    }
            }
        }

        private async _update() {
            const webview = this._panel.webview;
            this._panel.webview.html = this._getHtmlForWebview(webview);
        }

        private _getHtmlForWebview(webview: vscode.Webview) {
            const styleResetUri = webview.asWebviewUri(
                vscode.Uri.joinPath(this._extensionUri, "media", "reset.css")
            );

            const styleVSCodeUri = webview.asWebviewUri(
                vscode.Uri.joinPath(this._extensionUri, "media", "vscode.css")
            );
            const scriptUri = webview.asWebviewUri(
                vscode.Uri.joinPath(this._extensionUri, "dist-web", "js/app.js")
            );

            const scriptVendorUri = webview.asWebviewUri(
                vscode.Uri.joinPath(this._extensionUri, "dist-web",
                    "js/chunk-vendors.js")
            );

            const nonce = getNonce();
            const baseUri = webview.asWebviewUri(vscode.Uri.joinPath(
                this._extensionUri, 'dist-web')
                ).toString().replace('%22', '');

            return `
                <!DOCTYPE html>
                <html lang="en">
                <head>
                    <meta charset="utf-8" />
                    <meta name="viewport" content="width=device-width,
                        initial-scale=1" />
                    <link href="${styleResetUri}" rel="stylesheet">
                    <link href="${styleVSCodeUri}" rel="stylesheet">
                    <title>Web App Panel</title>
                </head>
                <body>
                <input hidden data-uri="${baseUri}">
                    <div id="app"></div>
                    <script type="text/javascript"
                        src="${scriptVendorUri}" nonce="${nonce}"></script>
                    <script type="text/javascript"
                        src="${scriptUri}" nonce="${nonce}"></script>
                </body>
                </html>
            `;
        }
}
function getWebviewOptions(extensionUri: vscode.Uri):
vscode.WebviewOptions {
    return {
        // Enable javascript in the webview
        enableScripts: true,

        localResourceRoots: [
            vscode.Uri.joinPath(extensionUri, 'media'),
            vscode.Uri.joinPath(extensionUri, 'dist-web'),
        ]
    };
}
You define the WebAppPanel class as a singleton to ensure that it always has only one instance. This is done by adding the following:
public static currentPanel: WebAppPanel | undefined;
It wraps an instance of the WebviewPanel and tracks it by defining the following:
private readonly _panel: vscode.WebviewPanel;
The core WebAppPanel class of this createOrShow() function. It checks whether the currentPanel has been instantiated and immediately displays the WebviewPanel.
if (WebAppPanel.currentPanel) {
    WebAppPanel.currentPanel._panel.reveal(column);
    return;
}
Otherwise, it uses the createWebviewPanel() function to instantiate a new one, as shown below:
const panel = vscode.window.createWebviewPanel(
    WebAppPanel.viewType,
    'Web App Panel',
    column || vscode.ViewColumn.One,
    getWebviewOptions(extensionUri),
);
The function accepts the following parameters:
- viewType: Specifies the unique identifier of the view type WebviewPanel
- Title: WebviewPanel
- showOptions: display position in the Webview editor
- Options: new settings Panel
Options are prepared inside the getWebviewOptions() function.
function getWebviewOptions(
    extensionUri: vscode.Uri
): vscode.WebviewOptions {
    return {
        enableScripts: true,
        localResourceRoots: [
            vscode.Uri.joinPath(extensionUri, 'media'),
            vscode.Uri.joinPath(extensionUri, 'dist-web'),
        ]
    };
}
It returns an object with two properties:
- enableScripts: controls whether scripts are enabled in Webview content
- localResourceRoots: Specifies that Webview can load the root path of a local resource using a URI (a common resource identifier representing a file on disk or any other resource). This ensures that the extension cannot access files outside the path you specify.
The WebviewPanel wraps a Webview for rendering in the VS code editor.
The createOrShow() function ends the WebAppPanel by calling its private constructor to set the value of to a new instance of currentPanel.
The most important part of the constructor is to set the HTML content of Webview as follows:
this._panel.webview.html = this._getHtmlForWebview(webview);
Should_ The getHtmlForWebview() function prepares and returns HTML content.
You will embed two CSS files in almost every Web view you create. The reset The CSS file resets some CSS properties in the Web view. Although the vscode The CSS file contains the default theme colors and CSS properties for VS Code. This is critical to giving your Webview the same look and feel as any other editor in VS Code.
const styleResetUri = webview.asWebviewUri(
    vscode.Uri.joinPath(this._extensionUri, "media", "reset.css"));

const styleVSCodeUri = webview.asWebviewUri(
    vscode.Uri.joinPath(this._extensionUri, "media", "vscode.css"));
Should_ The extensionUri property indicates the URI of the directory containing the current extension. The webviewswebviewuri() function converts the URI of the local file system to a URI that can be used in Webviews. They cannot use the file: URI to load resources directly from the workspace or the local file system. The asWebviewUri() function takes the local file: URI and converts it to a URI that can be used in Webview to load the same resource.
The function then prepares URI s for other resources, including JS / app.exe compiled by Vue CLI in step 5 JS and JS / chunk vendors JS file.
Remember that in step 4, Vue CLI copies all the images in the / dist Web / img / directory. Vue. All image paths in the JS application use a basic URI that points to the VS Code URI when running in Webview or to the file: URI when running in stand-alone mode.
At this stage, you need to generate a VS Code base URI and inject it into Vue JS via Vue JS mixin loads and reads hidden input fields.
WebAppPanel generates an extended VS Code base URI using the following code:
const baseUri =
    webview.asWebviewUri(
        vscode.Uri.joinPath(
            this._extensionUri, 'dist-web'
        )
    ).toString().replace('%22', '');
It does this by loading Vue Set the data URI data attribute value on the hidden input field in the HTML page of the. JS application to convey this URI to Vue JS application.
Finally, the function embeds all CSS and JavaScript URI s into the HTML page content and returns it.
nothing more!
Let's run the extension by clicking F5 and start typing "Open Vue App" in the command panel of the just opened VS Code instance, as shown in Figure 9.

Figure 9 opening Vue App command
Click this command to load Vue. Net in the Web view of the new editor window JS application, as shown in Figure 10.
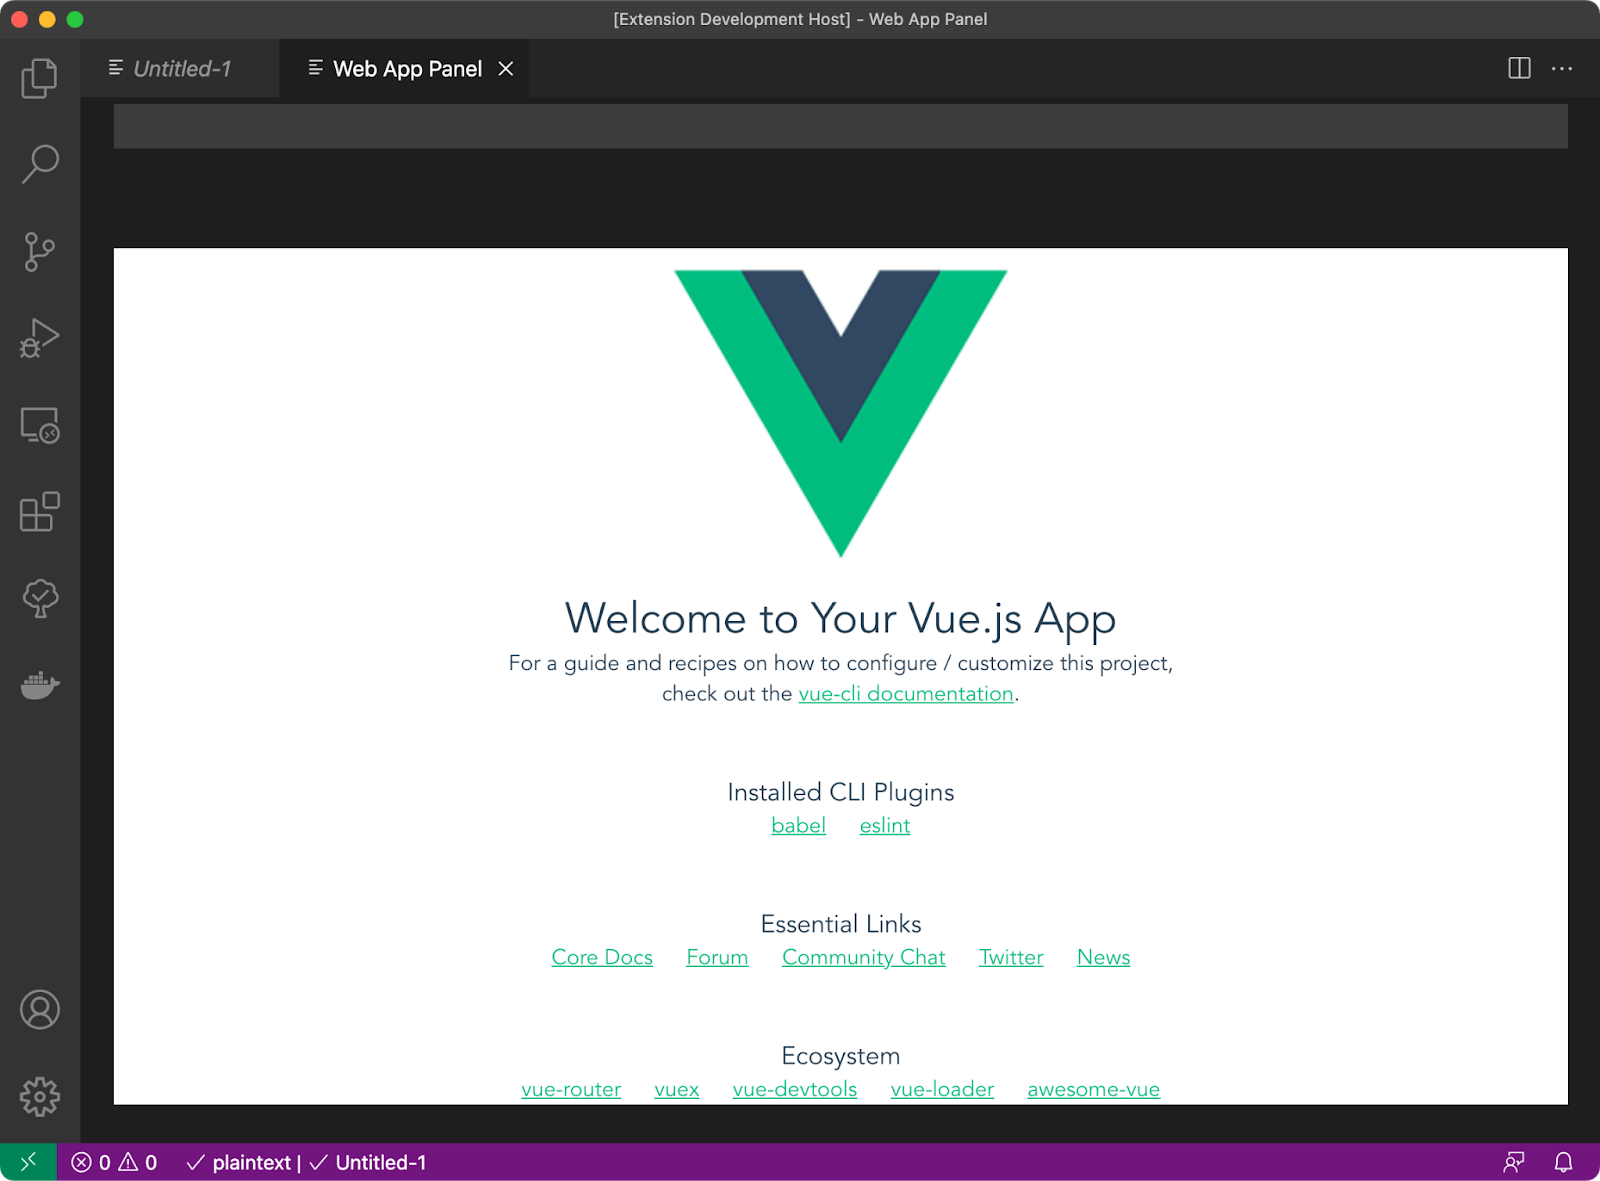
Figure 10: loading Vue application in VS Code extension
This is to load Vue generated by Vue CLI in VS Code extension JS application.
Use rollup JS using Vue JS build VS Code extension
In this section, I'll extend what you've built so far and introduce a new scenario where Vue CLI may not be the right tool for this work.
As you know, the Vue CLI the entire Vue JS application compiled into an app JS file. Let's put aside the blocking functionality provided by the CLI.
When building VS Code extensions, sometimes you need to load an HTML page in the WebviewPanel of the editor. At the same time, you may need the WebviewView to load another HTML page in a in the sidebar. Of course, you can use pure HTML and JavaScript to build your HTML, but because you want to use Vue JS to build your HTML page, so Vue CLI is not an option in this case.
You need to create a Vue JS application, which contains multiple independent small vues JS components, which are compiled separately into separate JavaScript files, not just merged into an app JS file.
I came up with a solution that involved creating a mini Vue using at least two files JS application. A JavaScript file and one or more vues JS component (root component with many subcomponents). The JavaScript file imports the Vue.js framework and mounts the corresponding Vue.js root component into the DOM in the HTML page.
For this solution, I decided to use rollup js ( https://rollupjs.org/ )To compile the file.
Let's explore this solution by building a new VS Code extension, which can do two things:
- Use WebviewPanel to convert Vue The JS application (or root component) is hosted in a new editor
- Use WebviewView to connect Vue The JS application (or root component) is hosted in the sidebar
Step 1
As before, use Yeoman to generate a new VS Code extension project.
Step 2
Add a new command to open Vue JS application. Find the package JSON file and add the following:
"contributes": {
    "commands": [
        {
            "command": "vscodevuerollup:openVueApp",
            "title": "Open Vue App",
            "category": "Vue Rollup"
        }
    ]
},
The identifier of the command is vscodevuerollup:openVueApp.
Then you declare an activation event:
"activationEvents": ["onCommand:vscodevuerollup:openVueApp"],
In addition, define a new View Container to load in the Activity Bar. Listing 3 shows what you need to do in package JSON file.
Listing 3: adding a view container
    "viewsContainers": {
        "activitybar": [
            {
                "id": "vscodevuerollup-sidebar-view",
                "title": "Vue App",
                "icon": "$(remote-explorer)"
            }
        ]
    },
    "views": {
        "vscodevuerollup-sidebar-view": [
            {
                "type": "webview",
                "id": "vscodevuerollup:sidebar",
                "name": "vue with rollup",
                "icon": "$(remote-explorer)",
                "contextualTitle": "vue app"
            }
        ]
    },
The ID of the active bar entry is vscodevuerollup sidebar view. This ID matches the ID of the view collection that will be hosted in this view container and defined in the view section.
"views": {"vscodevuerollup-sidebar-view": [...]}
The (vscodevuerollup sidebar view) entry represents a collection of views. Each view has an ID.
{
    "type": "webview",
    "id": "vscodevuerollup:sidebar",
    "name": "vue with rollup",
    "icon": "$(remote-explorer)",
    "contextualTitle": "vue app"
}
Note the ID vscodevuerollup:sidebar, scroll up to the activating Events section, and add the following entry:
"onView:vscodevuerollup:sidebar"
When using the onView declaration, VS Code activates the extension when the view with the specified ID expands on the sidebar.
Step 3
Switch to extension JS file and register the command handler inside the activate() function.
First, register the vscodevuerollup:openVueApp command:
context.subscriptions.push(
    vscode.commands.registerCommand(
        'vscodevuerollup:openVueApp', async (args) => {
            WebAppPanel.createOrShow(context.extensionUri);
        }
    )
);
Then register the vscodevuerollup:sendMessage command:
const sidebarProvider = new SidebarProvider(context.extensionUri);

context.subscriptions.push(
    vscode.window.registerWebviewViewProvider(
        SidebarProvider.viewType,
        sidebarProvider
    )
);
You are instantiating a new instance of this class, SidebarProvider, and using this vscode window. The registerwebviewprovider() function to register this provider.
Here, you are dealing with the second type of Web view I mentioned earlier, WebviewView To load the Webview into the sidebar, you need to create a class that implements the webviewprovider interface. It's just a WebviewView
The webviewprovider wraps a WebviewView, which in turn wraps a Webview. Rendering in the sidebar in webviewvs code.
Step 4
In this step, you will create a custom Vue JS application. First create the / web / directory in the extended root folder.
In this directory, create three different subdirectories:
- pages: this directory contains all Vue JS page.
- Component: This contains all Vue JS single file component (SFC).
- img: This includes you in Vue JS component.
Let's create / Web / pages / APP JS file and paste the following code into it to add the first Vue JS page:
import Vue from "vue";
import App from "@/components/App.vue";

new Vue({render: h => h(App)}).$mount("#app");
There's no magic here! It works with Vue CLI in main The. JS file is used to load and mount Vue on the HTML DOM The code of the JS application is the same. However, in this case, I just installed a Vue JS component. Consider this component as possible to use other vues in the tree hierarchy JS component.
Please note that my app Vue borrowed the same file from the Vue file you created earlier.
Let's create / Web / pages / sidebar JS file and paste this code into it to add another page:
import Vue from "vue";
import Sidebar from "@/components/Sidebar.vue";

new Vue({render: h => h(Sidebar)}).$mount("#app");
This page loads and mounts sidebar Vue components.
Listing 4 shows sidebar Complete content of Vue component. It defines the following UI sections:
- Displays messages received from the extension.
- Allow users to download from Vue JS application sends a message to the extension.
- Execute the command on the extension to load the app in the Web view in the editor JS page.
Listing 4: sidebar Vue component
<template>
    <div>
        <p>Message received from extension</p>
        <span>{{ message }}</span>

        <p>Send message to extension</p>
        <input type="text" v-model="text">
        <button @click="sendMessage">Send</button>

        <p>Open Vue App</p>
        <button @click="openApp">Open</button>
    </div>
</template>

<script> export default {
    data() {
        return {
            message: '',
            text: '',
        };
    },
    mounted() {
        window.addEventListener('message', this.receiveMessage);
    },
    beforeDestroy() {
        window.removeEventListener('message', this.receiveMessage);
    },
    methods: {
        openApp() {
            vscode.postMessage({
                type: 'openApp',
            });
            this.text = '';
        },
        sendMessage() {
            vscode.postMessage({
                type: 'message',
                value: this.text,
            });
            this.text = '';
        },
        receiveMessage(event) {
            if (!event) return;

            const envelope = event.data;
            switch (envelope.command) {
                case 'message': {
                    this.message = envelope.data;
                    break;
                }
            };
        },
    },
}
</script>

<style scoped>
    p {
        margin: 10px 0;
        padding: 5px 0;
        font-size: 1.2rem;
    }
    span {
        display: inline-block;
        margin-top: 5px;
        font-size: 1rem;
        color: orange;
    }
    hr {
        display: inline-block;
        width: 100%;
        margin: 10px 0;
    }
</style>
Navigate to the extension root directory and add a new rollup config. JS file.
Listing 5 shows the full contents of the file.
Listing 5: rollup config. js
import path from "path";
import fs from "fs";

import alias from '@rollup/plugin-alias';
import commonjs from 'rollup-plugin-commonjs';
import esbuild from 'rollup-plugin-esbuild';
import filesize from 'rollup-plugin-filesize';
import image from '@rollup/plugin-image';
import json from '@rollup/plugin-json';
import postcss from 'rollup-plugin-postcss';
import postcssImport from 'postcss-import';
import replace from '@rollup/plugin-replace';
import resolve from '@rollup/plugin-node-resolve';
import requireContext from 'rollup-plugin-require-context';
import { terser } from 'rollup-plugin-terser';
import vue from 'rollup-plugin-vue';

const production = !process.env.ROLLUP_WATCH;

const postCssPlugins = [
    postcssImport(),
];

export default fs
    .readdirSync(path.join(__dirname, "web", "pages"))
    .map((input) => {
        const name = input.split(".")[0].toLowerCase();
        return {
            input: `web/pages/${input}`,
            output: {
                file: `dist-web/${name}.js`,
                format: 'iife',
                name: 'app',
                sourcemap: false,
            },
            plugins: [
                commonjs(),
                json(),
                alias({
                    entries: [{ find: '@',
                    replacement: __dirname + '/web/' }],
                }),
                image(),
                postcss({ extract: `${name}.css`,
                    plugins: postCssPlugins
                }),
                requireContext(),
                resolve({
                    jsnext: true,
                    main: true,
                    browser: true,
                    dedupe: ["vue"],
                }),
                vue({
                    css: false
                }),
                replace({
                    'process.env.NODE_ENV': production ?
                        '"production"' : '"development"',
                    preventAssignment: true,
                }),
                esbuild({
                    minify: production,
                    target: 'es2015',
                }),
                production && terser(),
                production && filesize(),
            ],
            watch: {
                clearScreen: false,
                exclude: ['node_modules/**'],
            },
        };
    });
The most important part of the document:
export default fs
    .readdirSync(
        path.join(__dirname, "web", "pages")
    )
    .map((input) => {
        const name = input.split(".")[0].toLowerCase();

    return {
        input: `web/pages/${input}`,
        output: {
            file: `dist-web/${name}.js`,
            format: 'iife',
            name: 'app',
},
...
The code snippet traverses all *. In the / web/pages / directory js pages, and compile each page into a new JavaScript file / dist Web / in the directory.
Let's install the NPM package Concurrently by running the following command:
npm i --save-dev concurrently
Then, find the package JSON file and replace the monitoring script with:
"watch": "concurrently \"rollup -c -w\" \"webpack --watch\"",
Now, every time you change any file in both folders, the monitoring script compiles Vue JS pages and extension files.
Run this command to compile two applications and generate the / dist Web / Directory:
npm run watch
You can now see four new files created in the / dist Web / Directory:
- Application js
- Application css
- Sidebar js
- Sidebar css
Each page generates two files, especially JavaScript and CSS files.
be it so! Vue. The. JS page is ready to be hosted in the Web view.
Step 5
Let's start with webapppanel TS copy files from an extension project that uses Vue CLI. Then change the resource file to include / dist Web / APP JS and / dist Web / APP css.
Listing 6 shows the entire source code of the file after the change.
Listing 6: webapppanel TS load a single Vue JS root component
import * as vscode from "vscode";
import { getNonce } from "./getNonce";

export class WebAppPanel {
    public static currentPanel: WebAppPanel | undefined;

    public static readonly viewType = "vscodevuerollup:panel";

    private readonly _panel: vscode.WebviewPanel;
    private readonly _extensionUri: vscode.Uri;
    private _disposables: vscode.Disposable[] = [];

    public static createOrShow(extensionUri: vscode.Uri) {
        const column = vscode.window.activeTextEditor?
        vscode.window.activeTextEditor.viewColumn: undefined;

        // If we already have a panel, show it.
        if (WebAppPanel.currentPanel) {
            WebAppPanel.currentPanel._panel.reveal(column);
            return;
        }

        // Otherwise, create a new panel.
        const panel = vscode.window.createWebviewPanel(
            WebAppPanel.viewType,
            'Web App Panel',
            column || vscode.ViewColumn.One,
            getWebviewOptions(extensionUri),
        );

        WebAppPanel.currentPanel = new WebAppPanel(panel, extensionUri);
    }

    public static kill() {
        WebAppPanel.currentPanel?.dispose();
        WebAppPanel.currentPanel = undefined;
    }

    public static revive(panel: vscode.WebviewPanel,
        extensionUri: vscode.Uri) {
            WebAppPanel.currentPanel = new WebAppPanel(panel, extensionUri);
        }

    private constructor(panel: vscode.WebviewPanel,
        extensionUri: vscode.Uri) {
            this._panel = panel;
            this._extensionUri = extensionUri;

            // Set the webview's initial html content
            this._update();
            this._panel.onDidDispose(() => this.dispose(),
                null, this._disposables);

            // Update the content based on view changes
            this._panel.onDidChangeViewState(
                e => {
                    if (this._panel.visible) {
                        this._update();}
                },
                null,
                this._disposables
            );

            // Handle messages from the webview
            this._panel.webview.onDidReceiveMessage(
                message => {
                    switch (message.command) {
                        case 'alert': vscode.window.showErrorMessage(message.text);
                        return;
                    }
                },
                null,
                this._disposables
            );
        }

        public dispose() {
            WebAppPanel.currentPanel = undefined;

            // Clean up our resources
            this._panel.dispose();

            while (this._disposables.length) {
                const x = this._disposables.pop();
                if (x) {
                    x.dispose();
                }
            }
        }

        private async _update() {
            const webview = this._panel.webview;
            this._panel.webview.html = this._getHtmlForWebview(webview);
        }

        private _getHtmlForWebview(webview: vscode.Webview) {
            const styleResetUri = webview.asWebviewUri(
                vscode.Uri.joinPath(this._extensionUri, "media", "reset.css")
            );
            const styleVSCodeUri = webview.asWebviewUri(
                vscode.Uri.joinPath(
                    this._extensionUri, "media", "vscode.css")
            );

            const scriptUri = webview.asWebviewUri(
                vscode.Uri.joinPath(
                    this._extensionUri, "dist-web", "app.js")
            );

            const styleMainUri = webview.asWebviewUri(
                vscode.Uri.joinPath(
                    this._extensionUri, "dist-web", "app.css")
            );

            const nonce = getNonce();

            return `
                <!DOCTYPE html>
                <html lang="en">
                <head>
                    <meta charset="utf-8" />
                    <meta name="viewport" content="width=device-width,
                                                         initial-scale=1" />
                    <link href="${styleResetUri}" rel="stylesheet">
                    <link href="${styleVSCodeUri}" rel="stylesheet">
                    <link href="${styleMainUri}" rel="stylesheet">
                    <title>Web Pages Panel</title>
                </head>
                <body>
                    <div id="app"></div>
                    <script src="${scriptUri}" nonce="${nonce}">
                </body>
                </html>
            `;
        }
}

function getWebviewOptions(extensionUri: vscode.Uri): vscode.WebviewOptions {
    return {
        // Enable javascript in the webview
        enableScripts: true,

        localResourceRoots: [
            vscode.Uri.joinPath(extensionUri, 'media'),
            vscode.Uri.joinPath(extensionUri, 'dist-web'),
        ]
    };
}
Add a new / SRC / sidebarprovider TS file and paste the contents of Listing 7 into it.
Listing 7: sidebarprovider ts
import * as vscode from "vscode";
import { getNonce } from "./getNonce";

export class SidebarProvider implements vscode.WebviewViewProvider {
    public static readonly viewType = 'vscodevuerollup:sidebar';

    private _view?: vscode.WebviewView;

    constructor(private readonly _extensionUri: vscode.Uri) {}

    public resolveWebviewView(
        webviewView: vscode.WebviewView,
        context: vscode.WebviewViewResolveContext,
            _token: vscode.CancellationToken
    ) {
        this._view = webviewView;

    webviewView.webview.options = {
        // Allow scripts in the webview
        enableScripts: true,

        localResourceRoots: [
            this._extensionUri
        ],
    };

    webviewView.webview.html = this._getHtmlForWebview(webviewView.webview);

    webviewView.webview.onDidReceiveMessage(async (data) => {
        switch (data.type) {
            case "message": {
                if (!data.value) {
                    return;
                }
                vscode.window.showInformationMessage(data.value);
                break;
            }
            case "openApp": {
                await vscode.commands.executeCommand(
                    'vscodevuerollup:openVueApp', { ...data }
                );
                break;
            }
            case "onInfo": {
                if (!data.value) {
                    return;
                }
                vscode.window.showInformationMessage(data.value);
                break;
            }
            case "onError": {
                if (!data.value) {
                    return;
                }
                vscode.window.showErrorMessage(data.value);
                break;
            }
        }
    });
    }

    public revive(panel: vscode.WebviewView) {
        this._view = panel;
    }

    public sendMessage() {
        return vscode.window.showInputBox({
            prompt: 'Enter your message',
            placeHolder: 'Hey Sidebar!'
        }).then(value => {
            if (value) {
                this.postWebviewMessage({
                    command: 'message',
                    data: value,});
            }
        });
    }
    private postWebviewMessage(msg: {
        command: string,
        data?: any
    }) {
    vscode.commands.executeCommand(
                    'workbench.view.extension.vscodevuerollup-sidebar-view');
    vscode.commands.executeCommand('workbench.action.focusSideBar');

    this._view?.webview.postMessage(msg);
    }

    private _getHtmlForWebview(webview: vscode.Webview)
    {
        const styleResetUri = webview.asWebviewUri(
            vscode.Uri.joinPath(
                this._extensionUri, "media", "reset.css")
        );

        const styleVSCodeUri = webview.asWebviewUri(
            vscode.Uri.joinPath(
                this._extensionUri, "media", "vscode.css")
        );

        const scriptUri = webview.asWebviewUri(
            vscode.Uri.joinPath(
                this._extensionUri, "dist-web", "sidebar.js")
        );

        const styleMainUri = webview.asWebviewUri(
            vscode.Uri.joinPath(
                this._extensionUri, "dist-web", "sidebar.css")
        );

        const nonce = getNonce();

    return `
        <!DOCTYPE html>
        <html lang="en">
        <head>
            <meta charset="utf-8" />
            <meta name="viewport" content="width=device-width,
                                                 initial-scale=1" />
                <link href="${styleResetUri}" rel="stylesheet">
                <link href="${styleVSCodeUri}" rel="stylesheet">
                <link href="${styleMainUri}" rel="stylesheet">
                <title>Web Pages Panel</title>
                <script nonce="${nonce}">
                    const vscode = acquireVsCodeApi();
                </script>
        </head>
        <body>
            <div id="app"></div>
            <script src="${scriptUri}" nonce="${nonce}">
        </body>
        </html>
    `;
    }
}
The webviewprovider interface is implemented in SidebarProvider. It wraps an instance of WebviewView, which in turn wraps a Webview that contains the actual HTML content.
The resolveWebviewView() function is at the heart of this provider. VS Code uses it to Webview Sidebar It is in this function that you can set the HTML content of Webviewfor VS Code to display it in Sidebar The provider loads the resource file / dist Web / Sidebar JS and / dist Web / Sidebar Csshtml internal.
The HTML WebView now contains the following code:
<script>
    const vscode = acquireVsCodeApi();
</script>
The vscode object will become Vue JS applications can be used as a bridge for publishing messages to extensions.
nothing more! Let's press F5 to run the extension. A new instance of VS Code opens.
Locate and click the last icon added on the activity bar. Figure 11 shows Sidebar How Vue components are loaded into the Sidebar section.
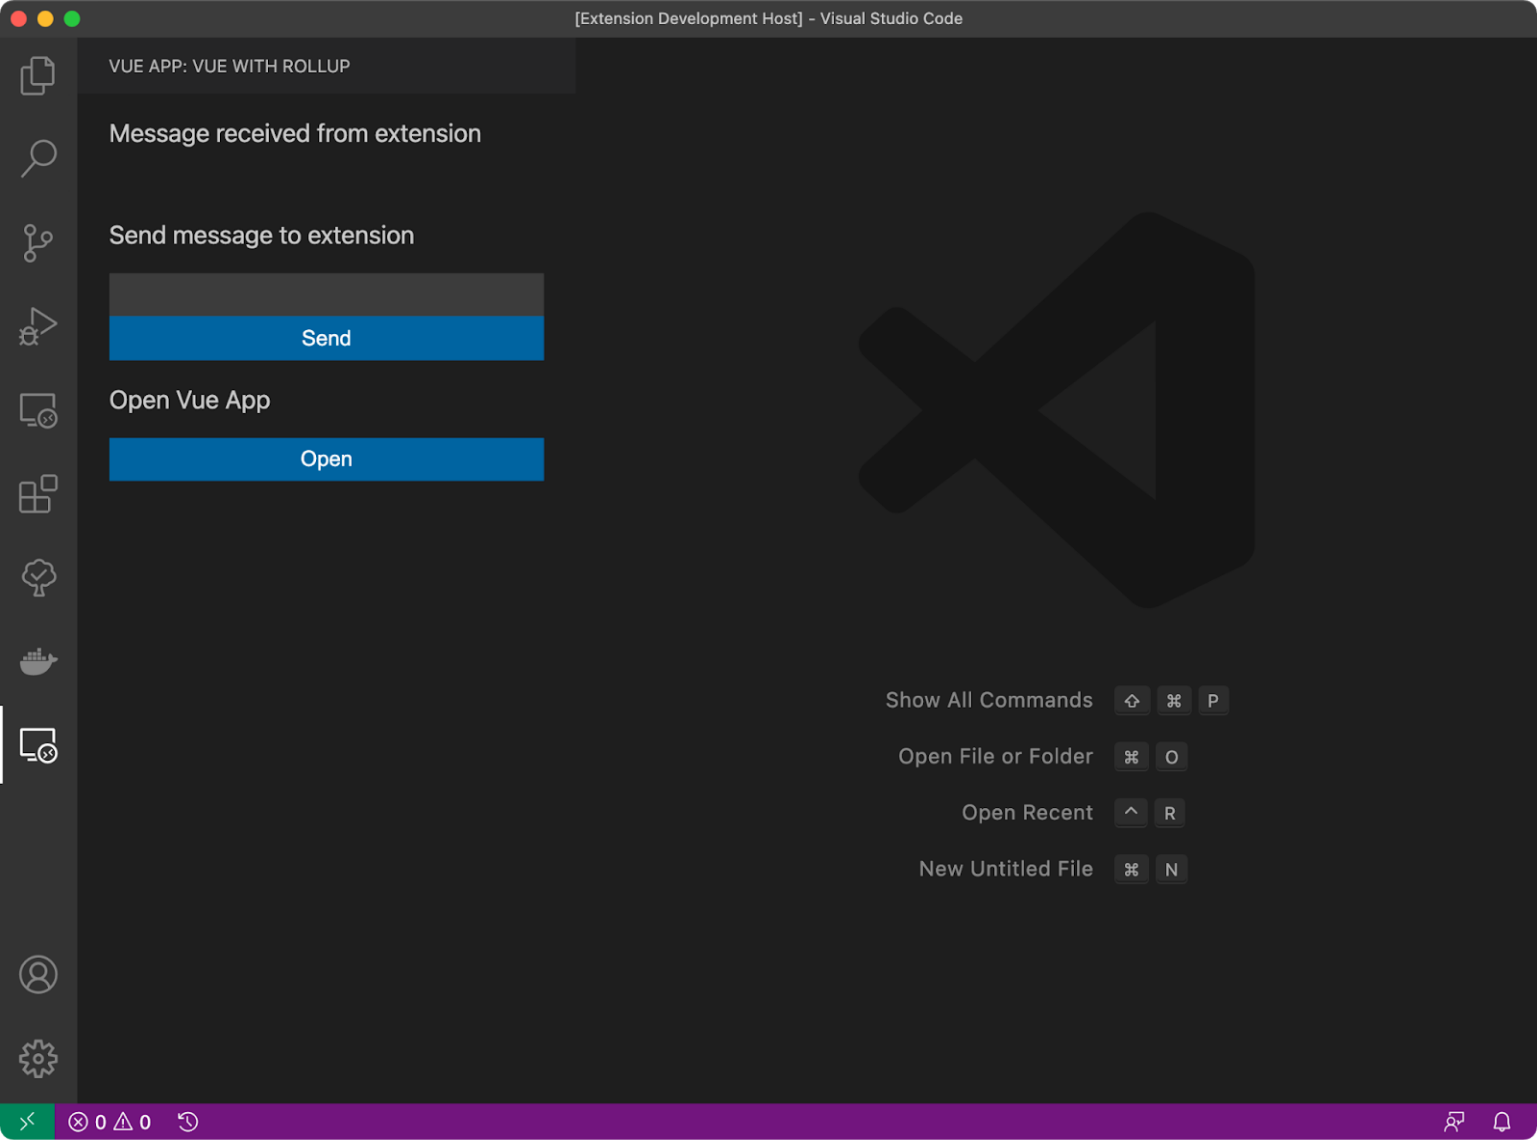
Figure 11: Sidebar in Sidebar Vue component
Step 6
When the user clicks the open button on the sidebar, let's load the app in the editor Vue components.
Go to / Web / components / sidebar Vue file and bind the button to the event handler:
<button @click="openApp">Open</button>
Then, define the openApp() function as follows:
openApp() {
    vscode.postMessage({
        type: 'openApp',
    });
},
This code uses the vscode The postmessage() function publishes a message to the extender by passing the message payload. In this case, the payload only specifies the type of message.
Switch to sidebarprovider TS file and listen inside the resolveWebviewView() function for the message type you just defined. You can listen to the message published in the function as follows:
webviewView.webview.onDidReceiveMessage(
    async (data) => {
        switch (data.type) {
            case "openApp": {
                await vscode.commands.executeCommand(
                        'vscodevuerollup:openVueApp',
                        { ...data }
                    );
                break;
            }
            // more
        }
    }
);
When the user clicks the open button on the sidebar, the provider reacts by executing the command vscodevaluerollup: openvueapp and passing the payload, if needed.
nothing more! Let's press F5 to run the extension. A new instance of VS Code opens.
Click the last icon added on the activity bar. Then click the open button. Figure 12 shows the app loaded in the Web view of the editor Vue components. Sidebar. The Vue component is loaded in the Web view of the sidebar.
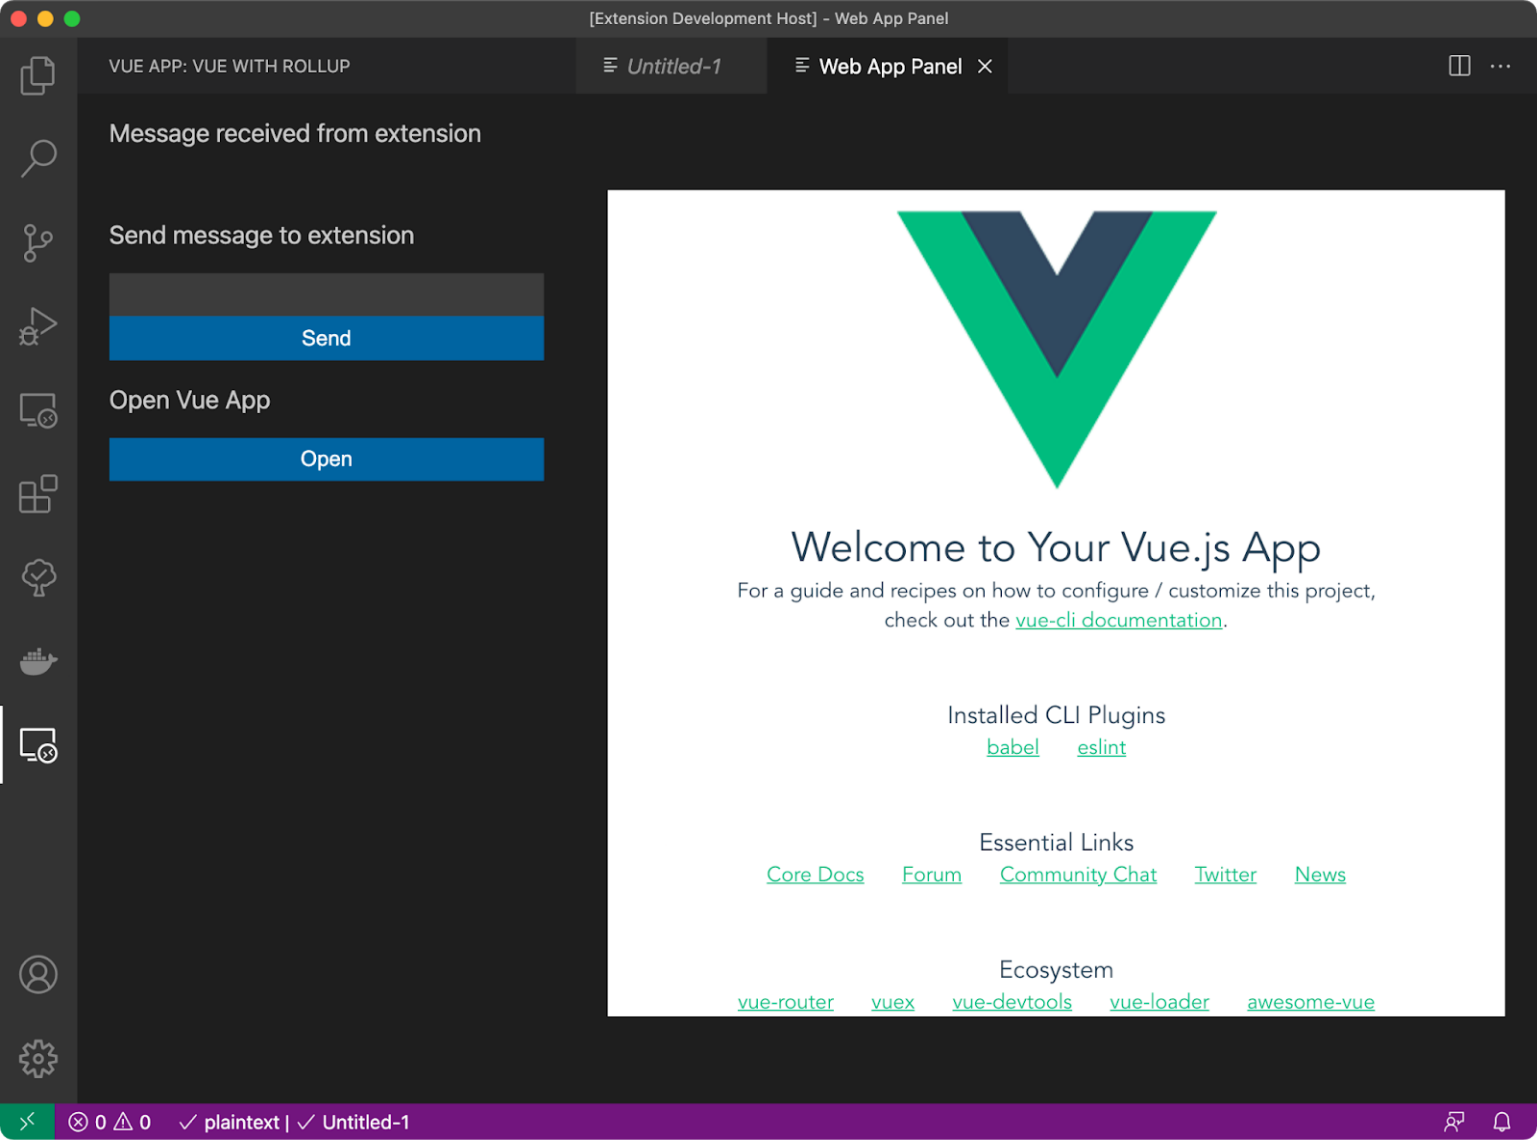
Figure 12: sidebar in VS Code extension Vue and app Vue component
The Webview API allows two-way communication between extensions and HTML content.
Step 7
Let's add a command that allows the extension to add sidebar from VS Code Vue component publishes messages.
First, define the vscodevuerollup:sendMessage command package. In the file JSON, as follows:
{
    "command": "vscodevuerollup:sendMessage",
    "title": "Send message to sidebar panel",
    "category": "Vue Rollup"
}
Then, in extension Register this command in the TS file:
context.subscriptions.push(
    vscode.commands.registerCommand(
        'vscodevuerollup:sendMessage', async () => {
            if (sidebarProvider) {
                await sidebarProvider.sendMessage();
            }
        }
    )
);
When the user triggers the sendMessage command, the command handler calls the instance function SidebarProvider on the class sendMessage().
Listing 8 shows the sendMessage() function. It uses the built-in vscode window. The showinputbox() function prompts the user for a message. Then use WebView The postmessage() built-in function publishes the message entered by the user to the sidebar Vue components.
Listing 8: sendMessage() function
public sendMessage() {
    return vscode.window.showInputBox({
        prompt: 'Enter your message',
        placeHolder: 'Hey Sidebar!'}
    ).then(value => {
        if (value) {
            this._view?.webview.postMessage({
                command: 'message',
                data: value,
            });
        }
    });
}
Sidebar. The Vue component processes the messages received from the extension by registering an event listener, as shown below:
mounted() {
    window.addEventListener(
        'message', this.receiveMessage
    );
},
receiveMessage() this function runs when the user triggers a command in VS Code.
You can define the function as follows by receiveMessage():
receiveMessage(event) {
    if (!event) return;

    const envelope = event.data;
    switch (envelope.command) {
        case 'message': {
            this.message = envelope.data;
            break;
        }
    };
},
It verifies that the command is of message type * *** It then extracts the payload of the command and assigns it to the local variables that the component displays on the UI.
Let's run the extension!
Locate and navigate to the Sidebar hosted within the Sidebar Vue components.
Open the command panel and start typing "Send message to sidebar panel" * *** VS Code prompts you for a message, as shown in Figure 13. Enter any message you select, and then press enter.

Figure 13: facilitating user input
The message will be displayed on the sidebar, as shown in Figure 14 * ***
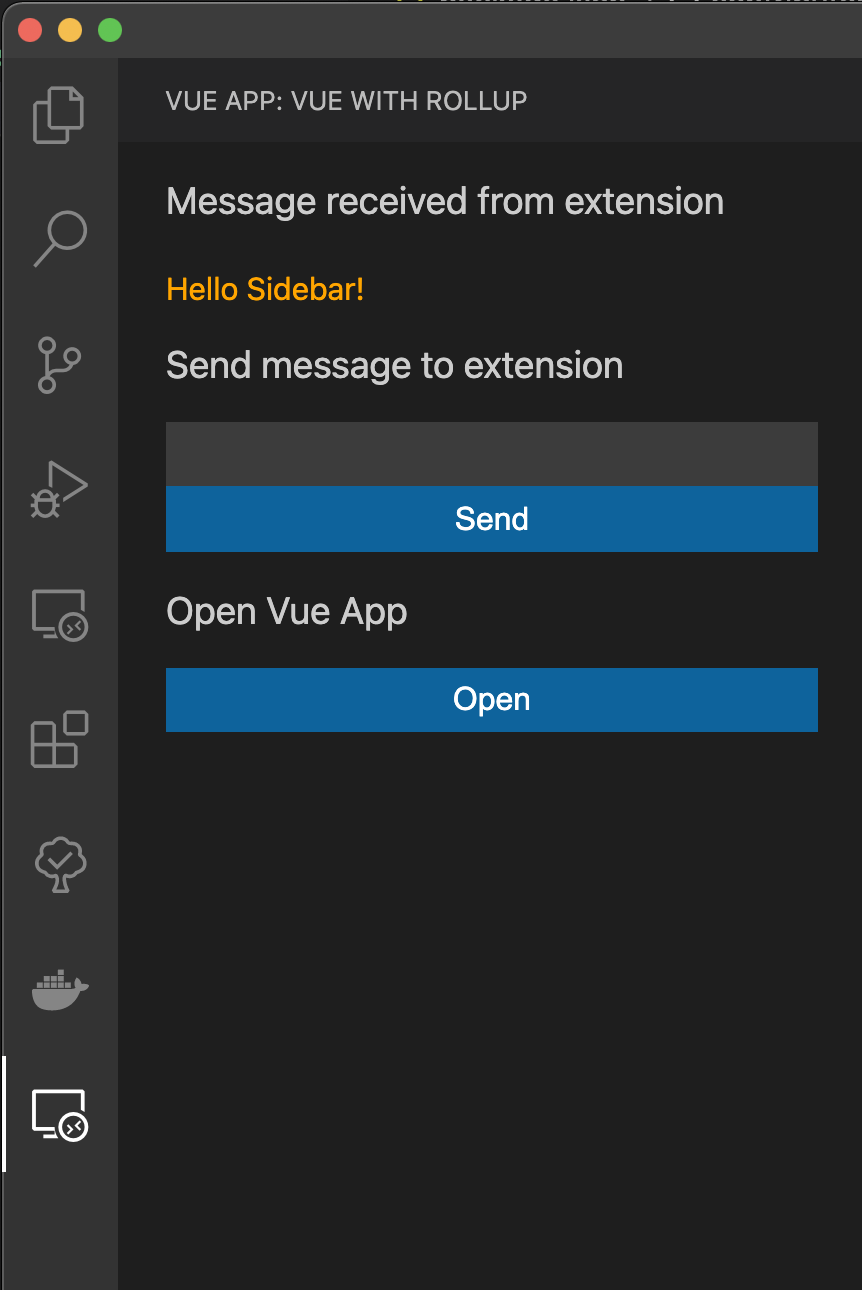
Figure 14: sidebar The Vue component receives messages from the extension.
congratulations! So far, you have completed the third VS Code extension.