Although there are many types of "windows" in Android system, only two types are often used: one is managed by system process, which is called "system window"; the other is generated by application program, which is used to display UI interface. If you are familiar with window manager service (WMS), everything is very simple. It is a service responsible for the overall management of all windows, which has been in operation from the beginning to the end. The reason why WMS is involved is that it is the big Boss, and all window changes should be notified to it. Although WindowManager has no relationship with it, it is responsible for it, and all information will be transmitted back to WMS through a certain way. Well, it's out of the question. We're talking about WindowManager, which is an interface class. It can manage view s, including adding, updating and deleting.
1, WindowManager
- Get WindowManager
wManager = (WindowManager) getApplicationContext().getSystemService(
                Context.WINDOW_SERVICE);
This method can be used directly in both Activity and Service to obtain WindowManager. Its getSystemService returns a WindowManagerImpl object, which is an object that exists in the local process. The fact is that WindowManagerImpl inherits WindowManager, while WindowManger inherits ViewManager.
- set up WindowManager.LayoutParams
LayoutParams stores the properties of windows. With this variable, you can assign various properties to windows. You can also change its attribute value to perform various operations, such as dragging and stretching of the suspended window.
The detailed property sheet is as follows:
http://www.cnblogs.com/shitianzeng/articles/2814050.html
- WindowManager operations
(1) Window addpublic void addView(View view, ViewGroup.LayoutParams params);(2) Window update
public void updateViewLayout(View view, ViewGroup.LayoutParams params);(3) Window delete
public void removeView(View view);All three of the above methods exist in ViewManager.
2, Suspended window example
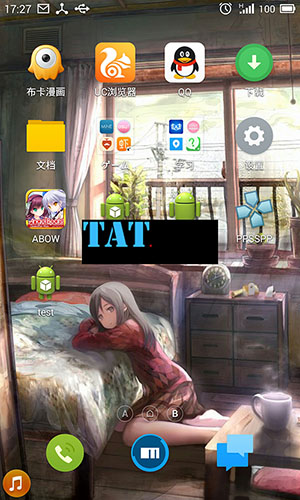
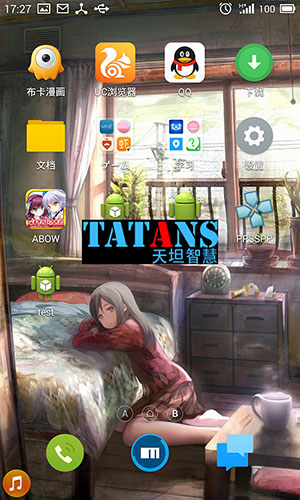
Example design: use service to open the suspension window, where there is a custom View, and click to eliminate the suspension window.
- The first is Service, which is opened by Activity. Get WindowManager before configuring properties

public class WindowService extends Service implements OnClickListener {

    private WindowManager wManager;// Window manager
    private WindowManager.LayoutParams mParams;// Properties of the window
    private MyView myView;
    private boolean flag = true;

    @Override
    public IBinder onBind(Intent intent) {
        // TODO Auto-generated method stub
        return null;
    }

    @Override
    public void onCreate() {
        // TODO Auto-generated method stub
        wManager = (WindowManager) getApplicationContext().getSystemService(
                Context.WINDOW_SERVICE);
        mParams = new WindowManager.LayoutParams();
        mParams.type = WindowManager.LayoutParams.TYPE_SYSTEM_ALERT;// System prompt window
        mParams.format = PixelFormat.TRANSLUCENT;// Support transparency
        //mParams.format = PixelFormat.RGBA_8888;
        mParams.flags |= WindowManager.LayoutParams.FLAG_NOT_FOCUSABLE;// focus
        mParams.width = 490;//Width and height of window
        mParams.height = 160;
        mParams.x = 0;//Offset of window position
        mParams.y = 0;
        //mParams.alpha  =0.1f; / / transparency of window
        myView = new MyView(this);
        myView.setOnClickListener(this);
        super.onCreate();
    }

    @Override
    public int onStartCommand(Intent intent, int flags, int startId) {
        // TODO Auto-generated method stub
        if (flag) {
            flag = false;
            wManager.addView(myView, mParams);//Add window
        }
        return super.onStartCommand(intent, flags, startId);
    }

    @Override
    public void onDestroy() {
        // TODO Auto-generated method stub
        if (myView.getParent() != null)
            wManager.removeView(myView);//Remove window
        super.onDestroy();
    }

    @Override
    public void onClick(View v) {
        // TODO Auto-generated method stub
        if (v.equals(myView)) {
            flag = true;
            if (myView.getParent() != null)
                wManager.removeView(myView);//Remove window
        }
    }

}
- A custom view
A long time ago, I wrote the surfaceView, which includes two display animations of text and pictures
@SuppressLint("WrongCall")
public class MyView extends SurfaceView implements SurfaceHolder.Callback {

    private static int span = 5;
    private MyThread wtf;
    private Paint paint;
    int sleepSpan = 150; // Animation delay ms
    Bitmap logo_s, logo_l; // logo picture reference
    int width_s; // Picture size
    int height_s;
    float currentX_s; // Picture location
    float currentY_s;
    float currentX_l; // Picture location
    float currentY_l;
    private Rect src;
    private RectF dst;
    private int currentAlpha = 0;

    public MyView(Context context) {
        super(context);

        this.getHolder().addCallback(this);// Set the implementer of the life cycle callback interface
        paint = new Paint();// Create a brush
        paint.setAntiAlias(true);// Turn on antialiasing
    }

    @Override
    public void surfaceCreated(SurfaceHolder holder) {
        logo_s = BitmapFactory
                .decodeResource(getResources(), R.drawable.logo_s);
        logo_l = BitmapFactory
                .decodeResource(getResources(), R.drawable.logo_l);
        // TODO Auto-generated method stub
        width_s = logo_s.getWidth();
        height_s = logo_s.getHeight();
        src = new Rect(0, 0, 0, height_s);
        // Location of large pictures
        currentX_s = 5;
        currentY_s = 5;
        dst = new RectF(currentX_s, currentY_s, currentX_s, currentY_s
                + height_s);
        currentX_l = currentX_s + width_s - logo_l.getWidth();
        // Location of small pictures
        currentY_l = currentY_s + height_s;
        currentAlpha = 0;
        wtf = new MyThread();
        wtf.start();
    }

    @Override
    public void surfaceChanged(SurfaceHolder holder, int format, int width,
            int height) {
        // TODO Auto-generated method stub

    }

    @Override
    public void surfaceDestroyed(SurfaceHolder holder) {
        // TODO Auto-generated method stub

    }

    @Override
    public void onDraw(Canvas canvas) {
        // TODO Auto-generated method stub
        // Draw black filled rectangle clear background
        super.onDraw(canvas);

        paint.setAlpha(120);// Set opacity to 255
        paint.setColor(Color.BLACK);// Set brush color
        canvas.drawColor(Color.BLACK);
        // Make a planar map
        if (logo_s == null || logo_l == null)
            return;
        src.right += span;
        dst.right += span;
        canvas.drawBitmap(logo_s, src, dst, paint);
        paint.setAlpha(currentAlpha);
        canvas.drawBitmap(logo_l, currentX_l, currentY_l, paint);
        // canvas.drawBitmap(bitmap, src, dst, paint);
        /*
         * Rect src = new Rect(x1, y2, cx1,cy1); Rect dst = new Rect(x2, y2,
         * cx2, cy2); The first rectangle is which section of the bitmap you want to intercept. The second rectangle is where you want it to appear on the screen.
         * The two rectangles can be different sizes, and will be stretched automatically when drawing.
         */
    }

    class MyThread extends Thread {
        public void run() {
            SurfaceHolder mholder = MyView.this.getHolder();// Get callback interface
            // Draw tatans
            try {
                sleep(500);
            } catch (InterruptedException e1) {
                // TODO Auto-generated catch block
                e1.printStackTrace();
            }
            for (int i = 0; i <= width_s / span; i++) {
                Canvas canvas = mholder.lockCanvas();// Get canvas
                try {
                    synchronized (mholder) // synchronization
                    {
                        onDraw(canvas);// conduct
                    }
                    sleep(20);
                } catch (Exception e) {
                    // TODO Auto-generated catch block
                    e.printStackTrace();
                } finally {
                    if (canvas != null) {
                        mholder.unlockCanvasAndPost(canvas);
                    }
                }

            }
            // Draw Tiantan wisdom
            for (int i = 0; i <= 25; i++) {
                currentAlpha = i * 10;
                Canvas canvas = mholder.lockCanvas();// Get canvas
                try {
                    synchronized (mholder) // synchronization
                    {
                        onDraw(canvas);// conduct
                    }
                    sleep(25);
                } catch (Exception e) {
                    // TODO Auto-generated catch block
                    e.printStackTrace();
                } finally {
                    if (canvas != null) {
                        mholder.unlockCanvasAndPost(canvas);
                    }
                }

            }
        }
    }

}
- In Activity, click to open service
@Override
    public boolean onTouchEvent(MotionEvent event) {
        // TODO Auto-generated method stub
        Log.d("CPACM","onTouchEvent");
        Intent intent = new Intent();
        intent.setClass(this, WindowService.class);
        startService(intent);
        this.finish();
        return super.onTouchEvent(event);
    }
- manifest.xml
<uses-permission android:name="android.permission.SYSTEM_ALERT_WINDOW" /> <!-- use SYSTEM_ALERT_WINDOW Must be added when -->
- design sketch
3, Conclusion
The deeper you learn, the more you discover you need to learn!
========================================
Author: cpacm
Source:( http://www.cnblogs.com/cpacm/p/4087690.html)