view Display Flow of Custom view
To display a view, it needs three processes: measurement, layout and drawing. This chapter discusses these three processes in detail. View's three major processes are more complex to analyze concretely. This article will not analyze in detail from the root causes, but it can ensure that it can reach a practical level.
1. Measurement process
1.1 Understanding MeasureSpec
View's measurement methods are public final void measure (int width measure Spec, int heightmeasure Spec) and protected void on measure (int width measure Spec, int heightmeasure Spec), whose parameters are two Measuer Specs, so before you understand the measurement process, you need to understand Measurement Spec.
MeasureSpec can be understood as a measurement specification. It is a 32-bit int value. The higher two bits represent SpecMode, the lower 30 bits represent SpecSize, and the SpecSize represents the measurement value. Looking at part of the source code of MeasureSpec, it is not difficult to find how MeasureSpec works.
MeaureSpec Partial source code:

        private static final int MODE_SHIFT = 30;
        private static final int MODE_MASK  = 0x3 << MODE_SHIFT;

        /**
         * Creates a measure specification based on the supplied size and mode.
         *
         * The mode must always be one of the following:
         * <ul>
         *  <li>{@link android.view.View.MeasureSpec#UNSPECIFIED}</li>
         *  <li>{@link android.view.View.MeasureSpec#EXACTLY}</li>
         *  <li>{@link android.view.View.MeasureSpec#AT_MOST}</li>
         * </ul>
         *
         * <p><strong>Note:</strong> On API level 17 and lower, makeMeasureSpec's
         * implementation was such that the order of arguments did not matter
         * and overflow in either value could impact the resulting MeasureSpec.
         * {@link android.widget.RelativeLayout} was affected by this bug.
         * Apps targeting API levels greater than 17 will get the fixed, more strict
         * behavior.</p>
         *
         * @param size the size of the measure specification
         * @param mode the mode of the measure specification
         * @return the measure specification based on size and mode
         */
        public static int makeMeasureSpec(@IntRange(from = 0, to = (1 << MeasureSpec.MODE_SHIFT) - 1) int size,
                                          @MeasureSpecMode int mode) {
            if (sUseBrokenMakeMeasureSpec) {
                return size + mode;
            } else {
                return (size & ~MODE_MASK) | (mode & MODE_MASK);
            }
        }


        /**
         * Extracts the mode from the supplied measure specification.
         *
         * @param measureSpec the measure specification to extract the mode from
         * @return {@link android.view.View.MeasureSpec#UNSPECIFIED},
         *         {@link android.view.View.MeasureSpec#AT_MOST} or
         *         {@link android.view.View.MeasureSpec#EXACTLY}
         */
        @MeasureSpecMode
        public static int getMode(int measureSpec) {
            //noinspection ResourceType
            return (measureSpec & MODE_MASK);
        }

        /**
         * Extracts the size from the supplied measure specification.
         *
         * @param measureSpec the measure specification to extract the size from
         * @return the size in pixels defined in the supplied measure specification
         */
        public static int getSize(int measureSpec) {
            return (measureSpec & ~MODE_MASK);
        }
It's not hard to see how MeasureSpec is structured. And we can decompose SpecMode and SpecSize from a MeasureSpec, or assemble a MeasureSpec with SpecMode and SpecSize. You can see SpecMode in the code above. Let's first look at the source code and comments for SpecMode.
/**
* Measure specification mode: The parent has not imposed any constraint
* on the child. It can be whatever size it wants.
*/
public static final int UNSPECIFIED = 0 << MODE_SHIFT;

/**
* Measure specification mode: The parent has determined an exact size
* for the child. The child is going to be given those bounds regardless
* of how big it wants to be.
*/
public static final int EXACTLY     = 1 << MODE_SHIFT;

/**
* Measure specification mode: The child can be as large as it wants up
* to the specified size.
*/
public static final int AT_MOST     = 2 << MODE_SHIFT;
SpecMode has three types:
1. EXACTLY: Determine the size. If SpecMode is Exactly, then what is SpecSize and what is the measurement result. For example, if the child View is set to a specified size in the layout, then the SpecMode passed from the parent layout to the measurement method is Exactly. In other words, the child layout is set to match_parent, and the parent layout can determine its own size at this time, so the pattern is Exactly.
2. AT_MOST: The sub-layout can determine its own size, but it cannot exceed the size of SpecSize. Typically, the parent layout has its own size, while the child layout setting parameter is wrap_content.
3. UNSPECIFIED: The parent layout does not restrict the child view, how much to give. For special measurement occasions.
1.2 Understanding the Measurement Process
After understanding MeasureSpec, we can look at the measurement method. In fact, the measurement method is a final method in View. We can't override it. The measurement method does some basic work, but in the commentary of the measurement method, it says that the real measurement work should be placed in the onMeasurement method, so it's basically all. Rewrite the onMeasure method. Next, take a look at the source code and comments for onMeasure. When you look at the source code, you must not omit the comment and only look at the source code. The comment is very important. Often some process instructions are in the comment. It is more useful to look at the key comment than to look at the source code of ten methods.
    /**
     * <p>
     * Measure the view and its content to determine the measured width and the
     * measured height. This method is invoked by {@link #measure(int, int)} and
     * should be overridden by subclasses to provide accurate and efficient
     * measurement of their contents.
     * </p>
     *
     * <p>
     * <strong>CONTRACT:</strong> When overriding this method, you
     * <em>must</em> call {@link #setMeasuredDimension(int, int)} to store the
     * measured width and height of this view. Failure to do so will trigger an
     * <code>IllegalStateException</code>, thrown by
     * {@link #measure(int, int)}. Calling the superclass'
     * {@link #onMeasure(int, int)} is a valid use.
     * </p>
     *
     * <p>
     * The base class implementation of measure defaults to the background size,
     * unless a larger size is allowed by the MeasureSpec. Subclasses should
     * override {@link #onMeasure(int, int)} to provide better measurements of
     * their content.
     * </p>
     *
     * <p>
     * If this method is overridden, it is the subclass's responsibility to make
     * sure the measured height and width are at least the view's minimum height
     * and width ({@link #getSuggestedMinimumHeight()} and
     * {@link #getSuggestedMinimumWidth()}).
     * </p>
     *
     * @param widthMeasureSpec horizontal space requirements as imposed by the parent.
     *                         The requirements are encoded with
     *                         {@link android.view.View.MeasureSpec}.
     * @param heightMeasureSpec vertical space requirements as imposed by the parent.
     *                         The requirements are encoded with
     *                         {@link android.view.View.MeasureSpec}.
     *
     * @see #getMeasuredWidth()
     * @see #getMeasuredHeight()
     * @see #setMeasuredDimension(int, int)
     * @see #getSuggestedMinimumHeight()
     * @see #getSuggestedMinimumWidth()
     * @see android.view.View.MeasureSpec#getMode(int)
     * @see android.view.View.MeasureSpec#getSize(int)
     */
    protected void onMeasure(int widthMeasureSpec, int heightMeasureSpec) {
        setMeasuredDimension(getDefaultSize(getSuggestedMinimumWidth(), widthMeasureSpec),
                getDefaultSize(getSuggestedMinimumHeight(), heightMeasureSpec));
    }
The first part of the commentary says that the measurement of size should be focused on this method, and that all inherited subclasses should override this method. There are two more important points: first, the rewriting method must store the measurement results through setMeasured Dimension (int, int) at the end of onMeasure, so that the measuredWidth and measuredHeight of this view are the valid values; second, it is necessary to ensure that the measured height and width are not less than getSuggested Minimum Height. () and the return value of getSuggestedMinimumWidth().
The onMeasure method in the View class is very simple. It directly obtains the width and height of the suggestion as the measurement result. In order to make the onMeasure method clear without getting stuck in the source code, we choose a relatively simple FrameLayout to look at its onMeasure source code. The corresponding annotations have been written in it.
    protected void onMeasure(int widthMeasureSpec, int heightMeasureSpec) {

        int count = getChildCount();

        /**
         * Determine whether it is necessary to repeatedly measure those child view s whose width and height parameters are match_parent, if the width of FrameLayout is not deterministic (Exactly),
         * Then only after the width of the FrameLayout is determined can the child view s whose width or height parameter is match_parent be measured.
         * */
        final boolean measureMatchParentChildren =
                MeasureSpec.getMode(widthMeasureSpec) != MeasureSpec.EXACTLY ||
                        MeasureSpec.getMode(heightMeasureSpec) != MeasureSpec.EXACTLY;
        mMatchParentChildren.clear();

        int maxHeight = 0;
        int maxWidth = 0;
        int childState = 0;

        /**
         * Measure all visible sub-view s
         * */
        for (int i = 0; i < count; i++) {
            final View child = getChildAt(i);
            if (mMeasureAllChildren || child.getVisibility() != GONE) {
                /**
                 * This is the main way to measure sub view s
                 * */
                measureChildWithMargins(child, widthMeasureSpec, 0, heightMeasureSpec, 0);
                final FrameLayout.LayoutParams lp = (FrameLayout.LayoutParams) child.getLayoutParams();
                /**
                 * After measuring the sub-view, get the width and height of the sub-view, and then compare the length and width of the sub-view with the existing length and width of the FrameLayout, so as to ensure that
                 * Full display of all child view s.
                 * */
                maxWidth = Math.max(maxWidth,
                        child.getMeasuredWidth() + lp.leftMargin + lp.rightMargin);
                maxHeight = Math.max(maxHeight,
                        child.getMeasuredHeight() + lp.topMargin + lp.bottomMargin);
                childState = combineMeasuredStates(childState, child.getMeasuredState());
                if (measureMatchParentChildren) {
                    if (lp.width == FrameLayout.LayoutParams.MATCH_PARENT ||
                            lp.height == FrameLayout.LayoutParams.MATCH_PARENT) {
                        mMatchParentChildren.add(child);
                    }
                }
            }
        }

        /**
         * Adding padding to the measurement results
         * */
        // Account for padding too
        maxWidth += getPaddingLeftWithForeground() + getPaddingRightWithForeground();
        maxHeight += getPaddingTopWithForeground() + getPaddingBottomWithForeground();

        /**
         * Check to see if it is less than the recommended minimum, and if it is less than, use the recommended minimum.
         * */
        // Check against our minimum height and width
        maxHeight = Math.max(maxHeight, getSuggestedMinimumHeight());
        maxWidth = Math.max(maxWidth, getSuggestedMinimumWidth());

        /**
         * Comparing the prospects, we should choose the bigger one.
         * */
        // Check against our foreground's minimum height and width
        final Drawable drawable = getForeground();
        if (drawable != null) {
            maxHeight = Math.max(maxHeight, drawable.getMinimumHeight());
            maxWidth = Math.max(maxWidth, drawable.getMinimumWidth());
        }

        /**
         * Set the measurement size of the FrameLayout
         * */
        setMeasuredDimension(resolveSizeAndState(maxWidth, widthMeasureSpec, childState),
                resolveSizeAndState(maxHeight, heightMeasureSpec,
                        childState << MEASURED_HEIGHT_STATE_SHIFT));
        /**
         * View a child view that needs to be measured wide or high match_parent, and reconstruct the MesureSpec of the child view if it needs to be measured.
         * */
        count = mMatchParentChildren.size();
        if (count > 1) {
            for (int i = 0; i < count; i++) {
                final View child = mMatchParentChildren.get(i);

                final ViewGroup.MarginLayoutParams lp = (ViewGroup.MarginLayoutParams) child.getLayoutParams();
                int childWidthMeasureSpec;
                int childHeightMeasureSpec;

                if (lp.width == FrameLayout.LayoutParams.MATCH_PARENT) {
                    childWidthMeasureSpec = MeasureSpec.makeMeasureSpec(getMeasuredWidth() -
                                    getPaddingLeftWithForeground() - getPaddingRightWithForeground() -
                                    lp.leftMargin - lp.rightMargin,
                            MeasureSpec.EXACTLY);
                } else {
                    childWidthMeasureSpec = getChildMeasureSpec(widthMeasureSpec,
                            getPaddingLeftWithForeground() + getPaddingRightWithForeground() +
                                    lp.leftMargin + lp.rightMargin,
                            lp.width);
                }

                if (lp.height == FrameLayout.LayoutParams.MATCH_PARENT) {
                    childHeightMeasureSpec = MeasureSpec.makeMeasureSpec(getMeasuredHeight() -
                                    getPaddingTopWithForeground() - getPaddingBottomWithForeground() -
                                    lp.topMargin - lp.bottomMargin,
                            MeasureSpec.EXACTLY);
                } else {
                    childHeightMeasureSpec = getChildMeasureSpec(heightMeasureSpec,
                            getPaddingTopWithForeground() + getPaddingBottomWithForeground() +
                                    lp.topMargin + lp.bottomMargin,
                            lp.height);
                }

                child.measure(childWidthMeasureSpec, childHeightMeasureSpec);
            }
        }
    }
The above is the measurement process of FrameLayout, which can be seen clearly with comments. First, FrameLayout measures all child views. If the size of FrameLayout is determined, then one round of measurement can determine the size of all child views. If the size of FrameLayout is uncertain, such as set to wrap_content, then the child views whose width or height parameter is match_parent cannot be measured precisely because the size of the parent is unknown at this time, and these child views will be stored in mMatch Parent Children. When measured in a round, the width and height of FrameLayout are the maximum width and the maximum height of the measured sub-view, respectively (the maximum width and maximum may not necessarily appear on the same sub-view). In order to prevent extreme situations, such as all child view width and height parameters are match_parent, then the measured width and height are all 0 (why 0 will be explained later). So you need to compare the smallest recommended values with the breadth and height of the prospects.
The last round is to measure the sub-views whose width or height parameter is match_parent, at which time the size of FrameLayout has been determined, and then reconstruct the sub-view's MesureSpec using the SpecMode l of FrameLayout and the width and height just measured in the first round, and then re-measure it.
As for how the parent layout measures the child view, we can see from the second round of measurement of onMeasure that the parent layout generates the child view's MesureSpec according to its own MeasureSpec and LayoutParams.height of the child view to be measured, and then passes this MeasureSpec to the child view's measurement method. The child view then measures its size according to its own situation. The getChildMeasureSpec method is the main method in the process of generating MesureSpec of the child view from the parent layout. Look at the source code of this method.
    /**
     * Does the hard part of measureChildren: figuring out the MeasureSpec to
     * pass to a particular child. This method figures out the right MeasureSpec
     * for one dimension (height or width) of one child view.
     *
     * The goal is to combine information from our MeasureSpec with the
     * LayoutParams of the child to get the best possible results. For example,
     * if the this view knows its size (because its MeasureSpec has a mode of
     * EXACTLY), and the child has indicated in its LayoutParams that it wants
     * to be the same size as the parent, the parent should ask the child to
     * layout given an exact size.
     *
     * @param spec The requirements for this view
     * @param padding The padding of this view for the current dimension and
     *        margins, if applicable
     * @param childDimension How big the child wants to be in the current
     *        dimension
     * @return a MeasureSpec integer for the child
     */
    public static int getChildMeasureSpec(int spec, int padding, int childDimension) {
        int specMode = MeasureSpec.getMode(spec);
        int specSize = MeasureSpec.getSize(spec);

        int size = Math.max(0, specSize - padding);

        int resultSize = 0;
        int resultMode = 0;

        switch (specMode) {
        // Parent has imposed an exact size on us
        case MeasureSpec.EXACTLY:
            if (childDimension >= 0) {
                resultSize = childDimension;
                resultMode = MeasureSpec.EXACTLY;
            } else if (childDimension == LayoutParams.MATCH_PARENT) {
                // Child wants to be our size. So be it.
                resultSize = size;
                resultMode = MeasureSpec.EXACTLY;
            } else if (childDimension == LayoutParams.WRAP_CONTENT) {
                // Child wants to determine its own size. It can't be
                // bigger than us.
                resultSize = size;
                resultMode = MeasureSpec.AT_MOST;
            }
            break;

        // Parent has imposed a maximum size on us
        case MeasureSpec.AT_MOST:
            if (childDimension >= 0) {
                // Child wants a specific size... so be it
                resultSize = childDimension;
                resultMode = MeasureSpec.EXACTLY;
            } else if (childDimension == LayoutParams.MATCH_PARENT) {
                // Child wants to be our size, but our size is not fixed.
                // Constrain child to not be bigger than us.
                resultSize = size;
                resultMode = MeasureSpec.AT_MOST;
            } else if (childDimension == LayoutParams.WRAP_CONTENT) {
                // Child wants to determine its own size. It can't be
                // bigger than us.
                resultSize = size;
                resultMode = MeasureSpec.AT_MOST;
            }
            break;

        // Parent asked to see how big we want to be
        case MeasureSpec.UNSPECIFIED:
            if (childDimension >= 0) {
                // Child wants a specific size... let him have it
                resultSize = childDimension;
                resultMode = MeasureSpec.EXACTLY;
            } else if (childDimension == LayoutParams.MATCH_PARENT) {
                // Child wants to be our size... find out how big it should
                // be
                resultSize = 0;
                resultMode = MeasureSpec.UNSPECIFIED;
            } else if (childDimension == LayoutParams.WRAP_CONTENT) {
                // Child wants to determine its own size.... find out how
                // big it should be
                resultSize = 0;
                resultMode = MeasureSpec.UNSPECIFIED;
            }
            break;
        }
        return MeasureSpec.makeMeasureSpec(resultSize, resultMode);
    }
The method is not difficult. We can see clearly how the parent layout produces the MesureSpec of the child view. The annotations are also clearly written. Summarize them in the following table:
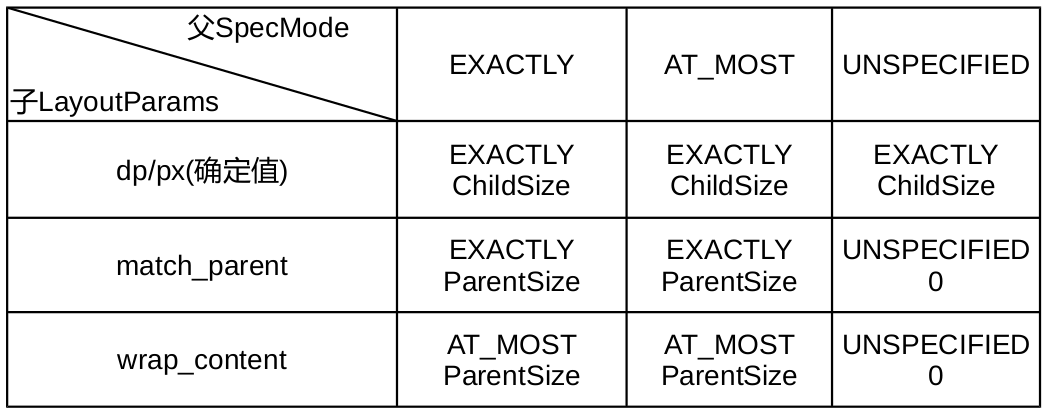
This is very simple. You can see how the parent layout creates the child view's MesureSpec based on its own MeasureSpec and Layout Params of its child view.
In the first round of onMeasure measurement, there is a key method, measureChildWithMargins(child, widthMeasureSpec, 0, heightMeasureSpec, 0). It can be seen from the name that this method measures the child view, and also takes the margin value of the child view into account. We can then look at the source code for this method.
    /**
     * Ask one of the children of this view to measure itself, taking into
     * account both the MeasureSpec requirements for this view and its padding
     * and margins. The child must have MarginLayoutParams The heavy lifting is
     * done in getChildMeasureSpec.
     *
     * @param child The child to measure
     * @param parentWidthMeasureSpec The width requirements for this view
     * @param widthUsed Extra space that has been used up by the parent
     *        horizontally (possibly by other children of the parent)
     * @param parentHeightMeasureSpec The height requirements for this view
     * @param heightUsed Extra space that has been used up by the parent
     *        vertically (possibly by other children of the parent)
     */
    protected void measureChildWithMargins(View child,
            int parentWidthMeasureSpec, int widthUsed,
            int parentHeightMeasureSpec, int heightUsed) {
        final MarginLayoutParams lp = (MarginLayoutParams) child.getLayoutParams();

        final int childWidthMeasureSpec = getChildMeasureSpec(parentWidthMeasureSpec,
                mPaddingLeft + mPaddingRight + lp.leftMargin + lp.rightMargin
                        + widthUsed, lp.width);
        final int childHeightMeasureSpec = getChildMeasureSpec(parentHeightMeasureSpec,
                mPaddingTop + mPaddingBottom + lp.topMargin + lp.bottomMargin
                        + heightUsed, lp.height);

        child.measure(childWidthMeasureSpec, childHeightMeasureSpec);
    }
As you can see, this method is still Mr. MesureSpec of the child view, and then calls the measure method of the child view. Note the various parameters introduced. Looking at the getChild MeasureSpec (int spec, int padding, int child Dimension) method, we know that its three parameters are:
- int spec: The view's MesureSpec, here is FrameLayout's Spec.
- int padding: This is not simply the literal padding value of the parent layout. In short, this is the space that the parent layout has taken up. If the HeightMeasureSpec is to be generated, the padding includes the positions occupied by other child views in the vertical direction, the padding Top and padding Bottom of the parent layout, and the topMargin and bottom Margin values of the child view itself.
- int child Dimension: To get the width or height of the child view of MeasureSpec, this value is one of three cases: size determination, wrap_content and match_parent.
In the onMeasure method, the first round of measurement sub-view is written as
measureChildWithMargins(child, widthMeasureSpec, 0, heightMeasureSpec, 0);Obviously, the widthUsed and heightUsed values passed to this method are 0, and the padding in getChildMeasureSpec (int spec, int padding, int child Dimension) inside this method does not include the positions occupied by other child views. This also fits in with the characteristics of FrameLayout: all subviews are overlapped and arranged without affecting each other. And if Framlayout is wrap_content, then its width is the largest width and height in all sub-views is the largest height in all sub-views.
1.3 Summary of Measurement Process
This is the complete measurement process of FrameLayout. Of course, the layout of FrameLayout itself is very simple. If it is Relative Layout, the measurement process will be more complex. But even so, we can conclude the general law of Layout measurement from it:
- Through its own MeasureSpec and Layuout Params of sub-view, the MesureSpec of sub-view is generated. This step calls the getChildMeasureSpec (int spec, int padding, int child Dimension) method.
- Invoke the measure(int widthMeasureSpec, int heightMeasureSpec) method of subview to measure the width of quantum view.
- After the sub-view measurement is finished, the width and height of the sub-view are calculated according to the situation. If your MeasureSpec is Exactly, you can directly take the size in SpecSize as your width or height; if wrap_content or something else, you need to call getMeasuredHeight() and getMeasuredWidth() of the child view to get the results of the child view measurement after each child view has been measured, and then you can get the results of the child view measurement. Calculate your width and height according to the situation.
- Set Measured Dimension (int measuredWidth, int measuredHeight) method is used to save the measurement results.
This completes the measurement process of layout and its sub-view. The measurement of view is simpler, because there is no child view, as long as the size of its own content is determined, and then combined with MeasureSpec, the measurement can be completed. For example, if a view needs to draw a circle, just consider the padding value and the size of the circle.
Note: The difference between three broad and high values:
1. LayoutParams.width, LayoutParams.height: This is the width and height value in the layout file, in units of px, and WRAP_CONTENT corresponds to - 2, MATHCH_PARENT corresponds to - 1, which can be invoked at any time. In particular, neither measurement nor layout process will affect this LayoutParams. Unless the setLayoutParams() method is manually invoked in the code to set, LayoutParams stores the width and height of the layout file, neither the measured width and height nor the final width and height. . You can do an experiment to initialize any control by adding ViewTreeObserver.OnGlobalLayoutListener with ViewTreeObserver and printing log in the callback function to show how to use LayoutParams to get the width and height of the control, and how to use getWidth() and getHeight() to get width and height directly. In this respect, LayoutParams is more like a benchmark for reference when generating MeasureSpec for the view by the parent layout, rather than necessarily the exact value. So if you want to get the true width and height of a control, you must not use LayoutParams. The width and height of view can be changed by setLayout Pramas (Layout Params param), and this is often the only way to specify the width and height manually. For example, although TextView has setWidth(int width) method, ImageView does not. It can only use setLayout Pramas (Layout Params param).
2. getMeasuredWidth(), getMeasuredHeight(): Get the measured width and height, which can be validated only after the end of the measurement method.
3. getWidth(), getHeight(): Get the final actual width and height, the actual width and height will be determined in the layout stage, but in most cases, the measured width and height is the final width and height.
2. layout process
Layout is simpler than measure, and unlike measure, it has a fixed routine and is basically implemented in a free way. Similarly to measure, onLayout() should be overridden when customizing view s, although layout() methods can be overridden.
2.1 Understanding the layout process
Similarly, for simplicity, we continue to select the layout process of FrameLayout to learn. Maybe you'll say that the layout of FrameLayout is too simple. Isn't it that all views are laid out on the top left? In fact, it's not that simple. FrameLayout also has parameters that can control the location of child views, and in the layout process we will see something that needs to be noticed in the custom view. Next, let's look at the layout function. It should be noted that the layout function is defined in the View class, and FrameLayout follows the specification and does not override the layout function, so it is necessary to find the layout function in the View class.
    /**
     * Assign a size and position to a view and all of its
     * descendants
     *
     * <p>This is the second phase of the layout mechanism.
     * (The first is measuring). In this phase, each parent calls
     * layout on all of its children to position them.
     * This is typically done using the child measurements
     * that were stored in the measure pass().</p>
     *
     * <p>Derived classes should not override this method.
     * Derived classes with children should override
     * onLayout. In that method, they should
     * call layout on each of their children.</p>
     *
     * @param l Left position, relative to parent
     * @param t Top position, relative to parent
     * @param r Right position, relative to parent
     * @param b Bottom position, relative to parent
     */
    @SuppressWarnings({"unchecked"})
    public void layout(int l, int t, int r, int b) {
        if ((mPrivateFlags3 & PFLAG3_MEASURE_NEEDED_BEFORE_LAYOUT) != 0) {
            onMeasure(mOldWidthMeasureSpec, mOldHeightMeasureSpec);
            mPrivateFlags3 &= ~PFLAG3_MEASURE_NEEDED_BEFORE_LAYOUT;
        }

        int oldL = mLeft;
        int oldT = mTop;
        int oldB = mBottom;
        int oldR = mRight;

        boolean changed = isLayoutModeOptical(mParent) ?
                setOpticalFrame(l, t, r, b) : setFrame(l, t, r, b);

        if (changed || (mPrivateFlags & PFLAG_LAYOUT_REQUIRED) == PFLAG_LAYOUT_REQUIRED) {
            onLayout(changed, l, t, r, b);
            mPrivateFlags &= ~PFLAG_LAYOUT_REQUIRED;

            ListenerInfo li = mListenerInfo;
            if (li != null && li.mOnLayoutChangeListeners != null) {
                ArrayList<OnLayoutChangeListener> listenersCopy =
                        (ArrayList<OnLayoutChangeListener>)li.mOnLayoutChangeListeners.clone();
                int numListeners = listenersCopy.size();
                for (int i = 0; i < numListeners; ++i) {
                    listenersCopy.get(i).onLayoutChange(this, l, t, r, b, oldL, oldT, oldR, oldB);
                }
            }
        }

        mPrivateFlags &= ~PFLAG_FORCE_LAYOUT;
        mPrivateFlags3 |= PFLAG3_IS_LAID_OUT;
    }
As you can see, the layout function of View does not actually perform many actual layout operations, but is responsible for some state updates and coordinate settings of this view. It uses the setFrame() function to apply the coordinates from the parent container to its own view. Then you call onLayout(changed, l, t, r, b), and then you can see the onLayout() function of FrameLayout. Note that l, t, r, and B are relative to the parent view, not absolute positions on the screen, as explained in the comments.
protected void onLayout(boolean changed, int left, int top, int right, int bottom) {
        layoutChildren(left, top, right, bottom, false /* no force left gravity */);
    }
Simply, layoutChildren is called directly and has a Boolean value more than the original parameter. Among them, change is a parameter that needs to be explained. It is the layout that compares its original position with the new value from the later layout function to find out whether its size and position have changed. If it changes, change is true, otherwise it is false. This can also be used to determine when to lay out the child view to avoid unnecessary layout wasting resources frequently. Verification of change is done in the layout function of the View class, so we don't have to worry about it.
    void layoutChildren(int left, int top, int right, int bottom,
                        boolean forceLeftGravity) {
        final int count = getChildCount();

        /**
         * Get the left and right position of the parent layout, where the parent layout refers to the FrameLayout itself
         * */
        final int parentLeft = getPaddingLeftWithForeground();
        final int parentRight = right - left - getPaddingRightWithForeground();

        final int parentTop = getPaddingTopWithForeground();
        final int parentBottom = bottom - top - getPaddingBottomWithForeground();

        mForegroundBoundsChanged = true;

        /**
         * Measure each child view in turn, and consider gravity of the child view
         * */
        for (int i = 0; i < count; i++) {
            final View child = getChildAt(i);
            if (child.getVisibility() != GONE) {
                final FrameLayout.LayoutParams lp = (FrameLayout.LayoutParams) child.getLayoutParams();

                final int width = child.getMeasuredWidth();
                final int height = child.getMeasuredHeight();

                int childLeft;
                int childTop;

                int gravity = lp.gravity;
                if (gravity == -1) {
                    gravity = DEFAULT_CHILD_GRAVITY;
                }

                final int layoutDirection = getLayoutDirection();
                /**
                 * The absolute gravity is determined horizontally and vertically according to gravity and layout direction, which determines the left and upper positions of the child view. If you are familiar with developer options,
                 * You will find that one of the options is "Force the layout from right to left" and that FrameLayout also has the android:layoutDirection property, which can be set to inherit.
                 * There are four options: local, ltr and rtl, but there is no upside-down orientation. After all, no culture's reading habits are upside-down. therefore
                 * About gravity needs to be combined with layout direction, but the upper and lower layout only needs to parse view's own gravity settings, not direction. In addition, absolute Gravity
                 * It's from left to right, no matter how it's set in the developer's options.
                 * */
                final int absoluteGravity = Gravity.getAbsoluteGravity(gravity, layoutDirection);
                final int verticalGravity = gravity & Gravity.VERTICAL_GRAVITY_MASK;

                /**
                 * Calculate the left position of the child view
                 * */
                switch (absoluteGravity & Gravity.HORIZONTAL_GRAVITY_MASK) {
                    case Gravity.CENTER_HORIZONTAL:
                        /**
                         * If the absolute gravity is horizontally centered, the following calculation is clearly intended to make the child view horizontally centered, taking into account the margin value
                         * */
                        childLeft = parentLeft + (parentRight - parentLeft - width) / 2 +
                                lp.leftMargin - lp.rightMargin;
                        break;
                    case Gravity.RIGHT:
                        /**
                         * If gravity is not forced to be left, then gravity is also calculated to be right.
                         * */
                        if (!forceLeftGravity) {
                            childLeft = parentRight - width - lp.rightMargin;
                            break;
                        }
                    case Gravity.LEFT:
                    default:
                        childLeft = parentLeft + lp.leftMargin;
                }
                /**
                 * Calculate the top position of the child view
                 * */
                switch (verticalGravity) {
                    case Gravity.TOP:
                        childTop = parentTop + lp.topMargin;
                        break;
                    case Gravity.CENTER_VERTICAL:
                        /**
                         * Horizontal centralized layout
                         * */
                        childTop = parentTop + (parentBottom - parentTop - height) / 2 +
                                lp.topMargin - lp.bottomMargin;
                        break;
                    case Gravity.BOTTOM:
                        childTop = parentBottom - height - lp.bottomMargin;
                        break;
                    default:
                        childTop = parentTop + lp.topMargin;
                }
                /**
                 * Call the layout function of the child view and pass in the calculated left, top, right and bottom values of the child view
                 * */
                child.layout(childLeft, childTop, childLeft + width, childTop + height);
            }
        }
    }
The key annotations have been written in the code, and we can see that the key to onLayout is to locate the left and right boundaries of the child view. In the layout process of FrameLayout, all sub-views are independent and not affected by other sub-views, which also verifies the characteristics of FrameLayout: all sub-views are superimposed and arranged. If it's a vertical layout of LinearLayout, the top of each next subview is calculated on the basis of the bottom position of the previous subview to ensure that they are sequentially arranged, which can be verified by the onLayout() function of LinearLayout itself.
Some people may ask that this is just a measurement of the position, but it has not been applied to the view. In fact, the setup is not onLayout() function, but as early as the layout() function of View. It's the setFrame() function, and change is the return value of the setFrame() function. It can also be seen from this that the location (should) of the child view is entirely determined by the parent layout, and the location is set directly in the layout() function of the parent layout calling the child view. It is not recommended to call setFrame() again in onLayout() function to avoid layout disorder. The onLayout() function should only be used to lay out subviews, or to do other work that needs to be done in the layout phase, such as log ging. If a custom view is a view rather than a layout, it is also possible to completely avoid rewriting onLayout().
2.2 FrameLayout property validation
In the layout process, we can see that only gravity and margin values of child views can affect the position of child views without changing the layout direction of FrameLayout (after all, few changes are made in the layout direction). Next, we will validate some features.
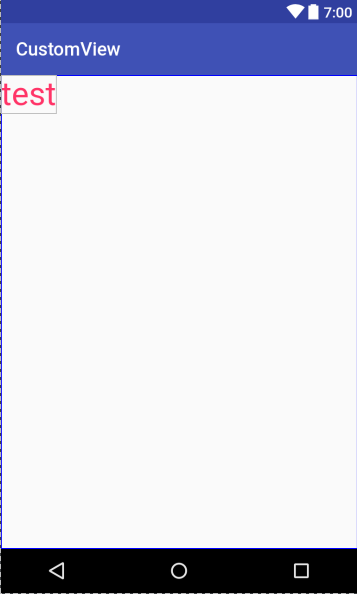
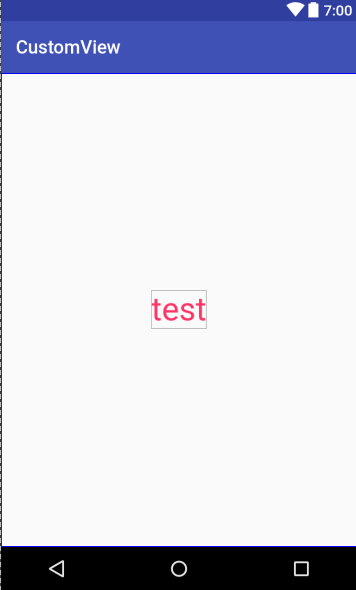
(1) No special settings
Create a new layout without any special options to see the effect
<?xml version="1.0" encoding="utf-8"?>
<FrameLayout xmlns:android="http://schemas.android.com/apk/res/android"
    xmlns:app="http://schemas.android.com/apk/res-auto"
    xmlns:tools="http://schemas.android.com/tools"
    android:layout_width="match_parent"
    android:layout_height="match_parent"
    tools:context="com.zu.customview.FrameLayoutTest">
    <TextView
        android:layout_width="wrap_content"
        android:layout_height="wrap_content"
        android:text="test"
        android:textSize="35sp"
        android:textColor="#ff3467"/>

</FrameLayout>
Effect
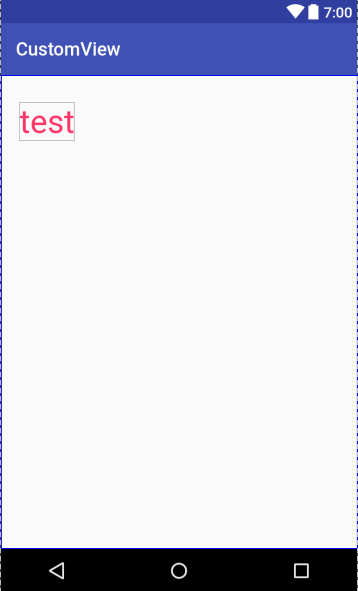
(2) Sub view adds margin
Modify the layout TextView and add margin
    <TextView
        android:layout_width="wrap_content"
        android:layout_height="wrap_content"
        android:text="test"
        android:textSize="35sp"
        android:textColor="#ff3467"
        android:layout_marginLeft="20dp"
        android:layout_marginTop="30dp"/>
Effect
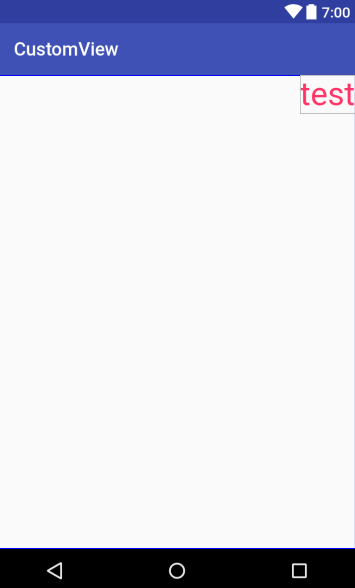
Here we have a phenomenon to see what happens if the marginLeft value is set until the right boundary of TextView exceeds the right boundary of FrameLayout.
    <TextView
        android:layout_width="wrap_content"
        android:layout_height="wrap_content"
        android:text="test"
        android:textSize="35sp"
        android:textColor="#ff3467"
        android:layout_marginTop="30dp"
        android:layout_marginLeft="330dp"/>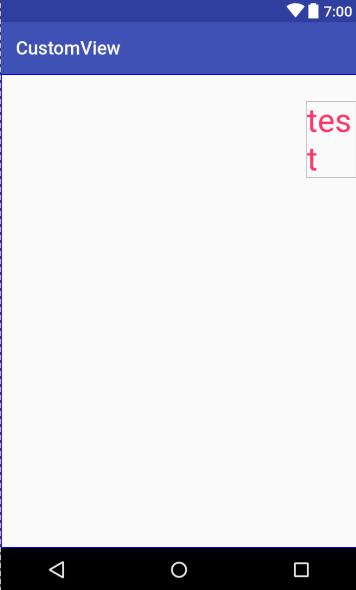
We found that TextView had broken down. Obviously, the child view can also get the layout information of the parent layout, and some changes will be made automatically during the layout process. Although this point is more intelligent, but inevitably there will be some undesirable situation. If you don't want to see a sub-view asserting itself, you can construct a MesureSpec of UNSPECIFIED to measure quantum view when measuring.
(3) Sub view adds layout_gravity
Modify the layout TextView and add gravity
    <TextView
        android:layout_width="wrap_content"
        android:layout_height="wrap_content"
        android:text="test"
        android:textSize="35sp"
        android:textColor="#ff3467"
        android:layout_gravity="center"/>
Effect
(4) FrameLayout modification layoutDirection
Remove margin and gravity from TextView and add the following sentence to FrameLayout to modify the layout of FrameLayout from right to left
android:layoutDirection="rtl"Effect
From the above process, I think everyone should have fully understood the layout process of FrameLayout, and also learned some other features of FrameLayout from the code and verified them.
2.3 layout process summary
This is the general process of layout, which can be summarized as follows:
- The parent layout is responsible for the layout of the child view in its onLayout() function, arranging the position of the child view, and passing the measured position (up, down, left and right) to the layout() function of the child view.
- The child view uses the setFrame() function in its layout() function to apply the position to the view, and compares the new position with the old position to determine whether its position and size have changed, and then calls the onLayout() callback function.
- If there are other views in the child view at this time, then the layout operation of the first complement to the child view is done in its onLayout() function, so that only the last child view has no other view, thus completing the layout of all views.
Of course, the above is the layout process of ViewGroup. If it is the layout process of View, it will be simpler. After all, there is no sub-view, so long as the incoming position is applied to the view, OK.
3. draw process
The draw process is much simpler than the other two. Its function is to draw the view content to the screen.
Take a look at the drawing () source of View first.
    /**
     * Manually render this view (and all of its children) to the given Canvas.
     * The view must have already done a full layout before this function is
     * called.  When implementing a view, implement
     * {@link #onDraw(android.graphics.Canvas)} instead of overriding this method.
     * If you do need to override this method, call the superclass version.
     *
     * @param canvas The Canvas to which the View is rendered.
     */
    public void draw(Canvas canvas) {
        final int privateFlags = mPrivateFlags;
        final boolean dirtyOpaque = (privateFlags & PFLAG_DIRTY_MASK) == PFLAG_DIRTY_OPAQUE &&
                (mAttachInfo == null || !mAttachInfo.mIgnoreDirtyState);
        mPrivateFlags = (privateFlags & ~PFLAG_DIRTY_MASK) | PFLAG_DRAWN;

        /*
         * Draw traversal performs several drawing steps which must be executed
         * in the appropriate order:
         *
         *      1. Draw the background
         *      2. If necessary, save the canvas' layers to prepare for fading
         *      3. Draw view's content
         *      4. Draw children
         *      5. If necessary, draw the fading edges and restore layers
         *      6. Draw decorations (scrollbars for instance)
         */

        // Step 1, draw the background, if needed
        int saveCount;

        if (!dirtyOpaque) {
            drawBackground(canvas);
        }

        // skip step 2 & 5 if possible (common case)
        final int viewFlags = mViewFlags;
        boolean horizontalEdges = (viewFlags & FADING_EDGE_HORIZONTAL) != 0;
        boolean verticalEdges = (viewFlags & FADING_EDGE_VERTICAL) != 0;
        if (!verticalEdges && !horizontalEdges) {
            // Step 3, draw the content
            if (!dirtyOpaque) onDraw(canvas);

            // Step 4, draw the children
            dispatchDraw(canvas);

            // Step 6, draw decorations (scrollbars)
            onDrawScrollBars(canvas);

            if (mOverlay != null && !mOverlay.isEmpty()) {
                mOverlay.getOverlayView().dispatchDraw(canvas);
            }

            // we're done...
            return;
        }
        ...
    }
It can be seen that the drawing is divided into six steps, of which the second and fifth steps are usually skipped. We only look at the remaining four steps:
- Drawing Background
- Draw your own content (onDraw())
- Draw sub view (dispatchDraw())
- Drawing Decoration
The above steps are not difficult to understand. Students who have drawn custom graphics in Bitmap all know that canvas drawings, if the positions overlap, will be drawn after the content of the previous coverage. This canvas is passed from ViewRoot, which ensures that all sub-views on the interface are drawn on a canvas. In fact, the measurement, layout and rendering of all views are initiated by ViewRoot.
The annotations still show that the draw() method should not be overridden, that the drawing itself should be handled in the onDraw() method, and that the sub-view should be drawn in the dispatchDraw(). If you must override the draw() method, you must also call super.draw(Canvas canvas) at the beginning.
Because different view drawing methods are different, some layout s and some views, and the need for drawing sub-views is different, onDraw() and dispatchDraw() in the View class are empty implementations. Because ViewGroup is a container, it needs to draw less things, mainly in the drawing of sub-views, so ViewGroup mainly implements dispatchDraw(). Conversely, TextView, ImageView and other non-container controls mainly implement onDraw() method to present more complex content. The original process is not very complicated. Compared with the process, the details of draw process are terrible. However, in order to fully understand the drawing process of containers and controls, we still select a little source code for a brief understanding.
Select a dispatchDraw() method in the ViewGroup class
    protected void dispatchDraw(Canvas canvas) {
        boolean usingRenderNodeProperties = canvas.isRecordingFor(mRenderNode);
        final int childrenCount = mChildrenCount;
        final View[] children = mChildren;
        int flags = mGroupFlags;

        if ((flags & FLAG_RUN_ANIMATION) != 0 && canAnimate()) {
            final boolean cache = (mGroupFlags & FLAG_ANIMATION_CACHE) == FLAG_ANIMATION_CACHE;

            final boolean buildCache = !isHardwareAccelerated();
            for (int i = 0; i < childrenCount; i++) {
                final View child = children[i];
                if ((child.mViewFlags & VISIBILITY_MASK) == VISIBLE) {
                    final LayoutParams params = child.getLayoutParams();
                    attachLayoutAnimationParameters(child, params, i, childrenCount);
                    bindLayoutAnimation(child);
                    if (cache) {
                        child.setDrawingCacheEnabled(true);
                        if (buildCache) {
                            child.buildDrawingCache(true);
                        }
                    }
                }
            }

            final LayoutAnimationController controller = mLayoutAnimationController;
            if (controller.willOverlap()) {
                mGroupFlags |= FLAG_OPTIMIZE_INVALIDATE;
            }

            controller.start();

            mGroupFlags &= ~FLAG_RUN_ANIMATION;
            mGroupFlags &= ~FLAG_ANIMATION_DONE;

            if (cache) {
                mGroupFlags |= FLAG_CHILDREN_DRAWN_WITH_CACHE;
            }

            if (mAnimationListener != null) {
                mAnimationListener.onAnimationStart(controller.getAnimation());
            }
        }

        int clipSaveCount = 0;
        final boolean clipToPadding = (flags & CLIP_TO_PADDING_MASK) == CLIP_TO_PADDING_MASK;
        if (clipToPadding) {
            clipSaveCount = canvas.save();
            canvas.clipRect(mScrollX + mPaddingLeft, mScrollY + mPaddingTop,
                    mScrollX + mRight - mLeft - mPaddingRight,
                    mScrollY + mBottom - mTop - mPaddingBottom);
        }

        // We will draw our child's animation, let's reset the flag
        mPrivateFlags &= ~PFLAG_DRAW_ANIMATION;
        mGroupFlags &= ~FLAG_INVALIDATE_REQUIRED;

        boolean more = false;
        final long drawingTime = getDrawingTime();

        if (usingRenderNodeProperties) canvas.insertReorderBarrier();
        // Only use the preordered list if not HW accelerated, since the HW pipeline will do the
        // draw reordering internally
        final ArrayList<View> preorderedList = usingRenderNodeProperties
                ? null : buildOrderedChildList();
        final boolean customOrder = preorderedList == null
                && isChildrenDrawingOrderEnabled();
        for (int i = 0; i < childrenCount; i++) {
            int childIndex = customOrder ? getChildDrawingOrder(childrenCount, i) : i;
            final View child = (preorderedList == null)
                    ? children[childIndex] : preorderedList.get(childIndex);
            if ((child.mViewFlags & VISIBILITY_MASK) == VISIBLE || child.getAnimation() != null) {
                more |= drawChild(canvas, child, drawingTime);
            }
        }
        if (preorderedList != null) preorderedList.clear();
        ...
    }
It can be seen that a lot of work is to prepare for drawing sub-view s, including preparing cache, setting canvas according to clip, etc. The real sentence drawn is more |= drawChild(canvas, child, drawingTime). Let's look at the source code of this function.
    /**
     * Draw one child of this View Group. This method is responsible for getting
     * the canvas in the right state. This includes clipping, translating so
     * that the child's scrolled origin is at 0, 0, and applying any animation
     * transformations.
     *
     * @param canvas The canvas on which to draw the child
     * @param child Who to draw
     * @param drawingTime The time at which draw is occurring
     * @return True if an invalidate() was issued
     */
    protected boolean drawChild(Canvas canvas, View child, long drawingTime) {
        return child.draw(canvas, this, drawingTime);
    }
As you can see from the annotations, this method is not only for drawing content, but also for animation and other visual effects of View application. It directly calls draw() of the child view, but obviously this draw function is different from what we mentioned earlier, and now these three parameters. This function is still in the View class, because the source code is too long, I will not post it. The comment states that this is specifically called by ViewGroup.drawChild(), and that subclasses should not override this method or call it anywhere else except ViewGroup.drawChild(). Looking at its code, you will find that it contains some code for displacement, scaling and deformation of canvas, which also verifies that it is really ready for the animation effect of View. And here we call the single parameter version of draw(Canvas canvas) to draw the content.
Specific views how to draw, do not look at in detail, canvas already has a variety of methods to draw images, such as drawing ellipses, squares, text, and even Drawable method. After looking at the onDraw() method of TextView and ImageView, it is found that before formal drawing, the content is drawn on a Drawable, and then the Drawable is drawn on canvas.
As for Canvas, Paint, Path, Drawable and so on, which are related to images, you can check them in detail, and you can use them now.
summary
At this point, the view's display process has been explained, and we can see how complex a view needs to go through the three stages of measure ment, layout and draw. Here we have to exclaim: the cpu is really fast now, with so many views, it can guarantee the frame rate of 60 FPS per second. It's a bit out of the question. In a word, the details have been clearly explained in various parts. Here's just a brief summary.
measure
- The information transfer of measure ment process is based on MeasureSpec.
- MeasureSpec consists of SpecMode and SpecSize. There are three kinds of SpecMode: EXACTLY, AT_MOST and UNSPECIFIED.
- The MesureSpec of the child view is constructed by the parent container combining its own MeasureSpec with its own Layout Params of the child view, so it is not necessary to consider its own Layout Params in the measure ment function of the child view itself, just referring to the MeasureSpec passed in by the parent container.
- Controls can only measure themselves, while containers need to measure child views. Measure by calling a measure(int, int) function of a View or ViewGroup.
- Make sure to call setMeasured Dimension (int, int) after the measurement is completed to save the measurement results.
- The measured width and height are equal to the final width and height in most cases, but it is not excluded that they will be different. After all, the final width and height are determined in the layout stage.
layout
- Layout the view by calling the layout(int, int, int, int) function of a View object.
- The exact layout of the child view is determined by the parent container. Once the parent container calls the layout (int, int, int) of the child view, the child view calls the setFrame() function to apply the location to the view, and judges whether the layout has changed based on the old and new location, and passes the judgement results and location parameters to the callback letter together. Number onLayout().
- Our own custom layout work should be done in onLayout(), including the layout of child view s.
draw
This should be the simplest but most complex step in the process. Cavans, Drawable and so on are needed for specific rendering. We can check this information in detail. In a word, the content is drawn on the incoming Canvas. There is no limit on what to draw and how to draw.
So far, the process of View display has been explored. Next is the event distribution mechanism of View, which will be explained in my next blog, The View Event Distribution Mechanism of Customized View.
Statement: Part of the knowledge in this series comes from Exploring the Art of Android Development. Thank you to the author. Some of the contents may be errors and omissions. Welcome to leave a message for discussion.