preface
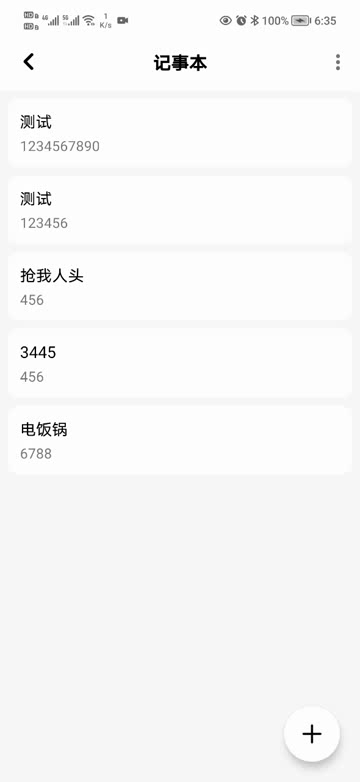
in the last article, I completed the basic function of Notepad, that is, adding, deleting, modifying and querying. This paper enhances some functions, which will make the user experience better. After completing this article, you can realize the following effect diagram
text
the functions are written one by one. The first is the view type. The list view is displayed by default, and a grid view is added.
1, Add grid view
create a notebook under the menu package_ settings. XML, the code inside is as follows:
<?xml version="1.0" encoding="utf-8"?>
<menu xmlns:android="http://schemas.android.com/apk/res/android">
    <item
        android:id="@+id/item_view_type"
        android:title="Grid view" />

</menu>
Next, add a new variable in NotebookActivity
	//Menu Item
    private MenuItem itemViewType;

    @Inject
    MVUtils mvUtils;

Use the ActionBar to set the menu. Because there are two views: list view and grid view, we can use a cache to process it and add a Constant in Constant:
	/**
     * Note page view mode
     */
    public static final String NOTEBOOK_VIEW_TYPE = "notebookViewType";
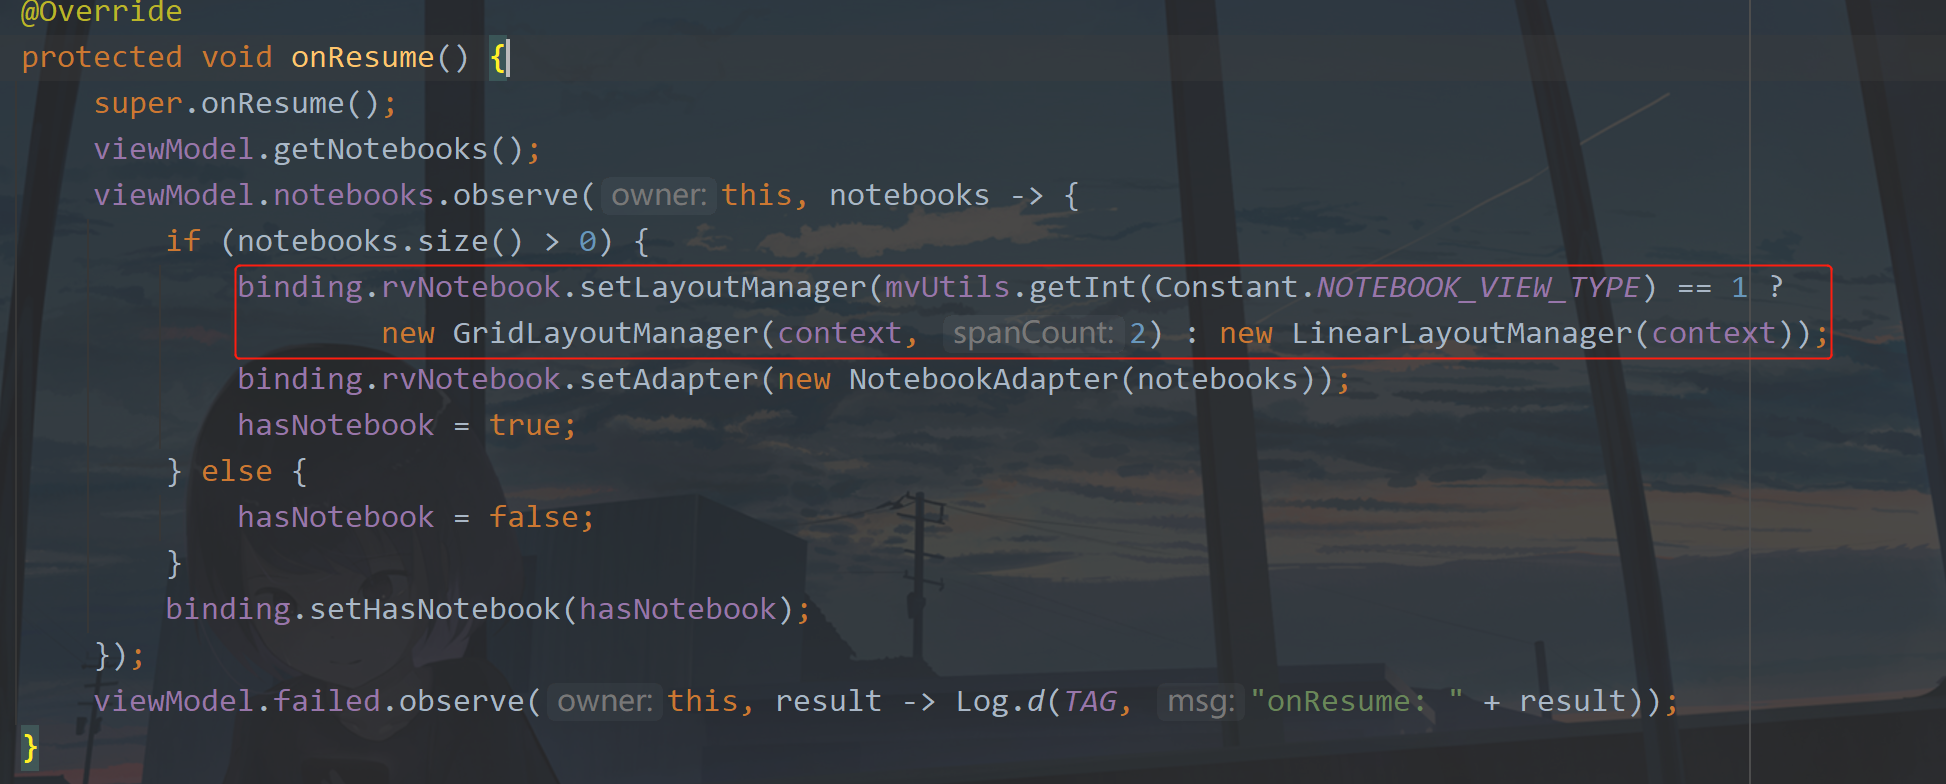
Then we use the cache method to display which view, and modify the code as shown in the following figure:
Next, create a menu in NotebookActivity. The code is as follows:
	@Override
    public boolean onCreateOptionsMenu(Menu menu) {
        getMenuInflater().inflate(R.menu.notebook_settings, menu);
        itemViewType = menu.findItem(R.id.item_view_type).setTitle(mvUtils.getInt(Constant.NOTEBOOK_VIEW_TYPE) == 1 ? "List view" : "Grid view");
        return super.onCreateOptionsMenu(menu);
    }
Is an item. Set different item titles according to different types.
Then there is the menu item click event, and the added code is as follows:
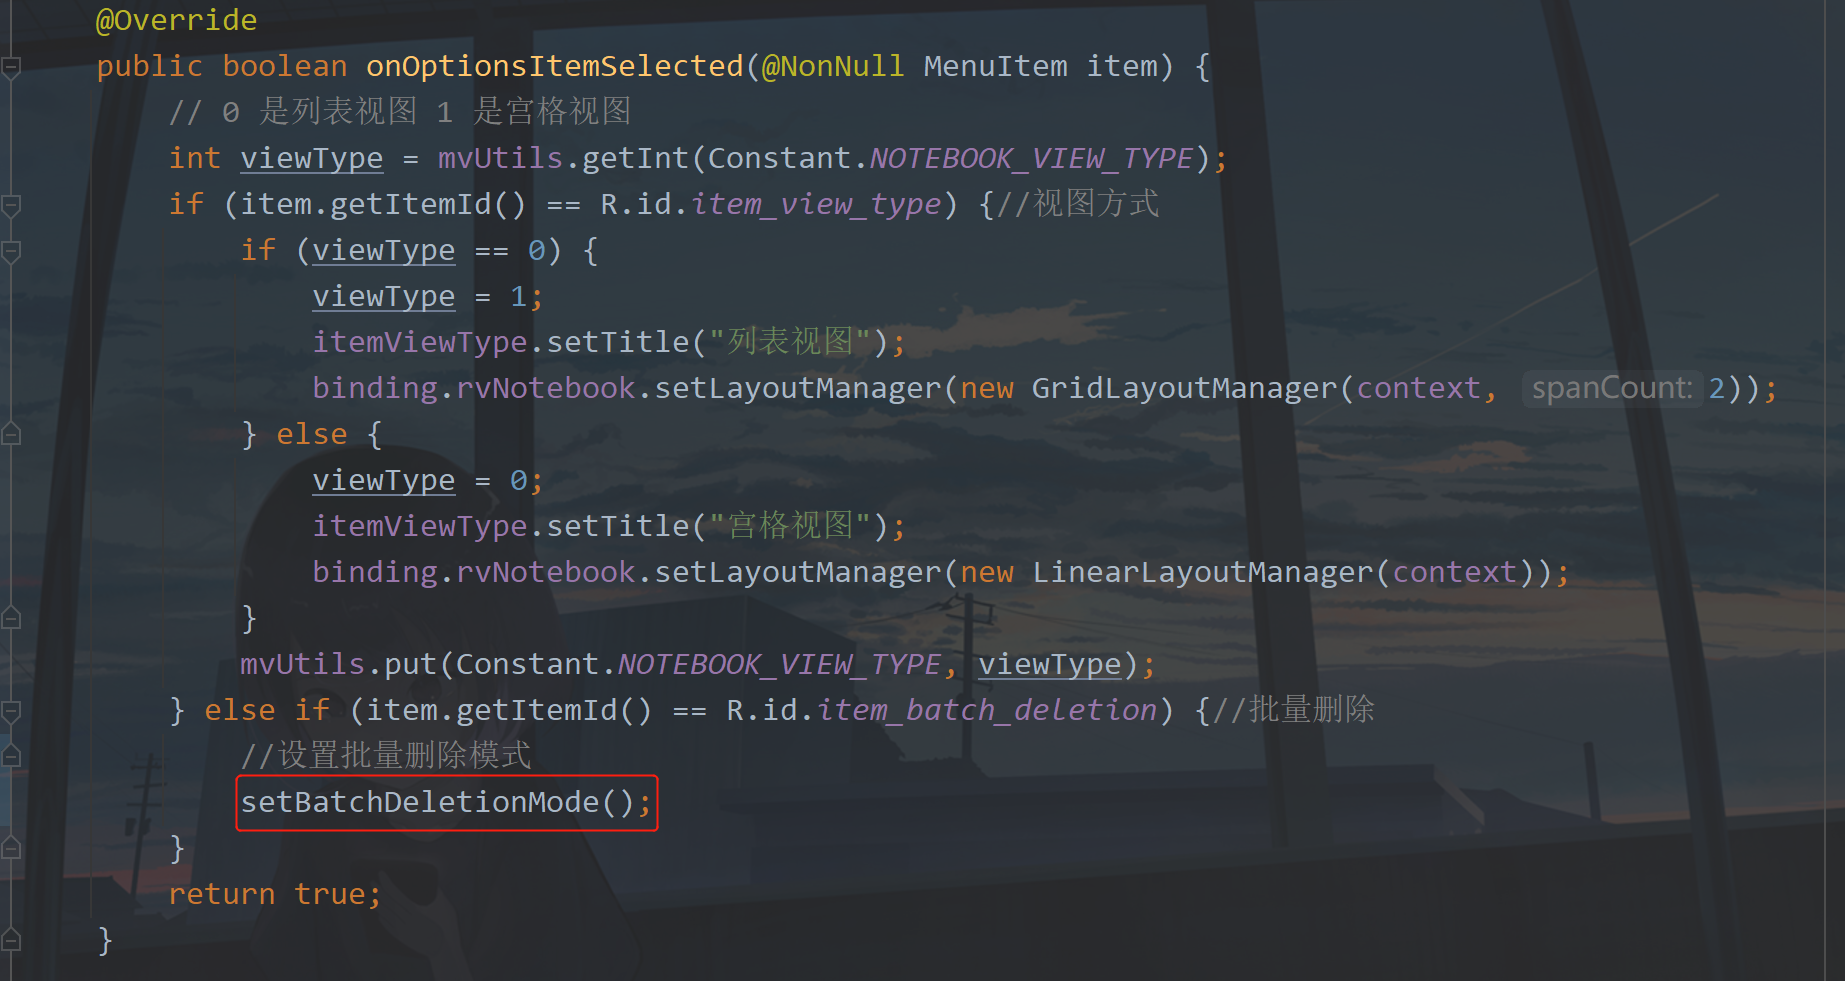
	@Override
    public boolean onOptionsItemSelected(@NonNull MenuItem item) {
        // 0 is a list view and 1 is a grid view
        int viewType = mvUtils.getInt(Constant.NOTEBOOK_VIEW_TYPE);
        if (item.getItemId() == R.id.item_view_type) {//View mode
            if (viewType == 0) {
                viewType = 1;
                itemViewType.setTitle("List view");
                binding.rvNotebook.setLayoutManager(new GridLayoutManager(context, 2));
            } else {
                viewType = 0;
                itemViewType.setTitle("Grid view");
                binding.rvNotebook.setLayoutManager(new LinearLayoutManager(context));
            }
            mvUtils.put(Constant.NOTEBOOK_VIEW_TYPE, viewType);
        }
        return true;
    }
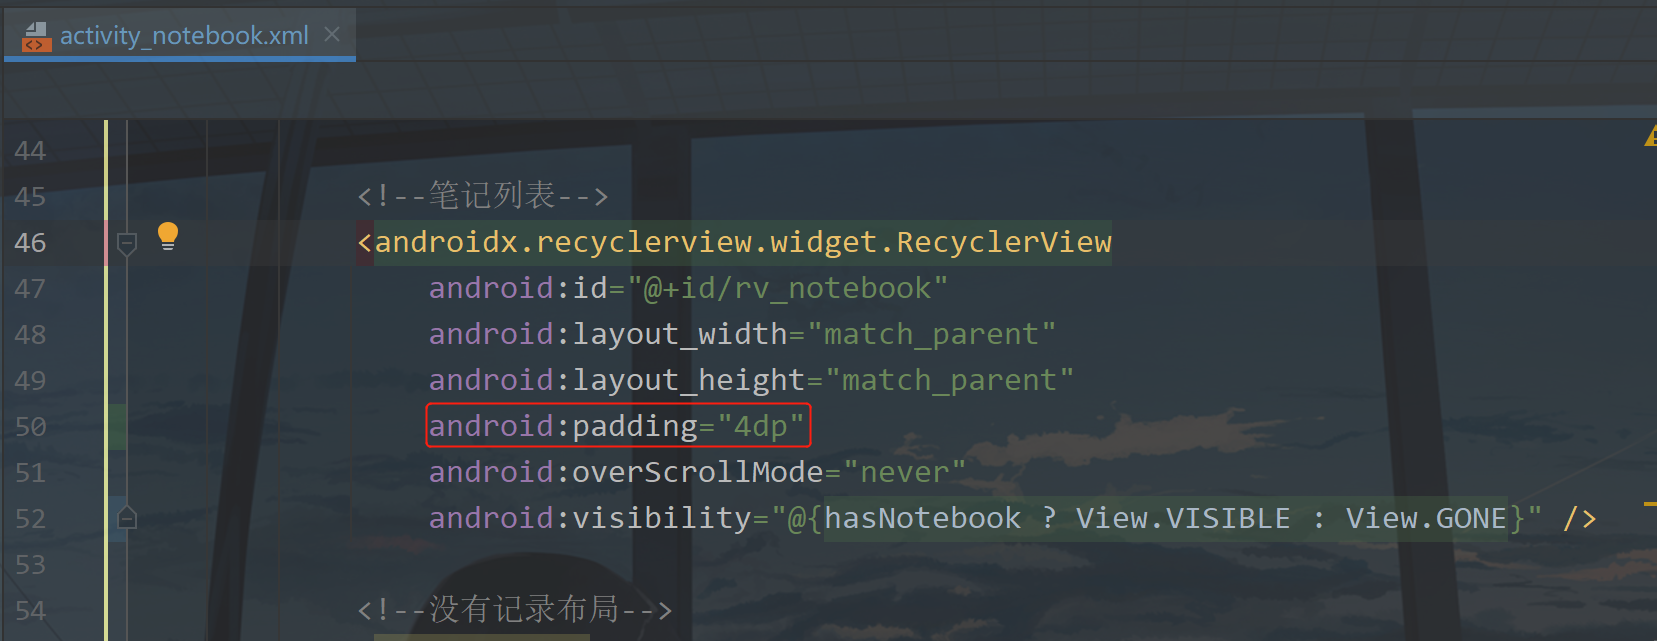
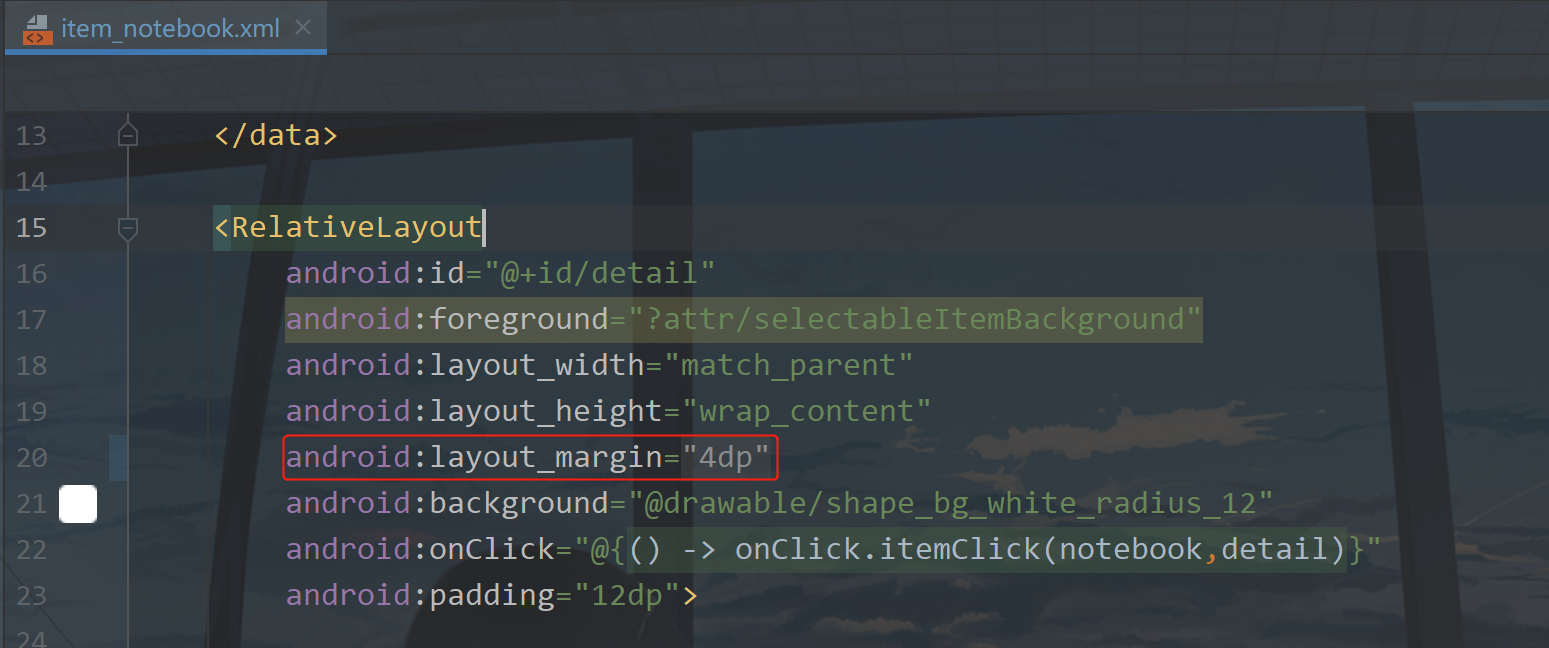
Finally, in order to make the item display better, you need to modify the layout and activity_notebook.xml, as shown in the following figure:
Then in item_ notebook. Modify the margins of the layout in XML
Run the following:
2, Batch delete
although there are deletions now, they are deleted one by one. If I am in a bad mood one day, I have 100 notes, and deleting them one by one is not very friendly. Users will crazy pick up programmers. What is not humanized at all, so we also need to make a batch deletion for this point, which is very necessary. So how to do it? The first thing to do is to change the UI, which is the first point.
① Menu modification
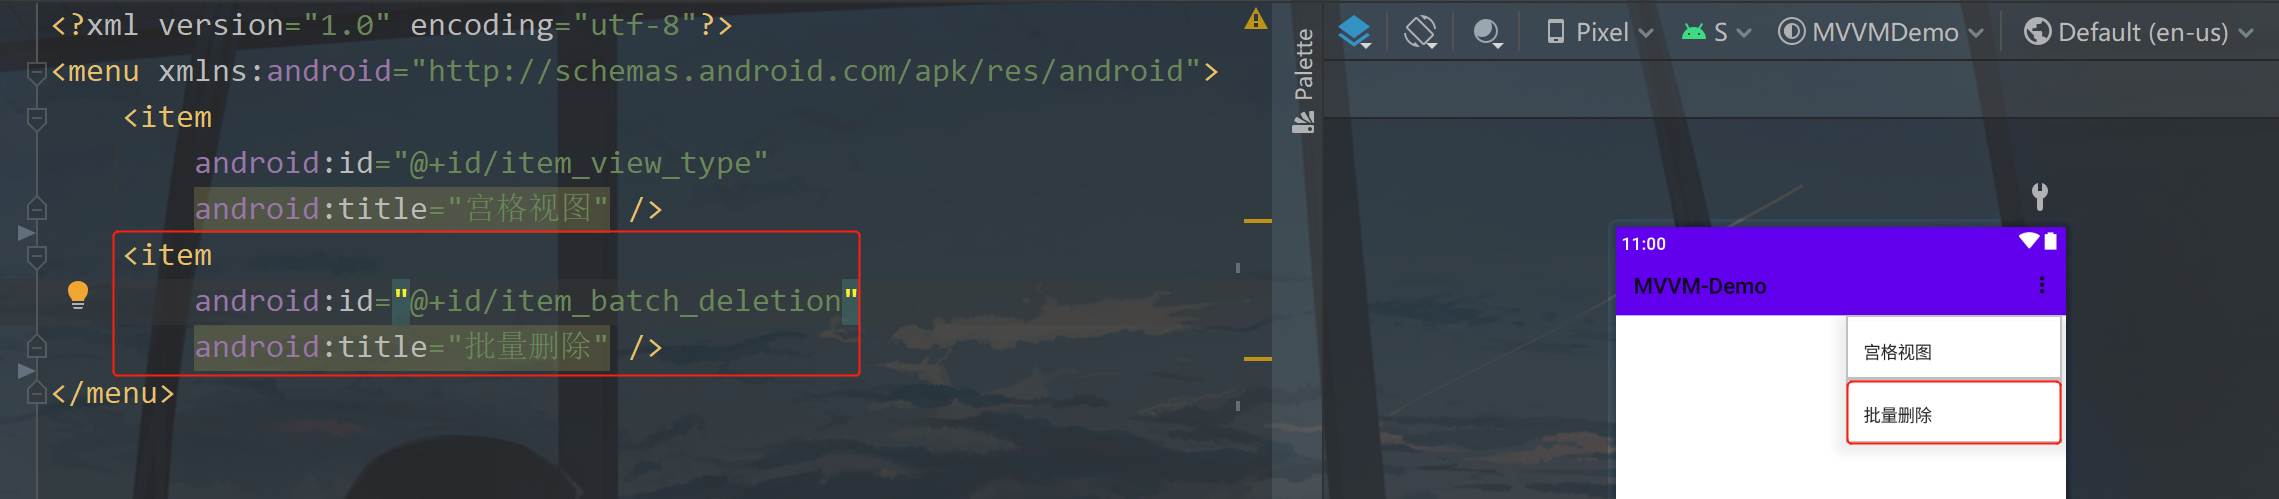
to modify the menu, the first step is to add an entry for batch deletion. At present, the menu has only one item, which is used to switch the list view. Here, it is in the notebook_ settings. Add an item to the XML, as shown in the following figure:
Then go back to NotebookActivity,
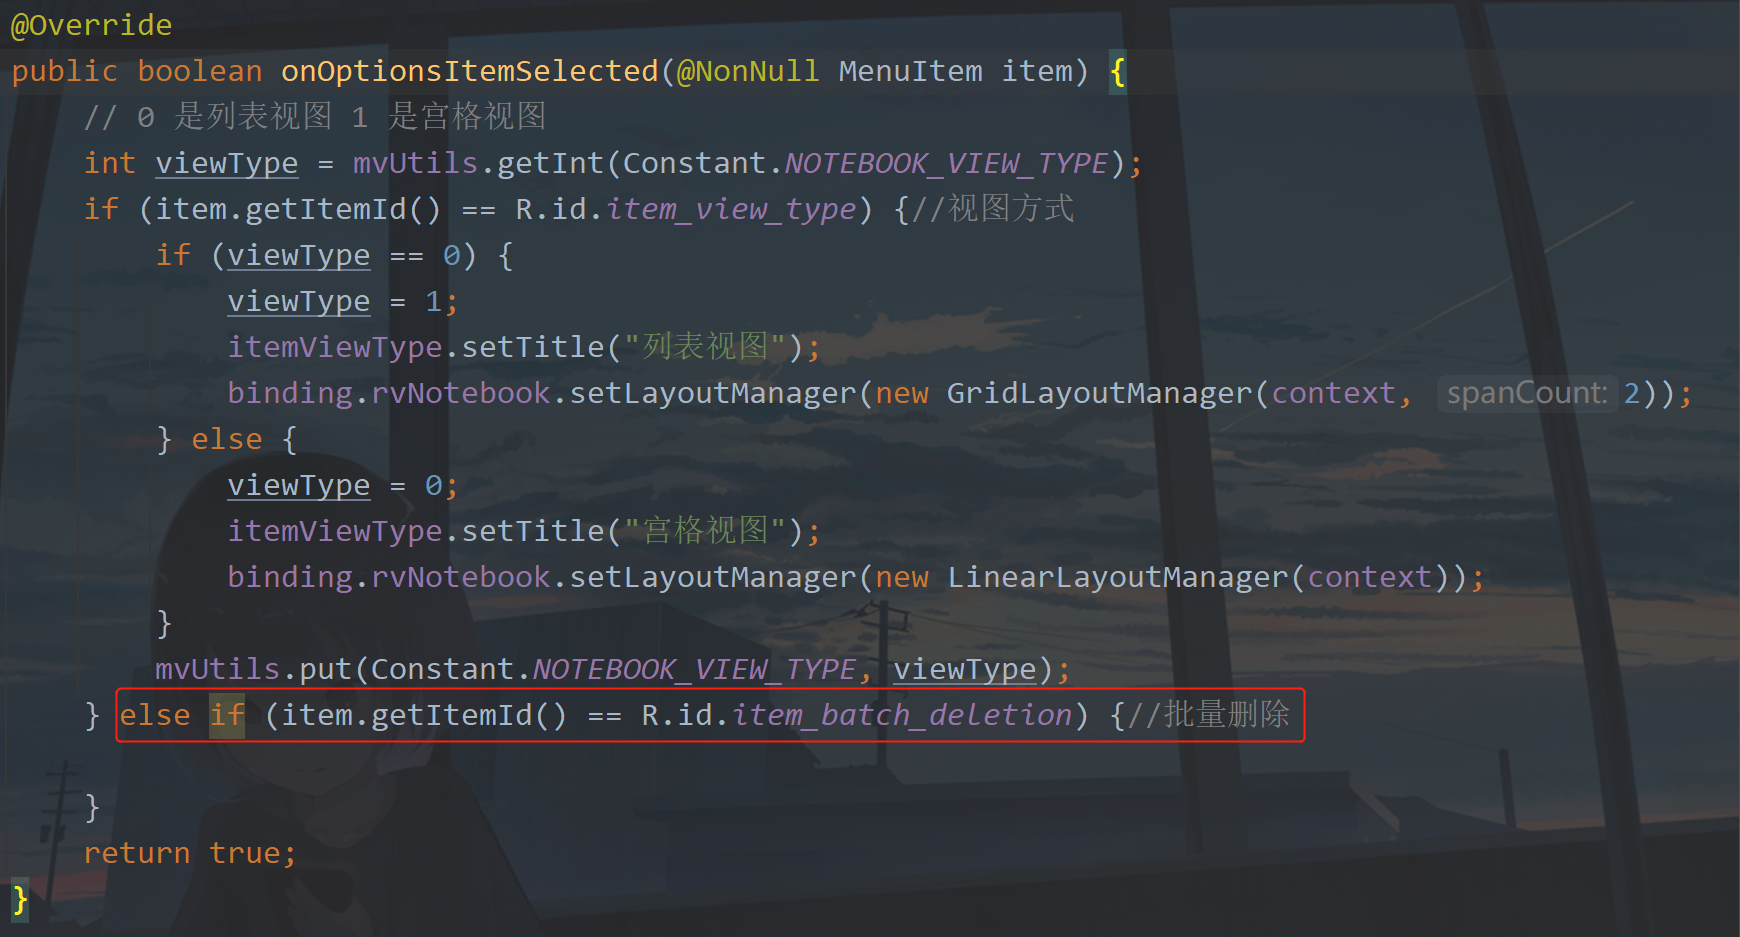
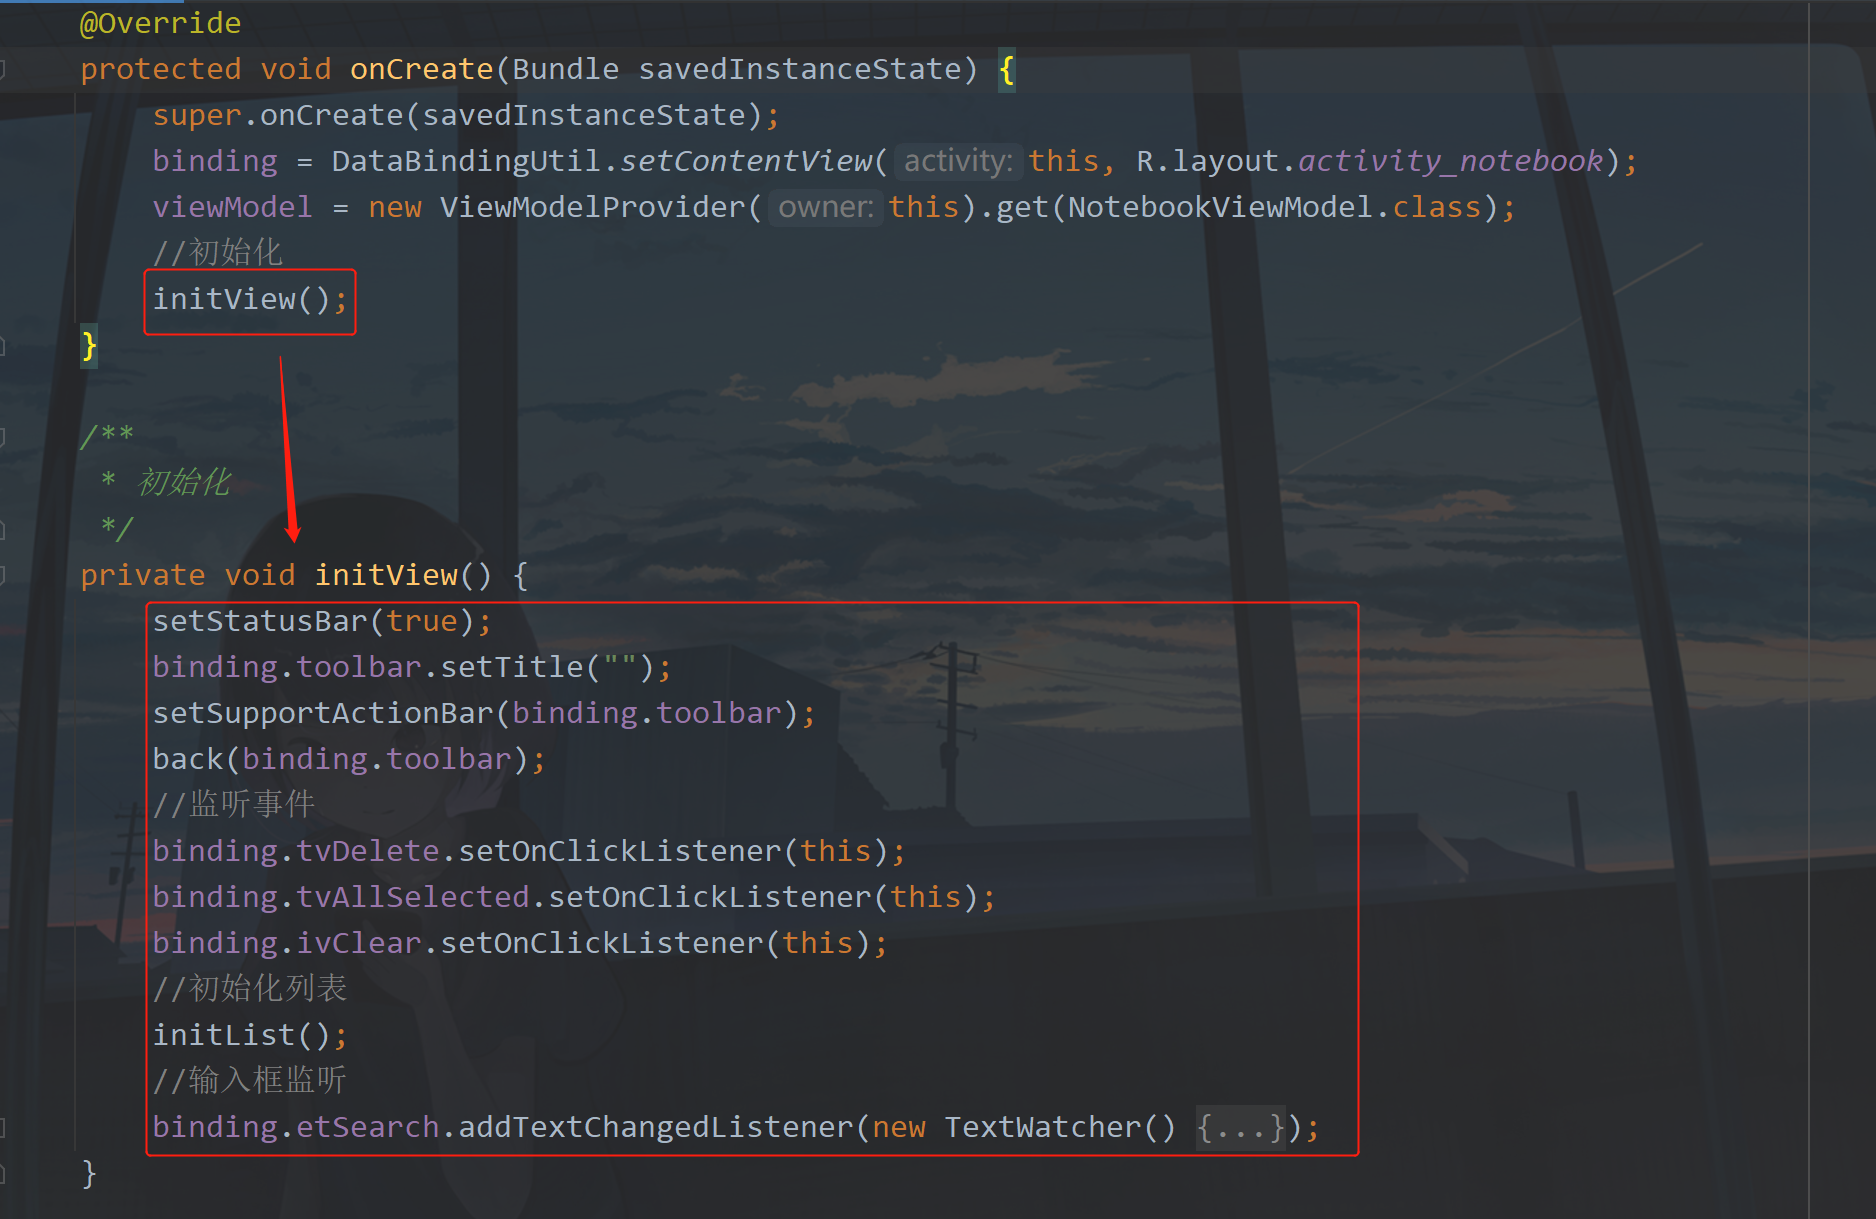
Add click processing. Click here to switch the mode of the current page and modify the layout UI.
② UI modification
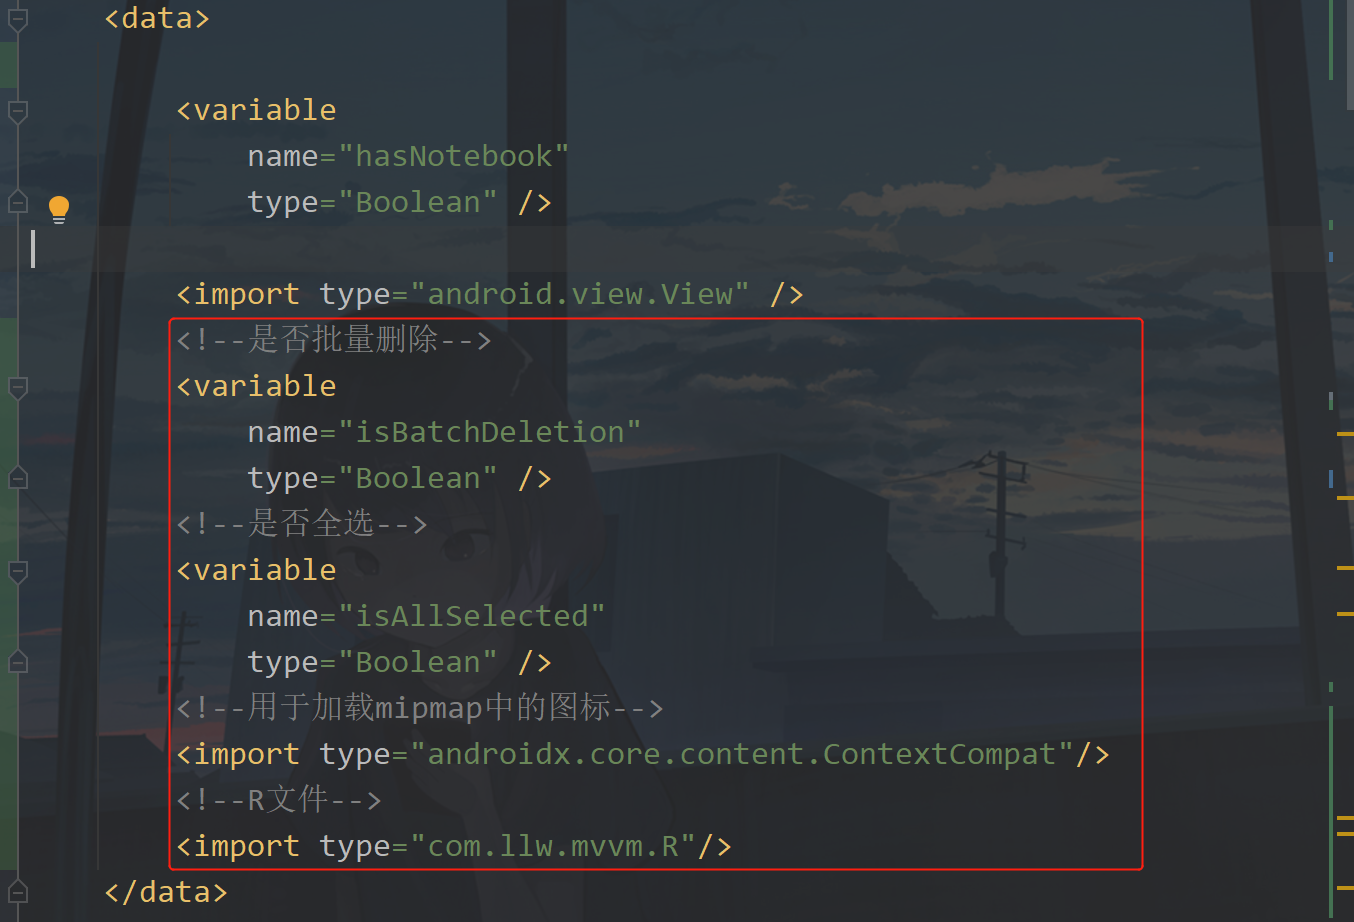
In activity_ notebook. Add variable data in data in xml, because you need to change the icon, text and text color of the layout through xml.
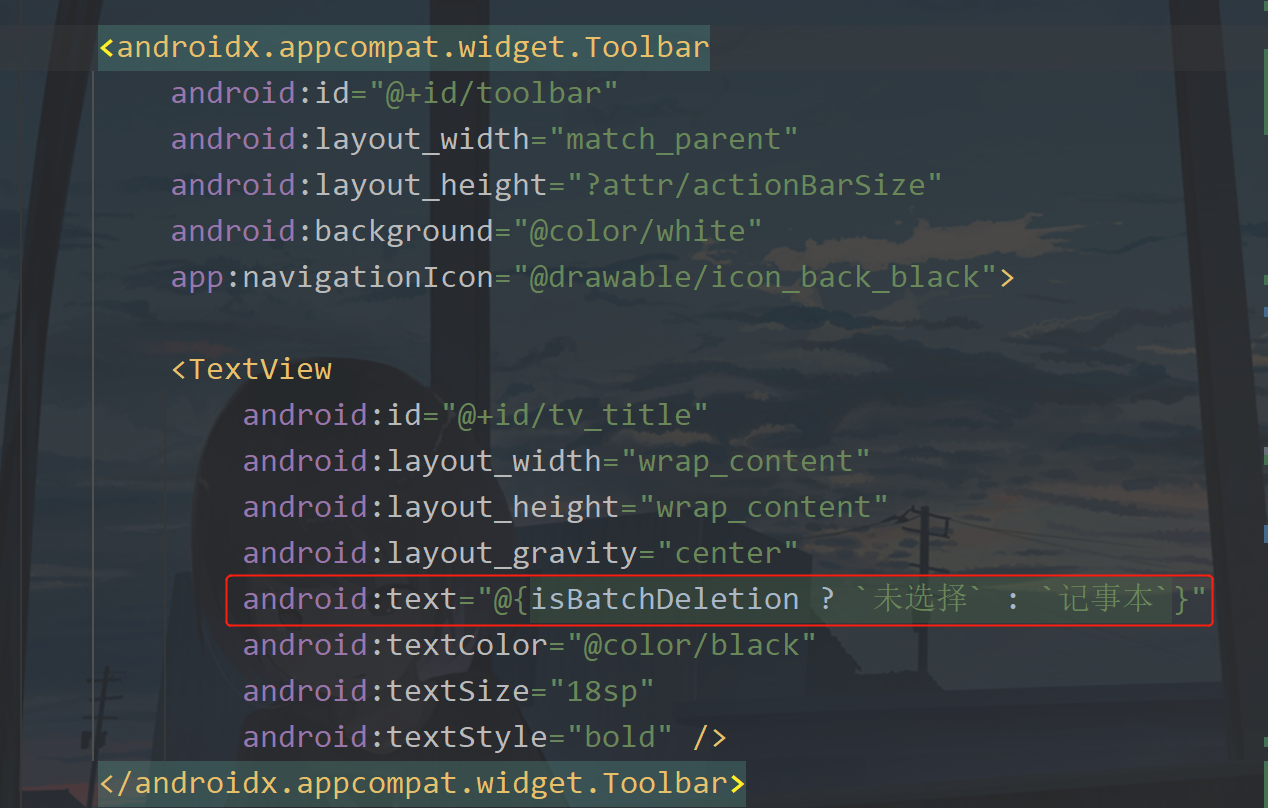
When batch deletion is triggered, first modify the title:
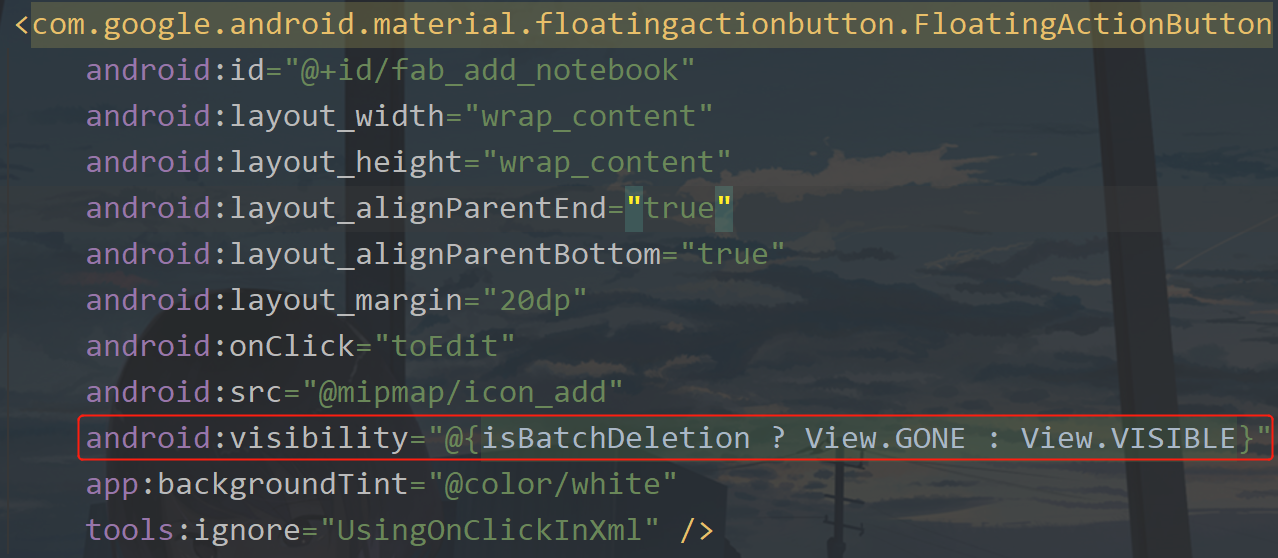
Secondly, hide the floating button:
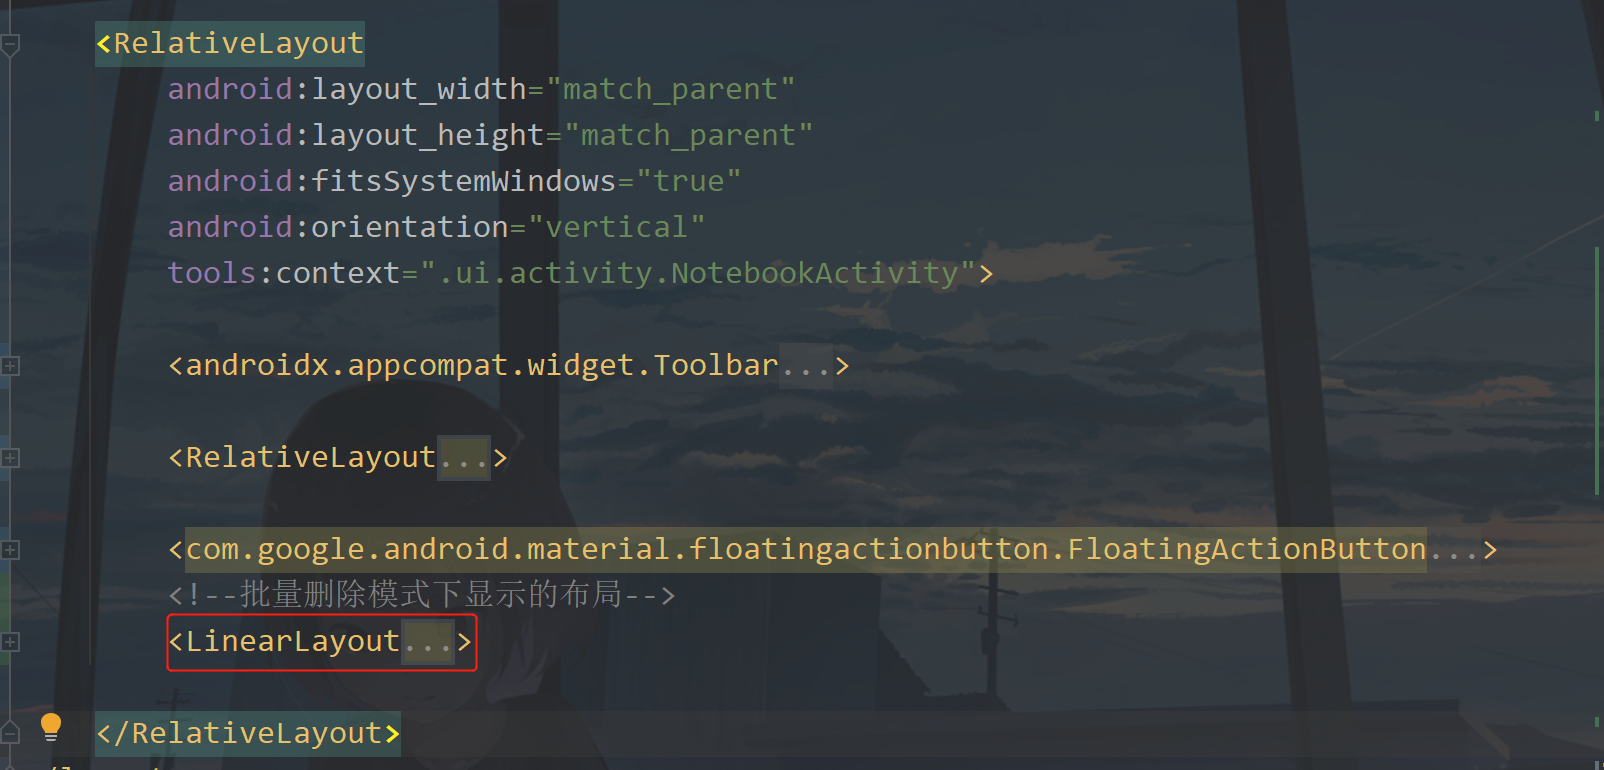
Finally, add a layout at the bottom of the page, which includes deletion and multiple selection:
		<!--Delete layout in batch display mode-->
        <LinearLayout
            android:layout_width="match_parent"
            android:layout_height="?attr/actionBarSize"
            android:layout_alignParentBottom="true"
            android:background="@color/white"
            android:gravity="center_vertical"
            android:visibility="@{isBatchDeletion ? View.VISIBLE : View.GONE}">

            <TextView
                android:id="@+id/tv_delete"
                android:layout_width="0dp"
                android:layout_height="wrap_content"
                android:layout_weight="1"
                android:drawableTop="@mipmap/ic_delete"
                android:gravity="center"
                android:text="delete"
                android:textColor="@color/black" />
            <TextView
                android:id="@+id/tv_all_selected"
                android:layout_width="0dp"
                android:layout_height="wrap_content"
                android:layout_weight="1"
                android:drawableTop="@{isAllSelected ? ContextCompat.getDrawable(tvAllSelected.getContext(),R.mipmap.ic_all_selected) : ContextCompat.getDrawable(tvAllSelected.getContext(),R.mipmap.ic_all_select)}"
                android:gravity="center"
                android:text="@{isAllSelected ? `Deselect all` : `Select all`}"
                android:textColor="@{isAllSelected ? @color/purple_500 : @color/black}" />
        </LinearLayout>
Take the icon from my source code and add it in the following figure:
Now the page has been modified, and the layout of item also needs to be changed. Open item_notebook.xml, add variable data code:
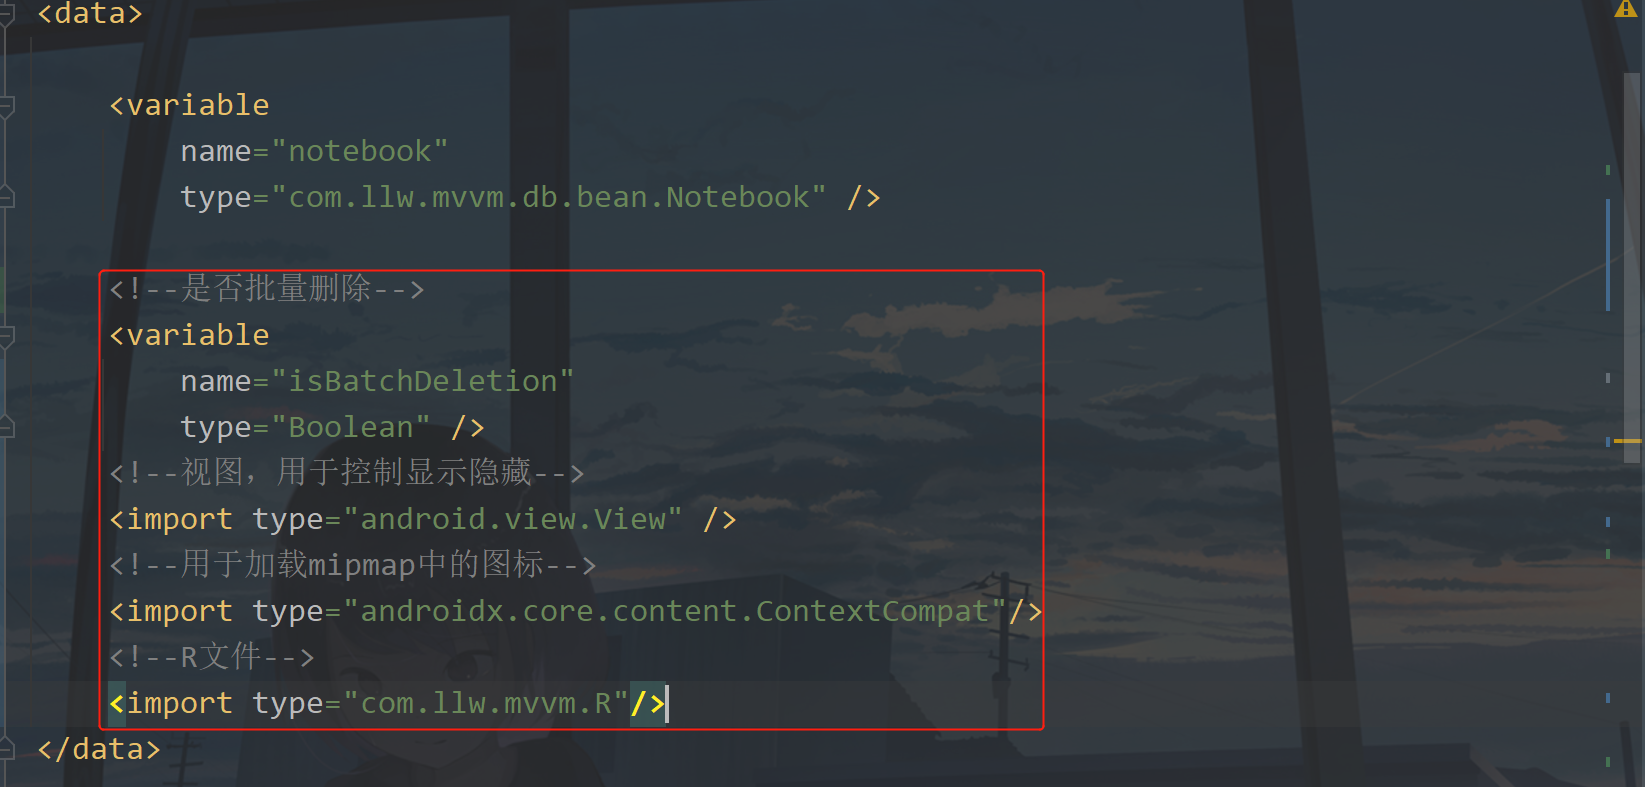
Here you will see that I have removed the click event of this item, and I will move this part of the code to NoteActivity, so I need to modify the item here_ notebook. Code in XML:
<?xml version="1.0" encoding="utf-8"?>
<layout xmlns:android="http://schemas.android.com/apk/res/android">

    <data>

        <variable
            name="notebook"
            type="com.llw.mvvm.db.bean.Notebook" />

        <!--Delete in batch-->
        <variable
            name="isBatchDeletion"
            type="Boolean" />
        <!--View to control display and hide-->
        <import type="android.view.View" />
        <!--For loading mipmap Icons in-->
        <import type="androidx.core.content.ContextCompat"/>
        <!--R file-->
        <import type="com.llw.mvvm.R"/>
    </data>

    <RelativeLayout
        android:layout_width="match_parent"
        android:layout_height="wrap_content"
        android:layout_margin="@dimen/dp_4"
        android:background="@drawable/shape_bg_white_radius_12"
        android:foreground="?attr/selectableItemBackground"
        android:padding="12dp">

        <TextView
            android:id="@+id/tv_title"
            android:layout_width="match_parent"
            android:layout_height="wrap_content"
            android:layout_toStartOf="@+id/iv_check"
            android:ellipsize="end"
            android:singleLine="true"
            android:text="@{notebook.title}"
            android:textColor="@color/black"
            android:textSize="16sp" />

        <TextView
            android:id="@+id/tv_content"
            android:layout_width="match_parent"
            android:layout_height="wrap_content"
            android:layout_below="@+id/tv_title"
            android:layout_marginTop="4dp"
            android:layout_toStartOf="@+id/iv_check"
            android:ellipsize="end"
            android:maxLines="3"
            android:text="@{notebook.content}"
            android:textSize="14sp" />

        <ImageView
            android:id="@+id/iv_check"
            android:layout_width="24dp"
            android:layout_height="24dp"
            android:layout_alignParentEnd="true"
            android:layout_centerVertical="true"
            android:layout_marginStart="6dp"
            android:src="@{notebook.select ? ContextCompat.getDrawable(ivCheck.getContext(),R.mipmap.ic_selected) : ContextCompat.getDrawable(ivCheck.getContext(),R.mipmap.ic_select)}"
            android:visibility="@{isBatchDeletion ? View.VISIBLE : View.GONE}" />
    </RelativeLayout>
</layout>
It's the same as before. Take the icon from my source code.
③ Adapter modification
After the item layout is changed, the following is the NotebookAdapter adapter.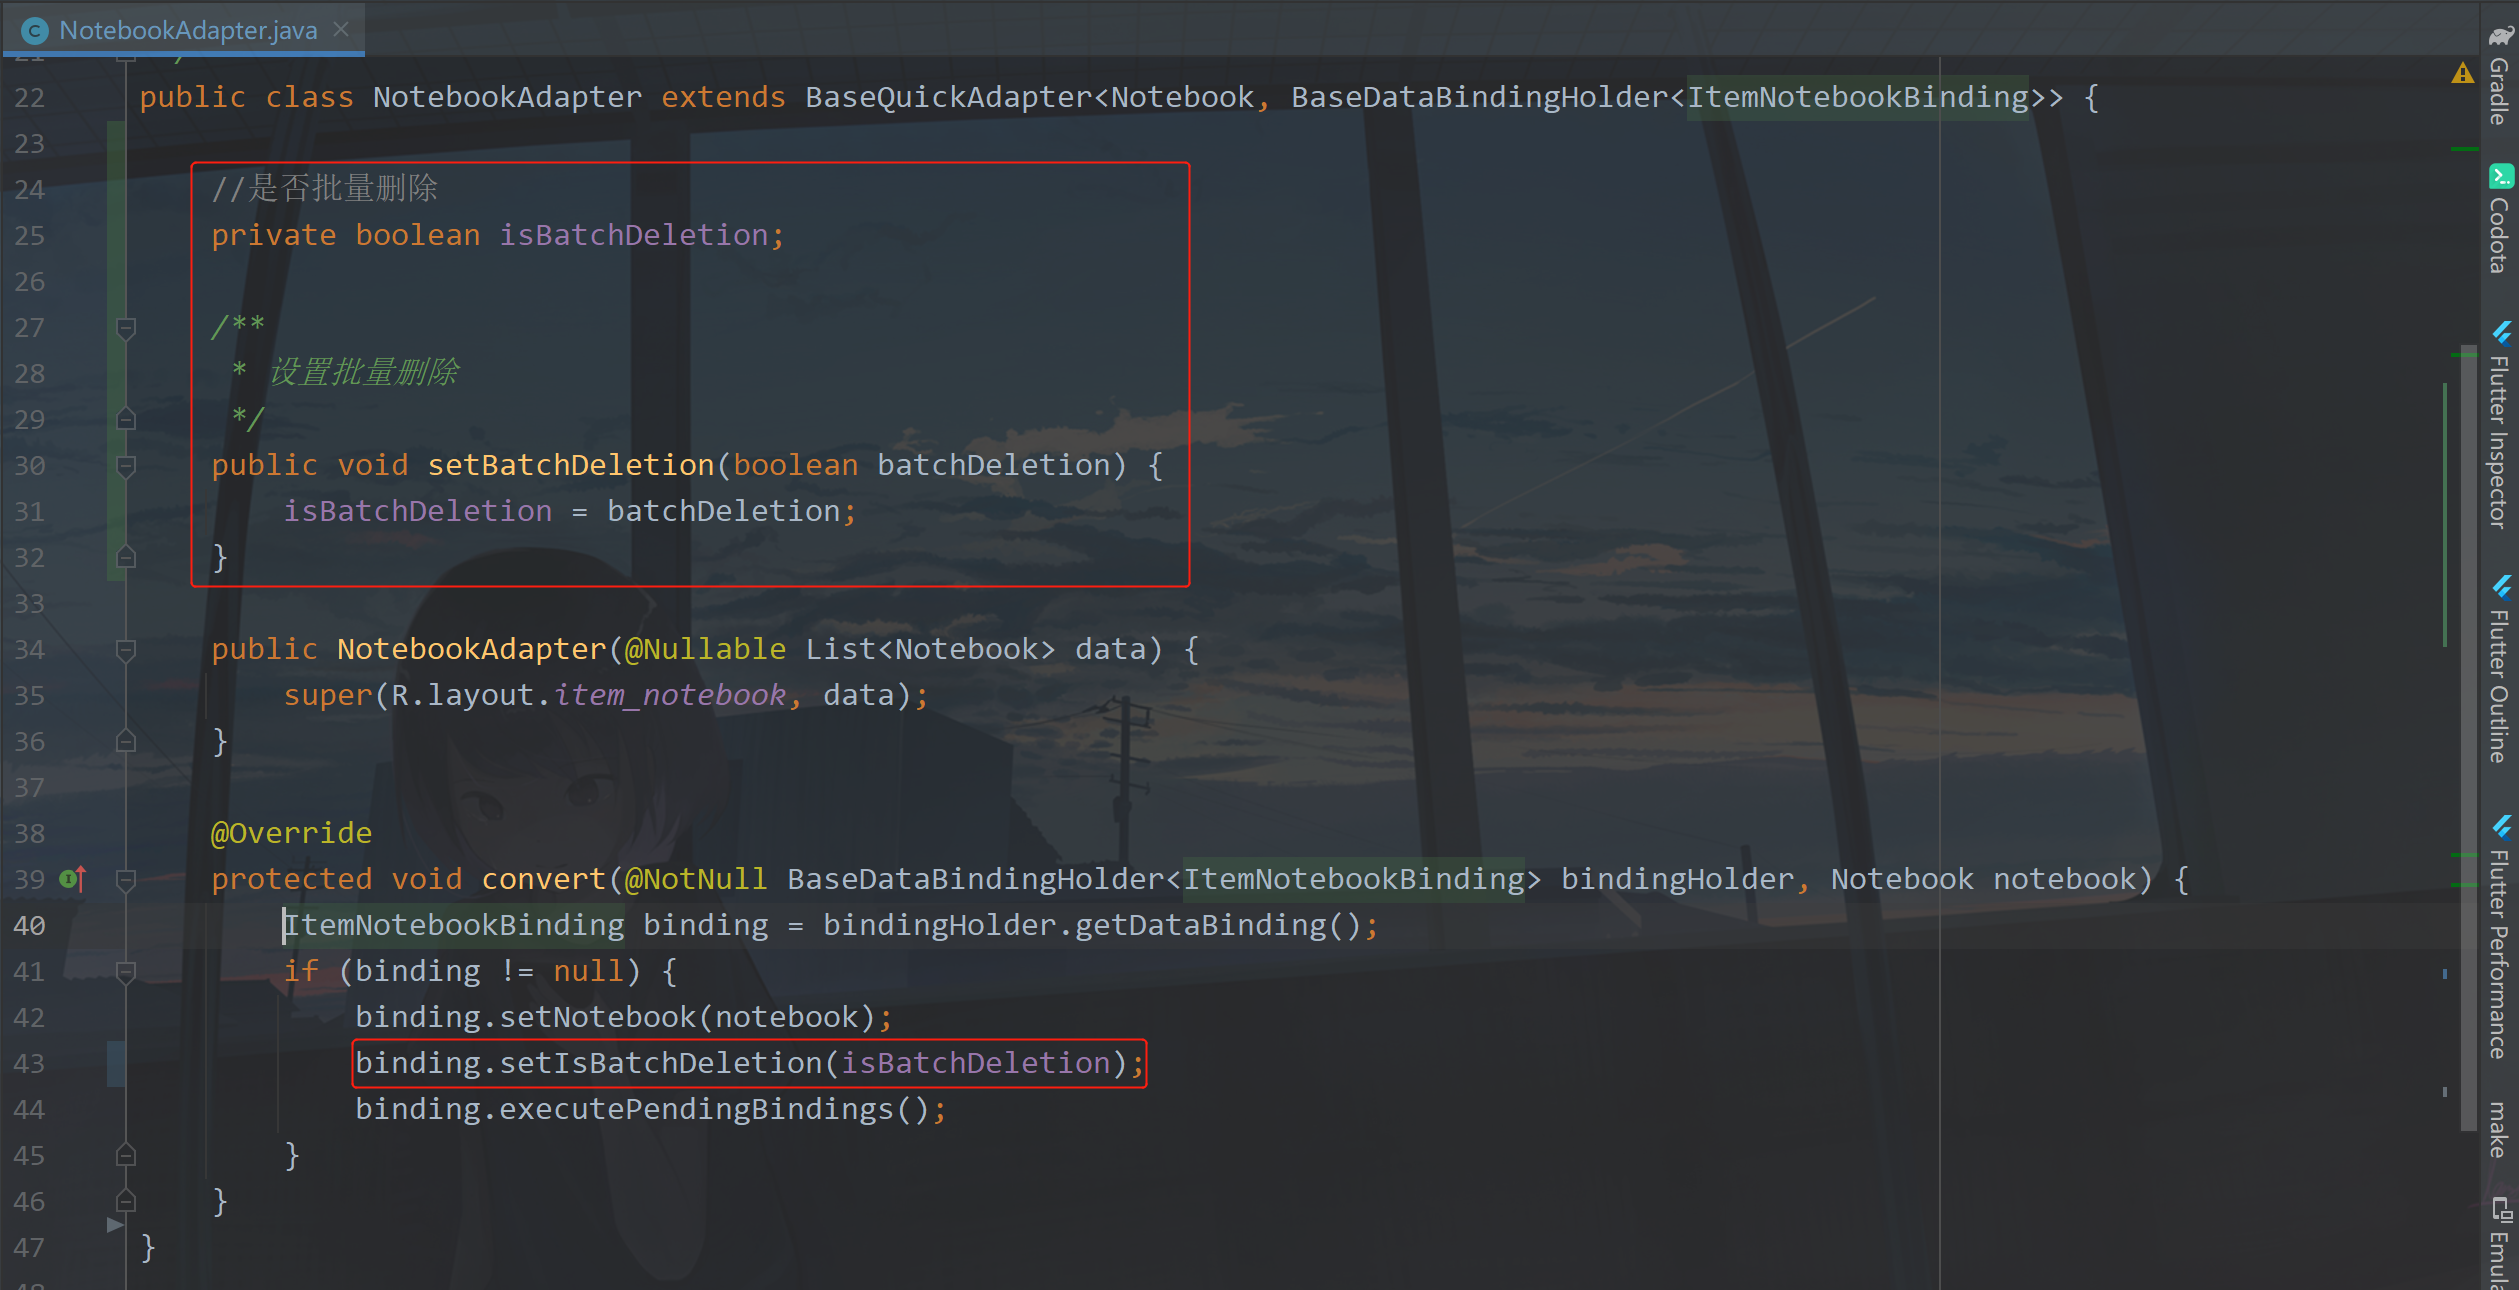
Here I remove the internal class of click event written before.
④ Modify delete method
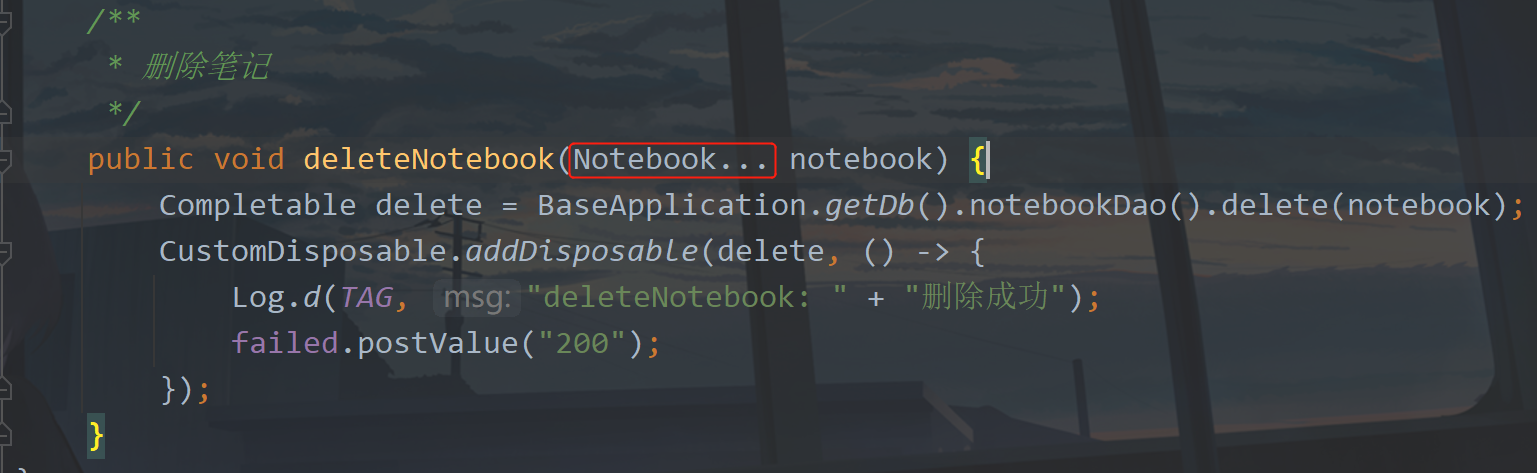
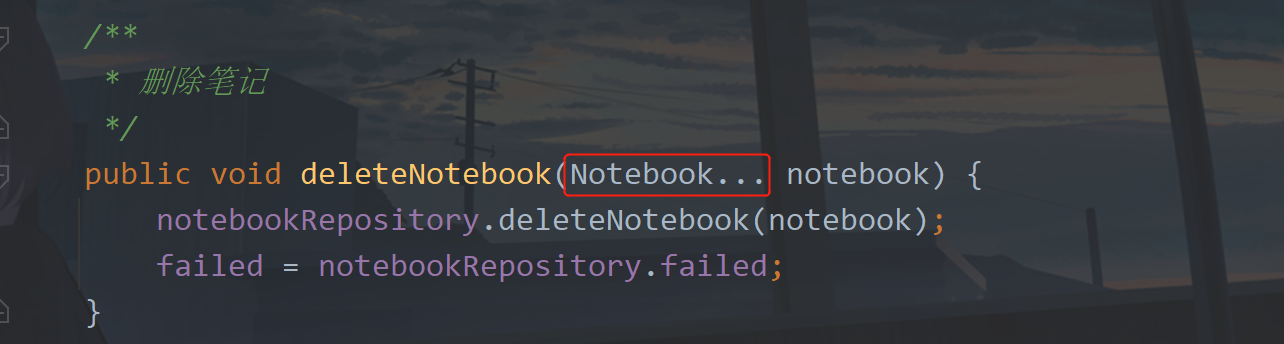
the deletion method in NotebookDao written before is to delete a single note. What if you want to delete multiple notes? Here we change it to dynamic parameters.

Just add three points later. This means that you can take one note and multiple notes. Next, modify the parameters of the deleteNotebook method in the NotebookRepository,
Then modify the parameters in the deleteNotebook method in the NotebookViewModel.
⑤ List processing
now only the code in NotebookActivity is left. First, add variables in NotebookActivity. The code is as follows:
	//Note adapter
    private NotebookAdapter notebookAdapter;
    //Note List
    private final List<Notebook> mList = new ArrayList<>();
    //Delete in batch
    private boolean isBatchDeletion = false;
    //Select all
    private boolean isAllSelected;
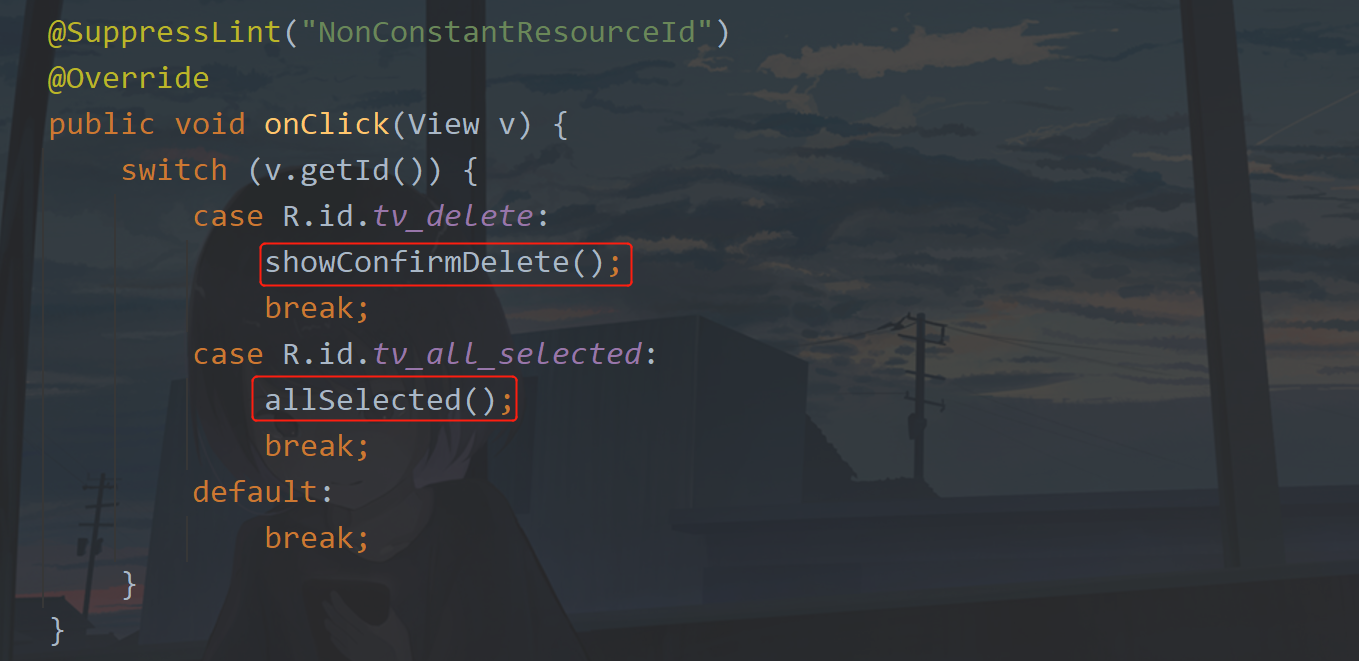
Realize the click monitoring of the page.

Control listening

Override the onClick method.
	@Override
    public void onClick(View v) {
        switch (v.getId()) {
            case R.id.tv_delete:

                break;
            case R.id.tv_all_selected:

                break;
            default:
                break;
        }
    }
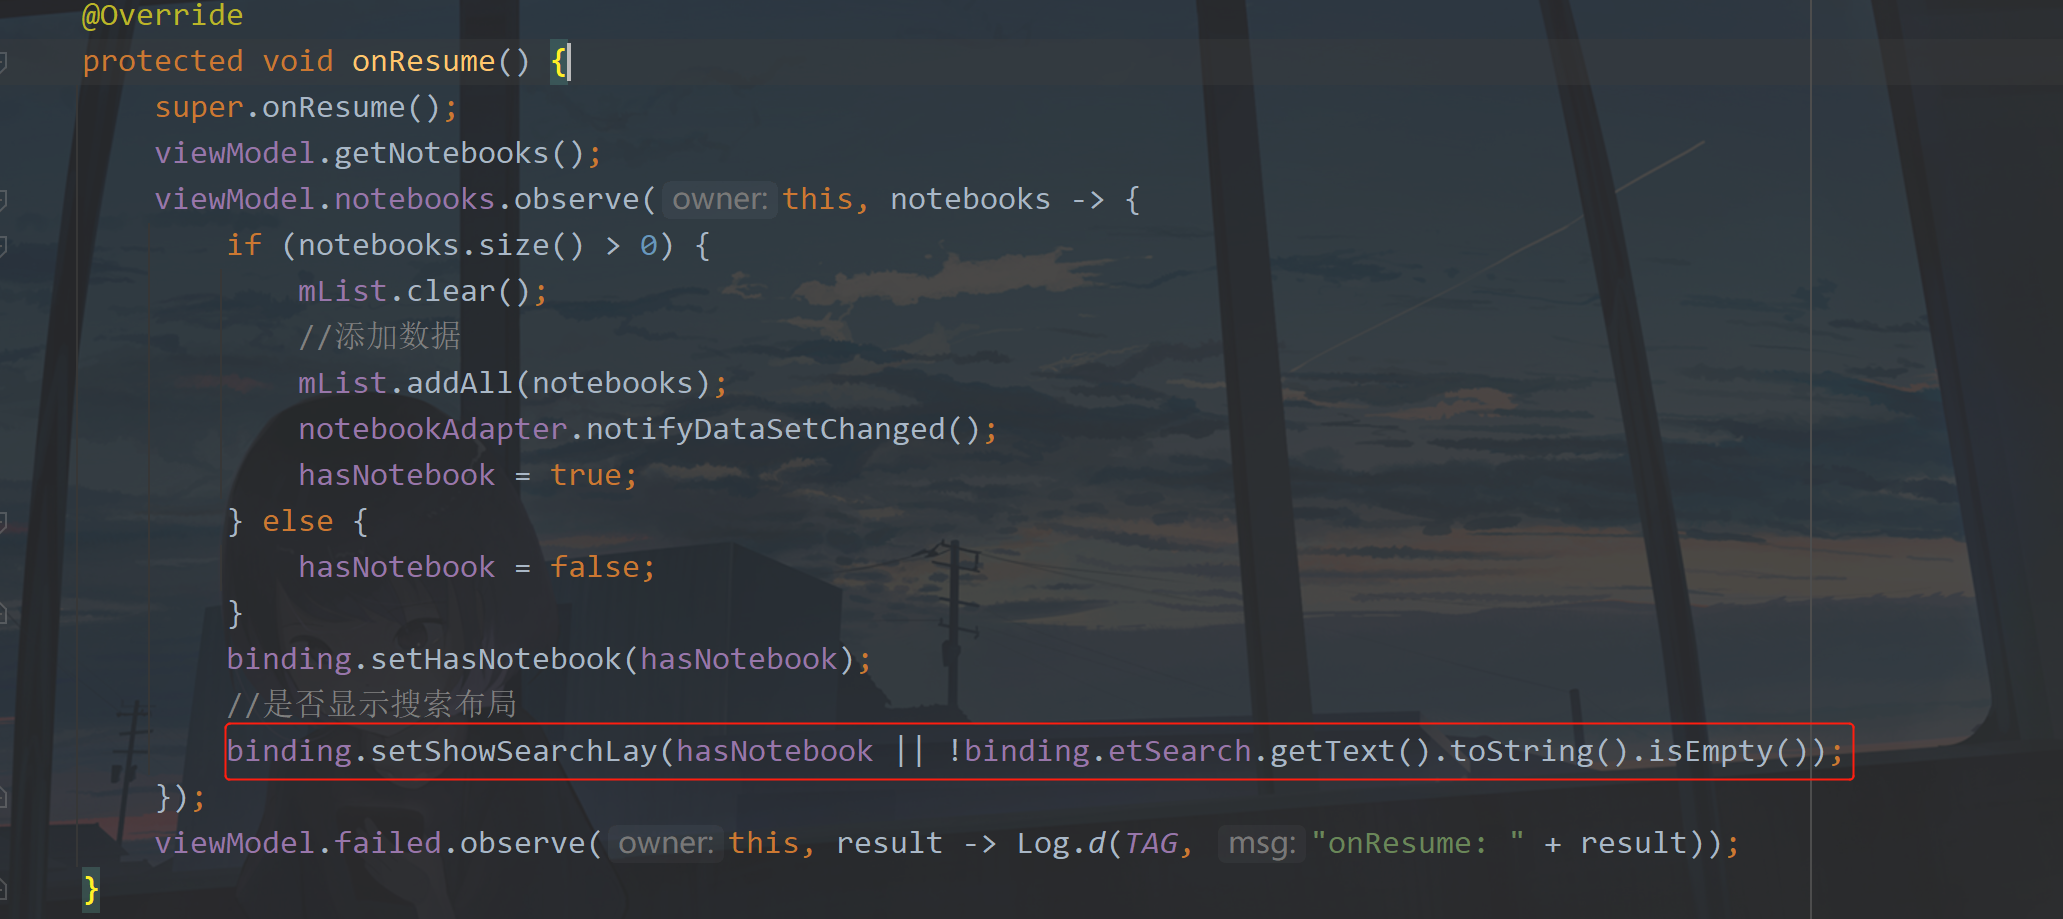
Here, click on two textviews in the bottom layout of the page, one for deletion and one for selecting all and canceling all. The processing events of these two buttons should be ignored first. Let's modify the code in onResume first:
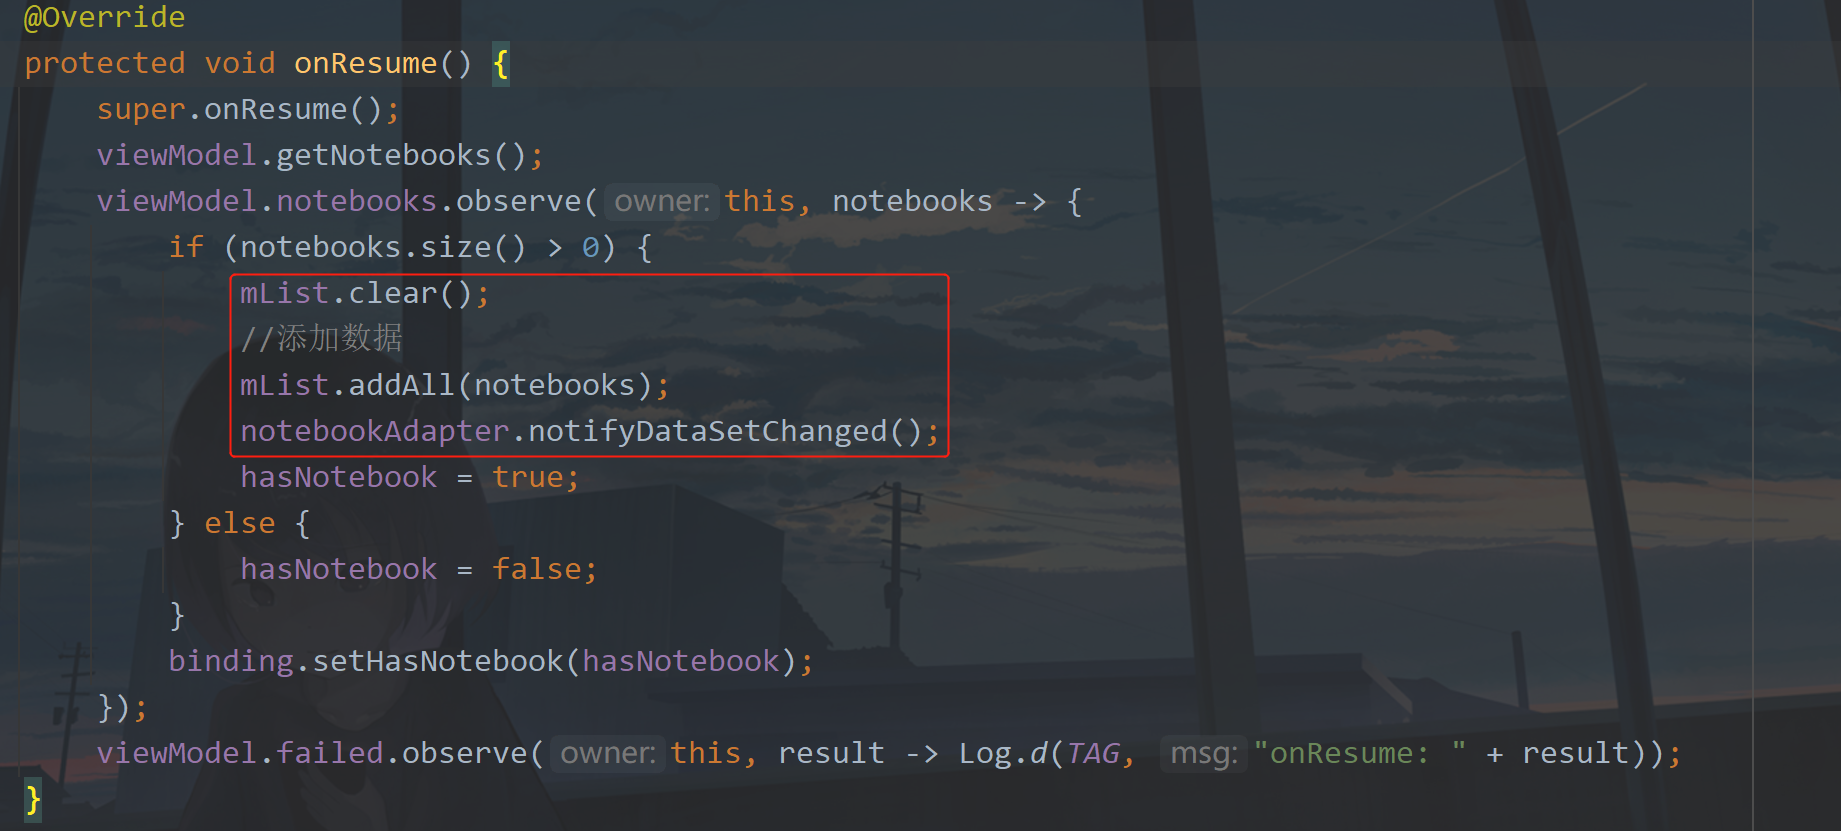
I wrote the previous code here into a method and created a new initList method.
	/**
     * Initialization list
     */
    private void initList() {
        //Adapter
        notebookAdapter = new NotebookAdapter(mList);
        //Set up adapter
        binding.rvNotebook.setAdapter(notebookAdapter);
        binding.rvNotebook.setLayoutManager(mvUtils.getInt(Constant.NOTEBOOK_VIEW_TYPE) == 1 ?
                new GridLayoutManager(context, 2) : new LinearLayoutManager(context));
        //item click event
        notebookAdapter.setOnItemClickListener((adapter, view, position) -> {
            if (isBatchDeletion) {
                //Selected device
                mList.get(position).setSelect(!mList.get(position).isSelect());
                notebookAdapter.notifyDataSetChanged();
                //Modify page title
                changeTitle();
            } else {
                Intent intent = new Intent(NotebookActivity.this, EditActivity.class);
                intent.putExtra("uid", mList.get(position).getUid());
                startActivity(intent);
            }
        });
    }
There is also a way to modify the page title, that is, when you select notes, you will record the number of choices.
	/**
     * Modify title
     */
    private void changeTitle() {
        int selectedNum = 0;
        for (Notebook notebook : mList) {
            if (notebook.isSelect()) {
                selectedNum++;
            }
        }
        Log.e(TAG, "changeTitle: " + selectedNum);
        binding.tvTitle.setText("Selected "+ selectedNum +" term");
        binding.setIsAllSelected(selectedNum == mList.size());
    }
The initList method just now was invoked in onCreate.

The following is the method called when you click batch delete item s in the menu. The new method is as follows:
/**
* Set batch deletion mode
*/
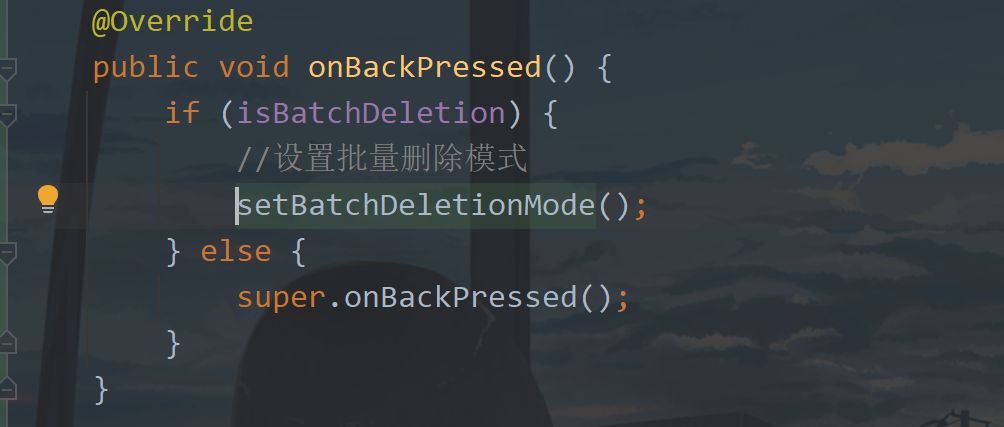
private void setBatchDeletionMode() {
//Enter batch deletion mode
isBatchDeletion = !isBatchDeletion;
//Set current page
binding.setIsBatchDeletion(isBatchDeletion);
if (!isBatchDeletion) {
//Uncheck all
for (Notebook notebook : mList) {
notebook.setSelect(false);
}
}
//Set up adapter
notebookAdapter.setBatchDeletion(isBatchDeletion);
notebookAdapter.notifyDataSetChanged();
}
this method first changes the current batch delete variable, and then sets it to xml. If it is false, you exit the batch delete mode, and the previously selected notes should also be deselected. Finally, set the changes in the adapter, and then refresh the adapter. The place where the method is called is shown in the following figure:
Because the page will enter the batch deletion mode, if the page returns at this time, this method will also be called.
The following are the methods to delete and select all / deselect all. I want to write about it. First, delete it.
⑥ Delete notes
because multiple notes are deleted, we need to pop up a window to prompt the user. The new code is as follows:
	/**
     * The confirm deletion pop-up window is displayed
     */
    private void showConfirmDelete() {
        AlertDialog.Builder builder = new AlertDialog.Builder(this).setMessage("Are you sure you want to delete the selected notes?")
                .setPositiveButton("determine", (dialog, which) -> {
                    dialog.dismiss();
                    List<Notebook> notebookList = new ArrayList<>();
                    //Delete selected notes
                    for (Notebook notebook : mList) {
                        if (notebook.isSelect()) {
                            notebookList.add(notebook);
                        }
                    }
                    Notebook[] notebooks = notebookList.toArray(new Notebook[0]);
                    viewModel.deleteNotebook(notebooks);
                    //Set batch deletion mode
                    setBatchDeletionMode();
                    //Request data
                    viewModel.getNotebooks();
                })
                .setNegativeButton("cancel", (dialog, which) -> dialog.dismiss());
        builder.create().show();
    }
the main method here is to add the selected notes to the list, and then transfer the list to the note array. The array can be passed into the method as a dynamic parameter. After deletion, of course, we need to turn off the batch deletion mode. Finally, let's query the notes in the database.
⑦ Select all
	/**
     * Select all / deselect all
     */
    private void allSelected() {
        isAllSelected = !isAllSelected;
        //Set up adapter
        for (Notebook notebook : mList) {
            notebook.setSelect(isAllSelected);
        }
        //Modify page title
        changeTitle();
        //Set current page
        binding.setIsAllSelected(isAllSelected);
        //Refresh adapter
        notebookAdapter.notifyDataSetChanged();
    }
The last is where the method is called:
The code is basically finished. When you write it, you finally smooth out the logic and run it below.
This batch deletion is OK, which is relatively troublesome.
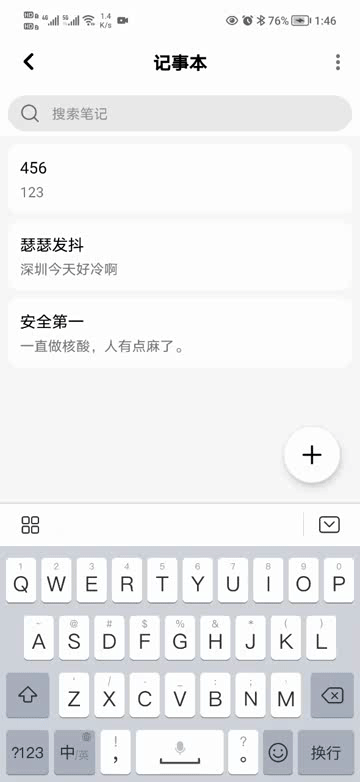
3, Search notes
when there are a lot of notes, it is necessary to search. If you let me find one by one, it doesn't exist. So now, let's start writing. Before writing, we need to sort out our ideas. First, we need an input box. After entering the content, the delete button is displayed. Clicking the button needs to clear the content of the input box, and then we can conduct fuzzy search through the content. The target fields are title and content, In other words, when you enter the content and search the data, as long as there is one title and content that can match. Emm…
① Input layout
Let's go. First, in activity_ notebook. Add variables to the data tag in XML, as shown below:
		<!--Display input layout-->
        <variable
            name="showSearchLay"
            type="Boolean" />
        <!--Whether there is content in the input box-->
        <variable
            name="isSearch"
            type="Boolean" />
Then add a search layout with the following code:
			<!--Search note layout and display when there are notes-->
            <LinearLayout
                android:id="@+id/lay_search"
                android:layout_width="match_parent"
                android:layout_height="46dp"
                android:background="@color/white"
                android:gravity="center_vertical"
                android:paddingStart="8dp"
                android:paddingEnd="8dp"
                android:visibility="@{showSearchLay ? View.VISIBLE : View.GONE}">

                <RelativeLayout
                    android:layout_width="match_parent"
                    android:layout_height="36dp"
                    android:background="@drawable/shape_search_bg"
                    android:paddingStart="12dp"
                    android:paddingEnd="12dp">

                    <ImageView
                        android:layout_width="20dp"
                        android:layout_height="20dp"
                        android:layout_centerVertical="true"
                        android:src="@mipmap/ic_search" />

                    <EditText
                        android:id="@+id/et_search"
                        android:layout_width="match_parent"
                        android:layout_height="36dp"
                        android:layout_centerVertical="true"
                        android:layout_marginStart="32dp"
                        android:layout_marginEnd="32dp"
                        android:background="@null"
                        android:hint="Search notes"
                        android:textColor="@color/black"
                        android:textCursorDrawable="@drawable/custom_cursor"
                        android:textSize="@dimen/sp_14" />

                    <ImageView
                        android:id="@+id/iv_clear"
                        android:layout_width="20dp"
                        android:layout_height="20dp"
                        android:layout_alignParentEnd="true"
                        android:layout_centerVertical="true"
                        android:src="@mipmap/ic_clear"
                        android:visibility="@{isSearch ? View.VISIBLE : View.GONE}" />
                </RelativeLayout>
            </LinearLayout>
The icon is in my source code. I need to explain the location of this layout:

One thing to note here is that the search layout is above the list, not above the data layout.
② Fuzzy search
the fuzzy search in Room is a little different from the conventional SQL statement. First, open NotebookDao and add the following code:
	// ||Equivalent to + sign
    @Query("SELECT * FROM notebook WHERE title LIKE '%' || :input || '%' OR content LIKE '%' || :input || '%' ")
    Flowable<List<Notebook>> searchNotebook(String input);
Here you can see the field conditions to be searched after where. Here | is equal to + and or is used to match another field. There are two fields: title and content. Because the data returned by fuzzy search will also be multiple, it is wrapped with List. Here is the place to call. Open the NotebookRepository and add the following code:
	/**
     * Search notes
     */
    public MutableLiveData<List<Notebook>> searchNotebook(String input) {
        Flowable<List<Notebook>> listFlowable = BaseApplication.getDb().notebookDao().searchNotebook(input);
        CustomDisposable.addDisposable(listFlowable, notebooks -> {
            if (notebooks.size() > 0) {
                notebooksMutableLiveData.postValue(notebooks);
            } else {
                notebooksMutableLiveData.postValue(emptyList);
                failed.postValue("No data");
            }
        });
        return notebooksMutableLiveData;
    }
The code here has nothing to say, which is similar to the previous method of obtaining all notes. Then it is called in NotebookViewModel, adding the following methods in NotibookViewModel:
	/**
     * Search notes
     * @param input Input content
     */
    public void searchNotebook(String input) {
        notebooks = notebookRepository.searchNotebook(input);
        failed = notebookRepository.failed;
    }
③ Logical processing
the first step is to check whether the search layout is displayed. If there is no data and there is no content in the search input box, it will not be displayed.
Input box listening of processing page:
		//Input box listening
        binding.etSearch.addTextChangedListener(new TextWatcher() {
            @Override
            public void beforeTextChanged(CharSequence s, int start, int count, int after) {

            }

            @Override
            public void onTextChanged(CharSequence s, int start, int before, int count) {

            }

            @Override
            public void afterTextChanged(Editable s) {
				if (s.length() > 0) {
                    binding.setIsSearch(true);
                    //Search notes
                    viewModel.searchNotebook(s.toString());
                } else {
                    //Get all notes
                    binding.setIsSearch(false);
                    viewModel.getNotebooks();
                }
            }
        });
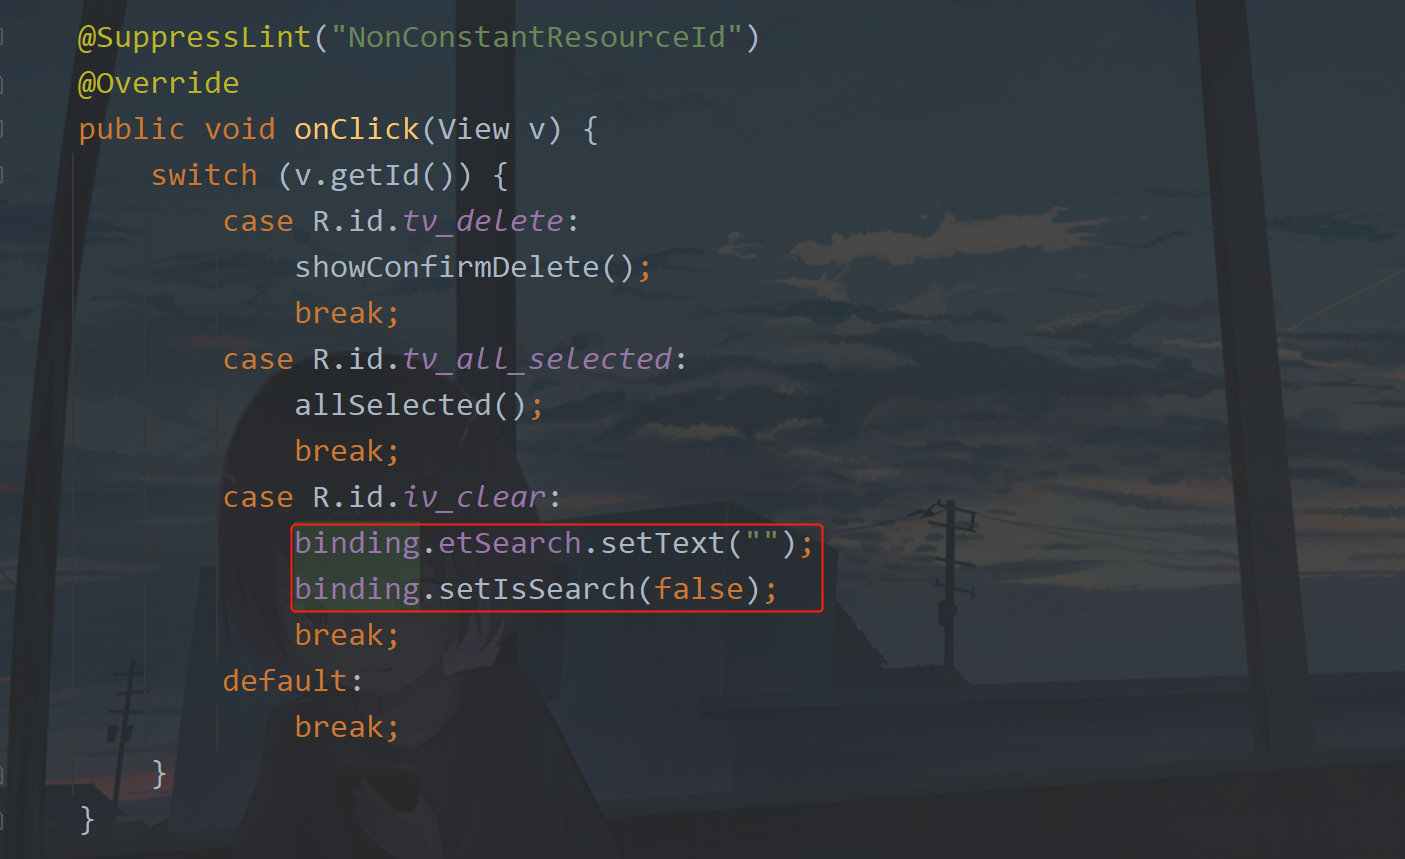
Process the listening of empty Icon:
binding.ivClear.setOnClickListener(this);
When clicked, the input box is cleared and the button is hidden.
Since there is too much code in onCreate, it is now encapsulated into the initView method.
Now the code is finished. Run it to see:
4, Source code
If it helps you, you can Fork or Star
GitHub: MVVM-Demo
CSDN: MVVMDemo_12.rar
5, Have fun
Question: Baojun 730, want to change to BMW 730, ask for modification advice!
Answer: it depends on how you want to change it. The simplest way to change Baojun 730 into BMW 730 is to cut off the right side of Jun word