7. Image outline
7.1 what is image contour
Image outline is a curve of continuous points with the same color or gray scale Contour is very useful in shape analysis and object detection and recognition.
Function of contour:
- For graphic analysis
- Object recognition and detection
Note:
- In order to improve the accuracy of detection, it is necessary to binarize or Canny the image first.
- The input image will be modified when drawing the outline. If you want to continue to use the original image later, you should store the original image in other variables.
7.2 finding contours
-
findContours(image, mode, method[, contours[, hierarchy[, offset]]])
-
Mode the mode in which the contour is found
-
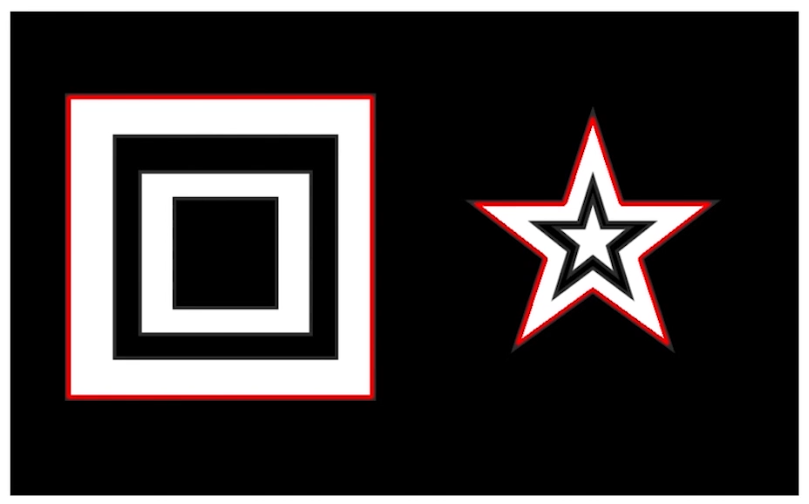
RETR_EXTERNAL = 0, which means that only the peripheral contour is detected
-
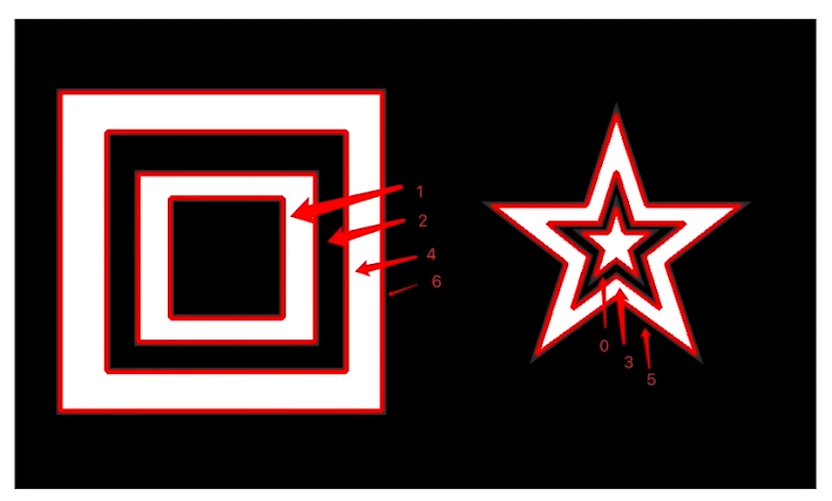
RETR_LIST = 1, the detected contour does not establish a hierarchical relationship, that is, all contours are detected, which is more commonly used
-
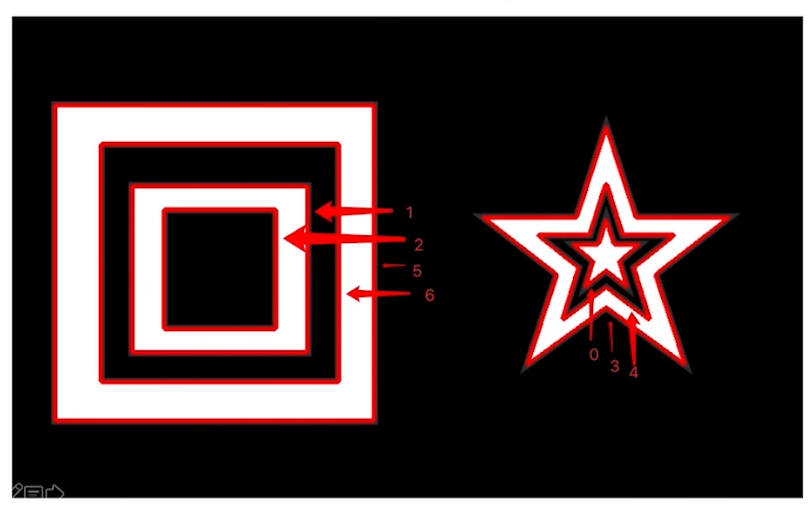
RETR_CCOMP = 2, up to two levels per floor, from small to large, from inside to outside
-
RETR_TREE = 3, store the outline according to the tree, from large to small, from right to left

-
-
Method contour approximation method is also called ApproximationMode
- CHAIN_APPROX_NONE saves points on all contours
- CHAIN_APPROX_SIMPLE saves only corners, such as quadrilateral, and only four corners of quadrilateral. It stores less information and is commonly used
-
Returns contours and hierarchy, i.e. contour and hierarchy
-
import cv2
import numpy as np

# The image display effect is black and white, but it is actually a color image of three channels
img = cv2.imread('./contours1.jpeg')

# Become a single channel black-and-white picture
gray = cv2.cvtColor(img, cv2.COLOR_BGR2GRAY)

# For binarization, note that there are two return values, threshold and result
ret, binary = cv2.threshold(gray, 150, 255, cv2.THRESH_BINARY)

# cv2.imshow('img', img)
# cv2.imshow('binary', binary)

# For contour search, the new version returns two results, contour and level, and the old version returns three parameters, image, contour and level
result, contours, hierarchy = cv2.findContours(binary, cv2.RETR_TREE, cv2.CHAIN_APPROX_SIMPLE)

# Print outline
print(contours)
cv2.waitKey(0)
cv2.destroyAllWindows()
7.3 outline drawing
- drawContours(image, contours, contourIdx, color[, thickness[, lineType[, hierarchy[, maxLevel[, offset]]]]])
- Imagethe outline image to draw
- Contour points
- contourIdx number of the contour to be drawn- 1 means to draw all contours
- Color the color of the outline, such as (0, 0, 255) indicates red
- thickness lineweight, - 1 means full fill
import cv2
import numpy as np

# The image display effect is black and white, but it is actually a color image of three channels
img = cv2.imread('./contours1.jpeg')

# Become a single channel black-and-white picture
gray = cv2.cvtColor(img, cv2.COLOR_BGR2GRAY)

# For binarization, note that there are two return values, threshold and result
ret, binary = cv2.threshold(gray, 150, 255, cv2.THRESH_BINARY)


# For contour search, the new version returns two results, contour and level, and the old version returns three parameters, image, contour and level
result, contours, hierarchy = cv2.findContours(binary, cv2.RETR_TREE, cv2.CHAIN_APPROX_SIMPLE)

# Draw the outline. Note that drawing the outline will change the original image
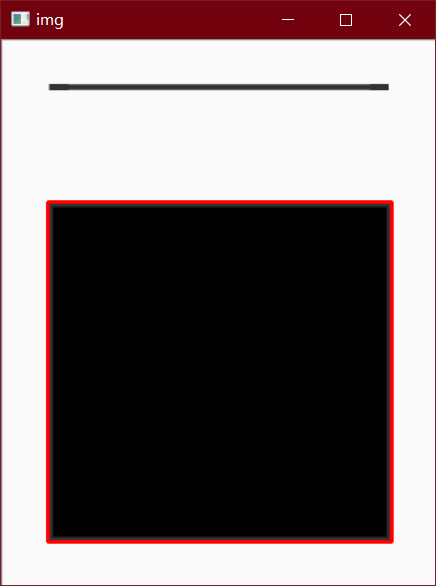
cv2.drawContours(img, contours, 1, (0, 0, 255), 2)

cv2.imshow('img', img)

cv2.waitKey(0)
cv2.destroyAllWindows()
7.4 area and perimeter of profile
Contour area refers to the area enclosed by all pixels in each contour, in pixels.
Contour area is one of the important statistical characteristics of contour. Through the size of contour area, we can further analyze the hidden information of each contour, for example, distinguish the size of objects by contour area and identify different objects.
After finding the contour, there may be many small contours, which can be filtered by the area of the contour
- contourArea(contour)
- arcLength(curve, closed)
- curve is the outline
- Is closed a closed profile
import cv2
import numpy as np

# The image display effect is black and white, but it is actually a color image of three channels
img = cv2.imread('./contours1.jpeg')

# Become a single channel black-and-white picture
gray = cv2.cvtColor(img, cv2.COLOR_BGR2GRAY)

# For binarization, note that there are two return values, threshold and result
ret, binary = cv2.threshold(gray, 150, 255, cv2.THRESH_BINARY)


# For contour search, the new version returns two results, contour and level, and the old version returns three parameters, image, contour and level
result, contours, hierarchy = cv2.findContours(binary, cv2.RETR_TREE, cv2.CHAIN_APPROX_SIMPLE)

# Draw the outline. Note that drawing the outline will change the original image
cv2.drawContours(img, contours, 1, (0, 0, 255), 2)

# Calculated area
area = cv2.contourArea(contours[1])
print('area: ', area)
cv2.imshow('img', img)

# Calculated perimeter
perimeter = cv2.arcLength(contours[1], True)
print('perimeter:', perimeter)

cv2.waitKey(0)
cv2.destroyAllWindows()
7.5 polygon approximation and convex hull
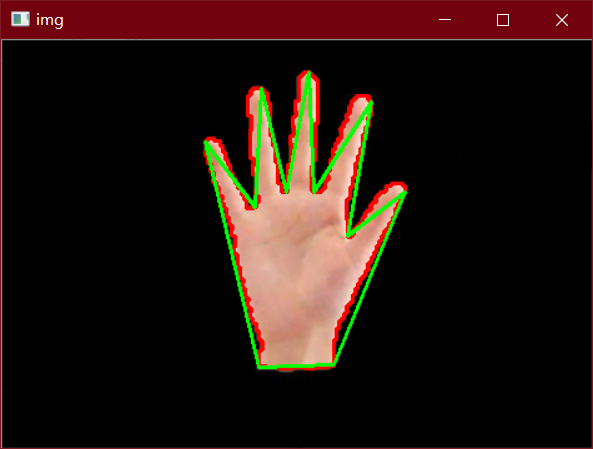
The contour information contour after find contours may be too complex and not smooth. approxPolyDP function can be used to properly approximate the polygonal curve, which is polygonal approximation of contour
apporxPolyDP uses the Douglas Peucker algorithm (DP in the method name) to approach the contour with polygons
The principle of DP algorithm is relatively simple. The core is to constantly find the farthest point of the polygon and join it to form a new polygon until the shortest distance is less than the specified accuracy.
- approxPolyDP(curve, epsilon, closed[, approxCurve])
- curve is the contour to approximate
- epsilon is the threshold used by DP algorithm
- Is the closed contour closed
import cv2
import numpy as np


img = cv2.imread('./hand.png')

gray = cv2.cvtColor(img, cv2.COLOR_BGR2GRAY)

# For binarization, note that there are two return values, threshold and result
ret, binary = cv2.threshold(gray, 150, 255, cv2.THRESH_BINARY)


# For contour search, the new version returns two results, contour and level, and the old version returns three parameters, image, contour and level
result, contours, hierarchy = cv2.findContours(binary, cv2.RETR_TREE, cv2.CHAIN_APPROX_SIMPLE)

# Draw the outline. Note that drawing the outline will change the original image
cv2.drawContours(img, contours, 0, (0, 0, 255), 2)
# Show the outline before polygon approximation


# Polygon approximation returns a series of points on the polygon, that is, the contour after polygon approximation
approx = cv2.approxPolyDP(contours[0], 20, True)
# print(type(approx))
# print(approx)
# print('--------------------------------------')
# print(contours[0])

# Draw the outline of the approaching polygon
cv2.drawContours(img, [approx], 0, (0, 255, 0), 2)
cv2.imshow('img', img)

cv2.waitKey(0)
cv2.destroyAllWindows()
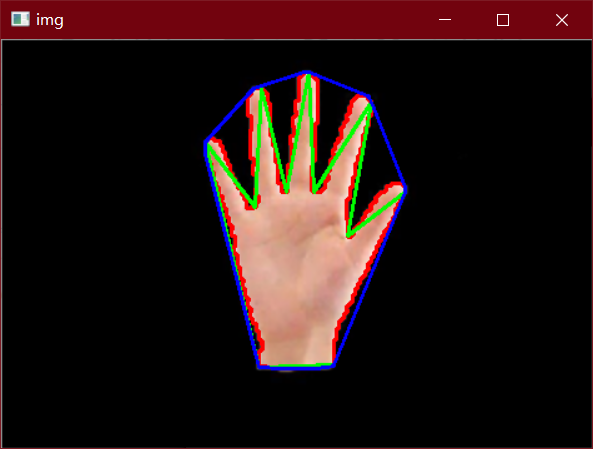
Approximation polygon is the height approximation of contour, but sometimes we want to simplify it by using the convex envelope of a polygon. A convex hull is similar to an approximation polygon, except that it is the outermost convex polygon of an object. Convex hull refers to a polygon that completely contains the original contour and is only composed of points on the contour. Every part of the convex hull is convex, that is, the straight line connecting any two points in the convex hull is inside the convex hull. In the convex hull, the internal angle of any three consecutive points is less than 180 °.
- convexHull(points[, hull[, clockwise[, returnPoints]]])
- points is the outline
- colckwise draw clockwise
import cv2
import numpy as np


img = cv2.imread('./hand.png')

gray = cv2.cvtColor(img, cv2.COLOR_BGR2GRAY)

# For binarization, note that there are two return values, threshold and result
ret, binary = cv2.threshold(gray, 150, 255, cv2.THRESH_BINARY)


# For contour search, the new version returns two results, contour and level, and the old version returns three parameters, image, contour and level
result, contours, hierarchy = cv2.findContours(binary, cv2.RETR_TREE, cv2.CHAIN_APPROX_SIMPLE)

# Draw the outline. Note that drawing the outline will change the original image
cv2.drawContours(img, contours, 0, (0, 0, 255), 2)


# Polygon approximation returns a series of points on the polygon, that is, the contour after polygon approximation
approx = cv2.approxPolyDP(contours[0], 20, True)

# Draw the outline of the polygon approximation
cv2.drawContours(img, [approx], 0, (0, 255, 0), 2)


# Computational convex hull
hull = cv2.convexHull(contours[0])
cv2.drawContours(img, [hull], 0, (255, 0, 0), 2)

cv2.imshow('img', img)

cv2.waitKey(0)
cv2.destroyAllWindows()
7.6 external rectangle
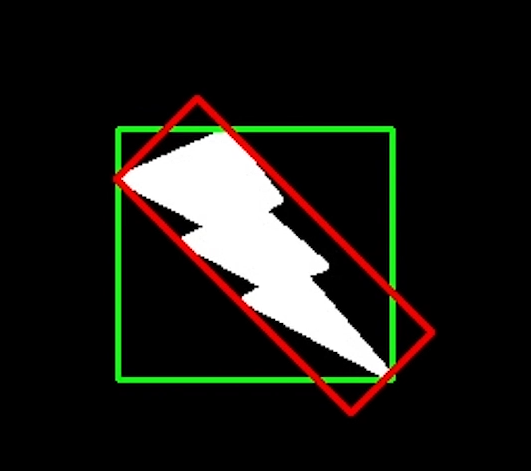
Circumscribed rectangle is divided into minimum circumscribed rectangle and maximum circumscribed rectangle
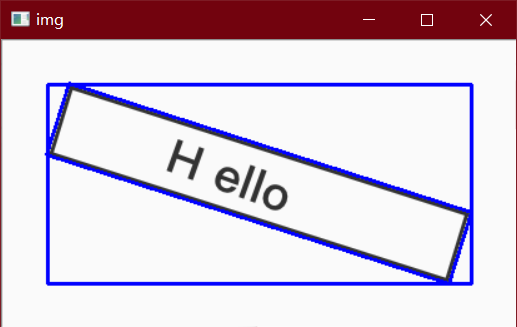
In the figure below, the red rectangle is the smallest circumscribed rectangle and the green rectangle is the largest circumscribed rectangle
-
Minaarearect (points) minimum circumscribed matrix
- points is the outline
- Returns a tuple containing the parameters of a rotatedrect: the starting coordinates x and y of the rectangle, the width and height of the rectangle, and the selection angle of the rectangle
-
boundingRect(points) maximum circumscribed matrix
- points is the outline
import cv2
import numpy as np


img = cv2.imread('./hello.jpeg')

gray = cv2.cvtColor(img, cv2.COLOR_BGR2GRAY)

ret, binary = cv2.threshold(gray, 150, 255, cv2.THRESH_BINARY)

result, contours, hierarchy = cv2.findContours(binary, cv2.RETR_TREE, cv2.CHAIN_APPROX_SIMPLE)

# The outermost contour is the whole image, and contours[1] represents the graphic contour inside the image
# Note that the returned content is a rotating rectangle, including the starting coordinates, width, height and selection angle of the rectangle
(x, y), (w, h), angle = cv2.minAreaRect(contours[1])

print(x, y)
print(w, h)
print(angle)
r = cv2.minAreaRect(contours[1])

# Quickly convert rotatedrect into contour data
box = cv2.boxPoints(r)
print(box)
# The outline must be an integer, not a decimal, so it is converted to an integer
box = np.round(box).astype('int64')
print(box)
# Draw minimum circumscribed rectangle
cv2.drawContours(img, [box], 0, (255, 0, 0), 2)

# Returns the x,y, and w,h of a rectangle
x,y, w, h = cv2.boundingRect(contours[1])
cv2.rectangle(img, (x, y), (x + w, y + h), (255, 0, 0), 2)

cv2.imshow('img', img)
cv2.waitKey(0)
cv2.destroyAllWindows()
