Address: https://www.ebpf.top/post/shrink_vbox_vmdk_size
When using VirtualBox (VMDK mode) to manage virtual machines, we often encounter some compilation and installation scenarios (such as compiling Linux kernel), which will lead to a sharp expansion of disk space. However, after the compilation is completed, even if we delete the relevant files, the host space occupied by the VM virtual machine does not decrease, At this time, in order to free up disk space or make it easier to share with others, we need to downsize the VM disk.
1.1 introduction to virtual disk format
VirtualBox mainly supports the following virtual disk formats: VMDK and VDI:
- VMDK (Virtual Machine Disk) was originally developed by VMware for its products. The format technical design document was originally closed source, but now it is open source and fully available in VirtualBox. One function of this format is to divide the image of a virtual machine into multiple 2GB files. This function is very useful if you want to place the virtual machine image on a file system that does not support large files (such as FAT32). In other virtual disk formats, only parallel HDD s can do the same function.
- VDI (Virtual Disk Image) format is the default format when VirtualBox creates a new virtual machine. It is also VirtualBox's own open format.
VirtualBox supports virtual disk formats such as VHDX and HDD. For details, please refer to VirtualBox simplified Chinese .
1.2 fill free space with zero bytes
VirtualBox only knows that this is the real free space in the disk when the space is set to zero, which is very different from that we can free the space by deleting it with the standard rm command on ordinary machines.
In order to achieve this effect, we need to log in to the VM host, log in to the virtual machine, fill the free space with zero byte space, and then delete the filled files to achieve the effect.
$ cat /dev/zero > zero.fill; sync; sleep 1; sync; rm -f zero.fill
cat: write error: No space left on device
After the command is executed, a "cat: write error: No space left on device" error will appear first. This error just indicates that we have filled all the free space with zero bytes.
So far, we have successfully filled the free space with zero bytes in the VM virtual machine. It's time to really "lose weight".
1.3 locating VM virtual disk files
On the main interface of VirtualBox operation, we can right-click the virtual machine and select the "Setting" option on the pop-up menu to pop up the settings related to this virtual machine and switch to the "Storage" tab.
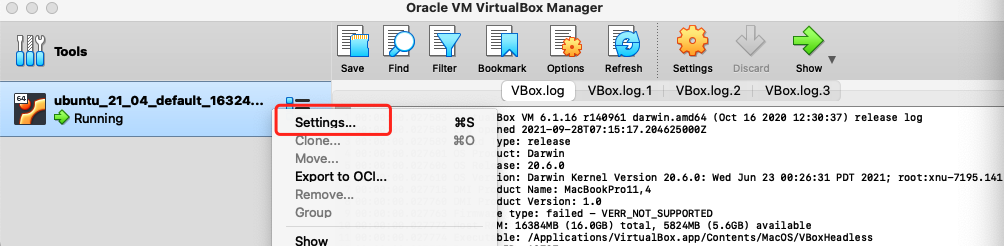
Figure 1-1 entering the VM settings page
In the main interface of the "Storage" tab, we can see the virtual disk mounted by the VM. Click the virtual disk option, and in the "Attributes" information bar on the right, you can query the directory and file name of the selected virtual disk in the "Location" item.
The directory is saved in the subdirectory named by the VM name under ~ / VirtualBox VMs / directory by default, such as ~ / VirtualBox VMs/ubuntu_21_04_default_1632463892989_42055 in this example, where ubuntu_21_04_default_1632463892989_42055 is the VM host name.
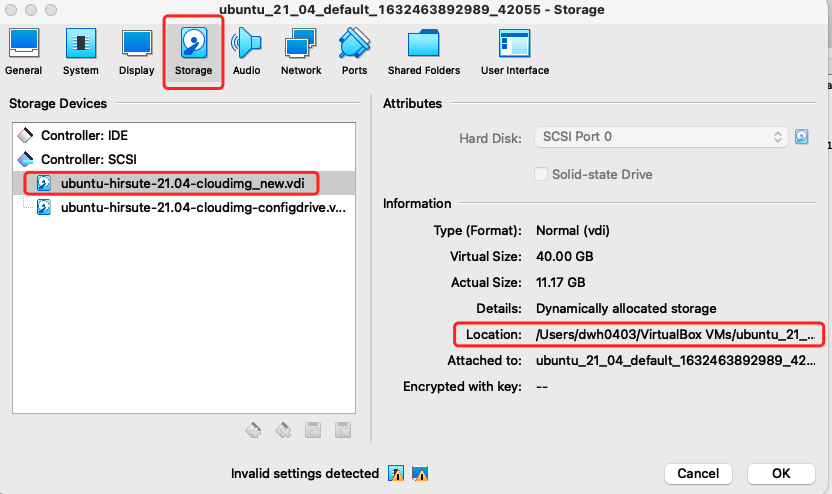
Figure 1-2 details of storage items in VM settings page
After determining the directory of the VM virtual disk, we enter the corresponding directory through the terminal to view:
$ cd ~/VirtualBox\ VMs/ubuntu_21_04_default_1632463892989_42055/
$ ls -lh
-rw-------  1 dwh0403  staff    35G Sep 28 13:37 ubuntu-hirsute-21.04-cloudimg.vmdk
...
Here we can see that the virtual disk occupies 35G of disk size. We can view the details of vmdk file through vboxmanage showhdinfo command (if we need to continue to use vmdk format later):
$ vboxmanage showhdinfo ubuntu-hirsute-21.04-cloudimg.vmdk
UUID:           6a00f1e1-a53f-4a48-9f41-4f2a96248286
Parent UUID:    base
State:          created
Type:           normal (base)
Location:       /Users/dwh0403/VirtualBox VMs/ubuntu_21_04_default_1632463892989_42055/ubuntu-hirsute-21.04-cloudimg.vmdk
Storage format: VMDK
Format variant: dynamic default
Capacity:       40960 MBytes
Size on disk:   35717 MBytes
Encryption:     disabled
In order to compress the space of the virtual disk, we need to convert the vmdk format to vdi format. If Vmware products are installed on this machine, you can directly use the tools provided by it to slim down, see Vmware disk management example .
$ vboxmanage clonehd --format vdi ubuntu-hirsute-21.04-cloudimg.vmdk  ubuntu-hirsute-21.04-cloudimg.vdi
0%...10%...20%...30%...40%...50%...60%...70%...80%...90%...100%
Clone medium created in format 'vdi'. UUID: 46de9fce-0055-472b-aee2-128509e3685

$ ls -hl
-rw-------  1 dwh0403  staff    11G Sep 28 13:41 ubuntu-hirsute-21.04-cloudimg.vdi
...

$ vboxmanage modifyhd ubuntu-hirsute-21.04-cloudimg.vdi --compact
0%...10%...20%...30%...40%...50%...60%...70%...80%...90%...100%
After the conversion is completed, we can check in the current directory. We can find that the file size of vdi has been reduced to 11G (the original vmdk file is 35G), indicating that the reduction of disk space has been completed during the conversion process.
1.4 mount the disk in VDI format (scheme I, verification, recommendation)
After converting the vdi format, the space adjustment has been completed. If we do not strongly use the vmdk format, we can directly uninstall the original vmdk format virtual disk from the VM, and then mount the vdi format disk. At the same time, remember to delete the vmdk format virtual disk.
When the VM virtual machine is turned off, enter the storage setting page of VM, and the steps are consistent with Figure 1-2.
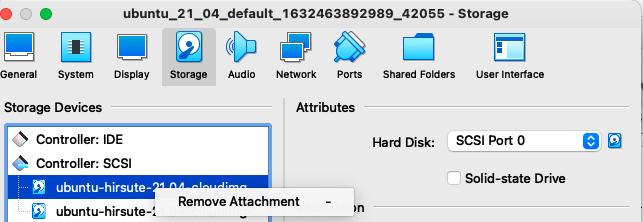
First, right-click to remove the old vmdk format virtual disk, and select "Remove Attachment" in the right-click menu attribute:
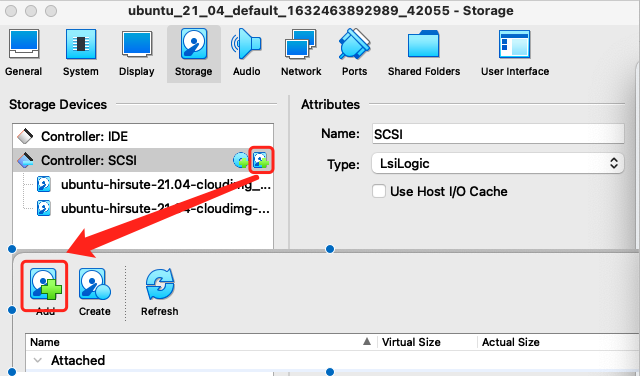
Then select the disk controller with the mouse and select the add Disk button:
 ]
]
Select the "Add" button in the pop-up window of adding disk files, enter the file selection window, and select our new vdi format file.
Then start the VM virtual machine for verification. If everything goes well, the whole slimming process is completed.
It is recommended to use the vdi format virtual disk format here. You can also use the following commands to adjust the size when the disk space is tight:
$ VBoxManage modifyhd xxx.vdi --resize the_new_size
1.5 disk mount using VMDK format (scheme 2, not verified)
If the virtual disk in vmdk format must be used for special reasons, we need to convert the reduced vdi format file to vmdk format:
$ VBoxManage clonehd ubuntu-hirsute-21.04-cloudimg.vdi ubuntu-hirsute-21.04-cloudimg_new.vmdk --format vmdk
In the same way as the above scheme, you can remove the virtual disk and add a new disk. If you overwrite it with the original file name, because a new UUID is generated during the conversion process, VirtualBox will not be able to recognize the new virtual disk. Here, you need to reset the UUID.
$ vboxmanage internalcommands sethduuid ./ubuntu-hirsute-21.04-cloudimg <primary UUID Here>
1.5.1 error resolution:
$ VBoxManage clonehd ubuntu_21_04_default_1632463892989_42055/ubuntu-hirsute-21.04-cloudimg.vdi  ubuntu-hirsute-21.04-cloudimg.vmdk --format vmdk
VBoxManage: error: UUID {6438d068-ae7b-467d-ab30-6e1228c30bd9} of the medium '/Users/dwh0403/VirtualBox VMs/ubuntu_21_04_default_1632463892989_42055/ubuntu-hirsute-21.04-cloudimg.vdi' does not match the value {46de9fce-0055-472b-aee2-128509e3685d} stored in the media registry ('/Users/dwh0403/Library/VirtualBox/VirtualBox.xml')
VBoxManage: error: Details: code NS_ERROR_FAILURE (0x80004005), component MediumWrap, interface IMedium, callee nsISupports
VBoxManage: error: Context: "CloneTo(pDstMedium, ComSafeArrayAsInParam(l_variants), NULL, pProgress.asOutParam())" at line 1068 of file VBoxManageDisk.cpp
If the above error is reported, it is recommended to modify the file name generated by vmdk and try again.
1.6 summary
Finally, we have successfully completed the downsizing of VM virtual space, which is very helpful for us to test functions in some scenarios.