data storage
As mentioned earlier, containers may have a short life cycle and are frequently created and destroyed. When the container is destroyed, the data saved in the container will also be cleared. This result is undesirable to users in some cases. In order to persist the container data, kubernetes introduces the concept of Volume.
Volume is a shared directory that can be accessed by multiple containers in a Pod. It is defined on the Pod and then mounted to a specific file directory by multiple containers in a Pod. kubernetes realizes data sharing and persistent storage between different containers in the same Pod through volume. The life container of a volume is not related to the life cycle of a single container in the Pod. When the container is terminated or restarted, the data in the volume will not be lost.
kubernetes Volume supports many types, including the following:
-
Simple storage: EmptyDir, HostPath, NFS
-
Advanced storage: PV, PVC
-
Configuration storage: ConfigMap, Secret
Basic storage
EmptyDir
EmptyDir is the most basic Volume type. An EmptyDir is an empty directory on the Host.
EmptyDir is created when the Pod is allocated to the Node. Its initial content is empty, and there is no need to specify the corresponding directory file on the host, because kubernetes will automatically allocate a directory. When the Pod is destroyed, the data in EmptyDir will also be permanently deleted.
The purpose of EmptyDir is as follows:
-
Temporary space, such as a temporary directory required for some applications to run, and does not need to be permanently reserved
-
A directory where one container needs to get data from another container (multi container shared directory)
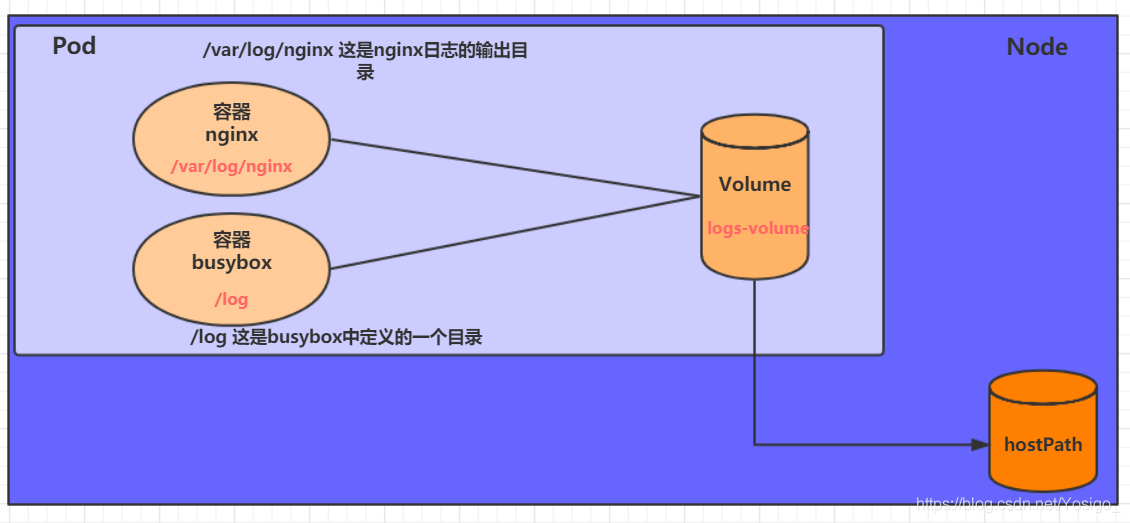
Next, use EmptyDir through a case of file sharing between containers.
- Prepare two containers nginx and busybox in a Pod, and then declare that a Volume is hung in the directories of the two containers respectively. Then the nginx container is responsible for writing logs to the Volume, and busybox reads the log contents to the console through commands.

Create a volume emptydir yaml
apiVersion: v1
kind: Pod
metadata:
  name: volume-emptydir
  namespace: dev
spec:
  containers:
    - name: nginx
      image: nginx:1.14-alpine
      ports:
        - containerPort: 80
      volumeMounts:   # Hang logs volume in the nginx container, and the corresponding directory is / var/log/nginx
        - mountPath: /var/log/nginx
          name: logs-volume
    - name: busybox
      image: busybox:1.30
      command: ["/bin/sh","-c","tail -f /logs/access.log" ]   # Initial command to dynamically read the contents of the specified file
      volumeMounts:    # Hang logs volume in the busybox container, and the corresponding directory is / logs
        - mountPath: /logs
          name: logs-volume
  volumes:      # Declare volume, the name is logs volume, and the type is emptyDir
    - name: logs-volume
      emptyDir: {}
# Create Pod
[root@k8s-master-01 ~]# kubectl create -f volume-emptydir.yaml
pod/volume-emptydir created

# View pod
[root@k8s-master-01 ~]# kubectl get pods volume-emptydir -n dev -o wide
NAME              READY   STATUS    RESTARTS   AGE   IP           NODE          NOMINATED NODE   READINE
volume-emptydir   2/2     Running   0          72s   10.244.2.2   k8s-node-02   <none>           <none>

# Accessing nginx through podIp
[root@k8s-master-01 ~]# curl 10.244.2.2
<!DOCTYPE html>
<html>
<head>
<title>Welcome to nginx!</title>
<style>
    body {
        width: 35em;
        margin: 0 auto;
        font-family: Tahoma, Verdana, Arial, sans-serif;
    }
</style>
</head>
<body>
<h1>Welcome to nginx!</h1>
<p>If you see this page, the nginx web server is successfully installed and
working. Further configuration is required.</p>

<p>For online documentation and support please refer to
<a href="http://nginx.org/">nginx.org</a>.<br/>
Commercial support is available at
<a href="http://nginx.com/">nginx.com</a>.</p>

<p><em>Thank you for using nginx.</em></p>
</body>
</html>

# View the standard output of the specified container through the kubectl logs command
[root@k8s-master-01 ~]# kubectl logs -f volume-emptydir -n dev -c busybox
10.244.0.0 - - [12/Aug/2021:08:56:01 +0000] "GET / HTTP/1.1" 200 612 "-" "curl/7.29.0" "-"
HostPath
The data in EmptyDir will not be persisted. It will be destroyed with the end of Pod. If you want to simply persist the data to the host, you can choose HostPath.
HostPath is to hang an actual directory in the Node host in the Pod for use by the container. This design can ensure that the Pod is destroyed, but the data basis can exist on the Node host.
Create a volume host path yaml:
apiVersion: v1
kind: Pod
metadata:
  name: volume-hostpath
  namespace: dev
spec:
  containers:
    - name: nginx
      image: nginx:1.17.1
      ports:
        - containerPort: 80
      volumeMounts:
        - mountPath: /var/log/nginx
          name: logs-volume
    - name: busybox
      image: busybox:1.30
      command: [ "/bin/sh","-c","tail -f /logs/access.log" ]
      volumeMounts:
        - mountPath: /logs
          name: logs-volume
  volumes:
    - name: logs-volume
      hostPath:
        path: /root/logs
        type: DirectoryOrCreate    # If the directory exists, it will be used. If it does not exist, it will be created first and then used
A note on the value of type
-
DirectoryOrCreate: if the directory exists, use it. If it does not exist, create it first and then use it
-
Directory: directory must exist
-
FileOrCreate: use the file if it exists. Create it before use if it does not exist
-
File: file must exist
-
Socket unix: socket must exist
-
CharDevice: character device must exist
-
BlockDevice: block device must exist
# Create Pod
[root@k8s-master-01 ~]# kubectl create -f volume-hostpath.yaml
pod/volume-hostpath created

# View Pod
[root@k8s-master-01 ~]# kubectl get pods volume-hostpath -n dev -o wide
NAME              READY   STATUS    RESTARTS   AGE     IP           NODE          NOMINATED NODE   READINESS GATES
volume-hostpath   2/2     Running   0          3m41s   10.244.2.3   k8s-node-02   <none>           <none>

# Access nginx
[root@k8s-master-01 ~]# curl 10.244.2.3
<!DOCTYPE html>
<html>
<head>
<title>Welcome to nginx!</title>
<style>
    body {
        width: 35em;
        margin: 0 auto;
        font-family: Tahoma, Verdana, Arial, sans-serif;
    }
</style>
</head>
<body>
<h1>Welcome to nginx!</h1>
<p>If you see this page, the nginx web server is successfully installed and
working. Further configuration is required.</p>

<p>For online documentation and support please refer to
<a href="http://nginx.org/">nginx.org</a>.<br/>
Commercial support is available at
<a href="http://nginx.com/">nginx.com</a>.</p>

<p><em>Thank you for using nginx.</em></p>
</body>
</html>

# Next, you can view the stored files in the / root/logs directory of the host
###  Note: the following operations need to run on the node where the Pod is located (k8s-node-02 in the case)
[root@k8s-node-02 ~]# ls /root/logs/
access.log  error.log

[root@k8s-node-02 ~]# cat /root/logs/access.log
10.244.0.0 - - [12/Aug/2021:09:35:02 +0000] "GET / HTTP/1.1" 200 612 "-" "curl/7.29.0" "-"

# Similarly, if you create a file in this directory, you can see it in the container
NFS
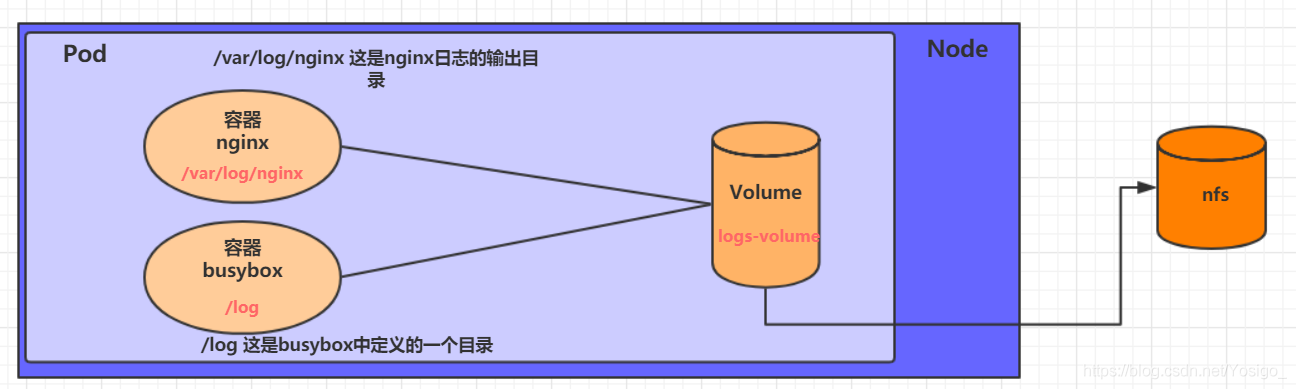
HostPath can solve the problem of data persistence, but once the Node fails, the Pod will have problems if it is transferred to another Node. At this time, it is necessary to prepare a separate network storage system. NFS and CIFS are commonly used.
NFS is a network file storage system. You can build an NFS server, and then directly connect the storage in the Pod to the NFS system. In this way, no matter how the Pod is transferred on the Node, as long as the connection between the Node and NFS is OK, the data can be accessed successfully.
First, prepare the nfs server. For simplicity, the master node is directly used as the nfs server
# Installing the nfs service on the master
[root@k8s-master-01 ~]# yum -y install nfs-utils

# Prepare a shared directory
[root@k8s-master-01 ~]# mkdir -pv /root/data/nfs
mkdir: created directory '/root/data'
mkdir: created directory '/root/data/nfs'

# Expose the shared directory to 192.168.168 with read and write permissions All hosts in the 15.0/24 network segment
[root@k8s-master-01 ~]# vim /etc/exports
/root/data/nfs     192.168.15.0/24(rw,no_root_squash)

# Start nfs service
[root@k8s-master-01 ~]# systemctl restart nfs
Next, you need to install nfs on each node node so that the node node can drive nfs devices
# Install the nfs service on all node s. Note that you do not need to start
[root@k8s-node-01 ~]# yum install nfs-utils -y

[root@k8s-node-02 ~]# yum install nfs-utils -y
Next, you can write the configuration file of pod and create volume NFS yaml
apiVersion: v1
kind: Pod
metadata:
  name: volume-nfs
  namespace: dev
spec:
  containers:
    - name: nginx
      image: nginx:1.17.1
      ports:
        - containerPort: 80
      volumeMounts:
        - mountPath: /var/log/nginx
          name: logs-volume
    - name: busybox
      image: busybox:1.30
      command: [ "/bin/sh","-c","tail -f /logs/access.log" ]
      volumeMounts:
        - mountPath: /logs
          name: logs-volume
  volumes:
    - name: logs-volume
      nfs:
        server: 192.168.15.11  # Address of nfs server
        path: /root/data/nfs   # Shared file path
Finally, run the pod and observe the results
# Create pod
[root@k8s-master-01 ~]# kubectl create -f volume-nfs.yaml
pod/volume-nfs created

# View pod
[root@k8s-master-01 ~]# kubectl get pods volume-nfs -n dev
NAME         READY   STATUS    RESTARTS   AGE
volume-nfs   2/2     Running   0          69s

# Check the shared directory on the nfs server and find that there are already files
[root@k8s-master-01 ~]#  ls /root/data/nfs/
access.log  error.log
Advanced storage
PV and PVC concepts
We have learned to use NFS to provide storage. At this time, users are required to build NFS systems and configure NFS in yaml. Since kubernetes supports many storage systems, it is obviously unrealistic for customers to master them all. In order to shield the details of the underlying storage implementation and facilitate users, kubernetes introduces PV and PVC resource objects.
-
PV (Persistent Volume) means Persistent Volume, which is an abstraction of the underlying shared storage. Generally, PV is created and configured by kubernetes administrator. It is related to the underlying specific shared storage technology, and connects with the shared storage through plug-ins.
-
PVC (Persistent Volume Claim) is a persistent volume declaration, which means a user's declaration of storage requirements. In other words, PVC is actually a resource requirement application sent by the user to kubernetes system.
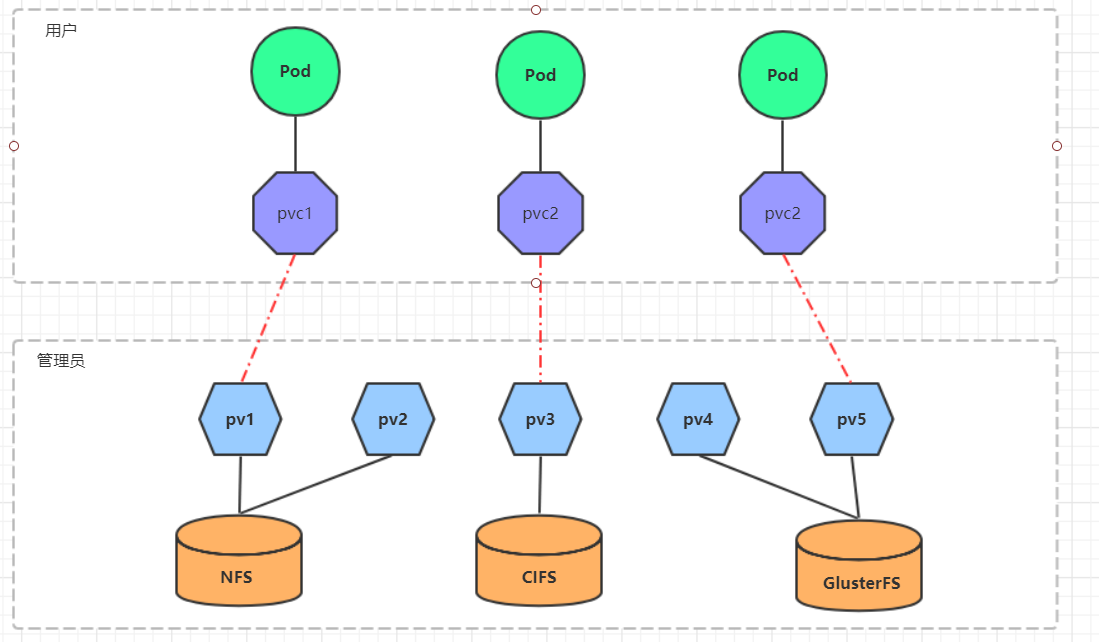
After using PV and PVC, the work can be further subdivided:
-
Storage: Storage Engineer Maintenance
-
PV: kubernetes administrator maintenance
-
PVC: kubernetes user maintenance