Guide: many places need to check the illumination, and there are many software to deal with it. Today I made a content about lighting effect. From 10 a.m. to 3:30 p.m., start writing headlines. About that long. There was no rest or meal at noon.
Content:
1. Start with the simplest case
2. My Lighting class
3. Basic parameter setting
4. Grid import and basic initialization (update_grid function)
Update light function (u#5)
6. Set a field to display the effect of light (update_shadow function)
7. Shiny appearance and visualization of results
8. End (with all codes attached)
A simple operation, if there is no change, repeated 10000 times, is still just an operation.
A simple operation, if there are two variables, repeated 10000 times, is a system.
1. Start with a simple case
There is a case in pyvita. Find an example of starting from a point and intersecting with the grid.

As shown in the figure, the blue one is a line, and the intersection with the sphere is displayed by points.
In this simple case, we can analyze what we need to know in order to obtain the intersection on the surface.
(1) a starting point is required
start
(2) need an end point,
end,
(3) a straight line is required,
(4) one face needs to be defined
(5) find the intersection
Let's take a look at the code of this simple case:
  import pyvista as pv
  import numpy as np
  # Create source to ray trace
  sphere=pv.Sphere(radius=0.85)
  # Define line segment
  start=[0, 0, 0]
  stop=[0.25, 1, 0.5]
  # Perform ray trace
  points, ind=sphere.ray_trace(start, stop)
  # # Create geometry to represent ray trace
  ray=pv.Line(start, stop)
  intersection=pv.PolyData(points)
  #
  # # Render the result
  p=pv.Plotter()
  p.add_mesh(sphere,
  show_edges=True, opacity=0.5, color="w",
  lighting=False, label="Test Mesh")
  p.add_mesh(ray, color="blue", line_width=5, label="Ray Segment")
  p.add_mesh(intersection, color="maroon",
  point_size=25, label="Intersection Points")
  p.add_legend()
  p()
In fact, the four lines 5, 8, 9 and 12 complete the main operations.
Line 5: defines a spherical mesh
Line 8-9: defines the start and end points
Line 12,: ray_ The trace function gets the intersection.
There are some realistic contents behind.
2. My Lighting class
I constructed a class and operated it completely according to the simple case above. Form the effect of the light in the figure below.

The blue circle behind is the display of the end point.
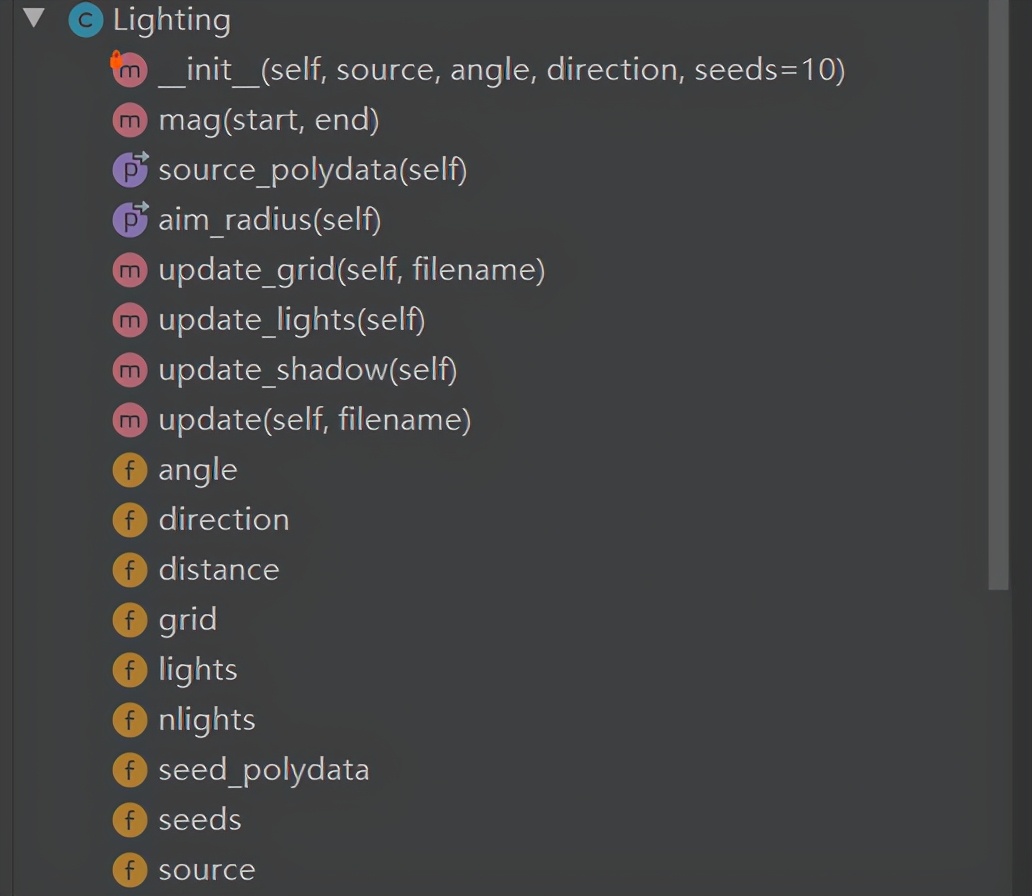
Let's first look at the basic structure:

In addition to some basic parameters, there are only three steps, which correspond to the above three functions:
update_grid
update_lights
update_shadow
3. Basic parameter setting

In__ init__ In the function, we define nine parameters.
Input parameters
Source represents the coordinates of the point light source
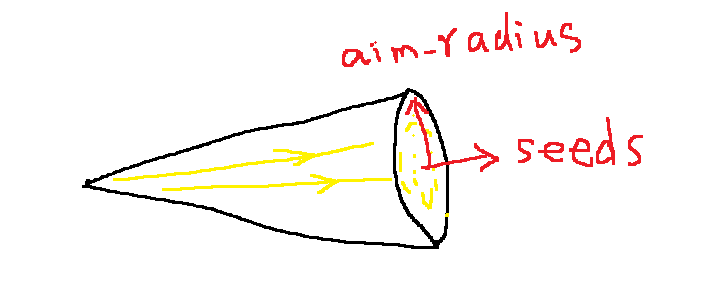
Angle represents the angle at which the point light diffuses to form a cone
Direction represents the direction of the light center and is a unit vector
seeds is a number of parameters needed to obtain the coordinates of the light end point
In addition to these four, the instance variables of the class are increased
Grid is used to store grid data
distance sets the length of the light cone
nlights records the number of rays
seed_polydata is visual data that stores light spots
In order to calculate the distance between two points, I defined a mag function
  @staticmethod
  def mag(start,end):
  s=(start[0] - end[0]) ** 2 + (start[1] - end[1]) ** 2 + (start[2] - end[2]) ** 2
  return s ** 0.5
There should be similar functions in the library, but I'm too lazy to check.
There are two more attributes
  @property
  def source_polydata(self):
  return pv.PolyData(self.source)
  @property
  def aim_radius(self):
  return np.tan(self.angle) * self.distance
The first one is to generate visual data of point light source
Second, aim_radius is the radius of the end point of the target.
After starting from the point light source, we hash the points on the bottom to determine the number of rays.

4. Grid import and basic initialization (update_grid function)
First, we have to deal with the grid. And initialize some Game download Data, such as distance.
Let's first look at the function code:
  def update_grid(self,filename):
  self.grid=pv.read(filename)
  xmin,xmax,ymin,ymax,zmin,zmax=self.grid.bounds
  start=[xmin,ymin,zmin]
  end=[xmax,ymax,zmax]
  dis=self.mag(start,end)
  p=[[xmin, ymin, zmin],
  [xmin, ymin, zmax],
  [xmin, ymax, zmin],
  [xmin, ymax, zmax],
  [xmax, ymin, zmin],
  [xmax, ymin, zmax],
  [xmax, ymax, zmin],
  [xmax, ymax, zmax]
  ]
  for i in p:
  self.distance=max(dis, self.mag(self.source, i))
  self.distance=self.distance*1.05
(1) read grid from file
(2) calculate the distance to determine that the light emitted by the point light source intersects all positions of the grid
5. Set the light (update_lights function)
That is to say, the data we need to extract. Take a look at the code:
  def update_lights(self):
  # Generate face
  # Terminal Center
  end_center=[self.source[0] + self.distance * self.direction[0],
  self.source[1] + self.distance * self.direction[1],
  self.source[2] + self.distance * self.direction[2]
  ]
  plane=pv.Plane(center=end_center, direction=self.direction,
  i_size=2 * self.aim_radius, j_size=2 * self.aim_radius,
  i_resolution=self.seeds, j_resolution=self.seeds)
  # Define end point
  stops=[]
  for point in plane.points:
  x1=point[0]
  y1=point[1]
  z1=point[2]
  if self.mag(point, end_center) < self.aim_radius:
  stops.append([x1, y1, z1])
  self.nlights=len(stops)
  self.lights=stops
  self.seed_polydata=pv.PolyData(stops)
(1) generate a plane data centered on the bottom center.
(2) extract the data of points belonging to the ball
(3) generate a polydata for visualization
6. Set a field to display the effect of light (update_shadow function)
The name may not be very good. The word shadow is used in the place where the light shines.
Also, look at the code first:
  def update_shadow(self):
  shadow_cell_ids=[]
  for i in range(self.nlights):
  point, ind=self.grid.ray_trace(self.source, self.lights[i])
  if len(point) < 1:
  pass
  else:
  a=self.mag(self.source, point[0])
  end=ind[0]
  for i in point:
  if self.mag(self.source, i) < a:
  a=self.mag(self.source, i)
  end=ind
  else:
  end=ind[0]
  shadow_cell_ids.append(end)
  # Create shadow cell property
  shadow=np.zeros((self.grid.n_cells,))
  for i in shadow_cell_ids:
  shadow[i]=10
  self.grid.cell_arrays['shadow']=shadow
(1) generate an id list, which is generated by ray_trace generates a list of face numbers.
At the same time, it should be noted that ray_trace will intersect more than two points with the surface. We choose the nearest one because the light will not pass through the object.
(2) generate a scalar attribute of shadow. The face in the list is assigned 10 and the others are 0
7. Shiny appearance and visualization of results
Finally, we actually wrote an update function.
  def update(self,filename):
  self.update_grid(filename)
  self.update_lights()
  self.update_shadow()
Mainly for the convenience of writing.
Let's take a look at the way we call:
  if __name__=='__main__':
  source=[3000,0,-2000]
  angle=20
  direction=[-0.3,0.1,1]
  seeds=100
  light=Lighting(source,angle,direction,seeds)
  light.update('car.stl')
  p=pv.Plotter()
  p.add_background_image('road.jpg')
  #
  p.add_mesh(light.source_polydata, color="yellow", point_size=20, render_points_as_spheres=True)
  p.add_mesh(light.seed_polydata, color="blue", line_width=5, label="Ray Segment")
  p.add_mesh(light.grid, scalars='shadow')
  # p.add_legend()
  p()
Set four parameters, call the update function at the same time, and read the car STL file. And show it.
The result is the effect as we said above.

8. Conclusion
A small function, put in practical application, will have a lot of incredible things. In fact, many times, we don't use so much knowledge. More likely is the form of organization.
I'm Dr. Zhang Lin. please remember to pay attention. If you are interested in anything, you can also reply in the message area.
Good luck!
Finally, attach all codes:
  import pyvista as pv
  import numpy as np
  class Lighting:
  def __init__(self, source, angle, direction, seeds=10):
  self.direction=direction
  self.source=source
  self.angle=angle/180*np.pi
  self.seeds=seeds
  # Determine the distance based on the entered grid
  self.grid=None
  self.distance=None
  # Generate light seed
  self.nlights=None
  self.lights=None
  self.seed_polydata=None
  @staticmethod
  def mag(start,end):
  s=(start[0] - end[0]) ** 2 + (start[1] - end[1]) ** 2 + (start[2] - end[2]) ** 2
  return s ** 0.5
  @property
  def source_polydata(self):
  return pv.PolyData(self.source)
  @property
  def aim_radius(self):
  return np.tan(self.angle) * self.distance
  def update_grid(self,filename):
  self.grid=pv.read(filename)
  xmin,xmax,ymin,ymax,zmin,zmax=self.grid.bounds
  start=[xmin,ymin,zmin]
  end=[xmax,ymax,zmax]
  dis=self.mag(start,end)
  p=[[xmin, ymin, zmin],
  [xmin, ymin, zmax],
  [xmin, ymax, zmin],
  [xmin, ymax, zmax],
  [xmax, ymin, zmin],
  [xmax, ymin, zmax],
  [xmax, ymax, zmin],
  [xmax, ymax, zmax]
  ]
  for i in p:
  self.distance=max(dis, self.mag(self.source, i))
  self.distance=self.distance*1.05
  def update_lights(self):
  # Generate face
  # Terminal Center
  end_center=[self.source[0] + self.distance * self.direction[0],
  self.source[1] + self.distance * self.direction[1],
  self.source[2] + self.distance * self.direction[2]
  ]
  plane=pv.Plane(center=end_center, direction=self.direction,
  i_size=2 * self.aim_radius, j_size=2 * self.aim_radius,
  i_resolution=self.seeds, j_resolution=self.seeds)
  # Define end point
  stops=[]
  for point in plane.points:
  x1=point[0]
  y1=point[1]
  z1=point[2]
  if self.mag(point, end_center) < self.aim_radius:
  stops.append([x1, y1, z1])
  self.nlights=len(stops)
  self.lights=stops
  self.seed_polydata=pv.PolyData(stops)
  def update_shadow(self):
  shadow_cell_ids=[]
  for i in range(self.nlights):
  point, ind=self.grid.ray_trace(self.source, self.lights[i])
  if len(point) < 1:
  pass
  else:
  a=self.mag(self.source, point[0])
  end=ind[0]
  for i in point:
  if self.mag(self.source, i) < a:
  a=self.mag(self.source, i)
  end=ind
  else:
  end=ind[0]
  shadow_cell_ids.append(end)
  # Create shadow cell property
  shadow=np.zeros((self.grid.n_cells,))
  for i in shadow_cell_ids:
  shadow[i]=10
  self.grid.cell_arrays['shadow']=shadow
  def update(self,filename):
  self.update_grid(filename)
  self.update_lights()
  self.update_shadow()
  if __name__=='__main__':
  source=[3000,0,-2000]
  angle=20
  direction=[-0.3,0.1,1]
  seeds=100
  light=Lighting(source,angle,direction,seeds)
  light.update('car.stl')
  p=pv.Plotter()
  p.add_background_image('road.jpg')
  #
  p.add_mesh(light.source_polydata, color="yellow", point_size=20, render_points_as_spheres=True)
  p.add_mesh(light.seed_polydata, color="blue", line_width=5, label="Ray Segment")
  p.add_mesh(light.grid, scalars='shadow')
  # p.add_legend()
  p()