vue common instructions
vue provides some more convenient output for page + data. These operations are called instructions. The instructions encapsulate some DOM behaviors and combine attributes as a code. The code has corresponding values. According to different values, the framework will bind relevant DOM operations
V-text (equivalent to innerText in native js)
Parse text
The two are equivalent
<span v-text="msg"></span>
<span>{{msg}}</span>
V-html (equivalent to innerHTML in native js)
Compared with v-text, v-html can parse tags
<p v-html="<span>Hello</span>"></p>
V-once (render only once)
Render elements and components only once. For subsequent re rendering, the element / component and all its child nodes will be treated as static content and skipped. This can be used to optimize update performance.
<span v-text="msg"></span><br>
<span v-once>{{msg}}</span><br>
<button @click="msg = 'Roll'">change msg</button>
After clicking the button, the first msg Change; The second does not change
V-cloak (solve the problem of flickering when the page is loaded)
Note: there will be no flicker problem in the scaffold, because it has been packaged by webpack
The function of the v-cloak instruction is to prevent the flicker problem during page loading and keep it on the element until the end of the associated instance
Interpolation flashes two {}} will flash once
Reason: load html first and then js, so in Vue When js is not loaded, the two curly braces will come out first
solve:
<style>
[v-cloak]{
	display:none
}
</style>
Let add with interpolation syntax v-cloak After rendering the data, v-cloak Attributes are automatically removed
v-cloak Once the attribute is removed, that is, there is no attribute, and the attribute selector cannot find the tag, it will make the tag visible
<div v-cloak>{{message}}</div>
<script type="text/javascript">
    new Vue({
      el:'#app',
      data:{
        message:'hello world'
      }
    })
</script>
v-show
The v-show element is always rendered and saved in the dom. It simply switches the display attribute of css
<div v-show="bool">Yll</div>
When bool Value is true,Displayed on the page, bool Value is false,to div set up display:none This property implements the hidden effect
v-if
v-if is inert. If the condition is false at first and does nothing, the element will be created only when the condition is true. If the condition is false again, the element will be destroyed and does not exist in the dom
<div v-if="bool">Yll</div>
You can also use V-IF, v-else-if, and v-else statements in conjunction
Note: instructions are only useful if they belong to a peer relationship
<div v-if="type === 'A'">A</div>
<div v-else-if="type === 'B'">B</div>
<div v-else-if="type === 'C'">C</div>
<div v-else>Not A/B/C</div>

<script>
    new Vue({
      el: '#app',
      data: {
        type: 'C'
      }
    })
</script>
The difference between v-if and v-show
- The same point: the feeling to users is the display or hiding of elements
- The implementation principles are different: v-if will dynamically create or destroy dom elements, and v-show will dynamically add or remove display:none style to control the display or hiding of elements
- Different performance: v-show has better performance than v-if
v-for loop
v-for: loop dynamic binding data
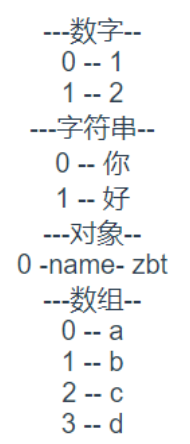
- You can cycle numbers: item starts from 1 to the current number, and index starts from 0
- You can loop strings: item is each character and index is the index
- Circular objects can be used: item is the attribute value, key is the attribute name, and the third parameter is the index
- You can loop through the array: item is each item and index is the index
<span>---number--</span>
<p v-for="(item,index) in 2" :key="index">{{index}} -- {{item}}</p>
<span>---character string--</span>
<p v-for="(item,index) in 'Hello'" :key="index">{{index}} -- {{item}}</p>
<span>---object--</span>
<p v-for="(item,key,index) in {name:'zbt'}" :key="index">{{index}} -{{key}}- {{item}}</p>
<span>---array--</span>
<p v-for="(item,index) in ['a','b','c','d']" :key="index">{{index}} -- {{item}}</p>
v-pre
Show raw information skip compilation
Skip the compilation of this element and its child elements.
Some static content does not need to be compiled. Adding this instruction can speed up rendering
<span v-pre>{{msg}}</span> // Show {{msg}}
v-bind
v-bind is abbreviated as:
Dynamically bind one or more attributes
# Bind class
<div v-bind:class="flag?'active':''"></div>
v-bind Can be abbreviated as':'
<div :class="{textSize: flag1,textColor: flag2}"></div>
v-bind Support binding an array
<div :class="['textSize','textColor']"></div>
# Binding style
<div v-bind:style="{ color: activeColor, fontSize: fontSize }"></div>
<div v-bind:style="[styleObj]"></div>
<script>
    new Vue({
      el: '#app',
      data: {
        flag:true,
        flag1:true,
        flag2:true,
        activeColor: 'red',
        fontSize: '30px',
        styleObj:{
        	color: 'red'
        }
      }
    })
</script>
.active { color: red; }
.textColor { color: green; }
.textSize { font-size:30px; }
v-on
v-on is abbreviated as@
It is mainly used to monitor dom events and implement event binding instructions
<button v-on:click='fun'></button>
v-on Can be abbreviated as@
<button @click='fun'></button>
Event function parameters
When the event is triggered, the parameter information needs to be passed. Put the method in parentheses, and $event is the event object
When binding events, if there are no parentheses, the first parameter is the event object
<button @click='fun'></button>
<script>
    new Vue({
      el: '#app',
      data: {},
      methods:{
      	fun(e) { console.log(e)}	// Output event object
      }
    })
</script>
If there are parentheses but no arguments, then e Default is undefined
<button @click='fun()'></button>
<script>
    new Vue({
      el: '#app',
      data: {},
      methods:{
      	fun(e) { console.log(e)}	// Output undefined
      }
    })
</script>
If you want to have both event objects and parameters, the event object should be written as $event
<button @click='fun($event,10)'></button>
<script>
    new Vue({
      el: '#app',
      data: {},
      methods:{
      	fun(e,num) { console.log(e,num)}
      }
    })
</script>
Event modifier
General modifier:
. prevent [block default event] / stop [stop bubbling] / once [can only be triggered once] = 'xxx'
. capture: control the execution of events in the capture phase [opposite to the direction of event bubbling, event capture from outside to inside]
. passive: modifies the onscroll event. It will not wait for the completion of onscroll, but will be triggered immediately
. self: it will be executed only when you click on yourself
Key modifier:
@keydown.enter/space/delete/up/right/down/left...=' xxx'
Keyboard code: @ Keydown 13 = ‘xxx’
Key combination: @ Keydown al1t. 67 = 'xxx’ //=>ALT+C
Note: when using modifiers, the order is very important; The corresponding code will be generated in the same order. Therefore, use v-on: click prevent. Self will block all clicks, while v-on: click self. Prevent only blocks clicks on the element itself
v-model
Used to create a two-way data binding on a form
The value entered by the control on the page can be synchronously updated to the data property of the relevant binding, and the value of the control entered on the page will also be updated when the data binding property is updated
v-model: bidirectional data binding; Generally used for form elements
Drop down box
<div id="app">
  <select v-model="selected">
    <option value="A Be selected">A</option>
    <option value="B Be selected">B</option>
    <option value="C Be selected">C</option>
  </select>
  <span>Selected: {{ selected }}</span>	// The value of the selected element. For example: A is selected
</div>
--------------------------------------------------------------------
<div id="app">
  <select v-model="selected" multiple>
    <option value="A Be selected">A</option>
    <option value="B Be selected">B</option>
    <option value="C Be selected">C</option>
  </select>
  <span>Selected: {{ selected }}</span>	// The set of value s of the selected element, for example: ['A selected ',' B selected ']
</div>
Radio
<div id="app">
  <input type="radio" value="small" v-model="picked">
  <label for="small">small</label>
  <br>
  <input type="radio" value="big" v-model="picked">
  <label for="big">big</label>
  <br>
  <span>Picked: {{ picked }}</span>		// The value of the selected element, for example: small
</div>
check box
When combined, we can define it as an array(For example, each radio box in the shopping cart)
<div id="">
  <input type="checkbox" id="one" value="one" v-model="checkedNames">
  <label for="one">Option 1</label>
  <input type="checkbox" id="two" value="two" v-model="checkedNames">
  <label for="two">Option 2</label>
  <input type="checkbox" id="three" value="three" v-model="checkedNames">
  <label for="three">Option 3</label>
  <br>
  <span>Checked names: {{ checkedNames }}</span>	// The collection of value s of the selected element, for example: ['one','two ']
</div>
-----------------------------------------------
When a single, we can define it as a Boolean value(For example, the shopping cart select all box)
<div id="app">
  <input type="checkbox" id="one" value="one" v-model="checkedNames">
  <label for="one">Option 1</label>
  <br>
  <span>Checked names: {{ checkedNames }}</span>	// Boolean value
</div>
<script>
export default {
    data() {
        return {
          checkedNames:false
        };
    },
};
</script>
v-model modifier
v-model You can also talk to.lazy,.trim and.number These modifiers are used together
 Every time input After the event is triggered, synchronize the value of the input box with the data and add lazy Modifier to change to use change Synchronize events
<input v-model.lazy="msg" >		// v-model.lazy the event is triggered only when the focus is removed
 Remove spaces at the beginning and end of the string
<input v-model.trim="msg">
Convert data to value type
<input v-model.number="age" type="number">
v-slot
For details, please see
Vue custom instruction
For details, please see