v-text v-cloak
V-text is equivalent to {}} for displaying content, but the difference is that {}} will cause flashing problems, and v-text will not flash
If you want to use {}} without flickering, use v-cloak. The steps are as follows:
Act on the v-cloak command on the template entry node managed by Vue
Add a CSS hidden style of attribute selector [v-cloak]: [v-cloak] {display: none;}
Principle: by default, the template managed by Vue is hidden at the beginning. After Vue parses and processes the DOM template, it will automatically change this style
Divide and display.
<style>
        /* Hide labels with v-clock attribute */
        [v-clock] {
            display: none
        }
    </style>
</head>
<body>
    <div id="app" v-clock>
        <!-- v-pre
        1. Used to display double braces{{}}
        2. Skipping the compilation of this element and its child elements can improve performance. -->
        <span v-pre>{{Hello!}}</span>

        <!-- If double braces are used, there will be double braces {{}} Flash out.
        Can pass v-text Solve the flicker problem

        If I need to have double braces, I don't want it to have{{}} Flash out
        -->
        <h3>{{message}}</h3>
        <h3>{{message}}</h3>
        <h3>{{message}}</h3>
        <h3 v-text="message"></h3>
        <h3 v-text="message"></h3>
        <h3 v-text="message"></h3>

    </div>
    <script src="./node_modules/vue/dist/vue.js"></script>
    <script>
        new Vue({
            el: '#app',
            data: {
                message: 'hello word.....'
            }
        })
    </script>
</body>
Calculated attribute computed
The calculated option defines the calculated properties
The calculated properties are similar to the functions defined in the methods option
- Calculated properties are cached and re evaluated only when the relevant responsive dependencies change.
- The function executes the function body each time.
Requirements: input math and English scores, and use methods and calculated to calculate the total scores respectively
<body>
<div id="app">
 mathematics:<input type="text" v-model="mathScore" >
 English:<input type="text" v-model="englishScore">
 Total score(method-one-way): <input type="text" v-model="sumScore()">
 Total score(Calculation properties-one-way): <input type="text" v-model="sumScore1">
</div>
<script src="./node_modules/vue/dist/vue.js"></script>
<script type="text/javascript">
 var vm = new Vue({
     el: '#app',
     data: {
            mathScore: 80,
            englishScore: 90,
            },
     methods: { //Don't lose s
            sumScore: function () {
            //At the console, enter VM Sumscore() is called every time
            console.info('sumScore Called')
            // `this ` points to the current vm instance. Subtracting 0 is to convert a string to a number
            return (this.mathScore-0) + (this.englishScore-0)
           }
         },
     computed: { //Calculation properties
           sumScore1 : function () {
           //At the console, enter VM Sumscore1 will not be called again, indicating that the calculated properties are cached
                console.info('sumScore1 Called')
                return (this.mathScore - 0) + (this.englishScore -0)
         }
       }
     })
  </script>
</body>
The calculation attribute in the calculated option is the getter function by default, so the above only supports one-way binding, which will only be used when modifying mathematical and English data
Update the total score, while modifying the total score will not update the data and English
Calculation attribute bidirectional binding
By default, there is only getter for calculating properties, but you can also provide a setter when necessary
<body>
<div id="app">
mathematics:<input type="text" v-model="mathScore" ><br>
English:<input type="text" v-model="englishScore"><br>
Total score(method-one-way): <input type="text" v-model="sumScore()"><br>
Total score(Calculation properties-one-way): <input type="text" v-model="sumScore1"><br>
Total score(Calculation properties-two-way): <input type="text" v-model="sumScore2"><br>
</div>
<script src="./node_modules/vue/dist/vue.js"></script>
<script type="text/javascript">
var vm = new Vue({
  el: '#app',
  data: {
     mathScore: 80,
     englishScore: 90,
     },
  methods: { //Don't lose s
     sumScore: function () {
     //Enter VM. In the console Sumscore() is called every time
         console.info('sumScore Called')
         // `this ` points to the current vm instance. Subtracting 0 is to convert a string to a number
         return (this.mathScore-0) + (this.englishScore-0)
       }
     },
  computed: {
   //The default getter of calculation property only supports one-way binding
     sumScore1: function(){
      //At the console, enter VM Sumscore1 will not be called again, indicating that the calculated properties are cached
       console.info('sumScore1 Called')
       return (this.mathScore - 0) + (this.englishScore -0)
     },
     //Specify getter/setter bidirectional binding
     sumScore2 : {
       get: function() {
        console.info('sumScore2 Called')
        return (this.mathScore-0) + (this.englishScore-0)
       },
       set: function(newValue) {//Value is the updated value
       // When called, sumScore2 is updated, and then math and English are updated to the average score
        var avgScore = newValue / 2
        this.mathScore = avgScore
        this.englishScore = avgScore
       }
      }
     }
   })
  </script>
</body>
Listener watch
When the attribute data changes, the callback function of the corresponding attribute will be called automatically for calculation inside the function
Listen for the specified properties through the watch option or $watch() of the vm instance
Requirements:
- Listen for math scores through the watch option. When the math is updated, the callback function recalculates the total score sumScore3
- Via VM$ The watch() option listens for English scores. When the English is updated, the callback function recalculates the total score sumScore3
Note: add a sumScore3 attribute in the data selection
<body>
 <div id="app">
   mathematics:<input type="text" v-model="mathScore" ><br>
   English:<input type="text" v-model="englishScore"><br>
   Total score(method-one-way): <input type="text" v-model="sumScore()"><br>
   Total score(Calculation properties-one-way): <input type="text" v-model="sumScore1"><br>
   Total score(Calculation properties-two-way): <input type="text" v-model="sumScore2"><br>
   Total score(monitor): <input type="text" v-model="sumScore3"><br>
 </div>
  <script src="./node_modules/vue/dist/vue.js"></script>
  <script type="text/javascript">
     var vm = new Vue({
      el: '#app',
      data: {
          mathScore: 80,
           englishScore: 90,
            sumScore3: 170
          },
      methods: { //Don't lose s
         sumScore: function () {
         //At the console, enter VM Sumscore() is called every time
           console.log('sumScore Called')
         // `this ` points to the current vm instance. Subtracting 0 is to convert a string to a number
           return (this.mathScore - 0) + (this.englishScore -0)
         }
       },
       // Calculation properties
      computed: {
      // The default getter only supports one-way binding
      sumScore1 : function () {
      //At the console, enter VM Sumscore1 will not be called again, indicating that the calculated properties are cached
        console.log('sumScore1 Called')
        return (this.mathScore - 0) + (this.englishScore -0)
      },
      //Specify getter/setter bidirectional binding
      sumScore2 : {
        get: function () {
             console.log('sumScore2 Called')
             return (this.mathScore-0) + (this.englishScore-0)
            },
        set: function (newValue) {//Value is the updated value
        // When called, sumScore2 is updated, and then math and English are updated to the average score
             var avgScore = newValue / 2
             this.mathScore = avgScore
             this.englishScore = avgScore
           }
         }
      },
      //Listener mode 1: watch option
      watch : {
      //When the math is modified, update the total score sumScore3
        mathScore : function (newValue, oldValue) {
        //newValue is the newly entered math score
        this.sumScore3 = (newValue-0) + (this.englishScore-0)
      }
    }
  })
  //Listener mode 2: call through vm object
  //The first parameter is the listening property name and the second callback function
  vm.$watch('englishScore', function (newValue) {
  //newValue is the newly entered English score
    this.sumScore3 = (newValue-0) + (this.mathScore-0)
 })
 </script>
</body>
Class and Style bind v-bind
Specifying styles through class lists and styles is a common requirement for data binding. They are all attributes of elements, which are processed with v-bind, in which
The type of result can be string, object or array.
Syntax format
v-bind:class = 'expression' or: class = 'expression'
The expression of class can be:
- String: class="activeClass"
- Object: class="{active: isActive, error: hasError}"
- Array: class = "['active ','error']" pay attention to adding single quotation marks, otherwise you will get the value in data
v-bind:style = 'expression' or: style = 'expression'
The expression of style is generally an object
:style="{color: activeColor, fontSize: fontSize + 'px'}"
Note: the value values activeColor and fontSize in the object are attributes in data
<body>
 <!-- Step 2:define styles -->
  <style>
   .active {
      color: green; }
   .delete {
      background: red; }
   .error {
      font-size: 30px;
    }
  </style>
  <div id="app">
   <h2>Class Binding, v-bind:class or :class</h2>
   <!--activeClass Will from data The value obtained in is active,The corresponding style is green-->
   <p v-bind:class="activeClass">String expression</p>

   <!-- isDelete by true,Render delete Style; When hasError by false,Not take error style;-->
   <p :class="{delete: isDelete, error: hasError}">Object expression</p>

 <!--- Render 'active', 'error' style,Be careful to use single quotes,Or get data Values in -->
   <p :class="['active', 'error']">Array expression</p>

   <h2>Style binding, v-bind:style or :class</h2>
   <p :style="{color: activeColor, fontSize: fontSize + 'px'}">Style binding</p>

 </div>
 <script src="./node_modules/vue/dist/vue.js"></script>
 <script type="text/javascript">
   new Vue({
    el: '#app',
    data: {
      activeClass: 'active',
      isDelete: true,
      hasError: false,
      //Demonstrate Style binding
      activeColor: 'red',
      fontSize: 20
     }
   })
 </script>
</body>
Conditional rendering v-if
Conditional instruction
Whether v-if renders the current element
v-else
v-else-if
v-show is similar to v-if, except that the element will always be rendered and kept in the DOM. It just simply switches the CSS attribute display of the element to show or hide
<body>
 <style>
   .box {
     width: 200px;
     height: 200px;
     background: red;
   }
 </style>
 <div id="app">
  <h2>v-if conditional rendering </h2>
  <input v-model="seen" type="checkbox" >When checked, a small red block will be displayed
  <!-- v-if by true The render current element is displayed, -->
   <div v-if="seen" class="box" ></div>
   <p v-else="seen">Red block hidden</p>

   <h2>v-show conditional rendering </h2>
   <!-- v-show Elements of are always rendered and retained in the DOM in,
   It's just a simple way to switch elements CSS attribute display Show hide,Instead of reloading div-->
   <div v-show="seen" class="box" ></div>
 </div>
   <script src="./node_modules/vue/dist/vue.js"></script>
   <script type="text/javascript">
     var vm = new Vue({
      el: '#app',
      data: {
       seen: false
      }
    })
   </script>
</body>
Comparison between v-if and v-show
When are elements rendered
If the initial condition is false, v-if does nothing and re renders the condition element whenever the condition is true
v-show no matter what the initial conditions are, the elements will always be rendered and simply switch based on CSS
Use scene selection
v-if has higher switching overhead,
v-show has higher initial rendering overhead.
Therefore, if you need to switch very frequently, it is better to use v-show; If the conditions rarely change after running, it is better to use v-if.
List rendering v-for
List rendering instructions
v-for iterative array
Syntax: v-for="(alias, index) in array"
Description: alias: alias of array element iteration; Index: the array index value starts from 0 (optional).
<div v-for="item in items" :key="item.id"></div>
<div v-for="(item, index) in items" :key="item.id"></div>
items is the source data array, and item is the alias of the array element iteration.
Note: using the key special attribute, it will rearrange the element order based on the change of the key, and remove the elements that do not exist in the key
Properties of the v-for iteration object
Syntax: v-for="(value, key, index) in Object"
Description: Value: attribute value of each object; key: attribute name (optional); Index: index value (optional).
<div v-for="value in object" ></div>
<div v-for="(value, key) in object"></div>
<div v-for="(value, key, index) in object"></div>
Note: when traversing an object, press object The results of keys () are traversed, but there is no guarantee that its results are in the same order under different JavaScript engines.
You can use of instead of in as the separator
<body>
 <div id="app">
  <h2>1. Iterative array</h2>
   <ul>
     <!-- e Alias the current object, index Array subscript 0 starts-->
     <li v-for="(e, index) in emps" :key="index">
      No.:{{index+1}},full name:{{e.name}},Salary:{{e.salary}}
     </li>
   </ul>
   <br>
   <h2>2. Iteration object</h2>
   <ul>
     <!-- value Is the attribute value, key Is the property name, index Index value-->
     <li v-for="(value, key, index) in emps[0]">
      The first{{index+1}}Attributes are:{{key}} = {{value}}
     </li>
   </ul>
 </div>
 <script src="./node_modules/vue/dist/vue.js"></script>
 <script type="text/javascript">
   var vm = new Vue({
    el: '#app',
    data: {
      emps:[ //array
        {name: 'Jack Ma', salary: '20000'},
        {name: 'pony ', salary: '18000'},
        {name: 'Qiang Dong Liu', salary: '13000'}
       ]
     }
   })
 </script>
</body>
Event handling v-on
Event handling method
Full format: v-on: event name = "function name" or v-on: event name = "function name (parameter...)"
Abbreviation format: @ event name = "function name" or @ event name = "function name (parameter...)" note: @ is not followed by a colon
Event: the default formal parameter in the function, which represents the native DOM event
When multiple parameters of the called function are passed in, you need to use the native DOM event, which is passed in through $event as an argument
Function: used to listen for DOM events
<body>
 <div id="app">
   <h2>1. Event handling method</h2>
   <button @click="say">Say {{msg}}</button>
   <button @click="warn('hello', $event)">Warn</button>
 </div>
 <script src="./node_modules/vue/dist/vue.js"></script>
 <script type="text/javascript">
    var vm = new Vue({
      el: '#app',
      data: {
         msg: 'Hello, Vue.js'
       },
      methods: {
         say: function (event) {
           // `this ` points to the current Vue instance in the method
           alert(this.msg)
           // `Event ` is a native DOM event
           alert(event.target.innerHTML)
         },
         //Multiple parameters. If you need to use a native event, pass $event as an argument
         warn: function (msg, event) {
           alert(msg + "," + event.target.tagName)
          }
        }
      })
 </script>
</body>
Event modifier
. stop prevent click event from continuing to propagate event stopPropagation()
. prevent block event default behavior event preventDefault()
. once click event will be triggered only once
<body>
 <div id="app">
  <h2>1. Event handling method</h2>
  <button @click="say">Say {{msg}}</button>
  <button @click="warn('hello', $event)">Warn</button>
  <br>

  <h2>2. Event modifier</h2>
  <!--Click event to continue propagation-->
  <div @click="todo">
    <!--Called after clicking doThis Re call todo-->
    <button @click="doThis">Click the event to continue propagation</button>
  </div>
  <br/>
  <!-- Prevent click events from continuing to propagate,-->
  <div @click="todo">
    <!--Call only after clicking doThis-->
    <button @click.stop="doThis">Blocking click events will continue to propagate</button>
  </div>

  <!-- Block event default behavior -->
  <a href="http://www.baidu. Com "@click.prevent =" dostop "> Baidu</a>

  <!-- The click event will only be triggered once -->
  <button @click.once="doOnly">The click event will only be triggered once: {{num}}</button>
</div>
<script src="./node_modules/vue/dist/vue.js"></script>
<script type="text/javascript">
   var vm = new Vue({
      el: '#app',
      data: {
        msg: 'Hello, Vue.js',
        num: 1
      },
      methods: {
        say: function (event) {
           // `this ` points to the current Vue instance in the method
           alert(this.msg)
           // `Event ` is a native DOM event
           alert(event.target.innerHTML)
        },
        //Multiple parameters. If you need to use a native event, pass $event as an argument
        warn: function (msg, event) {
           alert(msg + "," + event.target.tagName)
        },
        todo: function () {
           alert("todo....");
        },
        doThis: function () {
           alert("doThis....");
        },
        doStop: function () {
           alert("href Default jump blocked....")
        },
        doOnly: function() {
           this.num++
        }
      }
    })
 </script>
</body>
Key modifier
Format: v-on:keyup Key name or @ keyup Key name
Common key names:
.enter
.tab
. delete (capture delete and backspace keys)
.esc
.space
.up
.down
.left
.right
<body>
    <div id="app">
        <h3>1. Event handling method v-on or @</h3>
        <button v-on:click="say">Say {{msg}}</button>
        <!-- $event It represents the original Dom event -->
        <button @click="warn('hello', $event)">Warn</button>

        <h3>2. Event modifier</h3>
        <!-- 2.1 Prevent click events from continuing to propagate -->
        <div @click="todo">
            <button @click="doThis">Click the event to continue propagation</button>
        </div>
        <br>
        <div @click="todo">
            <!-- .stop Function: to prevent the propagation of events -->
            <!--Call only after clicking doThis-->
            <button @click.stop="doThis">Blocking click events will continue to propagate</button>
        </div>
        <br>

        <!-- 2.2 Block default behavior for events -->
        <a href="https://cn. vuejs. Org / "@click.prevent =" dostop "> Vue official documents</a>

        <!-- 2.3 The click event is triggered only once -->
        <button @click.once="doOnly">The click event is triggered only once:{{num}}</button>

        <br>

        <h3>3. Key modifier or key code</h3>
        <input type="text" @keyup.enter="keyEnter"><!--Called when entering the input box and pressing enter keyEnter-->
        <input type="text" @keyup.space="keySpace"><!--Called when entering the input box and pressing enter keySpace-->

        <input type="text" @keyup.13="keyCode">
    </div>
    <script src="./node_modules/vue/dist/vue.js"></script>
    <script>
        new Vue({
            el: '#app',
            data: {
                msg: 'Hello word!!',
                num: 0
            },
            methods: { //Define event handling functions
                say: function (event) {
                    // Event represents the Dom native event, Vue JS, it will automatically pass it in,
                    // `this ` points to the current Vue instance in the method
                    alert(this.msg)
                    alert(event.target.innerHTML)
                },
                warn: function (name, event) {
                    //If the function has multiple parameters, and the dual needs to use the native event, you need to use $event as the parameter
                    alert(name + ',' + event.target.tagName)
                },
                doThis: function () {
                    alert('doThis....')
                },
                todo: function () {
                    alert('todo....')
                },
                doStop: function () {
                    alert('doStop...href Default behavior has been blocked')
                },
                doOnly: function () {
                    this.num ++
                },
                keyEnter: function () {
                    alert('The Enter key is currently pressed')
                },
                keySpace: function() {
                    alert('You are currently pressing the spacebar')
                },
                keyCode: function () {
                    alert('Press 13')
                }
            },
        })

    </script>
</body>
Form data bidirectional binding v-model
- One way binding: data changes and view changes; The view changes (html is updated on the browser console), and the data remains unchanged; The above are all one-way bindings
- Two way binding: data changes and view changes; The view changes (updated in the input box) and the data changes;
Basic usage
The v-model instruction is used for bidirectional binding of form data for the following types:
Texttext
textarea multiline text
radio button
checkbox check box
select drop-down box
<body>
  <div id="demo">
        <!-- @submit.prevent The default behavior of blocking events. Currently blocked is action behavior -->
    <form action="#" @submit.prevent="submitForm">
        full name(text): <input type="text" v-model="name">
        <br><br>

        Gender(radio button):
            <input name="sex" type="radio" value="1" v-model="sex"/>male
            <input name="sex" type="radio" value="0" v-model="sex"/>female
        <br><br>

        skill(Checkbox ):
            <input type="checkbox" name="skills" value="java" v-model="skills">Java development
            <input type="checkbox" name="skills" value="vue" v-model="skills">Vue.js development
            <input type="checkbox" name="skills" value="python" v-model="skills">Python development
        <br><br>

        city(Drop down box):
        <select name="citys" v-model="city">
            <option v-for="c in citys" :value="c.code">
                {{c.name}}
            </option>
        </select>
        <br><br>

        explain(Multiline text): <textarea cols="30" rows="5" v-model="desc"></textarea>
        <br><br>
        <button type="submit" >Submit</button>
    </form>
</div>

<script src="./node_modules/vue/dist/vue.js"></script>
<script>
    new Vue({
        el: '#demo',
        data: {
            name: '',
            sex: '1',   //Male is selected by default
            skills: ['vue', 'python'], //Vue is selected by default JS development, Python development
            citys: [//Initialize drop-down box
                {code: 'bj', name: 'Beijing'},
                {code: 'sh', name: 'Shanghai'},
                {code: 'gz', name: 'Guangzhou'}
            ],
            city: 'sh', // The default selected city is Shanghai
            desc: ''
        },
        methods: {
            submitForm: function () { //Process submission form
                //Send ajax asynchronous processing
                alert(this.name + ', ' + this.sex + ', ' + this.skills +  ', ' + this.city + ', ' + this.desc)
            }
        }
    })
  </script>
</body>
Transition & animation effects
What is transition & Animation
Elements can be filtered or animated when they are displayed and hidden.
Commonly used transitions and animations are implemented using CSS
- Different effects can be achieved by operating the "filtering" or "animation" in CSS
- Add a parent element to the target element and let the parent element achieve the effect by automatically applying the class class name
Related class names dynamically added for corresponding elements during transition and Animation:
- XXX enter: defines the effect before display.
- XXX enter active: defines the effect of the display process.
- XXX enter to: defines the effect after display.
- XXX leave: defines the effect before hiding.
- XXX leave active: defines the effect of the hidden process.
- XXX leave to: defines the effect after hiding.
Filtering effect cases
1. Add a parent element for the target element < transition name = "XXX" >
2. Define class transition style
- Specify transition style: Transition
- Specifies the style when hidden: opacity (duration) / other
3. Function realization
When the button is clicked, the hidden text is displayed
Effect 1: show and hide gradient effects
Effect 2: the displayed and hidden have a translation effect, and the duration is different
    <style>
        /* Show or hide transition effects */
        .mxg-enter-active, .mxg-leave-active {
             transition: opacity 1s; /*Transition: the gradient effect lasts for 1 second */
        }
        /* Show the effect before or after hiding */
        .mxg-enter, .mxg-leave-to {
             opacity: 0; /* It's all hidden effects */
        }

        /* You can specify different effects for show and hide */
        /* Display transition effect for 1 second */
        .meng-enter-active {
            transition: all 1s; /*all All effects, lasting for 1 second*/
        }
        /* Hide transition effect for 5 seconds */
        .meng-leave-active {
            transition: all 5s; /*all All effects, lasting for 5 seconds*/
        }

        /* Show the effect before or after hiding */
        .meng-enter, .meng-leave-to {
             opacity: 0; /* It's all hidden effects */
             transform: translateX(10px); /*Move 10px horizontally*/
        }
    </style>
</head>
<body>
    <div id="app1">
        <button @click="show = !show">Gradual transition</button>
        <transition name="mxg">
            <p v-show="show" >mengxuegu</p>
        </transition>
    </div>

    <div id="app2">
            <button @click="show = !show">Gradient smooth transition</button>
            <transition name="meng">
                <p v-show="show" >vue</p>
            </transition>
    </div>
    <script src="./node_modules/vue/dist/vue.js"></script>
    <script>
        new Vue({
            el: '#app1',
            data: {
                show: true
            }
        })

        new Vue({
            el: '#app2',
            data: {
                show: true
            }
        })
    </script>
</body>
Animation effect case
CSS animation uses the same transition as CSS, but uses animation to specify the animation effect
Function realization:
After clicking the button, the text content has the effect of zooming in and out
Note: there is a problem with the source code on the official website. You should add style = "display: inline block" to the < p > element
    <style>
        /* Animation effects during display */
        .bounce-enter-active {
            animation: bounce-in 1s;
        }
        /* Animation effects during hiding */
        .bounce-leave-active {
            animation: bounce-in 1s reverse;
        }

        @keyframes bounce-in {
            0% { /*Percentage of duration, e.g. for 1s: 0% for 0 seconds, 50% for 0.5*/
                transform: scale(0); /*Zoom out to 0*/
            }

            50% {
                transform: scale(1.5); /*Zoom in 1.5x*/
            }

            100% {
                transform: scale(1); /*Original size*/
            }
        }
    </style>
</head>

<body>
    <div id="demo">
        <button @click="show = !show">Zoom in and out animation</button>
        <transition name="bounce">
            <p v-show="show" >vuejs</p>
        </transition>
    </div>
    <script src="./node_modules/vue/dist/vue.js"></script>
    <script>
        new Vue({
            el: '#demo',
            data: {
                show: true
            }
        })
    </script>
</body>
Custom instruction
Role of custom directives
In addition to built-in directives, Vue also allows you to register custom directives. In some cases, you still need to perform underlying operations on ordinary DOM elements. At this time, it is more convenient to use custom instructions.
Custom instruction document: https://cn.vuejs.org/v2/guide/custom-directive.html
Registering and using custom instruction methods
1. Register global instructions
// The instruction name should not contain v-
Vue.directive('Instruction name', {
 // el represents the DOM element that uses this instruction
 // Binding can obtain the binding value using this instruction, etc
  inserted: function (el, binding) {
   // Logic code
  }
})
2. Register local instructions
directives : {
  'Instruction name' : { // The instruction name should not contain v-
      inserted (el, binding) {
        // Logic code
      }
   }
}
Note: when registering, the instruction name should not contain v-
3. Use instructions:
When referring to an instruction, the instruction name is preceded by v-
It can be used directly on the element: v-instruction name = 'expression'
Case demonstration
Requirements:
1. The output text content is automatically converted to uppercase, and the font is red (the function type is v-text, but the display content is uppercase)
2. When the page is loaded, this element will get focus (Note: autofocus does not work on mobile Safari)
<body>
<div id="app">
    <p v-upper-text="message">xxxxx</p>
    Auto focus:<input type="text" v-focus>
</div>
<div id="app2">
    <p v-upper-text="msg">xxxxx</p>

</div>
<script src="./node_modules/vue/dist/vue.js"></script>
<script>
    // Register a global user-defined instruction, which can be used under multiple Vue management portals
    // The first parameter is the instruction name, but it should not start with v -
    // Register a global v-upper-text instruction
    Vue.directive('upper-text',{
        //Generally, the operation of style is in bind, and the bind function is called only once
        //Because it's a style, you don't need to insert elements into the DOM, just as link doesn't care whether elements are loaded when it introduces CSS files
        bind: function (el) {
            el.style.color = 'red'
        },
        //Generally, the js operation is in inserted, and inserted is called only once
        // el represents the DOM element that uses this instruction
        // Binding is used to obtain the binding value, expression, instruction name, etc. of the current instruction
        inserted: function (el, binding) {
            // The value obtained in the v-upper-text instruction is capitalized and output to the label body
            el.innerHTML = binding.value.toUpperCase()
        }
    })

    new Vue({
        el: '#app',
        data: {
            message: 'Progressive JavaScript frame '
        },
        //Register local custom instruction: this instruction can only be referenced under the entry of the current Vue instance management
        directives: {//Register a local instruction v-focus
            'focus': { // Instruction name,
                bind: function () {

                },
                //Operations related to js behavior are best performed in inserted, and operations related to style can be performed in bind
                // Refresh page to get focus automatically
                inserted: function (el, binding) {
                    //The element affected by v-focus will automatically get the focus after refreshing the page
                    el.focus()
                }
            }
        }
    })
</script>
</body>
MVVM design pattern
- What is: the re division of the three major parts of the front-end code
- Old division:
(1). HTML is a language that specifically defines web content
(2). CSS is a language that specifically defines web page styles
(3). Js is specialized in manipulating page content and style, and adding a language for interactive behavior - Problem: because HTML and CSS are weak! Missing essential elements of programming language!
(1). Without variables, if you want the content to change automatically, it is impossible!
(2). Missing necessary program structure: no branches and loops
Cause: JS should bear all the code of the operation page! This leads to cumbersome JS code and a lot of repetitive code! - New division:
(1). Interface / view:
a. Including traditional HTML+CSS
b. Enhanced the function of HTML!
1). For example: variables can be written in HTML!
2). If else or for loop can be written in HTML
3). Event binding can be written in HTML!
(2). Model data: all required variables on the page are stored in one object!
Problem: the variable value in the model data will not automatically run to the specified position on the page!
(3). View model: bind the view and model with an object!
Binding result: the variable value in the data model can automatically run to the specified position in the view without any js coding! When the data in the model object changes, the variable value at the corresponding position in the view changes automatically! - Principle of MVVM: how does Vue framework implement MVVM design pattern
(1). new Vue() loads the data object
a. Break up the data object, and the internal attributes of data directly belong to the new Vue() object
b. Hide each original attribute in data
c. For each attribute in data, please Bodyguard:
1). Each attribute in data has a pair of get/set methods
2). In the future, set() will be triggered automatically whenever you want to modify variables in data
3). In the set method of each attribute, a notify() function call is automatically implanted. Whenever you try to modify the attribute value in data, you will automatically call set(). If you call set() automatically, you will automatically notify()
(2). Load virtual DOM tree:
a. Find the parent element of the area to be monitored through the selector of the el attribute value
b. Create a virtual DOM tree
c. Scan the area to be monitored:
1). Every time an element of {{variable}} is found, the information of the element is recorded into the virtual DOM tree. At the same time, the value of the variable with the same name in data is used to replace the position of {{n}} in the page for the first time.
2). Every time an @ event name = "function name" element is found, it will automatically become:
On event name = "new Vue(). Function name"
(3). Load methods object: all methods in the methods object will be broken up and directly belong to the level of new Vue() and the broken attributes in data
Therefore, in the methods, if you want to operate the attribute in data, you can write it as "this. Attribute name"!
(4). When an event is triggered, the function specified in methods in new Vue() is automatically called to execute this Modification of property name. Modify the set() method that will automatically trigger the attribute, and automatically trigger the notify function inside set():
a. Traverse the virtual DOM tree to find only the individual elements affected
b. Use the DOM operations encapsulated in the virtual DOM tree in advance to modify only the affected individual elements in the page—— efficient! - Summary: principle of MVVM / binding principle of Vue:
Accessor properties + observer mode + virtual DOM tree - What is a virtual DOM tree:
(1). What is a virtual DOM tree: a compact DOM tree that holds only a small number of elements that may change
(2). advantage:
a. Small, fast!
b. Only update the affected elements, high efficiency!
c. It encapsulates the DOM operation, and there is no need for our programmers to code repeatedly!
Binding syntax
Same as ${} in template string
Interpolation syntax:
- What is binding syntax: let the content in HTML change automatically with the change of variables in the program—— That is to add variable function to HTML
- When: as long as the content of the element wants to change automatically with the variable
- How to: < element > XXXX {{variable name}} XXXX < / element >
- Principle:
(1). When the page content is loaded for the first time, the initial value of the variable with the same name in data will be used instead of the {variable name}} position
(2). When the variable with the same name in data is changed in new Vue(), the position of {{variable name}} is automatically updated to the new value - Summary: what can and cannot be put in {}}
(1). You can put variables, expressions, function calls, create objects, access array elements, and three items
(2). Cannot put: program structure (branch and loop), function call without return value - Example: using vue to display different content on a page
<head>
<meta charset="UTF-8">
<meta name="viewport" content="width=device-width, initial-scale=1.0">
<meta http-equiv="X-UA-Compatible" content="ie=edge">
<title>Document</title>
<script src="js/vue.js"></script>
</head>
<body>
<div id="app">
  <h1>user name:{{uname}}</h1>
  <h2>Gender:{{sex==1?"male":"female"}}</h2>
  <h3>Order time :{{new Date(orderTime).toLocaleString()}}</h3>
  <h3>Subtotal:¥{{(price*count).toFixed(2)}}</h3>
</div>
<script>
var vm=new Vue({
  el:"#app",
  data:{
    uname:"dingding",
    sex:1,
    orderTime:1579507293225,
    price:12.5,
    count:5
    //In the future, these values will come from ajax requests
  }
})
</script>
</body>
instructions
- What is: special attributes for adding new functionality to HTML elements
- When: as long as HTML elements need some special functions, they need to use the corresponding instructions to implement them
- Including: 13 kinds
v-bind
- If the attribute value of an element wants to change dynamically:
(1). Problem: cannot bind with {}}
(2). Solution: the v-bind instruction should be used:
a. Standard writing method: < element v-bind: attribute name = "js expression" >
b. Stress: do not add {} before the attribute name. Add v-bind:, = "after =" plays the role of {}}! {}} and what can be written in "!
c. Abbreviation: actually, v-bind can be omitted! But: cannot omit< Element: attribute name = "js expression" >
(3). Example: dynamic change according to different variable values
<head>
  <meta charset="UTF-8">
  <meta name="viewport" content="width=device-width, initial-scale=1.0">
  <meta http-equiv="X-UA-Compatible" content="ie=edge">
  <title>Document</title>
  <script src="js/vue.js"></script>
</head>
<body>
<div id="app">
<!--hope img of src Properties, with variables PM25 Value change of
  If pm25<100, src Change to 1.png
  Otherwise, if pm25<200, src Change to 2.png
  Otherwise, if pm25<300, src Change to 3.png
  otherwise src Change to 4.png-->
<img :src="pm25<100?'img/1.png':
           pm25<200?'img/2.png':
           pm25<300?'img/3.png':
                    'img/4.png'" >
<h1>{{pm25<100?'img/1.png':
      pm25<200?'img/2.png':
      pm25<300?'img/3.png':
               'img/4.png'}}</h1>
</div>
<script>
var vm=new Vue({
  el:"#app",
  data:{
    //In this example: because only one variable pm25 is required on the page, there is only one variable pm25 in data
    pm25:125
  }
})
setInterval(function(){
  vm.pm25=Math.random()*400
},1000)
</script>
</body>
a tag and img call link from server
<div id="app">
  <img v-bind:src="imgURL" alt="">
</div>
  <script>
      var vm=new Vue({
        el:"#app",
        data:{
          imgURL:"https://cn.vuejs.org/images/logo.png" +
              "?_sw-precache=cf23526f451784ff137f161b8fe" +
              "18d5a"
        }
      })
  </script>
v-bind dynamic binding class object syntax
  <style>
   .active{
     color: red;
   }
  </style>
</head>
<body>
<div id="app">
 <!--<h2 class="active">{{message}}</h2>-->
  <!--<h2 :class="active">{{message}}</h2>-->
  <!--The object writing key is the class name and the value is Boolean. Select the class name by modifying the Boolean value,Meeting with internal class Merge does not overwrite-->
  <h2 v-bind:class="{active: isActive , line: isLine}">{{message}}</h2>
  <h2 v-bind:class="getClasses()">{{message}}</h2>
  <button v-on:click="btnClick()" >Click to change color</button>
</div>
  <script>
      var vm=new Vue({
        el:"#app",
        data:{
          message:"How do you do",
          isActive:true,
          isLine:true
        },
        methods:{
          btnClick:function(){
            this.isActive = !this.isActive
          },
          getClasses: function(){
            return {active: this.isActive , line: this.isLine}
          }
        }
      })
  </script>
v-bind dynamic binding style object syntax
<div id="app">
<!--<h2 :style="{key(Attribute name): value(Attribute value)}">{{message}}</h2>-->
<!--style Followed by an object type, Object key yes css Attribute name,
  Object value Is the specific assigned value,Values can come from data Properties in-->

 <!--50px Must be quoted  vue Property values in are parsed as variables without quotes-->
  <!--<h2 :style="{fontSize: '50px'}">{{message}}</h2>-->

  <!--finalSize Use as a variable-->
  <!--<h2 :style="{fontSize: finalSize}">{{message}}</h2>-->
  <!--<h2 :style="{fontSize: finalSize + 'px', color: finaColor}">{{message}}</h2>-->
  <h2 :style="getStyles()">{{message}}</h2>

</div>
<script src="vue.js"></script>
<script>
  const app = new Vue({
    el:'#app',
    data:{
    message:'How do you do',
      // finalSize: '100px'
      finalSize: 100,
      finaColor:'red'
    },
    methods: {
      getStyles: function(){
        return{fontSize: this.finalSize + 'px', color: this.finaColor}
      }
    }
  })
</script>
v-bind dynamic binding class array syntax
<div id="app">
  <!--Variables are represented without quotes in the array,With variable string-->
 <h2 class="title" :class="[active, line]">{{message}}</h2>
  <h2 class="title" :class="getClasses()">{{message}}</h2>
</div>
  <script>
      var vm=new Vue({
        el:"#app",
        data:{
          message:"How do you do",
          // Variable aaa bbb requested by the server
          active:'aaa',
          line:'bbb'
        },
        methods: {
          getClasses: function () {
            return [this.active, this.line]
          }
        }
      })
  </script>
v-bind dynamic binding style array syntax
<div id="app">
  <!--style Followed by an array type, Multiple values are separated by commas-->
  <h2 :style="[baseStyle,baseStyle1]">{{message}}</h2>
</div>
<script src="vue.js"></script>
<script>
  const app = new Vue({
    el:'#app',
    data:{
      message:'How do you do',
      baseStyle: {backgroundColor: 'red'},
      baseStyle1:{fontSize: '100px'},
    }
  })
</script>
Control the display and hiding of an element according to the variable value in the program: two methods:
v-show
a. How to: < element v-show="js condition" >
b. Principle: when new Vue() scans v-show, the js condition will be executed automatically. If the condition is true, the element will be displayed as it is. Otherwise, if the js condition execution result is false, new Vue() automatically adds display:none to the current element to hide it
c. Example: point button control dialog box display and hide
<head>
  <meta charset="UTF-8">
  <meta name="viewport" content="width=device-width, initial-scale=1.0">
  <meta http-equiv="X-UA-Compatible" content="ie=edge">
  <title>Document</title>
  <style>
    .alert{
      width:300px;
      height:100px;
      position:fixed;
      padding:10px;
      top:50%;
      left:50%;
      margin-left:-160px;
      margin-top:-60px;
      background-color:#faf
    }
    .alert>span{
      cursor:pointer;
      border:1px solid #fff;
      float:right;
      padding:5px;
    }
  </style>
  <script src="js/vue.js"></script>
</head>
<body>
<div id="app">
  <!--Let the dialog box display when you want to click the button-->
  <button @click="showIt">click me</button>
  <div v-show="show" class="alert">
    <!--Hope point x Close the dialog box when-->
    <span @click="close">x</span>
    Your browser version is too low, please upgrade!
  </div>
</div>
<script>
var vm=new Vue({
  el:"#app",
  data:{
    //In this example: because a bool variable show is required on the page, it controls the display and hiding of the dialog box
    show:false
  },
  methods:{
    //Because clicking a button on the page requires calling a function called showIt, so
    //showIt:function(){
    showIt(){
      //In this example: call showIt to display the dialog box!
      //So:
      this.show=true;
    },
    //Because clicking the x button on the page requires calling a function called close, so
    close(){
      //In this example: call close to close the dialog box
      this.show=false;
    }
  }
})
</script>
</body>
v-if
a. It can also control the display and hiding of an element. In the above example, v-show can be directly replaced with v-if.
b. However, the principle is different: v-if during scanning, if the condition is true, the element is retained. Otherwise, if the condition is false, the element will be deleted!
Comparison between v-show and v-if
v-show uses display:none to hide elements without changing the DOM tree, which is efficient!
When the condition is false, v-show just adds an inline style to the element: display: none
v-if controls the display and hiding of elements by adding and deleting elements, which may modify the DOM tree frequently, which is inefficient!
When the condition is false, the element containing the v-if instruction will not exist in the dom at all
How to select during development:
Use v-show when you need to slice frequently between display and shadow
When there is only one switch, by using v-if
Controls the display and hiding of one of two elements:
(1). < Element 1 v-if = "condition" >
< element 2 v-else >
(2). emphasize:
a. Do not write conditions after v-else! (the same as else in js program)
b. v-if and v-else must be written together, and no other elements can be inserted
(3). Principle: if v-if is scanned, the condition is automatically executed. If the condition is true, keep the v-if element and delete the v-else element. Otherwise, if the condition is false, the v-if element is deleted and the v-else element is retained
(4). Example: switching login and logout status
<div id="app">
<!--You want to display the first one if you are already logged in div
    If you click logout, you want the status to change to not logged in-->
<div v-if="isLogin" id="div1">
  Welcome dingding | <a href="javascript:;" @click="logout">cancellation</a>
</div>
<!--Otherwise, if you are not logged in, the second one is displayed div
    If you click login, the status changes to logged in-->
<div v-else id="div2">
  <a href="javascript:;" @click="login">Sign in</a> | <a href="javascript:;">register</a>
</div>

<script>
var vm=new Vue({
  el:"#app",
  data:{
    //Because a variable isLogin is required on the interface to indicate whether to log in
    isLogin:false
  },
  methods:{
    //Because you click login on the page, you need to call the login function
    login(){
      //Click login to modify the status to logged in
      this.isLogin=true;
    },
    //Because you click logout on the page, you need to call the logout function
    logout(){
      //Click logout to change the status to not logged in
      this.isLogin=false;
    }
  }
})
</script>
- Select one of multiple elements to display:
(1). < Element 1 v-if = "condition1" >
< element 2 v-else-if = "condition 2" >
... ...
< element n v-else >
(2). emphasize:
a. Do not write conditions after v-else! (the same as else in js program)
b. v-if and v-else-if and v-else must be written together, and no other elements can be inserted
(3). Principle: when new Vue scans here:
a. new Vue() automatically evaluates each condition in turn.
b. If the condition is true, the element will be retained and other elements will be deleted
c. If all conditions are not met, only the v-else element is retained and the remaining elements before are deleted
(4). Example: multiple expressions, select one to display
<div id="app">
<!--Dependent variable PM25 The value changes in four img Select one of them to display and delete the others img.
  If pm25<100, Display 1.png
  Otherwise, if pm25<200, Display 2.png
  Otherwise, if pm25<300, Display 3.png
  Otherwise, 4 is displayed.png-->
<img v-if="pm25<100" src="img/1.png">
<img v-else-if="pm25<200" src="img/2.png">
<img v-else-if="pm25<300" src="img/3.png">
<img v-else src="img/4.png">
</div>
<script>
var vm=new Vue({
  el:"#app",
  data:{
    //In this example: because only one variable pm25 is required on the page, there is only one variable pm25 in data
    pm25:125
  }
})
setInterval(function(){
  vm.pm25=Math.random()*400
},1000)
</script>
<div id="app">
  <span v-if="isUser">
    <label for="username">User account</label>
    <!--key As a different identity, it will not be reused-->
    <input type="text" id="username" placeholder="User account" key="username">
  </span>
  <span v-else>
    <label for="email">User mailbox</label>
    <input type="text" id="email" placeholder="User mailbox" key="email">
  </span>
  <button @click="isUser = !isUser">Switch type</button>
</div>
<script src="vue.js"></script>
<script>
  const app = new Vue({
    el:'#app',
    data:{
      isUser:true
    }
  })
</script>
If you switch the type when there is input, you will find that the text still displays the previous input
This is because Vue takes performance into consideration when rendering DOM, and will reuse existing elements as much as possible instead of re creating new elements
Vue will find that the original input element is no longer used and is directly used as input in else
Solution: there is no need for Vue to have similar reuse problems. You can add key s to the corresponding input to take different values
High frequency written test questions (handwriting) observer mode
//observer mode: when the variable value is modified, all concerned people can be automatically notified and receive the new value
//Object to save data
var data={
  n:0, //Variables that outsiders want to obtain at any time keep a data that outsiders care about n
  observers:[],//Use an array to store all outsiders who care about this variable n in the future. These outsiders who covet this variable n are also called observers
  //Define a function to modify the value of variable n
  setN(n) {
    this.n = n
    //Any time you modify the value of variable n, you can notify all outsiders who pay attention to n
    this.notifyAllObservers()
  },
  //Define a function to store the outsider (observer) objects that focus on variable n in the observers array in data for centralized notification.
  addObs(observer) {
    this.observers.push(observer)
  },
  //Define a function to notify outsiders who care about the variable n stored in the observers array in the current data that n has changed
  notifyAllObservers() {
    //Traverse each outsider object in the observers array
    this.observers.forEach(observer => {
      //Every time you traverse an outsider object, you will notify the outsider that the variable n it cares about has changed. Please get the new value of variable n in time
      observer.getNewN()
    })
  }
}

//Add three outsiders (observers) objects that care about variable n to the observers array of data
for(var i=0;i<3;i++){
  data.addObs({
    //Each outsider object includes two properties and a function
    name:`obs${i}`, //Outsider's name
    look: data, //Every outsider cares about the variables in the data object and stares at the data object
    //Each outsider prepares a function that can be used to retrieve the new value of n in the data object when the variable in data changes.
    getNewN:function(){
      console.log(`${this.name} known that n is updated to ${this.look.n}`)
    }
  })
}

// Test code
console.log("data take n When changed to 1:")
data.setN(1)
console.log("data take n When changed to 2:")
data.setN(2)
console.log("data take n When changed to 3:")
data.setN(3)
v-for
v-for traversal array
<div id="app">
  <ul>
  <!--Traversal does not require an index-->
  <!--<li v-for="item in names">{{item}}</li>-->

    <li v-for="(item, index) in names">
      <!--The subscript starts from 0 and the demand starts from 1-->
      {{index+1}}.{{item}}
    </li>
  </ul>
</div>
<script src="vue.js"></script>
<script>
  const app = new Vue({
    el:'#app',
    data:{
     names:['why','kobe','james','curry']
    }
  })
</script>
v-for traversal object
<!--v-for="(value,attribute,Serial number) in object  -->
<div id="app">
  <!--1.In the process of traversing the object,If only one value is obtained,So what you get is value-->
  <ul>
    <li v-for="item in info">{{item}}</li>
  </ul>

  <!--2.obtain key and value  format:(value ,key)-->
  <ul>
    <!--Parentheses and in If there is no space between them, an error will be reported-->
    <!--<li v-for = "(value,key)in info">{{key}}:{{value}}</li>-->
    <li v-for = "(value,key) in info">{{key}}:{{value}}</li>

  </ul>

  <!--3.obtain key and value and index   format:(value ,key)-->
  <ul>
    <li v-for="(value,key,index) in info">{{index}}.{{key}}:{{value}}</li>
  </ul>
</div>
<script src="vue.js"></script>
<script>
  const app = new Vue({
    el:'#app',
    data:{
      info:{
        name:'ws',
        age:18,
        height:1.88
      }
    }
  })
</script>
- Repeatedly generate multiple HTML elements with the same structure: v-for
(1). < Elements to be generated repeatedly v-for="(value, i) of array" >
Emphasize: v-for must be placed on the element to be generated repeatedly, not on the parent element!
(2). Principle:
a. When new Vue() scans here, it automatically traverses each element in the array after of
b. Each time you traverse an element, a copy of the current HTML element is created
c. Two variables before of:
1). value will automatically get the value of the array element currently being traversed
2). i will automatically obtain the subscript position currently being traversed
d. If you need to use the element value or subscript currently being traversed in the current element or child element, you can bind the values of value and i with binding syntax.
Stress: the use range of value and i is limited to the current element and its child elements, and cannot be used outside the current element!
(3). Example: traverse array elements and repeatedly generate multiple elements with the same structure
<div id="app">
<ul>
<!--In this case: Because you have to generate multiple li,therefore v-for To write in li On, not on li Parent element of ul upper-->
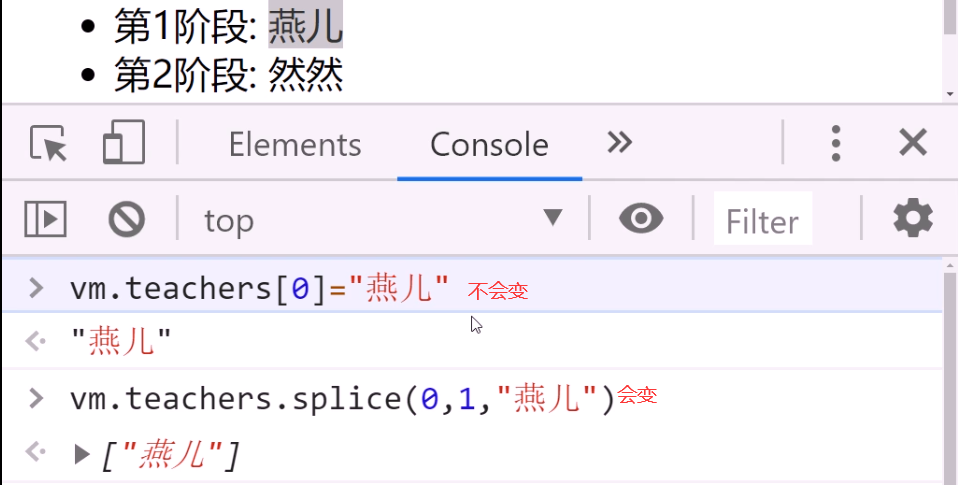
<li v-for="(value,i) of teachers" :key ="i">
The first{{i+1}}stage: {{value}}
</li>
</ul>
</div>
<script>
var vm=new Vue({
el:"#app",
data:{
teachers:["Bright","However","Dongdong","Taotao"]
}
})
</script>
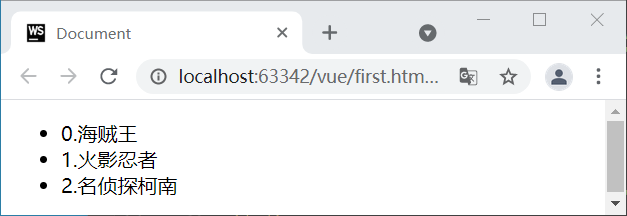
<div id="app">
  <ul>
    <li v-for="(m, index) in movies">{{index}}.{{m}}</li>
  </ul>
</div>
<script src="vue.js"></script>
<script>
  const app = new Vue({
    el:'#app',
    data:{
      movies:['One Piece','Naruto','Detective Conan']
    }
  })
</script>
(4)v-for can also:
a. You can traverse everything about numeric subscripts: such as strings
b. Each property in an object can be traversed
Example: traverse each attribute in the object and generate multiple html elements repeatedly
<div id="app">
  <!--Want to traverse data For each attribute of an object in, multiple objects with the same structure are generated repeatedly HTML element-->
  <ul>
    <li v-for="(value,key) of ym" :key ="key">{{key}} : {{value}}</li>
  </ul>
</div>
<script>
var vm=new Vue({
  el:"#app",
  data:{
    ym:{
      math:89,
      chs:69,
      eng:91
    }
  }
})
</script>
c. v-for can also count: give v-for a number, and it can generate a sequence that increases successively from 1!
1).< Elements to be generated repeatedly v-for="i of number" >
2). Principle: like people, v-for will automatically count from 1, and each count will automatically create a copy of the current element. Until the given number is reached.
3). Where: i will catch a number each time, which can be used in the binding of the current element and child elements.
Example: generate a specified number of paging buttons according to the number of pages
<head>
  <meta charset="UTF-8">
  <meta name="viewport" content="width=device-width, initial-scale=1.0">
  <meta http-equiv="X-UA-Compatible" content="ie=edge">
  <title>Document</title>
  <style>
  ul{ list-style:none }
  ul>li{
    float:left;
    border:1px solid #555;
    width:36px;
    height:36px;
    line-height:36px;
    text-align:center;
  }
  ul>li+li{
    border-left:0
  }
  </style>
  <script src="js/vue.js"></script>
</head>
<body>
<div id="app">
  <ul>
    <li v-for="i of pageCount">{{i}}</li>
  </ul>
</div>
<script>
var vm=new Vue({
  el:"#app",
  data:{
    pageCount:3
  }
})
</script>
</body>
Example: Click to change color
<style>
    .active{
      color: gold;
    }
</style>
</head>
<body>
<div id="app">
  <ul>
    <li v-for="(item,index) in movies"
        :class="{active: currentIndex===index}"
        @click="liClick(index)">
      {{index}}.{{item}}
    </li>

    <!--<li :class="{active: 0===currentIndex}"></li>-->
    <!--<li :class="{active: 1===currentIndex}"></li>-->
    <!--<li :class="{active: 2===currentIndex}"></li>-->
    <!--<li :class="{active: 3===currentIndex}"></li>-->
  </ul>
</div>
<script src="vue.js"></script>
<script>
  const app = new Vue({
    el:'#app',
    data:{
     movies:['Big brother Tangshan','Jingwu gate','Raptor crossing the river','a dragon and a tiger in combat','Death game'],
      currentIndex:0
    },
    methods:{
      liClick(index){
        this.currentIndex = index
      }
    }
  })
</script>
Shopping cart complete case (plus or minus the total number of removed)

<!doctype html>
<html lang="en">
<head>
  <meta charset="UTF-8">
  <meta name="viewport"
        content="width=device-width, user-scalable=no, initial-scale=1.0, maximum-scale=1.0, minimum-scale=1.0">
  <meta http-equiv="X-UA-Compatible" content="ie=edge">
  <title>Document</title>
  <style>
    table{
      border: 1px solid #e9e9e9;
      border-collapse: collapse;
      border-spacing: 0;
      margin: 0 auto;
    }
    th,td{
      padding: 10px 90px;
      border: 1px solid #e9e9e9;
      text-align: left;
    }
    th{
      background-color: #f7f7f7;
      color:#5c6b77;
      font-weight: 600;
    }
  </style>
</head>
<body>
<div id="app">
  <div v-if="books.length">
  <table>
    <thead>
     <tr>
       <th></th>
       <th>Book name</th>
       <th>Publication date</th>
       <th>Price</th>
       <th>Purchase quantity</th>
       <th>operation</th>
     </tr>
    </thead>
    <tbody>
      <tr v-for="(item,index) in books">
        <!--<td v-for="value in item">{{value}}</td>-->
        <td>{{item.id}}</td>
        <td>{{item.name}}</td>
        <td>{{item.data}}</td>
        <!--<td>{{item.price.toFixed(2)}}</td>-->
        <!--<td>{{getFinalPrice(item.price)}}</td>-->
        <td>{{item.price|showPrice}}</td>
        <td>
          <button @click="decrement(index)" v-bind:disabled="item.count<=0">-</button>
          {{item.count}}
          <button @click="increment(index)">+</button>
        </td>
        <td><button @click="removeHandle(index)">remove</button></td>
      </tr>
    </tbody>
  </table>
  <h2>Total price:{{totalPrice|showPrice}}</h2>
  </div>
  <h2 v-else>Shopping cart is empty</h2>
</div>
<script src="vue.js"></script>
<script>
  const app =new Vue({
    el:"#app",
    data:{
      books:[
        {
          id:1,
          name:'JavaScript Authoritative guide',
          data:'2021-3',
          price:139.00,
          count:0
        },
        {
          id:2,
          name:'JavaScript Advanced programming',
          data:'2019-10',
          price:128.00,
          count:0
        },
        {
          id:3,
          name:'You don't know JavaScript',
          data:'2021-6',
          price:204.00,
          count:0
        },
        {
          id:4,
          name:'JavaScript Design mode',
          data:'2019-9',
          price:59.00,
          count:0
        },
      ]
    },
    methods:{
      // getFinalPrice(price){
      //   return "¥"+ price.toFixed(2)
      // }
      increment(index){
        this.books[index].count++
      },
      decrement(index){
        this.books[index].count--
      },
      removeHandle(index){
        this.books.splice(index,1)
      }

    },
    computed:{
     totalPrice(){
       // 1. Normal for loop
       // let totalPrice = 0
       // for(let i=0;i<this.books.length; i++){
       //   totalPrice += this.books[i].price * this.books[i].count
       // }
       // return totalPrice

       // 2.for(let i in this.books)
      //  let totalPrice = 0
      //  for(let i in this.books){
      //    const book = this.books[i]
      //    totalPrice += book.price * book.count
      // }
      //  return totalPrice

       //3.for(let i of this.books)
       // let totalPrice = 0
       // for(let item of this.books){
       //       totalPrice += item.price * item.count
       //  }
       //     return totalPrice

       //4.reduce
       return this.books.reduce(function(preValue,book){
         return preValue + book.price * book.count
       },0)
     }
    },
    filters:{
      showPrice(price){
        return "¥"+ price.toFixed(2)
      }
    }
  })
</script>
</body>
</html>
Method of response expression in array
(5) Pit: if v-for traverses an array and modifies the array element value through subscript in the program, the HTML element on the page will not be changed automatically!
For example: this Teachers [0] = "swallow" page will not change!
Because the subscript 012 of the number type in the array... Cannot add the accessor property, it is not monitored!
Solution: in the future, modify the element value in the array in vue! Must use array function! To automatically update the page. Because functions are monitored.
For example: this teachers. Splice (0,1, "swallow")
Delete 1 element at position 0, and then put "swallow" at position 0
Result: the page will change automatically!
const app = new Vue({
    el:'#app',
    data:{
     letters:['a','b','c','d','e']
    },
    methods:{
      btnClick(){
        //0. Modify elements in the array by index value (not responsive)
        // this.letters[0] = 'b'
        //The page will not be modified. If there is no response, it can be written in split
        // this.letters.splice(0,1,'b')
        //Set (object to be modified, index value, modified value)
        Vue.set(this.letters,0,'b')

        // Seven responsive array methods
        //1.push method
        // this.letters.push('A')

        // 2.pop(): delete the last element in the array
        // this.letters.pop()

        // 3.shift(): deletes the first element in the array
        // this.letters.shift()

        // 4.unshift(): adds an element to the front of the array
        //  this.letters.unshift('A');
        // You can also add multiple elements. In the vue source code, unshift(...items:T[]):number; There are variable parameters items
        // this.letters.unshift('A','B','C')

        // 5.splice(start)
        // splice function: delete element / insert element / replace element
        // Delete elements: several elements need to be deleted when the second parameter is passed in (if there is no wear, all the following elements will be deleted)
        // const start = 2;
        // this.letters.splice(start,this.letters.length-start)

        // Replace element: the second parameter indicates how many elements to replace, followed by the previous element
        //  this.letters.splice(1,3,'f','g','h','j')

        // Insert element: the second parameter is passed in 0, and it should be followed by the element to be inserted
        //   this.letters.splice(1,0,'f','g','h')

        // 6.sort(): sort
        // this.letters.sort()

        // 7.reverse(): reverse
        // this.letters.reverse()
      }

    }
  })
key
It is officially recommended that we add a key attribute to the corresponding element or component when using v-for, which is actually related to the Diff algorithm of Vue's virtual DOM
key is mainly used to update the virtual DOM efficiently
<div id="app">
  <ul>
    <li v-for="item in letters" :key="item">{{item}}</li>
  </ul>
</div>
<script src="vue.js"></script>
<script>
  const app = new Vue({
    el:'#app',
    data:{
     letters:['A','B','C','D','E']
    }
  })
</script>
When there are many same nodes in a layer, that is, list nodes, we want to insert a new node
We hope to add an F between B and C. the default execution of diff algorithm is like this,
Is it inefficient to update C to F, D to C, E to D, and finally insert E
Therefore, we need to use key to make a unique identification for each node
Diff algorithm can correctly identify this node
Find the correct location area and insert a new node

Written test: why must v-for add: key
A: because the multiple elements generated repeatedly by v-for have no difference in element attributes except for different contents! Each repeatedly generated element is the same. Therefore, if an element in the array is modified in the future, v-for cannot recognize each HTML element, so it can only regenerate all HTML elements - low efficiency!
If the: key="i" attribute is bound to each element, each HTML element has a unique identifier key = "0" key = "1". When you modify the element at each position in the array in the future, you only need to modify the HTML element of the corresponding key, and other HTML elements remain unchanged—— efficient!
Summary: avoid regenerating all HTML elements when modifying array elements, but only update one of them! Improve modification efficiency!
how:
1). When traversing an array: < element v-for="(val,i) of array": key="i"
The Key values are 0 1 2 3
2). When traversing an object: < element v-for="(val,key) of object": key="key"
The Key values are: attribute name 1, attribute name 2
Because the attribute name in an object will not be repeated, the attribute name can also be used as: key to uniquely identify an HTML element
v-html
Binding HTML fragment content
(1). Problem: {cannot bind HTML fragment content.
Because: {{}} is essentially equivalent to textContent in DOM. It will display the HTML content as it is and will not be compiled!
(2). Solution: in the future, as long as the variable content to be bound is an HTML fragment, it will be bound with v-html!
(3). How to: < element v-html = "variable or expression containing HTML content" >
(4). emphasize:
a. v-html will compile the HTML content in the bound content and then display it to people
b. v-html is also an instruction, so js expressions can be written in the "" after v-html, such as string splicing!
c. If you use v-html, don't write content directly from the start tag and end tag of the element! Because it will be replaced by v-html content!
(5). Example: binding HTML content
<div id="app">
<h1>Source:{{html}}</h1>
<h1 v-html="'Source:'+html">
Welcome
</h1>
</div>
<script>
var vm=new Vue({
el:"#app",
data:{
html:`<p>come from<a href="javascript:;"><<Xinhua News Agency>></a>News of</p>`
}
})
</script>
Prevent users from briefly seeing {}
Problem: because the vue code is placed in the js file, if the network speed is slow and the vue code is not downloaded temporarily, the user is likely to see the binding syntax on the page for a short time, and the user experience is not good!
Two solutions:
v-cloak
(1). Temporarily hide elements with {}} content with v-cloak:
a. Step 2:
1). Add the v-cloak attribute on the element that contains the binding syntax {}}
2). Manually add style in css: [v-cloak] {display: none}
b. Principle:
1). Use the attribute selector to find all elements with v-cloak attribute and hide them temporarily
2). When new Vue() rendering is completed, all v-cloak attributes are automatically found and removed.
c. Example: use v-cloak to prevent users from seeing {cloak} briefly
<head>
  <meta charset="UTF-8">
  <meta name="viewport" content="width=device-width, initial-scale=1.0">
  <meta http-equiv="X-UA-Compatible" content="ie=edge">
  <title>Document</title>
  <style>
  [v-cloak]{
    display:none
  }
  </style>
  <script src="js/vue.js"></script>
</head>
<body>
<div id="app">
  <h1 v-cloak>Welcome: {{uname}}</h1>
</div>
<script>
setTimeout(function(){
  var vm=new Vue({
    el:"#app",
    data:{
      uname:"dingding"
    }
  })
},2000)
</script>
</body>
d. Problem: it is cumbersome to write instructions in HTML and manually add css selectors!
v-text
(2). Use v-text instead of {}} syntax in the content to bind non HTML fragment content:
a. < element v-text = "original {}}" content > < / element >
b. Principle:
1). Because the binding syntax is written in the attribute of the element, the user can't see the content of the element attribute without vue's help!
2). When new vue() reads v-text, it parses the content of v-text and replaces the content between the start tag and the end tag of the element
c. Emphasize:
1). Unlike v-html, v-text is equivalent to {}} and equivalent to textContent in DOM. Therefore, if v-text contains HTML fragments, they will not be compiled, but will be displayed to people as they are!
2). v-text is also an instruction, so js expressions can also be written in the "" after v-text, such as string splicing!
3). If you use v-text, don't write directly in the start tag and end tag of the element! Because it will be replaced by v-text content!
d. Example: use v-text to prevent users from seeing {text} briefly
<div id="app">
  <h1 v-text="'Welcome:'+uname"></h1>
</div>
<script>
setTimeout(function(){
  var vm=new Vue({
    el:"#app",
    data:{
      uname:"dingding"
    }
  })
},2000)
</script>
v-on
Event binding
(1). Standard writing:
a. div#app: < element v-on: event name = "handler ()"
b. In new vue():
methods:{
Processing function (formal parameter variable){
//The model variables in data can be accessed by "this. Attribute name"
}
}
(2). Abbreviation:
a. v-on: Available @ abbreviations
< element @ event name = "handler ()"
b. If the processing function does not need to pass parameters, () can be omitted
< element @ event name = "handler"
(3). Example: click the button to increase the number
<div id="app">
  <button @click="change(-1)">-</button>
  <span>{{n}}</span>
  <button @click="change(+1)">+</button>
</div>
<script>
var data={ n:0 }
var vm=new Vue({
  el:"#app",
  data:data,
  methods:{
    //In this example, because only one change function is required on the page, only one change function is added to methods
    //However, when the change() function is called on the page, a parameter value is passed in, so when defining the change function, you need to define a formal parameter to catch the actual parameter value
    change(i){
      //If i==+1, it means you want to + 1 this time
      if(i==+1){
        this.n++;
      }else{//Otherwise, if I=+ 1. Explain that I want to - 1 this time
        //- 1 can be used only when n > 0
        if(this.n>0){
          this.n--;
        }
      }
    }
  }
});
</script>
Event object
The event object in DOM is always passed in as the first parameter value of the event handling function by default:
Element on event name = function(e){
e->event
e.stopPropagation()
e.preventDefault()
e.target
e.offsetX e.offsetY
e.clientX e.clientY
}
How to get the event object in vue (how to get the mouse position in vue)
1). If the event handler does not need to pass in an argument value, then:
The event object is also automatically passed in as the first parameter value of the processing function. It can be caught with a formal parameter e when the function is defined -- the same as DOM
Example: use e to get mouse position:
<head>
  <meta charset="UTF-8">
  <meta name="viewport" content="width=device-width, initial-scale=1.0">
  <meta http-equiv="X-UA-Compatible" content="ie=edge">
  <title>Document</title>
  <style>
  div{
    width:300px; height:100px;
    margin:20px;
  }
  #d1{
    background-color:#aaf
  }
  #d2{
    background-color:#ffa
  }
  </style>
  <script src="js/vue.js"></script>
</head>
<body>
<div id="app">
<div id="d1" @click="doit">d1</div>
<div id="d2">d2</div>
</div>
<script>
var vm=new Vue({
  el:"#app",
  data:{

  },
  methods:{
    doit(e){//Same as DOM e
      console.log(`Point in d1 of: x:${e.offsetX},y:${e.offsetY}`);
    }
  }
})
</script>
</body>
Parameter transfer
<div id="app">
  <!--The method called by the event has no parameters. It is the same as without parentheses-->
  <button @click="btn1Click()">btn1Click()</button>
  <button @click="btn1Click">btn1Click</button>

  <button @click="btn2Click(123)">btn2Click(123)</button>
  <button @click="btn2Click()">btn2Click()</button>
  <!--When defining an event,Parentheses are omitted when writing methods,But the method itself requires a parameter,
      This time Vue Will default to browser generated event The event object is passed into the method as a parameter-->
  <!--Mouse event browser automatically generated event object-->
  <button @click="btn2Click">btn2Click</button>

  <!--When defining a method,We need event object,Other parameters are also required-->
  <!--Must write here $event vue Resolve as event Object if write event Will go data Variable found in event non-existent
   Parameters should be quoted(character string)Or I'll go too data The variable was not found in the-->
  <button @click="btn3Click('abc',$event)">btn3Click('abc',$event)</button>
  <button @click="btn3Click(abc,$event)">btn3Click(abc,$event)</button>
</div>
<script src="vue.js"></script>
<script>
  const app = new Vue({
    el:'#app',
    data:{
      message:'Hello'
    },
    methods:{
      btn1Click(){
        console.log("btn1Click");
      },
      btn2Click(event){
        console.log(event);
      },
      btn3Click(abc,event){
        console.log(abc,event);
      },
    }
  })
</script>
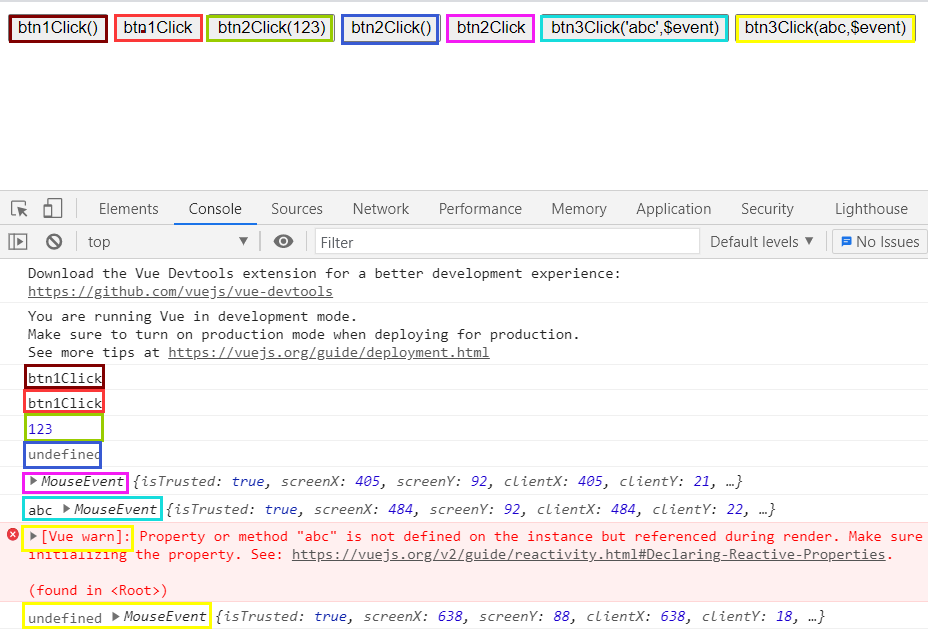
$event
Written test: if you want to pass in the custom argument value and get the event object:
i. With the help of $event keyword: a keyword built in vue framework that specifically points to the event object. Using $event is equivalent to using event object e
ii. When calling a function, $event can be passed into the function along with other argument values
iii. when defining a function, ordinary formal parameter variables can be used to catch the value of $event.
iv. example: use $event to get the mouse position and pass in the custom argument value
<head>
  <meta charset="UTF-8">
  <meta name="viewport" content="width=device-width, initial-scale=1.0">
  <meta http-equiv="X-UA-Compatible" content="ie=edge">
  <title>Document</title>
  <style>
  div{
    width:300px; height:100px;
    margin:20px;
  }
  #d1{
    background-color:#aaf
  }
  #d2{
    background-color:#ffa
  }
  </style>
  <script src="js/vue.js"></script>
</head>
<body>
<div id="app">
<div id="d1" @click="doit('d1',$event)">d1</div>
<div id="d2" @click="doit('d2',$event)">d2</div>
</div>
<script>
var vm=new Vue({
  el:"#app",
  data:{

  },
  methods:{
    doit(name,e){//Same as DOM e
      console.log(`Point in ${name}of: x:${e.offsetX},y:${e.offsetY}`);
    }
  }
})
</script>
</body>
v-once
Bind only once when the page is rendered for the first time. Even if the model variable changes later, the page will not be automatically updated: < element v-once >
Example: display time
<h1>Current system time: {{time}}</h1>
<!--You want to bind the online time only once when you open the web page for the first time. After that, even if time When the variable value changes, the online time will not be automatically updated-->
<h1 v-once>Online time: {{time}}</h1>
</div>
<script>
var vm=new Vue({
  el:"#app",
  data:{
    time:new Date().toLocaleString()
  }
})
setInterval(function(){
  vm.time=new Date().toLocaleString()
},1000)
</script>
v-pre
Prevent {}} in the element content from being vue compiled, and let {}} in the content be displayed as it is!
< element v-pre > XXX {XX}} XXX < / element >
Bidirectional binding
- One way binding: only the variable values in data can be automatically synchronized and updated to the HTML page. However, the modifications on the page cannot be automatically updated back to the data variable. (the first 11 are all)
(data - > div#app but div#app - X - > data) - Two way binding: it can automatically update the variable values in data to HTML pages synchronously. It can also automatically update the changes on the page back to the data variable.
(data <===> div#app) - When to use two-way binding: it is necessary to use two-way binding only when binding form elements! Because only form elements, users can modify its content on the page.
v-model
- How to: the binding principle of each form element is different:
1). Text box / text field: bound is the value attribute
a. < input V-model: value = "variable" / > / < textarea V-model: value = "variable" / > < / textarea >
b. Principle: when new Vue() scans here, it will automatically bind events for the current element. For example, if < input type = "text" V-model: value = "variable" >, it will be translated as: ο ninput = "vm. Variable = new value of the current text box".
c. Example: click the button, press enter, and enter the content in the text box to obtain the keywords entered in the text box and perform the search operation.
<div id="app">
  <!--Press enter on the text box to find-->
  <input type="text" v-model:value="keywords" @keyup="myKeyUp">
  <!--Click the button to find-->
  <button @click="search">use Baidu Search</button>
</div>
<script>
var vm=new Vue({
  el:"#app",
  data:{
    keywords:"macbook i5"
  },
  methods:{
    search(){
      console.log(`lookup ${this.keywords} Related content...`)
    },
       // $event
       //   ↓
    myKeyUp(e){
      //Only press enter to find
      if(e.keyCode==13){
        //Call the search() function next to
        this.search();
      }
    }
  },
  //If you want to change the variable keywords, perform the search again
  watch:{
    keywords(){
      console.log("Automatic call once watch Medium keywords function...")
      this.search();
    }
  }//All data: {}, methods: {}, and watch: {} in new vue() will be broken up and eventually directly belong to the new vue() object, which is of the same level, so you can this Methods, mutual visits.
})
</script>
(2). Radio button: bound with the checked attribute
a. < input type = "radio" name = "sex" value = "1" V-model: checked = "variable" > male
< input type = "radio" name = "sex" value = "0" V-model: checked = "variable" > female
b. Principle:
(1). From data - > Input: compare the value of the checked bound variable with the value of the current radio. If the value of the checked binding is equal to the value, the current radio is selected. Otherwise, uncheck.
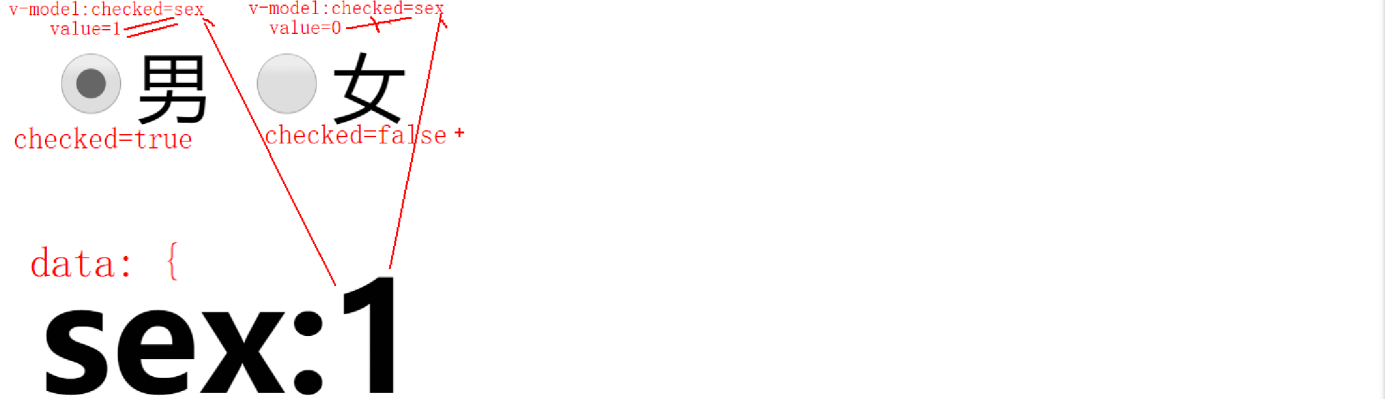
(2). After switching to select a radio, the value of the currently selected radio is used to replace the variable value in the data bound by the checked attribute. As a result, other positions in the page that pay attention to this variable will automatically change.
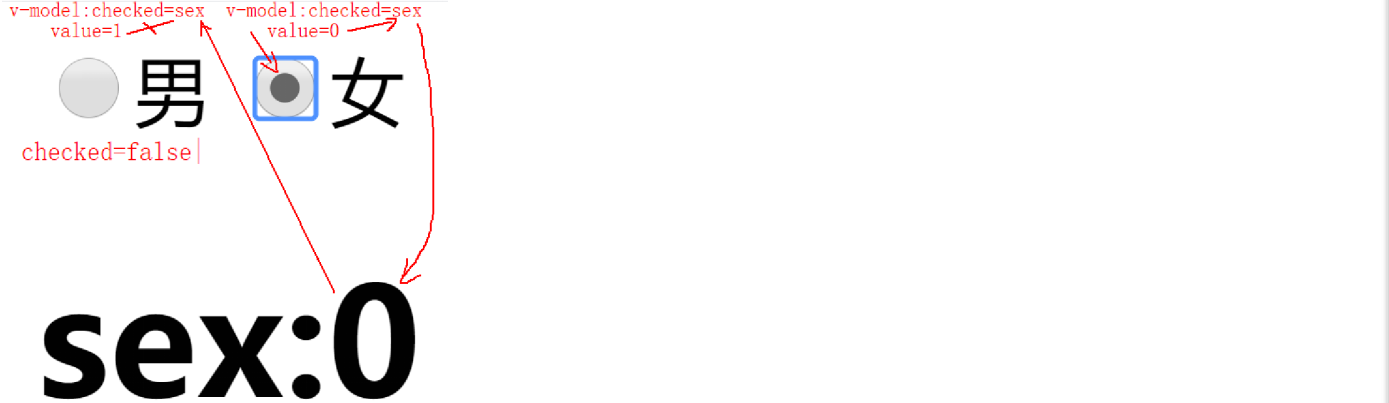
Example: select gender
<div id="app">
<label><input type="radio" name="sex" value="1" v-model:checked="sex">male</label>
<label><input type="radio" name="sex" value="0" v-model:checked="sex">female</label>
<h1>sex:{{sex}}</h1>
</div>
<script>
var vm=new Vue({
  el:"#app",
  data:{
    sex:1
  }
})
</script>
(3). Bi directional binding of select elements: because changing the selected item of a select changes the value of the entire select in the, the value of the select element should be bound
a.
<select v-model:value="variable">
		<option value="Value 1">Text1</option>
		<option value="Value 2">Text2</option>
		... ...
b. Principle:
1). From data - > select: bind the variable value with value and compare it with the value of each option. Select the option whose value is equal to the variable value
2). Switch the selected item in the select: replace the variable value in the data bound by the value of the select with the value value of the newly selected option. Causes all other positions of this variable to change automatically.
c. Example: select order status:
<div id="app">
<select v-model:value="orderStatus">
  <option value="0">Unpaid</option>
  <option value="10">Paid</option>
  <option value="20">Shipped</option>
  <option value="30">Signed in</option>
</select>
<h1>orderStatus:{{orderStatus}}</h1>
</div>
<script>
var vm=new Vue({
  el:"#app",
  data:{
    //0: unpaid 10: paid 20: shipped 30: signed in
    orderStatus:10
  }
})
</script>
(4). Bidirectional binding of a checkbox: all v-model s should be bound with the checked property because the checked property of the checkbox is changed by checking or unchecking the checkbox. And the bound variable should be of bool type
a. < input type = "checkbox" V-model: checked = "variable" >
b. Principle:
1). From data - > input checkbox: set whether the current checkbox is selected according to whether the variable is true or false
2). After switching the checked state of the checkbox, the new checked attribute value (true or false) is updated to the variable in the bound data
c. Example: agree, enable the form element; disagree, disable the form element
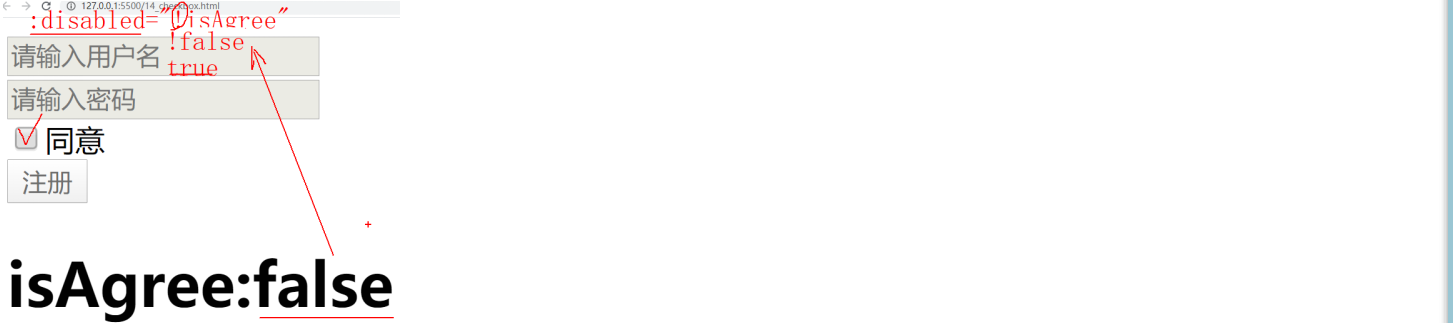

<div id="app">
  <input type="text" placeholder="enter one user name" :disabled="!isAgree"><br/>
  <input type="password" placeholder="Please input a password" :disabled="!isAgree"><br/>
  <label><input type="checkbox" v-model:checked="isAgree">agree</label></br>
  <button :disabled="!isAgree">register</button>
  <h1>isAgree:{{isAgree}}</h1>
</div>
<script>
var vm=new Vue({
  el:"#app",
  data:{
    isAgree:false //Disagree
  }
})
</script>
(5). Abbreviation: in fact, the ": attribute name" after all the above v-models can be omitted! v-model can automatically select the corresponding element to bind automatically according to different elements.
Monitoring function watch
(1). In the process of two-way binding, as long as you want the variable value to change, you can automatically perform an operation. You can use watch to add a monitoring function.
(2). new Vue({
el:"#app",
data: {variable: value,...},
methods:{
Function () {...}
},
watch: {/ / monitor
The variable to be monitored () {/ / as long as the variable in data is modified, the monitoring function with the same name as the variable in watch will be automatically executed!
... ...
}
}
})
(3). Stress: the function name in watch must have the same name as the variable to be monitored!
Binding style
Bind inline style
(1). Bad practice: bind the entire style attribute of the element as a string
< element style = "fixed css attribute": style = "variable" >
data:{
Variable: "css attributes that may change" / / for example: "top:50px; left:100px"
}
Disadvantages: it is not easy to modify one of the css attributes.
(2). Good practice: bind the style attribute of the element as an object:
Advantage: it is easy to modify a single css attribute
a. Only one variable is created, but the variable value saves multiple css attributes as objects
< element style = "fixed css attribute": style = "variable" >
data:{
Variable:{
Css attribute: value,
... : ...
}
//Automatically translated as: a string: "css attribute: value; css attribute: value;..."
}
After the css attribute in the variable dynamically bound to: style is compiled into a string, the css attribute in the automatic and fixed style without: is finally merged into one style attribute.
Example: use the up, down, left and right direction keys on the keyboard to control the movement of a small square:
<div id="app">
  <div id="pop" style="position:fixed; width:100px; height:100px; background-color:pink" :style="popStyle"></div>
</div>
<script>
var vm=new Vue({
  el:"#app",
  data:{
    popStyle:{
      top:"0px",
      left:"0px"
    }
    //Automatically translated as: popStyle:"top:0px; left:0px"
  }
})
window.onkeydown=function(e){
  //Left: 37 upper: 38 right: 39 lower: 40
  if(e.keyCode==39){//right
    var left=parseInt(vm.popStyle.left);
    left+=20;
    vm.popStyle.left=left+"px";
  }else if(e.keyCode==40){//lower
    var top=parseInt(vm.popStyle.top);
    top+=20;
    vm.popStyle.top=top+"px";
  }
}

</script>
b. Create a variable (create multiple variables) for each dynamically changing css attribute. When binding, use anonymous object in "{css attribute: variable 1, css attribute: variable 2}"
< element style = "fixed css attribute": style="{css attribute 1: variable 1, css attribute 2: variable 2,...}" >
data:{
Variable 1: value 1,
Variable 2: value 2
}
Result:: style="{css attribute 1: variable 1, css attribute 2: variable 2,...}" will be automatically translated as:
style = "css attribute 1: the value of variable 1; css attribute 2: the value of variable 2", and then merge it with other styles written dead without:
Example: use the up, down, left and right direction keys on the keyboard to control the movement of a small square:
<!DOCTYPE html>
<html lang="en">
<head>
  <meta charset="UTF-8">
  <meta name="viewport" content="width=device-width, initial-scale=1.0">
  <meta http-equiv="X-UA-Compatible" content="ie=edge">
  <title>Document</title>
  <script src="js/vue.js"></script>
</head>
<body>
<div id="app">
  <div id="pop" style="position:fixed; width:100px; height:100px; background-color:pink" :style="{top, left}"></div>
  <!--Automatic translation into: top:0px; left:0px;-->
</div>
<script>
var vm=new Vue({
  el:"#app",
  data:{
    top:"0px",
    left:"0px"
  }
});
window.onkeydown=function(e){
  //Left: 37 upper: 38 right: 39 lower: 40
  if(e.keyCode==39){//right
    var left=parseInt(vm.left);
    left+=20;
    vm.left=left+"px";
  }else if(e.keyCode==40){//lower
    var top=parseInt(vm.top);
    top+=20;
    vm.top=top+"px";
  }else if(e.keyCode==38){//upper
    var top=parseInt(vm.top);
    top-=20;
    vm.top=top+"px";
  }else if(e.keyCode==37){//Left
    var left=parseInt(vm.left);
    left-=20;
    vm.left=left+"px";
  }
}
</script>
</body>
</html>
Bind class
(1). style binding inline style problem: most style modifications are to modify multiple css attributes at the same time. If style binding is used, each css attribute must be written out, and the code is cumbersome!
(2). Solution: in the future, as long as you batch modify multiple css attributes of an element, you should use class instead of style
(3). how:
a. Bad practice: the class attribute can also be bound as an entire string, but the problem is still that it is not convenient to modify only one class.
b. Good practice: bind class as an object:
1). Only one variable is declared, but the variable value is an object that contains multiple class names
i. < element class = "fixed class": class = "variable"
ii. data:{
Variables: {Class1: true or false, class2: true or false}
}
iii. result: during compilation, only the class with the value of true in the variable object is compiled into the final class, and the class with the value of false is not included in the final formal class string. And dynamically bound: classes will be merged with fixed classes without: binding into one class!
iv. example: verify mobile phone number format:
<head>
  <meta charset="UTF-8">
  <meta name="viewport" content="width=device-width, initial-scale=1.0">
  <meta http-equiv="X-UA-Compatible" content="ie=edge">
  <title>Document</title>
  <script src="js/vue.js"></script>
  <style>
    /* Defines the base style of the prompt box */
    .msg{
      display:inline-block;
      width:160px;
      height:25px;
      border:1px solid #555;
      text-align:center;
      line-height:25px;
    }
    /* Defines the style of the prompt box when it passes validation */
    .success{
      border:1px solid green;
      background-color:lightgreen;
      color:green
    }
    /* Defines the style of the prompt box when validation fails */
    .fail{
      border:1px solid red;
      background-color:pink;
      color:red
    }
  </style>
</head>
<body>
<div id="app">
  <!-- Because to obtain the mobile phone number entered by the user for verification, all must use two-way binding -->
  <input type="text" v-model="phone">
  <!-- Because the style of the prompt box may be success and fail Switch back and forth, so dynamic binding span Part of class
      Because the content of the prompt box may also change dynamically with the verification results, a variable should also be bound msg-->
  <span class="msg" :class="msgClass">{{msg}}</span>
  <!--Three variables are required in the interface-->
</div>
<script>
var vm=new Vue({
  el:"#app",
  data:{
    //Because three variables are required in the page, there must be three variables in data
    phone:"", //Receive the mobile phone number entered by the user in the text box in real time
    msg:"", //Bind the contents of the prompt information according to the correctness of the verification results
    //Dynamically switch back and forth between success and fail class es according to the correctness of the verification results.
    msgClass:{
      success:false,
      fail:false
    }
  },
  watch:{
    //Because the vue validates while the user inputs, it is necessary to use watch to monitor the input changes of the user at any time.
    phone(){
      //Define the content of the regular verification phone
      var reg=/^1[3-9]\d{9}$/;
      //If the content of the phone passes the regular verification
      if(reg.test(this.phone)==true){
        //Apply the successful style to the modified msgClass, and do not apply the failed style
        this.msgClass={
          success:true,
          fail:false
        }
        //Modify the prompt content of span
        this.msg="The mobile phone number format is correct!"
      }else{//Otherwise, if the verification fails
        //Apply the failed style to modify msgClass, and do not apply the successful style
        this.msgClass={
          success:false,
          fail:true
        }
        //Modify the prompt content of span
        this.msg="The mobile phone number format is correct!"
      }
    }
  }
})
</script>
</body>
2). Declare a variable for each class. When binding, you can use {} object syntax to bind:
i. < element class = "fixed class": class="{class1: variable 1, class2: variable 2,...}"
ii. data:{
Variable 1: true or false,
Variable 2: true or false
}
iii. result: during compilation, only the classes with true value in class = "{}" will be compiled into the final class, and the classes with false value will not be included in the final formal class string. And dynamically bound: classes will be merged with fixed classes without: binding into one class!
iv. example: verify mobile phone number format:
<head>
  <meta charset="UTF-8">
  <meta name="viewport" content="width=device-width, initial-scale=1.0">
  <meta http-equiv="X-UA-Compatible" content="ie=edge">
  <title>Document</title>
  <script src="js/vue.js"></script>
  <style>
    /* Defines the base style of the prompt box */
    .msg{
      display:inline-block;
      width:160px;
      height:25px;
      border:1px solid #555;
      text-align:center;
      line-height:25px;
    }
    /* Defines the style of the prompt box when it passes validation */
    .success{
      border:1px solid green;
      background-color:lightgreen;
      color:green
    }
    /* Defines the style of the prompt box when validation fails */
    .fail{
      border:1px solid red;
      background-color:pink;
      color:red
    }
  </style>
</head>
<body>
<div id="app">
  <!-- Because to obtain the mobile phone number entered by the user for verification, all must use two-way binding -->
  <input type="text" v-model="phone">
  <!-- Because the style of the prompt box may be success and fail Switch back and forth, so dynamic binding span Part of class
      Because the content of the prompt box may also change dynamically with the verification results, a variable should also be bound msg-->
  <!--                       class Name variable-->
  <!-- <span class="msg" :class="{success:success, fail:fail}">{{msg}}</span> -->
  <!--result: which one? class The variable value after the name is true,Will enter the final stage class String. Variable value is false of class,Will not appear in the final class In string-->
  <span class="msg" :class="{success, fail}">{{msg}}</span>
  <!--Four variables are required in the interface-->
  <!--But, two class The values of the three variables and the error prompt are related to the data of the verification results! In fact, only one variable can control the change of three values-->
</div>
<script>
var vm=new Vue({
  el:"#app",
  data:{
    //Because three variables are required in the page, there must be three variables in data
    phone:"", //Receive the mobile phone number entered by the user in the text box in real time
    msg:"", //Bind the contents of the prompt information according to the correctness of the verification results
    //Dynamically switch back and forth between success and fail class es according to the correctness of the verification results.
    success:false,
    fail:false
  },
  watch:{
    //Because the vue validates while the user inputs, it is necessary to use watch to monitor the input changes of the user at any time.
    phone(){
      //Define the content of the regular verification phone
      var reg=/^1[3-9]\d{9}$/;
      //If the content of the phone passes the regular verification
      if(reg.test(this.phone)==true){
        //Apply the successful style to the modified msgClass, and do not apply the failed style
        this.success=true;
        this.fail=false
        //Modify the prompt content of span
        this.msg="The mobile phone number format is correct!"
      }else{//Otherwise, if the verification fails
        //Apply the failed style to modify msgClass, and do not apply the successful style
        this.success=false;
        this.fail=true
        //Modify the prompt content of span
        this.msg="The mobile phone number format is correct!"
      }
    }
  }
})
</script>
</body>
iv. example: Optimization: minimize the variables in data in vue to facilitate maintenance.
<head>
  <meta charset="UTF-8">
  <meta name="viewport" content="width=device-width, initial-scale=1.0">
  <meta http-equiv="X-UA-Compatible" content="ie=edge">
  <title>Document</title>
  <script src="js/vue.js"></script>
  <style>
    /* Defines the base style of the prompt box */
    .msg{
      display:inline-block;
      width:160px;
      height:25px;
      border:1px solid #555;
      text-align:center;
      line-height:25px;
    }
    /* Defines the style of the prompt box when it passes validation */
    .success{
      border:1px solid green;
      background-color:lightgreen;
      color:green
    }
    /* Defines the style of the prompt box when validation fails */
    .fail{
      border:1px solid red;
      background-color:pink;
      color:red
    }
  </style>
</head>
<body>
<div id="app">
  <!-- Because to obtain the mobile phone number entered by the user for verification, all must use two-way binding -->
  <input type="text" v-model="phone">
  <!-- Because the style of the prompt box may be success and fail Switch back and forth, so dynamic binding span Part of class
      Because the content of the prompt box may also change dynamically with the verification results, a variable should also be bound msg-->
  <!--                       class Name variable-->
  <!-- <span class="msg" :class="{success:success, fail:fail}">{{msg}}</span> -->
  <!--result: which one? class The variable value after the name is true,Will enter the final stage class String. Variable value is false of class,Will not appear in the final class In string-->
  <!-- <span class="msg" :class="{success:isRight, fail:isRight==false}">{{isRight==true?"Phone number available":"Mobile phone number format error!"}}</span> -->
  <span class="msg" :class="isRight==true?'success':'fail'">{{isRight==true?"Phone number available":"Mobile phone number format error!"}}</span>
  <!--Four variables are required in the interface-->
  <!--But, two class The values of the three variables and the error prompt are related to the data of the verification results! In fact, only one variable can control the change of three values-->
</div>
<script>
var vm=new Vue({
  el:"#app",
  data:{
    //Because three variables are required in the page, there must be three variables in data
    phone:"", //Receive the mobile phone number entered by the user in the text box in real time
    isRight:false
  },
  watch:{
    //Because the vue validates while the user inputs, it is necessary to use watch to monitor the input changes of the user at any time.
    phone(){
      //Define the content of the regular verification phone
      var reg=/^1[3-9]\d{9}$/;
      //Save the verification results to the variable isRight, which involves the change of three positions in turn!
      this.isRight=reg.test(this.phone);
    }
  }
})
</script>
</body>
Custom instruction
-
Add custom instructions to the Vue family:
Vue.directive("instruction name"), {/ / add a new instruction to the Vue family and make the instruction name
//Callback function: when the rendered element is inserted into the DOM tree, the callback function is automatically executed
Inserted (DOM element object where the current instruction is located){
//Execute the DOM operation on the DOM element object where the current instruction is located
//Here, the DOM operation performed on the current DOM element will be automatically applied to the page
}
})
Stress: when adding a custom instruction, the instruction name must not have a v-prefix! For example, if you want to add a custom instruction that allows an element to automatically get focus, you can name it "focus" -
Use custom instruction: just add the "v-instruction name" attribute on the element to which you want to apply the corresponding effect.
Emphasis: Although the instruction name is not prefixed with v when defining an instruction, it must be prefixed with v when using an instruction -
Principle:
(1). Vue.directive("instruction name"{
inserted(domElem){
Perform native DOM operations on domElem
}
})
Add a new custom instruction to the Vue family and associate a processing function
(2). When new vue(), all contents under < div id = "app" > will be scanned.
(3). Every time an instruction attribute beginning with v - is scanned, it will go back to the Vue family to find out whether there is a corresponding instruction. If there is a corresponding instruction, the processing function associated with the instruction will be called to perform the native DOM operation on the element where the instruction is located. -
Example: let the text box get focus automatically:
<head>
  <meta charset="UTF-8">
  <meta name="viewport" content="width=device-width, initial-scale=1.0">
  <meta http-equiv="X-UA-Compatible" content="ie=edge">
  <title>Document</title>
  <script src="js/vue.js"></script>
  <script>
    Vue.directive("focus",{
      inserted(domElem){
        //Make the current element get focus automatically
        domElem.focus();
        //      DOM native
      }
    })
  </script>
</head>
<body>
<div id="app">
  <input type="text" v-focus><button>use Baidu Search</button>
</div>
<script>
var vm=new Vue({
  el:"#app",
  data:{

  }
})
</script>
</body>
Stress: new Vue() plays the most important role in scanning HTML content. Only new Vue() can recognize the instructions beginning with v -, even if there is no value in data, as long as Vue related functions are used, new Vue() cannot be omitted!
Calculation properties
Both methods and computed can achieve the same function, but the calculated attribute will be cached. If it is used multiple times, the calculated attribute will only be called once
- What is: the attribute value of this attribute is not saved in the program. Each time the attribute is bound, the attribute value of this attribute needs to be dynamically calculated according to the values of other attributes.
- Why: some values can always be obtained by dynamic calculation according to the changes of other attribute values. Such a value, there is no need to save another copy in the program. Because even if it is saved, once other attribute values that this attribute depends on change, the attribute value of this attribute will also change.
- When: in the future, as long as the value of one attribute can be calculated according to other attributes, there is no need to save it!
- how:
(1). Define calculation properties:
new Vue({
el:"#app",
data:{
Variables required by the page
},
methods:{
Custom function or event handler
},
watch:{
A monitoring function that monitors a variable
},
computed:{
Property name (){
return the calculation result obtained by calculating other attribute values
}
}
})
(2). Use calculated attributes: Although calculated attributes are essentially a function, when used in HTML binding syntax, do not add ()! - result:
(1). As long as the value of another attribute on which the calculated attribute depends changes, the calculated attribute will also be notified to recalculate the new attribute value.
(2). The results calculated by the calculation attribute will be cached by Vue and used repeatedly to avoid repeated calculation. Even if it is used repeatedly, it is only calculated once for the first time. - Written test: methods vs calculated
(1). Usage:
a. methods must add ()
b. computed ()
(2). Repeated use:
a. The methods in methods will be re executed every time they are called, and the execution results will not be cached by vue.
b. The calculation attribute in calculated is calculated only once when it is used for the first time, and then the settlement results will be cached by Vue. Even if this calculation attribute is used repeatedly elsewhere, it will not be calculated repeatedly, but the value will be obtained directly from the cache. However, when the values of other dependent attributes change, the calculation is forced to recalculate. - How to select methods and computed:
(1). If you are more concerned about the execution result data of the function during this use, the calculation attribute is preferred
(2). If you are more concerned about the operation process of the function during this use, and the result data does not matter, or even the function does not return a value, the method in methods is preferred.
<div id="app">
 <!--1.Direct splicing: the syntax is too cumbersome-->
  <h2>{{firstName}} {{lastName}}</h2>

  <!--2.By definition methods-->
  <h2>{{getFullName()}}</h2>
  <h2>{{getFullName()}}</h2>
  <h2>{{getFullName()}}</h2>

  <!--3.adopt computed-->
  <h2>{{fullName}}</h2>
  <h2>{{fullName}}</h2>
  <h2>{{fullName}}</h2>
</div>
<script src="vue.js"></script>
<script>
  const app = new Vue({
    el:'#app',
    data:{
     firstName: 'Kobe',
     lastName: 'Bryant'
    },
    methods: {
      getFullName: function () {
        console.log('getFullName' );
        return this.firstName + ' ' + this.lastName
      }
    },
    computed: {
      fullName: function () {
        console.log('fullName' );
        return this.firstName + ' ' + this.lastName
      }
    }
  })
</script>
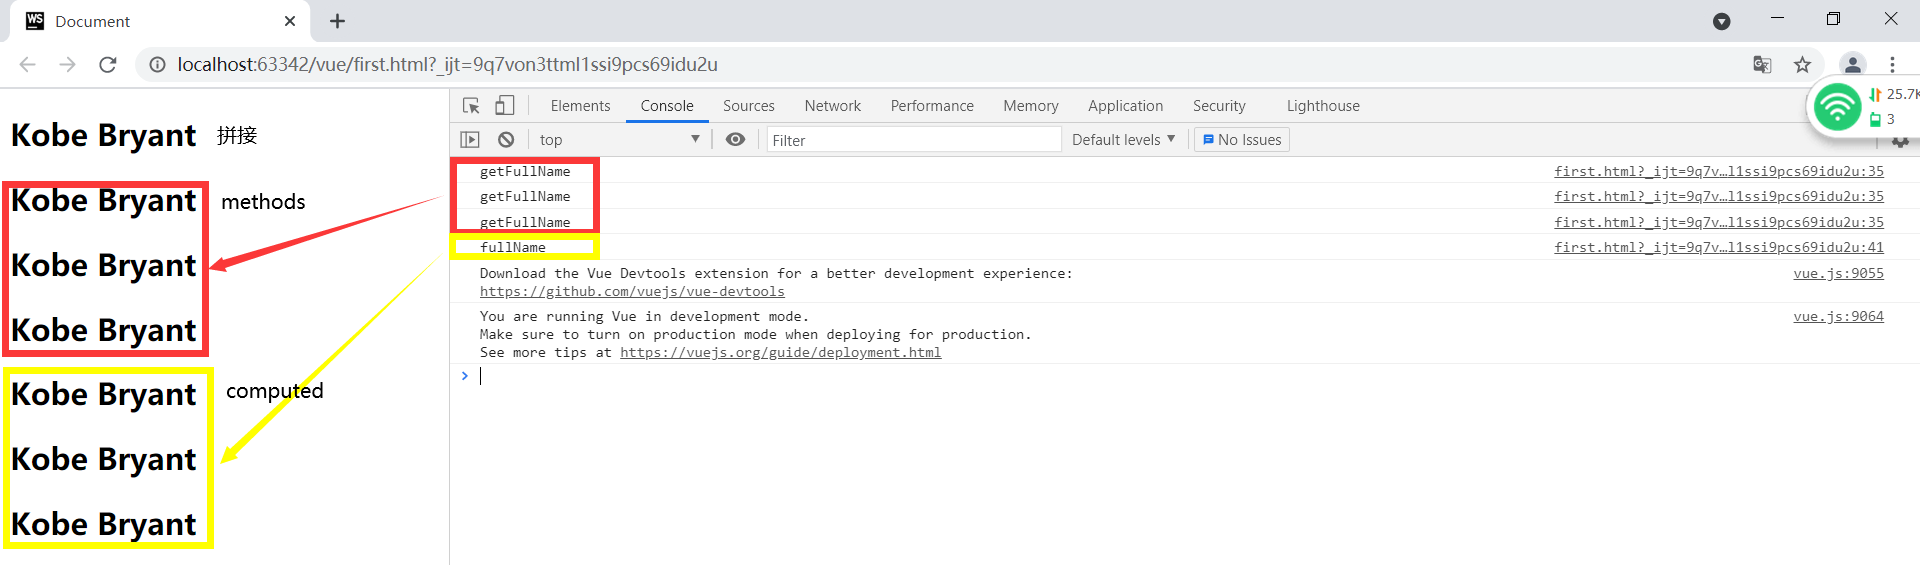
- Example: bind total price of shopping cart with calculation property:
<div id="app">
  <h3>total: ¥{{total.toFixed(2)}}</h3>
  <ul>
    <li v-for="(item,i) of cart" :key="i">
      {{item.pid}} | {{item.pname}} | ¥{{item.price.toFixed(2)}} | {{item.count}} - Subtotal:¥{{(item.price*item.count).toFixed(2)}}
    </li>
  </ul>
  <h3>total: ¥{{total.toFixed(2)}}</h3>
</div>
<script>
var vm=new Vue({
  el:"#app",
  data:{
    cart:[
      {pid:1, pname:"Huawei",price:4455, count:2},
      {pid:2, pname:"millet",price:3455, count:1},
      {pid:3, pname:"OPPO",price:3356, count:3},
    ]
  },
  methods:{ //It's called a method, so the usage is the same as that of a method - you must add ()

  },
  computed:{ //It is called attribute, so the usage is the same as that of attribute - without ()
    total(){
      console.log("Called once total()");
      var sum=0;
      for(var p of this.cart){
        sum+=p.price*p.count;
      }
      return sum;
    }
  }
})
</script>
<div id="app">
  <!--' ' Add a space inside-->
  <h2>{{firstName + ' ' + lastName }}</h2>
  <h2>{{firstName}} {{lastName}}</h2>

  <h2>{{getFullName()}}</h2>

   <!--Use calculated properties,fullName Use it directly as an attribute without calling the method with parentheses -->
  <h2>{{fullName}}</h2>

</div>
<script src="vue.js"></script>
<script>
  const app = new Vue({
    el:'#app',
    data:{
      firstName: 'Lebron',
      lastName: 'James'
    },
    computed: {
      fullName: function () {
        return this.firstName + ' ' + this.lastName
      }
    },
    methods:{
      getFullName(){
        return this.firstName + ' ' + this.lastName
      }
    }
  })
</script>
<script>
  const app = new Vue({
    el:'#app',
    data:{
      books:[
        {id:1, name: 'JavaScript Authoritative guide',price:119},
        {id:2, name: 'JavaScript Advanced design program',price:119},
        {id:3, name: 'You don't know JavaScript',price:119},
        {id:4, name: 'JavaScript Design mode',price:119},
      ]
    },
    computed: {
     totalPrice: function(){
       //filter/map/reduce
       // return this.books.reduce()
       let result=0
       for(let i=0;i<this.books.length;i++){
         result += this.books[i].price
       }
       // for(let i in this.books){
       //    this.books[i]
       // }
       // for(let book of this.books){
       //
       // }
       return result
     }
    }
  })
</script>
Calculate the setter and getter of the property (understand)
Each calculated property contains a getter and a setter
<div id="app">
  <h2>{{fullName}}</h2>
</div>
<script src="vue.js"></script>
<script>
  const app = new Vue({
    el:'#app',
    data:{
     firstName: 'Kobe',
     lastName: 'Bryant'
    },
    computed: {
       // fullName:function () {
       //    return this.firstName+ ' ' + this.lastName
       // }
      // Properties: strings
      // name: 'codewhy'

      // Properties: objects
      fullName: {
        // Calculated attributes are generally read-only attributes without set method
        set: function (newValue) {
          const names = newValue.split('');
          this.firstName = names[0];
          this.lastName = names[1];
         },
        get:function () {
          // return 'abc'
          return this.firstName+ ' ' + this.lastName
        },
        fullName:function () {
             return this.firstName+ ' ' + this.lastName
           }
      }
    }
  })
</script>
filter
-
What is a special function that is displayed after processing the original value of a variable
-
Why: the original values of individual variables cannot be directly shown to people!
For example, the number of milliseconds of gender 0 and 1 dates -
When: if the value of a variable cannot be directly shown to people, it must be processed before it can be shown to people
-
how:
(1). Add filter functions to the Vue family
Vue.filter("filter name", function(oldVal) {/ / accepts the original value of a variable
return the new value dynamically returned according to different oldVal
})
(2). Use filter functions in binding syntax:
{{variable | filter name}} -
result:
(1). The original value of the variable will not be displayed immediately, but will be given to the filter function after
(2). The returned value after the filter processing is returned and displayed in the element content -
Principle:
(1). Vue.filter("filter name", function (oldval) {return new value})
Define a filter function and add it to the Vue family for standby
(2). When new Vue() scans |, it will go back to the Vue family to find the filter function with the corresponding name.
(3). As long as it is found, first give the original value of the variable before | to the oldVal parameter of the filter function, and return the new value after processing by the filter function. Displays the location to the current binding syntax. -
Example: filter gender 1 and 0 as male and female
<head>
  <meta charset="UTF-8">
  <meta name="viewport" content="width=device-width, initial-scale=1.0">
  <meta http-equiv="X-UA-Compatible" content="ie=edge">
  <title>Document</title>
  <script src="js/vue.js"></script>
  <script>
    //sexFilter=function(){ ... }
    Vue.filter("sexFilter",function(oldVal){
      //The old value of gender catch may be 1 or 0
      return oldVal==1?"male":"female"
    })
  </script>
</head>
<body>
<div id="app">
  <h1>Gender: {{sex | sexFilter}}</h1>
</div>
<script>
var vm=new Vue({
  el:"#app",
  data:{
    sex:1
  }
})
</script>
</body>
- Parameters can be added to the filter:
(1). When defining a filter:
Vue.filter("filter name", function(oldVal, custom parameter,...){
Return new value
})
(2). When using filters:
{{variable | filter name (custom argument,...)}}
(3). Example: returns the gender of different languages according to the parameter value
<head>
  <meta charset="UTF-8">
  <meta name="viewport" content="width=device-width, initial-scale=1.0">
  <meta http-equiv="X-UA-Compatible" content="ie=edge">
  <title>Document</title>
  <script src="js/vue.js"></script>
  <script>
    //sexFilter=function(){ ... }
    Vue.filter("sexFilter",function(oldVal,language){
      //The old value of gender catch may be 1 or 0
      //The language parameter may catch cn or en, where the default is cn
      if(language=="en"){
        return oldVal==1?"Male":"Female"
      }else{
        return oldVal==1?"male":"female"
      }
    })
  </script>
</head>
<body>
<div id="app">
  <h1>Gender: {{sex | sexFilter}}</h1>
  <h1>Gender: {{sex | sexFilter("en")}}</h1>
</div>
<script>
var vm=new Vue({
  el:"#app",
  data:{
    sex:1
  }
})
</script>
- Filters can be used in conjunction with:
(1). In binding syntax: {{variable | filter 1 | filter 2 |...}}
(2). emphasize:
a. The old value entered by the latter filter 2 is no longer the original value of the variable, but the intermediate value processed by the previous filter.
b. Only the return value of the last filter will be displayed on the page. If you want the return values of the previous filters to be displayed on the page together, you can only splice the new values in the last filter to the old values passed in by the previous filter.
(3). Example: add additional icons for gender
<head>
  <meta charset="UTF-8">
  <meta name="viewport" content="width=device-width, initial-scale=1.0">
  <meta http-equiv="X-UA-Compatible" content="ie=edge">
  <title>Document</title>
  <script src="js/vue.js"></script>
  <script>
    //Define a new filter to add icons specifically for gender
    Vue.filter("sexIcon",function(oldVal){
      //There may be six kinds of oldVal: 10 male and female
      if(oldVal==1||oldVal==0){
        return oldVal==1?"♂":"♀";
      }else{
        return oldVal=="male"||oldVal=="Male"?oldVal+"♂":oldVal+"♀";
      }
    });
    //sexFilter=function(){ ... }
    Vue.filter("sexFilter",function(oldVal,language){
      //The old value of gender catch may be 1 or 0
      //The language parameter may catch cn or en, where the default is cn
      if(language=="en"){
        return oldVal==1?"Male":"Female"
      }else{
        return oldVal==1?"male":"female"
      }
    })
  </script>
</head>
<body>
<div id="app">
  <h1>Gender: {{sex | sexFilter | sexIcon }}</h1>
  <h1>Gender: {{sex | sexFilter("en") | sexIcon }}</h1>
  <h1>Gender: {{sex | sexIcon }}</h1>
</div>
<script>
var vm=new Vue({
  el:"#app",
  data:{
    sex:1
  }
})
</script>
</body>
axios
- What is axios: Promise based function library for sending ajax requests
- Why send ajax requests:
(1). xhr4 steps / 6 steps
(2). Self encapsulating functions, not comprehensive consideration
(3). $. In jquery ajax: the problem is that DOM operations are almost no longer used in vue, and jQuery is almost not used. If only to introduce $ Introducing the entire jQuery library with ajax functions is a bit of a fuss.
(4). Vue officially provides a set of components for sending ajax requests: Vue resource. Later, Vue found that any framework has its own functions for sending ajax requests, and they are similar. Therefore, Vue thinks it is unnecessary to reopen a set of ajax function library, so Vue resource is no longer maintained.
(5). Vue officials helped us choose a fashionable and easy-to-use ajax function library: axios, so almost all ajax requests sent in the framework in the future will use axios. - When: as long as you send ajax requests for server-side data in the Vue framework, use axios
- how:
(1). Preparation: introduce axios into the project JS to introduce the axios function library
< script SRC = "JS / Axios. JS" > import order and Vue JS independent
(2). Set the public domain name part of all server-side interfaces
axios.defaults.baseURL = "server side domain name address part"
(3). Send get request:
axios.get("url"), {/ / send a get request to the server interface address url
params: {/ / carry parameters
Parameter 1: value 1,
... : ...
}
//Automatically translated as "parameter 1 = value 1 & parameter 2 = value 2 &..."
//}).then(function(result){
}).then(res=>{
res.data is the result returned by the server
})
(4). Send post request:
axios.post("url", "variable 1 = value 1 & variable 2 = value 2 &...")
.then(res=>{
res.data is the result returned by the server
})
(5). Example: use axios to send get and post requests to the interface address on Sina cloud, pass parameters, and accept the response results
<head>
  <meta charset="UTF-8">
  <meta name="viewport" content="width=device-width, initial-scale=1.0">
  <meta http-equiv="X-UA-Compatible" content="ie=edge">
  <title>Document</title>
  <script src="js/axios.min.js">
    //axios={
    //  get(){ ... },
    //  post(){ ... }
    //}
  </script>
  <script src="js/qs.min.js">
    //Specifically, the object syntax is converted to query string syntax
    //{ uname:"dingding", upwd:"123456"}
    // ↓ Qs. Stringify (object)
    //"uname=dingding&upwd=123456"
  </script>
</head>
<body>
  <script>
  //First, define a unified server-side domain name for all interfaces
  axios.defaults.baseURL="http://xzserver.applinzi.com"
  //Request the home page commodity array of the student mall from the server, including the information of 6 commodity objects
  axios.get("/index")
      .then(res=>{
        console.log(res.data);
      })
  //To get the details of item 5: it is required to carry a lid parameter with the value of the item number to be queried
  axios.get("/details",{
    params:{lid:5}
  }).then(res=>{
    console.log(res.data) //Return details of item 5
  })
  //Call the login interface with the user name dingding and password 123456
  axios.post("/users/signin",
    //"uname=dingding&upwd=123456"
    Qs.stringify({ uname:"dingding", upwd:"123456"})
  ).then(res=>{
    console.log(res.data);
  })
  </script>
</body>
assembly
-
What is: a reusable independent functional area in a page with exclusive HTML, CSS, js and data
-
Why: 1 Reuse! 2. Facilitate the division of labor and cooperation of large projects! 3. Loose coupling!
-
When: as long as a function appears on the page, it may be used repeatedly, or multiple people need to work together, use components.
-
How to create a component:

Emphasis: because the HTML tag name is not case sensitive, if the component name contains multiple words, it must not be named with hump! You must split multiple words with -.
For example: myCounter, wrong. Because myCounter may be converted to all uppercase or all message tag names, it will be ambiguous when used.
My counter, right. Will not be converted. -
How to use components: a component in Vue is essentially a reusable custom HTML tag
In the page < component name > < / component name > -
Principle:
(1). Vue.component("my counter", {}) actually adds a Vue component object to the Vue family of the current page.
(2). When new vue() scans a custom tag in the page, it will go back to Vue's family to find out whether there is a component with the same name
(3). If this component is found, first copy the HTML fragment in the component template to replace the location of the custom tag in the page.
(4). For the use of this component, temporarily call the data() function once to return a data object exclusive to this component.
(5). Create a component object to monitor the small area of the current component.
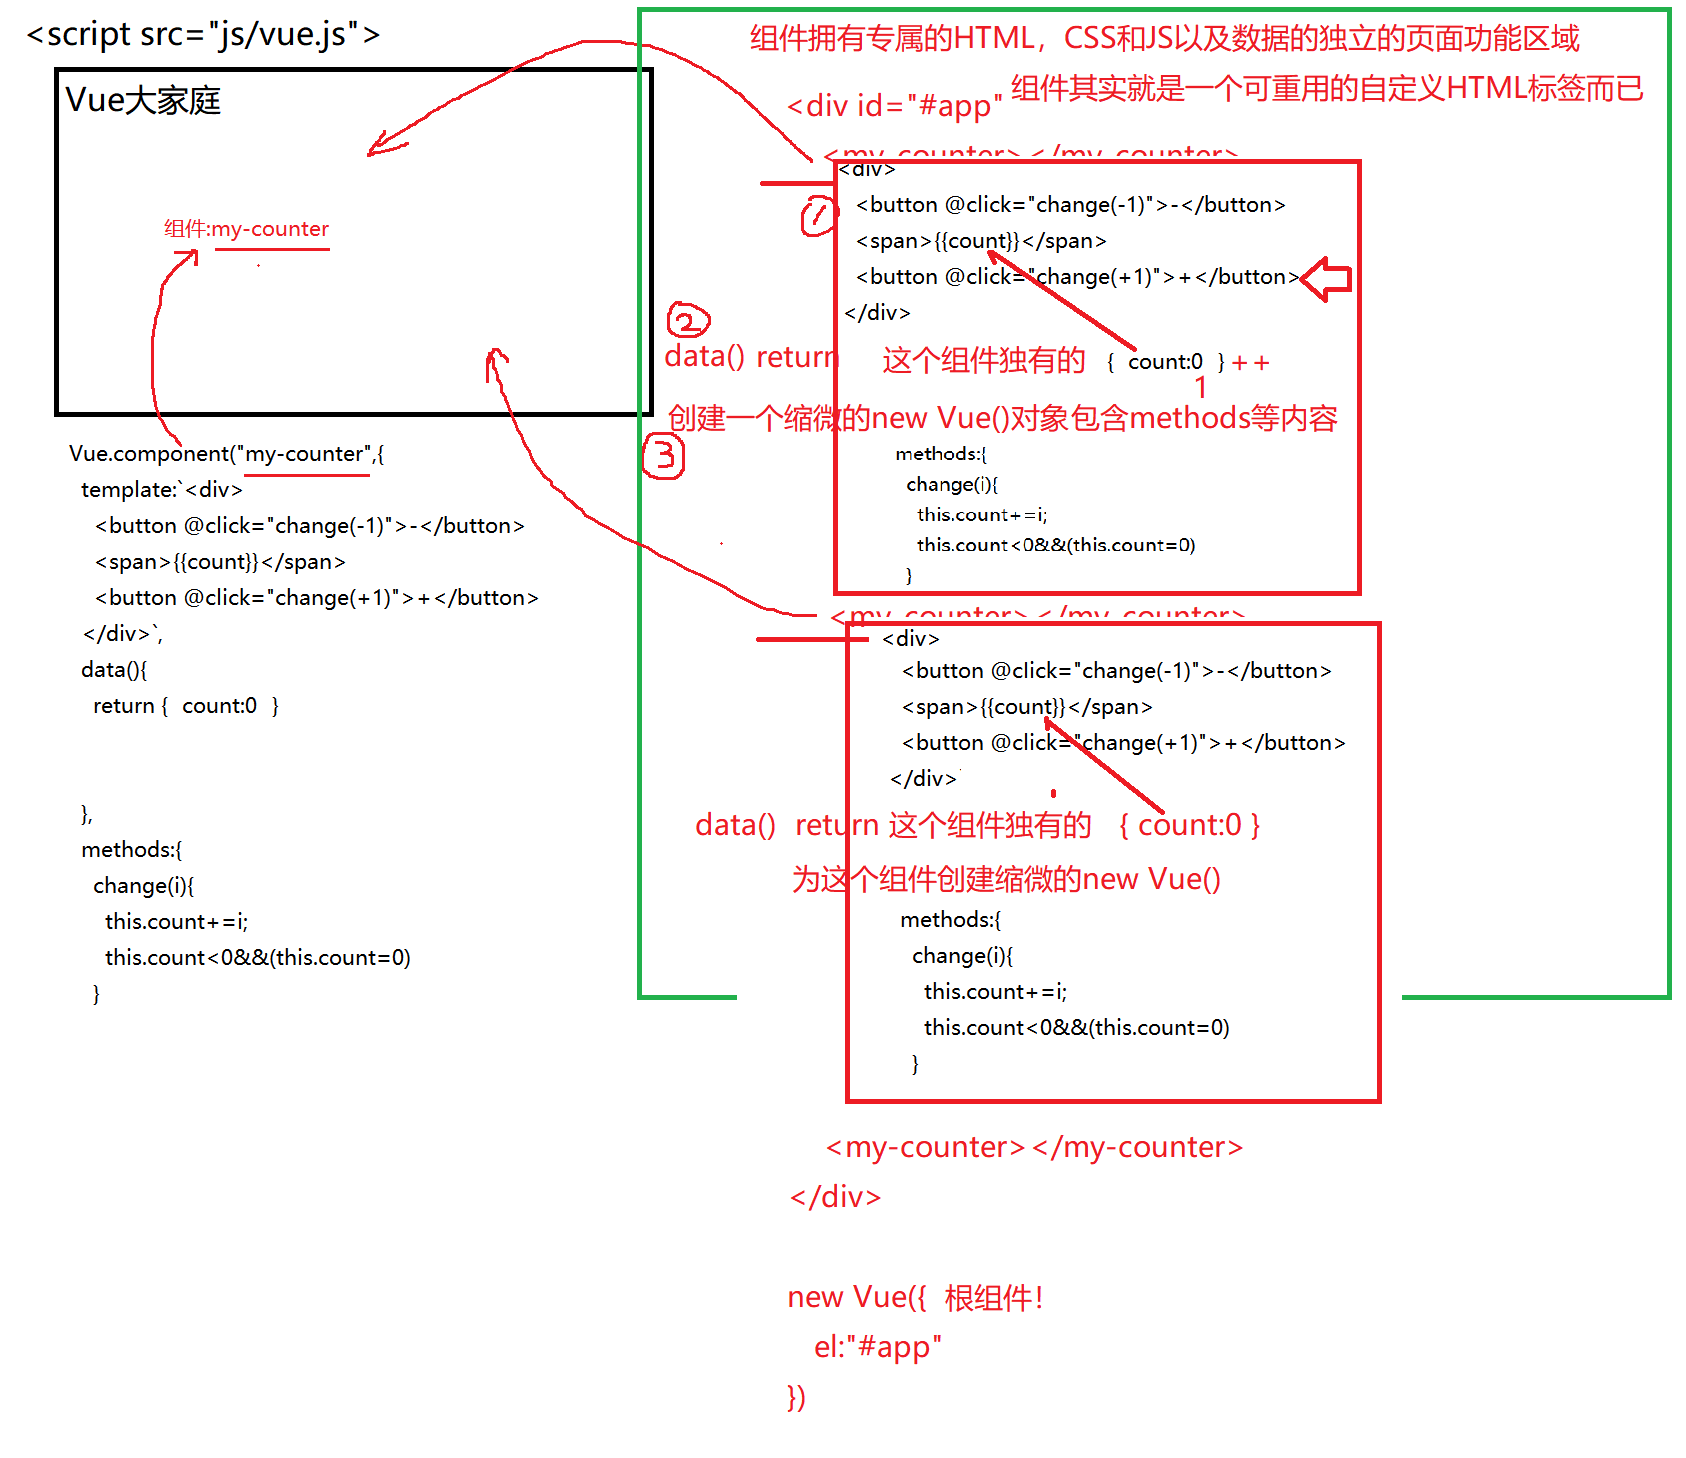
new Vue() vs component
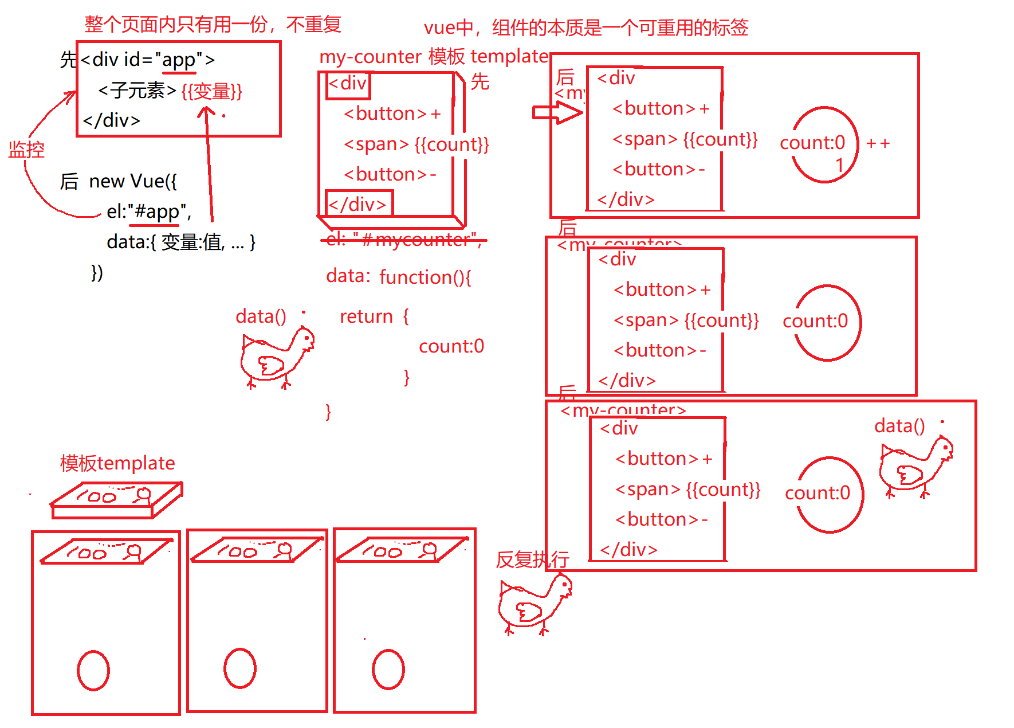
-
Example: define the number of modified components and reuse them
(1). 1_my-counter.js
Vue.component("my-counter",{
  //Most properties are the same as new Vue()
  //1. Define the HTML fragment template of reusable components
  template:`<div>
    <button @click="change(-1)">-</button>
    <span>{{count}}</span>
    <button @click="change(+1)">+</button>
  </div>`,
  //2. Define the data() function to return a new data object
  data(){
    return {//Equivalent to data {} in the previous new Vue()
      //Because a variable count is required in the component template
      count:0
    }
  },
  //3. The following content is exactly the same as that in new Vue()
  methods:{
    change(i){
      this.count+=i;
      this.count<0&&(this.count=0)
    }
  }
})
(2). 1_component.html
<head>
  <meta charset="UTF-8">
  <meta name="viewport" content="width=device-width, initial-scale=1.0">
  <meta http-equiv="X-UA-Compatible" content="ie=edge">
  <title>Document</title>
  <script src="js/vue.js"></script>
  <script src="1_my-counter.js">
    //Vue.component("my-counter",{ ... })
  </script>
</head>
<body>
<div id="app">
  <my-counter></my-counter>
  <my-counter></my-counter>
  <my-counter></my-counter>
</div>
<script>
var vm=new Vue({
  el:"#app",
  data:{

  }
})
</script>
</body>
- In fact, when the template template of the component is replaced on the page, new Vue() is not at ease. What if the newly loaded component content contains embedded unknown tags and instruction attributes?
Therefore, new Vue() will rescan the content of the template HTML fragment replaced this time. If it contains unknown instructions, go to Vue family again to find instructions. If you encounter tags you don't know, go to the Vue family again to find components
Component development
-
What is: in the future, a web page will be spliced by components
-
Why: 1 Reuse! 2. Facilitate the division of labor and cooperation of large projects! 3. Loose coupling!
-
When: in the future, almost all projects will be completed by component development
-
how:
(1). After getting a web page, first divide the number of components in the web page, and what is the inclusion relationship
(2). Create multiple component js files, and one component object is created in each component js file
(3). Child component labels can be used in the parent component to insert child components inside the parent component
(4). The js files of all components should be introduced into the web page where new Vue() is located -
Principle:
(1). When new Vue() scans the tag you don't know under < div id = "app" > in the web page, you go back to the Vue family to find out whether it contains the component definition
(2). If the component definition is found, replace the location of the component label in the page with the component template
(3). new Vue() does not scan only once, but every time the template fragment of the component is replaced, it will rescan whether the newly added template fragment contains more child unknown tags.
(4). As long as an unknown tag is scanned, it will continue to go back to the Vue family to find out whether the component definition is included. Then, the template fragment of the component is used to replace the position where the unknown label appears in the component just now. By analogy, new Vue() does not stop scanning until all tags are recognized, that is, all tags become tags of the browser's native HTML.
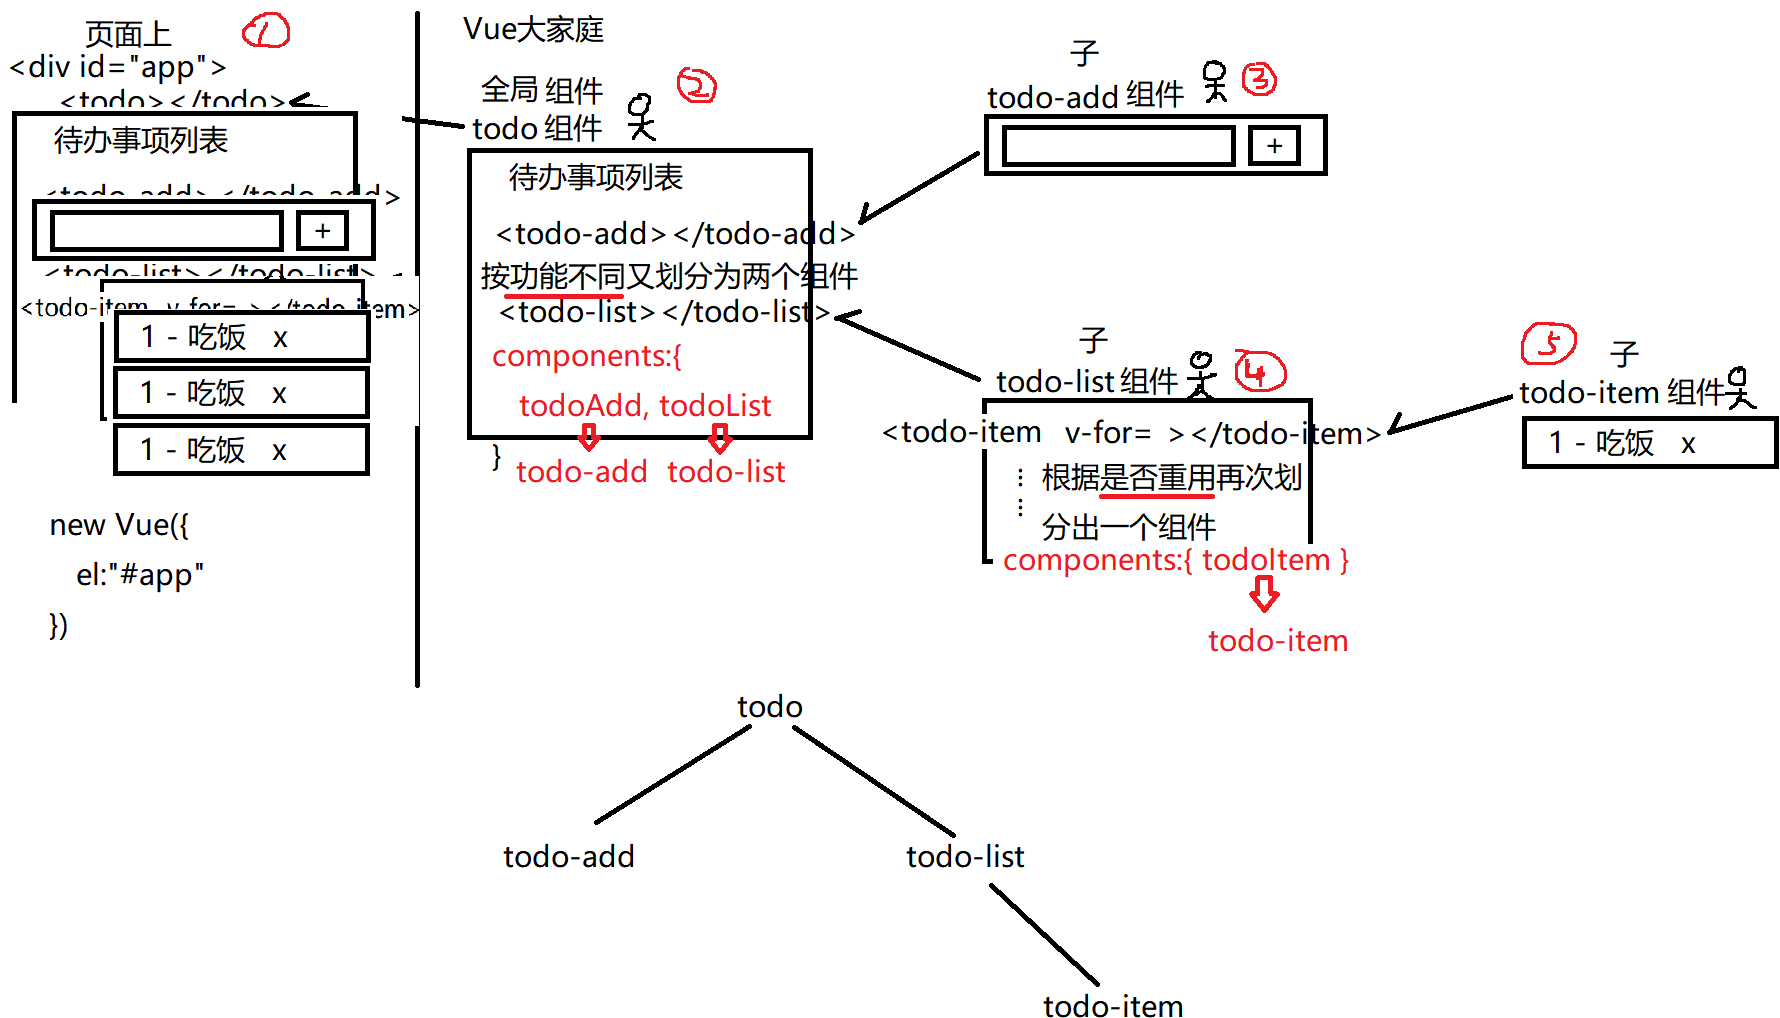
Define subcomponents
(1). What is a child component: specifies a component that can only be used within a specified parent component
(2). Why: because some components must only be used in the specified parent component to make sense. If you leave the specified parent component, it makes no sense or even makes an error.
(3). When: in the future, child components will be used whenever a component is specified to be used only in a parent component
(4). Root component, global component, sub component:
a. Root component: new Vue() -- monitors the entire page and is responsible for scanning and binding all contents in the page. There is only one root component in a page
b. Global component: Vue Component () -- can be used anywhere! No restrictions!
c. Child component: only component objects that can be used within a specified parent element. Once the specified parent component is found, an error will be reported when using the child component.
(5). How to use subcomponents:
a. Creating sub component objects: 2 features:
1). Do not use Vue Component (), and just create an ordinary js object!
2). Although it is an ordinary js object, the content in the object should be the same as Vue The content format in component () is the same.
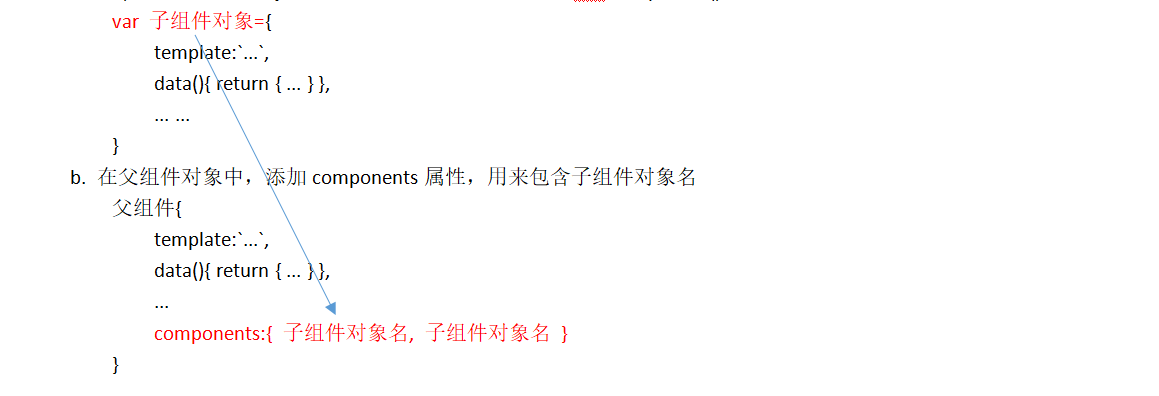
7. Example: use components to splice the HTML interface of todo case (temporarily excluding functions and data)
(1). 2_todo.js
Vue.component("todo",{
  template:`<div>
    <h1>To Do List </h1>
    <todo-add></todo-add>
    <todo-list></todo-list>
  </div>`,
  components:{//It is specified that todoAdd and todoList components can only be used in the current parent component todo
    todoAdd, todoList
//vue will automatically translate the component object name named by the hump into - split
//     ↓         ↓
//<todo-add> <todo-list>
  }//Indicates that todoAdd and todoList can only be used in todo in the future
})
(2). 2_todo-add.js
//Do not define subcomponents with Vue Component() can only create ordinary objects, and the object name must be named with hump
var todoAdd={
  template:`<div>
    <input type="text"/>
    <button>+</button>
  </div>`
}
(3). 2_todo-list.js
var todoList={
  template:`<ul>
    <todo-item></todo-item>
    <todo-item></todo-item>
    <todo-item></todo-item>
  </ul>`,
  components:{ //The todoItem component can only be used within the current parent component todoList
    todoItem
  }
}
(4). 2_todo-item.js
//The variable name of the object must be named by hump
//Moreover, the variable name of the object will be automatically translated into the label name of the sub component in the future.
var todoItem={//Keep the content format of the component unchanged in {}.
  template:`<li>
    1 - having dinner <a href="javascript:;">x</a>
  </li>`
}
(5). 2_todo.html
<head>
  <meta charset="UTF-8">
  <meta name="viewport" content="width=device-width, initial-scale=1.0">
  <meta http-equiv="X-UA-Compatible" content="ie=edge">
  <title>Document</title>
  <script src="js/vue.js"></script>
  <!--The child component must be introduced before the parent component!-->
  <script src="2_todo-add.js">
    //Vue.component("todo-add",{ ... })
  </script>
  <script src="2_todo-item.js">
    //Vue.component("todo-item",{ ... })
  </script>
  <script src="2_todo-list.js">
    //Vue.component("todo-list",{ ... })
  </script>
  <script src="2_todo.js">
    //Vue.component("todo",{ ... })
  </script>
</head>
<body>
<div id="app">
  <todo></todo>
</div>
<script>
var vm=new Vue({
  el:"#app",
  data:{

  }
})
</script>
</body>
Transfer data between components
(1). Parent to child:
a. Problem: the data members in the parent component data in Vue cannot be used directly by child components! Because the data of each component in Vue is its own! Therefore, you must actively pass the parent component to the child component to use:
b. Step 1: in the parent component: on the start tag of the child component, use: bind the variables in your data to a custom sign of the child component
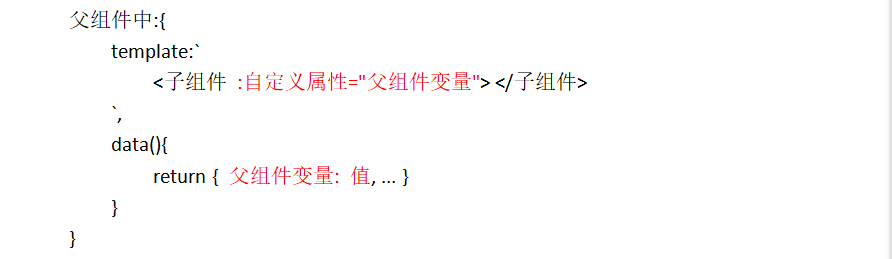
c. Step 2: the child component uses props attribute to get the value given by the parent component from the user-defined attribute bound by the parent component. The value given by the parent component taken out by the child component with props attribute is used in exactly the same way as the variable usage in the child component's own data: it can be used for binding syntax or this in js program visit.
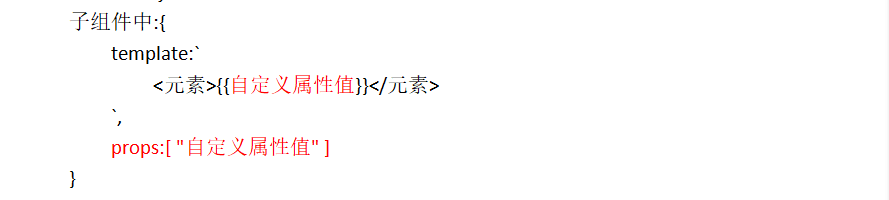
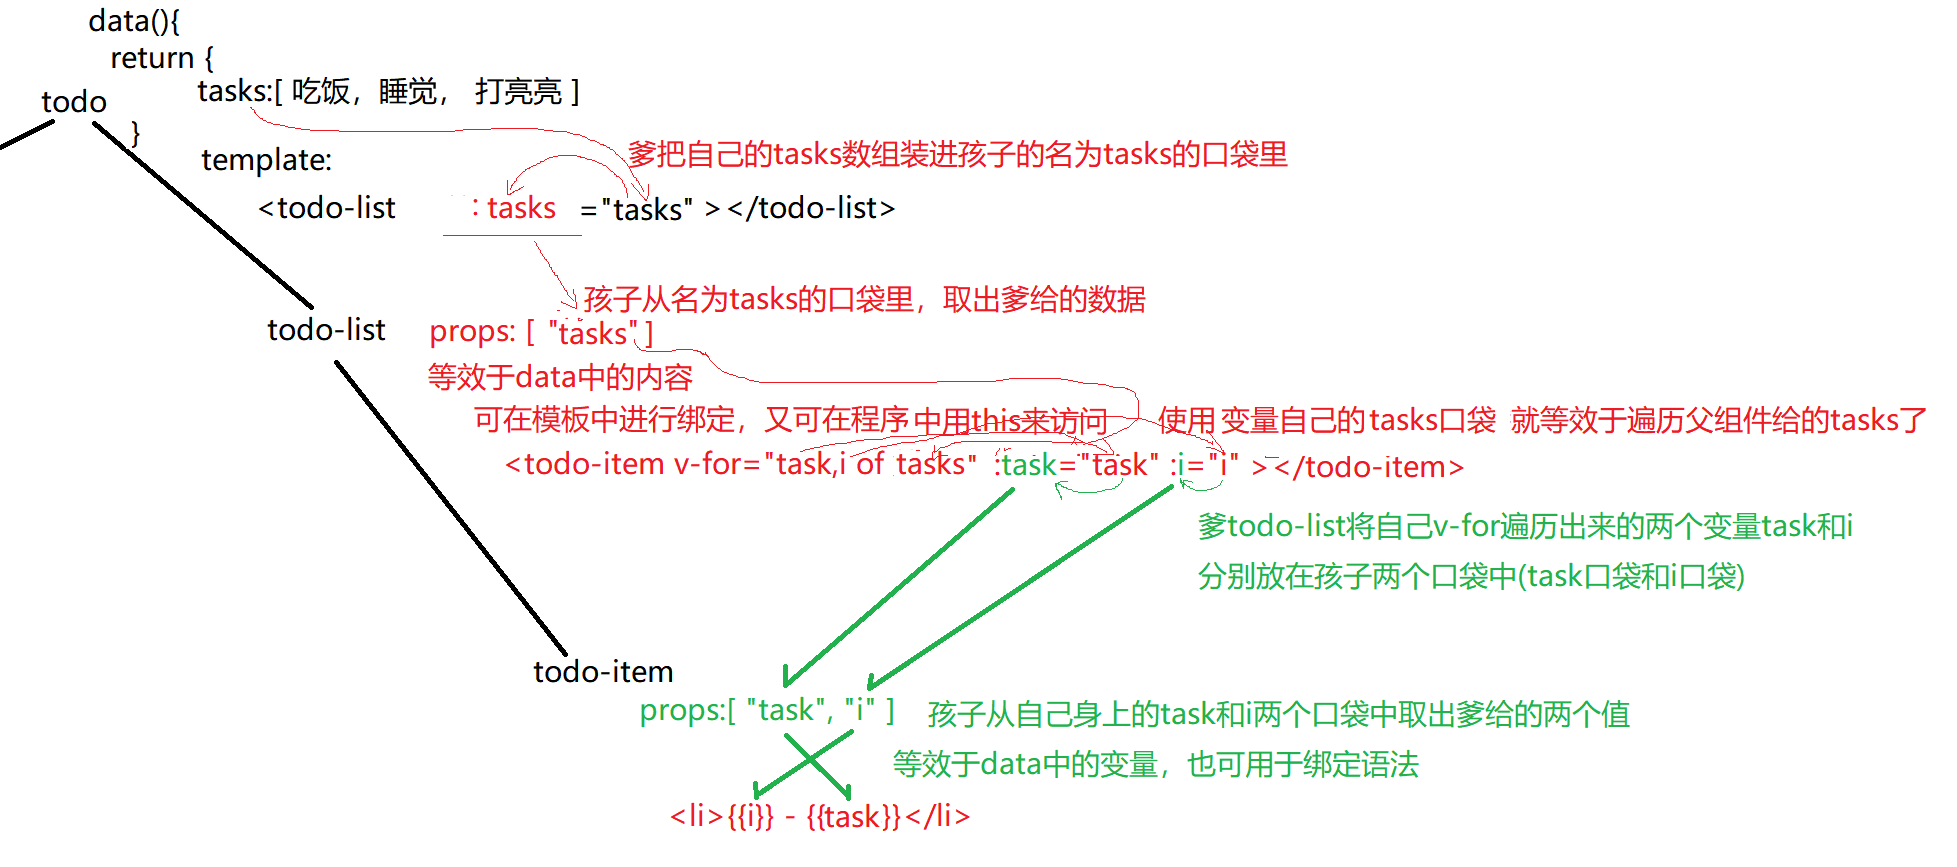
d. Upgrade: add data binding for todo case (delete and add operations are not implemented temporarily)
1). 2_todo.js
Vue.component("todo",{
  template:`<div>
    <h1>To Do List </h1>
    <todo-add></todo-add>
    <!--Dad todo,adopt:Binding syntax, set yourself data Variables in tasks,Assign to child components todo-list Custom properties for tasks in-->
    <todo-list :tasks="tasks"></todo-list>
  </div>`,
  data(){
    return {
      tasks:["having dinner","sleep","Play bright","study"]
    }
  },
  components:{
    todoAdd, todoList
//vue will automatically translate the component object name named by the hump into - split
//     ↓         ↓
//<todo-add> <todo-list>
  }//Indicates that todoAdd and todoList can only be used in todo in the future
})
2). 2_todo-list.js
var todoList={
  template:`<ul>
    <!--such as: be known as tasks Dad in his pocket tasks The array can still be used in the current sub component v-for ergodic-->
     <!--If current todoList Sub components of todoItem Continue to need todoList The data in can also be:Binding syntax, which is put by the current component into the custom attribute on the sub component. It can be put into multiple custom attributes, just like multiple pockets-->
    <!--For example: todo-item The subcomponent is mainly the task name traversed by the current component task And task serial number i,So in todo-item Add two custom attributes to the binding task and i Value of variable-->
    <todo-item v-for="(task,i) of tasks" :task="task" :i="i" :key="i"></todo-item>
  </ul>`,
  //The child todoList component takes out the tasks array from his father's pocket named tasks, just like using his own tasks array.
  props:["tasks"],
  components:{
    todoItem
  }
}
3). 2_todo-item.js
//The variable name of the object must be named by hump
//Moreover, the variable name of the object will be automatically translated into the label name of the sub component in the future.
var todoItem={//Keep the content format of the component unchanged in {}.
  template:`<li>
    <!--The data obtained from dad's pocket can be used in binding grammar in children, just like using yourself data As convenient as data in-->
    {{i+1}} - {{task}} <a href="javascript:;">x</a>
  </li>`,
  //The child todoItem component can take out the two values given by his father from the two pocket tasks and i given by his father: task name and task serial number.
  props:[ "task", "i" ]
}
SPA: Single Page Application
- What is: the whole application has only one complete HTML page. Other so-called pages are actually components. The so-called switch page or jump page is actually to switch different components in one page.
- When: almost all mobile projects use single page applications
- Why?
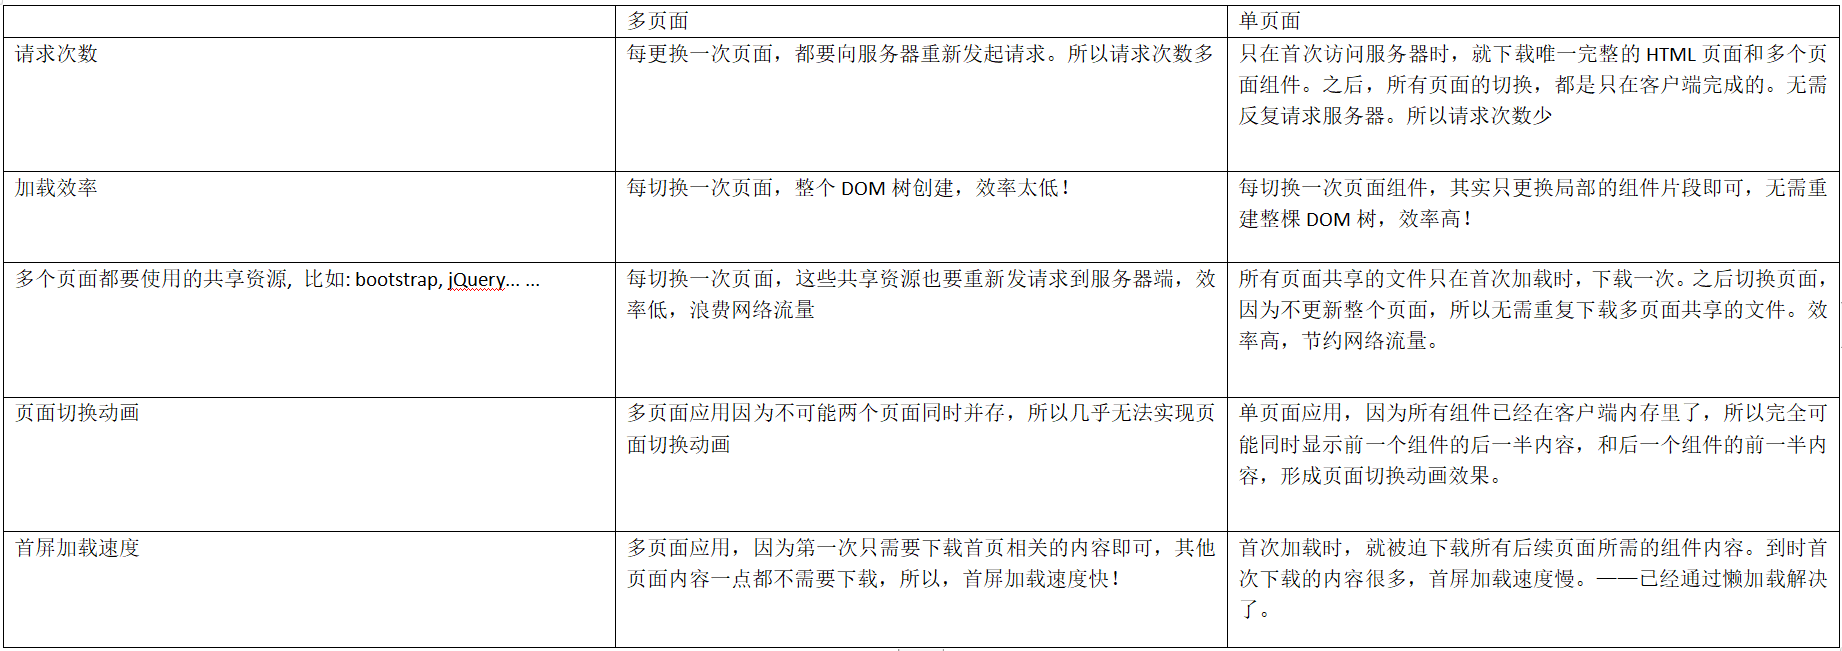
- how:
(1). Create only one unique and complete HTML page containing new Vue()
(2). Create component files corresponding to other pages
Emphasis: in SPA applications, the so-called "page" is actually a sub component containing page fragment content
(3). Create a routing object, including a routing Dictionary:
a. Router object: monitor the change of address bar at any time, find the corresponding components according to the provisions in the routing dictionary, and replace the objects in the specified area in the unique and complete HTML page.
b. Routing Dictionary: an array containing all relative paths and their corresponding component object names
c. The router must contain a routing dictionary to work properly
d. How to:
1). Import < script SRC = "JS / Vue router. JS" >
2). Create router objects and routing Dictionaries
var router=new VueRouter({
  			routes:[
    				{path:"/", component: Index},
    				{path:"/details", component: Details},
    				{path:"/products", component: Products},
    				{path:"*", component: NotFound }
  			]
		})
(4). Introduce all previous component objects and routing dictionary objects into a unique and complete HTML page
a. Import order: Vue router JS, child component, parent component, router object
b. Add < router View > < / router View > in < div id = "app" > to occupy the space for the coming page component fragment.
c. Introduce router object in new Vue()
(5). If global components are included, such as page headers:
a. First create the header component JS: my header js
Vue.component("my-header",{ ... })
b. Then introduce the global component into the only completed HTML page < script SRC = "my header. JS" >
c. Finally, in < div id = "app" >, add the global component label outside < router View >
<div id="app">
		<my-header></my-header>
		<router-view></router-view>
	</div>
d. Result: when switching page components in the future, only the router view part will be replaced. The external part of the router view remains unchanged, and the page header appears at the top of each page and becomes a common part of multiple pages.
5. Route jump:
(1). Dead in HTML:
a. Do not use < a href = "XXX" >
b. You must use the < router link to = "/ relative path" > text < / router link >
(2). Jump in JS: this$ router. Push ("/ relative path")
6. Routing parameters:
(1). Configure the routing object in the routing dictionary to allow parameter transfer
var router=new VueRouter({
	routes:[
		...
		{path:"/details/:lid", component: Details, props:true}
	]                Parameter name               Will parameter lid The value of becomes props Properties in
	result: Since then, I want to enter/details,Parameter value is required! No entry without parameter value!
})
(2)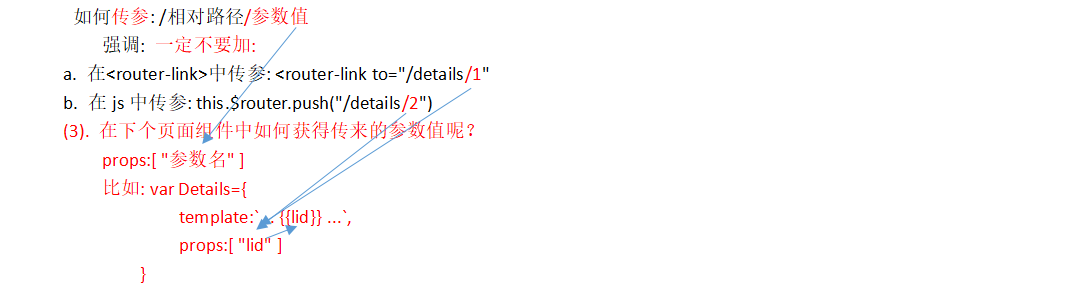
7. Example: realize single page application
(1). 3_SPA.html
<!DOCTYPE html>
<html lang="en">
<head>
  <meta charset="UTF-8">
  <meta name="viewport" content="width=device-width, initial-scale=1.0">
  <meta http-equiv="X-UA-Compatible" content="ie=edge">
  <title>Document</title>
  <script src="js/vue.js"></script>
  <script src="js/vue-router.js"></script>
  <script src="3_index.js"></script>
  <script src="3_details.js"></script>
  <script src="3_products.js"></script>
  <script src="3_not_found.js"></script>
  <script src="3_router.js">
    //var router=new VueRouter({ ... })
  </script>
  <script src="3_my_header.js"></script>
</head>
<body>
<div id="app">
  <my-header></my-header>
  <router-view></router-view>
</div>
<script>
var vm=new Vue({
  el:"#app",
  data:{

  },
  //router:router
  router
})
</script>
</body>
</html>
(2). 3_index.js
var Index={
  template:`<div style="background-color:#C8BFE7">
    <h1>Here is the home page</h1>
    <button @click="goToDetails">View details of item 1</button><br/>
    <router-link to="/details/2">View details of item 2</router-link>
  </div>`,
  methods:{
    goToDetails(){
      this.$router.push("/details/1")
    }
  }
}
(3). 3_details.js
var Details={
  template:`<div style="background-color:#FF7F27">
    <h1>Here is the details page</h1>
    <h2>display{{lid}}Details of item No...</h2>
    <button @click="back">Return to home page</button>
  </div>`,
  props:[ "lid" ],
  methods:{
    back(){
      this.$router.push("/")
    }
  }
}
(4) 3_products.js
var Products={
  template:`<div style="background-color:#B5E61D">
    <h1>Here is the product list page</h1>
  </div>`
}
(5). 3_not_found.js
var NotFound={
  template:`<h1 style="color:red">The page you visited does not exist!<br>404:Not Found</h1>`
}
(6). 3_router.js
var router=new VueRouter({
  routes:[
    {path:"/", component: Index},
    {path:"/details/:lid", component: Details,props:true},
    {path:"/products", component: Products},
    {path:"*", component: NotFound }
  ]
})
(7) 3_my_header.js
Vue.component("my-header",{
  template:`<div>
    <h1>Here is the header</h1>
    <ul>
      <li><router-link to="/">home page</router-link></li>
      <li><router-link to="/products">Product list page</router-link></li>
    </ul>
  </div>`
})
VUE scaffold
- What is a semi-finished product project that already contains core functions
- Why?
(1). Simple: core functions have been included to avoid a lot of repeated coding
(2). Specification: the folder structure, folder name and file name have been standardized to reduce the differences between different projects. - When: in the future, almost all front-end projects will be developed with scaffolding.
Install the tool vue create that generates the scaffold code
-
how:
(1). Install tool to generate scaffold Code: npm i -g @vue/cli
After installation: enter vue -V, and it will be successful if you see the version number
(2). Create a set of scaffold code structure for this project with the tool for generating scaffold Code:
a. In the directory where you want to generate the project, write cmd in the address bar and open the command line
b. On the command line, enter vue create xzvue
c. Your connection to the default npm registry seems to be slow.
Your current link is to the default foreign npm warehouse, which seems a little slow
Use https://registry.npm.taobao.org for faster installation? (Y/n)
Whether to use the domestic Taobao image to install faster. Enter Y and press enter
d. ? Please pick a preset: Please select a preset setting
default (babel, eslint) / / use the default setting
>Manually select features / / manually select features
Press the direction key, select the second one, manually select the function, and press enter
e. ? Check the features needed for your project: (Press <space> to select, <a> to toggle all
Select the functions required by your project (press the space to check or uncheck, and press a to select all)
, <i>to invert selection)
(*) Babel translates the ES6 or higher version of js code unknown to the browser into ES5 version of js
( ) TypeScript
( ) Progressive Web App (PWA) Support
(*) router component, the core of realizing single page application in Router VUE
(*) Vuex management share status
( ) CSS Pre-processors
>() linter / formatter linter is a code quality inspection tool, which will report errors even if the format is not standard! Don't choose
( ) Unit Testing
( ) E2E Testing
Press the arrow keys to move up and down, move to the function you want to select, press the spacebar to select Babel, Router and Vuex, and uncheck Linter
f. Use history mode for router? (Requires proper server setup for index fallback in production) (Y/n) enter n and press enter
Whether to use the history mode as the identification of the router (home page redirection needs to be configured in the production environment)
Vue router adopts # / relative path method by default to realize the client routing address:
For example: http://localhost:5500/index.html#/
http://localhost:5500/index.html#/details/2
history mode:
http://localhost:5500/
http://localhost:5500/details/2
The default browser will send all addresses in the address bar to the server to request resources. As long as # addresses remain in the client, they will not be sent to the server.
But, http://localhost:5500/details/2 We originally wanted to switch page components in the client route, but the browser will also send it to the server for search. Because the server does not have this resource, it is likely to report an error!
Therefore, in the future, you can either use the default # / relative path method or use histoy. You must also ask the server side to modify the configuration!
g. Where do you prefer placing config for Babel, ESLint, etc.? (Use arrow keys)
Where do you want to save this configuration? (select with direction keys)
In dedicated config files / / put the configuration of each component in its own configuration file
> In package.json / / put all configurations in one package JSON file
Press the direction key and select in package JSON, press enter
h. Save this as a preset for future projects? (y/N)
Do you want to save this configuration as a predefined configuration for future projects
Enter N and press enter
i. See the result: it shows that the project source code structure is generated successfully with scaffolding tools
...
Successfully created project xzvue.
👉 Get started with the following commands:
$ cd xzvue
$ npm run servej. In windows Explorer, enter the current folder and you will see the source code folder of the semi-finished project generated for this project xzvue.
k. For each new project, this set a-h of steps should be operated again.
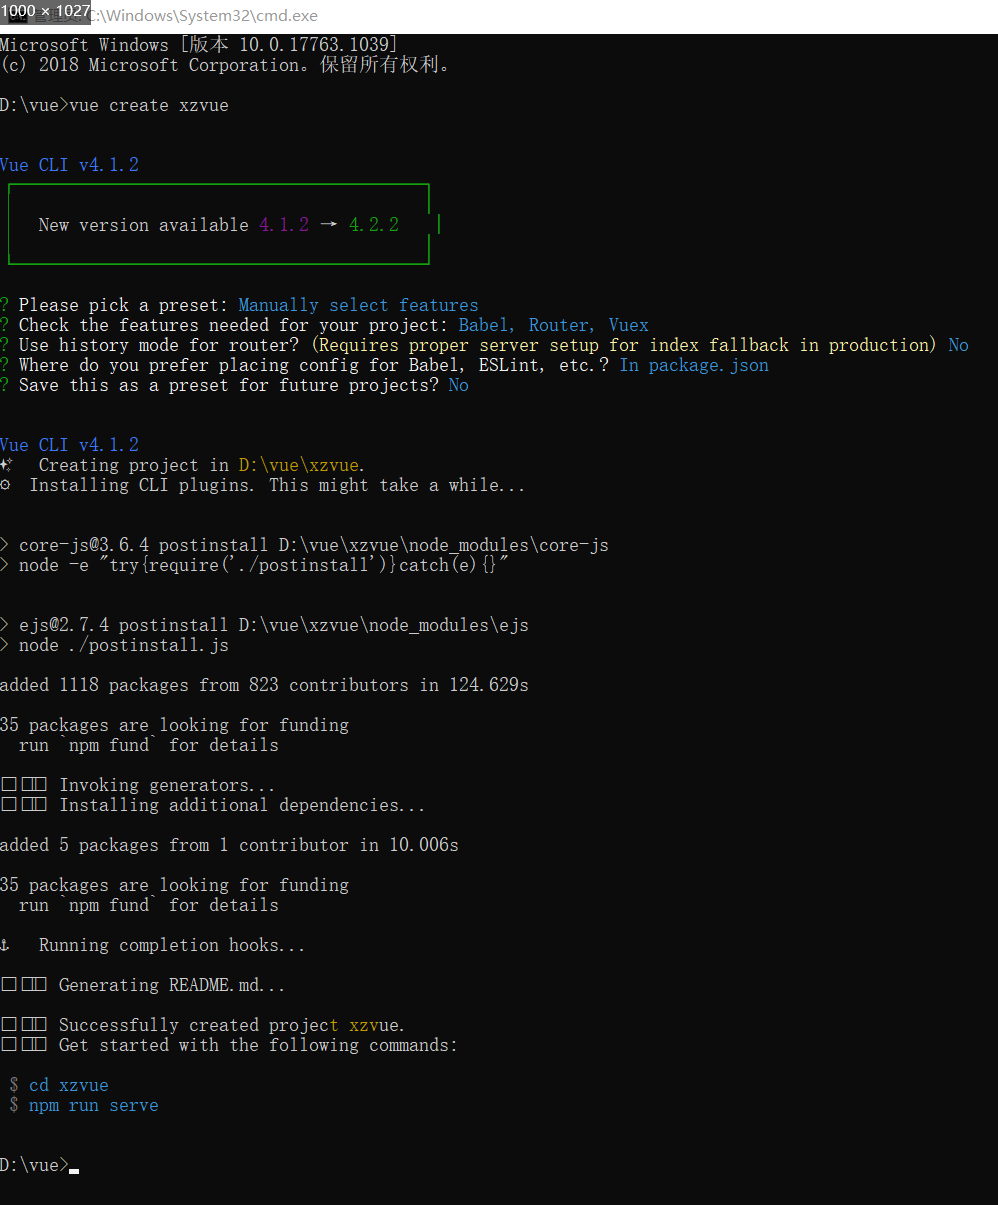
Run npm run serve
l. In fact, the source code of the scaffold project just created includes a sample web page:
Open the scaffolding project folder just created with vscode
Right click package. In the project JSON file, open in terminal / command line
In the pop-up command line window, enter npm run serve
Npm run serve: did two things:
Compile scaffold project code for ES5 code recognized by browser
At the same time, start the simple development server to run the web pages in the website
Open the browser and enter in the address bar: http://localhost:8080 , you can see the sample web page
Or in the command line window, press ctrl to click the connection address: http://localhost:8080 You can also view the sample web page
Emphasize: since then, live server has withdrawn from the historical stage! No longer use live server to run! All vue projects run with npm run serve
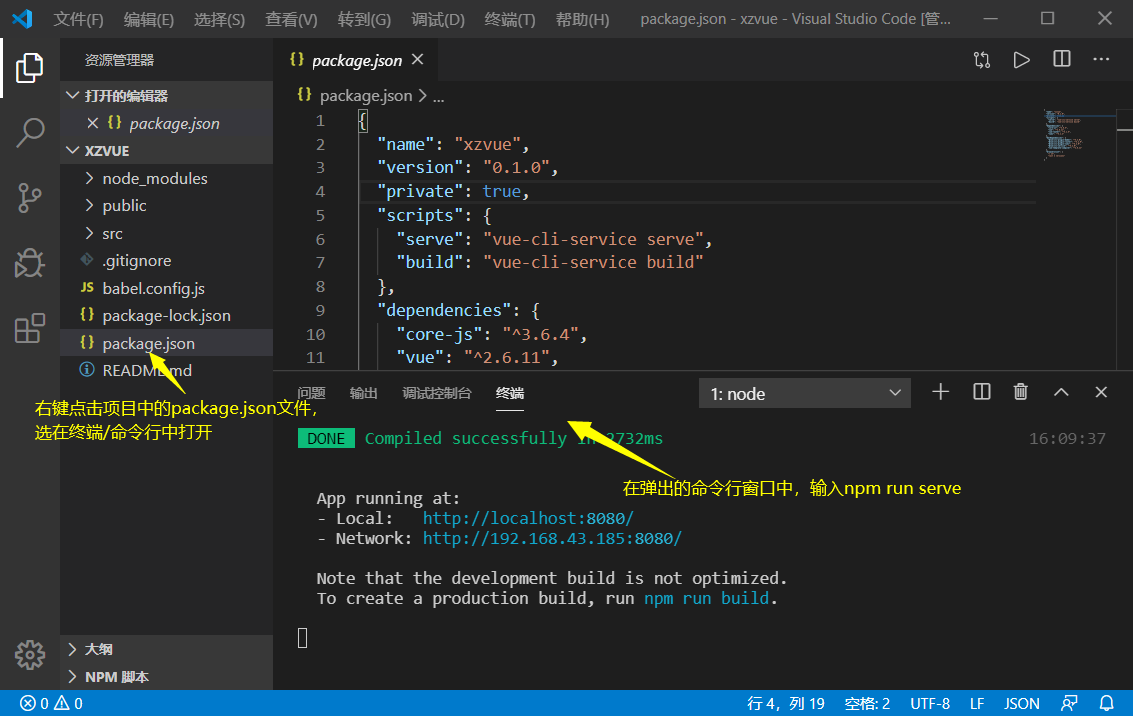
Add axios module for scaffold
① In the project folder generated by scaffold, for example, this is xzvue folder
Enter cmd in the address bar to open the command line
② To install the axios module locally:
npm i -save axios
③ In the scaffold project source code Src / main JS, the axios module is introduced before new Vue()
import axios from "axios" //node_ The modules installed in modules do not need to add paths when importing
④ Set the underlying path property of the axios object:
axios.defaults.baseURL="http: / / server side domain name"
For example, in the student mall project: Axios dafaults. baseURL=“ http://xzserver.applinzi.com ”
⑤ Place the axios object in Vue's prototype object
Vue.prototype.axios=axios;
⑥ Result: because all component objects are sub objects of Vue type, this. Is available anywhere within all components axios. Get () and this axios. Post() to access Vue Functions in Axios objects in prototype.
Scaffold project structure
(1). .git folder (hidden): configure some files ignored by git warehouse in local git warehouse folder (not uploaded)
(2). node_modules folder: save the dependent packages for scaffold project operation.
(3). public folder:
a. Save the only complete index of the whole single page application HTML file
b. In the future, it is also possible to save public css files and js files required by all pages, such as:
bootstrap.css , jquery.js , bootstrap.js
1). You can create new css and js folders under the public folder
2). Save the third-party css and js that all pages need to share
3). In the only complete index HTML, the top introduces the third-party css and js required by all pages
c. All pictures used in future web pages should also be saved in public!
Therefore, copy the img folder in the old project to public
(4). src folder: put all our own HTML, css and js
a. Root component: html and new Vue() of the only complete page in the original SPA are no longer placed in one html file, but it is divided into two files:
1). App.vue only puts the HTML content of the root component < div id = "app" > and the css style of the root component
2). main.js to put the root component new Vue({}) and the configuration of new Vue()
3). Result: at runtime, app < div id = "app" > and main in Vue JS, new Vue() will be recompiled back to the only complete index HTML page.
b. Multiple page components:
1). All page components should be placed in the src/views / folder
2). Each page component is a vue file
3). Each vue files contain three parts:
①
<template>
	Write the of the current page component HTML fragment
</template>
②
<script>//All js contents in the original page component object no longer contain the template attribute
{
	data(){  return { ... }  },
	...
}
 </script>
③
<style>
 Required for the current page css Style, pay attention to style conflicts between components(The child elements under this component begin with the uniform style class name)
</style>
c. Router object: Src / router / index js
It is almost the same as the router object in SPA
new VueRouter({
	routers:[
		{path:"/",component:Index},
		{path:"/details/:lid",component:Details, props:true},
		...
		{path:"*", component: NotFound }
	]
})
Note: the router object is already in main JS is added to new Vue()
d. components folder: save all global component object files and sub component files in a centralized manner.
Structure of scaffold and SPA application code
- In fact: the structure of scaffold code is essentially the same as that of SPA application code. Use the known to interpret the new.
(1). Review: SPA code structure:
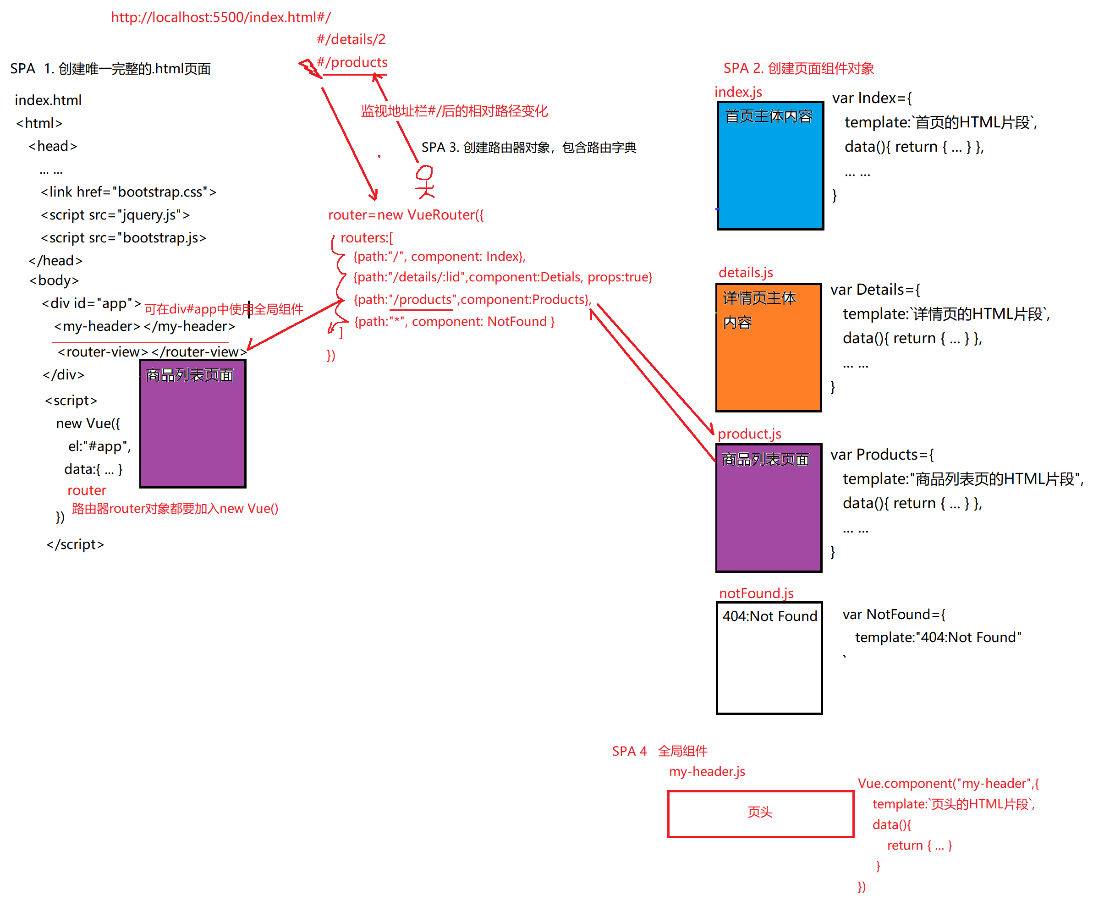
(2). Scaffold code structure: in fact, it is the code structure of SPA
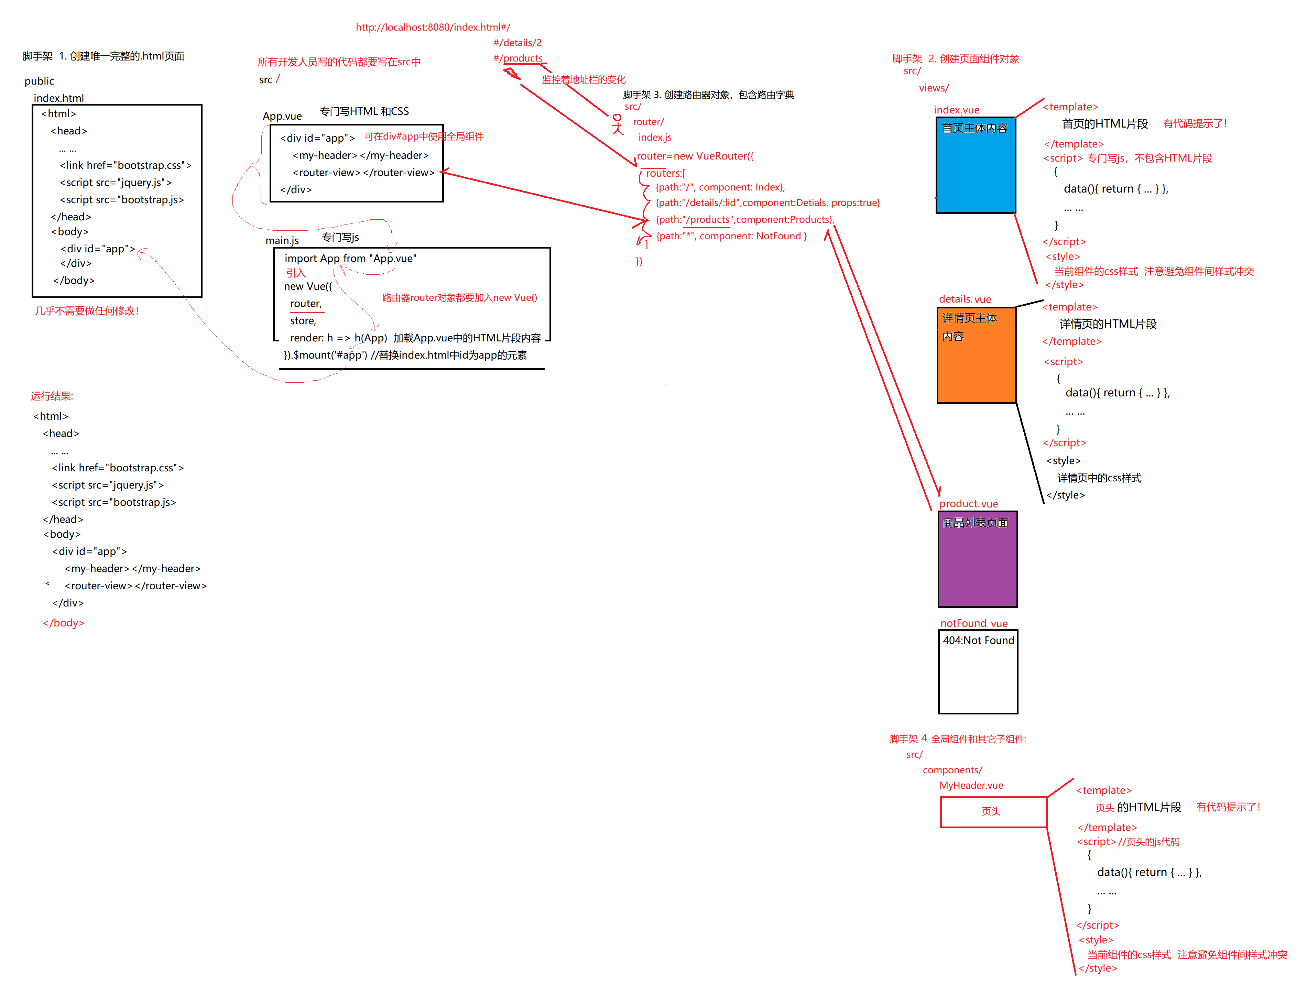
Application of es6 modular development in scaffold
(1). Introduction problem in old SPA applications: all component objects must be introduced into index HTML, and then use it as a global object. If you only look at a component object file, you can't see the dependency at all—— Not intuitive
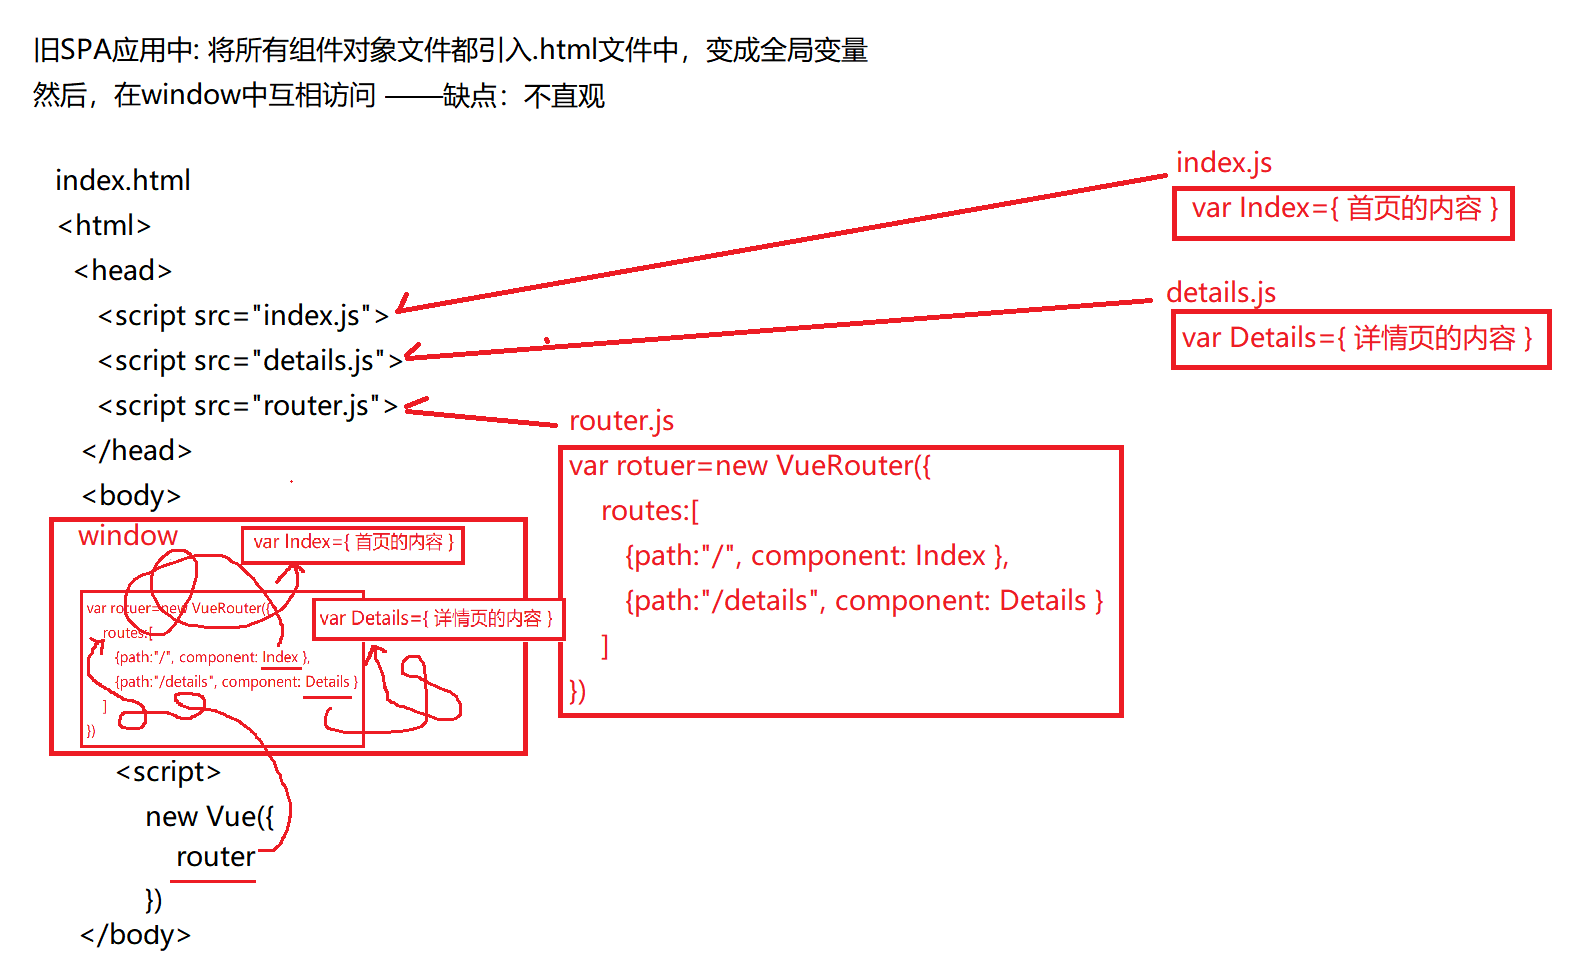
(2). Each vue files and js files are all module objects by default
(3). Each module object can throw out its own internal members for external access
export default {
The content of the component object to throw
}
(4). When a module wants to use the content of another module, it can directly find the content introduced into the module file without going through a third party.
import variable name from "relative path of target file"
(5). Result: you can introduce the contents thrown in the target file into your own file and use the contents in other file modules like using your own variables and objects—— Reduce the price difference of middlemen!

Development of scaffold project with VUE
- Add the img folder required by the website and the third-party css and js shared by all pages in the public / folder, and in the only complete index In the HTML page, < head > < / head >, third-party css and js are introduced
- Create multiple page components in src/views / folder. If there are several pages in the program in the future, create several vue file
Each page vue files contain three parts:
① < template > contains the HTML fragment of this page:
eg: in the student mall project: go back to the old jQuery project and find the corresponding page html file, copy the < main > part of the code to the page in vue scaffold project In < template > in vue
② < style > contains the css code of this page:
eg: in the student mall project: go back to the old jQuery project and find the corresponding page css file, copy all css codes to the page in vue scaffold project < style > in vue - In the router object, add the routing address of each page
In Src / router / index JS:
① First import the component objects of all pages:
import page name from "relative path of page component"
...
② Then modify the routing dictionary entry in the routes array:
{path: "/ pathname", component: page name} - Global components:
① Under src/components /
Create a new ordinary component vue file also contains three parts
< template > contains HTML fragments of components
< script > contains the vue js code of the component
< style > contains the css code of the component
② In main JS, before new Vue()
a. Find the location of the global component file and import the contents of the global component into main as a module object Standby in JS
import component name from ". / components / component name. vue"
For example, to import a header component:
import MyHeader from "./components/MyHeader"
b. Turn the introduced component object into a real global component!
Vue.component("tag name", component name)
For example, you want to turn the imported header component object into a real global component
Vue.component("my-header",MyHeader);
c. Results: in the future, global components can be introduced through < my header > < / my header > on any page or anywhere of components.
For example: want to add a header to the top of all pages in the future: in app In Vue
<div id="app">
   <my-header></my-header>
   <router-view/>
</div>
- Subcomponents:
① Create a new sub - component under src/components / vue file
In the sub assembly Write the contents of this subcomponent in the vue file
For example: Src / components / carousel vue
<template>
		<script>
		<style>
② import the child component object in < script > of the parent component
<script>
   import Component name from "Subcomponent path"
   such as: import Carsouel from "../components/ Carsouel "
③ In export default in < script > of parent component
export default {
		... ...
		components:{
			Component name
		such as: Carsouel
		}
	}
④ Result: in the current component or page, you can use < casouel > < / casouel > to introduce sub components
- The css code required for all pages is written in app < style > in Vue
- Get data dynamically using axios:
(1). After generating the project source code with the scaffold tool, add the axios module to the project (see the scaffold installation and configuration section)
(2). axios requests can be sent either in the created() function or in the mounted() function in the life cycle hook function of the current component.
(3). In Axios get(). Then (RES = > {}) will assign the data returned by the server (res.data) to the variables in data by categories in the call function
(4). In the < template > of the page / component, find the location where these variables are needed, and bind the data to the specified location of the page using the binding syntax mentioned above
Component lifecycle
① Life cycle: the loading process of a component
② Review: Web page loading process: there is also a life cycle
Load HTML and JS first. When HTML and JS are loaded, the DOMContentLoaded event will be triggered in advance,
Therefore, we can write code to send ajax requests in DOM content loaded. In this way, as long as the page is loaded to this stage and the event is triggered, it will automatically send a request to the server.
Then, when all web page contents are loaded, an event will be triggered: window onload. Usually written in window The code in the onload event will automatically trigger execution after the entire page is loaded.
③ Problem: the component is not a page and cannot trigger the loading completion event of the page. However, we also want to automatically send ajax requests after the component is loaded!
④ Solution: in fact, the component loading process also has life cycle stages, and each stage can automatically trigger a callback function. However, because this callback function is not a web page standard event, this special callback function is called the hook function in the life cycle
⑤ BS enumeration: the Vue component loading process is divided into four stages. Before and after each stage, a hook function will be automatically triggered. There are 8 hook functions:
1.0 beforeCreate(){ ... }
1. Create phase: create vue objects and create data objects in vue (only data objects can update the page, and Axios can be written as long as data is created)
1.1 created(){ ... axios.get() ... }
2.0 beforeMount(){ ... }
2. Mount stage: scan the web page content, establish a virtual DOM tree, and update the content in the page for the first time
2.1 mounted(){ ... axios.get() ... }
**************This is the end of the first loading process*****************
3.0 beforeUpdate(){ ... }
3. Update phase: this phase is automatically triggered when the variables in the data of the component are modified
3.1 updated(){ ... }
4.0 beforeDestroy(){ ... }
4. Destroy phase: this phase is automatically triggered only when a special function is actively called to destroy a component
4.1 destroyed(){ ... }
⑥ BS: execution sequence of parent and child component lifecycle functions:
Parent component beforeCreate()
Parent component created()
Parent component beforeMount()
When the parent component scans the page content, it finds unknown sub component labels and starts the loading process of sub components
Subcomponent beforeCreate()
Subcomponent created()
Subcomponent beforeMount()
Subattachment mounted()
The parent component continues to scan the subsequent contents successively
mounted() of parent component
summary
- Element content needs to be changed dynamically: {variable or js expression}}
- The element attribute value needs to be changed dynamically: attribute name = "variable or js expression"
- Controls the display and hiding of an element: preferred v-show = "condition"
- Controls the display of one of two elements:
< element 1 v-if = "condition" >
< element 2 v-else > - Control the display of multiple elements:
< element 1 v-if = "condition 1" >
< element 2 v-else-if = "condition 2" >
... ...
< element n v-else > - When repeatedly generating multiple HTML elements with the same structure:
< element v-for="(value,i) of array / string / object / number": key = "i" > - Bind HTML fragment content:
< element v-html = "variable or expression containing HTML content" > < / element > - Prevent users from seeing {syntax briefly:
(1). <style>[v-cloak]{display:none}</style>
< element v-cloak >
(2). < Element v-text = "js expression containing {}" > < / element > - Binding event: < element @ event name = "handler function (parameter value, $event)"
- Bind: v-once only once when the page is first loaded
- Prevent {}} in content from being compiled by vue: v-pre
- As long as the value of the form element is bound, the v-model is bound in both directions
< form element v-model = "variable" >
Source code of e-commerce management platform, public 🀄 Get [code farmer impression] 👍