What is Electron?
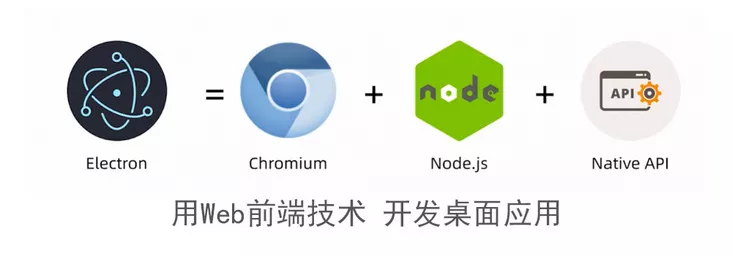
Electron There is only one simple sentence on the official website: Build cross platform desktop applications using JavaScript, HTML and CSS. Simply put, there is Electron, we can use front-end technology to write web Page, which can be converted into a desktop application.
Before that, Electron There are other features:
-
Based on Chromium and Node.js
-
Compatible with Mac, Windows and Linux, you can build applications on three platforms
Electron quick start
Let's start with a helloword
Initialization project
establish Electron The engineering method is the same as the front-end project. Create a directory and use npm initialization:
mkdir hello-electron && cd hello-electron
npm init -y
Installation dependency
npm install --save-dev electron
 Maybe the download will report an error. I used it cnpm
Create HTML
stay Electron In, each window can load local or remote URLs. Here we create a local URL first HTML File.
<!DOCTYPE html>
<html>
  <head>
    <meta charset="UTF-8">
    <title>Hello World!</title>
  </head>
  <body>
    <h1>Hello World!</h1>
  </body>
</html>
Create entry file
be similar to Node.js Start service, electron An entry file is also required for startup, which we create here index.js File. In this entry file, you need to load the file created above HTML File, so how to load it? Electron Two modules are provided:
-
app Module that controls the event lifecycle of the application.
-
BrowserWindow Module, which creates and manages application windows.
The entry file is Node.js Environment, so you can CommonJS Module specification to import Electron Module. Add one at the same time createWindow() Method to index.html Load into a new BrowserWindow example.
// index.js
const { app, BrowserWindow } = require('electron');

function createWindow () {
  const win = new BrowserWindow({
    width: 800,
    height: 600
  })

  win.loadFile('index.html')
}
// index.js
app.whenReady().then(() => {
  createWindow()
})
In this way, it can be opened by the following command Electron App!
# Here, you will automatically find the file corresponding to the main field of package.json to run
# Of course, you can also put commands in script
npx electron .
# Note: there is one in the back. Add it
Here is the end of the simple demo. To see the more detailed content, see this address: https://mp.weixin.qq.com/s/GlDC-qff5bkOS1UMDEiF8A
------------I am the dividing line--------------
Next, take vue+electron as an example
1. First, create the vue project
vue-cli3 is used here. If it is a lower version, please upgrade it yourself.
vue create electron-vue-demo
2. Automatic installation of electron
Enter the project root directory and execute:
vue add electron-builder
Note: my node version here is low. I want to upgrade the node version. (mac) window searches for data by itself
// eliminate node of cache(eliminate node (cache of)
sudo npm cache clean -f
// install"n"Version management tools, managing node(Nothing wrong, just n)
 sudo npm install -g n
// to update node edition
sudo n stable
// Check the current status of this machine again Node
node -v
Then execute Vue add electron builder again, ok, done!
3. Create src/background.js
Create a new background.js in the src directory of the vue project you just created, and copy the following code:
'use strict'

import { app, protocol, BrowserWindow } from 'electron'
import {
  createProtocol,
  installVueDevtools
} from 'vue-cli-plugin-electron-builder/lib'

const isDevelopment = process.env.NODE_ENV !== 'production'

// Keep a global reference of the window object, if you don't, the window will
// be closed automatically when the JavaScript object is garbage collected.
let win

// Scheme must be registered before the app is ready
protocol.registerSchemesAsPrivileged([{
  scheme: 'app',
  privileges: {
    secure: true,
    standard: true
  }
}])

function createWindow () {
  // Create the browser window.
  win = new BrowserWindow({
    width: 800,
    height: 600,
    webPreferences: {
      nodeIntegration: true
    }
  })

  if (process.env.WEBPACK_DEV_SERVER_URL) {
    // Load the url of the dev server if in development mode
    win.loadURL(process.env.WEBPACK_DEV_SERVER_URL)
    if (!process.env.IS_TEST) win.webContents.openDevTools()
  } else {
    createProtocol('app')
    // Load the index.html when not in development
    win.loadURL('app://./index.html')
  }

  win.on('closed', () => {
    win = null
  })
}

// Quit when all windows are closed.
app.on('window-all-closed', () => {
  // On macOS it is common for applications and their menu bar
  // to stay active until the user quits explicitly with Cmd + Q
  if (process.platform !== 'darwin') {
    app.quit()
  }
})

app.on('activate', () => {
  // On macOS it's common to re-create a window in the app when the
  // dock icon is clicked and there are no other windows open.
  if (win === null) {
    createWindow()
  }
})

// This method will be called when Electron has finished
// initialization and is ready to create browser windows.
// Some APIs can only be used after this event occurs.
app.on('ready', async () => {
  if (isDevelopment && !process.env.IS_TEST) {
    // Install Vue Devtools
    try {
      await installVueDevtools()
    } catch (e) {
      console.error('Vue Devtools failed to install:', e.toString())
    }
  }
  createWindow()
})

// Exit cleanly on request from parent process in development mode.
if (isDevelopment) {
  if (process.platform === 'win32') {
    process.on('message', data => {
      if (data === 'graceful-exit') {
        app.quit()
      }
    })
  } else {
    process.on('SIGTERM', () => {
      app.quit()
    })
  }
}
The above code is generated after automatic installation in section 1.5.
4. Install dependent packages
Execute in the project root directory and install all dependent packages
cnpm install
5. Compile and start the APP
Execute the following command to start compiling APP and start the development environment APP:
npm run electron:serve
After the compilation is successful, the client of the development environment will appear.
6. build the final product
Here we have integrated the electron builder tool. For the official documents, please refer to: https://www.electron.build/
7. Set app and installation package icons and app names
Modify vue.config.js
chainWebpack: config => {...},
+   pluginOptions: {
+       electronBuilder: {
+           builderOptions: {
+               win: {
+                   icon: './public/app.ico'
+               },
+               mac: {
+                   icon: './public/app.png'
+               },
+               productName: 'AppDemo' // Set name
+           }
+       }
+   }
8. Package APP
Execute the following command to build the project:
npm run electron:build
Finally in dist_ The built products are generated in the electron directory.
Well, that's the end of this article. Later, we will update the relevant articles of electron, learn more new knowledge, enrich it, come on! This blog is only for recording learning. I hope you can grow together.
Similarly, good knowledge or new technology can be discussed together!
For more details, please refer to this article: https://zhuanlan.zhihu.com/p/75764907