
1, Vue first experience
1.1 Vue installation
. The introduction of Internet links can be obtained from BootCDN
<script src="https://cdn.bootcdn.net/ajax/libs/vue/2.6.14/vue.js">
. npm installed locally
stay Visual Studio Code Terminal input:

 npm install vue@2.6.14

<script src="../node_modules/vue/dist/vue.js">
Note: in 2022, if Vue does not add a version number, it will download the latest 3X version by default
1.2 first Vue program
<div id="app">{{msg}}</div>
<script>
    new Vue({
      el: "#app",
        data: {
          msg: "hello world!"
        }
    })
</script>
1.3 instructions
Vue built-in properties
v-text display text plain text} render data
<div v-text="msg">

</div>
v-html display HTML tag rich text rendering
<div v-text="msg">
</div>
<script>
    const app = new Vue({
        el: "#app",
        data: {
            msg: "<h1>hello world!</h1>"
        }
    })
</script>
Output as is in the v-pre tag
<body>
<span id="app" v-pre>
<h1>Hello </h1>
<h2>World!</h2>
</span>
<script src="../node_modules/vue/dist/vue.js"></script>
<script>
new Vue({
el:'#app',
})
</script>
</body>
Bidirectional binding of v-model data
Note that it can only bind labels such as input boxes, and v-model can only use input labels for the time being
<div id="app">
      <!-- Bidirectional data binding
                     For the time being v-model Only use input On the label
         -->
      <input type="text" v-model="msg" />
      <span>{{msg}}</span>
    </div>
    <script src="https://cdn.bootcdn.net/ajax/libs/vue/2.6.14/vue.js"></script>
    <script>
      new Vue({
        el: "#app",
        data: {
          msg: "hello world!",
        },
      });
    </script>
The attribute of the v-bind binding tag is abbreviated as (:)
<body>
    <div id="aaa">
        <img v-bind:src="url" alt="" >
    </div>

<script src="../node_modules/vue/dist/vue.js"></script>
<script>
new Vue({
    el:'#aaa',
    data:{
        url:'https://gimg2.baidu.com/image_search/src=http%3A%2F%2Fb-ssl.duitang.com%2Fuploads%2Fitem%2F201610%2F09%2F20161009145526_SkzwT.thumb.700_0.png&refer=http%3A%2F%2Fb-ssl.duitang.com&app=2002&size=f9999,10000&q=a80&n=0&g=0n&fmt=jpeg?sec=1646900303&t=119d71032855639dd5b53b6bd18ddf13'
    }
})
</script>
</body>
v-on abbreviation@
<body>
    <div id="aaa">
<button @click="add">Click add number</button>
<span>{{msg}}</span>
</div><script src="../node_modules/vue/dist/vue.js"></script>
<script>
   const app=new Vue({
    el:'#aaa',
    data:{
        msg:1
    },
    methods: {
        add(){
            this.msg+=1
        }
    },
})
</script>
</body>
v-for loop traversal
Put it on whoever wants to traverse
<body>
    //v-for instruction: write the item name casually (123 is not allowed)
    <ul id="app">
        <li v-for="(item,index) in list">{{item}} {{index}}</li>
    </ul>

    <script src="../node_modules/vue/dist/vue.js"></script>
 <script>
const app=new Vue({
    el:'#app',
    data:{
        list:['Xiao Ming','Xiao Hong','Xiao Huang',1,3,5]
    }
})
 </script>
</body>
v-if instruction
  <div id="app">
      <p v-if="name==='bing'">Bing dwen dwen.</p>
      <P v-else-if="isShow==='mei'">No, No</P>
      <p v-else="dao">Didn't grab it!</p>
    </div>
    <script src="../vue.js"></script>
    <script>
      const app = new Vue({
        el: "#app",
        data: {
          isShow: false,
          name: "dao",
        },
      });
v-show instruction
 <div id="app">
      <p v-show="isShow">Is it best to write articles after school!</p>
    </div>
    <script src="../vue.js"></script>
    <script>
      const app = new Vue({
        el: "#app",
        data: {
          //false do not display true display
          isShow: false,
        },
      });
    </script>
What is the difference between v-if and v-show instructions?
The DOM element of v-if operation and the css style of v-show operation
1.4 case todolist
Requirements: an input box, an add button, a write event, click add, and a todolist item will be added.
Idea: use v-model two-way binding to constantly change a value, listen to the Add button, increase the value in the array each time, and v-for to traverse the array rendering list
The code is as follows:
<body>
    <div id="list">
    <input type="text" v-model="msg">
    <button @click="add">add to</button>
    <ul >
        <li v-for="item in list">{{item}}</li>
    </ul>
</div>

    <script src="../node_modules/vue/dist/vue.js"></script>
    <script>
        const app=new Vue({
            el:'#list',
            data:{
                msg:'',
                list:[]
            },
            methods:{
                add(){
this.list.unshift(this.msg)
this.msg=''
                }
            }
        })
    </script>
</body>
1.5 make a form for the case
requirement:
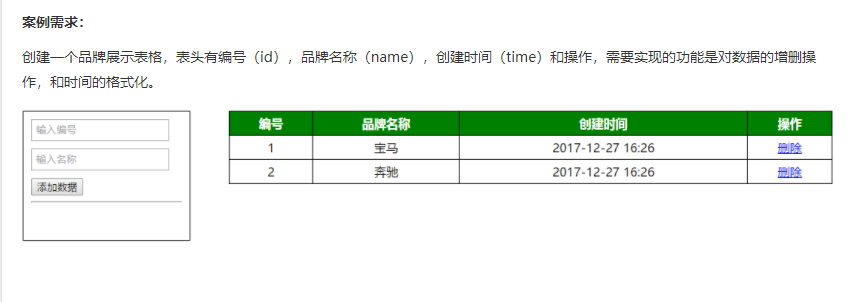
Idea: the idea is similar to that of the small case above, but we should pay attention to the application of objects and arrays, as well as some small CSS styles
The code is as follows:
<!DOCTYPE html>
<html lang="en">

<head>
    <meta charset="UTF-8">
    <meta http-equiv="X-UA-Compatible" content="IE=edge">
    <meta name="viewport" content="width=device-width, initial-scale=1.0">
    <title>Document</title>
    <style>
        * {
            margin: 0;
            padding: 0;
            list-style: none;
        }

        .box {

            width: 100vw;
            height: 200px;

        }

        .list {
            width: 200px;
            height: 100px;
            border: 1px solid red;
            display: flex;
            justify-content: space-around;
            align-items: center;
            flex-direction: column;
            float: left;
        }

        table {

            width: 50vw;
            border-collapse:collapse;
            float: left;

        }
        table td{
            /* border:1px solid black; */
            text-align: center;
        }

    </style>
</head>

<body>
    <div class="box">
        <div class="list">

            <input type="text" placeholder="Enter number" v-model="list.id">

            <input type="text" placeholder="Enter name" v-model="list.name">

            <button @click="add">Add data</button>
        </div>

        <table cellspacing="0" border="2" >
            <tr style="background-color: green;color: #fff;">
                <th>number</th>
                <th>Brand name</th>
                <th>Creation time</th>
                <th>operation</th>
            </tr>

            <tr v-for="(item,index) in all">
                <td>{{item.id}}</td>
                <td>{{item.name}}</td>
                <td>{{item.time}}</td>
     <td><button @click="remove(index)">delete</button></td>

        </table>

    </div>

    <script src="../node_modules/vue/dist/vue.js"></script>
    <script>
        const app = new Vue({
            el: '.box',
            data: {
                list: {
                    id: '',
                    name: '',
                    time: ''
                },
                all: [],


            },
            methods: {
                add() {
                    let time = getTime();
                    this.list.time = time;
                    // Save to all data
                    this.all.push(this.list)

                    //Clear single data
                    this.list = {
                        id: '',
                        name: '',
                        time: ''
                    }


                },
                // Delete operation
                remove(index) {
                    console.log(index);
                    this.all.splice(index,1)
                }


            }

        })


        //Encapsulate a time function
             function getTime(){
                  var date=new Date();
                   var year=date.getFullYear();
                   var month=date.getMonth()+1;
                   var day=date.getDate();
                  var hour=date.getHours();
                 var minute=date.getMinutes();
                 var second=date.getSeconds();
                 return `${year}--${month}--${day} ${hour}:${minute}:${second}`
     }

    </script>

</body>

</html>
be careful:
1. We have a ready-made method to obtain the current time, but we can only obtain the month, year and day. The method is as follows:
let time=new Date().toLocalString()
2. Some questions about table
Table attributes (these three can only be used directly after the table tag)
border="1"
cellspacing="1" (Gap between cells)
cellpadidng="1" (Distance between content and cell)
<table border="1" cellspacing="1" cellpadding="1"
3. How to avoid the coarsening of the border overlap in the table, set the border collapse: collapse in the css of the table; It can be solved.
<style>
table{
border-collapse:collapse;
}
</style>
Summary:
Official address: Introduction - Vue js
Vue is a progressive JavaScript framework. Vue only relates to the view layer. If you need other services, Vue router, Vuex, etc.