introduce
The front-end Shixian edits various information of the page and sends it to the back-end. When the front end requests, the back end needs to return the page information that meets the permission and instantiate the generated route.
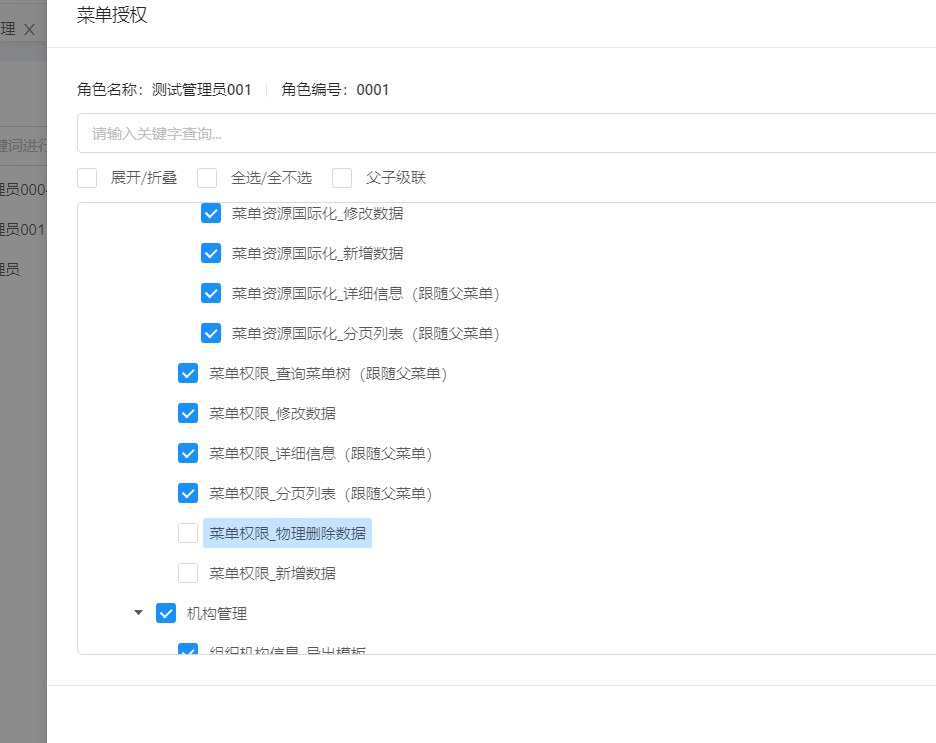
The premise of configuring permissions is that the front end needs to write all pages and buttons first, and tell the back end the correct component address, route and other information; Button permissions also need to write the parameters of permission identification on the button first, so that when the back end provides permission information, the front end can control the page and display the control permissions. Generally speaking, it is necessary to obtain this information when the login is successful. For the method of providing parameters, the background system generally has menu management, which is basically operated here. I've compiled a list of steps that I can refer to.
! [process] [linktu]
Create static route
Create and instantiate static routes in the router file, such as login interface, 404 page, frame page, etc., which do not need to be provided by the back end. This is done here.
// Configure routes that do not require permission. See permission for the determination of routing permission js
const routes = [
  {
    name: 'loginPage',
    path: '/login',
    component: () => import('@/home/login.vue'),
    meta: {
      title: 'Sign in',
      keepAlive: false
    }
  },
  {
    name: '404',
    path: '/404',
    component: () => import('@/views/404/index.vue'),
    meta: {
      title: 'Page not found',
      keepAlive: false
    }
  },
  {
    path: '/',
    name:'root',  //Be sure to set the name here
    component:RootPage,
    redirect:'/index',
    meta: {
      title: 'Regulatory submission',
    },
    children: [
      {
        name: 'index',
        path: '/index',
        component: routerReplaceSelf(() => import('@/views/home/index.vue')),
        meta: {
          title: 'home page',
          keepAlive: true,
          icon: 'home'
        },
        children:[]
      },
    ]
  },
];
const router = new VueRouter({
  mode: 'history',
  routes,
});
Create a Vuex file to manage routes
Create a new router in the store to maintain routes JS and fill in the code so that it can complete the storage, retrieval, processing and emptying of data. The logic of the LoadView method is not considered here, but the access of the route.
import routerReplaceSelf from '@/router/routeReplaceSelf';
export default {
  namespaced: true,
  state: {
    //Dynamic routing configuration
    asyncRouters: []
  },
  mutations: {
    // Set dynamic routing
    setAsyncRouter (state, asyncRouters) {
      state.asyncRouters = asyncRouters;
    }
  },
  actions: {
    //Get menu
    SetAsyncRouter ({ commit }, data) {
      //Get the routing configuration of the menu and configure
      let asyncRouters = filterAsyncRouter(data,0);
      commit('setAsyncRouter', asyncRouters);
    },
    ClearAsyncRouter ({ commit }) {
      commit('setAsyncRouter', []);
    }
  },
  getters: {
    //Get dynamic route
    asyncRouters (state) {
      return state.asyncRouters;
    },
  }
};

function filterAsyncRouter (routers,level) {
  // Traverse the routing string from the background and convert it into a component object
  let accessedRouters = routers.filter(router => {
      //When the status of the back-end control menu is disabled (1), skip this step
    if(router.status === '1'){
      return false;
    }
    if (router.meta) {
      // Default icon handling
      router.meta.icon = router.meta.icon ? router.meta.icon : "smile";
    }
    //Processing components - key points
    if (!router.componentBackUp) {
      router.componentBackUp = router.component;
    }
    router.name = router.menuCode;
    router.component = loadView(router.componentBackUp,level);
    //Existence subset
    if (router.children && router.children.length) {
      router.children = filterAsyncRouter(router.children,level+1);
    }
    return true;
  });
  return accessedRouters;
}
function loadView (view,level) {
  // Route lazy loading
    if(level > 0){
      return routerReplaceSelf((resolve) => require([`@/views/${view}`], resolve));
    }else{
      return ((resolve) => require([`@/views/${view}`], resolve));
    }
}
Maintain and obtain routing methods
After the login is successful, obtain the permissions owned by the user immediately and fill in the local routing tree.
/*
 * Get menu information,
 * '1,2,3'Represents the type of menu; 1-catalog, 2-item, 3-menu
 * null It is parentId, because to get all, fill in the blank and tell the backend.
 */
getMenuTreeForView('1,2,3', null).then(res => {
    //Escape to the data format required by the menu tree
    let data = this.convertTreeData(res.data);
    //Send a request to get the menu and set the menu to vuex,
    this.$store.dispatch('router/SetAsyncRouter',data);
    this.$router.push({
        path: this.redirect || '/index',
        query: this.otherQuery
    });
})
Set routing guard
The route guard will execute every time the route of the page changes. Before each phase is the logic that needs to be executed before the route enters. next() represents route release. The parameter to represents the target route, from represents the source route, and next is a release parameter.
registerRouteFresh is a custom flag that represents whether the route has been obtained from vuex. This flag will be reset whenever the page is refreshed. If the route jump is performed without refresh, only the route information obtained at the beginning will be used.
Here, you need to pay attention to the key parts marked in the comments. If there are components whose components are not mounted, you need to mount them again.
You can press F12 to view the routing information (after the console outputs this.$router, the routing information is in options.routes.), In the component attribute of the component, if VueComponent(options) is written during expansion, it indicates that the route has been successfully mounted. Otherwise, you need to pay attention to what is wrong.
Routing guard is very easy to fall into a dead cycle, so pay attention to logic.
//  The introduction setting of progress bar is the same as the first description above
import router from './router';
import store from './store';
import { getToken } from '@/utils/auth'; // get token from cookie

const whiteList = ['/login'];
let registerRouteFresh = false;
router.beforeEach(async (to, from, next) => {
  console.log('BEFORE_TO', to);
  document.title = `${to.meta.title} - ESRS Unified regulatory submission platform`;
  // Get the user token, which is used to judge whether the current user logs in
  const hasToken = getToken();
  if (hasToken) {
    if (to.path === '/login') {
      next({ path: '/' });
    } else {
      //Get the route in the store asynchronously
      let route = await store.getters['router/asyncRouters'];
      const hasRoute = route && route.length > 0;
      //   //Judge whether there is a route in the store. If so, proceed to the next part
      if (!(store.getters.baseInfo && store.getters.baseInfo.userName)) {
        await store.dispatch('user/getAndSetInfo');
      }
      if (registerRouteFresh) {
        if (to.matched.length === 0) {
          next(to.path);
        } else {
          next();
        }
      } else {
        console.log('No routing information');
        //If there is no route in the store, you need to get the asynchronous route and format it
        try {
          const accessRoutes = (await store.getters['router/asyncRouters']);
          console.log(accessRoutes);
          // Key: dynamically add formatted routes
          await  accessRoutes.map(asyncRouter => {
            console.log('asyncRouter', asyncRouter);
            if (!asyncRouter.component) {
              let finalUrl = asyncRouter.componentBackUp;
              asyncRouter.component =(resolve) => require([`@/views/${finalUrl}`], resolve);
            }
            router.options.routes[2].children.push(asyncRouter);
            router.addRoute('root', asyncRouter);
          });
          registerRouteFresh = true;
          console.log(router.options.routes[2]);
          await next({ ...to, replace: true });
        } catch (error) {
          console.log(error);
          next(`/login`);
        }
      }
    }
  } else {
    if (whiteList.indexOf(to.path) !== -1) {
      next();
    } else {
      next(`/login`);
    }
  }
});

router.afterEach(() => {
});
Handling of route view nesting
Next, we need to be concerned about nested views. Back end items cannot avoid the problem of multi-level parent-child menus. In general, in theory, the number of sub items requires the number of views (i.e. router view tag).
However, this time, I hope that both his son and grandson will only be displayed in the view on the root node. After collecting data, I found a common answer, routeReplaceSelf. (for an answer, see: https://www.cnblogs.com/senjer/p/15407301.html )
The main function of this customized js is to move the child view to the parent view for display. Where you need to move, wrap this function on the component attribute of its parent.
/**
 *  The component that displays the child's routing interface in the current routing interface
 *  User's Guide: wrap this function on the components on the parent of the child route.
 */
export default function routeReplaceSelf (component) {
  return {
    name: 'routerReplaceSelf',
    computed: {
      showChild () {
        const deepestMatchedRoute = this.$route.matched[this.$route.matched.length - 1];
        return deepestMatchedRoute.instances.default !== this;
      },
      cache () {
        return this.$route.meta.cache;
      },
    },
    render (h) {
      const child = this.showChild ? h('router-view') : h(component);
      if (this.cache) {
        return h('keep-alive', [child]);
      } else {
        return child;
      }
    },
  };
}
In the information processing of dynamic routing, you cannot directly wrap all routing information in this function; Otherwise, when you click the menu, the information outside the routing view will be lost. This is mainly to connect the next child routing package routeReplaceSelf in the second level menu. Therefore, in the LoadView function, in addition to passing in the component address, another level of variable is passed in. The level increases with each recursion to achieve this effect.
Of course, I looked at the framework of the big guys. When entering the sub routing view, I first created ParentView or Layout and other components, and the effect can be achieved only with router view in them. However, in this way, the parent menu can not be clicked. For example, in RuoYi's menu management, the log module has two menu items, but the "log management" itself cannot be clicked, because it is not a page, it does not meet my requirements this time, because the parent menu also requires a page in the ESRS project.
Handling of button permissions
In the login or required logic, after obtaining the permission information from the back end, save this information array to Vuex. Then we customize an instruction called v-hasPermi. This instruction will compare the parameters with the permission array. If it is not compared, it will prove that the user does not have the permission of this button and will not be displayed on the page.
Of course, button permissions are usually linked to user permissions. If a user does not have permissions but can forcibly send a request, the back end should also intercept the request. We need to cooperate with the back-end, but this time we only talk about how to deal with the front-end.
New button permission handler haspermi js.
/**
 * v-hasPermi Operation permission processing
 */

import store from '@/store';

export default {
  inserted (el, binding, vnode) {
    const { value } = binding;
    const all_permission = "*:*:*";
    const permissions = store.getters && store.getters.permission;

    if (value && value instanceof Array && value.length > 0) {
      const permissionFlag = value;

      const hasPermissions = permissions.some(permission => {
        return all_permission === permission || permissionFlag.includes(permission);
      });
      console.log('hasPermissions',hasPermissions);

      if (!hasPermissions) {
        el.parentNode && el.parentNode.removeChild(el);
      }
    } else {
      throw new Error(`Please set the operation permission label value`);
    }
  }
};
Register the custom directive v-hasPermi.
import hasPermi from './permission/hasPermi';

const install = function (Vue) {
  Vue.directive('hasPermi', hasPermi);
};

if (window.Vue) {
  window['hasPermi'] = hasPermi;
  Vue.use(install); // eslint-disable-line
}
export default install;
After that, you can place this customized instruction on the required button; vue will compare whether there is the permission information specified by you in the permission information array. If not, you won't see this button on the page.
<a-button type="link"
          icon="edit"
          @click="handleEdit(row.data.sid)"
          v-hasPermi="['system:menu:edit']">modify</a-button>
<a-button type="link"
          icon="delete"
          v-hasPermi="['system:menu:delete']"
          @click="handleDelete([row.data.sid])">delete</a-button>
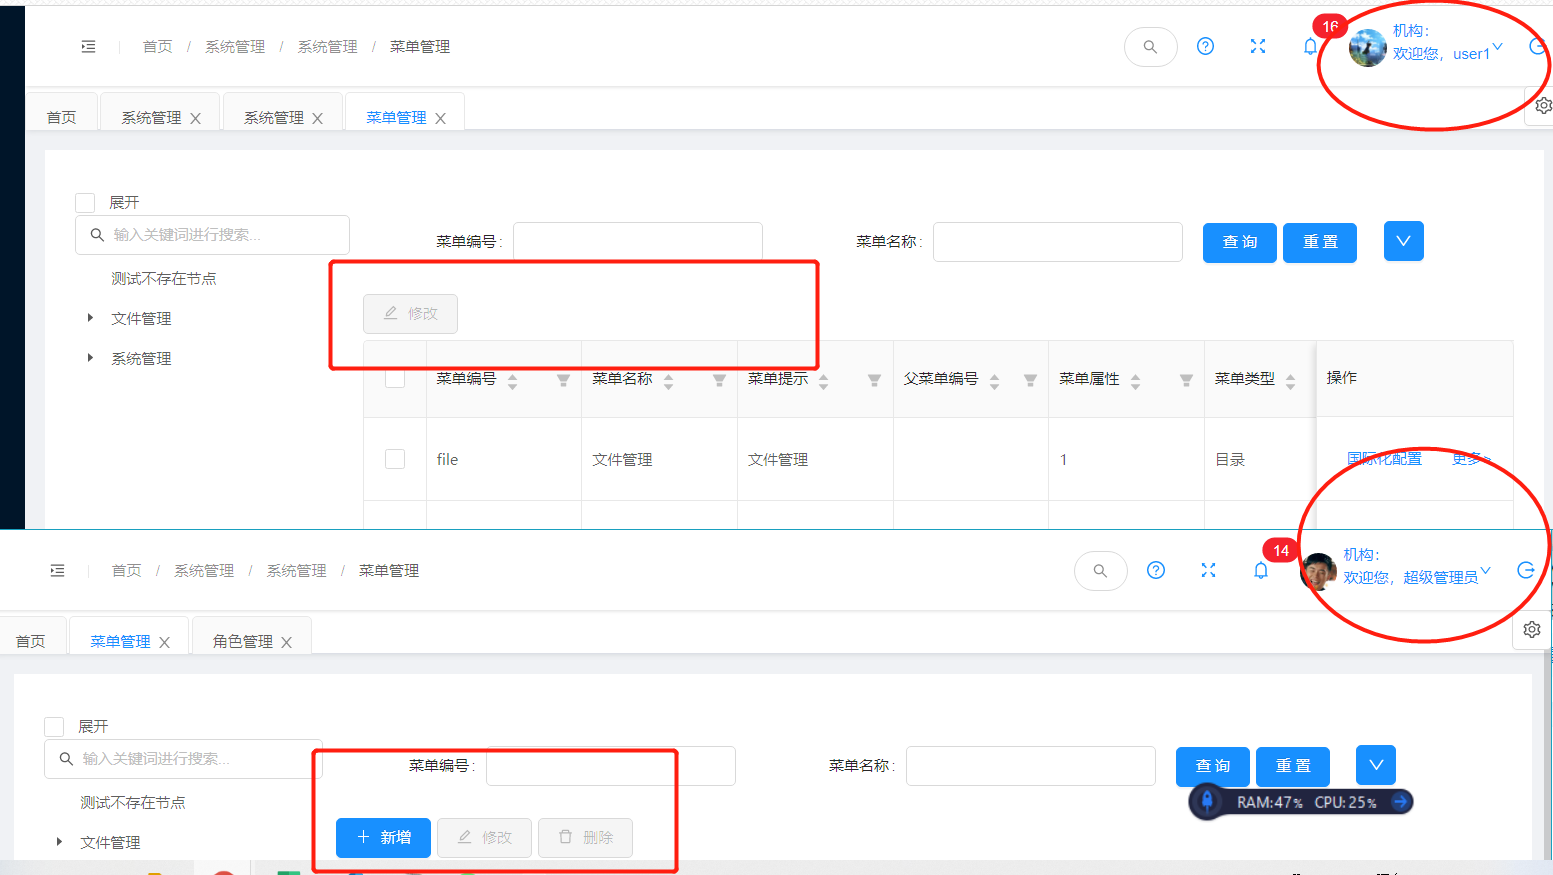
See the effect. The menu module of user user1 does not have the permission to delete or add, while the administrator admin has all of them.

Then you can log in to user1 and admin accounts and enter the page of the menu module to see the effect of permissions. It is found that user1 does not have the add and delete buttons directly, which indicates that the button permissions have taken effect normally.
