1. slot
1.1 slot - basic use of slot
- The slot of the component is also to make our package more scalable
- It allows users to decide what is displayed inside the component
-
The basic use of slots is added in the template label
-
Default value button for slot
-
If there are multiple values, they will be used as replacement elements when components are replaced at the same time
<div id="app">
  <cpn></cpn>
  <cpn><span>Ha ha ha ha</span></cpn>
  <cpn>
    <i>Hehe hehe</i>
    <button>Button</button>
    <div>I am div element</div>
  </cpn>
  <cpn></cpn>
</div>
<template id="cpn">
  <div>
    <h2>I'm a component</h2>
    <p>I am a component, ha ha</p>
    <slot><button>Button</button></slot>
  </div>
</template>
<script src="../js/vue.js"></script>
<script>
  const app=new Vue({
    el:"#app",
    data:{

    },
    components:{
      cpn:{
        template:`#cpn`,
      }
    }
  })
</script>
1.2 slot - use of named slots
<div id="app">
  <cpn><span slot="center">title</span></cpn>
  <cpn><button slot="left">return</button></cpn>

</div>
<template id="cpn">
  <div>
    <slot name="left"><span>left</span></slot>
    <slot name="center"><span>middle</span></slot>
    <slot name="right"><span>right</span></slot>
  </div>
</template>
<script src="../js/vue.js"></script>
<script>
  const app=new Vue({
    el:"#app",
    data:{
    },
    components:{
      cpn:{
        template:`#cpn`,
      }
    }
  })
</script>
1.3 compilation scope
<div id="app">
<!-- use vue In the instance isShow-->
  <cpn v-show="isShow"></cpn>
</div>
<template id="cpn">
  <div>
    <h2>I am a subcomponent</h2>
    <p>I am the content, ha ha ha ha ha ha</p>
<!-- It is used in the sub component isShow,Search in your own template, that is, your own scope   -->
    <button v-show="isShow"></button>
  </div>
</template>
<script src="../js/vue.js"></script>
<script>
  const app=new Vue({
    el:"#app",
    data:{
      isShow:true
    },
    components:{
      cpn:{
        template:`#cpn`,
        data(){
          return {
            isShow:false
          }
        }
      }
    }
  })
</script>
1.4 use of scope slots
Purpose of scope slot: the parent component replaces the label in the slot, but the content is provided by the child component
<div id="app">
  <cpn></cpn>
  <cpn>
    <!-- The purpose is to get the information in the subcomponent pLanguage -->
    <template slot-scope="slot">
      <!-- data You can choose your own name -->
<!--      <span v-for="item in slot.data">{{item}} - </span>-->
      <span>{{slot.data.join(' - ')}}</span>
    </template>
  </cpn>
<!--  <cpn></cpn>-->
</div>
<template id="cpn">
  <div>
    <slot :data="pLanguage">
      <ul>
        <li v-for="item in pLanguage">{{item}}</li>
      </ul>
    </slot>
  </div>
</template>
<script src="../js/vue.js"></script>
<script>
  const app=new Vue({
    el:"#app",
    data:{
    },
    components:{
      cpn:{
        template:`#cpn`,
        data(){
          return {
            pLanguage:['Java','C++','Python','JavaScript','C#','Go','Swit']
          }
        }
      }
    }
  })
</script>
2. Modular development
2.1 CommonJS
Modularity has two cores: import and export
// Import of CommonJS
module.exports={
    flag:flag,
    test(a,b){
        return a+b;
    },
    demo(a,b){
        return a*b;
    }
}
// Export of CommonJS
let {test,demo,flag}=require('moduleA');
// Equivalent to
let _mA=require('moduleA');
let test=_mA.test;
let demo=_mA.demo;
let flag=_mA.flag;
2.2 modular implementation of ES6
<body>
<script src="aaa.js" type="module"></script>
<script src="mmm.js" type="module"></script>
</body>
// aaa.js
var name='Xiao Ming'
var age=18
var flag=true

function sum(num1,num2){
  return num1+num2;
}

if(flag){
  console.log(sum(20,30));
}
// 1. Export method 1
export {
  flag,sum
}
// 2. Export method 2
export var num1=1000;
export var height=1.88;
// 3. Export functions and classes
export function mul(num1,num2){
  return num1+num2;
}
export class Person{
  run(){
    console.log('Running');
  }
}
// 4. export default
// const address = 'Beijing'
// export default address
export default function (argument){
  console.log(argument)
}
// mmm.js
// 1. Variables defined in the imported {} object
import {flag,sum} from "./aaa.js";
if(flag){
  console.log('Xiao Ming is a genius, ha ha ha');
  console.log(sum(20,10))
}
// 2. Import the variables defined in expert directly
import {num1,height} from "./aaa.js";
console.log(num1);
console.log(height);
// 3. Import the function of expert
import {mul,Person} from "./aaa.js";
console.log(mul(20, 10));
const p=new Person();
p.run();
// 4. Only one content can be imported into expert default
import addr from "./aaa.js";
console.log(addr)
addr('How do you do');
// 5. Import all uniformly
// import {flag,num1,height,Person,mul,sum} from "./aaa.js";   Not recommended
import * as aaa from './aaa.js'
console.log(aaa.flag);
3. Use of webpack
3.1 introduction to webpack
- webpack is a static module packaging tool for modern JavaScript applications
- The core of webpack is to make it possible for us to carry out modular development and help us deal with the dependencies between modules
- Not only JavaScript files, CSS, pictures, JSON files, etc. can be used as modules in webpack
- Official documents: https://www.webpackjs.com
The core of grunt/gulp is task: we can configure a series of tasks and define the transactions to be processed by the task (for example, ES6, ts conversion, image compression, scss conversion to css), and then use grunt/gulp to execute these tasks once, and automate the whole process. Therefore, grunt/gulp is also called the front-end automated task management tool.
3.2 basic usage process of webpack
-
Document framework
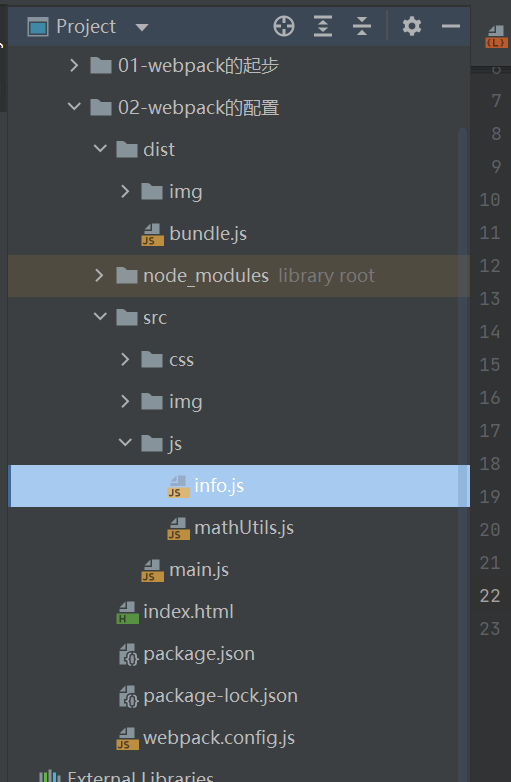
-
main. JS (import)
// 1. Modular specification using commonjs const {add,mul}=require('./js/mathUtils') console.log(add(10,10)); console.log(mul(1,10)); // 2. Modular specification using ES6 import {name,age,height} from "./js/info"; console.log(name); console.log(age); console.log(height); -
mathUtils. JS (export)
function add(num1,num2){ return num1+num2; } function mul(num1,num2){ return num1*num2; } module.exports={ add,mul } -
info.js (ES6 export)
const name='why' const age=18 const height=1.88 export {name,age,height} -
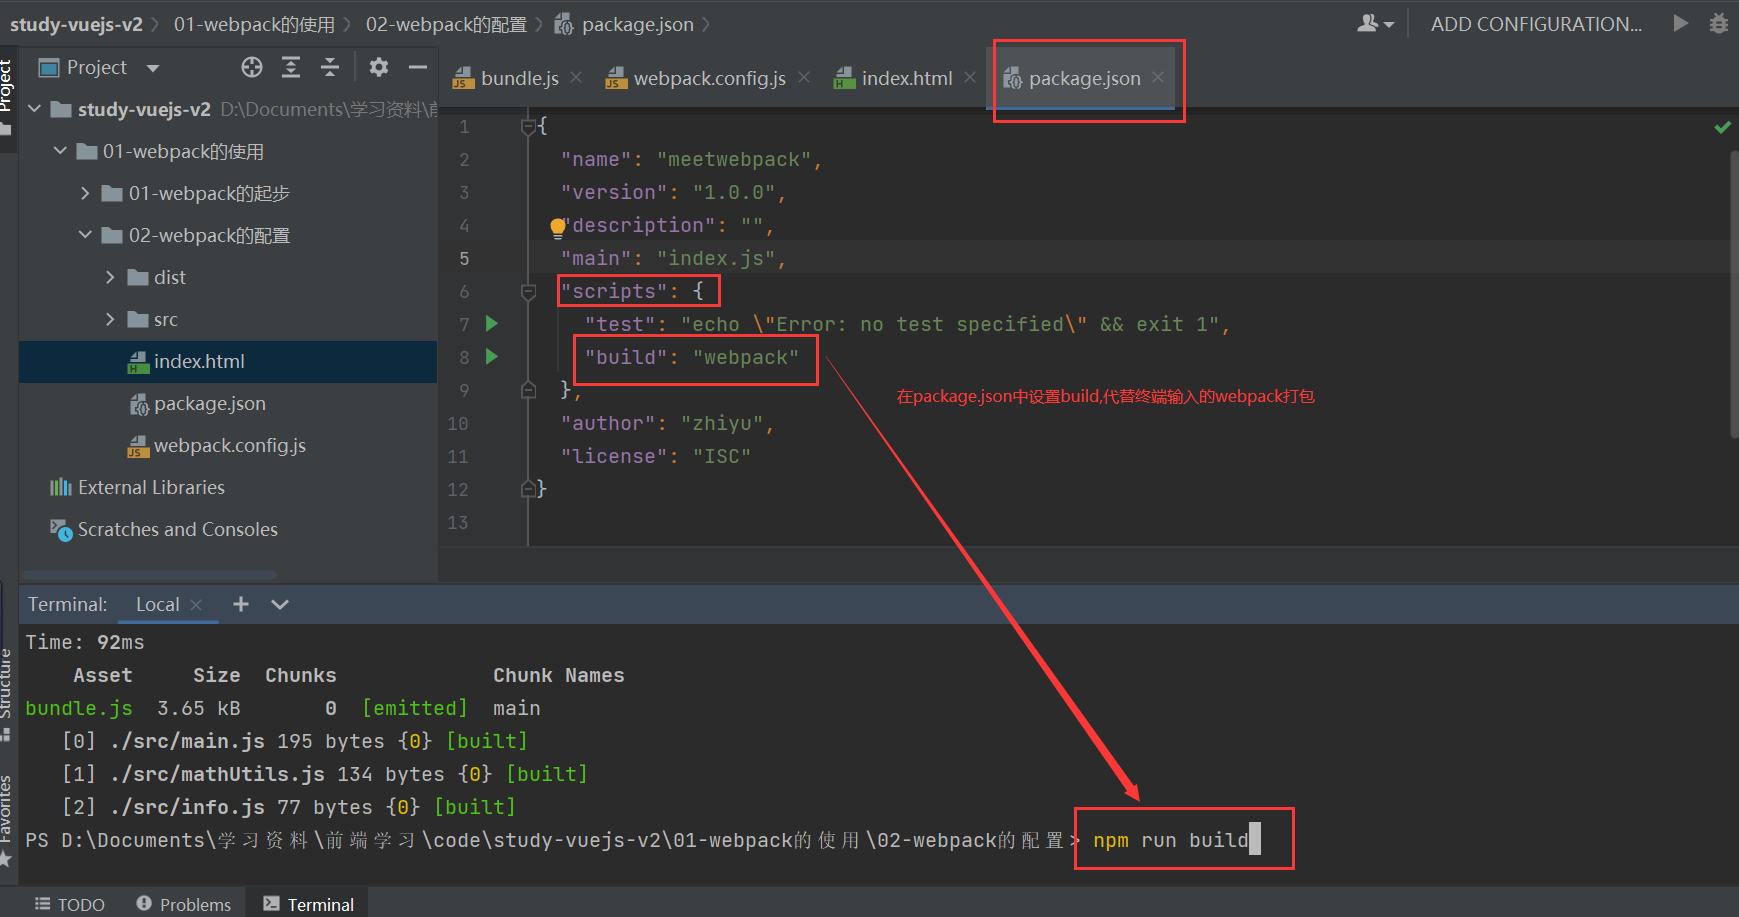
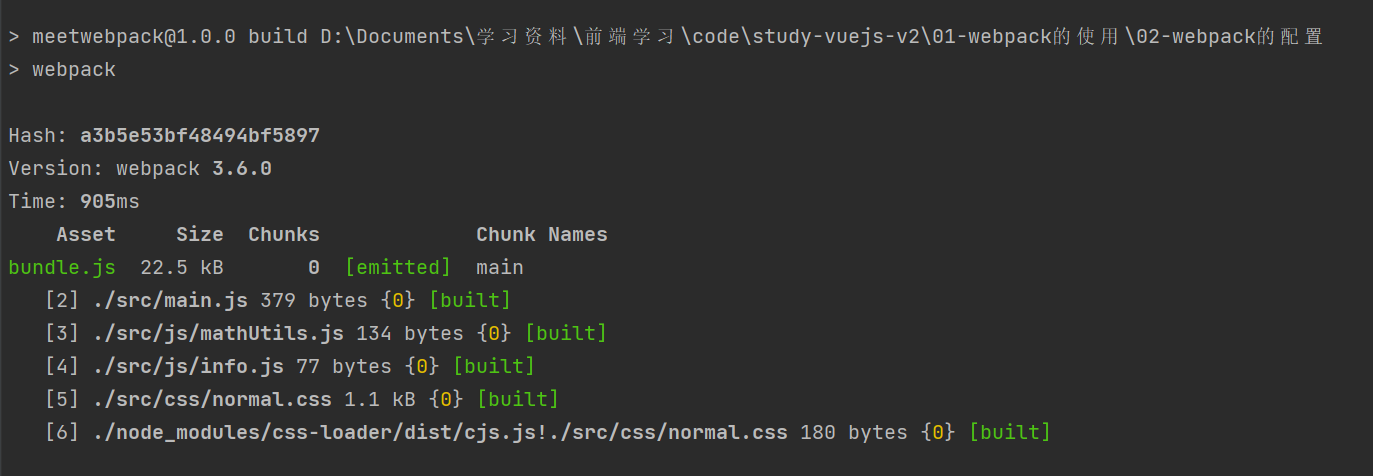
Enter the following command on the terminal to generate a bundle JS file

-
index.html: import bundle.html JS file
<body>
<script src="./dist/bundle.js"></script>
</body>
3.3 configuration of webpack
-
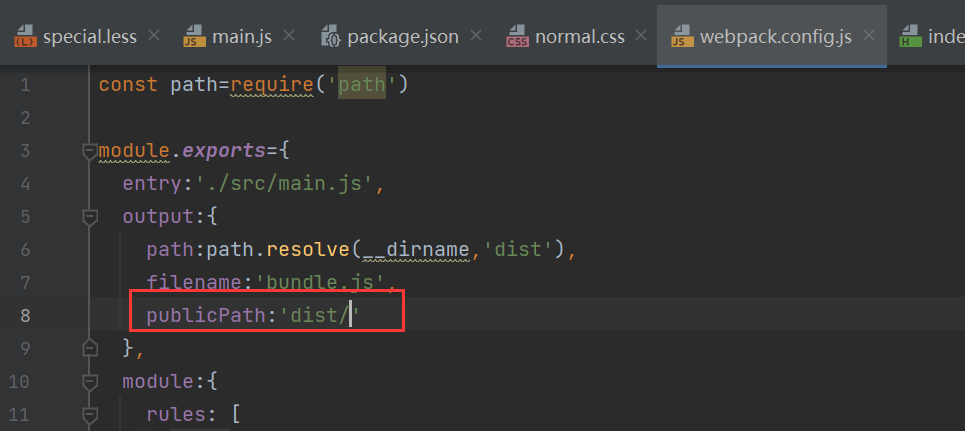
First create a file webpack config. js
const path=require('path') module.exports={ entry:'./src/main.js', output:{ path:path.resolve(__dirname,'dist'), filename:'bundle.js' } } -
Then input npm init in the terminal to generate package JSON file
{ "name": "meetwebpack", "version": "1.0.0", "description": "", "main": "index.js", "scripts": { "test": "echo \"Error: no test specified\" && exit 1" }, "author": "zhiyu", "license": "ISC" } -
Then input webpack at the terminal for packaging
3.4 configuration of css file in webpack
loader usage:
- Install the required loader through npm
- In webpack config. JS under the modules keyword
3.4.1 installing CSS loader
-
First write a CSS file normal css
body{ background-color: red; } -
In main Import dependency in JS file
// 3. Rely on css files require('./css/normal.css') -
Install loader:https://www.webpackjs.com/loaders/css-loader/
npm install --save-dev css-loader@2.0.2 //Sometimes an error may be reported if the version is too high
First on webpack config. JS, and then input npm run build in the terminal again for packaging
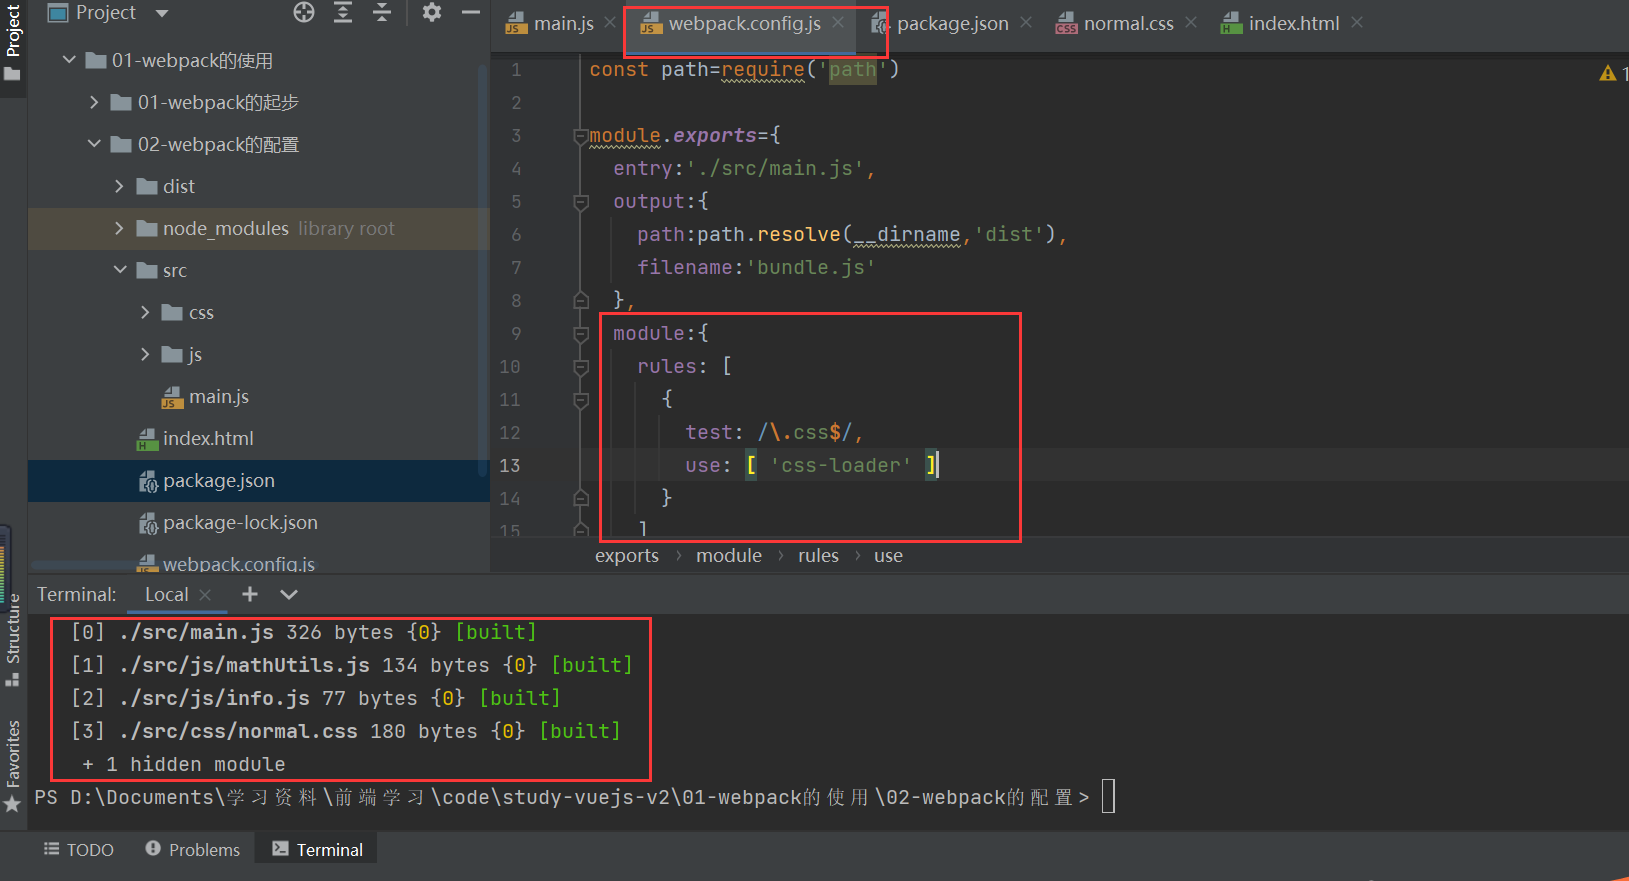
css loader is only responsible for loading css files
3.4.2 installing style loader
Enter NPM install style at the terminal- loader@0.23.1 --save-dev
Official website: https://www.webpackjs.com/loaders/style-loader/
Follow the figure below
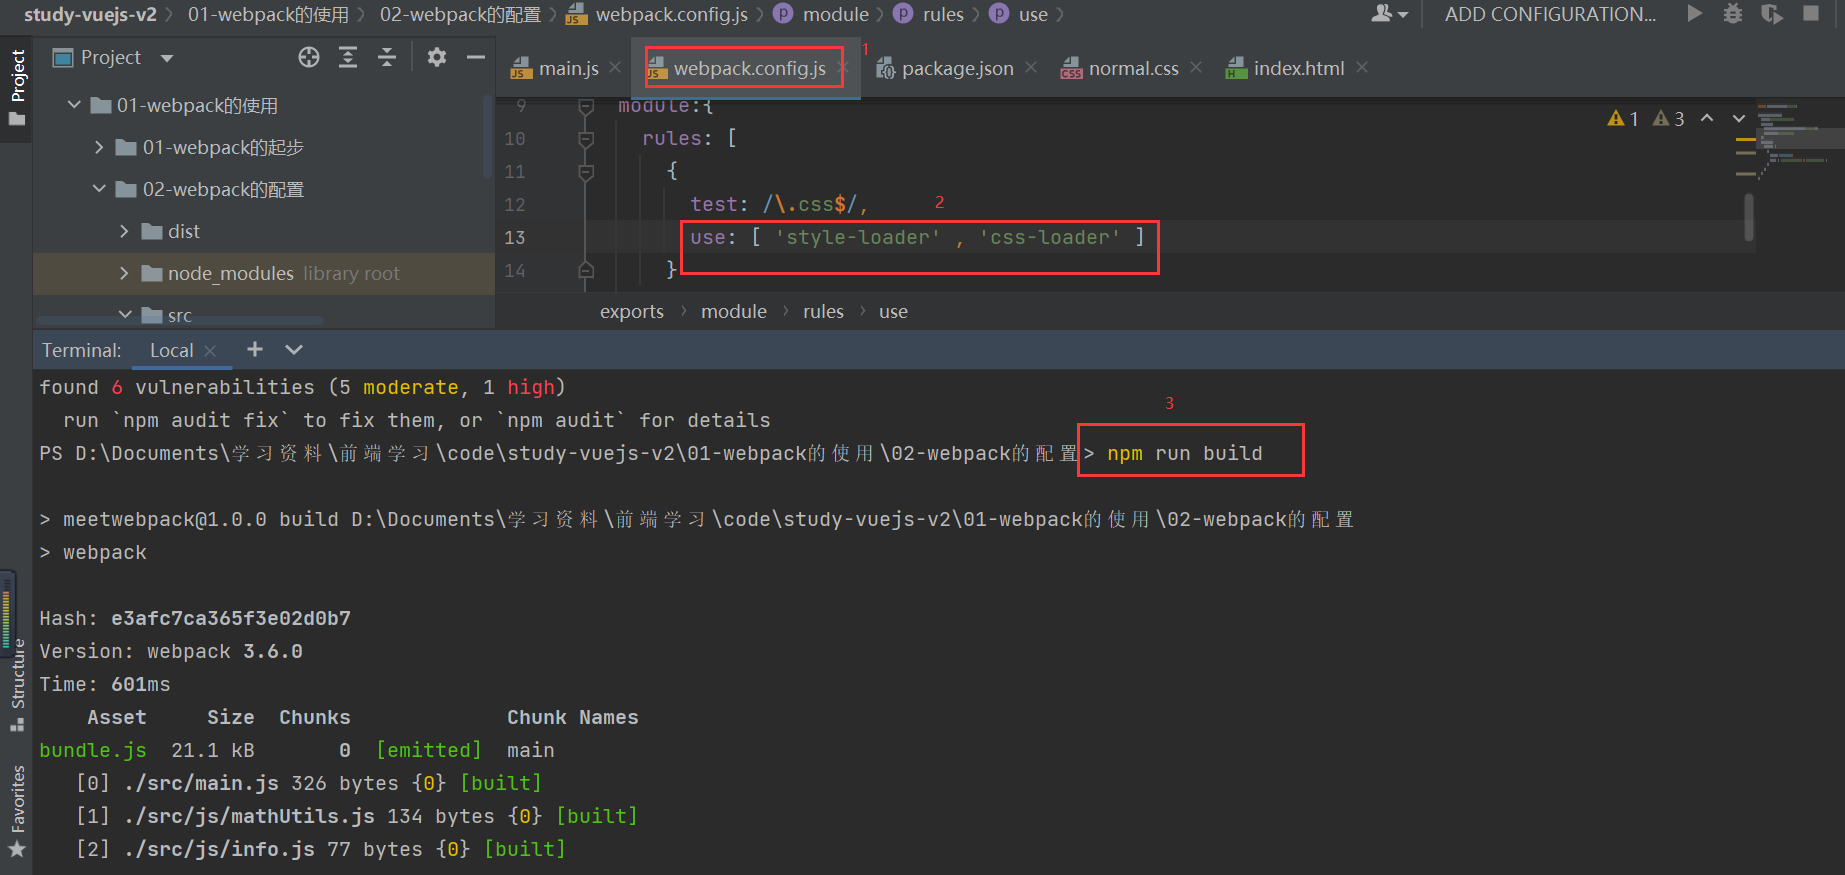
Style loader: responsible for adding styles to the DOM
When using multiple Loders, it is from right to left
3.5 processing of webpack less files
- less-loader Load and translate LESS files
-
Create less file: special less
@fontSize:50px; @fontColor:orange; body{ font-size: @fontSize; color: @fontColor; } -
In main Introducing dependency in JS
// 4. Rely on less files require('./css/special.less') -
Enter: NPM install -- save dev less on the terminal- loader@4.1.0 less@3.9.0 Install less loader
-
In webpack config. JS
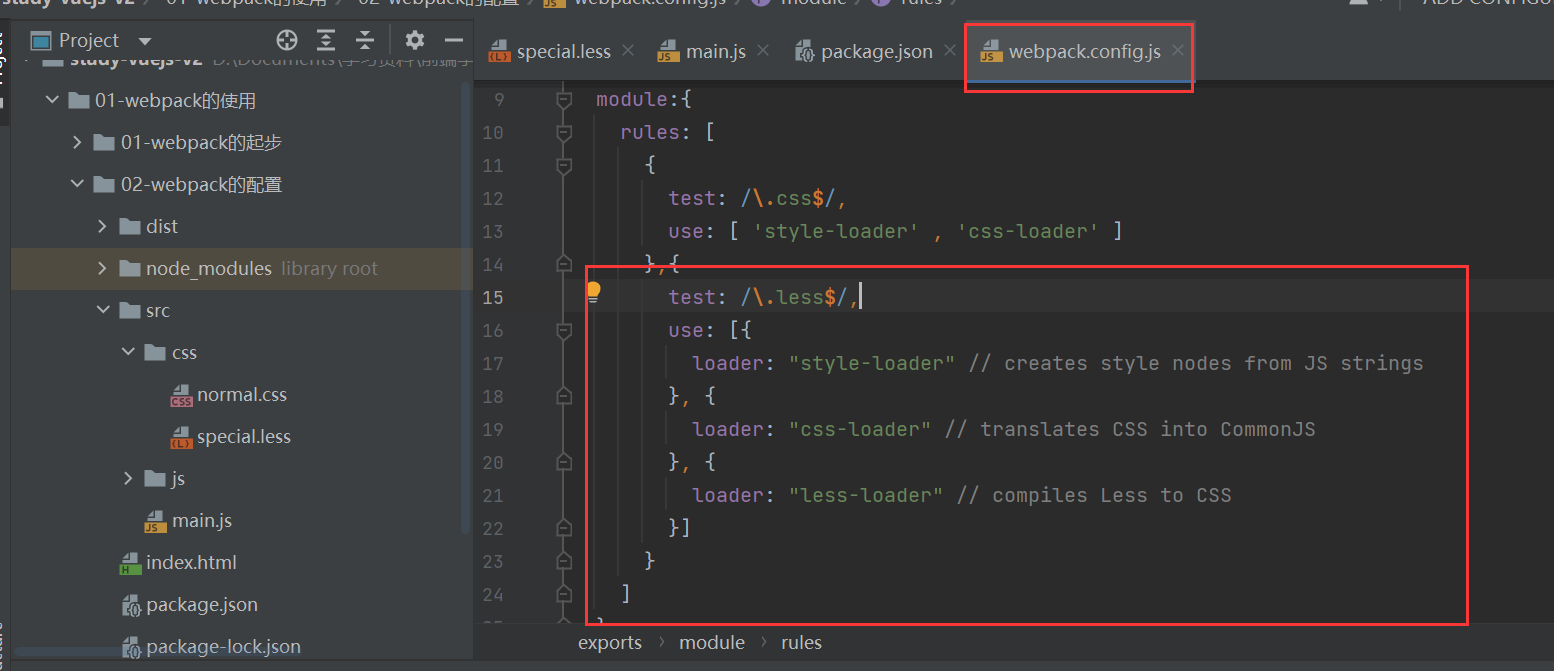
Package succeeded:
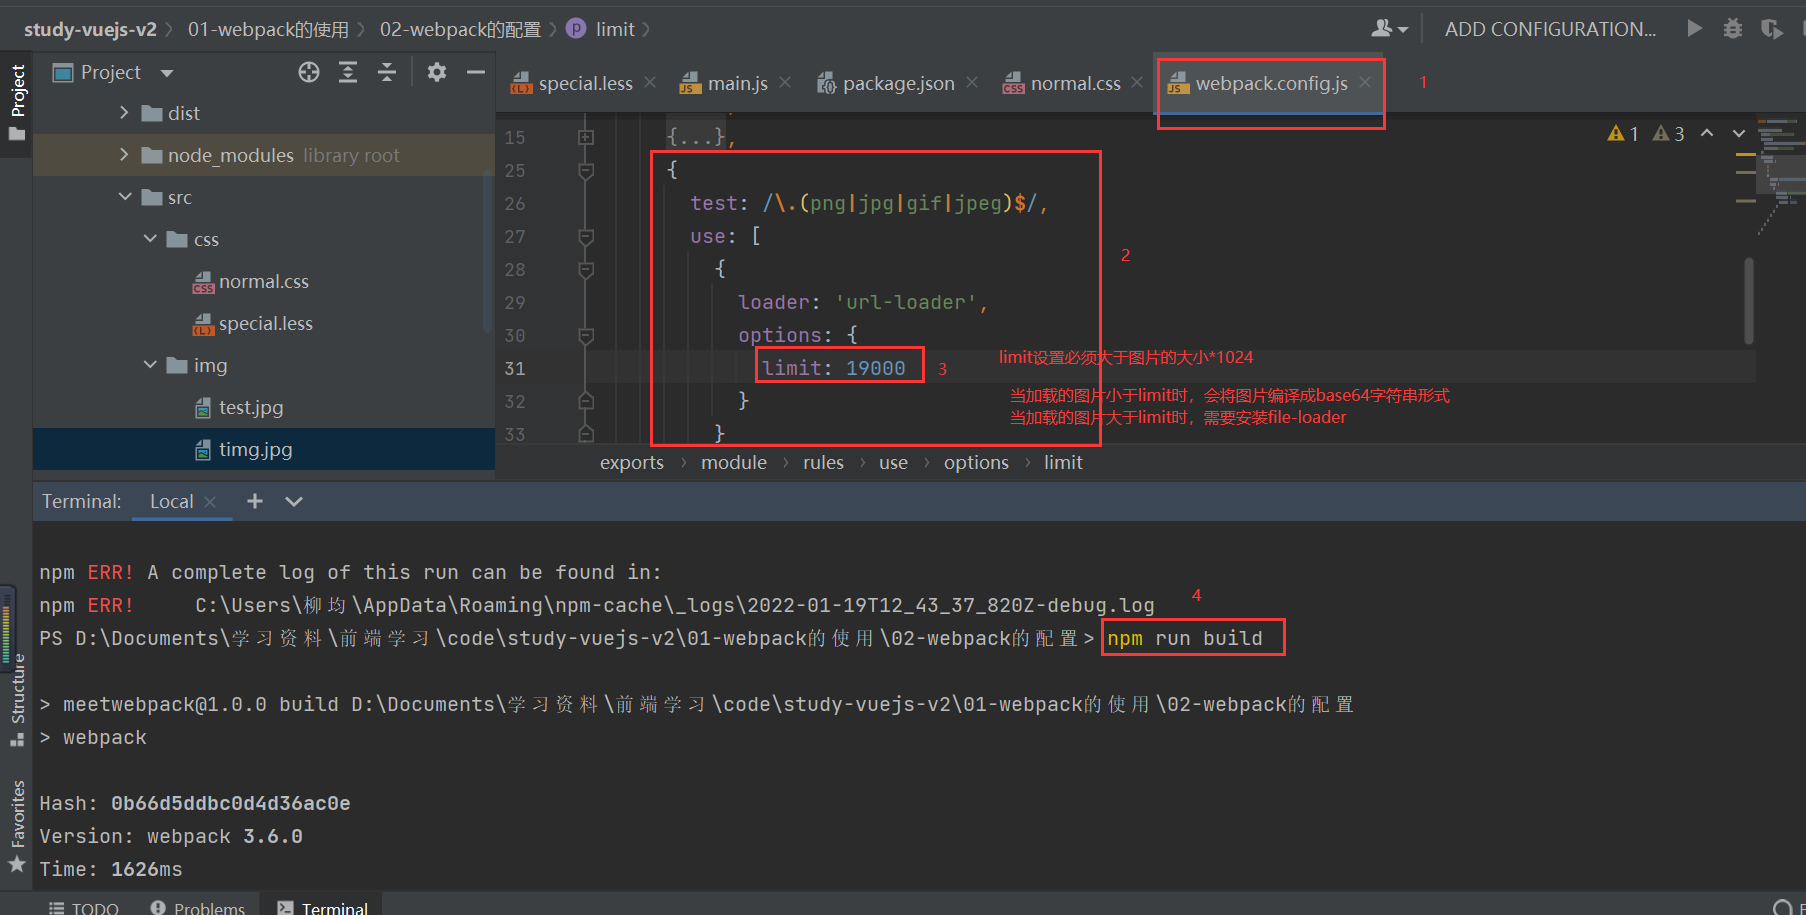
3.6 webpack - image processing
- url-loader Works like file loader, but can return if the file is less than the limit data URL
-
In normal Set the website background as a picture in the CSS file
body{ background: url("../img/test.jpg"); } -
Enter: NPM install -- save dev URL loader on the terminal
-
In webpack config. JS
-
When the loaded image is greater than the limit, the file loader module needs to be installed for loading
npm install file-loader@3.0.1 --save-dev
-
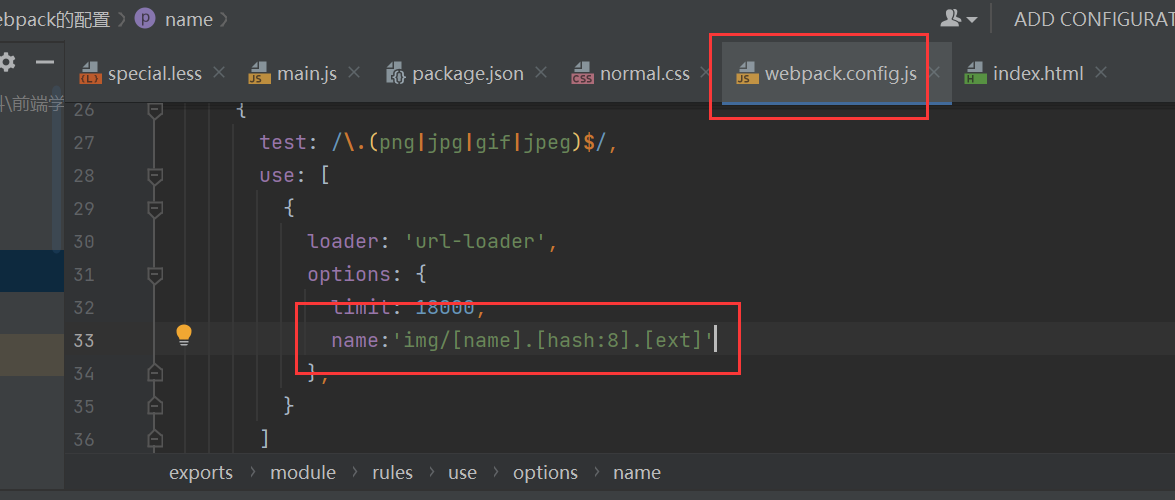
Loading picture path problem: it needs to be in webpack config. J add the following configuration
-
Put the packaged pictures into a folder, and then add a hash value with the original name: IMG / [name] [hash:8]. [ext]
3.7 babel from webpack-es6 to ES5
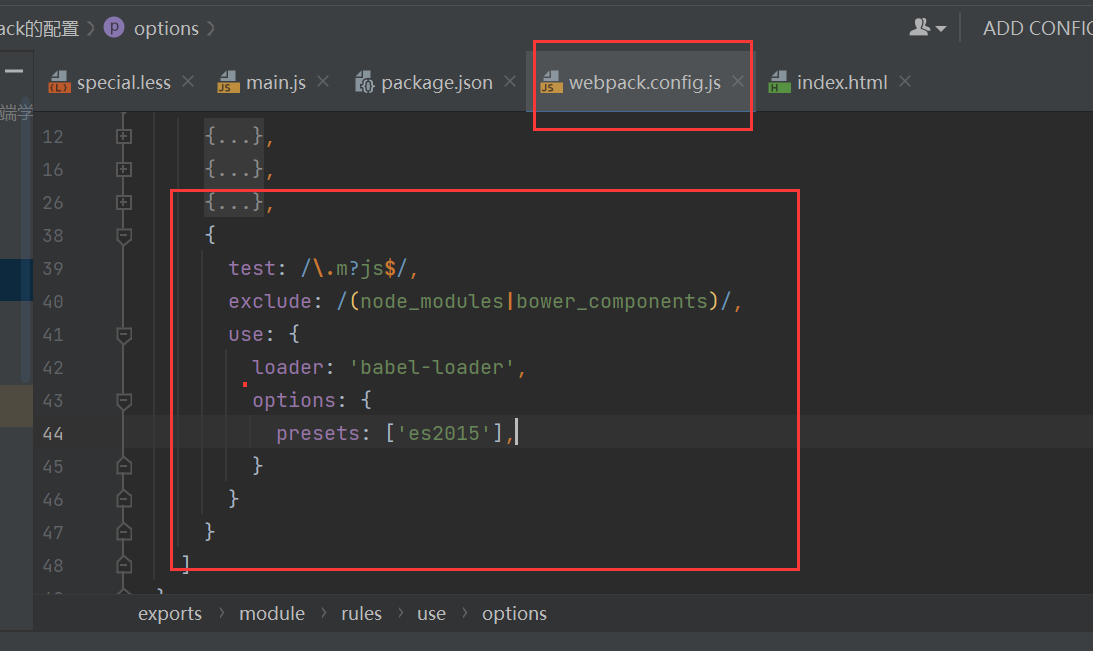
- babel-loader Load the ES2015 + code and use the Babel Translated into ES5
-
Enter NPM install Babel at the terminal- loader@7 babel-core babel-preset-es2015
-
On webpack config. JS
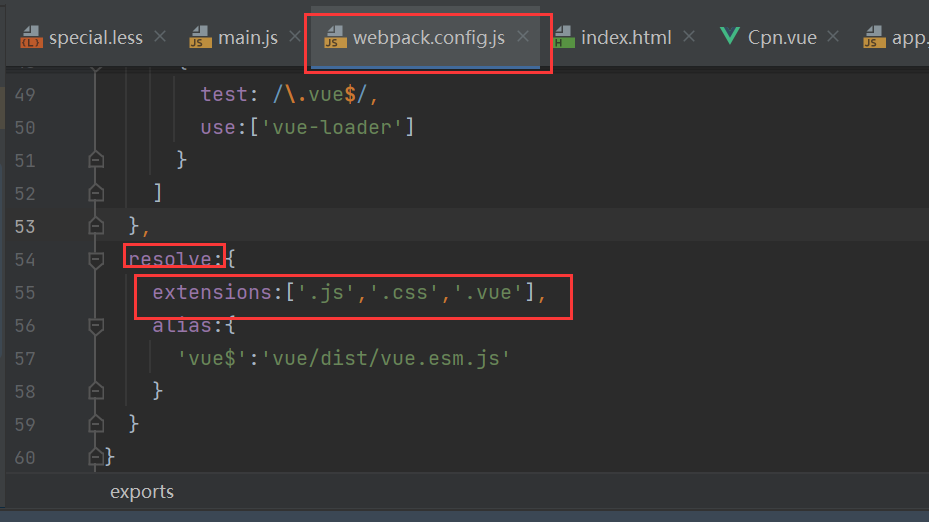
3.8 webpack - configuration process using Vue
- Vue loader loading and Translation Vue components
-
Enter: npm install vue --save on the terminal to install vue
-
In main JS write the export code
// 5. Use vue for development import Vue from 'vue' const app=new Vue({ el:'#app', data:{ message:'hello message', } }) -
After using npm run build, the page console reports an error

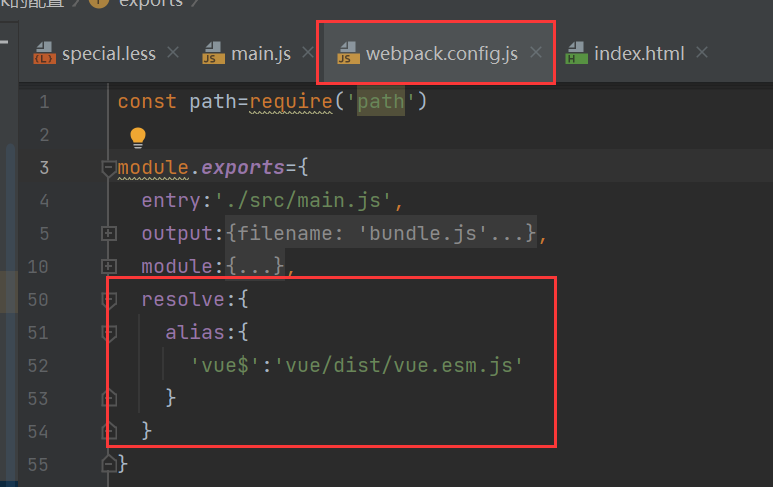
Solution: in webpack config. JS
3.9 use scheme of Vue
Difference between template and el when creating Vue: when there are both template and el, template will replace all div of el
-
In main JS, write the following code:
// 5. Use vue for development import Vue from 'vue' // import App from './vue/app' import App from './vue/App.vue' const app=new Vue({ el:'#app', template:`<App/>`, components:{ App } }) -
Create app JS file, export template
export default { template:` <div> <h2>{{message}}</h2> <button @click="btnClick">Button</button> <h2>{{name}}</h2> </div> `, data(){ return { message:'hello message', name:'coderwhy' } }, methods:{ btnClick(){ } } } -
Or create an app Vue file
<template> <div> <h2 class="title">{{message}}</h2> <button @click="btnClick">Button</button> <h2>{{name}}</h2> <Cpn></Cpn> </div> </template> <script> import Cpn from './Cpn.vue' export default { name: "App", components:{ Cpn }, data(){ return { message:'hello message', name:'coderwhy' } }, methods:{ btnClick(){ } } } </script> <style scoped> .title{ color:red; } </style> -
Create another CPN Vue file
<template> <div> <h2>I am cpn Title of the component</h2> <p>I am cpn Component content, ha ha</p> <h2>{{name}}</h2> </div> </template> <script> export default { name: "Cpn", data(){ return{ name:'cpn Component name' } } } </script> <style scoped> </style> -
In index There is little code in HTML
<body>
<div id="app">
</div>
<script src="./dist/bundle.js"></script>
</body>
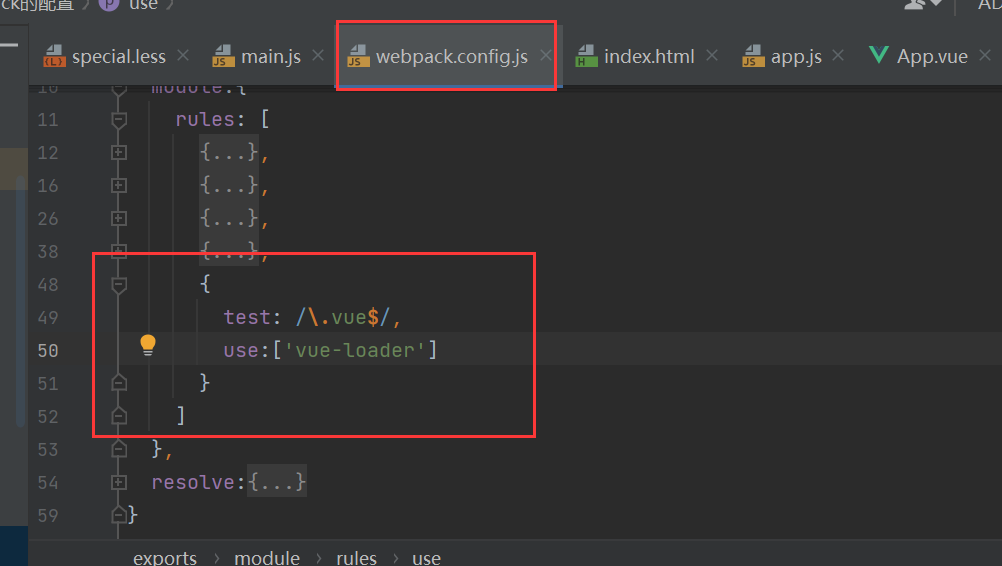
Install Vue loader:
-
Enter NPM install Vue at the terminal- loader@15.4.2 vue-template- compiler@2.5.21 --save-dev
-
In webpack config. JS
-
The following errors are reported when running npm run build
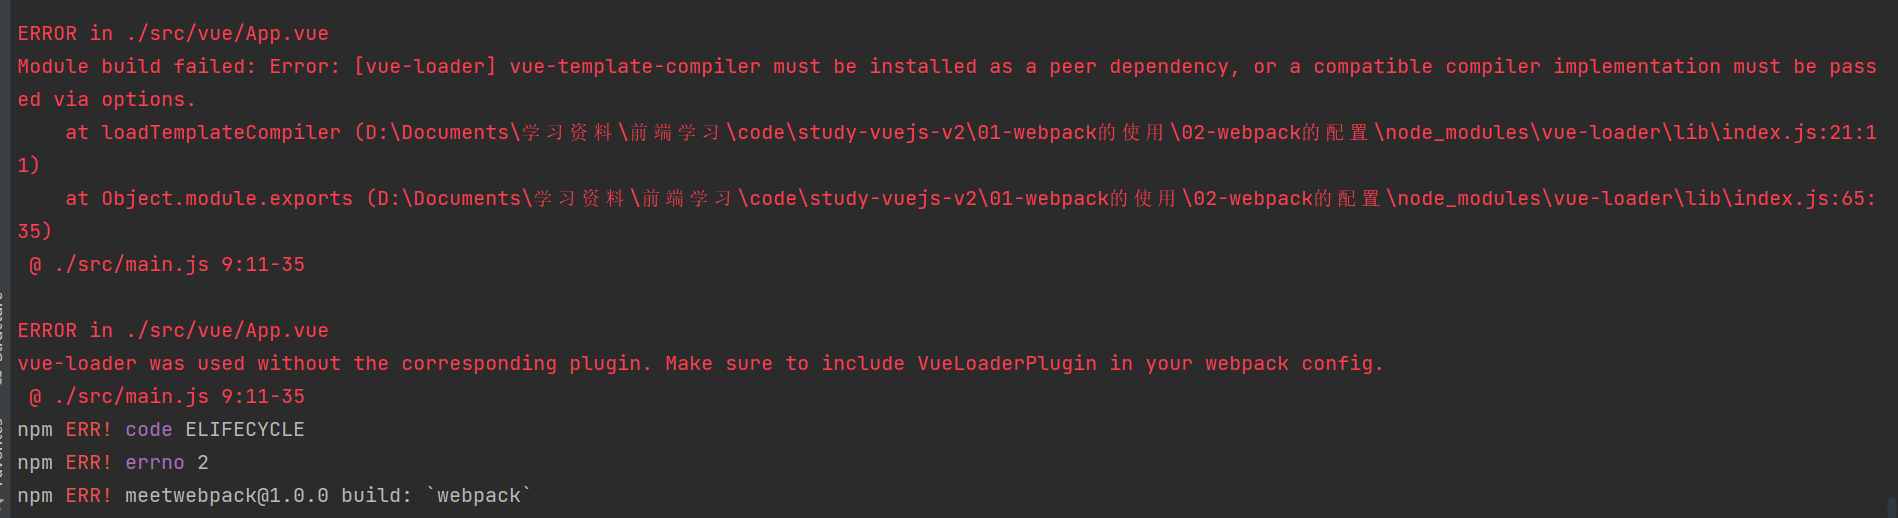
terms of settlement:
-
Set Vue loader lower than version 14
When adjusting the vue loader version to 13.0.0, vue and vue template compiler reported an error due to the inconsistent version
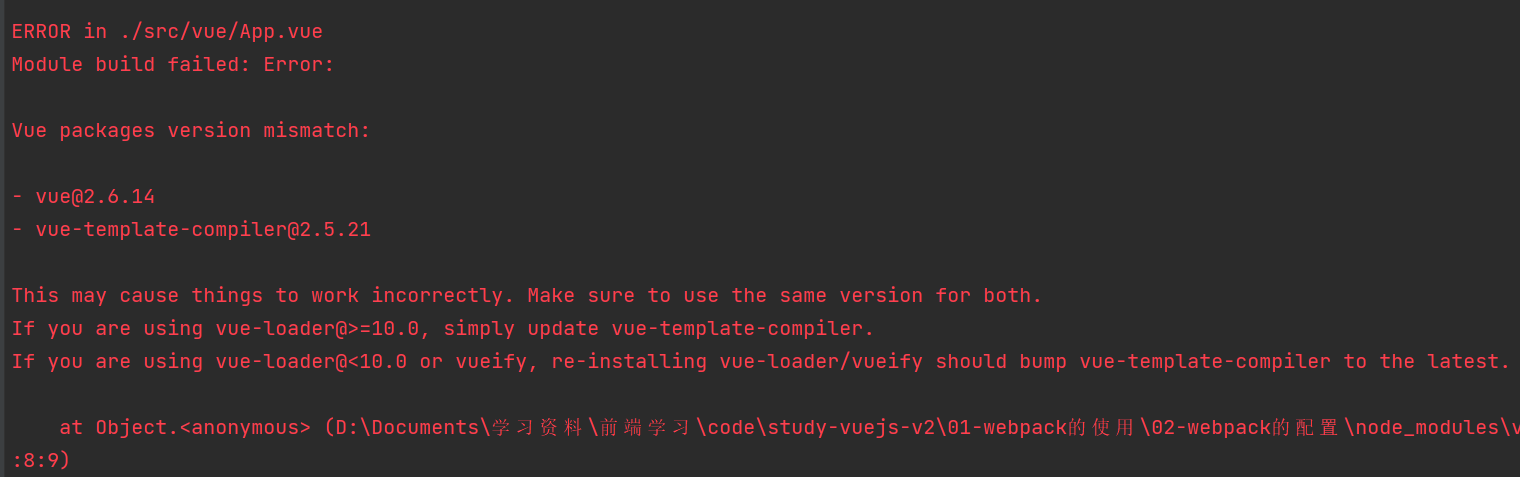
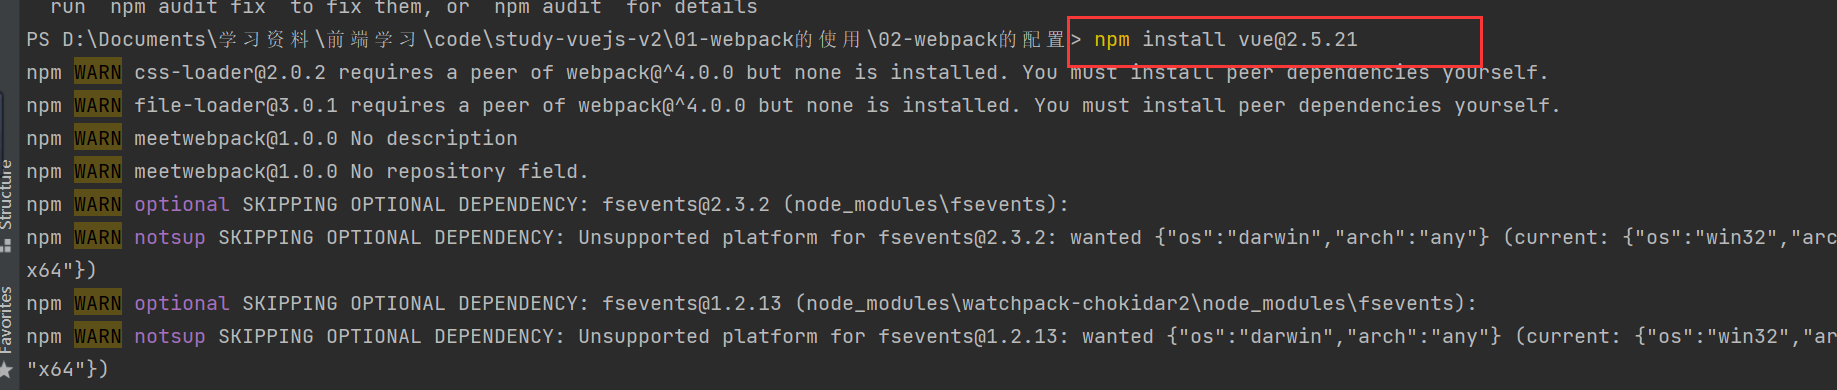
Solution: adjust the version of vue to the same as vue template compiler, reinstall vue, and run build in NPM to succeed
-
Install plug-in plugin
-
Omit file suffix when referencing
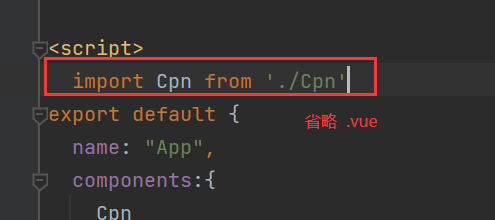
terms of settlement:
3.10 use of webpack banner Plugin
- plugin: it means plug-in, which is usually used to extend an existing framework
- loader is mainly used to convert some types of modules. It is a converter
- plugin is a plug-in. It is an extension of webpack itself and an extender
How to use plugin:
- Install plugins that need to be used through npm (some plugins that have been built into webpack do not need to be installed)
- In webpack config. Configuring plug-ins in plugins in JS
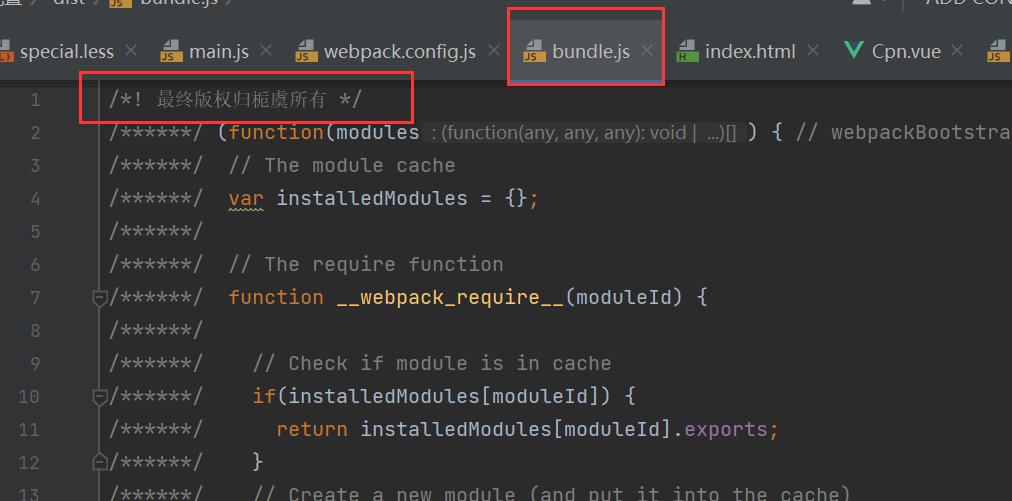
3.10.1 add copyright plugin
-
This plug-in is called BannerPlugin and belongs to webpack's own plug-in
-
Modify webpack config. Files in JS
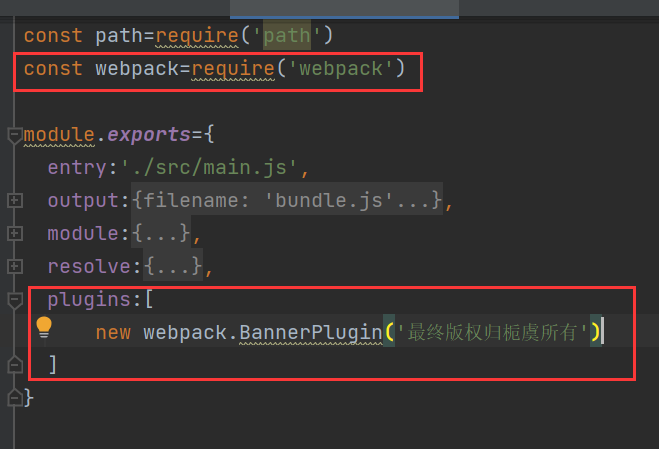
-
Repackaging program: View bundle JS file header,
3.10.2 use of htmlwebpackplugin
-
The plug-in can automatically generate an index HTML file (you can specify a template to generate)
-
The packaged js file is automatically inserted into the body through the script tag
-
Install the plug-in: NPM install HTML webpack- plugin@3.2.0 --save-dev
-
Using the plug-in, modify the webpack config. Part of plugins in JS file
-
Now, index. In the src directory The HTML file is modified as follows
<!DOCTYPE html>
<html lang="en">
<head>
  <meta charset="UTF-8">
  <title>Title</title>
</head>
<body>

<div id="app">
</div>
<!--<script type="text/javascript" src="dist/bundle.js"></script> dist/index It can be generated automatically without importing-->
</body>
</html>
-
Then in webpack config. JS file with the following modifications
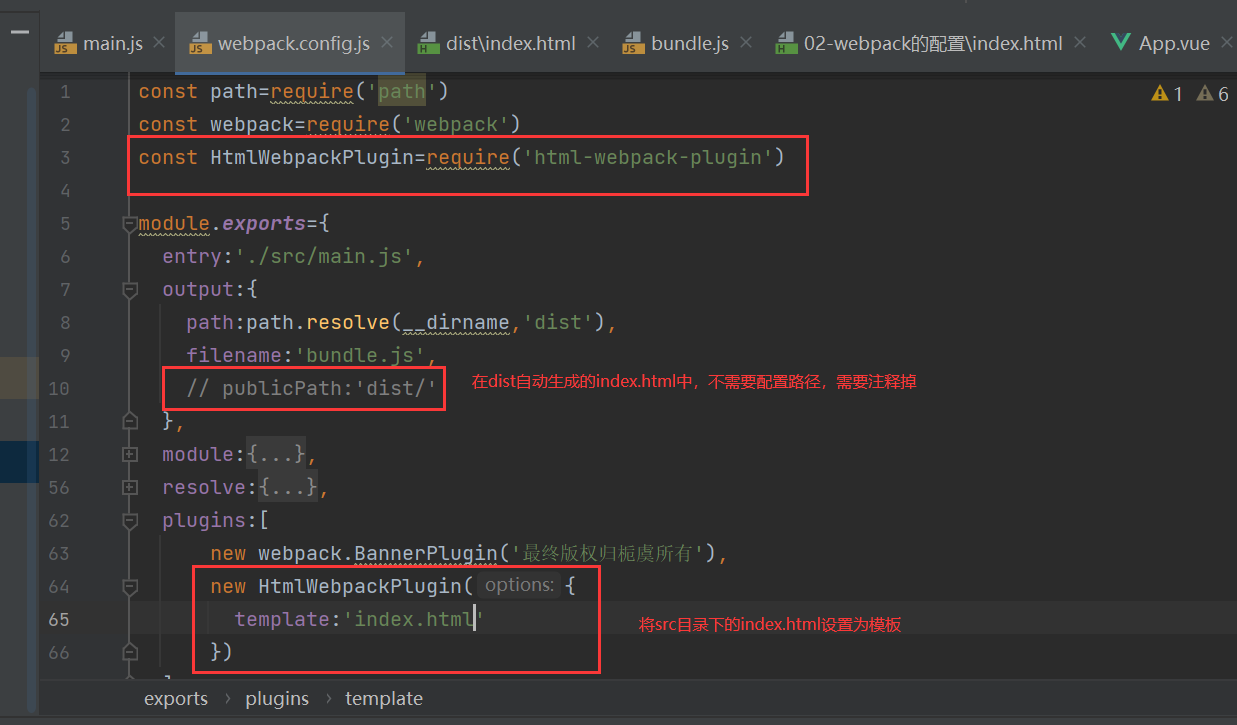
-
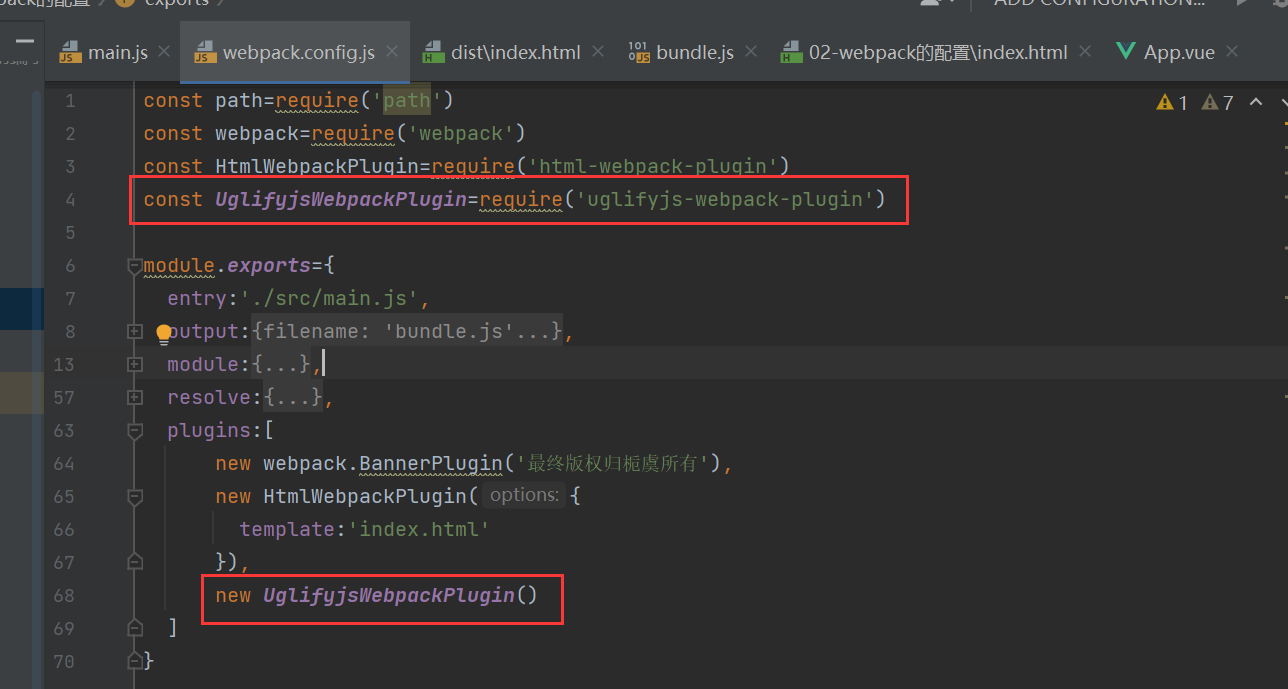
3.10.3 use of uglifyjswebpackplugin
-
The plug-in compresses the packaged js file
-
Installation: NPM install uglifyjs webpack- plugin@1.1.1 --save-dev
-
Modify webpack config. JS file, using plug-ins
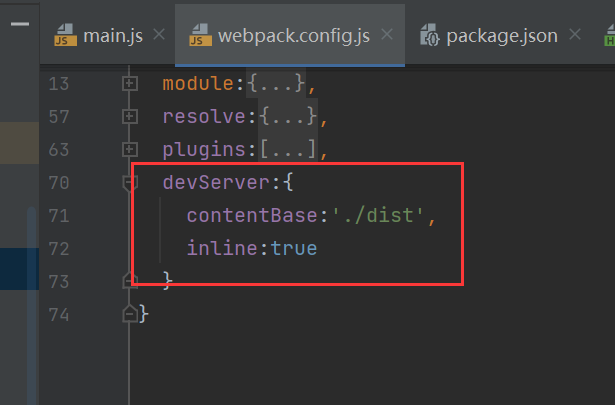
3.11 webpack dev server build local server
-
webpack provides an optional local development server based on node JS build, internal use of the express framework, we can achieve what we want, let the browser automatically refresh and display our modified results
-
Installation: NPM install -- save dev webpack dev- server@2.9.1
-
devserver is an option in the webpack. The option itself can set the following properties
- contentBase: which local folder provides local services. The default is the same as the folder
- Port: port number
- inline: real time page refresh
- History API fallback: in the SPA page, it depends on the history mode of HTML5
-
Modify webpack config. JS file
-
Configure another scripts: --open parameter to directly open the browser
"dev": "webpack-dev-server --open"
-
function:
-
Direct operation:/ node_modules/.bin/webpack-dev-server
-
In package Configuration path in JSON
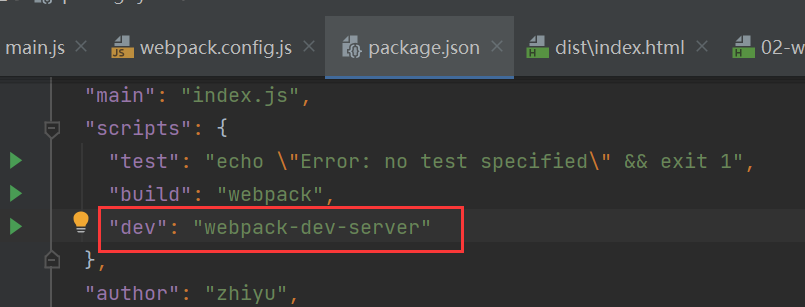
-
Input command: npm run dev
-
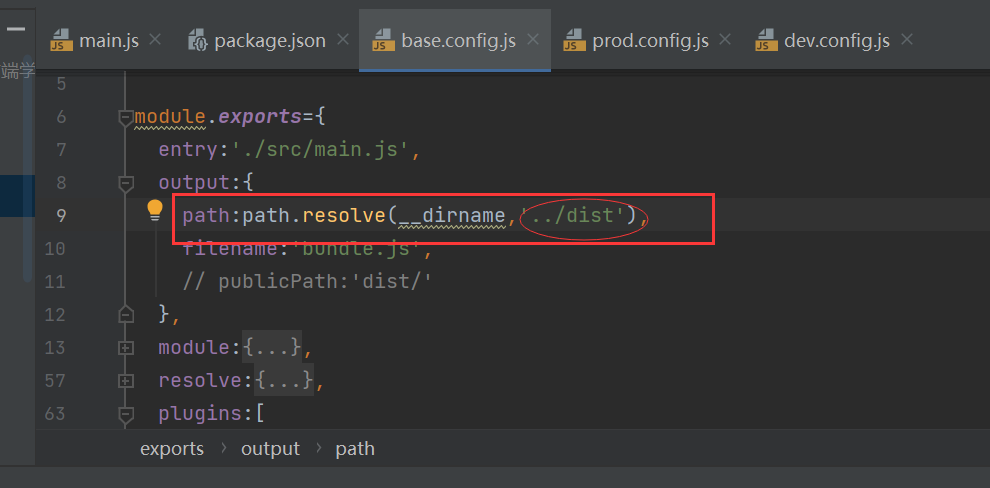
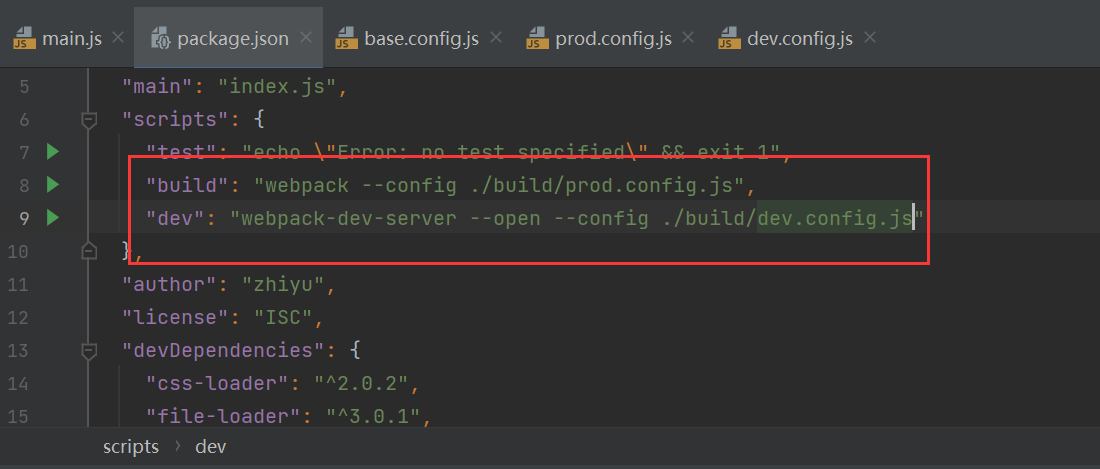
3.12 separation of webpack configuration files
-
Create a build folder, and create a new base. Under this folder config. JS file, which will webpack config. Copy and paste the contents in JS
-
Create a new dev.config.in the above folder JS and prod.config JS file, from base config. JS file is separated and placed in the first two files
// prod.config.js
const UglifyjsWebpackPlugin=require('uglifyjs-webpack-plugin')

module.exports={
  plugins:[
    new UglifyjsWebpackPlugin()
  ]
}
// dev.config.js module.exports={ devServer:{ contentBase:'./dist', inline:true } } -
Install plug-in: npm install webpack-merge@4.1.5 --save-dev
-
In prod.config js,base. config. JS
const UglifyjsWebpackPlugin=require('uglifyjs-webpack-plugin')
const webpackMerge=require('webpack-merge')
const baseConfig=require('./base.config')

module.exports=webpackMerge(baseConfig,{
  plugins:[
    new UglifyjsWebpackPlugin()
  ]
})
const webpackMerge=require('webpack-merge') const baseConfig=require('./base.config') module.exports=webpackMerge(baseConfig,{ devServer:{ contentBase:'./dist', inline:true } }) -
Modify package JSON path, delete the original webpack config. JS, start packaging and running

-
The packaging path problem is modified as follows:
kMerge=require('webpack-merge')
const baseConfig=require('./base.config')
module.exports=webpackMerge(baseConfig,{
plugins:[
new UglifyjsWebpackPlugin()
]
})
const webpackMerge=require('webpack-merge')
const baseConfig=require('./base.config')
module.exports=webpackMerge(baseConfig,{
  devServer:{
    contentBase:'./dist',
    inline:true
  }
})
-
Modify package JSON path, delete the original webpack config. JS, start packaging and running
-
The packaging path problem is modified as follows:
