1. VUE CLI related
1.1 vuecli- introduction and installation of scaffold
-
Vue cli is an officially released Vue JS project scaffold
-
Vue cli can be used to quickly build Vue development environment and corresponding webpack configuration
-
Vue CLI prerequisites - Node and Webpack
-
Install node JS: you can download and install it on the official website: http://nodejs.cn/download/
-
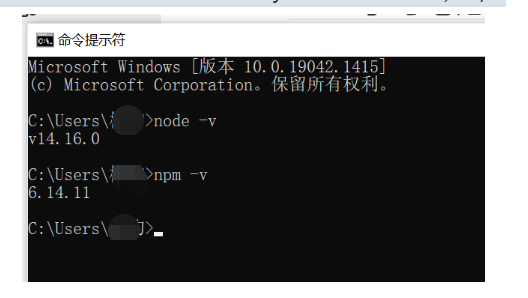
Detect the installed version: node (above version 8.9) and NPM are automatically installed by default
-
-
Install Vue scaffold in cmd: npm install -g @vue/cli
Official website: https://cli.vuejs.org/zh/guide/installation.html -
Pull 2 X template (old version): vue cli > = 3 uses the same vue command as the old version, so vue cli 2 (vue CLI) is overwritten. If you still need to use the old version of vue init function, you can install a bridge tool globally
npm install -g @vue/cli-init
# `vue init ` will run like ` vue init '- cli@2.x `Same
vue init webpack my-project   # Vue CLI2 initialization project
Vue create my-project		# Vue CLI3 initialization project
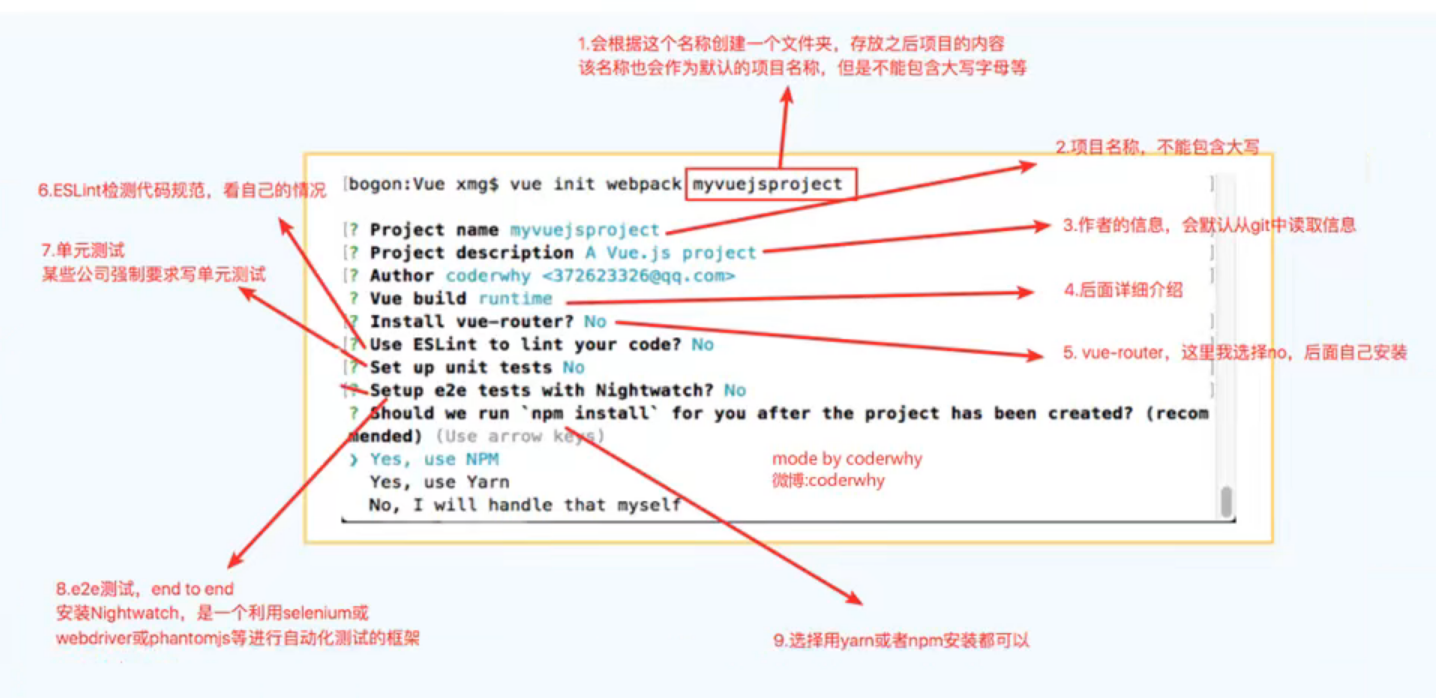
1.2 vuecli- initialize project process
- Now the terminal inputs: vue init webpack vuecli2test
-
Directory structure resolution of vuecli2-CLI2: https://www.jb51.net/article/154629.htm
-
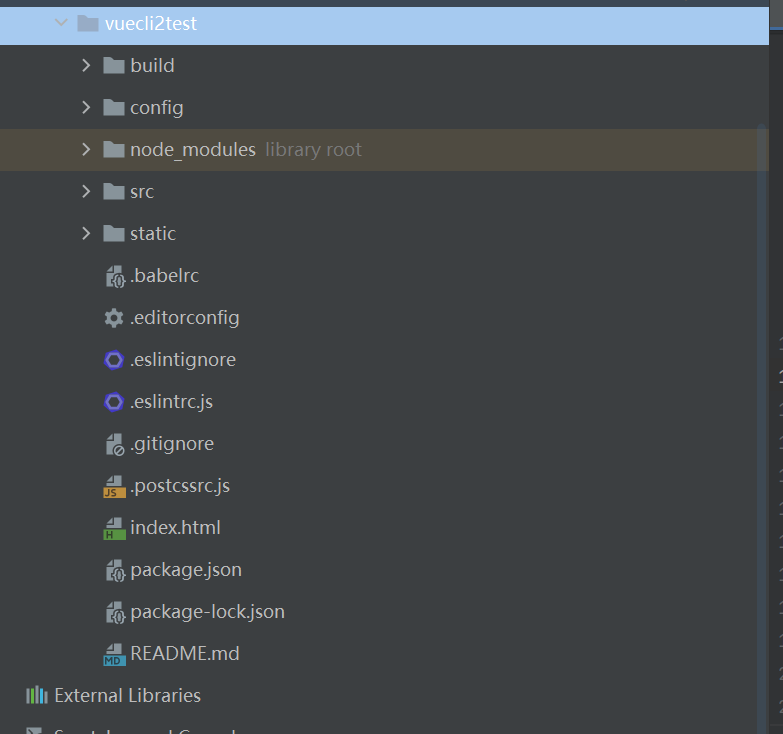
The following briefly describes the functions of each directory and file in turn:
build: the configuration of webpack, but here it is mainly the configuration related to plug-ins and project operation
config: it is also the configuration of webpack, but the difference is that it mainly configures some variables. And springboot application YML similar
node_modules: where dependencies are saved
src: where to write code
Static: where static resources are stored, such as html,css, etc., but images are placed in the src/assets directory
. babelrc: configuration file of babel; babel is a tool that can convert ES6 into ES5
. editorconfiig: text configuration, that is, the configuration of encoding, indentation format and newline character used by text code, such as HTML, CSS and JS
. eslintignore: eslint is used to constrain the code specification, that is, which files do not need to be constrained. Ignore it
. eslintrc: configuration file for eslint
. gitigore: which files do not need to be uploaded when uploading to github
index.html: entry page of the project
package.json: the basic information of the configuration item and the dependent version. It is emphasized here that the dependent version of the file only specifies the approximate range. The specific downloaded version is package lock JSON based
package-lock.json: record node_ The real version on which modules depend
README.md: the project specification looks like this -
Package generated by cli2 Script in JSON:

Dev: it is the script used to start the project during development. Generally, webpack dev server is used as the local server for hot loading to facilitate testing
Build: package the project to dist, but let's take a closer look. cli2 uses the node command to execute build under the build folder JS to package; Before learning node, our impression of JS was that it had to be introduced into html and finally executed in the browser
1.3 installing CLI errors and ESLint specifications
-
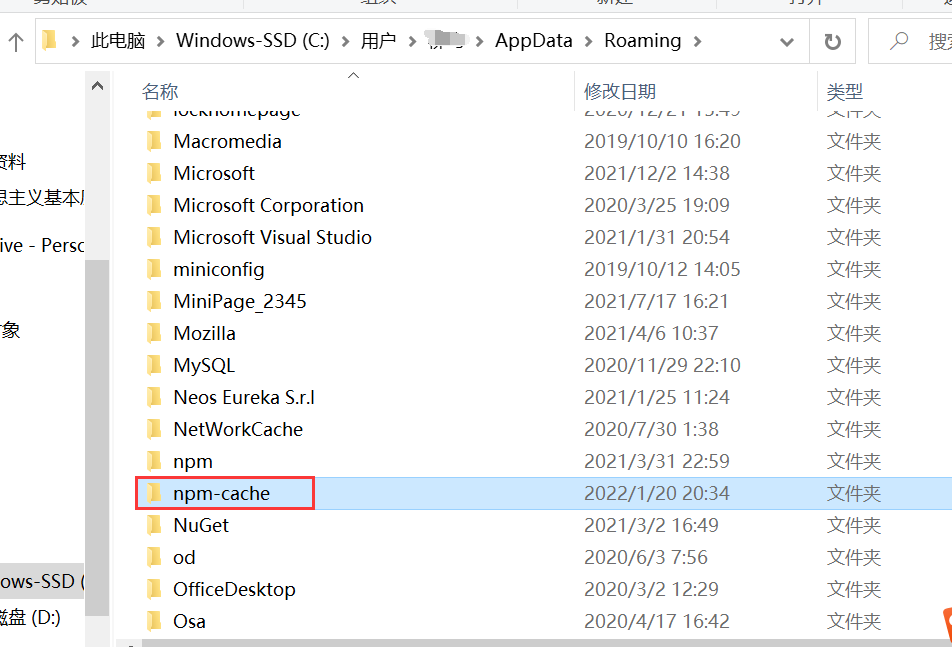
When there is an error in installing CLI, first run npm clean cache --force on cmd, and then download. If an error is still reported, uninstall the node and download again. If not, open cmd with administrator privileges for the above operations, or enter the following folder to delete the folder selected in the red box, and then install
-
ESLint specification: https://www.jianshu.com/p/c021912d67d2
Instead of using the ESLint specification, change true to false in the following file

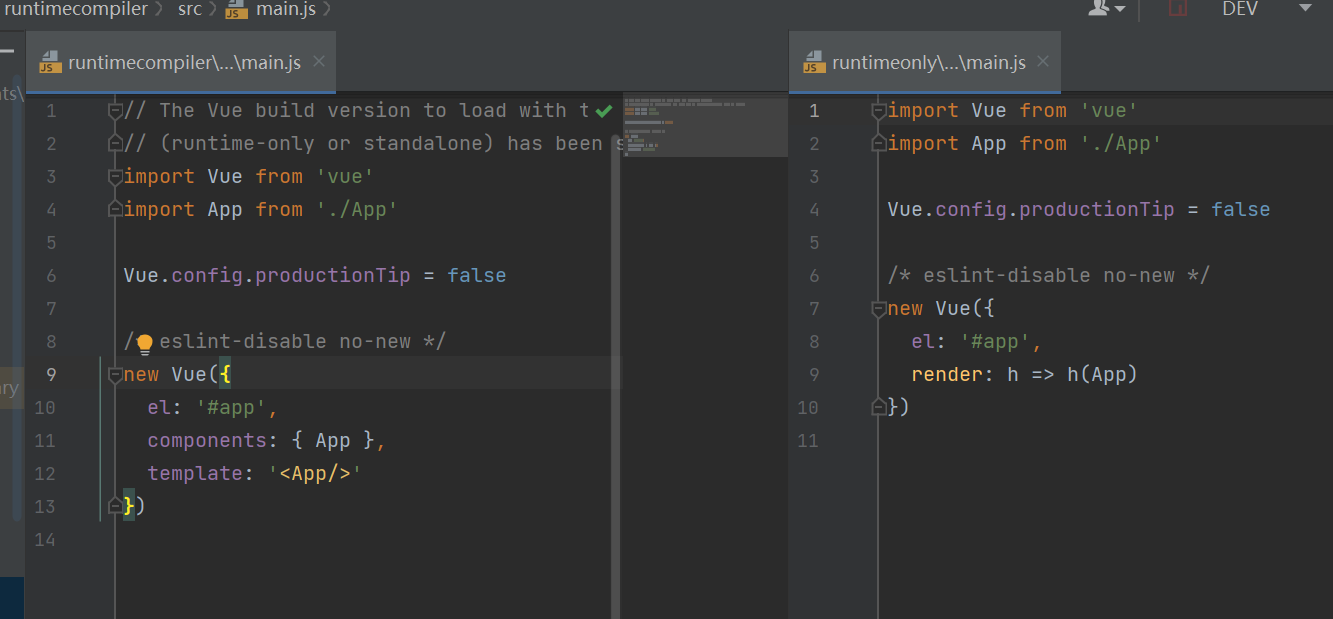
1.4 The difference between runtime compiler and runtime only
The difference between scaffolds created by these two methods is main JS (in src folder)
-
In the Vue instance, the parameters in the project created by the runtime compiler are: components and template
-
The parameters in the project created by runtime only are: render function
runtimecompiler rendering process: template - > ast -- > render -- > vdom -- > UI
runtimeonly render pass: render -- > vdom -- > UI
-
Runtime only: higher performance, less code
-
Runtime only: when the template is packaged, it has been compiled into the render function
Runtime compiler: compile the template only when it is running
-
If you still use template in later development, you need to choose runtime compiler
If the development uses vue file development, you can choose runtime only
How are components rendered into the page?
- template - > ast - > render - > vdom - > Real Dom - > page
- ast: abstract syntax tree
- vDom: virtual DOM
Set the rutimecompiler's main JS to render function type
import Vue from 'vue'
import App from './App'

Vue.config.productionTip = false

/* eslint-disable no-new */
const cpn={
  template:`<div>{{ message }}</div>`,
  data(){
    return {
      message:'I'm a component message'
    }
  }
}

new Vue({
  el: '#app',
  // components: { App },
  // template: '<App/>'
  render:function (createElement){
    //  1. General method: createElement('tag ', {tag attribute}, [' tag content ']) will replace the content of the previous app
    // return createElement('h2',{class:'box'},['hello world'])

    // return createElement('h2',
    //   {class:'box'},
    //   ['hello world',createElement('button ', [' button '],)])

    // 2. Pass in component object
    // return createElement(cpn)
    return createElement(App)
  }
})
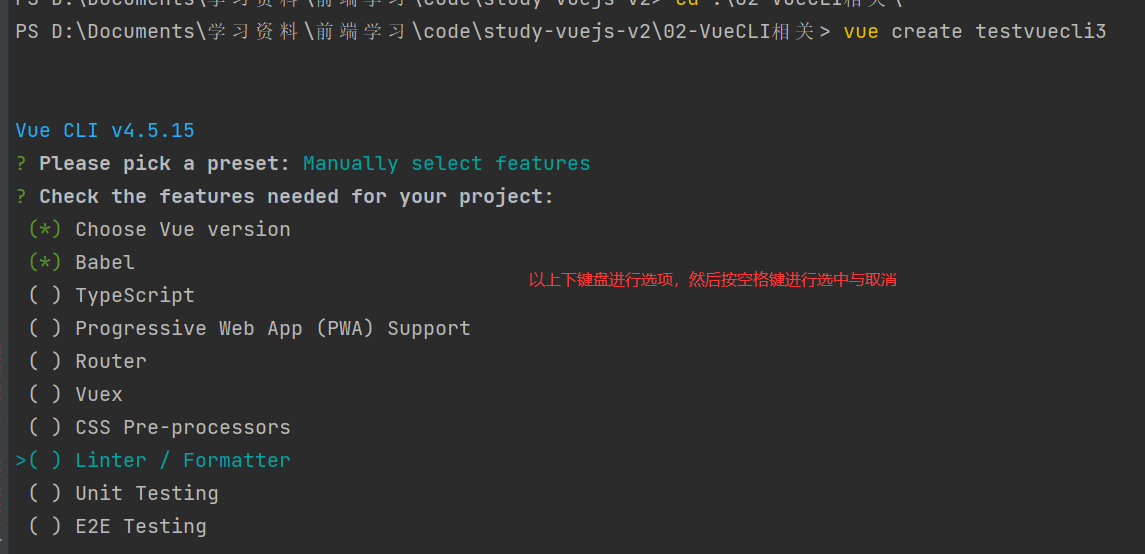
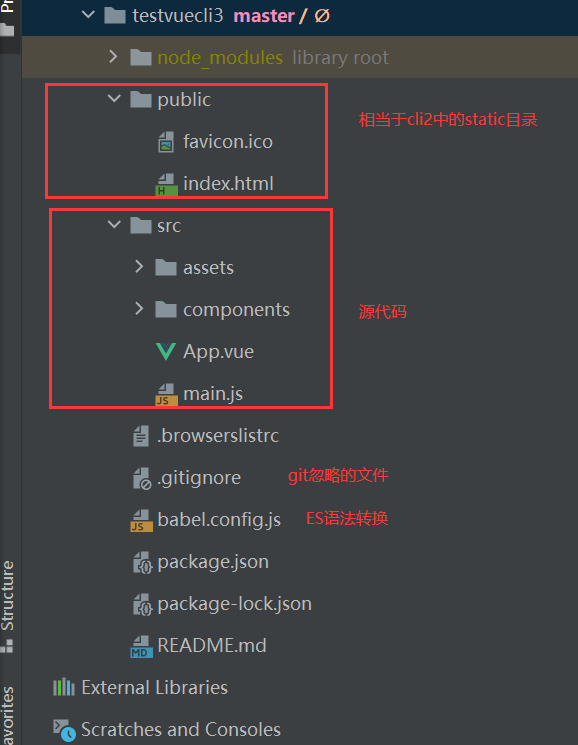
1.4 VueCLI3 create project and directory structure
-
Enter the command to create the project: vue create testvuecli3
-
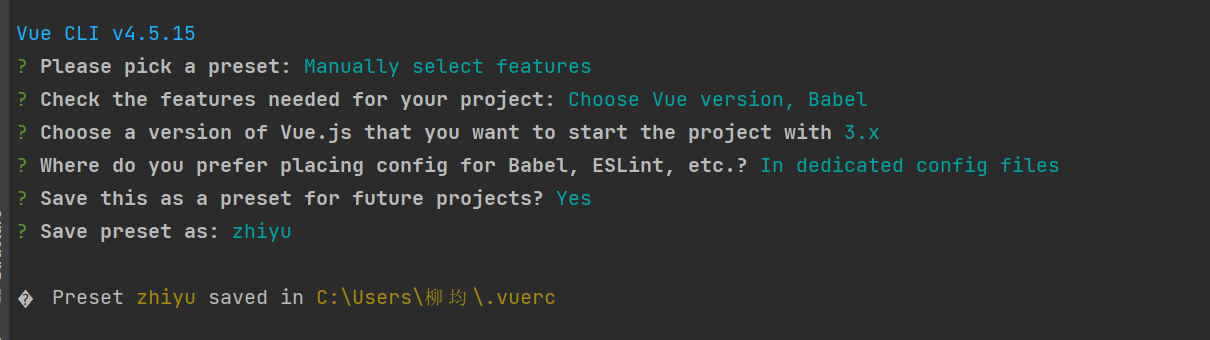
Create process
-
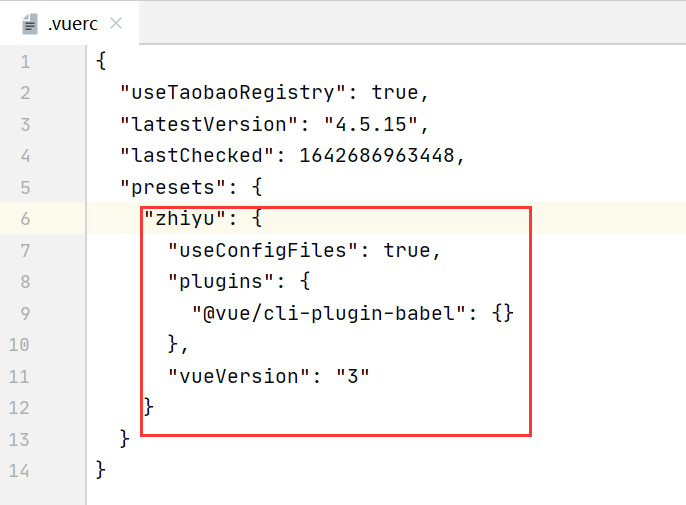
If you can't preset when creating a project, you can find the file of the following picture and delete it

-
directory structure
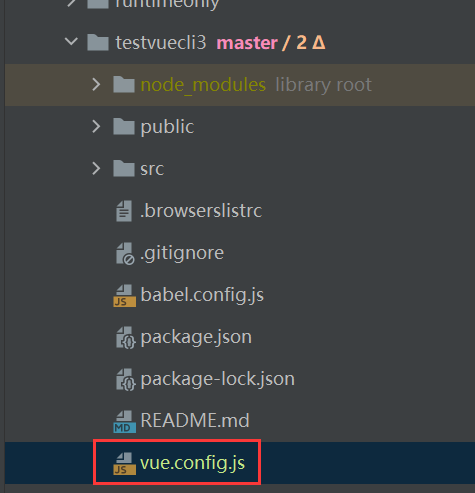
1.5 viewing and modifying vuecli3 configuration files
-
Input: vue ui launch a GUI for project management
-
Import the project on the web page, and then the versions of vue and vue template compiler plug-ins must be consistent
-
Create a file Vue. Exe in the project config. JS to modify some unique configurations
1.6 use of arrow function and this pointing
1.6.1 basic use of arrow function
Arrow function: it is also a basic way to define functions
// 1. How to define a function: function
const aaa=function (){

}
// 2. Define functions in object literals
const obj={
  bbb(){

  }
}
// 3. Arrow function in ES6
const ccc= (parameter list) => {}
1.6.2 parameters and return values of arrow function
// 1. Parameter problem
// 1.1 put in two parameters
const sum=(num1,num2)=>{
  return num1+num2;
}
// 1.2 put a parameter: omit parentheses
const power=num=>{
  return num*num;
}
// 2. Return value in function
// 2.1 When there are multiple lines of code in the function code block
const test=()=>{
  // 1. Print hello world
  console.log("Hello World");
  // 2. Print Hello Vuejs
  console.log('Hello Vuejs');
}
// 2.2 when there is only one line of code in the function code block
// const mul=(num1,num2)=>{
//   return num1+num2;
// }
const mul=(num1,num2)=>num1+num2;

// const demo=()=>{
//   console.log("Hello Demo");
// }
const demo=()=>console.log("Hello Demo");
console.log(demo());
1.6.3 use of this in arrow function
// When to use arrow functions: when you are ready to pass a function as an argument to another function
// setTimeout(function (){
//   console.log(this)
// },1000);
// setTimeout(()=>{
//   console.log(this);
// },1000)

// Conclusion: this in the arrow function refers to this in the nearest scope
const obj={
  aa(){
    setTimeout(function (){
        console.log(this)  // Window
      });
    setTimeout(()=>{
        console.log(this);  // Object object
      });
  }
}
obj.aa();

const obj2={
  bb(){
    setTimeout(function (){
      setTimeout(function (){
        console.log(this)  // Window
      })
    });

    setTimeout(()=>{
      console.log(this);  // window
    });

    setTimeout(()=>{
      setTimeout(function (){
        console.log(this)  // Window
      });
      setTimeout(()=>{
        console.log(this)  // obj
      })
    })
  }
}
2. Routing and its mapping relationship
2.1 what is routing
Routing: the activity of transmitting information from a source address to a destination address through an interconnected network,
Router provides two mechanisms: routing and transmission
- Routing determines the path of a packet from its source to its destination
- Transfer transfers data from the input to the appropriate output
Routing has a very important concept called routing table: in essence, it is a mapping table that determines the direction of data packets
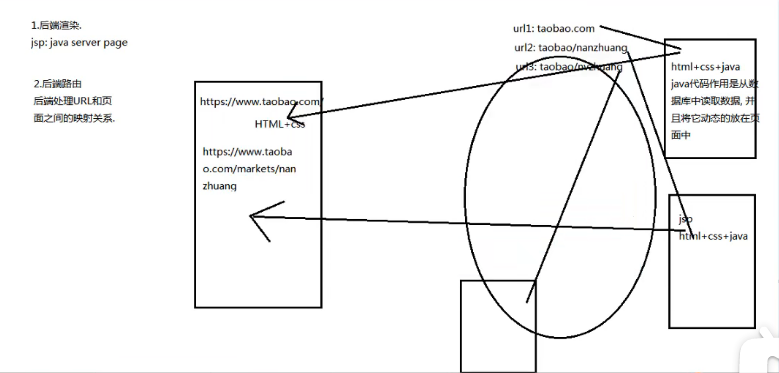
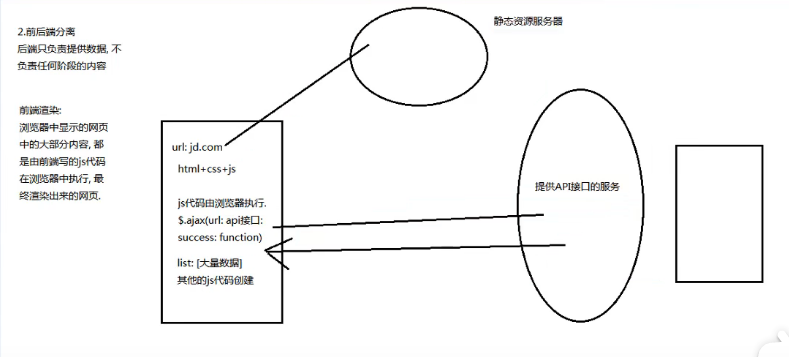
2.2 front end rendering and back end rendering and front end routing and back end routing
-
Back end rendering: the server directly produces and renders the corresponding HTML page and returns it to the client for display. For example: jsp page
Advantages: the front-end takes less time, that is, the first screen time is reduced, and the template is unified on the back-end. The front end (relatively) saves trouble and does not occupy client computing resources (parsing templates)
Disadvantages: occupying server resources
-
Front end rendering: most of the contents of the web page displayed in the browser are executed in the browser by the js code written by the front end, and finally rendered out. It can also be said that the back-end returns JSON data, and the front-end uses the pre written html template to read JSON data circularly, splice strings, and insert pages.
Advantages: the amount of data transmitted through the network is small. It does not occupy the computing resources of the server (parsing the template). The template is at the front end (probably only partially at the front end). The structure change and interaction are all done by the front end itself. After the change, you can adjust it yourself.
Disadvantages: the front-end takes a lot of time and requires relatively high level of front-end staff. There is a lot of front-end code, because part of the interaction logic previously processed in the background is handed over to the front-end processing. It takes up a small part of client computing resources for parsing templates
-
Back end routing stage: when the browser switches different URLs in the address bar, it sends a request to the background server every time. The server responds to the request. The server renders the whole page and returns the page to the client. In this case, the rendered page does not need to load any js and css separately, and can be directly presented to the browser, which is also conducive to SEO optimization
Advantages: it shares the pressure of the front end, and the splicing of html and data is completed by the server.
Disadvantages: when the project is very large, it increases the pressure on the server side. At the same time, the specified url path cannot be entered on the browser side to access the specified module. Another is that if the current network speed is too slow, it will delay the loading of the page and is not very friendly to the user experience. HTML code, data and corresponding logic will be mixed together, which is not conducive to writing and maintenance
-
Front end and back end separation stage: the back end only provides APIs to return data. The front end obtains data through Ajax and can render the data to the page through JavaScript. The biggest advantage of this is that the responsibilities of the front and back ends are clear. The back end focuses on data and the front end focuses on interaction and visualization; After the mobile terminal appears, the back end does not need any processing, and the previous set of APIs can still be used.
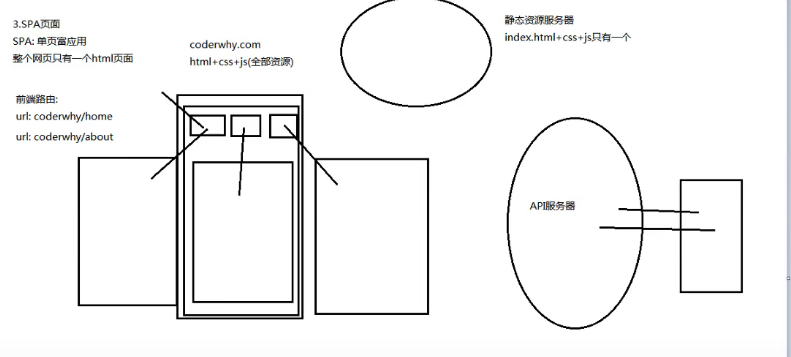
-
Front end Routing: it is a technology for page Jump without refreshing the browser. It is usually used to build Spa (single page application)
When processing multiple pages, the server will regularly match the URL and finally give it to a Controller for processing Finally, the generated HTML is returned to the front end
2.3 url hash and HTML history
2.3.1 url hash
- The hash of the url is the anchor point, which essentially changes the window href attribute of location
- You can directly assign location Hash to change the href, but the page does not refresh
Change the hash of the url:
-
First enter: location. In the page console hash = ‘aaa’
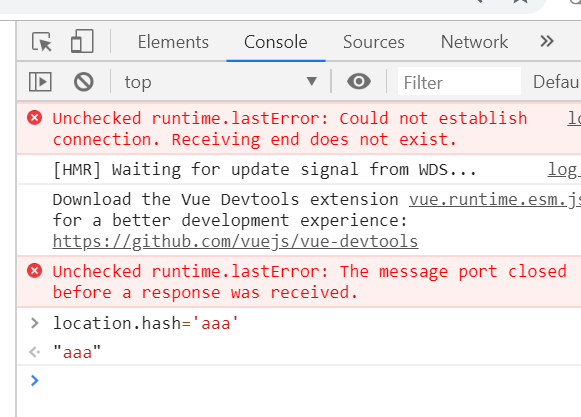
-
Page path:
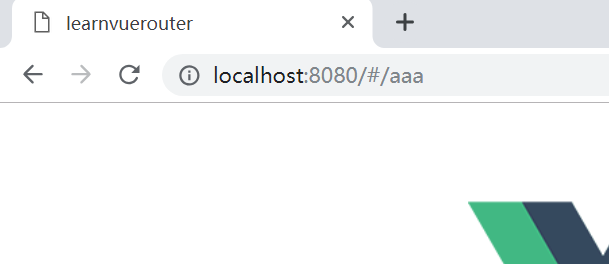
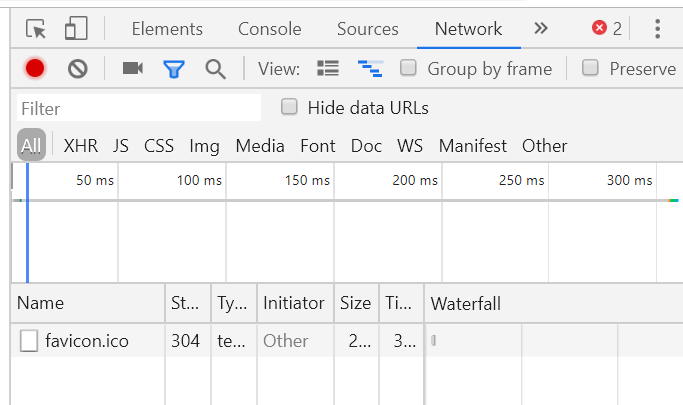
-
The console displays no requests
2.3.2 history of HTML
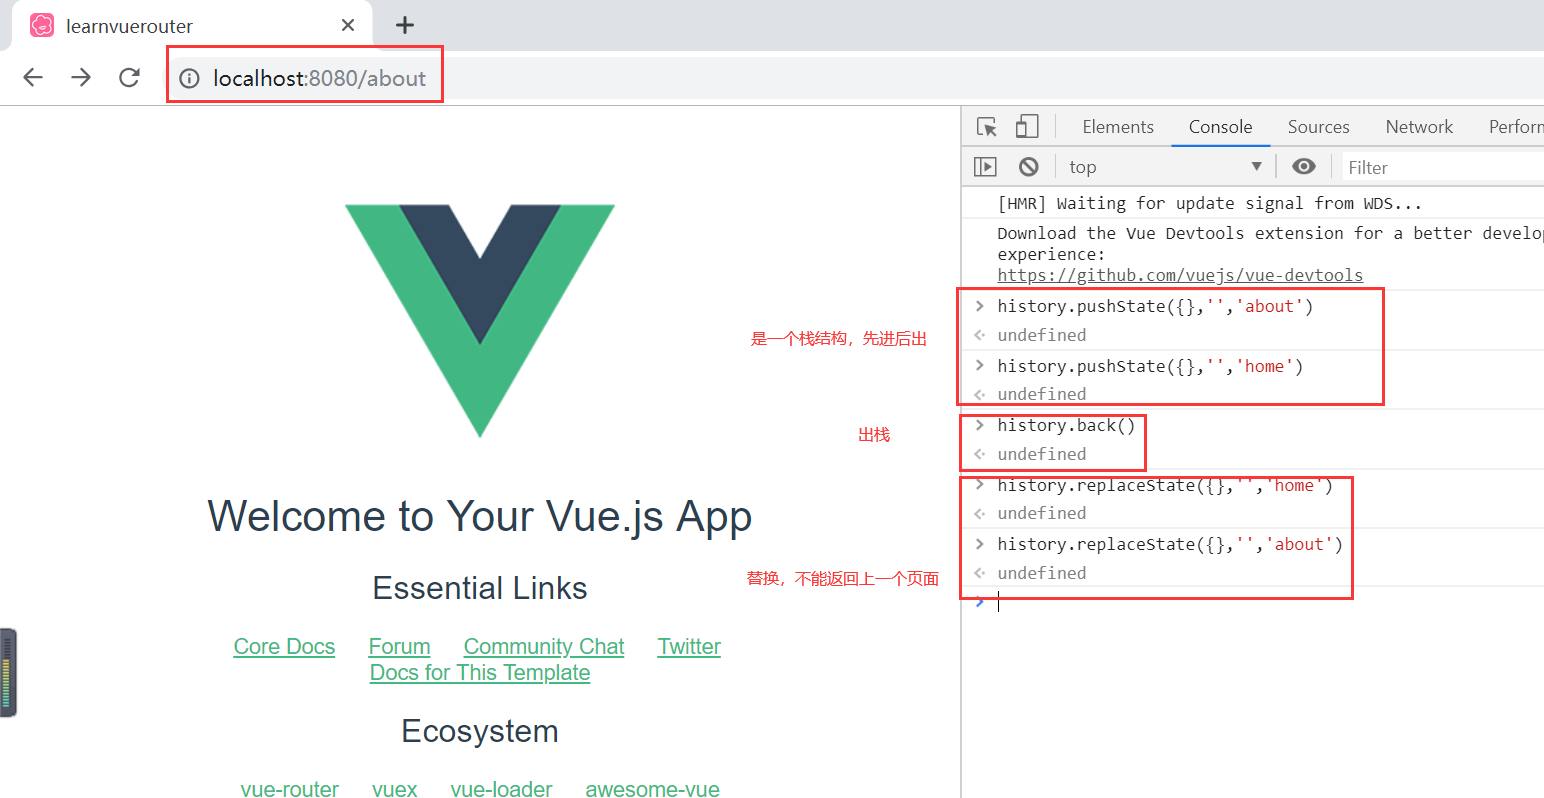
history.back() is equivalent to history go(-1)
history.forword() is equivalent to history go(1)
3. Vue router learning
3.1 installation and configuration of Vue router
Vue router is Vue JS official routing plug-in, which is similar to Vue JS is deeply integrated and suitable for building page applications
- Vue router is based on Routing and components
- Routing is used to set access paths and map paths to components
- In the single page application of Vue router, the change of page path is the switching of components
-
Installation of Vue router
- Enter NPM install Vue router -- save
-
Use it in a modular project (because it is a plug-in, you can install the routing function through Vue.use())
-
Import the routing object and call Vue use(VueEouter)
-
Create a routing instance and pass in the routing mapping configuration
-
Mount the created routing instance in the Vue instance
// Configure routing related information
import VueRouter from "vue-router";
import Vue from 'vue'

// 1. Via Vue Use to install the plug-in
Vue.use(VueRouter);

// 2. Create routing object
const routers=[

]
const router = new VueRouter({
  // Configure the mapping relationship between paths and components
  routers
})

// 3. Pass the router object into the vue instance
export default router
-
3.2 routing mapping configuration and presentation
Steps of using Vue Router:
-
Create routing component
-
src/components/Home.vue
<template> <div> <h2>I'm the home page</h2> <p>I am the content of the home page, ha ha ha</p> </div> </template> <script> export default { name: "Home" } </script> <style scoped> </style> -
src/components/About.vue
<template>
  <div>
    <h2>I'm about</h2>
    <p>I'm about content, ha ha</p>
  </div>
</template>

<script>
export default {
  name: "About"
}
</script>

<style scoped>

</style>
-
-
Configure route mapping: components and route mapping relationships
// Configure routing related information Src / router / index js import VueRouter from "vue-router"; import Vue from 'vue' import Home from '../components/Home' import About from '../components/About' // 1. Via Vue Use (plug-in), install plug-in Vue.use(VueRouter); // 2. Create routing object const routes=[ { path:'/home', component:Home }, { path:'/about', component:About } ] const router = new VueRouter({ // Configure the mapping relationship between paths and components routes // routes cannot be customized }) // 3. Pass the router object into the vue instance export default router -
Using routes: through and labels
-
: this tag is a built-in component in Vue router. It will be rendered as a tag
-
: the label will dynamically render different components according to the current path
-
During route switching, the mounted components are switched, and other contents will not change, and the location of the label is the location of the mounted components
<!-- src/App.vue --> <template> <div id="app"> <router-link to="/home">home page</router-link> <router-link to="/about">about</router-link> <router-view></router-view> </div> </template> <script> export default { name: 'App' } </script> <style> </style> -
3.3 the default value and of the route are modified to history mode
-
The first page is displayed by default
-
Path removal
3.4 other attributes of router link
-
To: Specifies the path to jump
-
tag: you can specify what components to render later, such as rendering them as button s
<template> <div id="app"> <router-link to="/home" tag="button">home page</router-link> <router-link to="/about" tag="button">about</router-link> <router-view></router-view> </div> </template> -
replace: no history record will be left. You can't use the back button of the web page to return to the previous page after use
<router-link to="/home" tag="button" replace>home page</router-link>
-
Active class: when the corresponding route matches successfully, a router link active class will be automatically set for the current element. Setting active class can modify the default name
<template>
  <div id="app">
    <!-- 1.Change directly on each one active-class="active" -->
<!--    <router-link to="/home" tag="button" replace active-class="active">home page</router-link>-->
<!--    <router-link to="/about" tag="button" replace active-class="active">about</router-link>-->
    <!-- 2. Modify in route -->
<!--    <router-link to="/home" tag="button" replace>home page</router-link>-->
<!--    <router-link to="/about" tag="button" replace>about</router-link>-->

    <!-- Routing code jump -->
    <button @click="homeClick">home page</button>
    <button @click="aboutClick">about</button>
    <router-view></router-view>
  </div>
</template>

<script>
export default {
  name: 'App',
  methods:{
    // Modify the path Vue router through code
    homeClick(){
      // push => pushState
      // this.$router.push('./home');
      this.$router.replace('./home');
    },
    aboutClick(){
      // this.$router.push('./about');
      this.$router.replace('./about');
    }
  }
}
</script>

<style>
 /*.router-link-active{     router-link-active Is the default name
   color:red;
  }*/

 .active{
   color:red;
 }
</style>
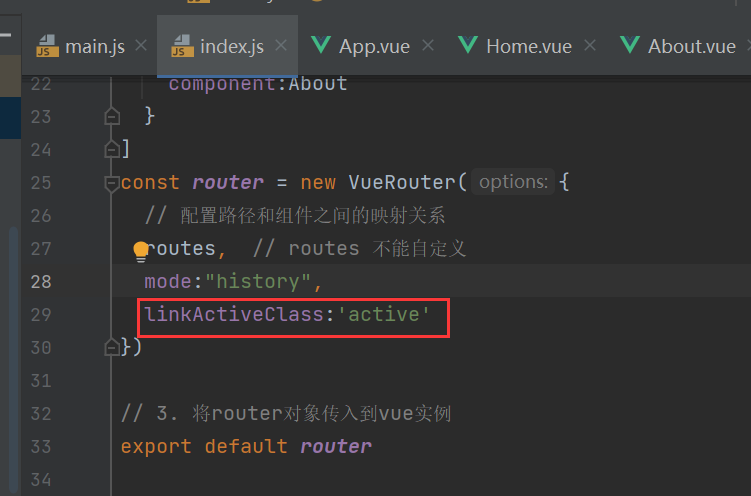
Modify active class = "active" method 2: configuration in routing:
3.5 use of Vue router dynamic routing
-
Configure a user Vue component
<template> <div> <h2>I am the user interface</h2> <p>I am the user's relevant information, hehe hehe</p> <h2>{{userId}}</h2> </div> </template> <script> export default { name: "User", computed:{ userId(){ return this.$route.params.userId } } } </script> <style scoped> </style> -
On app Configuration in Vue
<template> <div id="app"> <router-link to="/home">home page</router-link> <router-link to="/about">about</router-link> <router-link :to="'/user/'+userId">user</router-link> <router-view></router-view> </div> </template> <script> export default { name: 'App', data(){ return { userId:'lisi' } } </script> <style> .active{ color:red; } </style> -
In index JS configuration path
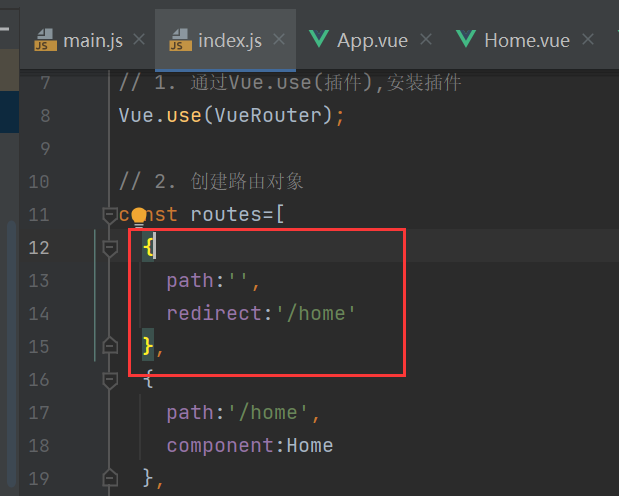
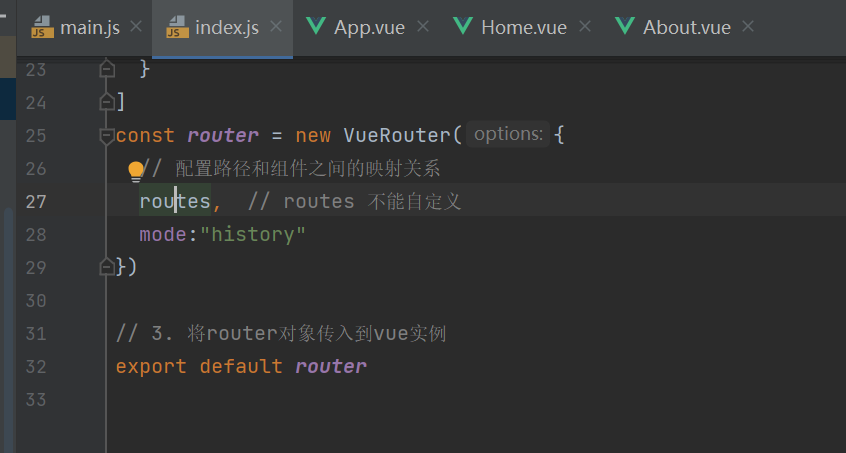
// Configure routing related information
import VueRouter from "vue-router";
import Vue from 'vue'
import Home from '../components/Home'
import About from '../components/About'
import User from '../components/User'

// 1. Via Vue Use (plug-in), install plug-in
Vue.use(VueRouter);

// 2. Create routing object
const routes=[
  {
    path:'',
    redirect:'/home'
  },
  {
    path:'/home',
    component:Home
  },
  {
    path:'/about',
    component:About
  },
  {
    path:'/user/:userId',
    component: User
  }
]
const router = new VueRouter({
  // Configure the mapping relationship between paths and components
  routes,  // routes cannot be customized
  mode:"history",
  linkActiveClass:'active'
})

// 3. Pass the router object into the vue instance
export default router
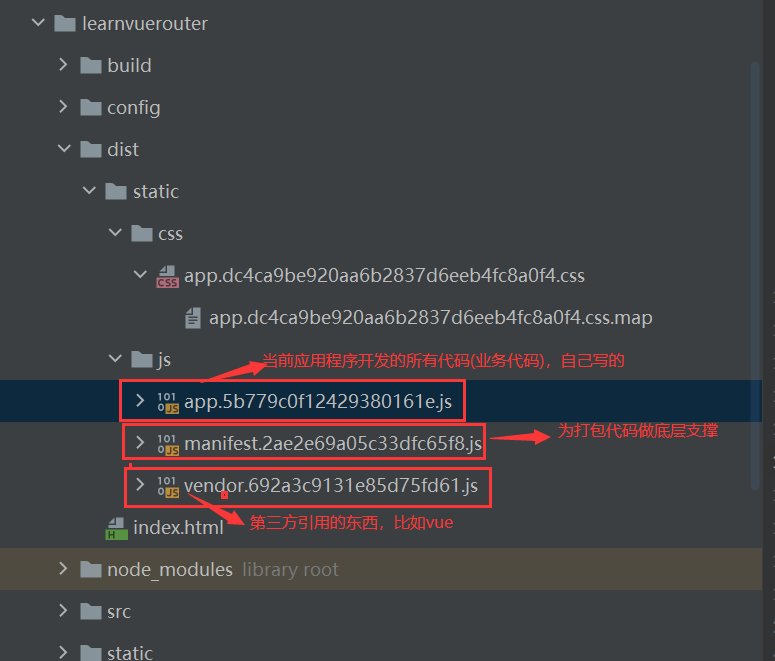
3.6 Vue router - Analysis of packaged files
3.7 use of Vue router lazy loading
-
Lazy load: load when used
-
Lazy route loading: the main function is to package the components corresponding to the route into js code blocks. The corresponding components are loaded only when the route is accessed
-
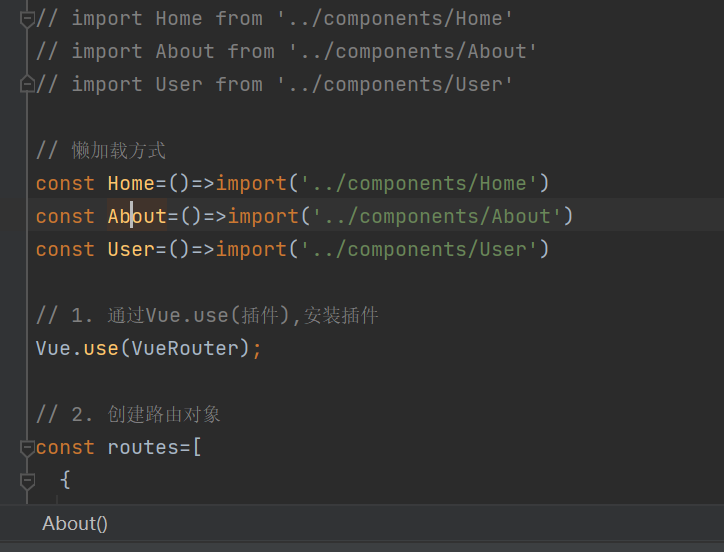
Lazy loading mode
-
Combine Vue's asynchronous components with webpack's code molecules
const Home=resolve=>{require.ensure(['../components/Home.vue'],()=>{resolve(require('../components/Home.vue'))})} -
AMD writing
const About=resolve=>require(['../components/About.vue'],resolve);
-
In ES6, we can have a simpler way to organize the code segmentation of Vue asynchronous components and webpack
const Home=()=>import('../components/Home.vue')
-
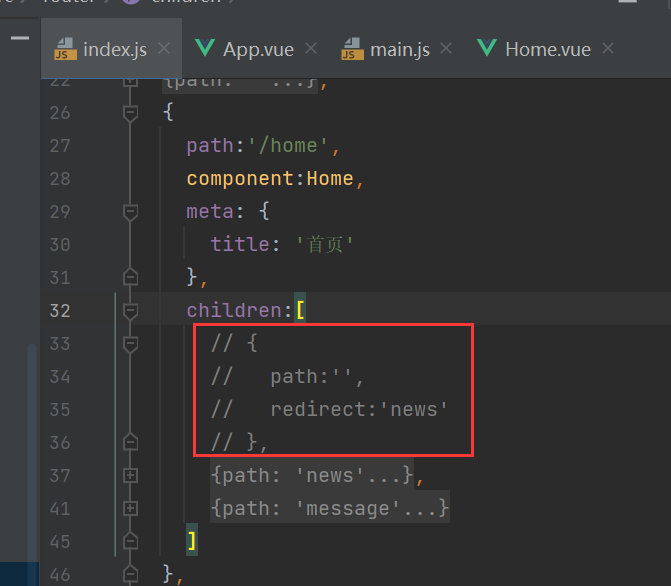
3.8 Vue router nested use of routes
-
Nested Routing: one path maps to one component, and accessing these two paths will render two components respectively
-
Steps to implement nested Routing:
-
Create corresponding sub components and configure corresponding sub routes in route mapping
// HomeVews component
<template>
  <div>
    <ul>
      <li>News 1</li>
      <li>News 2</li>
      <li>News 3</li>
      <li>News 4</li>
    </ul>
  </div>
</template>
// HomeMessage component
<template>
  <div>
    <ul>
      <li>Message 1</li>
      <li>Message 2</li>
      <li>Message 3</li>
      <li>Message 4</li>
    </ul>
  </div>
</template>
// Configure routing related information import VueRouter from "vue-router"; import Vue from 'vue' // import Home from '../components/Home' // import About from '../components/About' // import User from '../components/User' // Lazy loading mode const Home=()=>import('../components/Home') const HomeNews=()=>import('../components/HomeNews') const HomeMessage=()=>import('../components/HomeMessage') const About=()=>import('../components/About') const User=()=>import('../components/User') // 1. Via Vue Use (plug-in), install plug-in Vue.use(VueRouter); // 2. Create routing object const routes=[ { path:'', redirect:'/home' }, { path:'/home', component:Home, children:[ { // Default path path:'', redirect:'news' }, { path:'news', // Sub component path does not need '/' component:HomeNews }, { path:'message', component: HomeMessage } ] }, { path:'/about', component:About }, { path:'/user/:userId', component: User } ] const router = new VueRouter({ // Configure the mapping relationship between paths and components routes, // routes cannot be customized mode:"history", linkActiveClass:'active' }) // 3. Pass the router object into the vue instance export default router -
Use labels inside components
// At home Vue to configure sub paths
<template>
  <div>
    <h2>I'm the home page</h2>
    <p>I am the content of the home page, ha ha ha</p>
    <router-link to="/home/news">Journalism</router-link>
    <router-link to="/home/message">news</router-link>
    <router-view></router-view>
  </div>
</template>
-
3.9 Vue router parameter transfer
-
Two types of parameters are passed: params and query
-
Type of params:
- Configure routing format: / router/:id
- Transfer method: follow the corresponding value after the path
- Paths formed after transfer: / router / 123, / router / ABC
-
Type of query:
-
Configure routing format: / router, that is, normal configuration
-
Transfer method: the key of query is used as the transfer method in the object
-
Path formed after transfer: / router?id=123, /router?id=abc
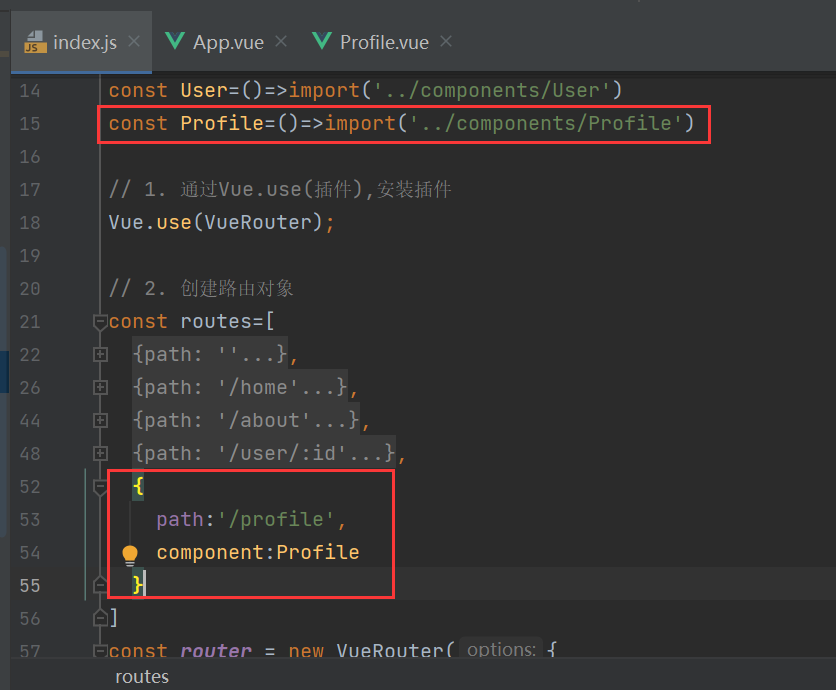
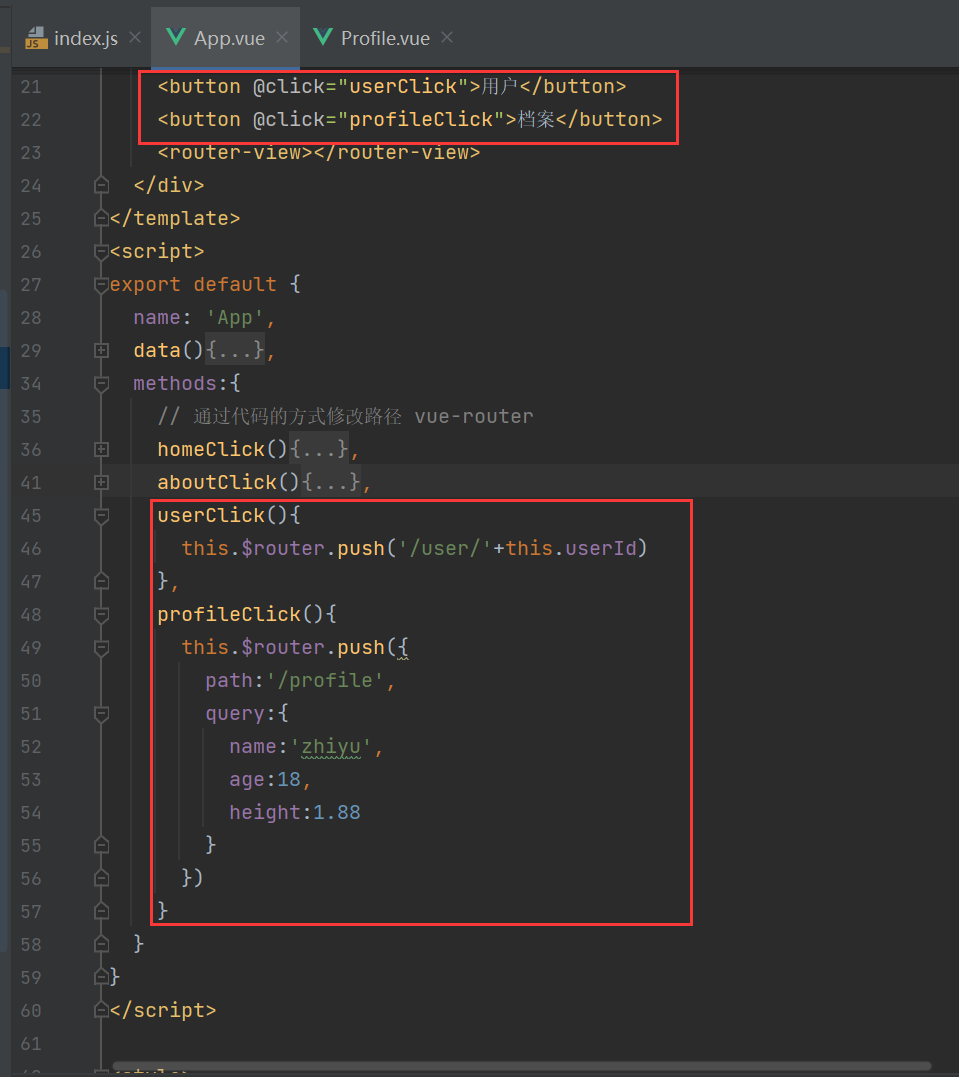
// Create a new component: profile vue
<template>
  <div>
    <h2>I am profile assembly</h2>
    <h2>{{$route.query.name}}</h2>
    <h2>{{$route.query.age}}</h2>
    <h2>{{$route.query.height}}</h2>
  </div>
</template>

// On app Configuration in Vue
<router-link :to="{path:'/profile',query:{name:'zhiyu',age:18,height:1.88}}">archives</router-link>

// In index JS configuration path
-

Use code jump:

3.10 origin of router and route
- All components inherit from the prototype of the vue class
- $router is a vueroter instance. If you want to navigate to different URL s, use router Push() method
- $route is the jump object of the current route, where you can get name,path,query,params, etc
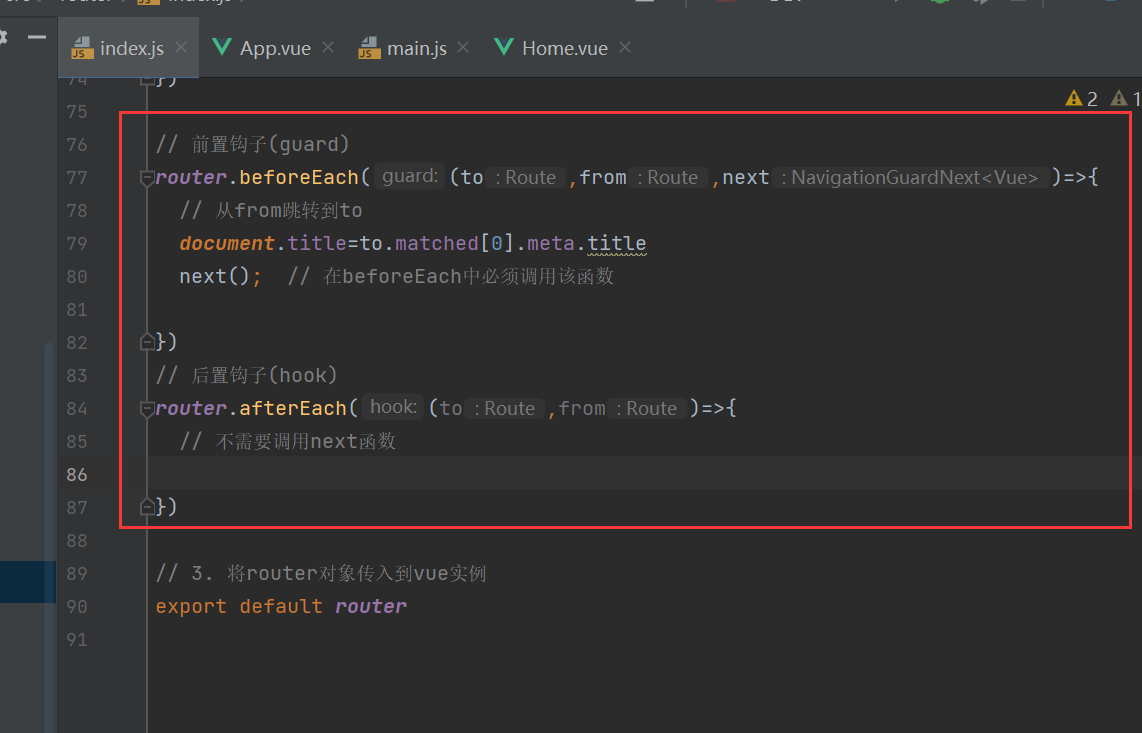
3.11 Vue router global navigation guard
   <h2>{{$route.query.name}}</h2>
     <h2>{{$route.query.age}}</h2>
     <h2>{{$route.query.height}}</h2>
   </div>
 </template>

 // On app Configuration in Vue
 <router-link :to="{path:'/profile',query:{name:'zhiyu',age:18,height:1.88}}">archives</router-link>

 // In index JS configuration path

 ```
Use code jump:
3.10 origin of router and route
- All components inherit from the prototype of the vue class
- $router is an instance of vueroter. If you want to navigate to different URL s, use router Push() method
- $route is the jump object of the current route, where you can get name,path,query,params, etc
3.11 Vue router global navigation guard
Official website learning: https://router.vuejs.org/zh/guide/advanced/navigation-guards.html
created() { // The created component will call back
  console.log("created");
},
mounted() { // When the template is mounted on the whole DOM, it will call back
  console.log("mounted");
},
updated() { // It will call back when the interface is refreshed
  console.log("updated");
Page title change case:
-
Add a method to each component
created() { // The created component will call back console.log("created"); document.title='home page'; }, -
Routing method
// Add an attribute meta in the path,
{
  path:'/home',
  component:Home,
  meta: {
    title: 'home page'
  },
},

// Then in index JS
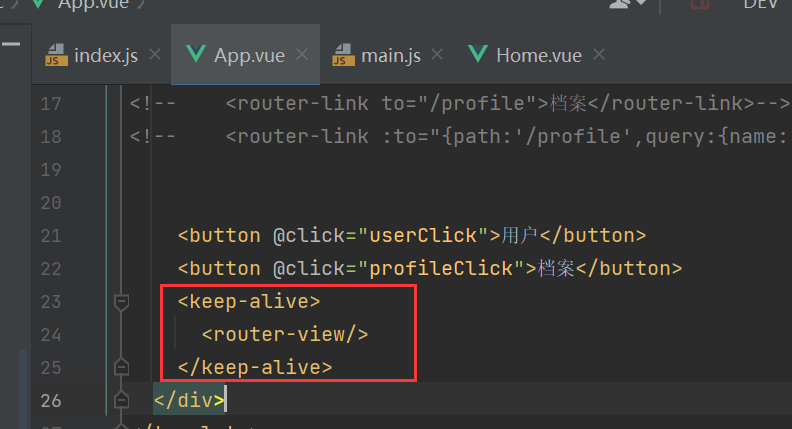
3.12 Vue router – keep alive and its problems
-
Keep alive is a built-in component of Vue, which can keep the contained components in the state or avoid re rendering, reduce loading time and performance consumption, and improve user experience
-
Router view is also a component. If it is directly wrapped in keep alive, all view components matching the path will be cached
-
Writing as shown in the following figure can reduce the frequent creation and destruction of components and improve the running speed
-
After clicking other pages, the home page is still the same as the original
-
Remove default path
-
Use component navigation
-
-
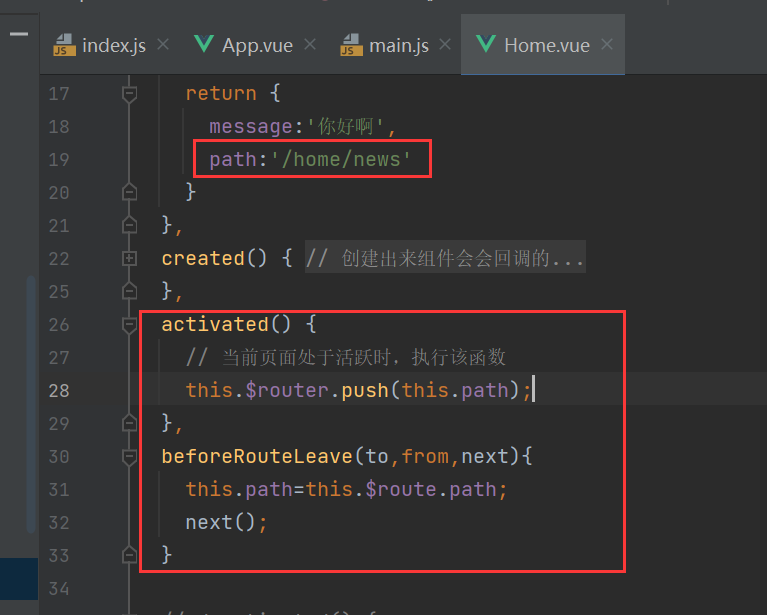
Activated: called when the keep alive component is activated. This hook function is not called during server-side rendering
Deactivated: called when the keep alive component is deactivated. This hook is not called during server-side rendering
-
Components created in keep alive will have two more life cycle hooks: activated and deactivated
-
Using keep alive will keep the data in memory. If you want to obtain the latest data every time you enter the page, you need to obtain the data in the activated stage and undertake the task of obtaining the data in the original created hook function.
-
Note: these two life cycle functions will be called only when the component is wrapped in keep alive. If it is used as a normal component, it will not be called. After version 2.1.0, after exclusion, even if it is wrapped in keep alive, these two hook functions will not be called! In addition, this hook function will not be called when rendering on the server.
-
-
Keep alive attribute:
include - string or regular expression. Only components with matching names are cached.
exclude - string or regular expression. Any component whose name matches will not be cached.
max - number. The maximum number of component instances that can be cached.