catalogue
1.1 three methods of global component definition
1.2 using component to define private components
4.1 value transfer from parent component to child component
4.2 the child component passes the value to the parent component through the event call
5.1 use transition class name to realize animation
5.2 animation - Custom v-prefix
5.3 using third-party animate CSS class library to achieve animation
5.4 hook function to realize small ball half court animation
5.5 use transition group element to realize list animation
1, Define Vue components
- What is a component: the emergence of components is to split the code volume of Vue instances. It allows us to divide different functional modules with different components. We can call the corresponding components for what functions we need in the future;
- The difference between componentization and Modularization: modularization: it is divided from the perspective of code logic; Facilitate the layered development of code and ensure the single function of each functional module; Componentization: it is divided from the perspective of UI interface; The Componentization of the front end facilitates the reuse of UI components
- Components can extend HTML elements and encapsulate reusable code.
1.1 three methods of global component definition
- Using Vue Extend with Vue Component method:
<!DOCTYPE html>
<html>
<head>
<meta charset="UTF-8">
<title>assembly</title>
<!-- introduce vue.js -->
<script type="text/javascript" src="vue.min.js"></script>
</head>
<body>
<div id="i1">
	<!-- If you need to use a component, put the name of the component directly to HTML The form of tag can be introduced into the page -->
	<!--  <my-com1></my-com1>-->
	<mycom1></mycom1>
</div>

<script>
	//1.1 using Vue Extend to create a global Vue component
	//var com1=Vue.extend({
	//	Template: '< H3 > this is using Vue Extend to create the Vue component < / H3 > '/ / specify the HTML structure to be displayed by the component through the template attribute
	//})
	//1.2 using Vue Component ('name of the component ', template object of the created component)
	//Vue.component('myCom1',com1)
	//If Vue is used. When defining a global component, the component name uses the hump name. When referring to a component again, you need to change the uppercase hump to lowercase letters. At the same time, use - connection between two words;
	//If the hump is not used, the name can be used directly;
	//Vue.component('mycom1',com1)

	//Vue. The first parameter of component: the name of the component. When it is referenced in the future, it will be introduced in the form of a label
	//Second parameter: Vue The component created by extend, where template is the HTML content to be displayed by the component in the future
	Vue.component('mycom1',Vue.extend({
		template:'<h3>This is using Vue.extend To create Vue assembly</h3>'  //The template attribute specifies the HTML structure to be displayed by the component
	}))

	//Create Vue instance and get ViewModel
	var vm=new Vue({
		el:"#i1",
		data:{},
		methods:{}
	});
</script>
</body>
</html>
The result chart shows:
- Use Vue directly Component method:
<!DOCTYPE html>
<html>
<head>
<meta charset="UTF-8">
<title>assembly</title>
<!-- introduce vue.js -->
<script type="text/javascript" src="vue.min.js"></script>
</head>
<body>
<div id="i1">
	<!-- Or use the form of labels to introduce your own components -->
	<mycom2></mycom2>
</div>

<script>
	Vue.component('mycom2',{
		//Note: no matter which way the component is created, the template content pointed to by the template attribute of the component must have and only have a unique root element
		template:'<div><h3>This is direct use Vue.component Created components</h3><span>123456</span></div>'
	})
	//Create Vue instance and get ViewModel
	var vm=new Vue({
		el:"#i1",
		data:{},
		methods:{}
	});
</script>
</body>
</html>
The result chart shows:
- Define the template string into the script tag; At the same time, you need to use Vue Component to define components:
<!DOCTYPE html>
<html>
<head>
<meta charset="UTF-8">
<title>assembly</title>
<!-- introduce vue.js -->
<script type="text/javascript" src="vue.min.js"></script>
</head>
<body>
<div id="i1">
	<mycom3></mycom3>
</div>

<!-- Under control#i1 outside, use the template element to define the HTML template structure of the component -- >
<template id="tmp1">
	<div>
		<h1>This is through template Element, a component structure defined externally,This method works well</h1>
	</div>
</template>

<script>
	Vue.component('mycom3',{
		template:'#tmp1'
	})
	//Create Vue instance and get ViewModel
	var vm=new Vue({
		el:"#i1",
		data:{},
		methods:{}
	});
</script>
</body>
</html>
The result chart shows:
1.2 using component to define private components
<!DOCTYPE html>
<html>
<head>
<meta charset="UTF-8">
<title>assembly</title>
<!-- introduce vue.js -->
<script type="text/javascript" src="vue.min.js"></script>
</head>
<body>
<div id="i1">
	<login></login>
</div>

<!-- Under control#i1 outside, use the template element to define the HTML template structure of the component -- >
<template id="temp">
	<div>
		<h1>This is private login assembly</h1>
	</div>
</template>

<script>

	//Create Vue instance and get ViewModel
	var vm=new Vue({
		el:"#i1",
		data:{},
		methods:{},
		components:{
			login:{
				template:'#temp'
			}
		}
	});
</script>
</body>
</html>
The result chart shows:
II. data in components
<!DOCTYPE html>
<html>
<head>
<meta charset="UTF-8">
<title>assembly</title>
<!-- introduce vue.js -->
<script type="text/javascript" src="vue.min.js"></script>
</head>
<body>
<div id="i1">
	<mycom1></mycom1>
</div>


<script>
	//1. The component can have its own data
	//2. The data of the component is a little different from that of the instance. The data in the instance can be an object, but the data in the component must be a method
	//3. In addition to a method, the data in the component must return an object inside the method;
	//4. The data in the component is used in the same way as the data in the instance
	Vue.component('mycom1',{
		template:'<h1>This is a global component-----{{message}}</h1>',
		data:function(){
			return {
				message:'This is in the component data Defined data'
			}
		}
	})
	//Create Vue instance and get ViewModel
	var vm=new Vue({
		el:"#i1",
		data:{},
		methods:{}
	});
</script>
</body>
</html>
The result chart shows:
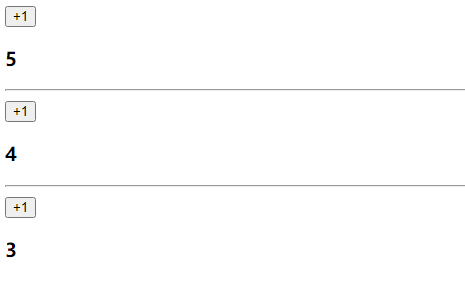
Component implementation counter:
<!DOCTYPE html>
<html>
<head>
<meta charset="UTF-8">
<title>assembly</title>
<!-- introduce vue.js -->
<script type="text/javascript" src="vue.min.js"></script>
</head>
<body>
<div id="i1">
	<counter></counter>
	<hr>
	<counter></counter>
	<hr>
	<counter></counter>
</div>
<template id="temp">
	<div>
		<input type="button" value="+1" @click="increament">
		<h3>{{count}}</h3>
	</div>
</template>

<script>

	//var dataObj={count:0}
	//This is a counter component with a button on it. Whenever you click the button, the count value in data will be + 1
	Vue.component('counter',{
		template:'#temp',
		data:function(){
			//return dataObj
			return {count:0}
		},
		methods:{
			increament(){
				this.count++
			}
		}
	})
	//Create Vue instance and get ViewModel
	var vm=new Vue({
		el:"#i1",
		data:{},
		methods:{}
	});
</script>
</body>
</html>
The result chart shows:
III. component switching
- Use v-if and v-else combined with flag to switch
<!DOCTYPE html>
<html>
<head>
<meta charset="UTF-8">
<title>assembly</title>
<!-- introduce vue.js -->
<script type="text/javascript" src="vue.min.js"></script>
</head>
<body>
<div id="i1">
	<a href="" @click.prevent="flag=true">Sign in</a>
	<a href="" @click.prevent="flag=false">register</a>

	<login v-if="flag"></login>
	<register v-else="flag"></register>
</div>


<script>


	Vue.component('login',{
		template:'<h3>Login component</h3>',

	})
	Vue.component('register',{
		template:'<h3>Register components</h3>',

	})
	//Create Vue instance and get ViewModel
	var vm=new Vue({
		el:"#i1",
		data:{
			flag:true
		},
		methods:{}
	});
</script>
</body>
</html>
The result chart shows:

- Use the component element provided by Vue to realize component switching
<!DOCTYPE html>
<html>
<head>
<meta charset="UTF-8">
<title>assembly</title>
<!-- introduce vue.js -->
<script type="text/javascript" src="vue.min.js"></script>
</head>
<body>
<div id="i1">
	<a href="" @click.prevent="comName='login'">Sign in</a>
	<a href="" @click.prevent="comName='register'">register</a>
	<!-- Vue Provided component,To display components with corresponding names -->
	<!-- component It's about placeholders, is Property, which can be used to specify the name of the component to be displayed -->
	<component :is="comName"></component>
</div>


<script>

	//The component name is a string
	Vue.component('login',{
		template:'<h3>Login component</h3>',

	})
	Vue.component('register',{
		template:'<h3>Register components</h3>',

	})
	//Create Vue instance and get ViewModel
	var vm=new Vue({
		el:"#i1",
		data:{
			comName:'' //In the current component: is the name of the bound component
		},
		methods:{}
	});
</script>
</body>
</html>- Component switching - application switching animation and mode mode mode
<!DOCTYPE html>
<html>
<head>
<meta charset="UTF-8">
<title>assembly</title>
<!-- introduce vue.js -->
<script type="text/javascript" src="vue.min.js"></script>
</head>
<style>
	.v-enter,
	.v-leave-to{
		opacity:0;
		transform:translateX(150px);
	}

	.v-enter-active,
	.v-leave-active{
		transition:all 0.5s ease
	}
</style>
<body>
<div id="i1">
	<a href="" @click.prevent="comName='login'">Sign in</a>
	<a href="" @click.prevent="comName='register'">register</a>

	<!-- adopt mode Property to set the mode during component switching -->
	<transition mode="out-in">
		<component :is="comName"></component>
	</transition>
</div>


<script>

	//The component name is a string
	Vue.component('login',{
		template:'<h3>Login component</h3>',

	})
	Vue.component('register',{
		template:'<h3>Register components</h3>',

	})
	//Create Vue instance and get ViewModel
	var vm=new Vue({
		el:"#i1",
		data:{
			comName:'' //In the current component: is the name of the bound component
		},
		methods:{}
	});
</script>
</body>
</html>
The result chart shows:
4, Component value transfer
4.1 value transfer from parent component to child component
<!DOCTYPE html>
<html>
<head>
<meta charset="UTF-8">
<title>assembly</title>
<!-- introduce vue.js -->
<script type="text/javascript" src="vue.min.js"></script>
</head>
<body>
<div id="i1">
	<!-- Parent components can be bound by attributes when referring to child components( v-bind)In the form of,
	The data to be transferred to the sub component is transferred to the sub component in the form of attribute binding for use by the sub component
	 -->
	<com1 :parentmsg="message"></com1>
</div>

<script>
	var vm=new Vue({
		el:"#i1",
		data:{
			message:'123 Data in parent component'
		},
		methods:{},
		components:{
			data(){
				//Note: the data in the child component is not passed through the parent component, but is private to the child component itself. For example, the data requested by the child component through Ajax can be put on the data
				//The data on data is readable and writable
				return {
					title:'111',
					content:'AAA'
				}
			},
			//Conclusion: after demonstration, it is found that the data on the data in the parent component and the methods in the child component cannot be accessed
			com1:{
				template:'<h1>This is a subcomponent----{{parentmsg}}</h1>',
				//Note: the data in all props in the component is passed to the child component through the parent component
				//The data in props is read-only and cannot be re assigned
				props:['parentmsg'], //Define the parentmsg attribute passed from the parent component in the props array first, so that this data can be used
			}
		}
	});
</script>
</body>
</html>
The result chart shows:
4.2 the child component passes the value to the parent component through the event call
<!DOCTYPE html>
<html>
<head>
<meta charset="UTF-8">
<title>assembly</title>
<!-- introduce vue.js -->
<script type="text/javascript" src="vue.min.js"></script>
</head>
<body>
<div id="i1">
	<!-- The parent component passes the method to the child component, using the event binding mechanism: v-on,
	After we customize an event attribute, the subcomponent can call the method passed to the scenic spot in some ways -->
	<com2 v-on:func="show"></com2>
</div>

<template id="tmpl">
	<div>
		<h1>This is a subcomponent</h1>
		<input type="button" value="This is the button in the subcomponent-Click it to trigger the information passed by the parent component func method" @click="myclick">
	</div>
</template>

<script>
	//Defines a component template object of literal type
	var com2={
			template:'#tmpl ', / / by specifying an id, it means to load the content in the template element with the specified id as the HTMl structure of the component
			data(){
				return {
					sonmsg:{name:'Xiaoyan',age:21}
				}
			},
			methods:{
				myclick(){
					//When clicking the button of the child component, how to get the func method passed by the parent component and call this method?
					//Original English meaning of emit: trigger, call and launch
					this.$emit('func',this.sonmsg)
				}
			}
	}

	var vm=new Vue({
		el:"#i1",
		data:{
			datamsgFromSon:null
		},
		methods:{
			show(data){
				//console.log('called the show method on the parent component: -- '+ data)
				console.log(data)
				this.datamsgFromSon=data
			}
		},
		components:{
			com2
		}
	});
</script>
</body>
</html>
The result chart shows:

5, Animation in Vue
5.1 use transition class name to realize animation
<!DOCTYPE html>
<html>
<head>
<meta charset="UTF-8">
<title>animation</title>
<!-- introduce vue.js -->
<script type="text/javascript" src="vue.min.js"></script>
<!-- 2.Customize two styles to control transition Internal elements to achieve animation -->
<style>
	/*v-enter [This is a time point] is the initial state of the element before entering, and it has not started entering at this time*/
	/*v-leave-to [This is a time point] is the ending state after the animation leaves. At this time, the element animation has ended*/
	.v-enter,
	.v-leave-to{
		opacity:0;
		transform:translatex(100px);
	}
	/*v-enter-active [[time period of admission animation]*/
	/*v-leave-active [Time period of departure animation]*/
	.v-enter-active,
	.v-leave-active{
		transition:all 0.8s ease
	}
</style>
</head>
<body>
<div id="i1">
	<input type="button" value="click" @click="flag=!flag">
	<!-- Demand: click the button to make h3 Show, click again, let h3 hide -->
	<!-- 1.use transition Element, wrap the elements that need to be controlled by animation -->
	<!-- transition Element, yes Vue Officially provided -->
	<transition>
		<h3 v-if="flag">This is a h3</h3>
	</transition>
</div>

<script>
	var vm=new Vue({
		el:"#i1",
		data:{
			flag:false
		},
		methods:{}
	});
</script>
</body>
</html>
The result chart shows:

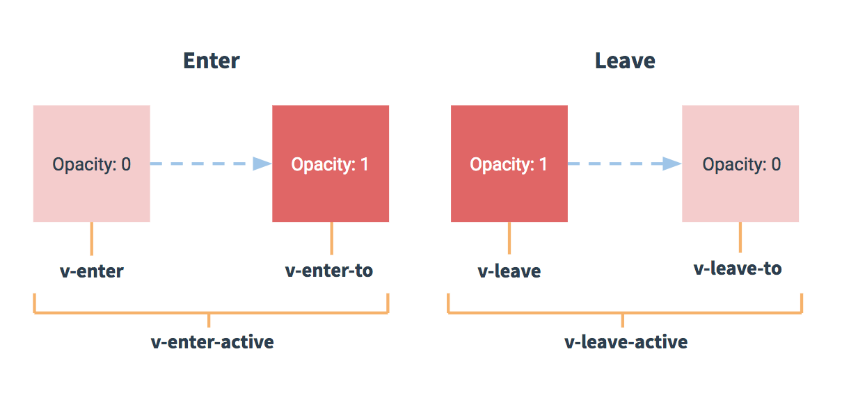
Transition is actually a fade in and fade out effect. Vue provides 6 class es to switch between displaying and hiding elements:
-
v-enter: defines the start state of the transition. Takes effect before the element is inserted and is removed at the next frame after the element is inserted.
-
v-enter-active: defines the state when the transition takes effect. Applied throughout the transition phase, it takes effect before the element is inserted and removed after the transition / animation is completed. This class can be used to define the process time, delay and curve function of entering the transition.
-
v-enter-to: version 2.1.8 and above define the end state of transition. The next frame takes effect after the element is inserted (at the same time # v-enter # is removed) and is removed after the transition / animation is completed.
-
v-leave: defines the start state of leaving the transition. Takes effect immediately when the exit transition is triggered and the next frame is removed.
-
v-leave-active: defines the state when the exit transition takes effect. Applied throughout the exit transition phase, it takes effect immediately when the exit transition is triggered and is removed after the transition / animation is completed. This class can be used to define the process time, delay and curve function of leaving the transition.
-
V - leave to: version 2.1.8 and above define the end state of leaving the transition. After the departure transition is triggered, the next frame takes effect (at the same time, # v-leave # is deleted) and is removed after the transition / animation is completed.
5.2 animation - Custom v-prefix
<!DOCTYPE html>
<html>
<head>
<meta charset="UTF-8">
<title>animation</title>
<!-- introduce vue.js -->
<script type="text/javascript" src="vue.min.js"></script>
<!-- 2.Customize two styles to control transition Internal elements to achieve animation -->
<style>
	/*v-enter [This is a time point] is the initial state of the element before entering, and it has not started entering at this time*/
	/*v-leave-to [This is a time point] is the ending state after the animation leaves. At this time, the element animation has ended*/
	.v-enter,
	.v-leave-to{
		opacity:0;
		transform:translatex(100px);
	}
	/*v-enter-active [[time period of admission animation]*/
	/*v-leave-active [Time period of departure animation]*/
	.v-enter-active,
	.v-leave-active{
		transition:all 0.8s ease
	}

	.my-enter,
	.my-leave-to{
		opacity:0;
		transform:translatey(100px);
	}
	.my-enter-active,
	.my-leave-active{
		transition:all 0.8s ease
	}
</style>
</head>
<body>
<div id="i1">
	<input type="button" value="click" @click="flag=!flag">
	<transition>
		<h3 v-if="flag">This is a h3</h3>
	</transition>
	<hr>
	<input type="button" value="click" @click="flag2=!flag2">
	<!-- to transition With a name, you can better group the animation.
	For these class names that switch in the transition, if you use one that has no name <transition>,be v- Is the default prefix for these class names -->
	<transition name="my">
		<h5 v-if="flag2">This is a h5</h5>
	</transition>
</div>

<script>
	var vm=new Vue({
		el:"#i1",
		data:{
			flag:false,
			flag2:false
		},
		methods:{}
	});
</script>
</body>
</html>
The result chart shows:
5.3 using third-party animate CSS class library to achieve animation
<!DOCTYPE html>
<html>
<head>
<meta charset="UTF-8">
<title>animation</title>
<!-- introduce vue.js -->
<script type="text/javascript" src="vue.min.js"></script>
<!-- introduce animate.min.css -->
<link rel="stylesheet" href="animate.min.css">

</head>
<body>
<div id="i1">
	<input type="button" value="click" @click="flag=!flag">
	<!-- Demand: click the button to make h3 Show, click again, let h3 hide -->
	<!-- get into: bounceIn  Leave: bounceOut-->
	<!--  <transition enter-active-class="animated bounceIn" leave-active-class="animated bounceOut">
		<h3 v-if="flag">This is a h3</h3>
	</transition>-->

	<!-- use :duration="Millisecond value" To uniformly set the animation duration when entering and leaving -->
	<!--  <transition enter-active-class="animated bounceIn" leave-active-class="animated bounceOut" :duratiion="400">
		<h3 v-if="flag">This is a h3</h3>
	</transition>-->

	<!-- use :duration="{enter:200,leave:400}" To set the admission time and departure time respectively -->
	<transition enter-active-class="animated bounceIn" leave-active-class="animated bounceOut" :duratiion="{enter:200,leave:400}">
		<h3 v-if="flag">This is a h3</h3>
	</transition>
</div>

<script>
	var vm=new Vue({
		el:"#i1",
		data:{
			flag:false
		},
		methods:{}
	});
</script>
</body>
</html>
The result chart shows:
5.4 hook function to realize small ball half court animation
<!DOCTYPE html>
<html>
<head>
<meta charset="UTF-8">
<title>animation</title>
<!-- introduce vue.js -->
<script type="text/javascript" src="vue.min.js"></script>
<style>
	.ball{
		width:15px;
		height:15px;
		border-radius:50%;
		background-color:red;
	}
</style>
</head>
<body>
<div id="i1">
	<input type="button" value="add to cart" @click="flag=!flag">
	<!-- 1.use transition The element wraps the ball -->
	<transition
		@before-enter="beforeEnter"
		@enter="enter"
		@after-enter="afterEnter">
		<div class="ball" v-show="flag"></div>
	</transition>

</div>

<script>
	var vm=new Vue({
		el:"#i1",
		data:{
			flag:false
		},
		methods:{
			//Note: the first parameter of the animation hook function: el, indicates the DOM element to execute the animation. It is a native JS DOM object
			//Can be any, el is through document The native JS DOM object obtained by getelementbyid ('') method
			beforeEnter(el){
				//beforeEnter indicates that the animation has not started before entering the field. You can set the starting style of the element before starting the animation in beforeEnter
				//Sets the starting position of the ball before it starts animation
				el.style.transform="translate(0,0)"
			},
			enter(el,done){
				//This sentence has no practical effect, but without writing, it can't produce animation effect;
				//It can be considered that El Offsetwidth forces the animation to refresh
				el.offsetHeight
				//Represents the style after the animation starts. Here, you can set the end state of the ball after the animation is completed
				el.style.transform="translate(150px,450px)"
				el.style.transition='all 1s ease'

				//Done here is actually the function of afterEnter, that is to say: done is a reference to a function
				done()
			},
			afterEnter(el){
				//After the animation is complete, after enter is called
				this.flag=!this.flag
			}
		}
	});
</script>
</body>
</html>
5.5 use transition group element to realize list animation
<!DOCTYPE html>
<html>
<head>
<meta charset="UTF-8">
<title>animation</title>
<!-- introduce vue.js -->
<script type="text/javascript" src="vue.min.js"></script>

<style>
	li{
		border:1px dashed #999;
		margin:5px;
		line-height:35px;
		padding-height: 5px;
		font-size:12px;
	}
	li:hover{
		background-color:lightblue;
		transition:all 0.8s ease
	}


	.v-enter,
	.v-leave-to{
		opacity:0;
		transform:translateY(80px);
	}

	.v-enter-active,
	.v-leave-active{
		transition:all 0.6s ease;
	}


	.v-move{
		transition:all 0.6s ease;
	}
	.v-leave-active{
		position:absolute;
	}

</style>
</head>
<body>
<div id="i1">

	<div>
		<label>
			Id:
			<input type="text" v-model="id">
		</label>

		<label>
			Name:
			<input type="text" v-model="name">
		</label>

		<input type="button" value="add to" @click="add">
	</div>
	<!--  <ul>-->
	<!-- When implementing the list transition, if the transition element is required, it is through v-for It is rendered and cannot be used transition Package, need to use transitionGroup -->
	<!-- If you want to v-for To animate elements created in a loop, you must set :key attribute -->
	<!-- to transition-group add to appear Property to achieve the effect of admission when the page is just displayed -->
	<!-- Pass for transition-group Element, setting tag Properties, specifying transition-group Render to the specified element, if not specified tag Property, default to span label -->
	<transition-group appear tag="ul">
		<li v-for="(item,i) in list" :key="item.id" @click="del(i)">
			{{item.id}}---{{item.name}}
		</li>
	</transition-group>

	<!--  </ul>-->
</div>

<script>
	var vm=new Vue({
		el:"#i1",
		data:{
			id:'',
			name:'',
			list:[
				{id:1,name:'Xiaoyan'},
				{id:2,name:'Xiao Song'},
				{id:3,name:'Small town'},
				{id:4,name:'Xiao Gao'},
			]
		},
		methods:{
			add(){
				this.list.push({id:this.id,name:this.name})
				this.id=this.name=''
			},
			del(i){
				this.list.splice(i,1)
			}
		}
	});
</script>
</body>
</html>
The result chart shows: