Record pit: when axios is used in vue, it is recorded in The this keyword used in the function function of then is not the this keyword of vue!
Solution: first define this keyword outside: var this = this; Then it can be used in function.
1. Summary
1.Only one page can exist Vue Instance, cannot create more than one Vue example.
2.vue Instance el Attribute representation vue The scope of the instance, which will be discussed later vue Can be used within the scope of the instance{{data Variable name in property}}Direct acquisition data Attribute value corresponding to variable name in.
3.vue Instance data Property is used to give the current vue Instance binding custom data, which can be bound in the future vue Directly use within the scope of the instance{{Variable name}}Method acquisition.
4.use{{}}conduct data When obtaining data in, you can{{}}Carry out arithmetic operation, logic operation and call relevant methods of relevant types in value syntax.
5.vue Instance el Property can write any css Selector, but recommended id Selector, because one vue An instance can only act on a specific scope.
1. Basic commands
v-text,v-html
v-on:click="test()",Simplified writing@click()
v-if,v-show,v-bind
v-for,v-model
2.computed calculation attribute
# Function: used to complete relevant business calculation in vue instance. When rendering a data page in the future, if the data needs to be rendered after business processing, computed can be used.

# Benefits: to improve the running performance of vue, it mainly uses computed for calculation related processing, and will cache the first calculation results, so as to facilitate the multiple use of pages in the future.

# Understanding: if a method is called multiple times in multiple places, the method will only be executed once, while the methods method is called multiple times in multiple places and will be executed multiple times.
3. Event modifier
# Event modifier
.stop Function: used to prevent event bubbling
.prevent Function: used to block the default behavior of labels
.self Function: only listen to events triggered between its own standards
.once Function: this event is triggered only once
# grammar
 @Event name.Event modifier="Event handler" ====> @click.stop="test()"
4. Key modifier
# Key modifier
	.enter
	.tab
	.delete(Capture delete and"Backspace"key)
	.esc
	.space
	.up
	.down
	.left
	.right
> For example, it is used to the event after triggering the Enter key
	<input type="text" v-model="msg" @keyup.enter="test()"/>
5. axios
Official definition: axios The asynchronous request library is not vue Official third-party asynchronous Library vue Medium recommendation axios
 Properties: 1.Create from browser XMLHttpRequests.
	 2.from node.js establish http Request.
	 3.support Promise API
	 4.Intercept request and corresponding.
	 5.Convert request data and response data.
	 6.Cancel the request.
	 7.Automatic conversion JSON data
	 8.Client support defense XSRF
1. Basic use
# 1.axios sends asynchronous request
  axios.get("http://localhost:8080/demo?id=21&name=zhangsan")
  .then(function(res){console.log(res)}) //Processing after representative's request
  .catch(function(err){console.log(err)}) //Post processing of representative request failure

# 2.axios sends various asynchronous requests
  a. axios.get("url?id=21")
  .then(function(res){res.data})
  .catch(function(err){console.log(err)})
  b. axios.post("url",{id:1,name:"zhangsan"})
  .then(function(res){res.data})
  .catch(function(err){console.log(err)})
# Note: the parameter transfer method of post is json, and the back end needs to receive it with @ RequestBody

# 3.axios creates a default instance and sends a request
  //Create a configuration object for axios
  var instance = axios.create({
  	baseURL:"http://localhost:8080/",
  	timeout:5000,
  })
  //Send get request
  instance.get("url?id=21")
  .then(function(res){res.data})
  .catch(function(err){console.log(err)})
# Note: after you have an instance here, you can directly take the instance to request. In the future, you only need to change the Url of this instance.
2. Interceptor
# interceptors
  Function: used to axios There are parameters in common, and the response public processing is handed over to the interceptor for processing, reducing axios Code redundancy when sending request
# axios interceptor type
  a. request interceptor ,this config The parameter is the requested configuration object. You can print it to know what it is.
	axios.interceptors.request.use(function (config) {
    	// What to do before sending the request
    	return config;
  	}, function (error) {
    	// What to do about request errors
    	return Promise.reject(error);
 	});

  b. Response interceptor, this response Parameters represent the data returned from the back end. You can modify the alignment or make some judgments
	axios.interceptors.response.use(function (response) {
    	// Do something about the response data
    	return response;
  	}, function (error) {
    	// Do something about response errors
    	return Promise.reject(error);
  	});
6.ES6 syntax
1. Variable declaration
Not recommended var Reason for: use var The declared variables have the problem of scope confusion
es6 ==> let const These two keywords are recommended for declaring variables

let :Used to declare local variables
Benefits: the scope of action is rigorous, from the beginning of code declaration to the end of code block. It is generally used when declaring basic variables. It is recommended let;

const: Used to declare js Medium constant
Benefit: once assigned, it cannot be modified, and it is declared js Recommended for objects or arrays in const
 For example: const student = {id:1,name:"zhangsan"};
The properties in the object are variable, and the object address is not variable.
2. Arrow function
When using anonymous functions, it is recommended to use the arrow function in es6 = >
It must be anonymous. If it is function test() {}, the arrow function cannot be used;
be careful:
- When the arrow function has no parameters or the parameters are greater than 1, you must add ().
- When the arrow function has only one parameter, () can be omitted without writing.
- When there is only one line of code in the function body, braces can be omitted.
- The biggest difference between the arrow function and the original anonymous function is that the arrow function does not have its own this, and the anonymous function has its own this
before:
function (){

};
Now?:
(parameter)=>{
    Function body
}
3. Template string
Usage syntax:` ` (Keyboard number 1 (left)
With this feature syntax, you don't have to worry about escaping strings.
let html = `<div><button οnclick="test(id)">Point me</button></div>`
4. Object definition
When defining an object, if the object property name is consistent with the variable name, write one.
 For example:
    let id = 21;
	let name = "Zhang San";
	let age = 23;
    const emp = {id,name,age};
Previous writing:
    const emp = {id:id,name:name,age:age};
7. component
What is SPA single page application?
That is, there is only one page in the future project = = = = > index html
Vue recommended development method requires that only one Vue instance can exist in an application.
In order to strictly follow the SPA development mode, vue Component is provided in vue
Components: 1.Component reduction vue Root instance code quantity
	 2.A group is responsible for completing a function or a group of functions in the project to realize business isolation
	 3.Components can also be vue Realize reuse
1. Global components
Note: whether global or local components are used, a unique root element must be added to the component template
Register vue root instance component directly
Parameter 1: component name; parameter 2: configuration object of component
Vue.component('login',{
    template: `<div><h2>User login</h2> <form acrion=""></form></div>`
}) //Registering this is the global component
Vue.component('register',{
    template: `<div><h2>User registration</h2> <form acrion=""></form></div>`
}) //Registering this is the global component

Direct when in use
<login></login>  or <register></register>
2. Local components
Note: whether global or local components are used, a unique root element must be added to the component template
Components can only be used in registered components
new Vue({
    el:"",
   	data:{},
    methods:{},
    created:{},
    components:{
        add:{
            template:`<div><h2>User add</h2><form action=""></form></div>`
        }
    }//The components of local component registration are added with s.
})

Direct when in use
<add></add>
3. Summary
Global components can be used in local components
Define the data methods computed lifecycle function and subcomponents in the component
//1. Define relevant data in the component
//a. Global components
Vue.component('Component name',{
    template:`<div><h1>{{id}}</h1></div>`,//html code used to define components
    //The data here is a method, and the return object needs to be returned
    data(){ //It is used to define the component's own data. In the future, it will directly use {}} in the component html to get values
        return{
            //For example:
            id:1,
        }
    },
    methods:{},
    computed:{},
    components:{},//Define your own components
    created(){},
})

//b. Local component
const app = new Vue({
    ......
    components:{//Used to define local components
        login:{
            template:`<div><h1>{{id}}</h1></div>`;
            //The data here is a method, and the return object needs to be returned
            data(){
        		return{
        			id: 1,
    			}
    		},
            methods:{},
            computed:{},
            components:{},//Define your own components
            created(){}
        }
    }
})
4. Transfer data from parent to child components
One way data flow: if the parent component changes, the data affecting the child components will be refreshed
//props transfers static data: it is to write a piece of data
		//Dynamic data: variable data
//Transfer data from parent component to child component:
// a. Transfer static data, declare static data key=value on the component usage label, define it inside the component, and use props array to receive data
// b. The component label states: key="value" the internal use definition of the component can receive data only by using props array

//example
			components:{
				add:{
					props:['title','count'],
					template:`<div>
					<button @click="zizeng()">User add</button>
					<h1>{{title}}---{{copyTitle}}---{{count}} -- {{copyCount}}</h1>
					</div>`,
					data(){
						return{
							copyTitle : this.title+"evaluate",
							copyCount : this.count
						}
					},
					methods:{
						zizeng(){
							console.log(this.copyCount++);
						}
					}
				}
			}
5. The parent passes events to the child and returns data to the parent component
The method name when passing events cannot use hump naming method, so it is all lowercase
<!-- Using components
 When using a component, you can pass events to the component directly by defining the pass events on the corresponding component label
@key=value
@Pass event name = "Pass event name in parent component"
-->
//Among the methods used in the component, use the following method call to pass the event name:
// this.$emit('pass event name ', parameter returned to parent component);
example:
	<body>
		<div id="app" align="center">
			{{count}}
			<login title = "1" @testperent="testPerent"></login>

		</div>
	</body>

<script>

		const login = {
			props:['title'],
			template : `
				<div>
					<h1>{{title}}</h1>
					<button @click="testChild">Click me trigger subassembly</button>
				</div>
			`,
			data(){
					return{
						count:19,
					}
			},
			methods:{
				testChild(){
					console.log(this.count)
					alert("I'm a subcomponent");
					this.$emit('testperent',this.count);//Here, call the value passed by the parent component. Parameter 1: pass the event name
                    									//Parameter 2: data returned to the parent component method. Multiple commas can be defined
				}
			}

		}
		const vue = new Vue({
			el:"#app",
			data:{
				count:2
			},
			methods:{
				testPerent(count){ //The count of this parameter is the value passed from the subcomponent
					alert('I am the parent component');
					this.count = count;
					console.log("I received the value passed from the subcomponent",count);
				}
			},
			components:{
				login,
			}
		})
	</script>
6.slot
Slot: slot
 Function: it is used to extend existing components to make components more flexible, similar to computer usb Interface
 Named slot: a slot with a name
 In the of sub components template In use<slot name ="aa"></slot> The tag represents a slot interface attached to this component( usb)
When using this component, label the label in the component label slot attribute,Attribute value is aa,Then this label will find slot Slot is aa If the slot in the component is assigned a value slot The tag will become the tag passed on.
example:
	<body>

		<div id="app" align="center">
			{{count}}
			<login>
				<span slot="aa">Ah ah ah ah</span> //The slot attribute here represents the assignment of the slot whose slot name of the subcomponent is aa
				<h1 slot="bb">I want to give you bb assignment</h1>//The slot attribute here represents the assignment of the slot whose slot name of the sub component is bb
				<button slot="cc" @click="testPerent()">Click me to change the parent count</button> //This is the same as above
                //Click the button above to call the parent method
			</login>
		</div>
	</body>

	<script src="js/Mouse.js"></script>
	<script src="js/vue.js"></script>
	<script src="js/axios.min.js"></script>
	<script>

		const login = {
			template:`
				<div>
 					//This slot label represents a usb space occupation. When using it, you can assign a value to this slot wherever you need it
					<slot name ="aa"></slot>
					<button>I'm a button</button>
					<slot name = "bb"></slot>
					<slot name = "cc"></slot>
				</div>
			`,
		}

		const vue = new Vue({
			el:"#app",
			data:{
				count:2
			},
			methods:{
				testPerent(count){
					this.count++;
				}
			},
			components:{
				login,
			}
		})
	</script>
8.Vue-Router
1. Basic use
Steps:
- Download Vue router JS and introduce it in the page
- Create a routing rule and register it in the vue instance
const router = new VueRouter({
	route:[
        {path:"/login",component:Component name,name:"Routing name"},
        //redirect
		{path:'/',redirect:"/login",name:'Login'},
         //Prevent false input
        {path:'/*',component:notFount,name:"NotFount"},
})
-
Show routing components
-
Add the switch route link (i.e. a label, for example:“ Jump to the login page < / a ">),
	<body>
		<div id="app" align="center">
			<!--3.Show routing component labels -->
			<router-view></router-view>
		</div>
	</body>
	<script src="js/Mouse.js"></script>
	<script src="js/vue.js"></script>
	<script src="js/axios.min.js"></script>
	<!-- This must be placed in vue.js Because it's vue Plug ins in -->
	<script src="js/vue-router.js"></script>
	<script>

		const login = {
			template:`<div><button>User login</button></div>`,
		}
		const register = {
			template:`<div><button>User registration</button></div>`
		}
		const notFount = {
			template:`<div><h1>404 Page lost!!!</h1></div>`
		}

		//1. Create routing configuration rules
		const router = new VueRouter({
		// 	//Each object is a path, and the routes here have no r
			routes:[
				//Configure the root path to access login. Here, redirect is used to represent redirection to login. The redirection must specify the path and cannot specify the component
				{path:'/',redirect:"/login",name:'Login'}, //The name here represents the name of the object
				{path:'/login', component:login,name:'Login'},
				{path:"/register",component:register,name:"Register"},
				{path:'/*',component:notFount,name:"NotFount"}, //This is placed at the end to prevent user input errors
			]
		});

		const vue = new Vue({
			el:"#app",
			router:router, //2. Register routing
		})
2. Two ways to switch routes
# 1. Label mode switching
1. <a href = "#/Routing path ">
2. <router-link to="/Routing path">
3. <router-link :to="{path:'/Routing path'}">
4. <router-link :to="{name:'Route name'}">

# 2.js mode switching (for example, you need to jump to a component after completing the method logic)
1. this.$router.push('/Routing path');
2. this.$router.push({path:'/Routing path'})
3. this.$router.push({name:'Route name'})

# 3.
this.$route  Represents the current routing object
this.$router Represents the routing manager object
3. Solve the problem of multiple handover errors of the same route
const originalPush = VueRouter.protoType.push;
VueRouter.prototype.push = function push(location){
    return originalPush.call(this,location).catch(err => err);
}
4. Switch route parameter transmission mode
Label switching routing
 There are two ways to transfer parameters in the address bar

# 1.queryString (in the way of "?) uses this in the component method of js$ route. query. key
 give an example:
<router-link to="{path:'/login',query:{name:'zs',password:'123'}}"></router-link>
<router-link to="{name:'Login',query:{name:'zs',password:'123'}}"></router-link>

# 2.restful path passing parameters use this in js component methods$ route. params. key
 give an example:
<router-link to="{path:'/login',params:{name:'zs',age:'12'}"></router-link>
<router-link to="{name:'Login',params:{name:'zs',age:'12'}"></router-link>
> Note: if used restful,So what is the route path The path of must be written like this to the above login Path as an example
> /login/:name/:age
> If several parameters are defined, several parameters must be passed, and the parameter name of the path must be consistent with the parameter name passed

# In the component method of js, the parameters are received in this way
const login = {
	template:`
		<div><h1>User login</h1></div
	`,
	created(){
		//All use the current routing object, not the routing manager object
		//If it's query
		this.$route.query.name;
		//If it's restful
		this.$route.params.name;
	}
}
5. Route nesting
The component of the child route must be added to the component of the parent route to display the label
		const router = new VueRouter({
			routes:[
                //The sub route cannot have /, because '/' represents the root.

				{path:"/users",component:oneComponent,name:"users",children:[
					{path:"add",component:addComponent,name:"addUser"},
					{path:"modify",component:modifyComponent,name:"modifyUser"},
				]
				},
				{path:"/",redirect:"/users"},
			]
		})
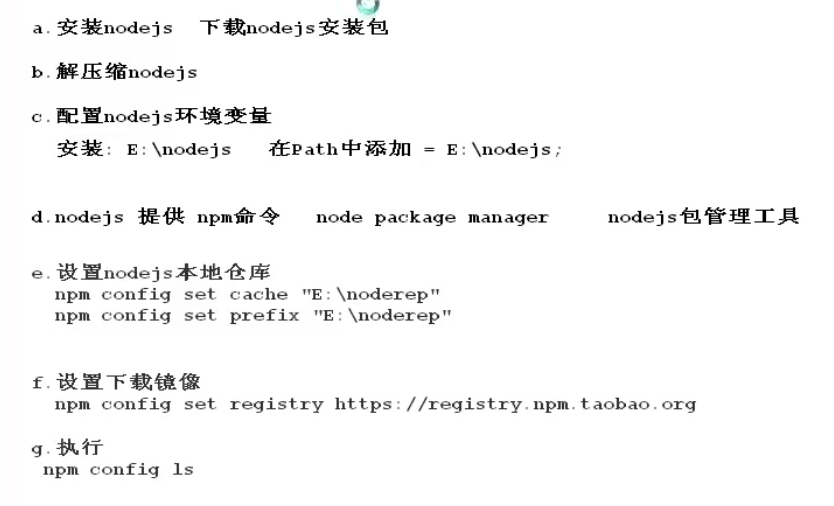
9. Use Vue cli, node js
1. Install node js
Declaration cycle of vue
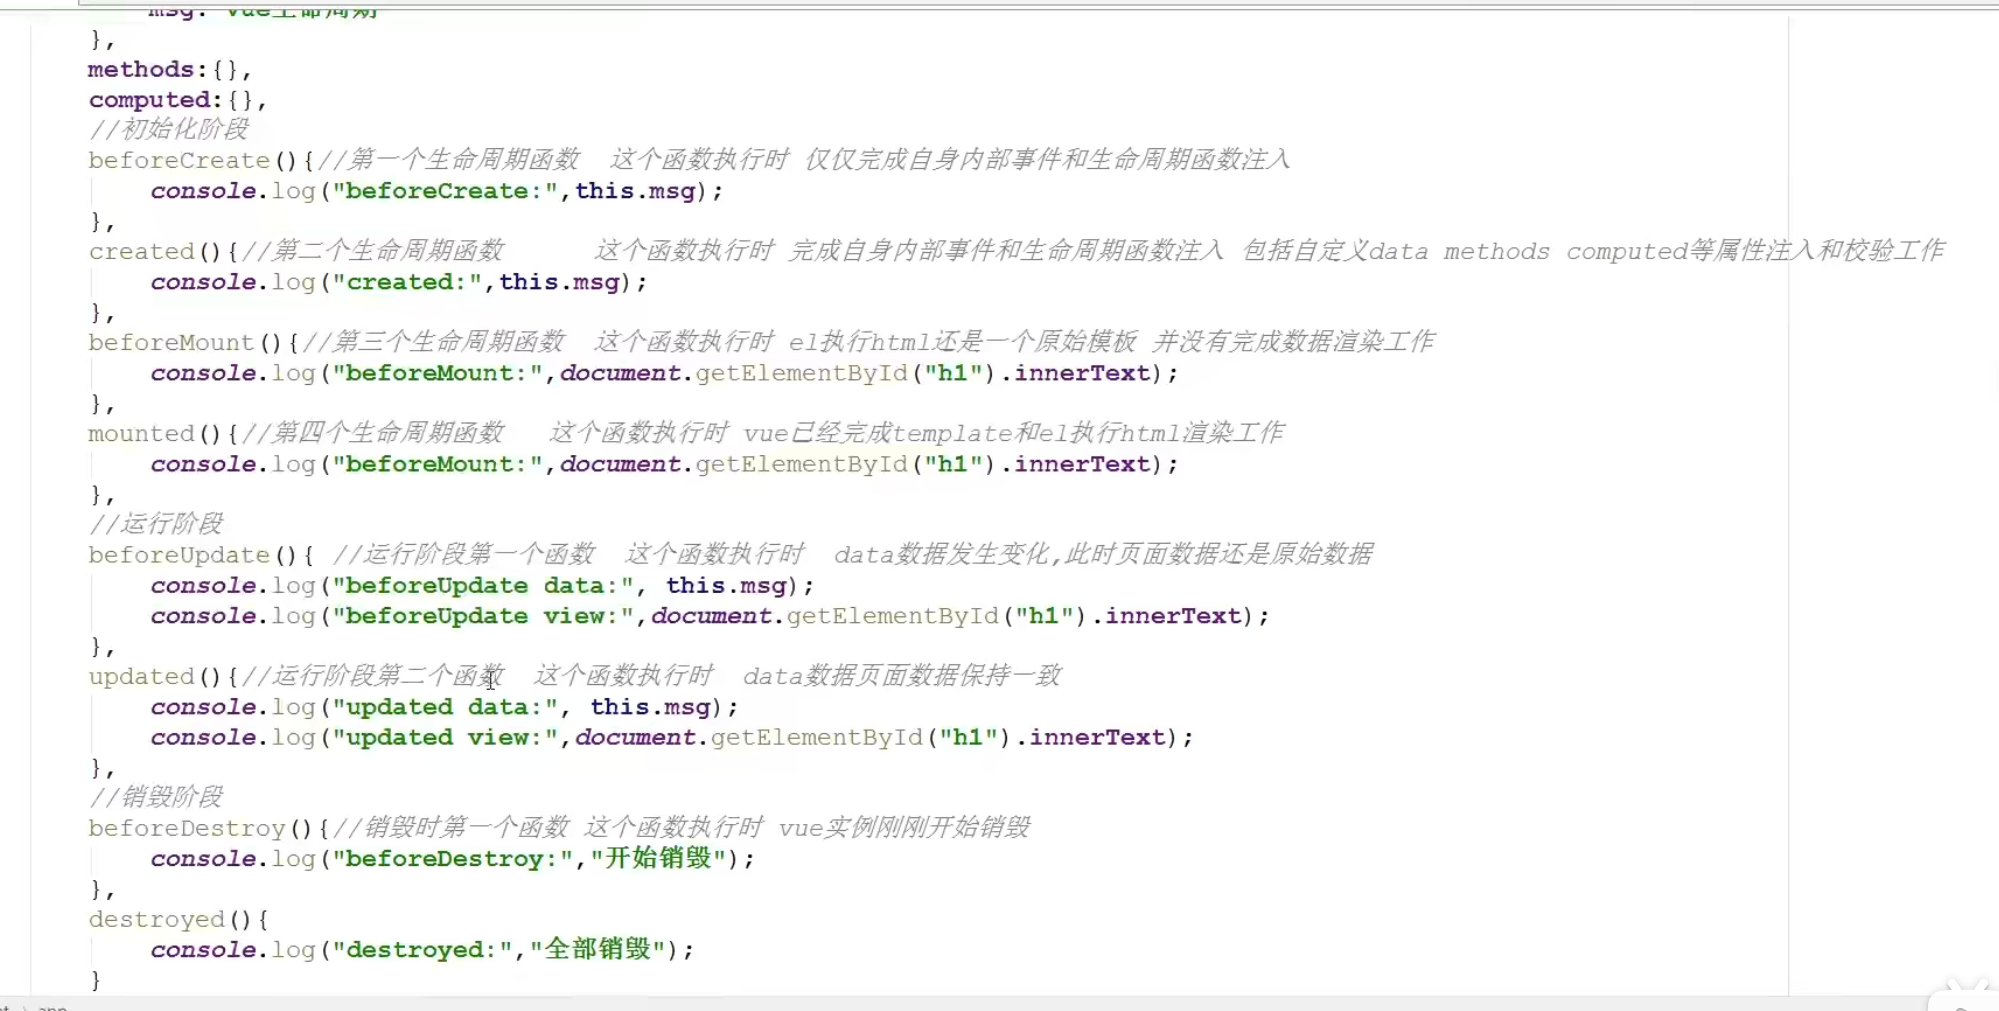
-
What is the vue life cycle
Definition: refers to the whole process from vue instance creation to destruction in the page
-
vue lifecycle hook = = > vue lifecycle function
Life cycle function hook features: it is triggered automatically during the life cycle of vue instances, and it does not need to be triggered manually
-
Three stages: initialization stage, operation stage and destruction stage.
  const vm=new Vue({
        el:"#app",
        data:{
            msg:['Jin Feipeng',"Xinhua computer"]
        },
        methods:{
            add:function () {
                console.log("add Be executed");
                this.count++
            },
            sub:function () {
                console.log("sub Be executed");
                this.count--
            }
        },

      //Initialization phase
        beforeCreate:function(){
 			//The first life cycle function, when executed, only completes its own internal events and life cycle function injection
            //Nothing in the vue instance can be obtained in this method
            console.log("beforeCreate:",this.msg);
        },
        created:function(){
            //The second life cycle function. When this function is executed, it completes the injection of its own internal events and life cycle functions, including the injection and verification of custom data, methods, computed and other attributes
            //In this method, you can get the things in the vue instance
            console.log("created:",this.msg);
        },
        beforeMount(){
          //The third life cycle function. When this function is executed, el executes html, which is still an original template and does not complete data rendering
            //We can't get the value here because we haven't finished rendering the dom tree yet
            console.log("beforeMount:",document.getElementById("h1").innerText)
        },
        mounted:function () {
            //The fourth life cycle function. When this function is executed, vue has completed the html rendering of template and el
          	//You can get the value here,
            console.log("beforeMount:",document.getElementById("h1").innerText)
        },

      	//Operation phase
      	beforeUpdate(){
            //The first function in the running stage. When this function is executed, the data changes. At this time, the page data is still the original data
            console.log("beforeUpdate data",this.msg)
            console.log("beforeMount vive",document.getElementById("h1").innerText)
        },
      	update(){
      		//The second function in the running phase. When this function is executed, the data page data is consistent
            console.log("beforeUpdate data",this.msg)
            console.log("beforeMount vive",document.getElementById("h1").innerText)
  		},

      	//Destruction phase
      	beforeDestroy(){
            //The first function when destroying When this function is executed, the vue instance has just begun to be destroyed
            console.log("Start destruction")
        },
      	destroy(){
            //Last function
            console.log("All destroyed successfully")
        }
    })