Analysis tools
Coverage: view code usage
Remove dead code
Lazy load code
Webpack bundle analyzer: view the resource tree
1. productionSourceMap:false
2. Route lazy loading
3. Close Prefetch
4. The element UI component loads on demand
5. Use CDN to load resources externally - Vue, vuex, Vue router, axios
6. Using CDN to load resources externally
7.gzip
conclusion
Postscript: do you want to split css
Analysis tools
Coverage: view code usage
Coverage is a new function of the chrome developer tool. Literally, it can be used to detect which js and css are already running and which js and css are not yet used when the website is running. As shown in the figure, this is the running and not running code displayed when I open the csdn web page.

What does this new feature do?
As shown in the figure above, the right side shows the number of css and js files we loaded. The red area indicates the code that has been run, while the cyan indicates the code that has been loaded but not run. It can be used to find the unused js and css code in the page. You can provide users with only the necessary code, which can improve the performance of the page. This is useful for finding scripts that can be split and for delaying the loading of non critical scripts.
In the data recorded above, the largest file is vendor JS, 55% of the code has not been executed, about 80 KB, which is equivalent to the file size of a typical picture.
If a file has a low coverage (i.e. a high proportion of unused code), it usually means that the user has loaded too much unnecessary code (either it is really useless code, or it is the code that has not been executed at the current time point). It is not difficult for students with performance knowledge to infer that this will slow down the full load time of the page or the startup time of the single page application, and the performance loss will be particularly obvious under the slow network. In addition, more code parsing and compilation means more hardware resource consumption, which is low There will also be obvious performance problems on end devices.
In my opinion, Coverage data can guide us to optimize WEB applications from at least the following two aspects:
Remove dead code
Taking the Coverage data as a reference, we can understand the proportion of page heavy useless code. In the real world, many engineers may work on the legacy code base, and the legacy code base still exists for a long time, so it is likely that there are a lot of useless code in the code base, but no one dares to delete them. Because of the dynamic nature of JS language, you can't roughly delete the code that looks "unused", Unless you know all the code execution paths, it is obviously unrealistic for large applications or legacy code bases.
How to remove dead code? We can rely on packaging tools, such as UglifyJS, which supports the direct deletion of configuration items of dead code when compressing code. The Webpack 2 introduces the Tree Shaking feature, which can automatically remove the code not used in the project from the package, but this optimization is limited to the export ed code. In short, dead code should be removed as much as possible, and the Coverage tool can provide a judgment benchmark.
Lazy load code
If the dead code that can be deleted is deleted, but the Coverage data is still high, you should think from another angle. As mentioned earlier, JS is a dynamic language, and some codes may not be used when the page is loaded, but the user's subsequent operations will trigger the execution of these codes. Why not let these codes be loaded when necessary? Smart, you may have thought that this is the technology of lazy loading.
If Webpack is used for packaging without special configuration tuning, it will package all dependencies into a huge file by default, which is prone to low coverage of first loading. For lazy loading in Webpack, please refer to Code Splitting and bundle loader. The specific configuration details will not be discussed here. Using lazy loading can greatly reduce the code downloaded for the first time, so as to improve performance. It should be noted that lazy loading optimization needs to strike a balance between the number of modules and the size of modules. Otherwise, too many lazy modules will be detrimental to performance, because each HTTP request also has additional overhead.
Webpack bundle analyzer: view the resource tree
I use Vue cli 3.0. I need to install the plug-in webpack bundle analyzer first (npm installation will be slow, and cnpm is recommended)
cnpm i webpack-bundle-analyzer
In Vue config. JS to add the configuration of the analysis tool:
module.exports = {
  chainWebpack: (config) => {
    /* Add analysis tool */
    if (process.env.NODE_ENV === 'production') {
      config
        .plugin('webpack-bundle-analyzer')
        .use(require('webpack-bundle-analyzer').BundleAnalyzerPlugin)
        .end()
      config.plugins.delete('prefetch')
    } else {
    }
  }
}
Rerun
npm run build --report
A project packaging diagram will be opened in the browser to visually compare the size of each bundle file.

Start slimming
1. productionSourceMap:false
Modify Vue config. Configuration in JS
module.exports = {
  outputDir: `${srcFile}`, // Directory of files generated during npm run build type:string, default:'dist'
  productionSourceMap: false, // Whether to generate the sourceMap file when building the production package. false will improve the construction speed
}
Change the productionSourceMap to false. Otherwise, some map files will appear in the final packaged file. The function of the map file is that after the project is packaged, the code is compressed and encrypted. If an error is reported during operation, the output error information cannot accurately know where the code is reporting an error.
With a map, you can output exactly which row and column are wrong like unencrypted code.
If you don't turn it off, the production environment can see the source code through the map file.
2. Route lazy loading
In router JS file, the original static reference mode
import ShowBlogs from '@/components/ShowBlogs'

routes:[ path: 'Blogs', name: 'ShowBlogs', component: ShowBlogs ]
Change to
routes:[ path: 'Blogs',name: 'ShowBlogs',component: () => import('./components/ShowBlogs.vue')
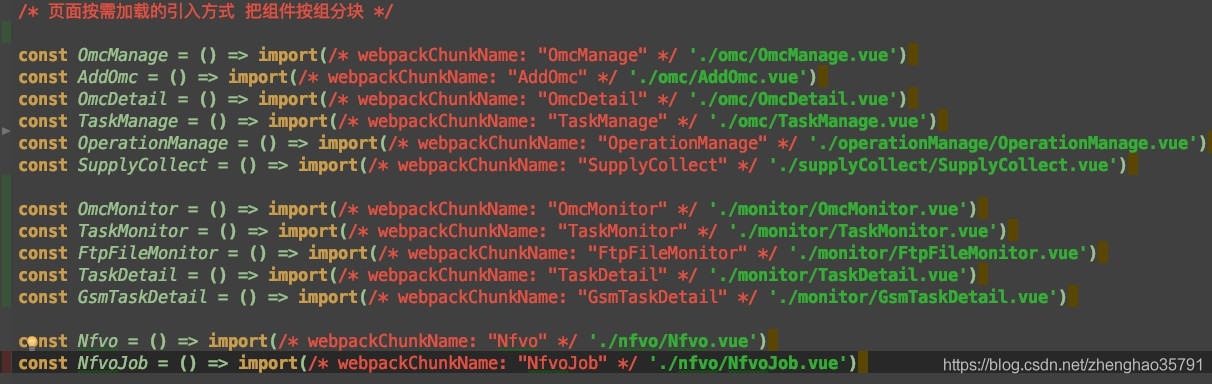
It is dynamically introduced in the form of a function, so that the respective routing files can be packaged separately. The routing component will be downloaded only when the given route is parsed.
3. Turn off Prefetch
Because vuecli 3 enables prefetch (preload module) by default to obtain the content that users may access in the future
On the first screen, you will download more than a dozen routing files at one go
So we want to turn off this function in Vue config. JS
Refer to the official website:

4. Element UI components are loaded on demand
The dependency package to be loaded on the first screen, of which element UI takes up 568k
The original introduction method introduced the whole package:
import ElementUI from 'element-ui'
Vue.use(ElementUI)
On demand import
With the help of Babel plugin component, we can only introduce the required components to reduce the project volume.
First, install the Babel plugin component:
npm install babel-plugin-component -D
Then, the babelrc is modified as:
{
  "presets": [["es2015", { "modules": false }]],
  "plugins": [
    [
      "component",
      {
        "libraryName": "element-ui",
        "styleLibraryName": "theme-chalk"
      }
    ]
  ]
}
Next, if you only want to introduce some components, such as Button and Select, you need to use main JS to write the following:
import Vue from 'vue';
import { Button, Select } from 'element-ui';
import App from './App.vue';

Vue.component(Button.name, Button);
Vue.component(Select.name, Select);
/* Or write as
 * Vue.use(Button)
 * Vue.use(Select)
 */

new Vue({
  el: '#app',
  render: h => h(App)
});
Note: some components are imported in different ways. Please refer to the official website of element for details.
Vue.prototype.$alert = MessageBox.alert;
Vue.prototype.$confirm = MessageBox.confirm;
...
5. Use CDN to load resources - Vue, vuex, Vue router, axios
Vue, vuex, Vue router, axios, etc. can be configured by using the externals parameter of wenpack. Here, we set that it only needs to be used in the production environment:
// vue.config.js
const isProduction = process.env.NODE_ENV === 'production';
const cdn = {
    css: [],
    js: [
        'https://cdn.bootcss.com/vue/2.5.17/vue.runtime.min.js',
        'https://cdn.bootcss.com/vue-router/3.0.1/vue-router.min.js',
        'https://cdn.bootcss.com/vuex/3.0.1/vuex.min.js',
        'https://cdn.bootcss.com/axios/0.18.0/axios.min.js',
    ]
}
module.exports = {
    chainWebpack: config => {
        // Production environment configuration
        if (isProduction) {
            // cdn injection into production environment
            config.plugin('html')
                .tap(args => {
                    args[0].cdn = cdn;
                    return args;
                });
        }
    },
    configureWebpack: config => {
        if (isProduction) {
            // Introduced by cdn
            config.externals = {
                'vue': 'Vue',
                'vuex': 'Vuex',
                'vue-router': 'VueRouter',
                'axios': 'axios'
            }
        }
    },
}
```javascript
<!DOCTYPE html>
<html lang="zh">

<head>
  <meta charset="utf-8">
  <meta http-equiv="X-UA-Compatible" content="IE=edge">
  <meta name="viewport" content="width=device-width,initial-scale=1.0">
  <!-- use CDN of CSS file -->
  <% for (var i in htmlWebpackPlugin.options.cdn && htmlWebpackPlugin.options.cdn.css) { %>
    <link href="<%= htmlWebpackPlugin.options.cdn.css[i] %>" rel="preload" as="style">
    <link href="<%= htmlWebpackPlugin.options.cdn.css[i] %>" rel="stylesheet">
  <% } %>
  <!-- use CDN of JS file -->
  <% for (var i in htmlWebpackPlugin.options.cdn && htmlWebpackPlugin.options.cdn.js) { %>
    <link href="<%= htmlWebpackPlugin.options.cdn.js[i] %>" rel="preload" as="script">
  <% } %>
</head>

<body>
  <noscript>
    <strong>We're sorry but eye-admin doesn't work properly without JavaScript enabled. Please enable it to continue.</strong>
  </noscript>
  <div id="app"></div>
  <!-- built files will be auto injected -->
  <% for (var i in htmlWebpackPlugin.options.cdn && htmlWebpackPlugin.options.cdn.js) { %>
    <script src="<%= htmlWebpackPlugin.options.cdn.js[i] %>"></script>
  <% } %>
</body>
</html>
6. Use CDN to load resources externally
This optimization is mainly aimed at ecarts, and on-demand loading is also mentioned in its document, but we don't need on-demand loading this time. I want to kill ecarts completely.
First, in index The external CDN of ecarts is introduced into HTML (if map components are required, they also need to be introduced)
//index.html
<script src="https://cdn.bootcss.com/echarts/4.1.0/echarts.min.js"></script>
Copy the code and then in webpack base. config. JS, make the following changes
// module. Add external objects in exports
	module.exports = {
    	externals: {
        	"echarts": "echarts"        //The default is the global variable exposed by the library referenced by the configuration (in this case, echarts)
    	},
}
7.gzip
After unpacking, we use gzip for compression
install compression-webpack-plugin
cnmp i compression-webpack-plugin -D
In Vue congig. Introduce and modify webpack configuration in JS
const CompressionPlugin = require('compression-webpack-plugin')

configureWebpack: (config) => {
        if (process.env.NODE_ENV === 'production') {
            // Modify configuration for production environment
            config.mode = 'production'
            return {
                plugins: [new CompressionPlugin({
                    test: /\.js$|\.html$|\.css/, //Match file name
                    threshold: 10240, //Compress data over 10k
                    deleteOriginalAssets: false //Delete original file
                })]
            }
        }
We also need to configure the server accordingly
If the browser sending the request supports gzip, send it a file in gzip format
My server is built with express framework
As long as you install compression, you can use it
const compression = require('compression')
app.use(compression())
conclusion
- In case of webpack packaging performance problems, first perform NPM run build report analysis for a wave, and then make corresponding optimization according to the analysis results. Whoever occupies a large volume will do it Routing a lot of complex pages, routing lazy loading must be done
- Many libraries now provide the function of loading on demand. If necessary, you can load on demand according to the practice of official documents
- The externals provided by webpack can cooperate with the external resource CDN to easily and significantly reduce the packaging volume. It is suitable for libraries such as echarts, jQuery and lodash that expose a global variable
- Don't forget to turn on Gzip compression
- This article only focuses on the optimization of webpack level. Performance optimization is not only these, but also other aspects, such as page rendering optimization (reducing rearrangement), network loading optimization and so on.
- Determine the necessity of introduction
- With the development of the front end, if the project adopts MVVM mode framework and two-way data binding, it can not be said that there is no need to introduce libraries like jQuery, at least it can be said that there is no need to introduce them. If you still have some concerns, you can refer to you right not need jQuery; It's not easy to introduce such a behemoth and add trouble to the problem that can be solved by writing a few lines of code in native language.
- Avoid class library references instead of
- If this happens, it will not only be large but also lose the whole packaging volume. Once the project is large, it is difficult to ensure that each introduced class library is useful, especially for secondary development. Therefore, the use of tools is very necessary. It is strongly recommended to use tools such as Eslint, inject corresponding rules, and give mandatory reminders to the declared but unused code; This can not only effectively avoid similar situations (also applicable to the detection of common variables), but also make the team code style as similar as possible; To know that the code complies with the rules enough, it can also make the compression tool compress the code more effectively, killing more with one stone. Why not?
Postscript: do you want to split css
vuecli 3 and vuecli 2 X has another difference
vuecli 3 will open a css separation plug-in ExtractTextPlugin by default
The css files of each module will be separated. There are 13 css files, and our home page requests 4, which takes a lot of resource request time
We can be in Vue config. JS
css: {
// Whether to use the css separation plug-in ExtractTextPlugin
extract: false,
// Open CSS source maps?
sourceMap: false,
// css preset configuration item
loaderOptions: {},
// Enable CSS modules for all CSS / pre processor files
modules: false
}

There is no css folder in the packaged file
Instead, an integrated js file is responsible for injecting all styles at the beginning
The number of files loaded on the first screen decreases, but the volume becomes larger. There is no big difference in the final measurement speed
Therefore, different people have different opinions on whether to split css, and analyze specific projects