Vue practice foundation arrangement
Recently, I was reading the project source code and systematically learning the classic development architecture of SpringBoot+Vue, but today I opened the back-end code I wrote before and found that many of them had forgotten, so I decided to stop and summarize the problems encountered this week for later review.
1. Vue project start
initialization
#Enter project directory
vue init webpack Project name
#Add dependent files
npm install
#Note that different projects may require different dependencies. To run completed projects, just click to make the IDE complete automatically. It will be downloaded automatically according to package-lock.json. Of course, the initialized new projects need to be installed by themselves
npm install webpack -g
npm install webpack-cli -g
//Other commands are not listed here
Pay attention to the warning during installation. Don't use force to repair
Basic architecture
- build – construction file
- config - configuration file
- node_modules - dependencies (used with package-lock.json, equivalent to downloading from it, similar to maven)
- scr
- assets: used to store resource files
- Components: used to store Vue functional components
- views: used to store Vue view components
- Router: used to store Vue router configuration
- APP.vue – root component of page entry file Vue
- main.js – program entry file (entry JS file)
- package.json – there are program running instructions, which can be clicked
Note that in Vue, @ /... Path usually refers to the src root directory, and the above four parts belong to this root directory
vue file format
APP.vue
<template>
  For writing HTML Front end file in format
</template>

<script>
Import vue File, or directly new,The essence here is to write js Place
import HelloWorld from './components/HelloWorld'

export default {
  //The module specifies the output by default to facilitate the introduction of other components
  name: 'App',
  components: {
    HelloWorld
  }
}
</script>

<style>
css file location
</style>
2. Vue integration UI framework development
Integrate element UI
- install
npm i element-ui -S
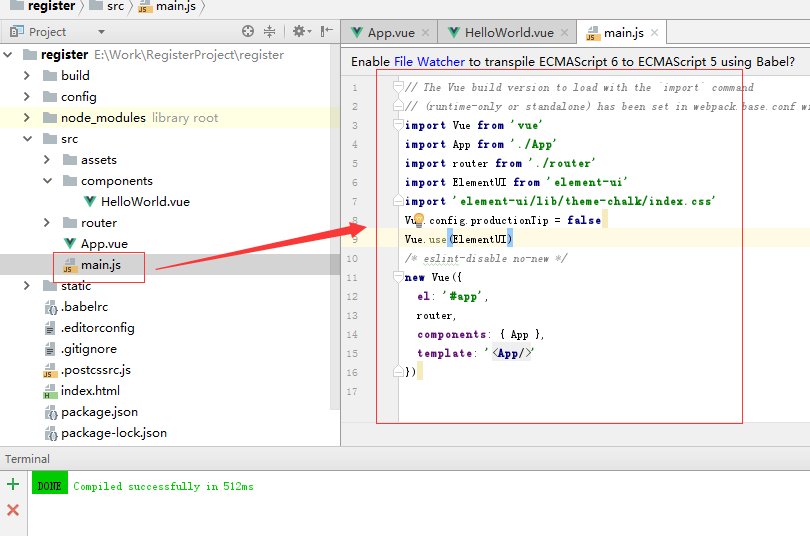
- Modify main.js
import Vue from 'vue'
import App from './App'
import router from './router'
import ElementUI from 'element-ui'
import 'element-ui/lib/theme-chalk/index.css'
Vue.config.productionTip = false
Vue.use(ElementUI)
3. Use
<template>
<div class="hello">
<h1>{{ msg }} </h1>
<h2>Essential Links </h2>
<el-button>Default button </el-button>
<el-button type="primary">Main button </el-button>
<el-button type="text">text button </el-button>
</div>
</template>
<script>
export default {
name: 'hello',
data () {
return {
msg: 'Welcome to Your Vue.js App'
}
}
}
</script>
<!-- Add "scoped" attribute to limit CSS to this component only -->
<style scoped>
h1, h2 {
font-weight: normal;
}
ul {
list-style-type: none;
padding: 0;
}
li {
display: inline-block;
margin: 0 10px;
}
a {
color: #42b983;
}
</style>
Run successfully!
details
Note that it is best to use self closing labels in APP.vue to insert components
<Login/>
There can only be one child element in the vue file. If there are two, they need to be added
<div></div>
Component call name note
-
The name and label referenced in the template are the external names of the sub components. After adding, the system will automatically import
-
HelloWorld==hello-world
3. Use of Vue basic UI components
It is suggested to study this part in combination with official documents and examples
El dialog usage
This is the dialog box in el
Trigger startup dialog box
<el-button type="text" @click="dialogVisible = true">Click open Dialog</el-button>
<el-dialog  :visible.sync="dialogVisible" width="900px">
.....Can insert content....
</el-dialog>
Pay attention to initialization dialogVisible
<script>
export default {
  name: 'add-nodes',
  data () {
    return {
      dialogVisible: false
    }
  }
}
</script>
Introduction to basic usage and properties
:visible.sync=Property binding display and hide//This is very important and is the key to whether the dialog box appears or not
El form usage
Form Validation
<el-form  :model="nodesForm"  ref="nodesForm"  label-width="100px" class="demo-ruleForm">
      <div class="node-model-content" style="padding-left: 0">
      <div >
          <el-form-item label="IP:" :prop="index + '.ip'" style="display: inline-block" :rules="[]">
            <el-input  style="width: 150px;" maxlength="16"></el-input>
          </el-form-item>
     </div>
      </div>
    </el-form>
    The middle can be added div and el-form-item
Introduction to basic usage and properties
:model  The data structure of the whole form
ref: After binding, it can be later js Used in $refs
label-width width
class classification
Child element
<el-form-item label="IP:" :prop="index + '.ip'" style="display: inline-block" :rules="[]">
          <el-input  style="width: 150px;" maxlength="16"></el-input>
          </el-form-item>
label:Display label
prop: afferent form of model Field of
style="display: inline-block;"
Handle the height and width of non replacement elements in the line:
rules: Inspection rules
For non replacement elements in the line, such as duspan, a and other labels, under normal circumstances, you can't set zhi width and height. After adding this attribute, you can trigger such labels to behave like block level elements, and you can set width and height.
Renders the object as an inline object, but the content of the object is rendered as a block object. Subsequent inline objects are arranged in the same row. For example, we can give a link (a element) inline block attribute value, so that it has both the width and height characteristics of block and the peer characteristics of inline.
4. Vue routing settings
There are three basic concepts in routing: route, routes and router
- Route, which is a route, can also be seen from this English word. It is singular. The home button = > Home content, which is a route, and the about button = > about content, which is another route.
- Routes is a group of routes. Each route above is combined to form an array. [{home button = > Home content}, {about button = > about content}]
- Router is a mechanism, equivalent to a manager, which manages routes. Because routes only defines a group of routes, where is it static? What should I do when a real request comes? What happens when the user clicks the home button? At this time, the router works. It goes to routes to find the corresponding home content, so the home content is displayed on the page.
- The routing in the client is actually the display and hiding of dom elements. When the home content is displayed in the page, all the contents in about are hidden, and vice versa. There are two ways to implement client-side routing: hash based and html5 history api based
Create a simple routing structure
1.router index.js
Summarize the simple routing structure
1. Create the router folder and create the JS file index.js
import Vue from "vue";
import Router from "vue-router";
//Note that dependencies may need to be downloaded during the introduction process

import HiWorld from "../components/HiWorld";
import AddNodes from "../components/add-nodes";
//The package will be automatically imported when importing components

Vue.use(Router);
const routes = [
  {
    path:"/home",
    component: HiWorld
  },
  {
    path: "/add-nodes",
    component:AddNodes
  },

    path: '/',
    redirect: '/home'
  }
]
var router =  new Router({
  routes
});
export default router;
2. Modify the main.js file
import Vue from 'vue'
import App from './App'

import router from "./router"

Vue.config.productionTip = false
//Add this line and add router in new
Vue.use(router);

/* eslint-disable no-new */
new Vue({
  el: '#app',
  components: { App },
  template: '<App/>',
  router,
})
3.APP.vue can use routing
 <!-- router-link Define which path to navigate to after clicking -->
<router-link to="/add-nodes">add-nodes</router-link>
<router-view></router-view>
 <!-- Or directly enter the path jump -->
Lazy loading
When packaging and building applications, JavaScript packages become very large, affecting page loading. If we can divide the components corresponding to different routes into different code blocks, and then load the corresponding components when the route is accessed, it will be more efficient.
component:resolve => require(['@/views/components/help'],resolve)
#Question
vue projects are often combined with the official route manager of vue router. The default mode of vue router is hash mode, and there will be one in the browser URL address # just change another mode of vue router, history mode (index.js setting in router)
var router =  new Router({
  mode:'history',
  routes
});
export default router;