because Vue Due to the lack of support for routing during development, the vue router plug-in was officially added. vue's single page application is based on Routing and components. Routing is used to set access paths and map paths and components. The traditional page application uses some hyperlinks to realize page switching and jump. In vue router single page applications, it is the switching between paths, which is actually the switching of components. Routing is the path manager of SPA (single page application). Generally speaking, vue router is our WebApp link path management system.
some friends will have doubts. Why can't we write links directly with the a tag as before? Because we generally use Vue to do single page applications with only one main page index.html, the < a > < / a > tag you write does not work. We need to use Vue router for management.
1, Installation
Method 1: Download separately and import manually:
Yarn add Vue router ---- install routing command
Introduce in main.js
//1. Import route
import VueRouter from 'vue-router'
// 2. In vue, Vue.use() needs to be called when using vue plug-ins
//Using routing plug-ins
Vue.use(VueRouter)
//3. Create routing rule array
const routes = [
  {
    path: "/find",
    component: Find
  },
  {
    path: "/my",
    component: My
  },
  {
    path: "/part",
    component: Part
  }
]
//4. Create routing object - incoming rule
const router = new VueRouter({
  routes
})
//5. Associate to vue instance

new Vue({
  router
})


//6. Import the component component in the component and replace it with the following label
<router-view></router-view>
Method 2: use Vue cli scaffold to build the project
The configuration process will select whether to use routing (see for details) Vue cli scaffold ), if y is selected, the Vue router will be automatically downloaded later
If you use it in a modular project, you must explicitly install the routing function through Vue.use(). Vue cli is used to produce our project structure. There will be a router folder under the src file directory, which is the place to write routing components. In src/router/index.js, this file is the core file of routing
// src/router/index.js file

import Vue from 'vue'   //Introducing Vue
import Router from 'vue-router'  //Introducing Vue router
import Hello from '@/components/Hello'  //Introduce the Hello.vue component in the root directory

Vue.use(Router)  //Vue global use Router

export default new Router({
  routes: [              //Configure routing. Here is an array
    {                    //Each link is an object
      path: '/',         //Link path
      name: 'Hello',     //Route name,
      component: Hello   //Corresponding component template
    },{
      path:'/hi',
      component:Hi,
      children:[        //Sub route, nested route (steal a lazy here to avoid listing it separately)
        {path:'/',component:Hi},
        {path:'hi1',component:Hi1},
        {path:'hi2',component:Hi2},
      ]
    }
  ]
})
2, Declarative navigation (jump)
Before describing declarative navigation, describe router link And router-view
1.router-link Is a component. By default, it will be rendered as an a tag with a link, and the link address is specified through the to attribute.
Note: the selected router link will automatically add a class attribute value. Router link active (as shown below:)
-
The hash value path in the router link exact active (exact match) url is exactly the same as the href attribute value. Set this kind of name
-
The hash value in the router link active url contains the path of the href attribute value
<router-link to="/">[text]</router-link>
- To: navigation path. You need to fill in the path value you configured in the router/index.js file. If you want to navigate to the default home page, you only need to write to = "/",
- [text]: is the navigation name we want to display to the user.
2.router-view Used to render matching components. (extension)
① transition can be set for router view component( Common usage of Vue2.0 Transition).
<transition name="fade">
  <router-view ></router-view>
</transition>
css transition class name:
In the process of component transition, there will be four CSS class names to switch. These four class names are related to the name attribute of transition, such as name="fade". There will be the following four CSS class names:
- Fade enter: enter the start state of the transition. The element takes effect when it is inserted. It is deleted immediately after only one frame is applied.
- Fade enter active: enter the end state of the transition. The element takes effect when it is inserted and is removed after the transition process is completed.
- Fade leave: it leaves the start state of the transition. It is triggered when the element is deleted. It is deleted immediately after only one frame is applied.
- Fade leave active: leaves the end state of the transition. The element takes effect when it is deleted. It is deleted after the transition is completed.
From the above four class names, we can see that fade enter active and fade leave active are valid during the whole entry or exit process, so the transition attribute of CSS is set under these two classes.
Transition mode:
- In out mode (default in out mode): the new element enters the transition first, and then the current element leaves the transition.
- Out in: the current element leaves first, and the new element enters after leaving.
② . it can also be used in conjunction with < keep alive >. Keep alive can cache data so that the data of the previous routing component will not be cleared when re rendering the routing component. For example, after some DOM operations are performed on the current routing component A, click to enter another routing component b, and then return to routing component A. the previous DOM operations are still saved in if you do not add Ke When EP live returns to routing component A, the previous DOM operations are gone and have to be repeated. If there is a shopping cart component in your application, keep alive is required.
<transition>
  <keep-alive>
    <router-view></router-view>
  </keep-alive>
</transition>
Get to the point:
2.1 declarative navigation - basic use
Objective: the global component router link can be used to replace the a tag
-
Vue router provides a global component router link
-
Router link will eventually render as a link. The to attribute is equivalent to providing the href attribute (to does not need #)
-
Router link provides the function of declarative navigation and highlighting (with its own class name)
<template>
  <div>
    <div class="footer_wrap">
      <router-link to="/find">Discover music</router-link>
      <router-link to="/my">My music</router-link>
      <router-link to="/part">friend</router-link>
    </div>
    <div class="top">
      <router-view></router-view>
    </div>
  </div>
</template>

<script>
export default {};
</script>

<style scoped>
/* Other styles are omitted */
.footer_wrap .router-link-active{
  color: white;
  background: black;
}
</style>
Summary: for link navigation, route link is used to cooperate with to to realize Click to switch routes
2.2 declarative navigation - jump parameters
Objective: when jumping a route, you can pass values to the components corresponding to the route
Pass the value of the to attribute on the router link. The syntax format is as follows
-
/path? Parameter name = value
-
/Path / value - the routing object needs to configure path in advance: "/ path / parameter name"
The corresponding page component receives the passed value
-
$route.query. Parameter name
-
$route.params. Parameter name
Steps:
1. Create components/Part.vue - prepare to receive the parameters and values passed on the route
<template>
  <div>
      <p>Focus on stars</p>
      <p>Find wonderful</p>
      <p>Find partners</p>
      <p>Join us</p>
      <p>name: {{ $route.query.name }} -- {{ $route.params.username }}</p>
  </div>
</template>
2. Route definition (added in routing rules)
{
    path: "/part",
    component: Part
  },
  {
    path: "/part/:username", // Yes: the path represents the specific value to be received
    component: Part
  },
3. Navigate to jump and pass the value to MyGoods.vue component
<router-link to="/part?name=Biography">friend-Biography</router-link>
<router-link to="/part/Xiao Zhi">friend-Xiao Zhi</router-link>
Summary:
? key=value, use $route.query.key to get the value
/Value Use $route.params.key in the routing rule / path/:key in advance
3: Programming navigation
3.1 programmed navigation - basic use
Goal: jump with JS code (declarative use to)
Syntax:
this.$router.push({path: "routing path"})
this.$router.push({name: "routing name"})
1.main.js - name the route in the route array
{
    path: "/find",
    name: "Find",
    component: Find
},
{
    path: "/my",
    name: "My",
    component: My
},
{
    path: "/part",
    name: "Part",
    component: Part
},
2.App.vue - programmed navigation jump with js
<template>
  <div>
    <div class="footer_wrap">
      <span @click="btn('/find', 'Find')">Discover music</span>
      <span @click="btn('/my', 'My')">My music</span>
      <span @click="btn('/part', 'Part')">friend</span>
    </div>
    <div class="top">
      <router-view></router-view>
    </div>
  </div>
</template>
<script>
// be careful:
// Although the name is used to jump, the hash value of the url still switches the path value
// Scenario:
// Easy to modify: name route name (can't be seen on the page, just defined)
// The path can be seen in the hash value of the url (try to conform to the specifications within the group)

export default {
  methods: {
    btn(targetPath, targetName){
      this.$router.push({
        // path: targetPath, / / mode 1: path jump
        name: targetName     // Method 2:name jump
      })
    }
  }
};
</script>
3.2 programmed navigation - jump transfer parameters
Syntax:
//Corresponding route reception $ route.params. Parameter name Value
//Corresponding route reception $ route.query. Parameter name Value
//Important: path automatically ignores params
//Recommendation: pass parameters in name+query mode
//Note: if the "hash value and" parameter "on the current url are consistent with the" hash value and "parameter" you want to jump to, the problem of redundant navigation will arise and the route will not be jumped
In app.vue
<template>
  <div>
    <div class="footer_wrap">
      <span @click="$router.push({ path: '/find' })">Discover music</span>
      <span @click="$router.push({ path: '/my' })">My music</span>
      <span @click="btn('Part')">Friend 1</span>
      <span @click="oneBtn">Friend 2</span>
      <span @click="twoBtn">Friend 3</span>
    </div>
    <div class="top">
      <router-view></router-view>
    </div>
  </div>
</template>
<script>
export default {
methods: {
// 1. Click to pass the name parameter to match the name attribute value in the routing rule
btn(uname) {
// The push mode can save the history, and you can directly click back to move forward
// replace mode does not save history
this.$router.push({
name: uname,
// path: targetPath,
});
},
//2.path mode (query is used for receiving)
oneBtn() {
this.$router.push({
// path: "/part/?name = small",
//Send parameters in the form of query string and receive them with $route.query.name
path: "/part/reere",
//Pass parameters in the form of dynamic parameters. After configuring path: '/part/:uname' in routing rules, receive parameters with $route.params.uname,
// You can also pass parameters in the form of query alone
// query: {
// name: "dada",
// },
});
},
twoBtn() {
this.$router.push({
name: "Part", //A matching component is required in the routing object
// To pass parameters in params, you need to use the $route.params. Attribute name in the corresponding component
params: {
uname: "Biography",
},
// If parameters are passed in params, you need to use $route.query. Attribute name in the corresponding component
query: {
name: "Xiao Zhi",
},
});
},
},
};
</script>In Part.vue In component
<template>
  <div>
    <p>Focus on stars</p>
    <p>Find wonderful</p>
    <p>Find partners</p>
    <p>
      Query string value receiving:{{ $route.query.name }}-------Dynamic value transmission and reception:{{
        $route.params.uname
      }}
    </p>
  </div>
</template>

<script>
export default {

};
</script>

<style>
</style>
In routing rules:
{
        path: '/find',
        component: Find,
        children: [{
                path: "recommend",
                component: Recommend
            },
            {
                path: "ranking",
                component: Ranking
            },
            {
                path: "songlist",
                component: SongList
            }
        ]
    },
    {
        path: '/my',
        component: My
    },
    {
        path: '/part',
        name: 'Part',
        component: Part
    },
    // When the values of dynamic parameters are passed, the rule array needs to be configured
    {
        path: '/part/:uname',
        component: Part
    },
4, vue routing Redirection of
Target: forcibly switch to the target path after matching the path
-
The default hash value of web page opening url is / path
-
Redirect is to set which routing path to redirect to
const routes = [
  {
    path: "/", // Default hash value path
    redirect: "/find" // Redirect to / find
    // The path in # the browser url is changed to / find - rematch array rule
  }
]
Define route - 404 page
At the end of the route, the path matches * (any path) – if the previous does not match, the last one will be hit, and the corresponding component page will be displayed
1. Create NotFound page
<template>
  <img src="../assets/404.png" alt="">
</template>

<script>
export default {

}
</script>

<style scoped>
    img{
        width: 100%;
    }
</style>
2. In main.js - modify the routing configuration
import NotFound from '@/views/NotFound'

const routes = [
  // ... other configurations are omitted
  // 404 at the end (the rule is to compare paths one by one from front to back)
  {
    path: "*",
    component: NotFound
  }
]
Summary: if the route fails to hit any rules, a 404 page is given
5, Routing - mode settings
hash routing, for example: http://localhost:8080/#/home
history routing, for example: http://localhost:8080/home (you need server-side support when you go online in the future, otherwise you will find a folder)
const router = new VueRouter({
routes,
mode: "history" // Background support is required after packaging and going online. The mode is hash
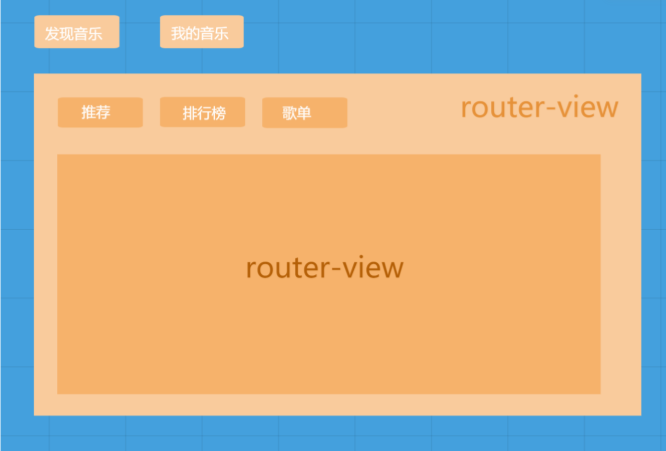
})5, vue Routing - nesting and guarding
Objective: to nest the secondary routes under the existing primary routes
Router view nested architecture diagram
-
Create all components needed
src/views/Find.vue -- discover music pages
src/views/My.vue -- my music page
src/views/Second/Recommend.vue -- discover music page / recommend page
src/views/Second/Ranking.vue -- discover music page / leaderboard page
src/views/Second/SongList.vue -- discover music page / song list page
-
main.js – continue configuring Level 2 routing
The first level routing path is defined from /
The second level route writes the name directly after the path, and does not need to start with /
Nested routing writes a routing information object in the children array of the parent route
-
explain:
The router view of App.vue is responsible for discovering music and my music page and switching
The router view of Find.vue is responsible for finding three pages under music and switching
1. Configure secondary navigation and style - in Find.vue
<template>
  <div>
    <!-- <p>recommend</p>
    <p>Ranking List</p>
    <p>song sheet</p> -->
    <div class="nav_main">
      <router-link to="/find/recommend">recommend</router-link>
      <router-link to="/find/ranking">Ranking List</router-link>
      <router-link to="/find/songlist">song sheet</router-link>
    </div>

    <div style="1px solid red;">
      <router-view></router-view>
    </div>
  </div>
</template>
2. Configure routing rules - Secondary routing display
const routes = [
  // ... omit other
  {
    path: "/find",
    name: "Find",
    component: Find,
    children: [
      {
        path: "recommend",
        component: Recommend
      },
      {
        path: "ranking",
        component: Ranking
      },
      {
        path: "songlist",
        component: SongList
      }
    ]
  }
  // ... omit other
]
Summary: nested routing, find out which page to write router view and children in the corresponding rules
As long as the route value changes, find the route matching rule = = = after the matching is successful, find the corresponding component = = = find the route view
6, Global front guard
Objective: before route jump, execute the pre guard function once to judge whether it can jump normally
Use the fixed method beforeeach (hook function) on the routing object
Target: routing guard
Scenario: when you want to judge the routing permission
Syntax: router. Beforeeach ((to, from, next) = > {/ / execute "before" route jump. Here, decide whether to jump})
//Parameter 1: route to jump to (route object information) target
//Parameter 2: route from which to jump (route object information) source
//Parameter 3: function body - next() will make the route jump and switch normally, next(false) will stay in place, and next ("forced modification to another route path")
//Note: if next is not called, the page remains in place
const isLogin = false; // Login status (not logged in)
router.beforeEach((to, from, next) => {
  if (to.path === "/my" && isLogin === false) {
    alert("Please login")
    next(false) // Prevent route jump
  } else {
    next() // Normal release
  }
})
Summary: next() is released, next(false) remains in place and does not jump the route, and next(path) is forcibly changed to the corresponding path to jump
Supplement:
1. When setting the path of the secondary route, if there is no '/', it will be spliced at the beginning of the path of the parent route
If '/' is taken, it will jump directly with this, and the path of the parent route will not be taken (the child component needs to be displayed in the placeholder of the parent component)
2.this.$router is actually a global routing object. Any page can call methods such as push(),go()
this.$route indicates the route object currently being used for jump. You can call its name,path,query,params and other properties