Demo and source code of this article have been put in GitHub, if you think this article is good, please point a compliment, or add a star to GitHub!
https://github.com/zwl-jasmine95/Vue_test
All of the following knowledge is based on vue.js version 2.0
Component is one of the most powerful functions of Vue. js. Components can extend HTML elements and encapsulate reusable code. At a higher level, components are custom elements for which the Vue.js compiler adds special functionality. In some cases, components can also be in the form of native HTML elements, extending with is features.
I. Component Creation and Registration
1. Global Components
There are two steps in using components: registering components and using components.
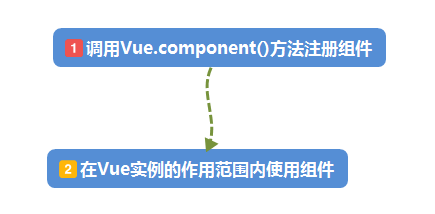
(1) To register a global component, you can use:
Vue.component(tagName, options)
For example:
Vue.component('my-component', {
  // option
})
(2) Create a root instance:
//Create a root instance
 var vm = new Vue({
        el:'#component-demo'
 });
Case:
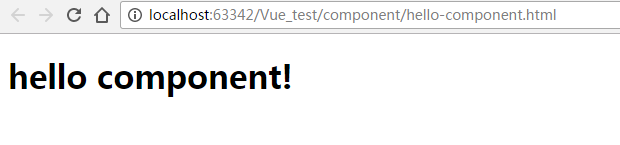
 1 <!DOCTYPE html>
 2 <html lang="en">
 3 <head>
 4     <meta charset="UTF-8">
 5     <title>Global Components( component)Basic use</title>
 6 </head>
 7 <body>
 8     <div id="component-demo">
 9         <!-- 2. #component-demo yes Vue For instance mounted elements, components should be used within the scope of mounted elements-->
10         <hello-component></hello-component>
11     </div>
12
13 <script type="text/javascript" src="../lib/js/vue.js"></script>
14 <script type="text/javascript">
15
16     //1.Global component registration,And specify the label of the component, the component's HTML Labeled as<hello-component>
17     Vue.component('hello-component',{
18         template:'<h1>hello component!</h1>'
19     });
20
21     //Create a root instance
22     var vm = new Vue({
23         el:'#component-demo'
24     });
25
26 </script>
27 </body>
28 </html>
Matters needing attention:
- For custom tag names, Vue.js does not require compliance with the W3C rule (lowercase, and contains a short bar), although it is better to follow this rule.
- The registration component must occur before the root instance is initialized.
- If the custom tag name is humped, the short bar should be added to the uppercase letters and the uppercase letters should be changed to lowercase. For example, the name'Hello world component'changes to <hello-world-component> </hello-world-component> when used.
2. Local Components
When calling a Vue.component() to register a component, the registration of the component is global, which means that the component can be used under any Vue example.
If global registration is not required, or components are used in other components, local registration can be achieved using the component property of the option object.
 1     <div id="component-demo">
 2         <local-component></local-component>
 3     </div>
 4     <script type="text/javascript">
 5
 6         var child = {
 7             template:'<h1>Basic use of local components!</h1>'
 8         };
 9
10         var vm = new Vue({
11             el:'#component-demo',
12             components:{
13                 'local-component':child
14             }
15         });
16     </script>
Because the local-component component component is registered under the Vue instance corresponding to the # component-demo element, it cannot be used under other Vue instances. If you do this, the browser will prompt an error:
 1 <!DOCTYPE html>
 2 <html lang="en">
 3 <head>
 4     <meta charset="UTF-8">
 5     <title>Local components</title>
 6 </head>
 7 <body>
 8
 9     <div id="component-demo">
10         <local-component></local-component>
11     </div>
12
13     <div id="component-demo2">
14         <!--There will be a mistake here, because local-component yes#component-demo Local components that cannot be used elsewhere-->
15         <local-component></local-component>
16     </div>
17
18 <script type="text/javascript" src="../lib/js/vue.js"></script>
19 <script type="text/javascript">
20
21     var child = {
22         template:'<h1>Basic use of local components!</h1>'
23     };
24
25     var vm = new Vue({
26         el:'#component-demo',
27         components:{
28             'local-component':child
29         }
30     });
31
32     var vm2 = new Vue({
33         el:'#component-demo2'
34     });
35
36
37 </script>
38 </body>
39 </html>

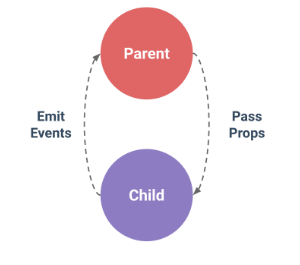
Components mean collaborative work, and usually the parent-child relationship is that Component A uses Component B in its template. They must communicate with each other: the parent component passes data to the child component, and the child component needs to inform the parent of what is happening inside it. However, it is important to decouple parent and child components as much as possible in a well-defined interface. This ensures that each component can be written and understood in a relatively isolated environment, and greatly improves the maintainability and reusability of components.
In Vue, the relationship between parent and child components can be summarized as props down, events up. The parent component passes data down to the child component through props, and the child component sends messages to the parent component through events.
2. DOM Template Analysis of Components
When using DOM as a template (for example, mounting the el option on an existing element), you are limited by HTML, because Vue can only get template content after browsers parse and standardize HTML. Especially, elements like <ul>, <ol>, <table>, <select> restrict elements that can be wrapped by them, while elements like <option> can only appear inside some other elements.
Using these restricted elements in custom components can lead to problems, such as:
<table>
  <my-row>...</my-row>
</table>
Custom component <my-row> is considered invalid content, so it can cause errors in rendering. The alternative is to use special is attributes:
<table>
  <tr is="my-row"></tr>
</table>
It should be noted that if you use a string template from one of the following sources, these restrictions will not apply:
- <script type="text/x-template">
- JavaScript Inline Template String
- vue component
Therefore, use string templates if necessary.
Component string template
The above component registration method is troublesome in splicing HTML elements into template options, which also leads to high coupling between HTML and JavaScript. Fortunately, Vue.js provides two ways to separate HTML templates defined in JavaScript.
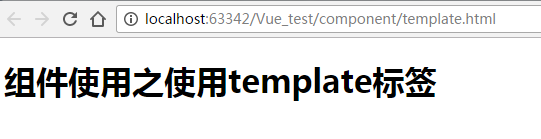
1. Use script tags
 1 <!DOCTYPE html>
 2 <html lang="en">
 3 <head>
 4     <meta charset="UTF-8">
 5     <title>Use script Label</title>
 6 </head>
 7 <body>
 8 <div id="demo">
 9     <my-component></my-component>
10 </div>
11
12 <script type="text/x-template" id="myComponent">
13     <h1>Use of Components script Label</h1>
14 </script>
15
16 <script type="text/javascript" src="../lib/js/vue.js"></script>
17 <script type="text/javascript">
18     Vue.component('my-component',{
19         template:'#myComponent'
20     });
21
22     var vm = new Vue({
23         el:'#demo'
24     });
25 </script>
26 </body>
27 </html>
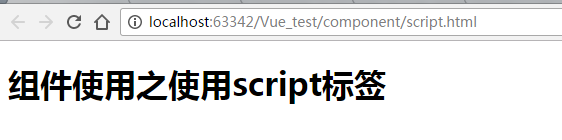
The template option is no longer an HTML element, but an id from which Vue.js finds the corresponding element and compiles the HTML within that element as a template.
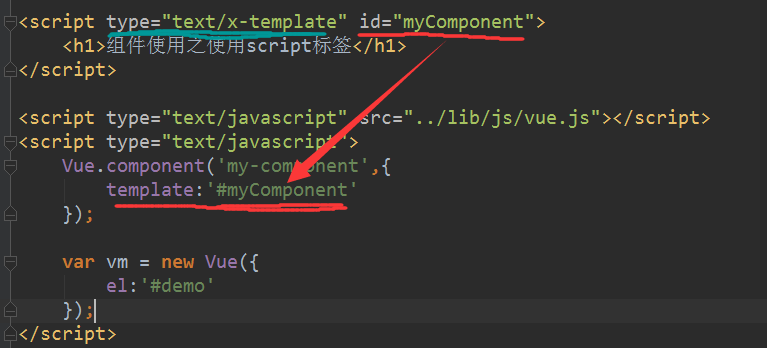
Note: When using the <script> tag, type is specified as text/x-template to tell the browser that this is not a js script and that the content defined in the <script> tag will be ignored by the browser when parsing HTML documents.
2. Use template tags
If you use the < template > tag, you do not need to specify the type attribute.
 1 <!DOCTYPE html>
 2 <html lang="en">
 3 <head>
 4     <meta charset="UTF-8">
 5     <title>Use template Label</title>
 6 </head>
 7 <body>
 8 <div id="demo">
 9     <my-component></my-component>
10 </div>
11
12 <template id="myComponent">
13     <h1>Use of Components template Label</h1>
14 </template>
15
16 <script type="text/javascript" src="../lib/js/vue.js"></script>
17 <script type="text/javascript">
18     Vue.component('my-component',{
19         template:'#myComponent'
20     });
21
22     var vm = new Vue({
23         el:'#demo'
24     });
25 </script>
26 </body>
27 </html>
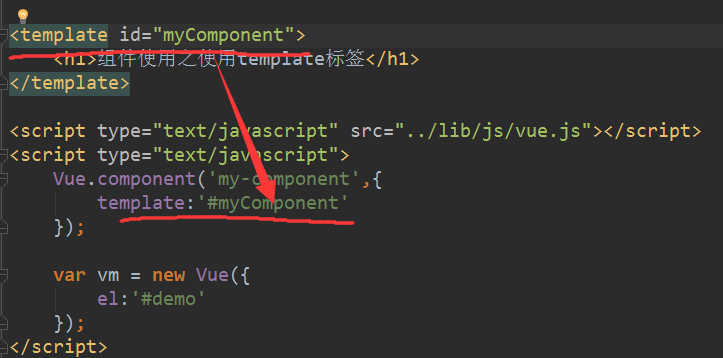
It is recommended to use < script > or < template > tags to define HTML templates for components. This makes HTML code and JavaScript code separate and easy to read and maintain.
Restrictions on Component data Options
Most of the options passed in through the Vue constructor can be used in components. data is an exception. It must be a function.
If so:
Vue.component('hello-component',{
        template:'<h1>{{message}}</h1>',
        data:{
            message:1
        }
});
Errors will be reported:

Therefore, it should be changed to:
Vue.component('my-component',{
        template:'<h1>{{message}}</h1>',
        data:function () {
            return {message : 'data Must be a function'};
        }
 });
5. props - parent component delivers information to child component
The scope of component instances is isolated. This means that data from the parent component cannot (and should not) be directly referenced within the template of the child component. To make the child component use the data of the parent component, we need to use the props option of the child component.
1. Static data
 1    <div id="demo">
 2         <child-component message="hello props!"></child-component>
 3     </div>
 4
 5     <template id="myComponent">
 6         <h1>{{message}}</h1>
 7     </template>
 8
 9     <script type="text/javascript" src="../lib/js/vue.js"></script>
10     <script type="text/javascript">
11         var child = {
12             // statement props
13             props: ['message'],
14             // just like data Same, prop Can be used in templates
15             // The same can be done in the vm Examples like“ this.message"Use this way
16             template:'#myComponent'
17         };
18
19         var vm = new Vue({
20             el:'#demo',
21             components:{
22                 'child-component':child
23             }
24         });
25     </script>
The HTML feature is case-insensitive. So, when you're not using a string template, the prop name for camel Cased needs to be converted to the corresponding kebab-case name.
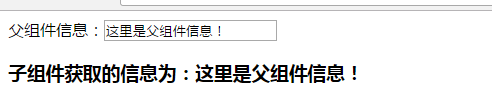
2. Dynamic data
In a template, to dynamically bind the data of the parent component to the props of the child template is similar to any ordinary HTML feature, that is, to use v-bind. Whenever the data of the parent component changes, the change is also transmitted to the child component.
 1 <body>
 2     <div id="demo">
 3         Parent component information:<input type="text" v-model="parentMessage">
 4         <child-component v-bind:message="parentMessage"></child-component>
 5     </div>
 6
 7     <template id="myComponent">
 8         <h1>The information obtained by the sub-component is:{{message}}</h1>
 9     </template>
10
11     <script type="text/javascript" src="../lib/js/vue.js"></script>
12     <script type="text/javascript">
13
14         var child = {
15             props: ['message'],
16             template:'#myComponent'
17         };
18
19         var vm = new Vue({
20             el:'#demo',
21             data:{
22                 parentMessage:'Here is the parent component information!'
23             },
24             components:{
25                 'child-component':child
26             }
27         });
28     </script>
29 </body>
A common mistake for beginners is to use literal grammar to pass values:
<! -- Passes a string "1" -->.
<comp some-prop="1"></comp>
Because it is a literal prop, its value is the string "1" instead of number. If you want to pass an actual number, you need to use v-bind so that its value is evaluated as a JavaScript expression:
<! - Pass the actual number - >
<comp v-bind:some-prop="1"></comp>
3. Binding Type of Pros - Single Binding
prop is unidirectionally bound: when the attributes of the parent component change, it is transmitted to the child component, but not vice versa. This is to prevent the child component from unintentionally modifying the state of the parent component.
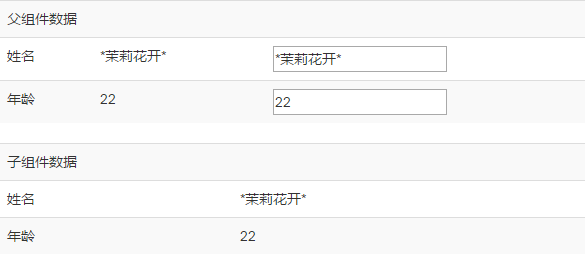
 1 <!DOCTYPE html>
 2 <html lang="en">
 3 <head>
 4     <meta charset="UTF-8">
 5     <title>props Single Data Binding</title>
 6     <link rel="stylesheet" href="../lib/css/bootstrap.min.css">
 7 </head>
 8 <body>
 9     <div id="demo">
10         <table class="table table-striped">
11             <tr>
12                 <td colspan="3">Parent component data</td>
13             </tr>
14             <tr>
15                 <td>Full name</td>
16                 <td>{{parentName}}</td>
17                 <td><input type="text" v-model="parentName"/></td>
18             </tr>
19             <tr>
20                 <td>Age</td>
21                 <td>{{parentAge}}</td>
22                 <td><input type="text" v-model="parentAge"/></td>
23             </tr>
24         </table>
25
26         <!--Pay attention here. camelCased (Hump type) Named prop Need to be converted to corresponding kebab-case (Short Transverse Separation) name-->
27         <child-component v-bind:child-name="parentName" v-bind:child-age="parentAge"></child-component>
28
29     </div>
30
31     <template id="myComponent">
32         <table class="table table-striped">
33             <tr>
34                 <td colspan="3">Subcomponent data</td>
35             </tr>
36             <tr>
37                 <td>Full name</td>
38                 <td>{{childName}}</td>
39             </tr>
40             <tr>
41                 <td>Age</td>
42                 <td>{{childAge}}</td>
43             </tr>
44         </table>
45     </template>
46
47     <script type="text/javascript" src="../lib/js/vue.js"></script>
48     <script type="text/javascript">
49
50         var child = {
51             template:'#myComponent',
52             props: ['childName','childAge']
53
54         };
55
56         var vm = new Vue({
57             el:'#demo',
58             data:{
59                 parentName:'*Jasmine Blossom*',
60                 parentAge:22
61             },
62             components:{
63                 'child-component':child
64             }
65         });
66     </script>
67 </body>
68 </html>
When the data of the parent component changes, the data of the child component is modified as well:
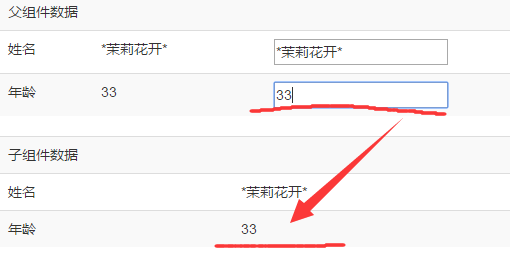
Every time the parent component is updated, all props of the child component are updated to the latest value. This means that you shouldn't change prop within subcomponents. If you do, Vue will give a warning in the console.
Why do we have the impulse to modify the data in prop? Usually there are two reasons:
-
After prop is introduced as the initial value, the subcomponent wants to use it as local data.
-
prop is passed in as an initial value and is processed by subcomponents into other data outputs.
For these two reasons, the correct way to deal with them is:
-
Define a local variable and initialize it with the value of prop:
props: ['initialCounter'],
data: function () {
    return { counter: this.initialCounter }
}
-
Define a computational property, process the value of prop and return it.
props: ['size'],
computed: {
    normalizedSize: function () {
        return this.size.trim().toLowerCase()
    }
}
For the demo code mentioned above, we can modify it slightly to change the name of the child component from the parent component to the new one:
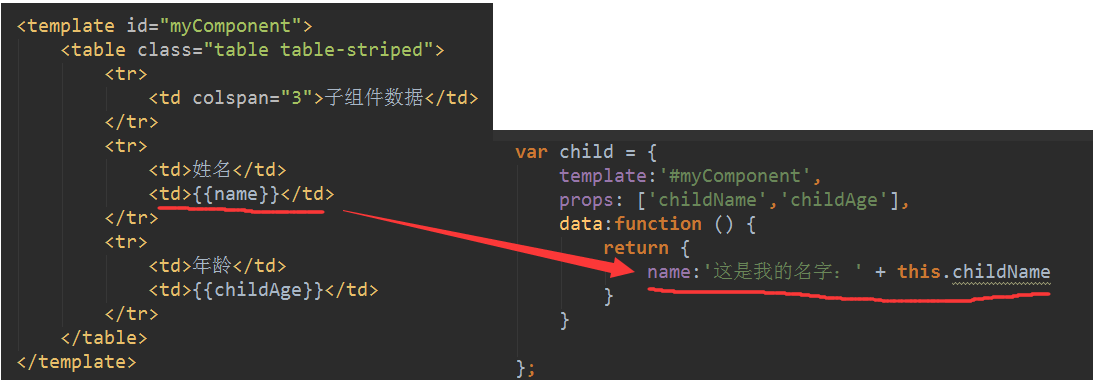
We can see the effect:

!!! Here, when the name of the parent component changes, the name of the child component does not change.
Be careful:
1. Objects and arrays are reference types in JavaScript, pointing to the same memory space. If prop is an object or array, changing it inside the child component will affect the state of the parent component.
2.Vue 2.x compared with Vue 1.x, in addition to the implementation of Virtual-Dom, the biggest discomfort for users is the two-way binding function of props of removed components. In the past, using twoWay and. sync binding modifier of props in Vue1.x can realize the bidirectional binding function of props, but this function has been completely abandoned in Vue2. If the bidirectional binding is needed, it needs to be implemented by itself.
4. Pros Verification
We can specify validation specifications for component props. If incoming data does not conform to specifications, Vue will issue a warning. This is useful when components are used by others.
To specify validation specifications, you need to use the form of an object instead of an array of strings:
Vue.component('example', {
  props: {

    // Basic Type Detection (`null` It means that any type is OK.)
    propA: Number,

    // Multiple types
    propB: [String, Number],

    // Necessary and String
    propC: {
      type: String,
      required: true
    },

    // Numbers, with default values
    propD: {
      type: Number,
      default: 100
    },

    // array/The default value of an object should be returned by a factory function
    propE: {
      type: Object,
      default: function () {
        return { message: 'hello' }
      }
    },

    // Custom Validation Function
    propF: {
      validator: function (value) {
        return value > 10
      }
    }
  }
})
type It can be the following native constructor:
- String
- Number
- Boolean
- Function
- Object
- Array
- Symbol
type It can also be a custom constructor function, using instanceof Testing.
When prop The validation failed. Vue Warning will be thrown (If the development version is used). Be careful props The component instance is checked before it is created, so the default or validator In functions, such as data,computed or methods Instance attributes such as these are not available yet.
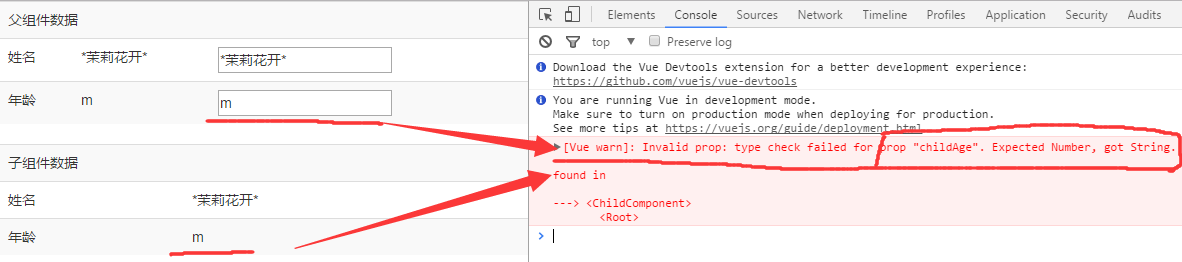
Example: Modify the demo code in the third section to validate the name and age of the data passed. The name must be a string type and the age must be numeric and not empty.
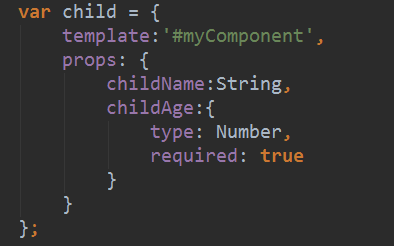
When you type "m" at age, you can see that the console is wrong. Because the data passed is of string type, age props validation requires numbers.
6. Component Customization Events
The parent component uses props to pass data to the child component, but how does the child communicate with the parent component? At this point, Vue's custom event system comes in handy.
1. Binding custom events with v-on
Each Vue instance is implemented Events interface That is:
- Use $on(eventName) to listen for events
- Use $emit(eventName) to trigger events
In addition, the parent component can use v-on directly to listen for events triggered by the child component where the child component is used. Instead of listening for events thrown by subcomponents with $on, you must bind directly with v-on in the template.
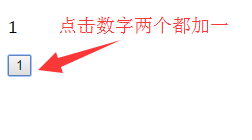
 1 <!DOCTYPE html>
 2 <html lang="en">
 3 <head>
 4     <meta charset="UTF-8">
 5     <title>v-on Binding custom events</title>
 6     <script type="text/javascript" src="../lib/js/vue.js"></script>
 7 </head>
 8 <body>
 9     <div id="counter-event-example">
10         <p>{{ total }}</p>
11         <button-counter v-on:add="incrementTotal"></button-counter>
12     </div>
13
14     <script type="text/javascript">
15
16         Vue.component('button-counter', {
17             template: '<button v-on:click="incrementCounter">{{ counter }}</button>',
18             data: function () {
19                 return {
20                     counter: 0
21                 }
22             },
23             methods: {
24                 incrementCounter: function () {
25                     this.counter += 1;
26                     this.$emit('add'); //Report to the parent component that it happened'add'Event
27                 }
28             }
29         });
30         new Vue({
31             el: '#counter-event-example',
32             data: {
33                 total: 0
34             },
35             methods: {
36                 incrementTotal: function () {
37                     this.total += 1
38                 }
39             }
40         })
41     </script>
42 </body>
43 </html>
Analysis:
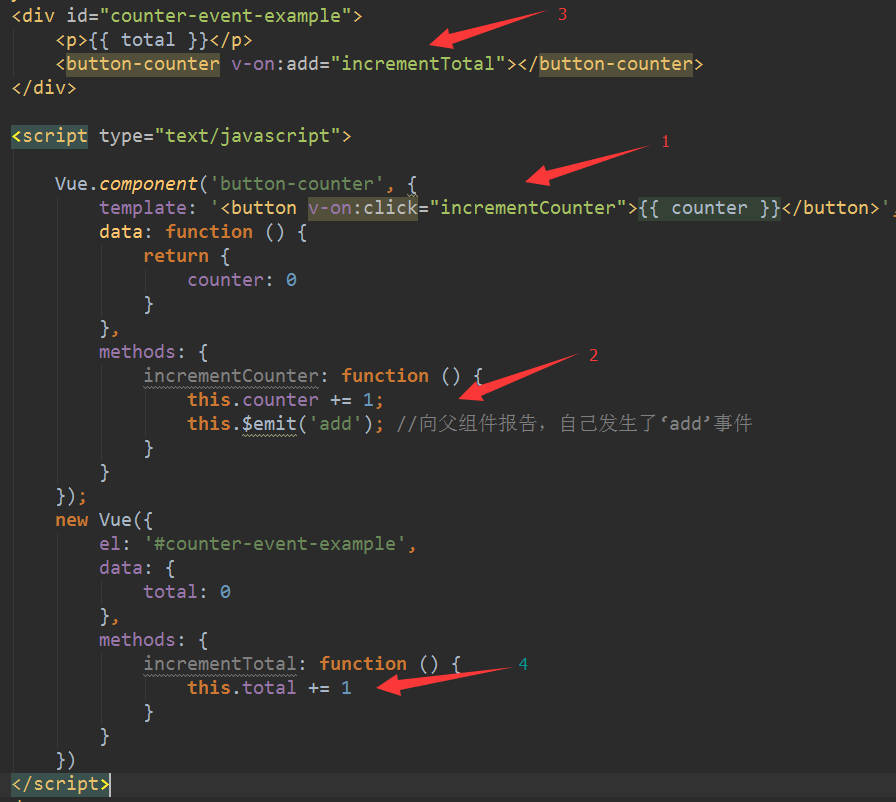
Step 1: Bind the click event to the function incrementCounter (step 1 in the picture) in the sub-component. It is easy to understand that clicking on the button of the sub-component will trigger the incrementCounter function located in the sub-component.
Step 2: When the incrementCounter function is triggered, the number of subcomponents is added to the original value by 1, and Represents that you report to the parent that you triggered the add event (as for the name of the event that happened, you can name it as you like, as long as the name is the same when binding in the parent component.)
The third step: When the child component triggers the add event, the parent component calls the incrementTotal function to respond to the child component.
At this point, we recall step 2, in which emit has been used to notify the child component, so it forms the mutual echo and transmission of information between the parent and child components. In fact, in the process of development, the communication between the parent and child components also uses this method. When the parent component passes the information to the child component, it passes through the props parameter, and usually does not modify the parent component directly in the child component. The information comes in, and through such a hook, the parent component is notified to change some parameters.
Step 4: Define the incrementTotal function of the parent component, and add 1 to the original value.
2. Binding native events to components
Sometimes, you may want to listen for a native event on the root element of a component. v-on can be modified with.Native. For example:
<my-component v-on:click.native="doTheThing"></my-component>
3. Form input components using custom events
Custom events can be used to create custom form input components and use v-model to bind data bidirectionally. Look at this:
<input v-model="something">
This is just grammatical sugar for the following examples:
<input v-bind:value="something" v-on:input="something = $event.target.value">
So when used in components, it corresponds to the following abbreviations:
<custom-input v-bind:value="something" v-on:input="something = arguments[0]"></custom-input>
Accept a value attribute, so to make the component's v-model work, it should (in 2.2.0 + this is configurable):
- Accept a value attribute
- Trigger input event when new values are available
demo:
 1 <div id="demo">
 2         <currency-input v-model="price"></currency-input>
 3     </div>
 4
 5     <template id="currency">
 6         <span>$<input ref="input" v-bind:value="value" v-on:input="updateValue($event.target.value)" /></span>
 7     </template>
 8
 9     <script type="text/javascript">
10         Vue.component('currency-input',{
11             template:'#currency',
12             props: ['value'],
13             methods: {
14                 // Instead of updating values directly, this method is used to format and limit the number of digits of input values.
15                 updateValue: function (value) {
16                     var formattedValue = value
17                     // Delete space characters on both sides
18                             .trim()
19                             // Keep 2 decimal places
20                             .slice(0,value.indexOf('.') === -1 ? value.length: value.indexOf('.') + 3);
21                     // If the values are not uniform, manual coverage is used to maintain consistency
22                     if (formattedValue !== value) {
23                         this.$refs.input.value = formattedValue
24                     }
25                     // adopt input Event Emission Number
26                     this.$emit('input', Number(formattedValue))
27                 }
28             }
29         });
30
31         var vm = new Vue({
32             el:'#demo',
33             data:{
34                 price:''
35             }
36         })
37     </script>
 (Only two decimal points can be entered, only numbers can be entered)
Special attributes ref:
(Expectation: string) ref is used to register reference information for elements or subcomponents. Reference information will be registered on the parent component's $refs object. If used on common DOM elements, references point to DOM elements; if used on subcomponents, references point to component instances:
<!-- vm.$refs.p will be the DOM node -->
<p ref="p">hello</p>
<!-- vm.$refs.child will be the child comp instance -->
<child-comp ref="child"></child-comp>
When v-for is used for elements or components, the reference information will be an array containing DOM nodes or component instances.
Important note on ref registration time: because ref itself is created as a rendering result, you can't access them at the time of initial rendering - they don't exist yet! refs is not responsive, so you shouldn't try to use it for data binding in templates.
4. v-model of customized components
(2.2.0 added)
By default, a component's v-model uses value attributes and input events, but input types such as radio boxes and check boxes may use value attributes for other purposes. The model option avoids such conflicts:
Vue.component('my-checkbox', {
  model: {
    prop: 'checked',
    event: 'change'
  },
  props: {
    checked: Boolean,
    // this allows using the `value` prop for a different purpose
    value: String
  },
  // ...
})
<my-checkbox v-model="foo" value="some value"></my-checkbox>
The above code is equivalent to:
<my-checkbox :checked="foo" @change="val => { foo = val }" value="some value"></my-checkbox>
5,. sync modifier
In some cases, we may need to bind a prop in both directions. In fact, this is exactly what the.sync modifier in Vue 1.x provides. When a child component changes the value of a prop, the change is synchronized to the value bound in the parent component. This is convenient, but it can also lead to problems because it undermines the one-way data flow hypothesis. Since the code of the child component changing prop is no different from the normal state change code, when you look at the code of the child component, you have no idea when it quietly changes the state of the parent component. This will bring a high maintenance cost in the application of debug complex structure.
That's why we removed.sync in 2.0. However, in the practical application after the 2.0 release, we find that.sync still has its applicability, such as in the development of reusable component libraries. All we need to do is make it easier to distinguish the code whose child component changes the state of the parent component.
We have reintroduced the.sync modifier since 2.3.0, but this time it only exists as a compile-time grammatical sugar. It will be extended to a v-on listener that automatically updates the properties of the parent component.
The following code
<comp :foo.sync="bar"></comp>
It will be expanded to:
<comp :foo="bar" @update:foo="val => bar = val"></comp>
When a subcomponent needs to update the value of foo, it needs to explicitly trigger an update event:
this.$emit('update:foo', newValue)
6. Non-parent-child component communication
Sometimes two components also need to communicate (non-parent-child relationship). In a simple scenario, an empty Vue instance can be used as a central event bus, equivalent to a transit station, which can be used to pass events and receive events.
var bus = new Vue()

// Trigger module A Events in
bus.$emit('id-selected', 1)

// In component B Listen for events in created hooks
bus.$on('id-selected', function (id) {
  // ...
})
Here is an example to illustrate:
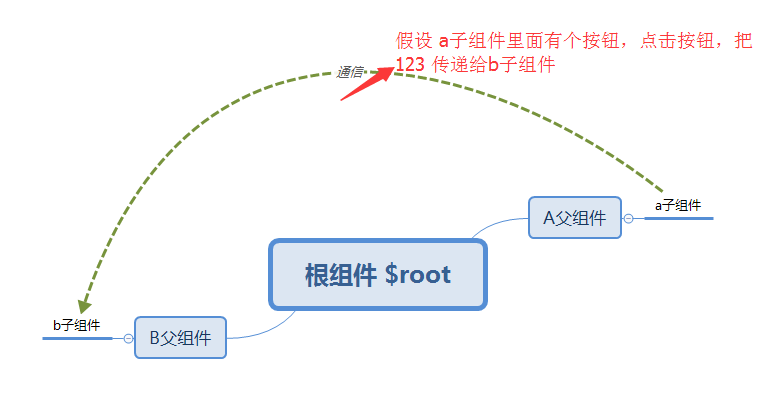
 1 <div id="demo">
 2         <a-component></a-component>
 3         <b-component></b-component>
 4     </div>
 5
 6
 7     <script type="text/javascript">
 8         Vue.component('a-component',{
 9             template:'<button @click="submit">Submission</button>',
10             methods: {
11                 submit() {
12                     // Event Name Customization, Differentiating Events by Different Names
13                     this.$root.Bus.$emit('eventName', 123)
14                 }
15             }
16         });
17
18         Vue.component('b-component',{
19             template:'<p>{{message}}</p>',
20             data:function () {
21               return {
22                   message:'b Sub components'
23               }
24             },
25
26             // Listen for this event when the current instance is created
27             created(){
28                 this.$root.Bus.$on('eventName', function (value) {
29                     console.log(value);
30                 });
31             },
32
33             // Don't forget to unbind events when components are destroyed
34             beforeDestroy() {
35                 this.$root.Bus.$off('eventName')
36             }
37         });
38
39         var vm = new Vue({
40             el:'#demo',
41             data: {
42                 // Empty instances are placed under the root component, and all subcomponents can be invoked
43                 Bus: new Vue()
44             }
45         })
46     </script>
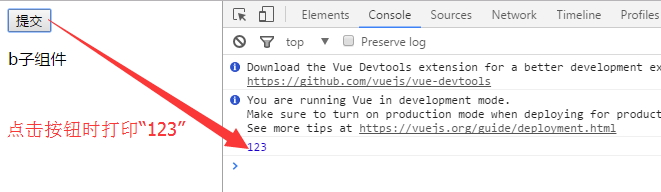
Demo and source code for this article have been placed in GitHub https://github.com/zwl-jasmine95/Vue_test
Point a compliment ()