1. Interpolation syntax
- mustach syntax is used to parse the contents in the tag body. There is an expression in {xxx}} and all attributes in data can be read
2. Instruction syntax
Parsing tag attributes and tag body contents, binding events for tags, is also an expression, and the data in data can be read
1.v-bind
- Used to resolve tag properties,
- : attribute = 'xxx', XXX can be an expression or data attached to vm
- Used for one-way data binding (can only flow from data to page)
- Binding of class attribute:
- : class = string can change any style
- : class = array can dynamically decide which styles to add
- : class = the object determines whether one or more attributes need to be added through the true / false value of the object attribute value
- Binding of style attributes:
- : style = array binding multiple style attributes
- : style = bind a style attribute to the object
2.v-model
- It can only be applied to form elements and used to bind data in both directions (not only from data to page, but also from page to data)
- v-model:value = "xxx" value is collected by default, which can be abbreviated as v-model = "xxx"
The essence of bidirectional data binding of v-model: it actually runs two instructions inside, v-bind (data flows to the page, @ input() (once the input event is detected, modify the value of data in the methods method)
Collect form data:

 If:<input type="text"/>,be v-model The collection is value Value, which is entered by the user value Value.

 If:<input type="radio"/>,be v-model The collection is value Value, and the label should be configured value Value.

 If:<input type="checkbox"/>

1.No configuration input of value Attribute, then what is collected is checked(Check or (unchecked, Boolean)

2.to configure input of value attribute:

(1)v-model If the initial value of is a non array, then what is collected is checked(Check or (unchecked, Boolean)

(2)v-model If the initial value of is an array, what is collected is value Array of

remarks: v-model Three modifiers for:

.lazy: Lose focus and collect data

.number: Convert the input string to a valid number

.trim: Input leading and trailing space filtering
3.v-on:xxx or @xxx: [bind event]
-
It is used to bind events. The bound event callback is the method in methods.
-
The functions in the methods method should use ordinary functions instead of arrow functions, so that this point is the vm instance
-
Method has one parameter by default e v e n t , as fruit need want pass his he ginseng number and event, if necessary, pass other parameters and Event. If you need to pass other parameters to coexist with event, you need to use $event in the argument
-
Event modifier: Prevent (prevent default events from happening)
. Stop (stop bubbling)
. Once event
-
Keyboard events:
Key aliases commonly used in Vue:
Enter = > Enter
Delete = > delete (capture "delete" and "backspace" keys)
Exit = > ESC
Space = > space
Line feed = > tab (special, must be used with keydown)
Up = > up
Down = > down
Left = > left
Right = > right
2.Vue does not provide an alias key. You can use the original key value of the key to bind it, but pay attention to change it to kebab case (named by a short horizontal line)
3. System modifier keys (special usage): ctrl, alt, shift, meta
(1). Use with keyup: press the modifier key and then press other keys, and then release other keys to trigger the event.
(2). Use with keydown: normally trigger events.
4. You can also use keyCode to specify specific keys (not recommended)
5.Vue.config.keyCodes. User defined key name = key code. You can customize key alias
4. V-IF / v-else-if / v-else & & v-show [conditional rendering]
-
v-if
Writing method:
(1).v-if = "expression"
(2).v-else-if = "expression"
(3).v-else = "expression"
Applicable to: scenes with low switching frequency.
Features: DOM elements that are not displayed are removed directly.
Note: v-if can be used with: v-else-if and v-else, but the structure must not be "broken".
v-show
Writing method: v-show = "expression"
Applicable to: scenes with high switching frequency.
Features: DOM elements that are not displayed are not removed, but are only hidden with styles
Note: when using v-if, elements may not be available, but they can be obtained by using v-show.
5.v-for [list rendering]
- Native js bedding:
<!-- Primordial js in --> <!-- array: for...in... key || for...of... value --> <!-- object: for...in... key || Value to pass obj[p]obtain>-
vue method:
 Traversal use of perhaps in Fine
 Array traverses the value of the array / Array key
 Object traverses the value of the object / Object's key / index value
-
Interview question: what is the role of the key in react and vue? (internal principle of key)
1. Role of key in virtual DOM:
key is the identification of the virtual DOM object. When the data changes, Vue will generate a new virtual DOM according to the new data,
Then Vue compares the differences between [new virtual DOM] and [old virtual DOM], and the comparison rules are as follows:
2. Comparison rules:
(1). The same key as the new virtual DOM was found in the old virtual DOM:
①. If the content in the virtual DOM does not change, directly use the previous real DOM!
②. If the content in the virtual DOM changes, a new real DOM is generated, and then the previous real DOM in the page is replaced.
(2). The same key as the new virtual DOM was not found in the old virtual dom
Create a new real DOM and then render it to the page.
3. Possible problems caused by using index as key:
1. If the data is added or deleted in reverse order, the following sequence is broken:
It will produce unnecessary real DOM updates = = > the interface effect is no problem, but the efficiency is low.
2. If the structure also contains the DOM of the input class:
There will be an error DOM update = = > there is a problem with the interface.
-
How to select a key in development?
1. it is best to use the unique identifier of each data as key, such as id, mobile phone number, id card number, student id number and so on.
2. If there are no destructive operations such as adding or deleting data in reverse order, it is only used to render the list for display. There is no problem using index as the key.
6. Built in instructions
-
v-text / v-html
v-text completely replaces the contents of the label
V-html will completely replace the content in the tag. Difference: v-html will parse the tag
v-html is dangerous and easy to expose cookie information and cause xss attack
Use v-html only where you trust
-
-
v-cloak
Because there may be a delay in requesting page content, in order not to display the original code on the page, and then the page flashes
Add the v-cloak instruction [no need to add value], and use [v-cloak]:{display:none} in conjunction with the css style
Principle: before rendering, css style works and is not displayed on the page. Once vue starts working, the v-cloak instruction is automatically removed, and the css style will not work
-
v-once
v-once has only instructions and no value
Adding v-once means that it will render only once and stop rendering, which can be used to optimize performance
-
v-pre
v-pre means that this statement will not be compiled by vue and can be directly displayed on the page
Can optimize performance
7. Custom instructions
- See directives attribute = > > >
II vm properties and methods
1.el
- There are two ways to write:
- Write directly in the new Vue() configuration
- vm.$mount('#root')
2.data
-
There are two ways to write:
- Functional formula (components can only be written in this way to prevent data pollution)
- Object type
-
Data proxy
<!-- Data proxy: the operation (reading) of an attribute in another object through one object proxy/(write)--> <script type="text/javascript" > let obj = {x:100} let obj2 = {y:200} Object.defineProperty(obj2,'x',{ get(){ return obj.x }, set(value){ obj.x = value } })- In the above example, obj X and obj 2 X forms a two-way linkage, obj The modification of X will be reflected to obj2.0 through the get() function X body; obj2. The modification of X will be reflected to obj through the set() function On X
- Definition: the data in the data will be proxied to the vm in a similar way, and each attribute of the data will be proxied to the vm to read / write, which is more convenient to operate the data in the data
- Principle: through object Defineproperty () adds all the properties in the data object to the vm. Specify a getter/setter for each property added to the vm. Operate (read / write) the corresponding properties in data inside getter/setter.
3.computed
-
1. Definition: the attribute to be used does not exist. It can only be obtained through complex operations on the data in data
-
2. Principle: through object Defineproperty () adds all data properties to the methods in the methods property of vm. The data in getter() is used to read the data; Write data in data with setter() function
-
3. When does the get function execute?
(1). It is executed once on the first reading.
(2). When the dependent data changes, it will be called again.
When is set called? Modify this Fullname.
-
4. Advantages: compared with the implementation of methods, there is an internal caching mechanism (reuse), which is more efficient and convenient for debugging.
-
5. Remarks:
1. The calculated attributes will eventually appear on the vm and can be read and used directly.
2. If the calculation attribute is to be modified, the set function must be written to respond to the modification, and the data that the calculation depends on in the set will be changed.
3.methods
4.watch
-
There are two ways to write:
watch:{
				isHot:{
					// immediate:true, / / let the handler call during initialization
					//When will handler be called? When isHot changes.
					handler(newValue,oldValue){
						console.log('isHot It was modified',newValue,oldValue)
					}
				},
				//Monitor the change of an attribute in the multi-level structure
				/* 'numbers.a':{
					handler(){
						console.log('a Changed ')
					}
				} */
				//Monitor the changes of all attributes in the multi-level structure
				numbers:{
					deep:true,
					handler(){
						console.log('numbers Changed')
					}
				}
			}
//Normal writing vm.$watch('isHot',{ immediate:true, //Let the handler call during initialization deep:true,//Depth monitoring handler(newValue,oldValue){ console.log('isHot It was modified',newValue,oldValue) } }) //Abbreviation vm.$watch('isHot',(newValue,oldValue)=>{ console.log('isHot It was modified',newValue,oldValue,this) }) -
Function: the watch attribute is used to monitor the changes of data
-
Difference: the computed attribute can be used, and the watch attribute can be used
The watch attribute can do this, but the computed attribute may not, for example, asynchronous callback
-
Two important small principles:
1. The functions managed by Vue should be written as ordinary functions, so that the point of this is the vm or component instance object.
2. All functions not managed by Vue (timer callback function, ajax callback function, Promise callback function, etc.) should be written as arrow function, so that the point of this is the vm or component instance object.
5.filters
1. Definition: display the data to be displayed after specific formatting (applicable to some simple logic processing).
2. There are two ways to write:
1. Registration filter: Vue Filter (name, callback) or new Vue{filters: {}}
2. Use filter: {{xxx | filter name}} or v-bind: attribute = "xxx | filter name"
3. remarks:
1. Filters can also receive additional parameters, and multiple filters can also be connected in series
2. The original data is not changed, but new corresponding data is generated
6.directives
-
For custom instructions
-
There are two ways to write:
-
One is written in new vue(), which has two forms: object form and function form.
-
Function form: it is called when the instruction is successfully bound with the element (first), or when the template is recompiled. In fact, it combines the first and third functions in the form of object.
-
// 1. Function writing
// When will the big function be called? 1. When the instruction is successfully bound to the element (I). 2. When the template where the instruction is located is parsed again. In fact, it combines the first and third functions
                // Element is the corresponding dom element obtained, which is the real element
			   // binding is an element bound by a custom instruction
                big(element,binding){
                    element.innerHTML = binding.value * 10
                },
* Object form:Second function added () The principle is to get the focus event, which can work only when the element is displayed on the page (1).bind: Called when the instruction successfully binds to the element. (2).inserted: Called when the element of the instruction is inserted into the page. (3).update: Called when the template structure of the instruction is re parsed. * ```javascript // 2. Object writing fbind:{ // When Binding bind(element,binding){ // It is not managed by vue, so this points to the window object element.value = binding.value }, // When displayed on the page inserted(element,binding){ element.focus() }, // When the template is compiled and updated update(element,binding) { element.value = binding.value element.focus() }, }-
Write globally:
Vue.directive('big',function(element,binding){ element.innerHTML = binding.value * 10 }) Vue.directive('fbind',{ // When Binding bind(element,binding){ element.value = binding.value }, // When displayed on the page inserted(element,binding){ element.focus() }, // When the template is compiled and updated update(element,binding) { element.value = binding.value element.focus() }}) -
remarks:
1. v - is not added when the instruction is defined, but v - is added when it is used;
2. If the instruction name is more than one word, use the kebab case naming method instead of camelCase.
-
-
How Vue monitors data:
1. vue will monitor all levels of data in data.
2. How to monitor data in objects?
Monitoring is realized through setter, and the data to be monitored is passed in when new Vue is created.
(1). Object. By default, Vue does not perform responsive processing
(2). To make a response to the attribute added later, please use the following API:
Vue.set(target, propertyName/index, value) or
vm.$set(target,propertyName/index,value)
3. How do I monitor data in an array?
By wrapping the update elements of the array, the essence is to do two things:
(1). Call the native corresponding method to update the array.
(2). Re parse the template to update the page.
4. When modifying an element in the Vue array, you must use the following methods:
1. Use these APIs: push (), pop(), shift(), unshift(), splice(), sort(), reverse()
2.Vue.set() or VM$ set()
Special note: Vue Set() and vm$ Set() cannot add attribute to vm or vm's root data object!!!
III MVVM model
1.M(model)
- Model: it is the data in data
2.V(view)
- Views: template codes
3.VM (View Model)
- View models: Vue instances
All the data in data eventually appears on the vm
The attributes and methods of vm and vue prototype chain can be used in the template
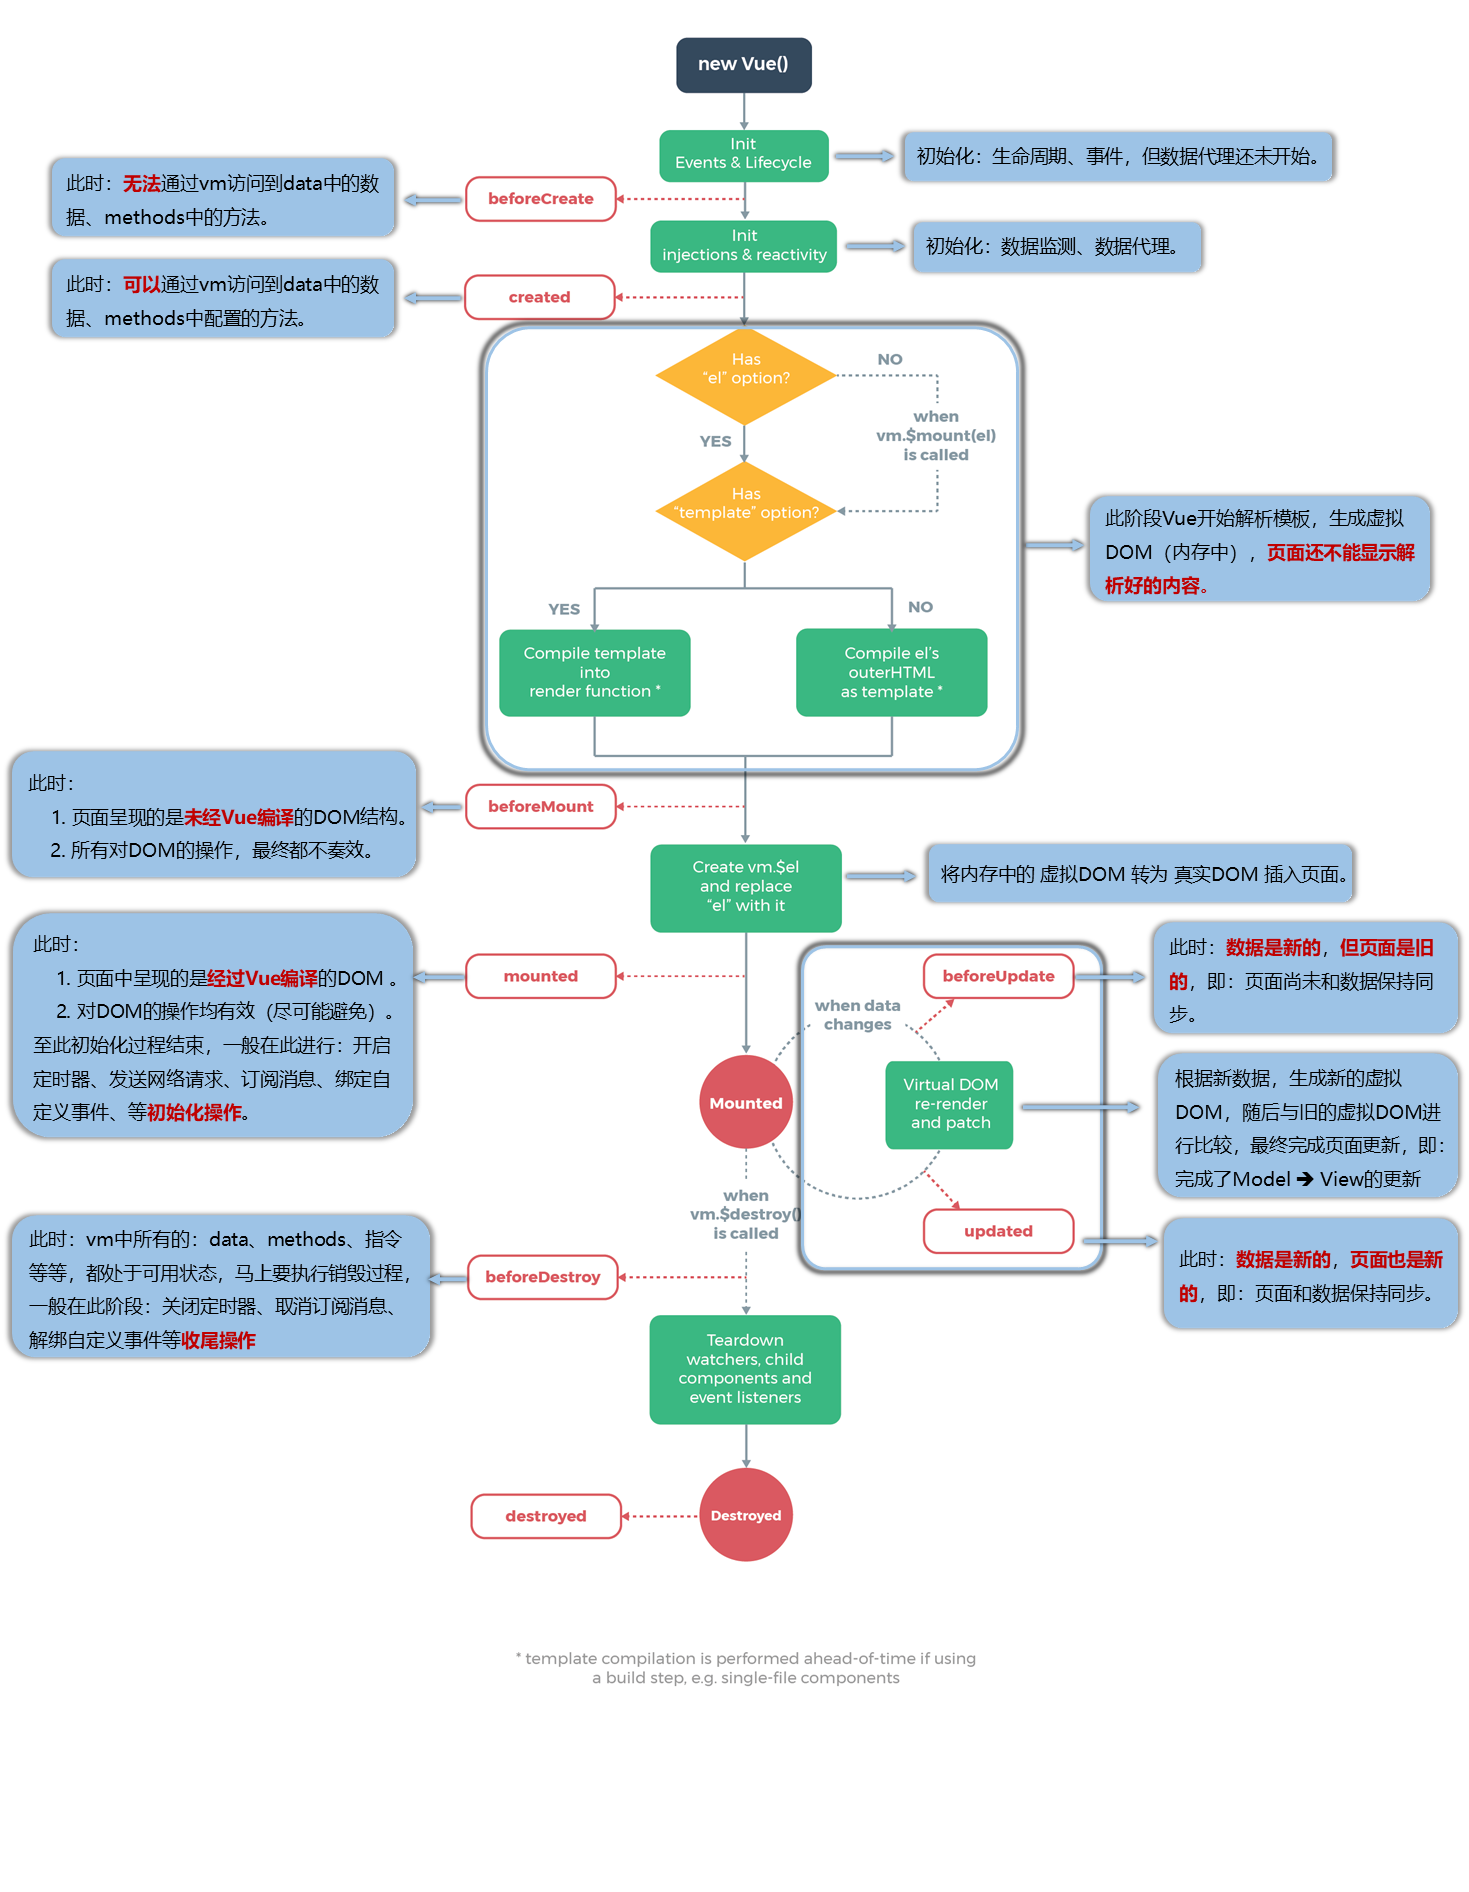
IV Life cycle function
V vue-cli
1.ref attribute
// assembly
<h1 v-text="msg" ref="title"></h1>
<button ref="btn" @click="showDOM">Click on the top of my output DOM element</button>
<School ref="sch"/>
// vc
methods: {
			showDOM(){
				console.log(this.$refs.title) //Real DOM elements
				console.log(this.$refs.btn) //Real DOM elements
				console.log(this.$refs.sch) //Instance object of School component (vc)
			}
		},
2.props attribute
- The parent component passes data to the child component
//Parent component
// : age will parse the contents in quotation marks, and age will be parsed into numbers
<div>
	<Student name="Li Si" sex="female" :age="18"/>
</div>
// Receiving sub component

// 1. Simple declaration of receipt
props:['name','sex','age']

// 2. Limit the type of data while receiving
props:{
	name:String,
    age:Number,
    sex:String
}

// 3. Data type + designation of default value + restriction on necessity
props:{
    name:{
        type:String,
         required:true
    },
    name:{
        type:Number,
        default:99
    },
    name:{
        type:String,
        required:true
    },
}
3.mixins mixing
// mixin.js
export const hunhe = {
	methods: {
		showName(){
			alert(this.name)
		}
	},
	mounted() {
		console.log('How do you do!')
	},
}
export const hunhe2 = {
	data() {
		return {
			x:100,
			y:200
		}
	},
}
// main.js
import {hunhe,hunhe2} from './mixin'
Vue.mixin(hunhe)
Vue.mixin(hunhe2)
//In the component, a hunhe is introduced and used as a configuration item
// import {hunhe,hunhe2} from '../mixin'
export default {
	name:'School',
	data() {
		return {
			name:'Shang Silicon Valley',
			address:'Beijing',
			x:666
		}
	},
	// mixins:[hunhe,hunhe2],
}
4.plugins plug-in
- plugins plug-in is actually a function with an install method. In main JS through Vue Use () registers this plug-in, which is actually an automatic call to the install method of the function
5.scoped style
- Styles in other components are not affected
<style scoped>
	.demo{
		background-color: skyblue;
	}
</style>
Vi Browser local storage
1.localStorage
Stored in the hard disk, it will not disappear with the refresh of the browser
-
Store data (in the form of key value) locastorage setItem('msg','hello!')
-
If the data is an object, it must be converted to json format data
-
let p = {name: 'Zhang San', age: 18} localstorage setItem('person',JSON.stringify(p))
-
-
Read data localstorage getItem('msg')
- const result = localStorage.getItem('person') console.log(JSON.parse(result))
-
Clear data localstorage removeItem('msg')
-
Empty all data localstorage clear()
2.sessionStorage
The API is exactly the same as localStorage, except that the data will be lost as the browser refreshes
VII Communication between components
1. The child transfers data to the parent
-
The first is to transfer function type data with props
// Parent component
<School :getSchoolName="getSchoolName"/>
// The subcomponent receives data of function type
props:['getSchoolName'],
// The subcomponent calls the data of the passed function type with parameters
methods: {
			sendSchoolName(){
				this.getSchoolName(this.name)
			}
		}
// The callback is written in the parent component getSchoolName(name){ console.log('App Received school name:',name) }, -
The second method: the parent component binds a custom event to the child component
// Bind custom events for child components in parent components
<Student @atguigu="getStudentName" />
// Trigger a custom event bound to itself in the subcomponent and pass parameters
sendStudentlName(){
				//Trigger the atguigu event on the Student component instance
				this.$emit('atguigu',this.name,666,888,900)
			},
// Execute callback function in parent component getStudentName(name,...params){ console.log('App Received Student Name:',name,params) this.studentName = name },-
// Unbind custom events in self components
unbind(){
		this.$off('atguigu') //Unbind a custom event
		// this.$off(['atguigu','demo']) / / unbind multiple custom events
		// this.$off() / / unbind all custom events
		},
// Destroy component instance
death(){
		this.$destroy() //The instance of the current Student component is destroyed. After destruction, the custom events of all Student instances are ineffective.
		}
-
-
Sheet 3: Pass r e f s take reach group piece , however after use refs gets the component and uses refs gets the component, and then uses on to bind custom events for the sub components. The rest are similar
// Parent component

<Student ref="student" @click.native="show"/>
// @click.native="show" components use native events, plus Native modifier

mounted() {
	this.$refs.student.$on('atguigu',this.getStudentName) //Binding custom events
// this.$refs.student.$once('atguigu',this.getStudentName) / / bind custom events (one-time)
}
2. Global event bus
-
Install global event bus
// main.js (install global event bus)
// Mount $bus on the prototype object of Vue, then both vc and vm can find $bus
beforeCreate() {
		Vue.prototype.$bus = this //Install global event bus
}
// Components that transfer data methods: { sendStudentName(){ this.$bus.$emit('hello',this.name) } }// Component receiving data (bind custom events and specify callback for the component transmitting data) mounted() { // console.log('School',this) this.$bus.$on('hello',(data)=>{ console.log('I am School Component, received data',data) }) }, beforeDestroy() { this.$bus.$off('hello') },
3. Subscription and publication of messages
-
Install and import PubSub from 'PubSub JS'
-
// Components that emit messages methods: { sendStudentName(){ // this.$bus.$emit('hello',this.name) pubsub.publish('hello',666) } } -
// A component that receives messages and uses data
mounted() {
	 this.pubId = pubsub.subscribe('hello',(msgName,data)=>{
	 console.log('Someone posted it hello News, hello The callback of the message was executed',msgName,data)
		})
},
beforeDestroy() {
			// this.$bus.$off('hello')
			pubsub.unsubscribe(this.pubId)
}
VIII Transition and animation
1.transition
-
The first css writing method
-
// Name is the name given in conjunction with css, and the appear ance attribute is the animation effect added at the beginning // Template template <transition name="hello" appear> <h1 > How do you do!!!! </h1> </transition> -
//css Style .hello-enter-active { animation:hello 0.5s linear; } .hello-enter-active { animation:hello 0.5s linear reverse; } @keyframes hello { from { transition:translateX(-100%) } to { transition:translateX(0px) } } -
The second css writing method
-
/* The starting point of entry and the end point of departure */ .hello-enter,.hello-leave-to{ transform: translateX(-100%); } /* The end of entry and the starting point of departure */ .hello-enter-to,.hello-leave{ transform: translateX(0); } /* The whole movement process */ .hello-enter-active,.hello-leave-active{ transition: 0.5s linear; } -
Third: use the third-party style library animate css
-
// Install and introduce third-party libraries
import 'animate.css'
// Template template
<transition-group
			appear
			name="animate__animated animate__bounce"
			enter-active-class="animate__swing"
			leave-active-class="animate__backOutUp"
>
			<h1 v-show="!isShow" key="1">How do you do!</h1>
			<h1 v-show="isShow" key="2">Yu Cuiwen!</h1>
		</transition-group>
IX slot
1. Default slot
Use < slot > < / slot > to dig a pit in the component, and when it is used, it can be filled with content (buried soil) in the component
2. Named slot
When there are several slots, name each slot with < slot name = "first" > < / slot >, and then add < H2 slot = "first" > < / H2 > to the label used to distinguish
3. Scope slot
- In fact, the data is in the slot component, but I want to show the usage data in the parent component
Transfer data in the slot component < slot: Games = "games" > < / slot >
However, it is not received by props in the parent component. A < template > < / template scope / slot scope = "atguigu" > component must be packaged in < category > < / category > > to receive data objects and use them internally
`
- {{g}}
- `
X Vuex plug-in
-
Build a state management library store state management library in src
-
// store/index.js
import Vue from "vue"
// Introducing plug-ins
import Vuex from "vuex"
// Register plug-ins
Vue.use(Vuex)

// Using plug-ins
export default new Vuex.Store({
    modules: {
        countAbout: countOptions,   // modularization
        personAbout: personOptions
    }
})
// main.js
import store from "./store"

new Vue({
  render: h => h(App),
  store,
}).$mount('#app')

1.state object - save state
-
(1). mapState helper function
-
// store/index.js
state: {
        sum: 0,
        address: "Xi'an",
        school: 'nwpu',
    }
// In component import { mapState } from "vuex"; computed: { // ... mapState(["countAbout", "personAbout"]), / / regardless of modularization ...mapState("countAbout", ["sum", "address", "school"]), // Modular writing ...mapState("personAbout", ["personList"]), // Add modularity in front -
(2). Normal writing
-
// In component
computed: {
    personList() {
      return 									this.$store.state.personAbout.personList;
    },
    sum() {
      return this.$store.state.countAbout.sum;
    }
  }
2.getters object - calculate attributes
-
(1). mapGetters helper function
-
// store/index.js // The function parameter in the getters object is state getters: { firstPersonName(state) { return state.personList[0].name } } -
// In component import { mapGetters } from "vuex"; computed: { ...mapGetters("countAbout", ["bigSum"]), }, -
(2). Normal writing
-
// In component
computed: {
    firstPersonName() {
      return this.$store.getters["personAbout/firstPersonName"]; //Modular writing
    },
  },
3.actions object - asynchronous operation processing
-
(1).mapActions auxiliary function writing method
-
// store/index.js // The actions configuration object receives two parameters: context and payload // The context object has various attributes, such as dispath, commit and state attributes // payload is the value passed in actions: { addOdd(context, val) { if (context.state.sum % 2) { // state.sum += val context.commit('addOdd', val) } }, addWait(context, val) { setTimeout(() => { // context.state.sum += val context.commit('addWait', val) }, 500) } }, -
// In component import { mapActions } from "vuex"; methods: { ...mapActions("countAbout", ["addOdd", "addWait"]), }, -
Normal writing
-
methods: {
    addPersonWang() {
      const oneList = { id: nanoid(), name: this.name };
      this.$store.dispatch("personAbout/addPersonWang", oneList);
      this.name = "";
    },
    addPersonServer() {
      this.$store.dispatch("personAbout/addPersonServer");
    },
  }
4.mutations object - synchronous processing of data
-
// store/index.js mutations: { add(state, val) { state.sum += val }, cut(state, val) { state.sum -= val }, addOdd(state, val) { state.sum += val }, addWait(state, val) { state.sum += val }, }, -
mapMutations helper function
-
// In component import { mapMutations } from "vuex"; // The payload parameter is written in the template methods: { ...mapMutations("countAbout", ["add", "cut"]), } -
Normal writing
-
// In component
methods: {
    addPerson() {
      const oneList = { id: nanoid(), name: this.name };
      this.$store.commit("personAbout/ADD_PERSON", oneList);
      this.name = "";
    }
  }
Xi VueRouter routing
-
// router/index.js
// Router used to create the entire file
import VueRouter from 'vue-router'
export default new VueRouter ({
	routes:[
        ...
    ]
})

// main.js
import router from "./router"
Vue.use(VueRouter)
new Vue({
  render: h => h(App),
  router,
}).$mount('#app')
1. Basic use
-
Navigation bar: in router / index JS, and then use the < router link > tag in the component to realize route jump
-
// Active class adds a style to the active route
// to is the route path of the jump
<router-link class="list-group-item" active-class="active" to="/about">About</router-link>
<router-link class="list-group-item" active-class="active" to="/home">Home</router-link>
-
Display bar: display the contents of the navigation bar in the appropriate position
-
<router-view></router-view>
2. Multi level nesting
- In router / index JS, the configuration item children, and then nested in the routing component
3.query parameters
-
The first method is to jump the route and carry the query parameter. The string of to is written
-
<router-link :to="`/home/message/detail?id=${m.id}&title=${m.title}`">{{m.title}}</router-link> -
The second method: jump the route and carry the query parameter. The object writing method of to
-
<router-link :to="{ path:'/home/message/detail', query:{ id:m.id, title:m.title } }"> {{m.title}} </router-link> -
Next: in the corresponding display component, $route query. Id get data
-
The third method: named route & & rewrite the object writing method of query parameter to
-
The name configuration object can be added to the configuration item of routes, so that the object writing method of the query parameter to can be changed, and the path can be rewritten to the corresponding name
4.params parameters
-
It is basically similar to the query parameter, but the path:'detail/:id/:title' should be used in the routing configuration rule for placeholder
-
The first method is to jump the route and carry the params parameter, which is written as a string of to
-
<router-link :to="`/home/message/detail/${m.id}/${m.title}`">{{m.title}}</router-link> -
The second is to jump the route and carry the params parameter, which is the object writing method of to
-
<router-link :to="{
					name:'xiangqing',
					params:{
						id:m.id,
						title:m.title
					}
				}">
					{{m.title}}
</router-link>
5. props configuration of routing
Configure rules in routing (router / index.js)
-
// Configure in Detail component
// The first way to write props is that the value is an object, and all key values in the object will be passed to the Detail component in the form of props.
props:{a:1,b:'hello'}

//The second writing method of props is Boolean value. If the Boolean value is true, all params parameters received by the routing component will be passed to the Detail component in the form of props.
props:true

//The third way to write props is that the value is a function
props($route){
	return {
		id:$route.query.id,
		title:$route.query.title,
		a:1,
		b:'hello'
	}
}
Receive and use Detail in the component
-
// Detail component
// Receive props from components
props:['id','title'],

 // < template > template
<ul>
		<li>Message number:{{id}}</li>
		<li>Message Title:{{title}}</li>
</ul>
6. Programmed route navigation
Use the push and replace methods of $router to realize route jump without the help of < router link >
methods: {
			pushShow(m){
				this.$router.push({
					name:'xiangqing',
					query:{
						id:m.id,
						title:m.title
					}
				})
			},
			replaceShow(m){
				this.$router.replace({
					name:'xiangqing',
					query:{
						id:m.id,
						title:m.title
					}
				})
			}
		},
7. Cache route & & active inactive lifecycle function
-
Cache route: < keep alive >
// include cached route name
// Cache single route include = "News"
// Cache multiple routes: include = "['News','Message ']"
<keep-alive include="News">
		<router-view></router-view>
</keep-alive>
-
Active hook - it is called when the routing component is activated. You can set timers and other operations in this hook
-
Life cycle hook (inactive) - it is called when the routing component is inactive. You can clear the timer and other operations in this hook
-
These two hooks must be used together with < keep alive > to be effective
8. Route guard
1. Global routing guard
-
Global pre route guard - called during initialization and before each route switch
-
// router/index.js router.beforeEach((to,from,next)=>{ console.log('Pre routing guard',to,from) // meta objects in routing rules can be configured with other information if(to.meta.isAuth){ //Determine whether authentication is required if(localStorage.getItem('school')==='atguigu'){ next() }else{ alert('The school name is incorrect. You have no permission to view it!') } }else{ next() } }) -
Global post route guard - called during initialization and after each route switch
-
router.afterEach((to,from)=>{
	console.log('Post routing guard',to,from)
	document.title = to.meta.title || 'Silicon Valley system'
})
2. Exclusive routing guard
-
// In routing configuration rules
 					name:'xinwen',
					path:'news',
					component:News,
					meta:{isAuth:true,title:'Journalism'},
					beforeEnter: (to, from, next) => {
						console.log('Exclusive routing guard',to,from)
						if(to.meta.isAuth){ //Determine whether authentication is required
							if(localStorage.getItem('school')==='atguigu'){
								next()
							}else{
								alert('The school name is incorrect. You have no permission to view it!')
							}
						}else{
							next()
						}
					}
  // The exclusive front routing guard is used together with the global rear routing guard
3. Route guard in the assembly
-
// In component
//It is called when entering the component through routing rules
		beforeRouteEnter (to, from, next) {
			console.log('About--beforeRouteEnter',to,from)
			if(to.meta.isAuth){ //Determine whether authentication is required
				if(localStorage.getItem('school')==='atguigu'){
					next()
				}else{
					alert('The school name is incorrect. You have no permission to view it!')
				}
			}else{
				next()
			}
		},

//Called when leaving the component through routing rules
		beforeRouteLeave (to, from, next) {
			console.log('About--beforeRouteLeave',to,from)
			next()
		}
9.history mode and hash mode
- Configure mode:history or hash in routing rules
Xi Element UI component library
// main.js

//Complete introduction
//Import ElementUI component library
// import ElementUI from 'element-ui';
//Introduce all styles of ElementUI
// import 'element-ui/lib/theme-chalk/index.css';

//On demand import
import { Button,Row,DatePicker } from 'element-ui';

//Apply ElementUI
// Vue.use(ElementUI);
Vue.component('atguigu-button', Button);
Vue.component('atguigu-row', Row);
Vue.component('atguigu-date-picker', DatePicker);
,
beforeEnter: (to, from, next) => {
console.log('exclusive route guard ', to,from)
if(to.meta.isAuth) {/ / judge whether authentication is required
if(localStorage.getItem('school')==='atguigu'){
next()
}else{
alert('the school name is wrong and you have no permission to view it! '
}
}else{
next()
}
}
//The exclusive front routing guard is used together with the global rear routing guard
##### 3. Route guard in the assembly

* ```javascript
// In component
//It is called when entering the component through routing rules
		beforeRouteEnter (to, from, next) {
			console.log('About--beforeRouteEnter',to,from)
			if(to.meta.isAuth){ //Determine whether authentication is required
				if(localStorage.getItem('school')==='atguigu'){
					next()
				}else{
					alert('The school name is incorrect. You have no permission to view it!')
				}
			}else{
				next()
			}
		},

//Called when leaving the component through routing rules
		beforeRouteLeave (to, from, next) {
			console.log('About--beforeRouteLeave',to,from)
			next()
		}
9.history mode and hash mode
- Configure mode:history or hash in routing rules
Xi Element UI component library
// main.js

//Complete introduction
//Import ElementUI component library
// import ElementUI from 'element-ui';
//Introduce all styles of ElementUI
// import 'element-ui/lib/theme-chalk/index.css';

//On demand import
import { Button,Row,DatePicker } from 'element-ui';

//Apply ElementUI
// Vue.use(ElementUI);
Vue.component('atguigu-button', Button);
Vue.component('atguigu-row', Row);
Vue.component('atguigu-date-picker', DatePicker);