Vue introduction
What is vue?
- Build user interface
- It is very convenient to fill data into html pages with vue
- frame
- Framework is a ready-made solution. Programmers can only abide by the specifications of the framework and write their own business functions!
- To learn vue is to learn the usage specified in the vue framework!
- vue instructions, components (reuse of UI structure), routing, Vuex, vue component library
- Only after mastering the contents listed by the teacher above can we have the ability to develop vue projects!
Two characteristics of vue
-
Data driven view:
- Changes in data drive the view to update automatically
- Benefits: programmers just maintain the data well, and the page structure will be vue automatically rendered!
-
Bidirectional data binding:
In the web page, the form is responsible for collecting data, and Ajax is responsible for submitting data.
- js data changes will be automatically rendered to the page
- When the data collected by the form on the page changes, it will be automatically obtained by vue and updated into js data
Note: the underlying principle of data-driven View and bidirectional data binding is MVVM (Mode data source, View view and ViewModel are examples of vue)
MVVM
MVVM is the core principle of vue realizing data-driven view and bidirectional data binding.
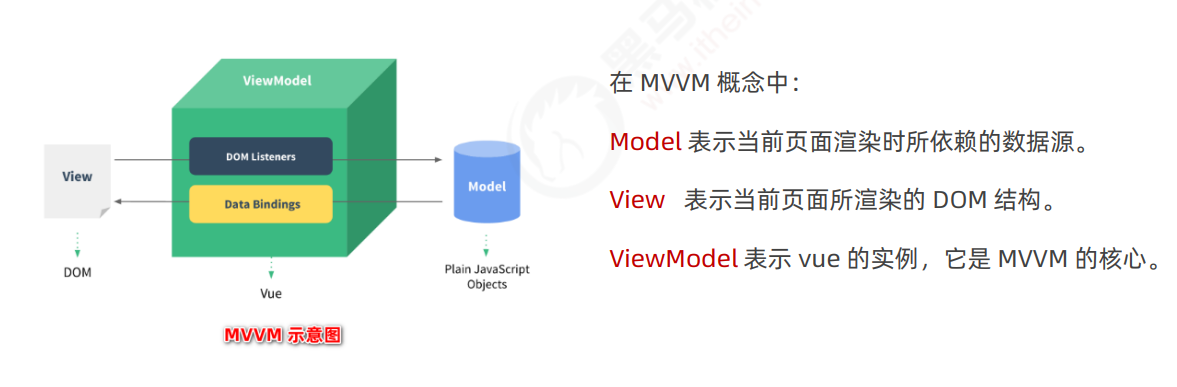
How MVVM works
As the core of MVVM, ViewModel connects the data source (Model) of the current page with the structure (View) of the page.

When the data source changes, it will be monitored by ViewModel, and the VM will automatically update the structure of the page according to the latest data source.
When the value of a single element changes, it will also be monitored and heard by the VM. The VM will automatically synchronize the latest value after the change to the Model data source
start
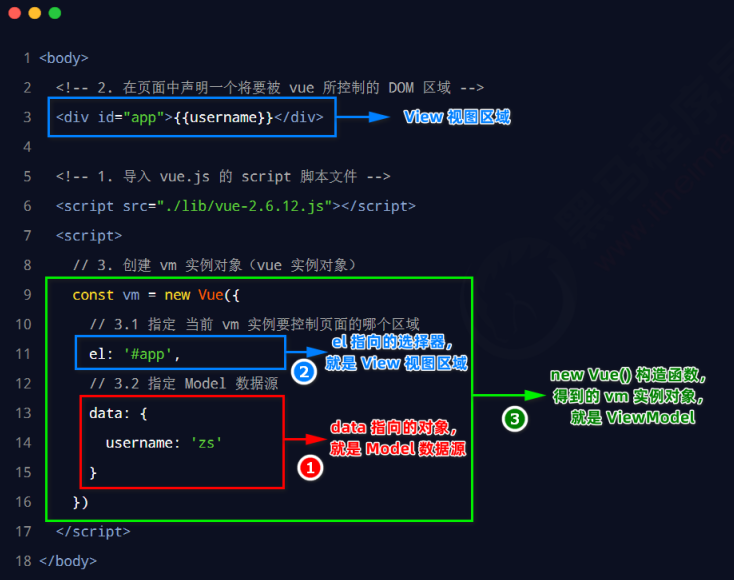
First Vue program:
-
Import a development version of Vue js
-
Create Vue instance object and set el attribute and data attribute
-
Use concise template syntax to render data to the page
{{message}}
Correspondence between basic code and MVVM
Plug in Library
day.js Quick date formatting
Solve the problem of comma and semicolon when formatting Vue files:

In the root directory, add a prettierrc.json configuration file, write:
{
	"singleQuote": true,
    "semi": false,
    "trailingComma": "none"
}
Once and for all:
-
Create a new user directory on your computer prettierrc.json file, the same as the above parameters.
-
In the setting of * * Vs code * * Add configuration path to JSON:
	// Set the configuration file to solve the problem of red commas and semicolons when formatting vue files
	// Pay attention to the configuration path here, and remember to make the user name on your computer
  "prettier.configPath": "C:/Users/mi/.prettierrc.json",
Solve the problem of spaces before function parentheses when formatting:
- The Prettier formatting plug-in cannot handle the problem of adding spaces before function parentheses
Solution 1. In the current project eslintrc. Add ignore and blank space to the rules in JS and pop up red prompt:
'space-before-function-paren':['error','never']
Solution 2: this problem can be solved by using the Prettier now plug-in.
vue instruction
1. Content rendering instruction
- v-text sets the content of the label. The default writing method will overwrite the original content inside the element, and the internal expression is supported.
- {{}} interpolation expression: it is most used in actual development. It is only a placeholder for the content and will not overwrite the original content!
- Function of v-html instruction: you can render the string with label into real HTML content!
Note: interpolation expressions can only be used in the content node of an element, not in the attribute node of an element!
2. v-bind attribute binding attribute
- In vue, you can use the v-bind: instruction to dynamically bind values for the attributes of elements;
- Abbreviations are in English:
-
During binding with v-bind attribute, if the binding content needs to be dynamically spliced, the outside of the string should be wrapped with single quotation marks, for example:
<div :title="'box' + index">This is a div</div>
-
When using v-bind to bind an element, if you want to pass in a Number value, avoid being parsed into a string
<select    v-model='value'>
	<option  : value='number'>...</option>
</select>
3. v-on event binding attribute
-
v-on: short for@
-
The syntax format is:
<p> count The values are:{{ count }}</p>

<button @click="add"></button>

methods: {
   add() {
			// If you want to modify the data in data in the method, you can access it through this
			this.count += 1
   }
}
$event
During event binding, there will be a native DOM event object e. If the event object passes in parameters, the default event object will be overwritten.
Application scenario of $event: if the default event object e is overwritten, you can manually pass a $event.
For example:
// Click the button to increase the count value, bind the click event and pass the parameter

<button @click="add(3, $event)"></button>

methods: {
   add(n, e) {
			// If you want to modify the data in data in the method, you can access it through this
			this.count += 1
   }
}
Event modifier:
A very interesting thing during event binding is to control the triggering of events.
-
.prevent
<a @click.prevent="xxx">link</a>
-
.stop
<button @click.stop="xxx">Button</button>
Event modifier
explain
.prevent
Block default behavior (e.g. prevent a link from jumping, prevent form submission, etc.)
.stop
Prevent bubbling events
.capture
Trigger the current event handler in capture mode
.once
The bound event is triggered only once
.self
Only in event Target is the event handler function triggered when the current element itself
Key modifier
Key
Key code value
use
Enter
13
.enter
Tab
9
.tab
Delete
46
. delete (capture "delete" and "backspace" keys)
Esc
27
.esc
BackSpace
8
.space
Up Arrow
38
.up
Left Arrow
37
.left
Right Arrow
39
.right
Dw Arrow
40
.down
1. Customize other key aliases:
Vue.config.keyCodes.f6 = 118

<input @keyup.f6="xxx" />  // The callback of xxx will be triggered only by clicking f6
2. Multiple keys trigger this event at the same time
@keyup.ctrl.enter="XXX" // Press ctrl and enter to trigger event execution
[case application]: after entering the form, press enter to add, and press esc to clear the form
<input type="text" v-model="newbrand"
       @keyup.enter="add"
       @keyup.esc="newbrand=''" />
4. v-model form binding
Realize the bidirectional binding of form elements and data without operating DOM.
Modifier of v-model instruction
Modifier
effect
Examples
.number
Automatically convert the user input value to Number
<input v-model.number="age" />
.trim
Remove leading and trailing white space characters
<input v-model.trim="msg" />
.lazy
Update page data when the form loses focus after input, rather than real-time update
<input v-model.lazy="msg" />
-
Input input box
-
type="text"
-
type="radio"
-
type="checkbox"
-
type="xxxx"
-
-
textarea
-
select
5. Conditional rendering instruction
Conditional rendering instructions are used to assist developers in controlling the display and hiding of DOM on demand.
v-if and v-show
-
The principle of v-show is to dynamically add or remove style = "display: none;" for elements Style to control the display and hiding of elements.
- If you want to frequently switch the display state of elements, the performance will be better with v-show.
-
The principle of v-if is to dynamically create or remove DOM elements every time to realize the display and hiding of elements.
- If the conditions rarely change at run time, it is better to use v-if.
There are two ways to use the v-if instruction:
-
Directly give a Boolean value of true or false
<p v-if="true">cover v-if Controlled elements</p>
-
Provide a judgment condition for v-if to control the display and hiding of elements according to whether the judgment result is true or false
<p v-if="type === 'A'">good</p>
v-else-if
<div v-if="type === 'A'">excellent</div>
<div v-else-if="type === 'B'">good</div>
<div v-else-if="type === 'C'">pass</div>
<div v-else>fail,</div>
6. List rendering instruction
Loop rendering a list structure based on an array.
v-for
The v-for instruction requires special syntax in the form of item in items
- items is an array of source data (to be cycled), and
- Item each item that is cycled.
[example]: dynamically render form data:
 <link rel="stylesheet" href="./lib/bootstrap.css">

  <!-- hope Vue Can control the following div,Help us fill in the data div inside -->
  <div id="app">
    <table class="table table-bordered table-hover table-striped">
      <thead>
        <th>Indexes</th>
        <th>Id</th>
        <th>full name</th>
      </thead>
      <tbody>
        <!-- Official suggestion: as long as it is used v-for Instruction, then you must bind one :key attribute -->
        <!-- And try to id As key Value of -->
        <!-- Official pair key The value type of is required: string or numeric type -->
        <!-- key The value of must not be repeated, otherwise the terminal will report an error: Duplicate keys detected -->
        <tr v-for="(item, index) in list" :key="item.id">
          <td>{{ index }}</td>
          <td>{{ item.id }}</td>
          <td>{{ item.name }}</td>
        </tr>
      </tbody>
    </table>
  </div>
Use the key to maintain the status of the list
The official recommendation is to bind a key attribute with the v-for instruction. The function of key is to update the virtual DOM efficiently.
-
The value type of key is required: string or number type
-
Take the value of the data item id attribute as the value of the key (because the value of the id attribute is unique)
-
If you change the data order, index will be reordered, so the value of index is not unique.
Calculated attribute
Monitor the changes of data in real time and return a new calculated value for the component to use when rendering DOM.
It can be used by template structures (interpolation, v-bind) or methods methods.
- However, in some cases, we may need to display the data after some transformation, or combine multiple data for display. At this time, we can use the calculation attribute.
Example 1:
<div id="app">
  <h2>{{getFullName()}}</h2>
  <h2>{{fullName}}</h2>
</div>


  const vm = new Vue({
    el: '#app',
    data: {
      firstName: 'lin',
      lastName: 'willen'
    },
    computed: {
      fullName () {
        return this.firstName + ' ' + this.lastName;
      }
    },
     // Using methods: the method is called every time
    methods: {
      getFullName () {
        return this.firstName + ' ' + this.lastName;
      }
    }
  })
characteristic:
- When defining, it should be defined as "method".
- When using calculation attributes, you can use ordinary attributes
- The reuse of code is realized. As long as the dependent data source in the calculation attribute changes, the calculation attribute will be re evaluated automatically.
Example 2:
<div id="app">
  <h2>Total price:{{totalPrice}}</h2>
</div>


const vm = new Vue({
    el: '#app',
    data: {
      books:[
        {id: 1001, name: 'Unix Programming art',price: 119},
        {id: 1002, name: 'Code Complete ',price: 105},
        {id: 1003, name: 'Deep understanding of Computer Principles',price: 99},
        {id: 1004, name: 'Modern operating system',price: 109}
      ]
    },
    computed: {
      totalPrice () {

        let totalPrice = 0;

        for (let i in this.books) {
          totalPrice += this.books[i].price;
        }

        // You can also use for of
        for (let book of this.books) {
          totalPrice += book.price;
        }
        return totalPrice;
      }
    }
  })
Calculate attribute vs method
Both methods and computed seem to be able to implement our functions, so why do we need one more calculation attribute
- methods: the method will be called every time it is used
- Computed: the computed attribute will cache the computed result. It will only be called once if it remains unchanged. It will be called again unless the original attribute is changed
Compute properties vs listeners
Focus on different application scenarios:
- The calculation attribute focuses on monitoring the changes of multiple values, and finally calculates and returns a new value.
- The listener focuses on listening to the changes of single data, and finally performs specific business processing without any return value.
vue component
What is component development?
According to the idea of encapsulation, the reusable UI structure on the page is encapsulated into components to facilitate the development and maintenance of the project.
Component development in vue
- vue is a front-end framework supporting component-based development.
- The suffix of the component in Vue is vue
Composition of components
Each vue components are composed of three parts:
-
Template: the template structure of the component, and each component must contain the template structure.
-
script: JavaScript behavior of components
-
Style: the style of the component
//Add the lang = "less" attribute on the tag to write the style of the component using the less syntax
//scoped prevent style conflicts
script node:
(1) name node in script
- It is used to define the name of components. Each component can be clearly distinguished during debugging.
(2) data node in script
- The data required during component rendering must be a function and cannot directly point to object data.
(3) methods node in script
- The event handling function (method) in the component must be defined in the methods node
Register private components
Private sub components are registered through components, and the registered components can only be used in the current component.
1. Use import syntax to import required components
import Left from '@/components/Left.vue'
2. Use the components node in the script tag to register components
<script>
export default {
  comments:{
    Left
  }
}
</script>
3. Use the components just registered in the form of labels
<template>
   <Left></Left>
</template>
Register global components
In the main of vue project JS entry file, via vue The component () method can register global components.
Registration:
import Vue from 'vue'
import App from './App.vue'

// Import the component that needs to be globally registered
import Count from '@/components/Count.vue'

// Parameter 1: the 'registered name' of the component. It is required to be the same as this name when it is used in the form of label in the future.
// Parameter 2: the component that needs to be globally registered.
Vue.component('MyCount', Count)

// The environment configuration prompted by the message is set as the development environment or production environment
Vue.config.productionTip = false

new Vue({
  // Which is rendered in the render function vue component, then this component is called "root component"
  render: h => h(App)
}).$mount('#app')
use:
<template>
    // Note the 'registration name' here
    <MyCount ></MyCount>
</template>
The case of the name when the component is registered
There are two ways to define component registration names in Vue:
- Dash nomenclature, such as my wiper and my search
- Components must also be named with dashes
- Nomenclature of large humps, such as MySwiper and MySearch
- It can be used not only according to the naming method of large hump, but also converted into the name of short horizontal line.
Note: in the development, it is recommended to use the hump naming method to register the name of the component, because it is more applicable.
Style conflict between components
By default, it is written in The styles in vue components take effect globally, so it is easy to cause style conflicts among multiple components.
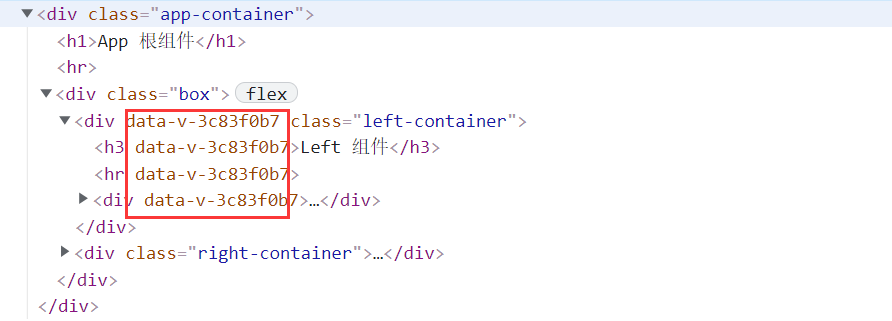
scoped attribute
Make the style of the current component ineffective for its sub components.
Vue provides adding scoped attribute in style node to prevent style conflict:
- The principle is to assign a unique custom attribute to each component. When writing a component style, you can control the scope of the style through the attribute selector.
<template>
    <div class="container" data-v-001>
        <h3 data-v-001 > Rotating chart assembly</h3>
	</div>
</template>

<style>
  // Prevent style conflicts through brackets' attribute selector '
  // Because the custom attribute assigned to each component is' unique '
 . container[data-v-001]{
      border: 1px solid red;
    }
</style>
In order to improve the development efficiency and development experience, directly use the scoped attribute in the style node:
<style lang="less" scoped>
</style>
/deep / style penetration
Make certain styles effective for subcomponents.
Usage scenario: when using a third-party component library, you need to modify the default style of the third-party component.
<style lang="less" scoped>

/*When / deep / is not added, the generated selector format is title[data-v-052242de]*/
.title{
    color: blue;
}

/*When / deep / is added, the generated selector format is [data-v-052242de] title*/
/deep/ .title {
  color: pink;
}
</style>
Class is bound to Style
Dynamically manipulate element styles through v-bind.
1. Dynamically bind HTML class:
Dynamically bind the class name of class for the element through ternary expression:
<h3 class="thin" :class="isItalic ?'italic':''">MyDeep assembly</h3>
<button @click="isItalic=!lisItalic"> Toggle Italic </button>


data(){
	return { isItalic:true }
.thin{
	font-weight:200;
.italic{
	font-style:italic;
}
Bind with HTML array syntax 2
If the element needs to dynamically bind the class names of multiple classes, the syntax format of array can be used at this time
<h3 class="thin":class="[isItalic? 'italic': '',isDelete? 'delete':'']">MyDeep assembly</h3>
<button @click="isItalic= !isItalic"> Font thinning </button>
<button @click="isDelete= !isDelete"> Add strikethrough e</button>

<script>
export default {
  data () {
    return {
      isItalic: true,
      isDelete: false,
    }
  }
}
</script>
3. Bind HTML class with object syntax:
<h3 class="thin":class="classObj">MyDeep assembly</h3>
<button @click="classObj.isItalic = !classObjisItalic"> Font thinning </button>
<button @click="classObj.isDelete = !classObj.isDelete"> Add strikethrough e</button>

<script>
export default {
  data () {
    return {
        classObj:{
            isItalic: true,
      		isDelete: false,
        }
    }
  }
}
</script>
4. Bind inline style s with object syntax
Naming can be done by hump or dash (remember to enclose it in quotation marks):
<div :style="{color:active, fontSize: fsize +'px','background-color': bgcolor}">
    Hello world!!
</div>

<button @click="fsize += 1">Font size+1</button>
<button @click="fsize -= 1">Font size-1</button>


data () {
    return {
      active: 'red',
      fsize: 30,
      bgcolor: 'pink'
    }
}
Custom attribute props
props is a custom attribute of a component, which allows the user to specify the initial value for the current component through the custom attribute, which greatly improves the reusability of the component.
Declare prpos in component
The definition of my article component is as follows:
<template>
<h3>title:{{title}}</h3>
<h5>Author:{{author}}</h5>
</template>
The data passed from the parent component to the my article component must be declared in the props node:
<script>
    export default {
		props:['title','author'],
</script>
Undeclared props cannot be used
If the parent component passes undeclared props attributes to the child component, these attributes will be ignored and cannot be used by the child component.
Dynamically bind the value of props
Using the form of v-bind attribute binding, you can dynamically bind the value of props for components.
<!--adopt V-bind Property binding for author Dynamically assign a value to an expression

<my-article :title="info.title" :author="'post by'+info.author"></my-article>
Case naming of props
If the name of props attribute is declared by "camel case" in the component, there are two ways to bind the value of the attribute:
<script>
    export default {
		props:['pubTime'],  // Use the 'hump naming' method to declare the pubTime attribute for the current component
</script>
When in use, it can be named by hump or separated by dashes. The form is the value of component binding attribute:
<my-article pubTime="2021" ></my-article>
// Equivalent to
<my-article pub-time="2021" ></my-article>
props verification
-
Basic type check type
props:{ //8 basic types supported propA:String, //String type propB:Number, //Number type propC:Boolean, //Boolean type propD:Array, //Array type propE:Object, //object type propF:Date, //Date type propG:Function, //Function type propH:Symbol //Symbol type } -
Multiple possible types
-
required for verification
-
The default value of the property is default
props:{
    // Define multiple possible types for the current property in the form of an array
    type: [String, Number],
    required: true,
    default: 0,
}
Custom validation function
When encapsulating components, you can specify a user-defined verification function for the prop attribute, so as to control the value of the prop attribute more accurately:
 props:{
   type:{
       // Verify the type attribute through the validataor function, and the attribute value is received through the val formal parameter
     validataor(val){
       // You must match one of the following strings
       return ['success','warning','danger'].indexOf(val) !== -1
     }
   }
}
prpos passes in different initial values
In actual development, we often encounter the following situations:
- When different components use the same registered component, you want to assign a different initial value.
1. The packager of the component allows the user to customize the initial value through props:
<template>
  <div>
    <h5>Count Is a global component and will be Left and Right Component use</h5>
    <p>count The values are:{{ init }}</p>
    <button @click="count += 1">+1</button>
  </div>
</template>

<script>
export default {
  // props: ['init'],
  props: {
    // The name of the custom attribute is customized by the encapsulator (as long as the name is legal)
    init: {
      // If the init attribute is not passed when the Count component is used by the outside world, the default value will take effect
      default: 0,
      // The specified value type must be a Number
      type: Number,
      // Required item verification (indicating that the value must be passed in)
      required: true
    }
  },

  data() {
    return {
        //props is read-only and cannot be modified
       // To modify the value of props, you can transfer the value of props to data
      count: this.init
    }
  }
}
2. The user of the component passes in the initial value through the attribute node
Left and Right components:
<template>
  <div class="left-container">
    <h3>Left assembly</h3>
    <hr />
    <MyCount :init="9"></MyCount>
  </div>
</template>


<template>
  <div class="right-container">
    <h3>Right assembly</h3>
    <hr />

    <MyCount :init="6"></MyCount>
  </div>
</template>
Attention points of parameters in props
-
props can define multiple possible data types for data through [];
-
props passed in Object. The default value must be fn
props: {
commCount: {
type: String,
default: ''
},
pubdate: {
//Define multiple possible types for the current property in the form of an array
type: [String, Number],
default: ''
},
cover: {
type: Object,
//Return the default value of cover through the default function
default: function() {
//The object of this return is the default value of the cover attribute
return { cover: 0 }
}
}
}

- Props is read-only. If you want to modify the value of props, you can transfer the value of props to data.
- props has three attribute values: default, type and required.
Custom event
When encapsulating a component, in order for the user of the component to listen to the changes of the state in the component, the user-defined event of the component is needed.
Three steps to use custom events in vue2:
-
When encapsulating components (subcomponents): trigger custom events
-
When using a component (parent component): listen for custom events
Trigger custom event
// Subcomponents

<button @click="onBtnClick"> +1 </button>

<script>
export default {
    data() {
        // The child component's own data. In the future, you want to pass the count value to the parent component
        return { count: 0 }
    },
    methods: {
        onBtnClick() {
            this.count t= 1
            //When modifying data, the user-defined event is triggered through $emit()
            // Call this when you click the '+ 1' button$ Emit triggers a custom numchange event
            this.$emit( 'numchange')}
    }
}
</script>
Listen for custom events
// Parent component
<Son @numchange="getNewCount"></Son>

methods : {
	getNewCount(val) {
	console.log('I got it count Change of value', val)
},
Custom event parameters
After calling this$ When the emit() method triggers a custom event, you can pass parameters for the custom event through the second parameter:
methods: {
    onBtnClick() {
        this.count t= 1
        this.$emit( 'numchange' , this.count)} // Trigger a user-defined event and pass parameters through the second parameter
}
Filter filter
In Vue 3 Filter related functions are eliminated in the version of X.
In Vue 3 X use calculation attributes or methods instead of the eliminated filter function.
Filters are often used to format text. Filters can be used in two places: double bracket interpolation expressions and v-bind attribute bindings.
<!-- Passed in double curly brackets | call capitalize Filter, right message Format values  -->
{{ message | capitalize }}

<!-- stay `v-bind` in -->
<div v-bind:id="rawId | formatId"></div>
Private filter
The filter defined under the filters node is called "private filter" because it can only be used in the el area controlled by the current vm instance.
Create a private filter. The example code is as follows:
const vm = new Vue({
    el: '#app',
    data: {
        message: 'hello world!',
        info: 'title info'
    },
    // Define filters under the filters node
    filters: {
        // Filter for converting initials to uppercase
        capitalize (value) {
            return value.charAt(0).toUpperCase() + value.slice(1)
        }
    }
Global filter
If you want to share filters among multiple vue instances, you can define global filters in the following format:
// Vue. The filters () method receives two parameters:
// The first parameter: the name of the filter, and the second parameter: the processing function of the filter

Vue.filter('capitalize',(str)=>{
    return value.charAt(0).toUpperCase() + value.slice(1)'
} )
Call multiple filters:
{{ message | filterA | filterB }}
- First give the value of message to filterA for processing, then give the processing result of filterA to filterB for processing, and finally render the processing result of filterB to the page as the final value.
Filter transmission parameters
The filter is a JavaScript function, so it can receive parameters:
{{ message | filterA('arg1', arg2) }}

// The first parameter is always the value to be processed before the 'pipe character', and the second parameter is the parameter passed when calling the filter

Vue.filter('filterA',(msg,arg1,arg2)=>{
	// Logical code of filter
})
Here, filterA is defined as a filter function that receives three parameters. The value of message is the first parameter, the ordinary string 'arg1' is the second parameter, and the value of expression arg2 is the third parameter.
<p>{{message | cap | maxl(5)}}</p>


Vue.filter('cap', (str) => {
    return str.charAt(0).toUpperCase() + str.slice(1) + '----'
})

Vue.filter('maxl', (str, len = 10) => {
    if (str.length <= len) return str
    return str.slice(0, len) + '....'
})
var app = new Vue({
    el: '#app',
    data: {
        message: 'hello Vue 2021 October 30, 2013 00:07:45!'
    }
Precautions for filter
- In the filter function, there must be a return value
- In the formal parameter of the filter, you can get the value to be processed before the "pipe character"
- If the names of the global filter and the private filter are the same, the private filter is called according to the "proximity principle"“
for attribute of label
Enable and disable radio buttons using the attributes of label:
<input type="checkbox" :id="'cb' + item.id" v-model="item.status">
<label  :for="'cb' + item.id" v-if="item.status">Enabled</label>
<label  :for="'cb' + item.id" v-else>disabled </label>
watch listener
The watch listener monitors the changes of data, so as to do specific operations for the changes of data.
Format of listener
- Method format listener
- It cannot be triggered automatically when you first enter the page!!
- If the listener is an object, if the properties in the object change, the listener will not be triggered!
- Object format listener
- The listener can be triggered automatically through the immediate option!
- You can use the deep option to let the listener deeply listen to the changes of each attribute in the object!
Listener created using method format:
Monitor the change of username value, and use axios to initiate Ajax request to detect whether the currently entered username is available:
import axios from 'axios'

export default{
    data(){
        return{ username: ''}
    }
},
watch: {
    // newVal is' new value after change ', and oldVal is' old value before change'
    async username(newVal,oldVal) {
        if (newVal === '') return
        // Use axios to initiate a request and judge whether the user name is available
        const { data: res } = await axios.get(`https://www.escook.cn/api/finduser/${newVal}` )
        console.log(res)
    }
}
When created using the method: the component will not call the watch listener after the initial loading.
immediate option
If you want the watch listener to be called immediately when the browser is open, you need to use the immediate option.
Listener created using object format:
watch: {
    username: {
        // Handler is a fixed writing method, which means that when the value of username changes, the handler processing function will be called automatically
        async handler(newVal,oldVal) {
            if (newVal === '') return
            const { data: res } = await axios.get('https://www.escook.cn/api/finduser/' + newVal)
            console.log(res)
        },
            // Indicates that the current watch listener is triggered immediately after the page is rendered for the first time
            immediate: true
    }
}
- Using handler to define listener functions
- immediate controls whether the listener is triggered automatically. The default value is false and does not trigger immediately.
deep option
If the watch is listening on an object, if the attribute value in the object changes, it cannot be listened. At this time, you need to use deep to enable deep listening.
<input type="text" v-model.trim="username"/>


data: {
   info: {username: 'admin'}
},
watch:{
    // Listen for changes in info objects
	info:{
      	handler(newVal){
            console.log(newVal.username)
		},
	// Enable deep listening to monitor the changes of each attribute value. The default value is false
	deep: true
	}
}
Listen for changes in a single attribute of an object
If you only want to listen for changes to a single attribute in an object, you can define a watch listener as follows.
const vm = new Vue({
    el: '#app',
    data: {
        info: {username: 'admin',}
    },
    watch:{
        'info.username':{
            handler(newVal){
                console.log(newVal)
            },
        }
    }
})
Component lifecycle
- Life Cycle refers to the whole phase of a component from creation - > operation - > destruction, emphasizing a time period.
- Life cycle function: it is a built-in function provided by vue framework. It will be automatically executed in order along with the life cycle of components.
Life cycle emphasizes time period, and life cycle function emphasizes time point.
Classification of life cycle functions
Life cycle diagram:
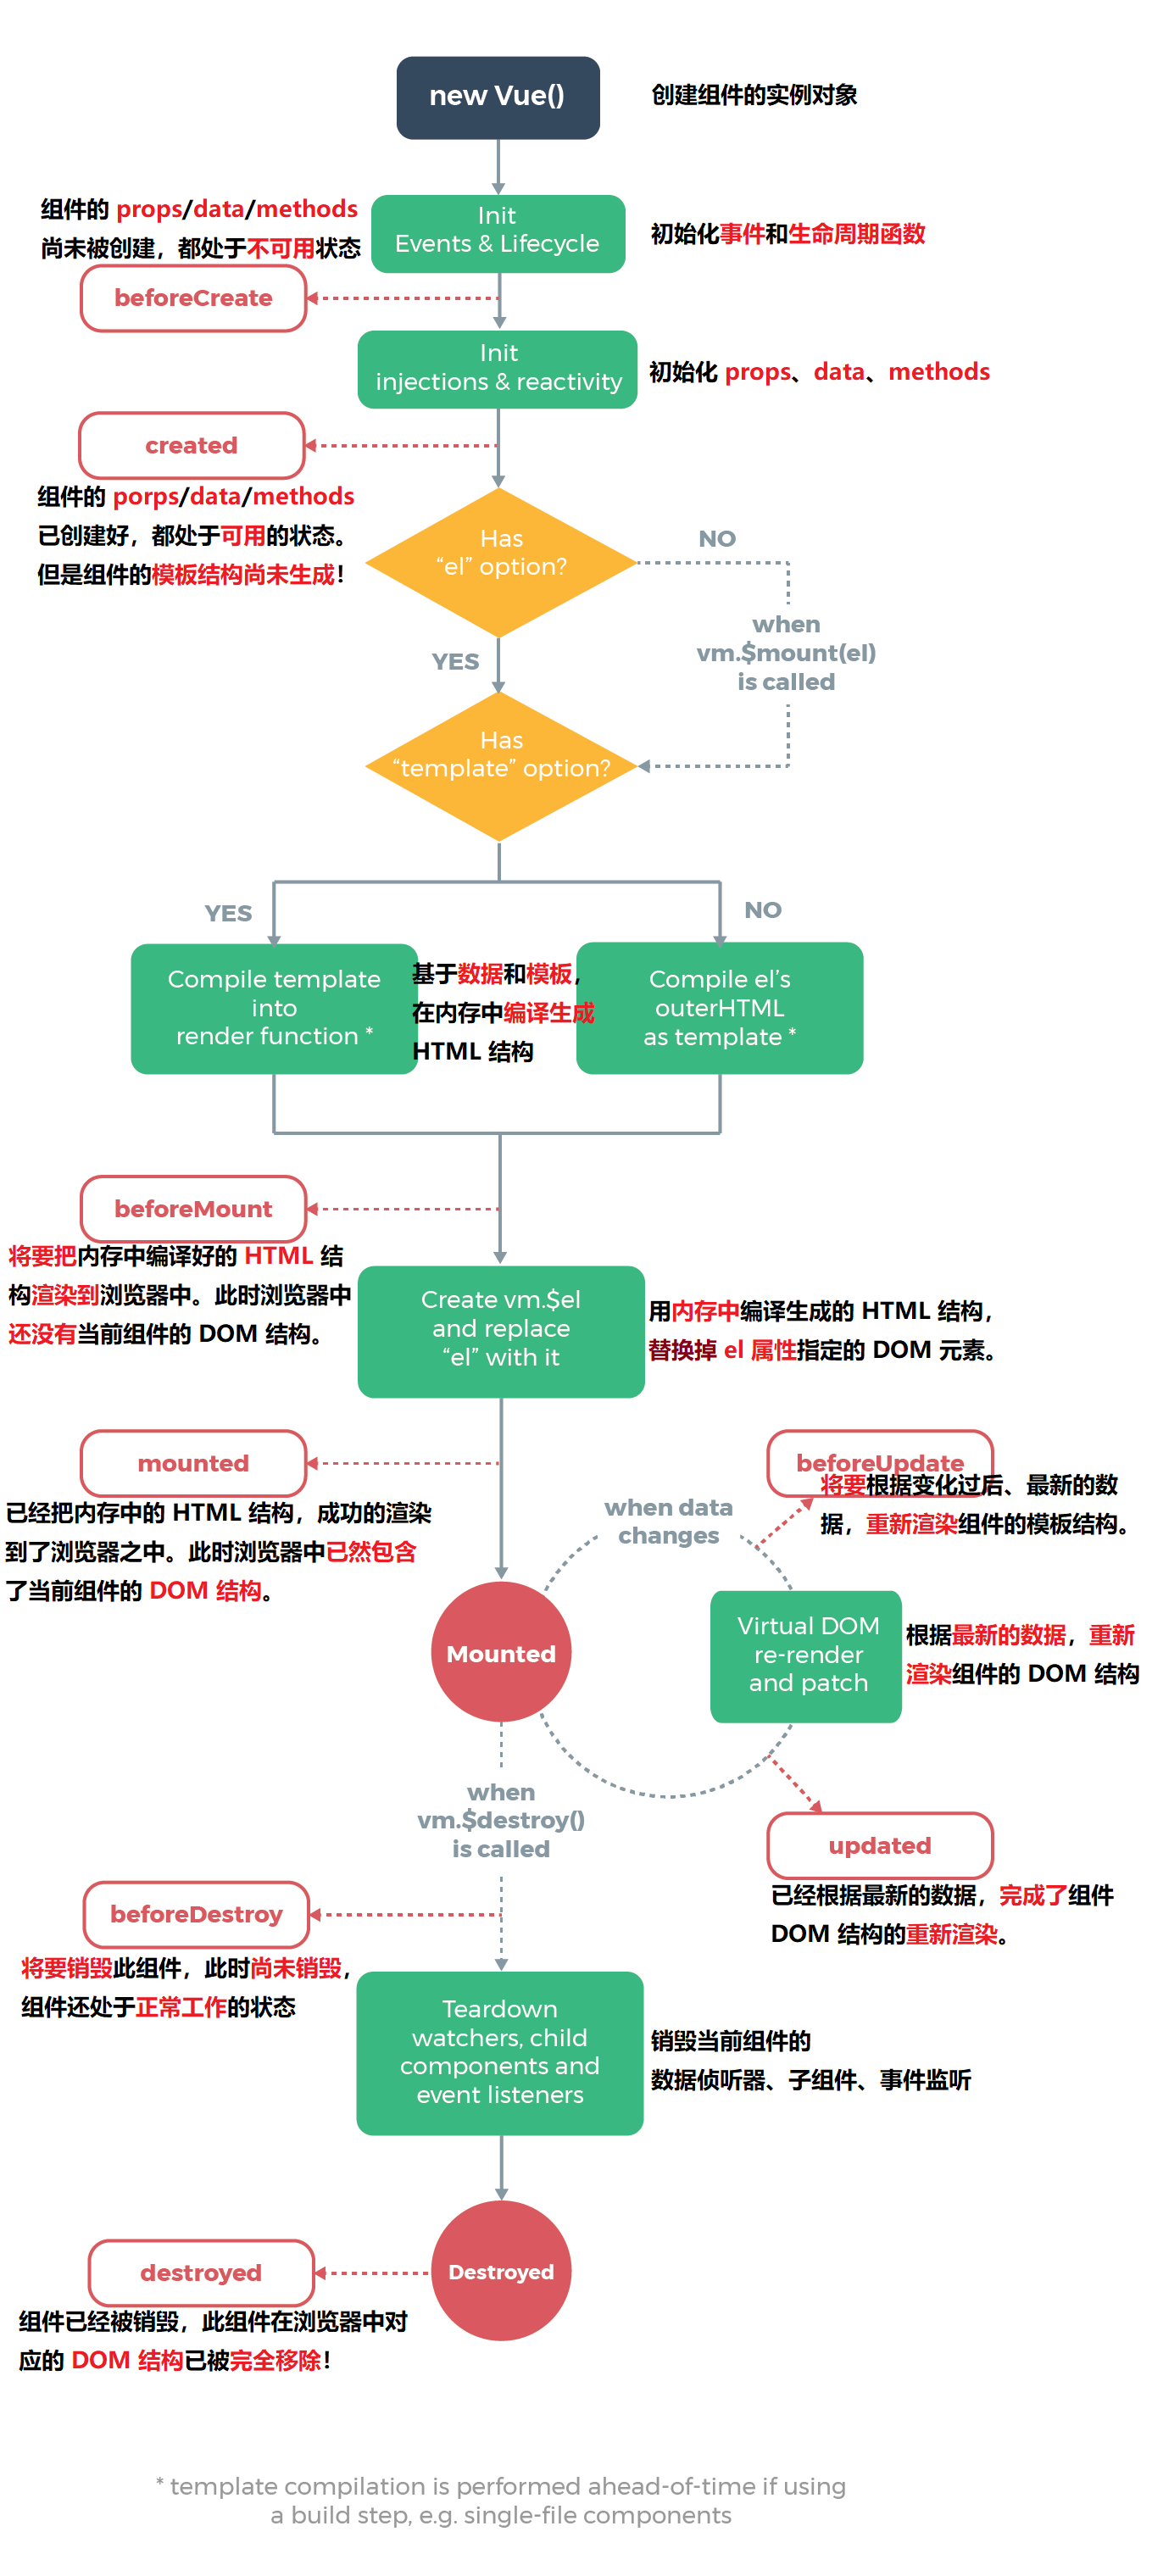
Three periodic functions that need attention:
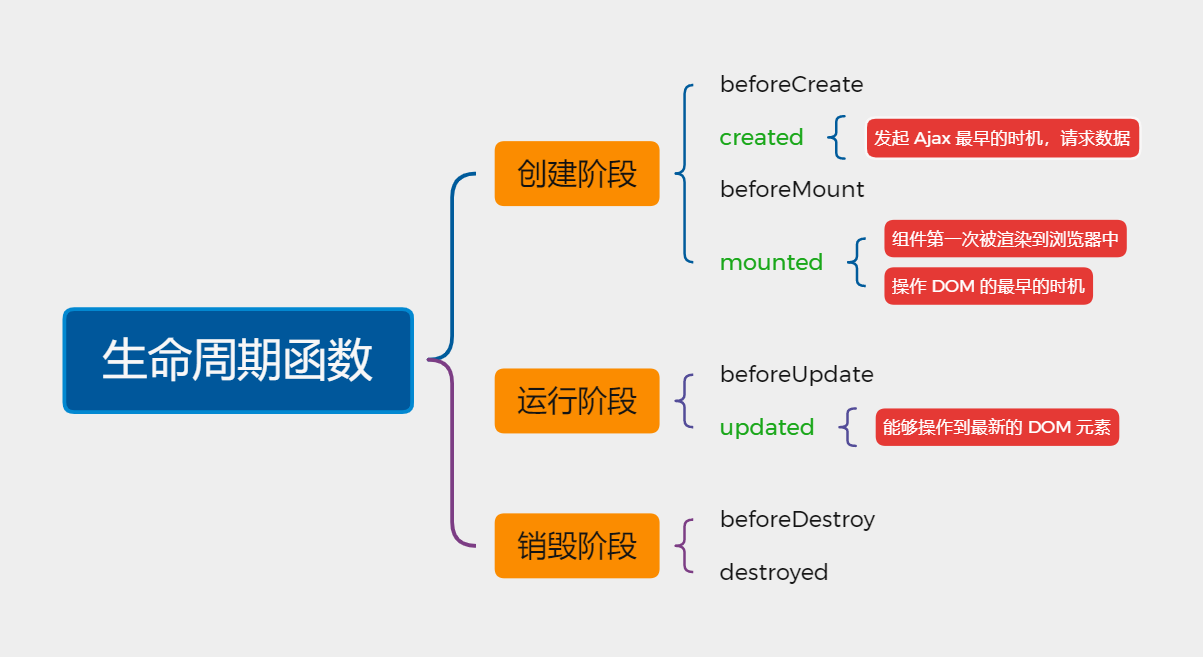
In actual development, created is the most commonly used life cycle function!
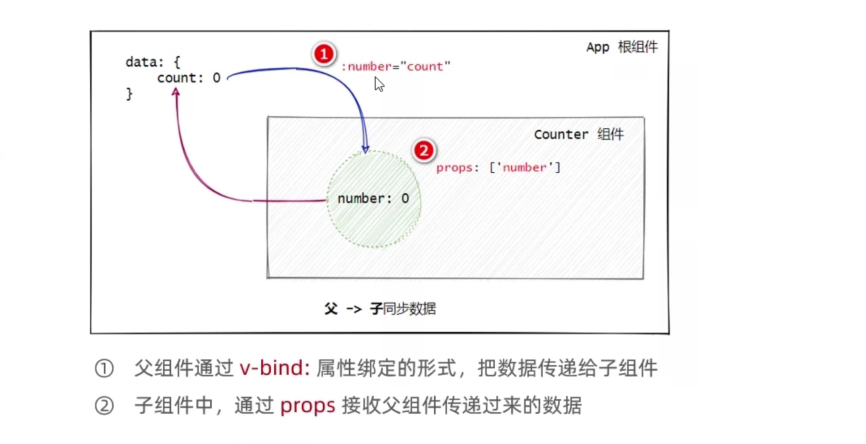
Data sharing between components

Father → son
The parent component shares data with the child component through v-bind attribute binding, and the child component uses props to receive data.
// Parent component
// Register subcomponents
<Son :msg="message" :user="userinfo"></Son>

<script>
    // Import subcomponents
    import Son from '@component/Son.vue'

export default {
    data:{
        return{
        message:'hello vue.js'
        userinfo:{
        name: 'lilei',age: 21
    },
    components: {
        Son
    		}
		}
	}
}
</script>


// Subcomponents
<template>
    <div>
    	<h5>Son assembly</h5>
		<p>Passed from parent component msg Value is: {{ msg }</p>
    	<p>Passed from parent component user Value is: {{ user }}</p>
    </div>
</template>

export default {
	props: [ 'msg' , 'user ']
}
Son → father
Child components share data with parent components and use custom events.
// Subcomponents

export default {
    data() {
        // The child component's own data. In the future, you want to pass the count value to the parent component
        return { count: 0 }
    },
    methods: {
        add() {
            this.count t= 1
            //When modifying data, the user-defined event is triggered through $emit()
            this.$emit( 'numchange' , this.count)}
    }
}


// Parent component
<h1>App Root component</h1>
<h3>The data transmitted from the sub component is: {{ countFromSon }}</h3>
<Son @numchange="getNewCount"> </Son>

<script>
import Son from '@component/Son.vue'

export default {
    data() {
        return { countFromSon: 0 }
    },
    methods : {
        getNewCount(val) {
            console.log('numchange The event was triggered!', val)
            this.countFromSon = val
        },
        components: {
        Son
    }
}
}
    </script>
Brother component data sharing
In vue2 In X, the data sharing scheme between sibling components is EventBus.
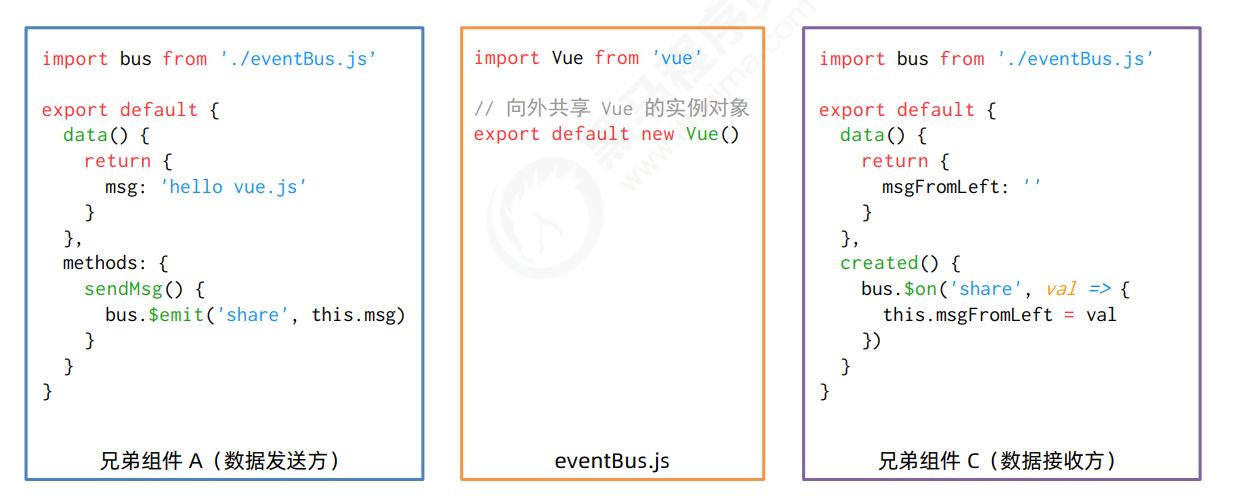
Steps for using EventBus
- Create eventbus JS module and share an instance object of Vue outward
- At the data sender, call bus$ The emit ('event name ', data to be sent) method triggers a custom event.
- At the data receiver, call bus$ The on ('event name ', event handler) method registers a custom event.
ref reference operation DOM
Get the reference of DOM element or component without relying on jQuery and calling DOM API.
Each vue component instance contains a $refs object, which stores the corresponding DOM element or component reference. By default, $refs of the component points to an empty object.
Using ref to reference DOM elements
<!--use ref Property, corresponding to DOM Add reference name-->

<h3 ref="myh3">MyRef assembly</h3>
<button@click="getRef">obtain $refs quote</button>


methods:{
    getRef(){
    	//Through this$ refs. The name of the reference can get the reference of the DOM element
        console.log(this.$refs.myh3)
    	//Manipulate the DOM element to change the text color to red
    	this.$refs.myh3.style.color='red'
},
Using ref to reference component instances
Requirements: control subcomponents in the root component
<!--use ref Property to add a reference name to the corresponding component-->

<my-counter ref="counterRef"> </my-counter>
<button @click="getRef"> obtain $refs quote </button>

methods:{
    getRef(){
    	// Through this$ refs. The name of the reference can refer to an instance of the component
        console.log(this.$refs.counterRef)
    	// After referring to the instance of the component, you can call the methods method on the sub component
        this.$refs.counterRef.add()
},
Click the text box to get focus automatically
Add a ref reference and call the of the native DOM object The focus() method is sufficient.
this.$nextTick(cb) method
$nextTick(cb) ensures that the cb callback function can operate to the latest DOM element (deferred to the next DOM update cycle).
- Solve the problem that we use ref to operate DOM elements and report errors before the page is rendered.
Controls the on-demand switching of text boxes and buttons
Click the button to display the text box, and hide the button when entering the text box:
<template>
    <input type="text" v-if="inputVisible" ref="ipt">
    <button v-else @click="showInput">Exhibition input Input box</button>
</template>


<script>
export default{
	data(){
		return{
		//Controls the on-demand switching of text boxes and buttons
		inputVisible:false,
},
methods:{
    showInput(){
        //Toggles Boolean values to display text boxes
        this.inputVisible=true

        //Get the DOM reference of the text box and call Focus() makes it get focus automatically

        // this.$refs.ipt.focus() error, the page is not rendered at this time, and the text box cannot be obtained

        //Postpone the operation of the input text box until the next DOM update. Otherwise, there is no text box element on the page at all
        this.$nextTick(() =>{
				this.$refs.ipt.focus()
		})
    }
},
    </script>
Dynamic component
Realize on-demand display between different components. (dynamic switching between component display and hiding), similar to Vue router.
Basic use of dynamic components
Vue provides a built-in < component > component, which is specially used to realize the rendering of dynamic components:
-
The component tag is vue built-in and serves as a placeholder for components
-
Dynamically specify the component to render through the: is attribute
-
The value of the is attribute, indicating the name of the component to be rendered.
-
The value of the is attribute should be the registered name of the component under the components node.
-
-
Use keep alive to maintain the state of components (avoid re rendering when components switch).
- Keep alive caches internal components instead of destroying them.
-
Specify which components need to be cached through include.
-
Specify which components do not need to be cached through the exclude attribute.
//Click the button to dynamically switch the name of the component
< button @ Click = "comName = 'Left'" > show Left
< button @ Click = "comName = 'Right'" > show Right
Define name in component:
-
When the name attribute is provided, the name of the component is the value of the name attribute.
export default {
name: 'MyRight'
}
Declare the name application scenario: realize the component caching function in combination with the < keep alive > tag; And see the name of the component in the debugging tool.
slot
Insert content in the content node of the component used as a check-in form.
- Slots are defined through the slot element to reserve content placeholders for users.
- When packaging components, the contents without reserved slots will be discarded.
Backup content
The content added in the slot tag will be used as backup content.
// Subcomponent my com
<template>
	<slot>This is backup content</slot>
</template>


// Use slot
	<my-com>
       // If the user does not provide content, the content defined in the above slot tag will take effect, and the page will have "this is backup content"
       // If provided, the following img will be rendered to the page
        <img src="../assets/log.png" alt="">
	</my-com>
Named slot
// MyArticle component
<template>
<div class="container">
    <header>
        <slot name="header"></slot>
    </header>
    <main>
        <slot></slot>
    </main>
    <footer>
        <slot name="footer"></slot>
    </footer>
    </div>
</template>
- Vue officially stipulates that each slot must have a name, and a < slot > exit without a name will have the implied name "default".
Provide content for named slots
If we want to fill the slot with the specified name, we can use the v-slot instruction on a < template > element and provide its name in the form of v-slot parameters:
<MyArticle>

    <template v-slot:header>
		// Put the content in the header tag of MyArticle component
		<h1>Now is the best, there is no future.</h1>
    </template>

	// In the previous code block, the main tag does not specify a named slot, so it is rendered to the main tag by default
    <p>It's 22:05 Sunday, November 7, 2021</p>
    <p>Today is not only Sunday, but also the winter solstice</p>

    <template #footer>
		<p>Finally, I wish you a happy winter solstice!</p>
    </template>

</MyArticle>
-
v-slot: it can be abbreviated #. For example, v-slot:header can be rewritten as #header.
-
The v-slot attribute can only be placed on the component label and < template > element (otherwise an error will be reported).
Scope slot
In the process of packaging components, props data can be bound for reserved < slot > slots. This < slot > with props data is called "scope slot". The example code is as follows:
<template>
	<div>
        <h1> This is Left assembly</h1>
		<!--Below slot Is a scope slot -->
 		<slot v-for="item in list" :user="item"></slot>
    </div>
  </template>
Receive the data provided by the scope slot, and use deconstruction assignment to simplify the data receiving process:
<!-- Using custom components -->
<Left>
  <!--For the data objects provided by the scope slot, the receiving process can be simplified by "deconstruction assignment"-->
  <template #default="{user}">
        <tr>
            <td>{{user.id}}</td>
            <td>{{user.name}}</td>
            <td>{{user.state}}</td>
        </tr>
  </template>
</Left>
Custom instruction
vue officially provides v-text, v-for, v-model, v-if and other commonly used instructions. In addition, vue also allows developers to customize instructions.
Private custom directives: {}
In each vue component, private user-defined instructions can be declared under the directives node.
1. Define a private user-defined instruction:
directives:{
    color:{
        //Set the red text for the HTML element bound to
        bind(el){
            //el in the formal parameter is the native DOM object bound with this instruction
            el.style.color='red'
        }
2. Use custom instructions:
-
When using a custom instruction, you need to prefix it with a v-instruction
<!– When declaring a custom instruction, the name of the instruction is color. When used, it is v-color -- >
App components
3. Dynamically bind parameter values for user-defined instructions
When using a custom instruction in the template structure, you can dynamically bind parameter values for the current instruction by means of the equal sign =:
<template>

<!--When using an instruction, dynamically bind parameter values for the current instruction color-->
<h1 v-color="color">App assembly</h1>

</template>

data(){
	return{
	color:'red'
}
4. Get the parameter value of the instruction through binding:
In the above example, we bound a dynamic parameter value for the custom instruction. How to get this value?
When declaring a custom instruction, you can receive the parameter value of the instruction through the second parameter in the formal parameter
<h1 v-color="color">App assembly</h1>

// At this time, the string is passed in and will not be searched in the data
<p v-color="'blue'" ></p>

directives:{
	color:{
		bind(el,binding){
            //Through the binding object Value attribute to get the dynamic parameter value
			el.style.color=binding.value
}
5. Use the update function to update the DOM
The update function is called every time the DOM is updated.
Note: when using custom instructions in vue3 projects, bind must be changed to mounted and update to updated.
The bind function is called only once: it is called when the instruction is bound to the element for the first time, and the bind function will not be triggered when the DOM is updated.
directives:{
	color:{
		//Called when the instruction is first bound to an element
        bind(el,binding){
			el.style.color=binding.value
	},
		//Called every time the DOM is updated
		update(el,binding){
			el.style.color=binding.value
	}
6. Use both bind and update function abbreviations
If the logic in the bind and update functions are exactly the same, the custom instruction of object format can be abbreviated to function format:
directives:{
    //The same business logic will be triggered during bind and update
    color( el,binding ){
        el.style.color=binding.value
}
Global customization directive Vue directive ()
Declare through "Vue.directive()".
Note: when using Vue cli (scaffold), write the global customization instruction in main JS file:
//Parameter 1: string, indicating the name of the global user-defined instruction
//Parameter 2: object, used to receive the parameter value of the instruction

Vue.directive('color',function(el,binding){
		el.style.color=binding.value
})

// Abbreviation
Vue.directive('color',(el,binding) =>{
		el.style.color=binding.value
})
vue-cli
Vue CLI It's officially released vue JS project scaffold, which can quickly build vue development environment and Webpack configuration.
Installation and use
1, Installation of Vue scaffold
npm install -g @vue/cli
2, Create project
vue create project(entry name)
Table of contents:
|- public         // Static page directory
    |- index.html // Project entrance
|- src            // Source directory
    |- assets     // Store static resource files used in the project, such as css style sheets and picture resources
    |- components     // Encapsulated and reusable components should be placed in the components directory
    |- App.vue        // Root component
    |- main.js        // The entry file for the project. The operation of the whole project should be carried out first
Operation process of vue project:
Via main JS app Vue render to index HTML in the specified area.
- App.vue is used to write the template structure to be rendered
- index. You need to reserve an el area in HTML
- main.js app Vue renders to index HTML in the reserved area
axios
axios is a library that focuses on network requests. The return value obtained by calling axios method is Promise object.
Basic use of axios
-
Initiate GET request:
axios({ // Request mode method: 'GET', // Requested address url: 'http://www.liulongbin.top:3006/api/getbooks', // Query parameters in URL (GET request parameters) params: { id: 1 } }).then(function (result) { console.log(result) })- params represents the data passed to the server, which is spliced behind the request address in the form of url parameters
- For example: params: {page: 1, per: 3}
- Final generation: http://jsonplaceholder.typicode.com/page=1&per=3
- params represents the data passed to the server, which is spliced behind the request address in the form of url parameters
-
Initiate POST request:
document.querySelector('#btnPost').addEventListener('click', async function () {

  // If the return value of calling a method is Promise instance, you can add await!
  // await can only be used in methods that are "decorated" by async


  // 1. After calling axios, use async/await for simplification
  // 2. Use deconstruction assignment to deconstruct the data attribute from the large object encapsulated by axios
  // 3. Rename the deconstructed data attribute with colon, which is generally renamed as {data: res}

  const { data: res } = await axios({
    method: 'POST',
    url: 'http://www.liulongbin.top:3006/api/post',

    //  POST request body parameters
    data: {
      name: 'zs',
      age: 20
    }
  })

  console.log(res)
})
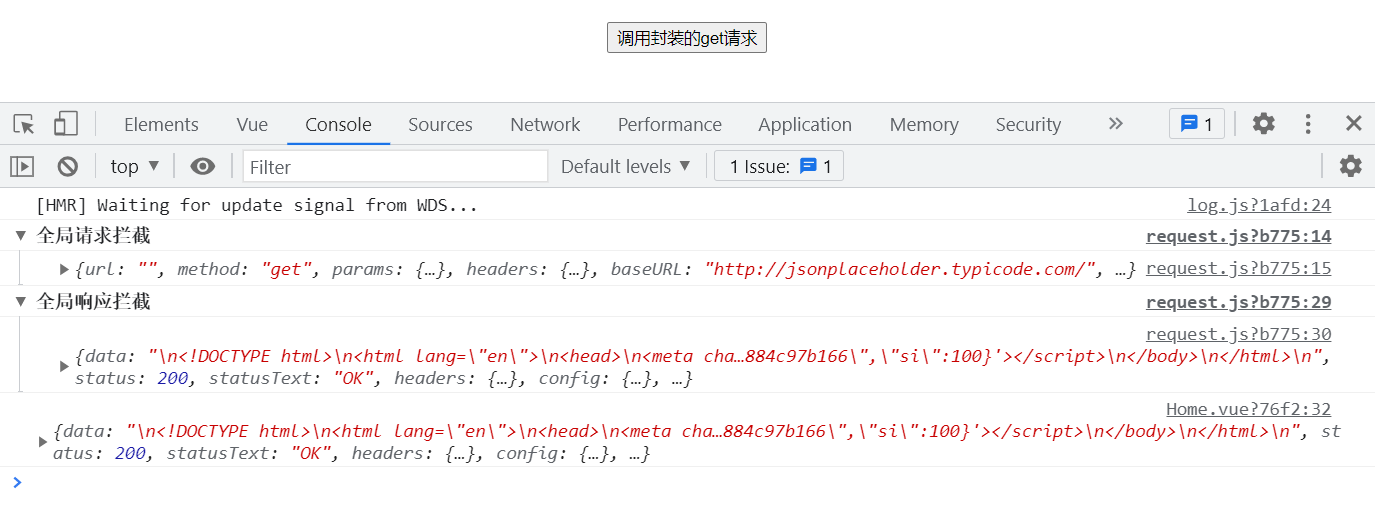
Six attributes of axios encapsulation:
After axios requests data, it sets up a shell outside the real data.
{
    config:{ },
    // Data is the real data returned by the server
    data:{
        status: 200,
        msg: "Data acquisition succeeded!",
        data: Array(6)
    },
    headers:{ ... },
    request:{ },
    status: 200,
    statusText: 'OK',
}
axios directly initiates GET and POST requests
document.querySelector('#btnGET').addEventListener('click', async function () {
    /* axios.get('url Address'{
        // GET parameter
        params: {}
      }) */

    const { data: res } = await axios.get('http://www.liulongbin.top:3006/api/getbooks', {
        params: { id: 1 }
    })
    console.log(res)
})

document.querySelector('#btnPOST').addEventListener('click', async function () {
    // axios. Post ('url ', {/ * post request body data * /})
    const { data: res } = await axios.post('http://www.liulongbin. Top: 3006 / API / post ', {Name:' ZS', gender: 'female'})
    console.log(res)
})
Using axios in Vue cli
Generally, we will use it directly as follows:
// In assembly
<template>
    <button @click="postInfo">launch POST request</button>
</template>


<script>
// 1. Import axios
import axios from 'axios'
export default {
 //2. Define axios request method in methods
  methods: {
    async postInfo() {
      const { data: res } = await axios.post('http://www.liaoyia.top:3306/api/post', { name: 'zs', age: 20 })
      console.log(res)
    }
  }
}
</script>
Disadvantages: import the axios file and write the request address every time you use it (not friendly to later maintenance).
Mount axios on the Vue prototype and configure the request root path
Avoid repeatedly importing axios and repeatedly writing the full request address.
In main JS
import Vue from 'vue'
import App from './App.vue'
import axios from 'axios'

Vue.config.productionTip = false

// Request root path of global configuration axios (configuration item officially provided)
axios.defaults.baseURL = 'http://www.liaoyia.top:3006'

// Mount axios to vue Prototype for each Instances of vue components are used directly
Vue.prototype.$http = axios

// In the future, in every To initiate a request in the vue component, directly call this$ http. xxx
// However, attaching axios to Vue prototype has one disadvantage: it is not conducive to the reuse of API interface!!!

new Vue({
  render: h => h(App)
}).$mount('#app')
use:
<template>
     <button @click="btnGetBooks">Get the data of the book list</button>
</template>


<script>
export default {
  methods: {
    // Click the button to obtain the data of the book list
    async btnGetBooks() {
      const { data: res } = await this.$http.get('/api/getbooks')
      console.log(res)
    }
  }
}
</script>
However, mounting axios on the Vue prototype and configuring the request root path also has disadvantages:
API interface reuse cannot be realized: when multiple components want to use the same request method (API), it can only be redefined once for each component.
axios package
1. If there are multiple request addresses in the project, we can use factory mode to encapsulate js module according to multiple addresses, create multiple axios instance objects, and set the request root path (baseURL):
The steps are as follows: create the utils folder in the src directory of the project and create a new request JS file:
import axiox from 'axios'

const request =axiox.create({
    //The baseURL will be spliced in front of the url parameter when sending the request
    baseURL:'http://jsonplaceholder.typicode.com/',

    timeout:5000
})

// Export out
export default  request
- When using this method: generally, we only create an axios instance object in a js module and export it out.
- If there are multiple server addresses, create multiple js modules and create axios instance objects in them.
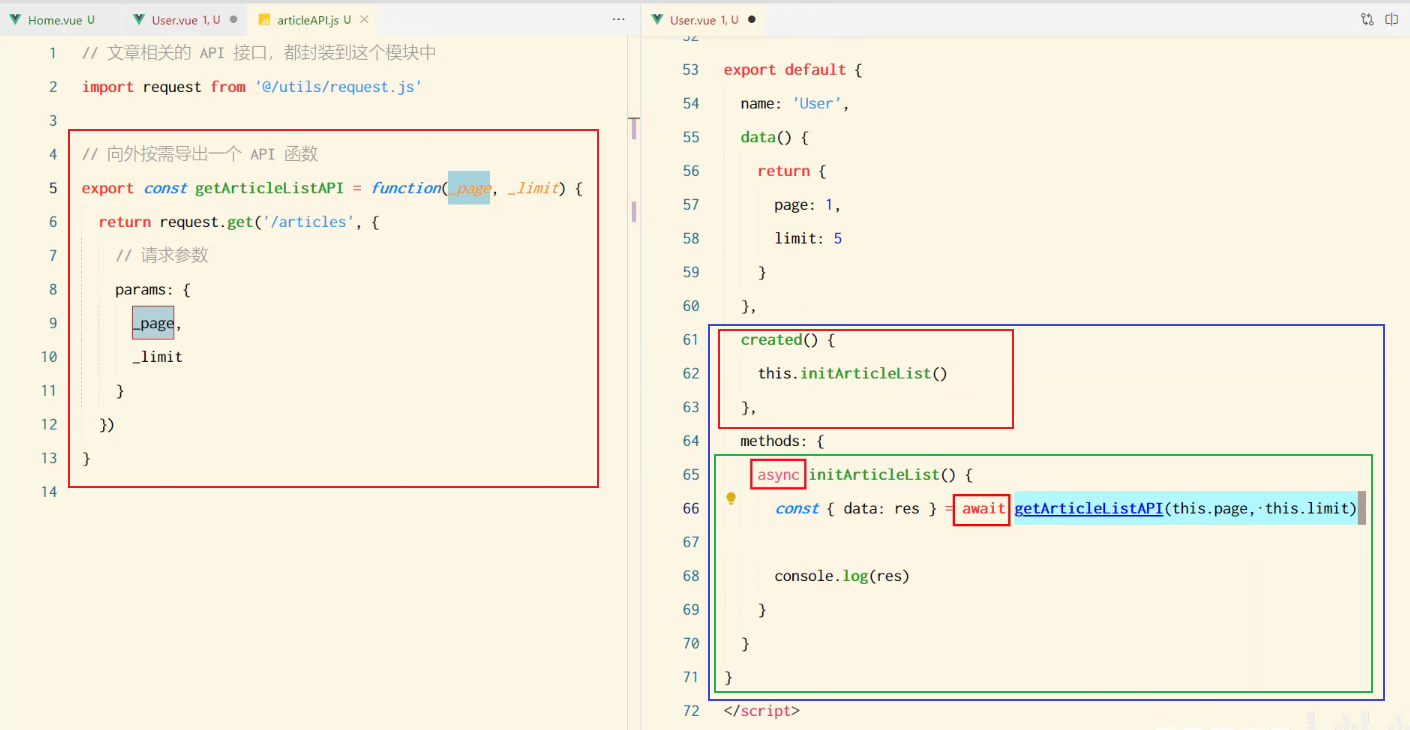
2. In order to realize reusability, we can also encapsulate all requests in the API module. In the API module, we can export a method as needed, and this method calls request Get or request Post to request an interface, and finally return a Promise object.
For example, if you want to call the interface to obtain user related information:
Create a new utils folder in the root directory and a new userapi JS file
//Import request under utils folder js

import request from '@/utils/request.js'

export const getArticleListAPI = function(_page, _limit) {
  return request.get('/articles', {
    params: {
      _page,
      _limit
    }
  })
}
[example]: click the button to initiate a GET request and automatically call the request interceptor and add a response Interceptor:
<template>
  <div class="home">
    <button @click="getByMineHandle">Call encapsulated get request</button>
  </div>
</template>

<script>
 // Import get method
import  { get } from '../utils/request'

export default {
  name: 'Home',
  methods:{

    getByMineHandle(){
      get('',{page:3,per:2}).
      then(res=>console.log(res))
    }
  }
}
</script>


import axiox from 'axios'

const instance =axiox.create({
    //The baseURL will be spliced in front of the url parameter when sending the request
    baseURL:'http://jsonplaceholder.typicode.com/',
    timeout:5000
})

//Request interception
// All network requests will go this way first
// Add a request interceptor, and all network requests will go through this method first
// We can add some custom content to the request, such as token or provide information in headers
instance.interceptors.request.use(function (config) {
    // What to do before sending the request
    console.group('Global request interception')
    console.log(config)
    console.groupEnd()
    config.headers.token ='12343'
    return config;
}, function (error) {
    // What to do about request errors
    return Promise.reject(error);
});

// Add response interceptor
//Here, the response can be processed according to the returned status code of the server
//404 404 500
instance.interceptors.response.use(function (response) {
    // Do something about the response data
    console.group('Global response interception')
    console.log(response)
    console.groupEnd()
    return response;
}, function (error) {
    // Do something about response errors
    return Promise.reject(error);
});

// Get data from server view
export function get(url,params) {
    return instance.get(url,{
        params
    })
}

// Create data to server
export function post(url,data) {
    return instance.post(url,data)
}

// Delete data from server
export  function del(url) {
    return instance.delete(url)
}

//  Send update data to the server
export  function put(url,data) {
    return instance.put(url,data)
}
Vue-router
SPA and front end routing
SPA (single page web page), the display and switching of all components are completed in this only page.
At this time, the switching between different components needs to rely on front-end routing.
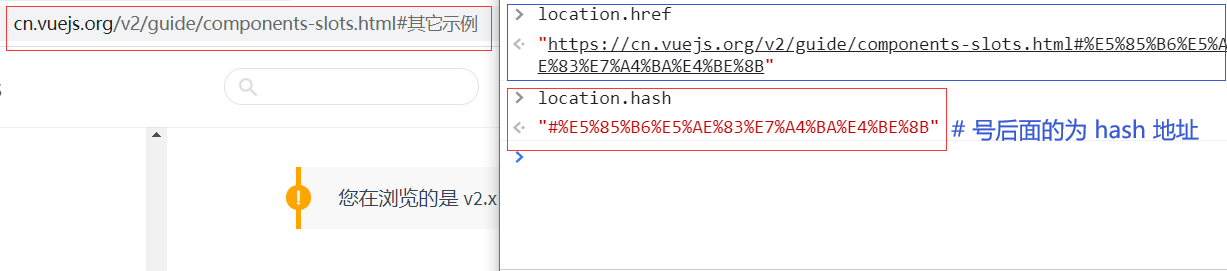
What is front-end routing?
- The corresponding relationship between Hash address and components. Different hashes display different pages.
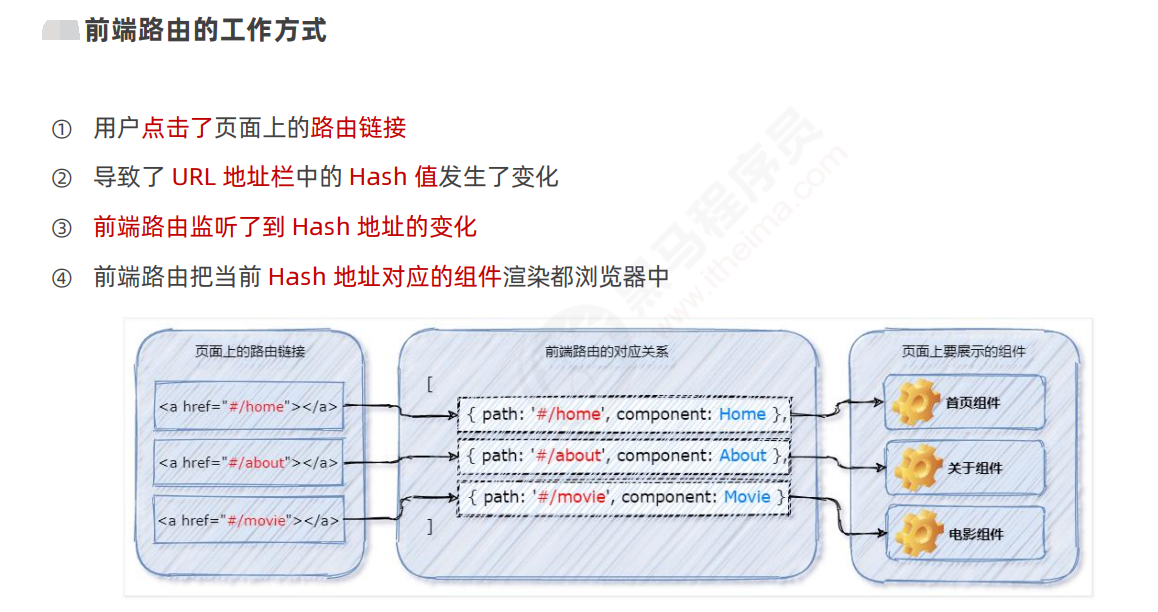
How front end routing works:
Basic usage of Vue router
vue-router It's vue JS official routing solution. It can only be used in combination with vue project, and can easily manage the switching of components in SPA project.
-
Install Vue router package
npm i vue-router@3.5.2 -S
At this point, a router folder will be added under the src source directory.
-
Create routing module
In the src source code directory, create a router / index JS routing module and initialize:
//1. import Vue from'vue'
import VueRouter from'vue-router'

//2. Call Vue Use() function to install vueroter as a plug-in of Vue
Vue.use(VueRouter)

//3. Create an instance object of the route
const router=new VueRouter()

//4. Instance object of outward shared route
export default router
-
Import and mount the routing module
In Src / main JS entry file, import and mount the routing module:
import Vue from'vue' import App from'./App.vue' //1. Import routing module import router from@/router' new Vue ({ render:h=>h(App), //2. Mount the routing module router:router }).$mount('#app') -
Declare route links and placeholders
In Src / APP In Vue component, use < router link > and < router View > provided by Vue router to declare routing links and placeholders:
<tcmplate> <div class="app-container"> <h1>App assembly</h1> <!--1.Define routing links--> <router-link to="/home">home page</router-link> <router-link to="/movie">film</router-link> <router-link to="/about">about</router-link> <!--2.Placeholder for defining routes--> <router-view></router-view> </div> </template> -
Declare matching rules for routes
In Src / router / index JS routing module, declare the matching rules of the route through the routes array:
//Import components that need to be displayed using route switching

import Home from'@/components/Home.vue'
import Movie from'@/components/Movie.vue'
import About from'@/components/About.vue'

//2. Create an instance object of the route
const router=new VueRouter({
    //In the routes array, declare the matching rules of routes
	routes:[
        //path indicates the hash address to be matched; Component indicates the routing component to be displayed
        {path:'/home',component: Home},
		{path:'/movie',component: Movie},
        {path:'/about',component: About}
]
})
Route redirection
When accessing address A, the user is forced to jump to address C to display A specific component page.
- Through the redirect attribute of the routing rule, specify a new routing address to realize the redirection of the route.
In the following application scenario, when a user accesses a web page / directory, he / she jumps to the home page:
const router=new VueRouter({
//In the routes array, declare the matching rules of routes
    routes:[
		//When the user accesses the attribute of / redirect, it jumps to the corresponding attribute of / redirect
		{ path: '/',redirect:'/home' },
		{ path: '/home',component: Home },
		{ path: '/movie',component: Movie },
		{ path: '/about',component: About }
})
Route highlighting
The active route link can be highlighted in the following two ways:
- Use the default highlighted class
- Class class highlighted by custom route
Default highlighted class
A class name called router link active will be applied to the activated routing link by default. You can use this kind of name selector to set the highlighted style for the activated routing link:
/*In index In the CSS global style sheet, reset the router link active style*/

.router-link-active {
    color:#ef4238;
    font-weight:bold;
    border-bottom: 2px #ef4238 solid;
}
Class class highlighted by custom route
When creating the instance object of the route, the developer can customize the class name applied when the route link is activated based on the linkActiveClass attribute:
const router=createRouter({
	history:createlebHashHistory(),
	// Specify the activated routing link, and the class name router active will be applied,
	// The default router link active class name will be overwritten
    1inkActiveclass:'router-active',
    routes:[
    	{ path: '/',redirect: '/home' },
		{ path: '/home',component: Home },
		{ path: '/movie',component: Movie },
		{ path: '/about',component: About },
]
})
Nested Route
The nested display of components through routing is called nested routing.
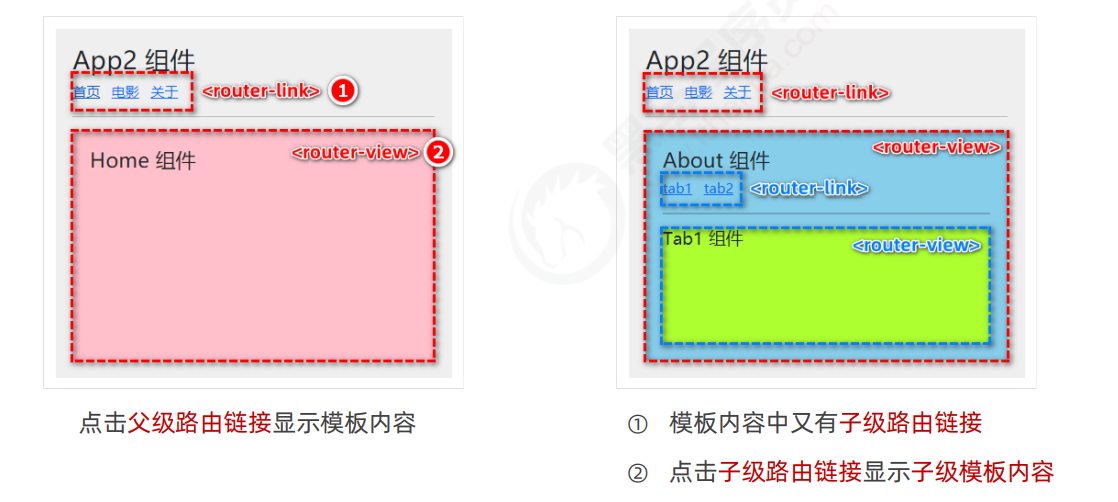
1. Declare sub route links and placeholders for sub routes
In the figure above, we are in about The Vue component contains tab1 and tab2 components. If we want to show it, we need to state the sub route link and the sub route placeholder:
<template>
	<div class="about-container">
	 	<h3>About assembly</h3>

		<!--1.On the about page, declare two sub routing links-->
		<router-link to="/about/tab1">tab1</router-link>
    	<router-link to="/about/tab2">tab2</router-link>

    	<hr/>
 		<!--2.On the about page, declare a placeholder for the sub route-->
 		<router-view></router-view>
	</div>
</template>
So far, we have sub route links, sub route placeholders and components corresponding to links, but we still lack corresponding relationships, that is, routing rules, to display on the page.
2. Declare the sub routing rules through the children attribute
In Src / router / index JS routing module, import the required components and use the children attribute to declare the sub routing rules:
// Import components
import Tab1 from '@/components/tabs/Tab1.vue'
import Tab2 from '@/components/tabs/Tab2.vue'

const router=new VueRouter({
    routes:[
        {	//Routing rules of about page (parent routing rules)
            path: '/about',
            component: About,
            //1. Through the children attribute, nest the child routing rules
            children:[
			{ path: 'tab1',component: Tab1 },//2. When accessing / about/tab1, the Tab1 component is displayed
			{ path: 'tab2',component: Tab2 } //2. When accessing / about/tab2, display the Tab2 component
}]
})
- Note: when using the children attribute to nest the child routing rules, the path name does not need to be added /.
3. Default sub route
If the path value of a routing rule in the children array is an empty string, the routing rule is called "default sub route".
// src/router/index.js

const router=new VueRouter({
    routes:[
        {
            path: '/about',
            component: About,
            // / / redirect the page by default: 'about table'
            children:[

            //  The path value is an empty string. At this time, Tab1 is the default sub route. Once you enter the About page, Tab1 is displayed by default
			{ path: '',component: Tab1 },
        	{ path: 'tab2',component: Tab2 }
	}]
})
- Therefore, the default sub route and route redirection can be used to set and display specific component pages.
Dynamic route matching
Dynamic routing refers to defining the variable part of the Hash address as a parameter item, so as to improve the reusability of routing rules.
There are three routing links:
<router-link to="/movie/1"> Movie 1 </router-link>
<router-link to="/movie/2"> Movie 2 </router-link>
<router-link to="/movie/3"> Movie 3 </router-link>
Although it is feasible to define the following three routing rules, they are too cumbersome and have poor reusability:
{path:'/movie/1',component:Movie}
{path:'/movie/2',component:Movie}
{path:'/movie/3',component:Movie}
Using dynamic routing, the three routing rules created above are combined into one, which improves the reusability of routing rules:
//  src/router/index.js file

//The dynamic parameters in the route are declared with: and the name of the dynamic parameter is after the colon
{ path:'/movie/:id',component:Movie}
- In Vue router, the English colon (:) is used to define the parameter items of the route.
$route.params accesses dynamically matched parameter values
In the components rendered by dynamic routing, you can use this$ route. Params object accesses dynamically matched parameter values:
<template>
	<div class="movie-container">
		<!--this.$route Is the "parameter object" of the route-->
		<h3> Movie assembly-- {{this.$route.params.id}} </h3>
	</div>
</template>

<script>
	export default{
		name:'Movie'
	}
</script>
Receive routing parameters using props
In order to simplify the acquisition form of routing parameters, Vue router allows to enable props parameter transmission in routing rules. When defining routing rules, declare props: true option,
// Index. Under router JS file
// 1. Declare props: true option
{ path:'/movie/: id',component: Movie,props:true }
Once defined, you can receive the parameter items matched by the routing rules in the form of props in the Movie component.
<template>
	<!-- 3,Direct use props Route parameters received in -->
    <h3> MyMovie assembly--{{id}}</h3>
</template>

<script>
export default{
    //2. Use props to receive the matching parameter items in the routing rules
	props:['id']
</script>
Programming navigation API
Vue router provides many APIs for programmatic navigation, among which the most commonly used navigation APIs are:
- this.$router. push('hash address')
- Jump to the specified hash address and add a history.
- this.$router.replace('hash address')
- Jump to the specified hash address and replace the current history.
- this.$router. go (value n)
- Realize navigation history forward and backward.
- $router.back(), back to the previous page.
- $router.forward(), advance to the next page.
Call this$ router. Push() or $router The replace () method can jump to the specified hash address and display the corresponding component page:
<template>
	<div class="home-container">
		<h3> Home assembly </h3>
		<button @click="gotoMovie">Jump to Movie page</button>
	</div>
</template>

<script>
export default{
	methods:{
		gotollovie(){
        this.$router.push("/movie/1")
    }
}
</script>
The difference between push and replace:
- push will add a history
- replace does not add history, but replaces the current history.
Call this$ router. Go () method, you can go forward and backward in browsing history:
<template>
	<h3> MyMovie assembly---{{id}}</h3>
	<button @click="goBack" >back off</button>
</template>

<script>
export default{
	props:['id'],
    methods:{
		goBack(){
            this.$router.go(-1) //Go back to the previous component page
        }
},
</script>
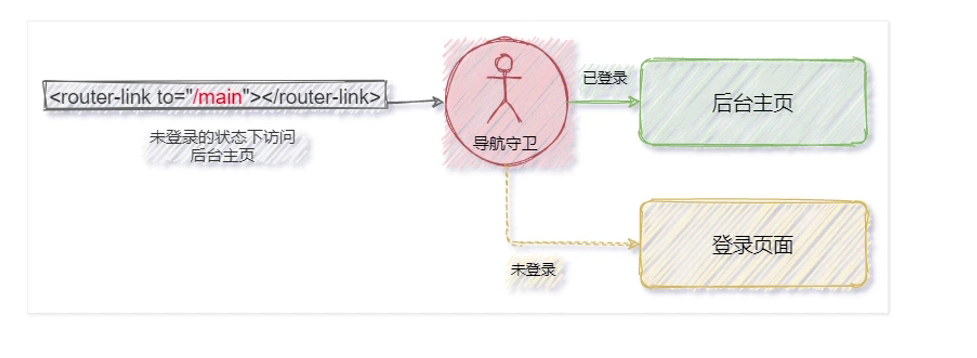
Navigation guard
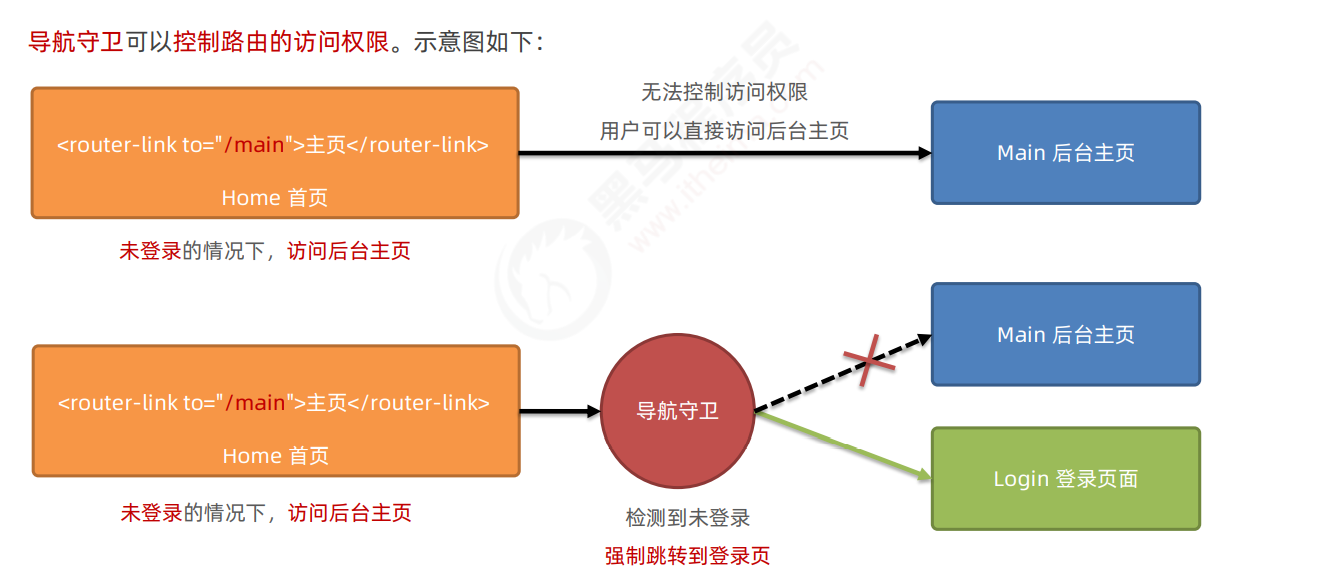
Every time the navigation jump of the route occurs, the global front guard will be triggered. Therefore, in the global front guard, we can control the access rights of each route:
//Create routing instance object
const router = new VueRouter({.....})

//Call the beforeEach method of the routing instance object to declare "global pre guard"“
//This "callback function" will be triggered automatically every time a route navigation jump occurs

router.beforeEach((to,from,next) =>{
    /* The next function must be called */
})
Three formal parameters of guard method:
- To is the information (object) of the route to be accessed
- from is the information object of the route to leave
- Next is a function. You must call next () to indicate release and allow this route navigation.
be careful:
- If the next parameter is not declared in the guard method, the user is allowed to access each route by default!
- If the next parameter is declared in the guard method, the next() function must be called, otherwise the user is not allowed to access any route!
Three calling methods of next function
- Direct release: next()
- Force it to stay on the current page: next(false)
- Force it to jump to the login page: next('/ Login')
Control the access authority of the background home page in combination with token
router.beforeEach((to,from,next) => {
     //Get user information cached by browser
    const userInfo = window.localStorage.getItem('token');
	if (to.path === '/main' && !userInfo ){ //The main page is accessed and the token does not exist
            // You are visiting the background home page, but there is no token value. Jump to the login page
			next('/login')
	} else{
	   next()//You are not visiting the background home page, so you can release it directly
})
In the above code, what if multiple pages in the project need to set access permissions
-
Use the route navigation guard to determine whether the access is a Hash address with permission:
//The first: using multiple judgment, the code is bloated
router.beforeEach((to,from,next) => {
if (to.path === '/main' || to.path === '/user' || to.path === 'seeting'){
// code...
} else{
// ...
}
})
We can store multiple addresses into an array or a json file or js file:
const patArr = ['/mian', '/home', '/home/users', '/home/rights']

router.beforeEach((to,from,next) => {
	if (patArr.indexOf(to.path)  !== -1){
          // code....
		} else{
          // ....
	}
})


// Stored in js for use

// 1. Define a patharr JS file
export default ['/mian', '/home', '/home/users', '/home/rights']
// 2. Import when using
import  pathArr from '@/router'
meta routing original information
In the above example, it is not convenient enough. Vue router provides us with a meta field, passes in an object, and sets requiresAuth: true, which is equivalent to starting up and jumping to verification.
const router = new VueRouter({
  routes: [
    {
      path: '/blog',
      component: Blog,
          path: 'bar',
          component: Bar,
          // Set meta to enable jump verification
          meta: { requiresAuth: true }
    }
  ]
})
Define page permissions in global guard:
router.beforeEach((to, from, next) => {
	console.log(to)
    //Judge $route Is there a meta field value in the matched array
    if (to.matched.some(record => record.meta.requiresAuth)) {
        If the current page has user
        if (!localStorage.getItem("user")) {
            next({
                path: '/login',
                //Incoming full path
                query: { redirect: to.fullPath }
            })
        } else {
            next()
        }
    } else {
        next() // Make sure to call next() and the release instructions are on the white list
    }
})
Change the logic of the login page
// Login.vue
methods:{
    handLeLonge(){
	// Get user name and password
        setTimeout(()=>{
            let data = {
                user: this.user
            }
        // Save user name to local
            localStorage.setItem('user',JSON.stringify(data))
            this.$route.push({
                path: this.$route.query.redirect
            })
        })
    }

}
Expansion - detailed explanation of Web links
 // APP components
 <router-link to="/movie/1"> Loki </router-link>
 <router-link to="/movie/2?name=zs&age=20"> Thor< /router-link>
 <router-link to="/movie/3"> Reconnection </router-link>
 <router-link to="/about">   about </router-link>


<template>
  <div class="movie-container">
    <!-- this.$route  Is the "parameter object" of the route -->
    <!-- this.$router Is the "navigation object" of the route -->
    <h3>Movie assembly --- {{ $route.params.mid }} --- {{ mid }}</h3>

    <button @click="showThis"> Print this</button>

    <!-- When using programmed navigation jump in the line, this It must be omitted, or an error will be reported! -->
    <button @click="$router.back()">back back off</button>
    <button @click="$router.forward()">forward forward</button>

  </div>
</template>

<script>
export default {
  name: 'Movie',
  // Receive props data
  props: ['mid'],
  methods: {
    showThis() {
      console.log(this)
    },
  }
}
</script>
Click this printed from Raytheon movie, and there is a $route object, as follows:
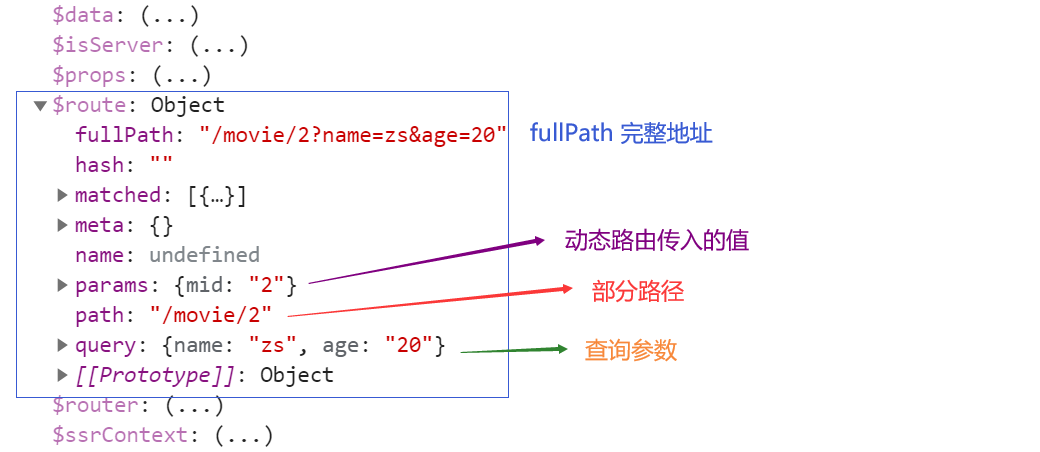
- In the hash address, the parameter item after / is called "path parameter"
- In the route parameter object, you need to use this$ route. Params to access path parameters
- However, we usually use props parameters to receive path parameters.
- In the hash address,? The following parameter items are called * * query parameters**
- In the route parameter object, you need to use this$ route. Query to access query parameters
- In this$ In route, path is only the path part; fullPath is the full address.
Development ideas:
-
To jump from one address to another (for example, jump to the home page immediately after logging in, and set the default display page in the home page)
- First determine who to leave and where to go
- Find the page to leave and add redirect to it to point to the new address.
Note:
-
When the label node is not level, it cannot be judged by the combination of v-if and v-else
-
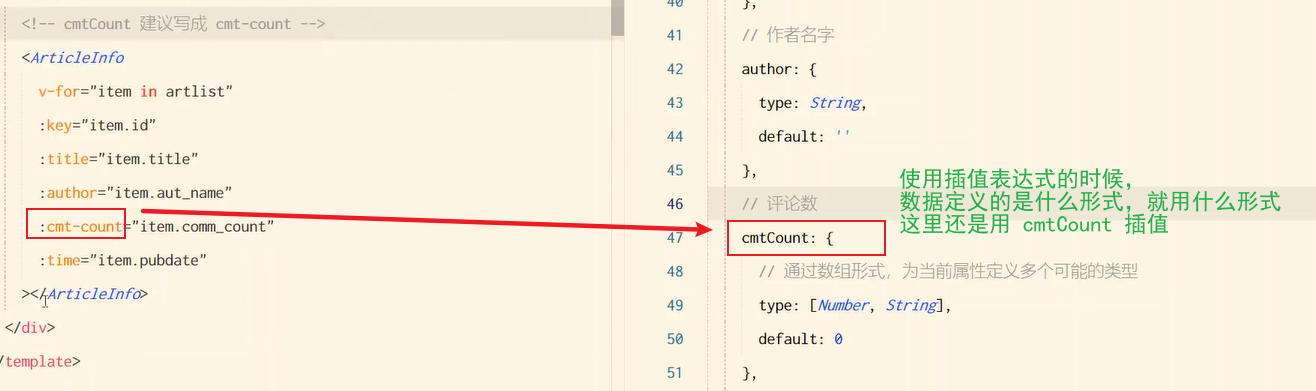
In vue:
-
When using components, if a property name is in the form of "small hump", it is recommended to rewrite it into "hyphen" format when binding properties. For example, cmtCount is suggested to be written as CMT count
-
Vuex
What is Vuex
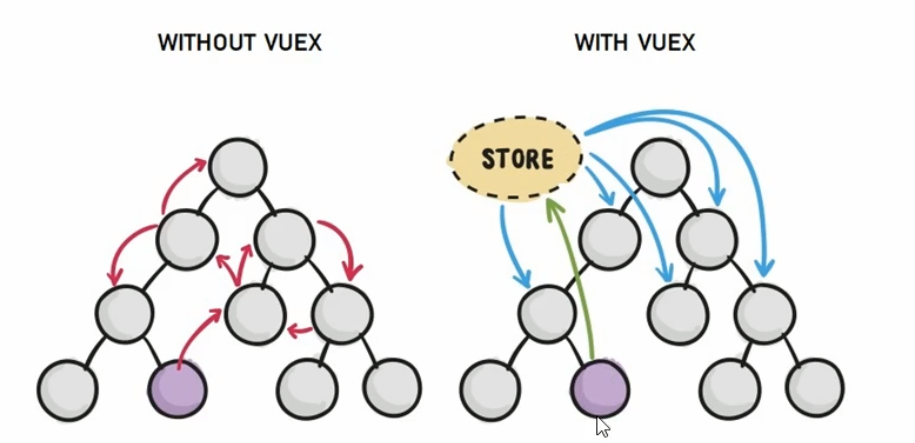
vuex is the ultimate data sharing solution between components.
- Vuex is a mechanism to realize the global state (data) management of components, which can facilitate the sharing of data between components.
advantage:
- Centralized management of shared data, easy to develop and maintain
- Efficiently realize the data sharing between components and improve the development efficiency
- Responsive data, synchronization with pages
What kind of data is suitable for storage in Vuex?
Generally, only the data shared between components is necessary to be stored in vuex; The private data in the component can still be stored in the data of the component itself!
Basic use of Vuex:
-
Install vuex dependency package
npm install vuex --save
-
In store / index JS import package and create store object
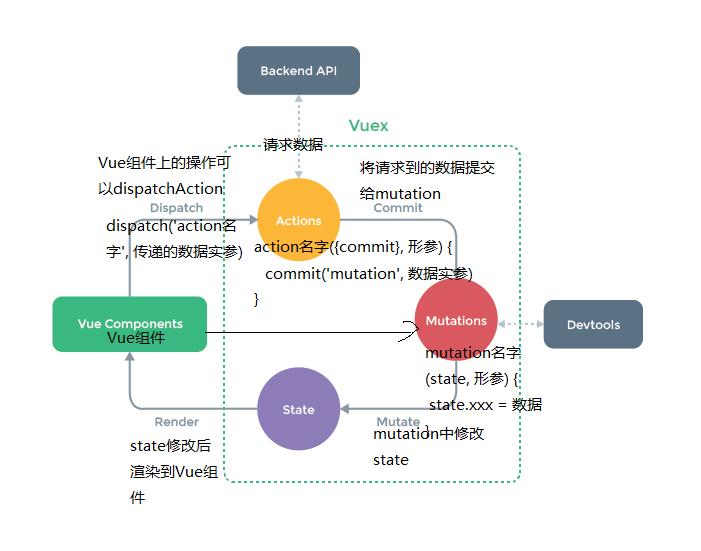
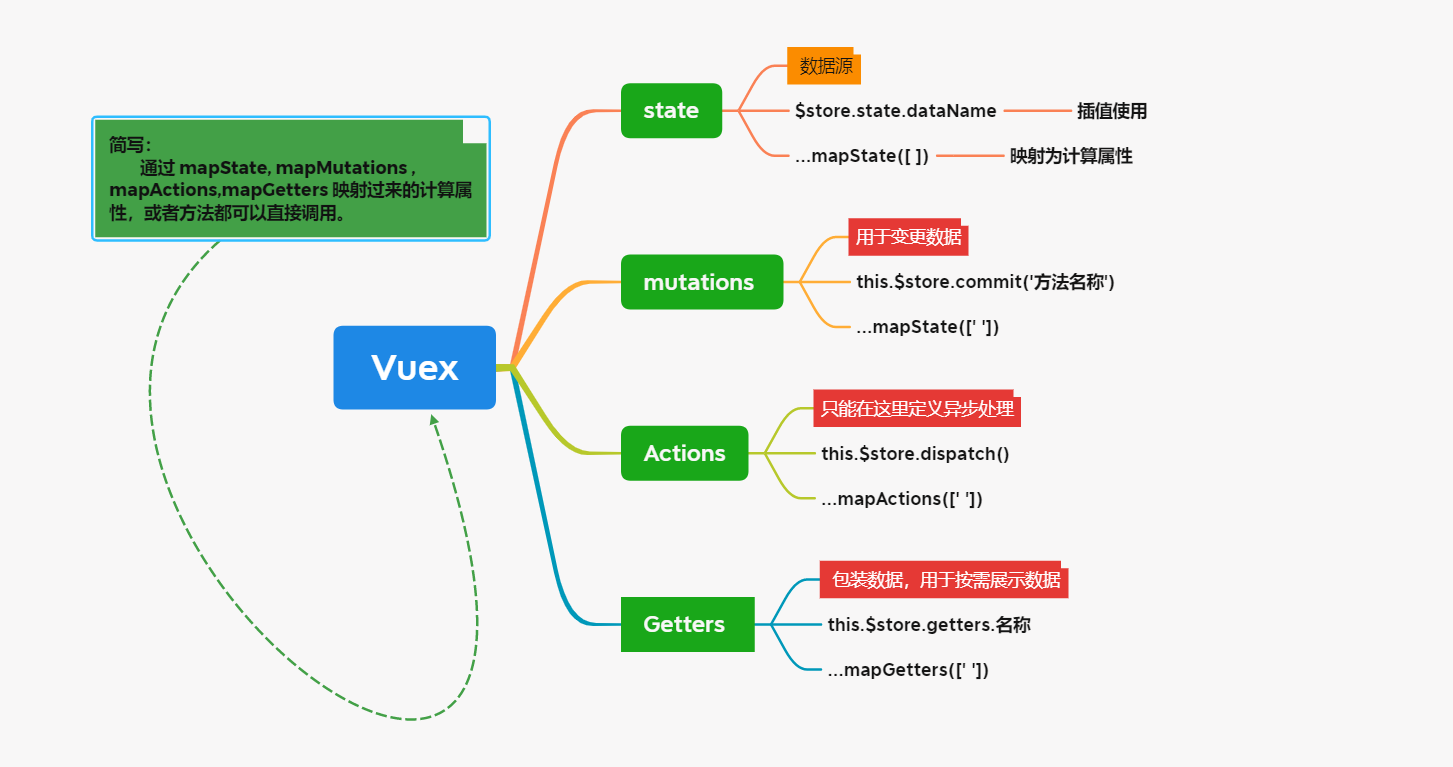
//Import vuex package import Vuex from 'vuex' Vue.use(Vuex) // Create a store object const store = new Vuex.Store({ // The data stored in state is the global shared data state: { count: 0 }, mutations: {}, actions: {}, modules: {} }) -
Mount the store object to vue instance main JS
import store from './store/index';

new Vue({
 el: '#app',
 render: h => h(app),
 router,
 // Mount the created shared data object into the Vue instance
 // All components can directly obtain global data from the store
 store
})
Understand vuex:
state data source
State provides a unique public data source, and all shared data should be uniformly stored in the state of the Store.
There are two ways to access data in state:
this.$store.state. Global data name access:
// this.$store.state. Global data name
<h3>Current latest count The value is:{{$store.state.count}}</h3>
- Because in the template string, you don't need to write this.
mapState is mapped to a calculated attribute:
Map the global data required by the current component to the calculated calculation attribute through the mapState function:
// 1. Import mapState function from vuex on demand in components that want to use data
import { mapState } from 'vuex'

// Map the current component's data to the global attribute, 2
computed: {
 ...mapState(['count'])
}
Changes data
mutation is used to change the data in the store.
- The Store data can only be changed through mutation, and the data in the Store cannot be directly operated.
- Although the operation is a little cumbersome, it can centrally monitor the changes of all data.
this.$store.commit() triggers changes
// Define Mutation
const store = new Vuex.Store({
    state: {
        count: 0
    },
    mutations: {
        add(state) {
            // Change status
            state.count++
        }
    }
})


// Trigger mutation in component
methods: {
    handle1() {
        // The first way to trigger changes
        this.$store.commit('add')
    }
}
Parameters can be passed when mutations are triggered:
// Define Mutation
const store = new Vuex.Store({
    state: {
        count: 0
    },
    mutations: {
        addN(state, step) {
            // Change status
            state.count += step
        }
    }
})


// Trigger mutation
methods: {
    handle2() {
        // When calling the commit function,
        // Carry parameters when triggering mutations
        this.$store.commit('addN', 3)
    }
}
mapMutations map to methods
-
Import mapMutations function from vuex on demand
import { mapMutations } from 'vuex' -
Map to the methods function of the current component through the mapMutations function just imported on demand.
// 2. Map the specified changes function to the methods function of the current component
methods: {
 ...mapMutations(['add', 'addN'])
}
example:
// store
mutations: {
  add(state) {
    // Change status
    state.count++
  },
  sub(state) {
    state.count--
  },
  addN(state, step) {
    // Change status
    state.count += step
  },
  subN(state, step) {
    state.count -= step
  }
},

// Component A
import { mapState,mapMutations } from 'vuex'
methods:{
  ...mapMutations(['sub','subN']),
  decrement(){
    // call
    this.sub()
  },
  decrementN(){
    this.subN(5)
  }
}
Actions handles asynchronous operations
If you change data through asynchronous operation, you must use Action instead of Mutation, but in Action, you still need to change data indirectly by triggering Mutation.
Note: the data in state cannot be modified directly in Actions, but through changes.
this.$store.dispatch triggers Actions
// store/index.js define Action

const store = new Vuex.store({
  // ... Omit other codes
  mutations: {
    // Only functions in mutations have the right to modify state.
    // Asynchronous operations cannot be performed in mutations.
    add(state) {
      state.count++
    }
  },
  actions: {
    // The data in state cannot be modified directly in Actions, but through changes.
    addAsync(context) {
      setTimeout(() => {
        context.commit('add')
      }, 1000);
    }
  },
})


// Trigger Action in component
methods:{
  handle(){
    // The first way to trigger actions
    this.$store.dispatch('addAsync')
  }
}
mapActions is mapped to methods
// 1. Import mapActions function from Vuex on demand.

import {mapActions} from 'vuex'

// 2. Map the specified actions function to the methods of the current component.
methods:{
  ...mapActions(['subAsync']),
  decrementAsync(){
    this.subAsync()
  }
}


// store/index.js
actions: {
 // The data in state cannot be modified directly in Actions, but through changes.
  subAsync(context){
    setTimeout(() => {
      context.commit('sub')
    }, 1000);
  }
}
Getter displays data on demand
Getter is used to process the data in the Store to form new data. Filter or sort the display.
-
Getter does not modify the original data in the Store. It only acts as a wrapper to process and output the data in the Store.
-
If the data in the Store changes, the data in Getter will also change.
//Define Getter
const store = new Vuex.Store({
state:{
count:0
},
getters: {
showNum(state) {
return "the latest quantity is ['+ state.count +']"
}
},
})
this.$store.getters. Name access
this.$store.getters.name
mapGetters map to calculated properties
import { mapGetters } from 'vuex'

computed:{
	...mapGetters(['showNum'])
}
Short!!!
In fact, the calculation properties or methods mapped through mapstate, mapmutations, mapactions and mapgetters can be called directly without using commit or dispatch.
Normal writing:
<button @click="decrementAsync"> -1Async</button>

import {mapActions} from 'vuex'


methods: {
  ...mapActions(['subAsync']),
  decrementAsync(){
    this.subAsync()
  }
},
In fact, it can be abbreviated as:
<button @click="decrementAsync"> -1Async</button>

import {mapActions} from 'vuex'

//... Omit some code

methods: {
  ...mapActions(['subAsync']),
},
When there are parameters, you can also bring them directly, like this:
<button @click="subAsync(5)"> +5 </button>


import {mapActions} from 'vuex'

//... Omit some code

methods: {
  ...mapActions(['addAsync']),
},
Vue 3
Data sharing between components
Custom events in Vue 3
There is one more emits node declaration in vu3 than in vu2:
Use custom events in vue 3:
When packaging components:
1. stay`emits`Node declaration custom event
2. `trigger`Listening events
When using components: listen for custom events
Declare custom events:
// Subcomponents
<button @click="onBtnClick"> +1 </button>

<script>
export default {
    // Custom events must be declared in the emits node
    emits: ['chage']
}
</script>
Trigger custom event:
// Subcomponents
<button @click="onBtnClick"> +1 </button>

<script>
export default {
    // Custom events must be declared in the emits node
    emits: ['chage'],
    data() {
        // The child component's own data. In the future, you want to pass the count value to the parent component
        return { count: 0 }
    },
    methods: {
        onBtnClick() {
            this.count t= 1
            //When modifying data, the user-defined event is triggered through $emit()
            // Call this when you click the '+ 1' button$ Emit triggers a custom numchange event
            this.$emit( 'numchange')}
    }
}
</script>
Listen for custom events:
// Parent component
// Use v-on instruction binding to listen for events
<Son @numchange="getNewCount"></Son>

methods : {
	getNewCount(val) {
	console.log('I got it count Change of value', val)
},
v-model on component
When you need to maintain the synchronization of data inside and outside the component, you can use the v-model instruction on the component. Sketch Map:
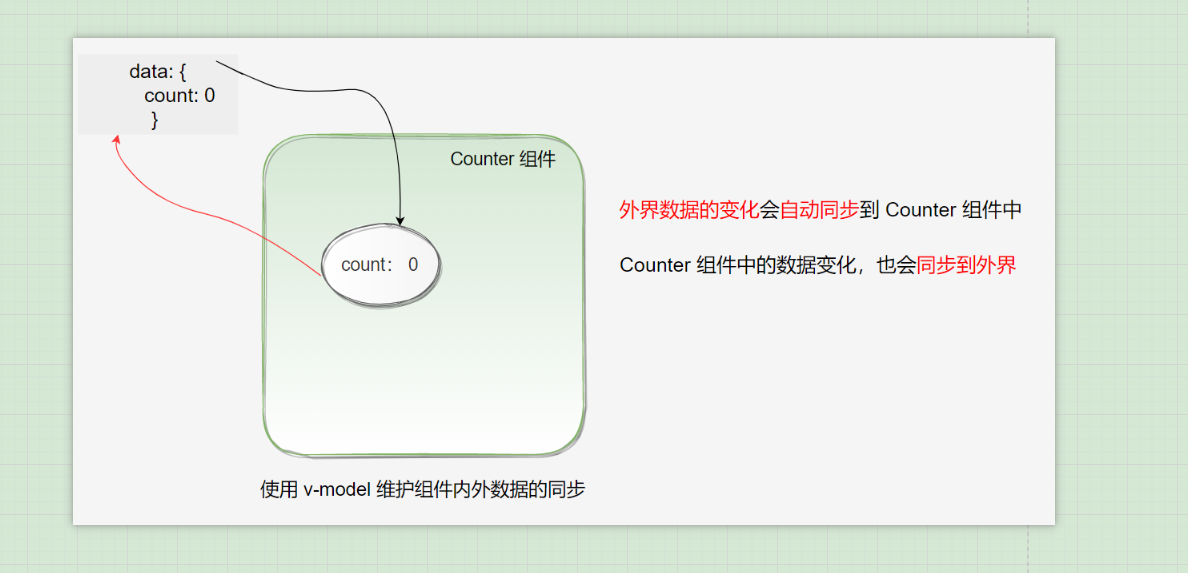
Parent child component data sharing
Realize the bidirectional synchronization of parent-child component data.
Child components share data with parent components:
-
The parent component shares data with the child component through v-bind attribute binding, and the child component uses props to receive data.
Parent component shares data with child component:
-
By customizing the event emit, and then triggering $emit(), the subcomponent listens.
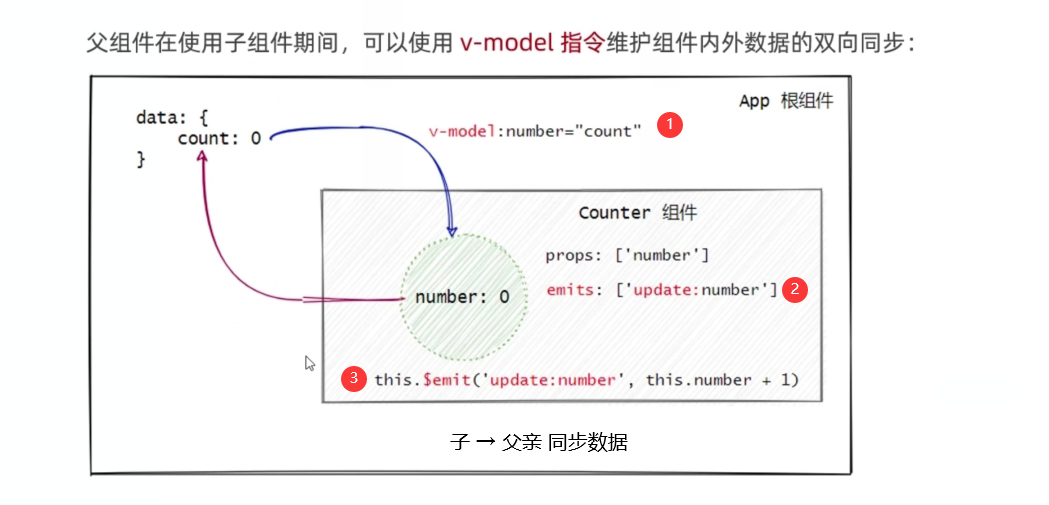
- Add the v-model instruction before the v-bind: instruction
- Declare the emits custom event in the subcomponent. The format must be update:xxx
- Call $emit() to trigger a custom event to update the data in the parent component
The benefits of enabling v-model to share data between child and parent components are as follows:
There is no need to listen to custom events in the parent component, and there is no need to declare additional event handling functions.
Parent component:
// Use bidirectional data binding instructions
<my-son v-model:number="count"> </my-son>

data(){
	return{
		count: 0
	}
}
Sub components:
// Subcomponents

<button @click="add"> +1 </button>

<script>
export default {
    prpos:['number']
    emits:['update:number']
    methods: {
        add() {
            this.$emit( 'update:number',this.num+1)}
    }
}
</script>
Data sharing between descendant relationship components
It means that the components of the parent node share data with their descendants.
Use steps:
-
The parent node shares data with the descendant components through the provide method.
export default { data() { return { color: 'red', // 1. Define the data to be shared by "parent component" to "child component" } }, provide() { // The provide function returns the data object to be shared return { color: this.color, count: 1, } }, } -
The descendant node receives data through inject.
<template>
    <h5>Tertiary assembly --- {{ color }} --- {{ count }}</h5>
</template>

<script>
export default {
  // The descendant component uses inject to receive the data shared by the parent node
  inject: ['color', 'count'],
}
</script>
The parent node shares responsive data externally
When the parent node uses provide to share data downward, it is not responsive. We can share responsive data downward in combination with the calculated function:
import { computed } from 'vue' // 1. Import the computed function from vue as needed

export default {
  data() {
    return {
      color: 'red',
    }
  },
  provide() {
    return {
      // 2. Use the computed function to wrap the shared data into "responsive" data
      color: computed(() => this.color),
      count: 1,
    }
  },
}
Descendant nodes use responsive data. Note that the received responsive data must be in value is used in the form of:
<template>
    // Responsive data must be in value
    <h5>Descendant component --- {{ color.value }} --- {{ count }}</h5>
</template>

<script>
export default {
  // The descendant component uses inject to receive the data shared by the parent node
  inject: ['color', 'count'],
}
</script>
Global data sharing
vuex is the ultimate data sharing solution between components.
- Solve the troublesome problem of sharing large and frequent data.
- vuex is used to manage the data that needs to be shared in components.
Data sharing summary
Parent child relationship:
- Parent → child: Custom Attributes
- Child → parent: custom event
- Parent child component data sharing uses the v-model on the component
Brotherhood: EvenBus
Descendant relationship: provide & inject
Global data sharing: vuex
Configuring axios globally in vue3
import { createApp } from 'vue'

import './assets/css/bootstrap.css'
import './index.css'

import axios from 'axios'

// Create a single page application instance
const app = createApp(App)

// Configure global request root path
axios.defaults.baseURL = 'https://www.escook.cn'

// Globally mount to app root path
// $http is a way of emulating vue to encapsulate members
app.config.globalProperties.$http = axios

// Implement mount
app.mount('#app')
Use in components:
methods: {
    async getInfo() {
      const { data: res } = await this.$http.get('/api/get', {
        // get requests must pass parameters through params
        params: {
          name: 'ls',
          age: 33,
        },
      })
      console.log(res)
    },
  },
Create route in vue3
-
vue3 requires the installation of 4 Version of X
-
Create router in src directory JS file and configure
import { createRouter, createWebHashHistory } from 'vue-router'
import Login from './components/MyLogin.vue'
import Home from './components/Home.vue'//Create routing instance object
const router = createRouter({
history: createWebHashHistory(), / / specifies the switching of routes through hash management
routes: [
{ path: '/home', redirect: '/login' },
{ path: '/login', component: Login, name: 'login' },
],
})export default router //4. Share routing objects outward
In Src / main JS entry file, import and mount the routing module:
import { createApp } from 'vue'
import App from './App.vue'

import router from './router'

// Create app instance
const app = createApp(App)

app.use(router)

// Mount app instance
app.mount('#app')
event:
// Parent component
// Use v-on instruction binding to listen for events
<Son @numchange="getNewCount"></Son>

methods : {
	getNewCount(val) {
	console.log('I got it count Change of value', val)
},
v-model on component
When you need to maintain the synchronization of data inside and outside the component, you can use the v-model instruction on the component. Sketch Map:
Parent child component data sharing
Realize the bidirectional synchronization of parent-child component data.
Child components share data with parent components:
- The parent component shares data with the child component through v-bind attribute binding, and the child component uses props to receive data.
Parent component shares data with child component:
- By customizing the event emit, and then triggering $emit(), the subcomponent listens.
- Add the v-model instruction before the v-bind: instruction
- Declare the emits custom event in the subcomponent. The format must be update:xxx
- Call $emit() to trigger a custom event to update the data in the parent component
The benefits of enabling v-model to share data between child and parent components are as follows:
There is no need to listen to custom events in the parent component, and there is no need to declare additional event handling functions.
Parent component:
// Use bidirectional data binding instructions
<my-son v-model:number="count"> </my-son>

data(){
	return{
		count: 0
	}
}
Sub components:
// Subcomponents

<button @click="add"> +1 </button>

<script>
export default {
    prpos:['number']
    emits:['update:number']
    methods: {
        add() {
            this.$emit( 'update:number',this.num+1)}
    }
}
</script>
Data sharing between descendant relationship components
It means that the components of the parent node share data with their descendants.
Use steps:
-
The parent node shares data with the descendant components through the provide method.
export default { data() { return { color: 'red', // 1. Define the data to be shared by "parent component" to "child component" } }, provide() { // The provide function returns the data object to be shared return { color: this.color, count: 1, } }, } -
The descendant node receives data through inject.
<template>
    <h5>Tertiary assembly --- {{ color }} --- {{ count }}</h5>
</template>

<script>
export default {
  // The descendant component uses inject to receive the data shared by the parent node
  inject: ['color', 'count'],
}
</script>
The parent node shares responsive data externally
When the parent node uses provide to share data downward, it is not responsive. We can share responsive data downward in combination with the calculated function:
import { computed } from 'vue' // 1. Import the computed function from vue as needed

export default {
  data() {
    return {
      color: 'red',
    }
  },
  provide() {
    return {
      // 2. Use the computed function to wrap the shared data into "responsive" data
      color: computed(() => this.color),
      count: 1,
    }
  },
}
Descendant nodes use responsive data. Note that the received responsive data must be in value is used in the form of:
<template>
    // Responsive data must be in value
    <h5>Descendant component --- {{ color.value }} --- {{ count }}</h5>
</template>

<script>
export default {
  // The descendant component uses inject to receive the data shared by the parent node
  inject: ['color', 'count'],
}
</script>
Global data sharing
vuex is the ultimate data sharing solution between components.
- Solve the troublesome problem of sharing large and frequent data.
- vuex is used to manage the data that needs to be shared in components.
Data sharing summary
Parent child relationship:
- Parent → child: Custom Attributes
- Child → parent: custom event
- Parent child component data sharing uses the v-model on the component
Brotherhood: EvenBus
Descendant relationship: provide & inject
Global data sharing: vuex
Configuring axios globally in vue3
import { createApp } from 'vue'

import './assets/css/bootstrap.css'
import './index.css'

import axios from 'axios'

// Create a single page application instance
const app = createApp(App)

// Configure global request root path
axios.defaults.baseURL = 'https://www.escook.cn'

// Globally mount to app root path
// $http is a way of emulating vue to encapsulate members
app.config.globalProperties.$http = axios

// Implement mount
app.mount('#app')
Use in components:
methods: {
    async getInfo() {
      const { data: res } = await this.$http.get('/api/get', {
        // get requests must pass parameters through params
        params: {
          name: 'ls',
          age: 33,
        },
      })
      console.log(res)
    },
  },
Create route in vue3
-
vue3 requires the installation of 4 Version of X
-
Create router in src directory JS file and configure
import { createRouter, createWebHashHistory } from 'vue-router'
import Login from './components/MyLogin.vue'
import Home from './components/Home.vue'//Create routing instance object
const router = createRouter({
history: createWebHashHistory(), / / specifies the switching of routes through hash management
routes: [
{ path: '/home', redirect: '/login' },
{ path: '/login', component: Login, name: 'login' },
],
})export default router //4. Share routing objects outward
In Src / main JS entry file, import and mount the routing module:
import { createApp } from 'vue'
import App from './App.vue'

import router from './router'

// Create app instance
const app = createApp(App)

app.use(router)

// Mount app instance
app.mount('#app')
)