If you are Xiaobai, this set of information can help you become a big bull. If you have rich development experience, this set of information can help you break through the bottleneck
2022web full set of video tutorial front-end architecture H5 vue node applet Video + data + code + interview questions.
Course address: Vue3 0 project actual combat 2021 | Vue differentiation comparison + actual operation of the company's background management system | zero foundation introduction front-end development tutorial (C#/.Net/Vue Foundation / Vue3 technology introduction / Vue actual combat)_ Beep beep beep_ bilibili https://www.bilibili.com/video/BV17V411j76p?p=1
ElementUI from introduction to actual combat [promotion and salary increase, seize the day] - learn video tutorial - Tencent classroom https://ke.qq.com/course/3547529
Fatal Frame. Opening introduction
Vue3 vs Vue2
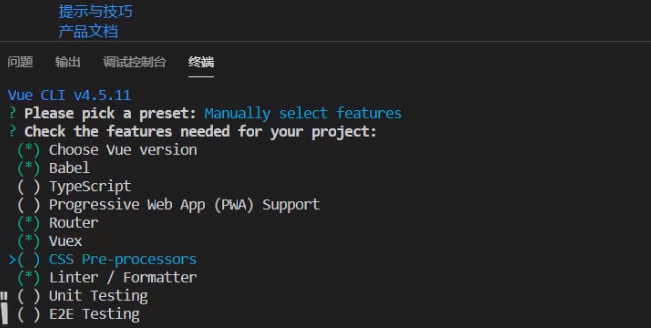
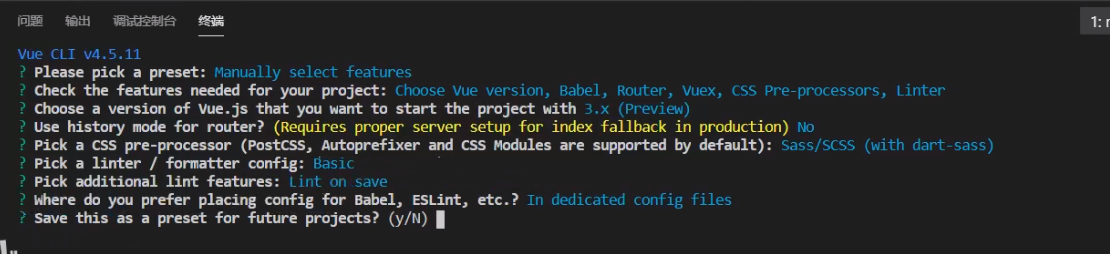
Vue cli build Vue3 project
First taste of vue3 composite API
Actual combat element plus + Axios + vue3

I Vue running environment installation, why do I need to install the running environment
Pre installed environment: node v8+
Why do I need to run environment vue project = = file type is vue he needs to be compiled into js files can be recognized by the browser. Will one click installation increase the learning cost? We just use the node environment and don't need to learn alone
Install node environment and download | node JS Chinese network http://nodejs.cn/download/
View node version: node – v
Vue3 of this course needs node version 8 or above
II npm image installation
npm is the built-in resource manager of node
View npm version: npm -v npm
Image: Taobao NPM image registry address: http://registry.npm.taobao.org/
Cnpmjs image registry address: http://registry.cnpmjs.org/
Set image source: npm config set registry address
View image source: npm config get registry
III VueCli scaffold installation
Install Vue cli NPM install - G @ Vue / cli
-g Global

IV Building Vue3 projects using Vue cli
Differences between Vue CLI and Vue
Scaffolding is based on Vue JS for rapid development of the complete system, through @ vue/cli to achieve rapid construction of standardized project scaffolding
Relationship between Vue version and VueCLI version
The Vue version is not affected by the scaffold version. Using VueCLI to build the project process, you can select the corresponding version of Vue according to your needs
View VueCLI version number: vue -v
V Building Vue3 projects using Vue cli
Run the command under the project file: Vue createproject name


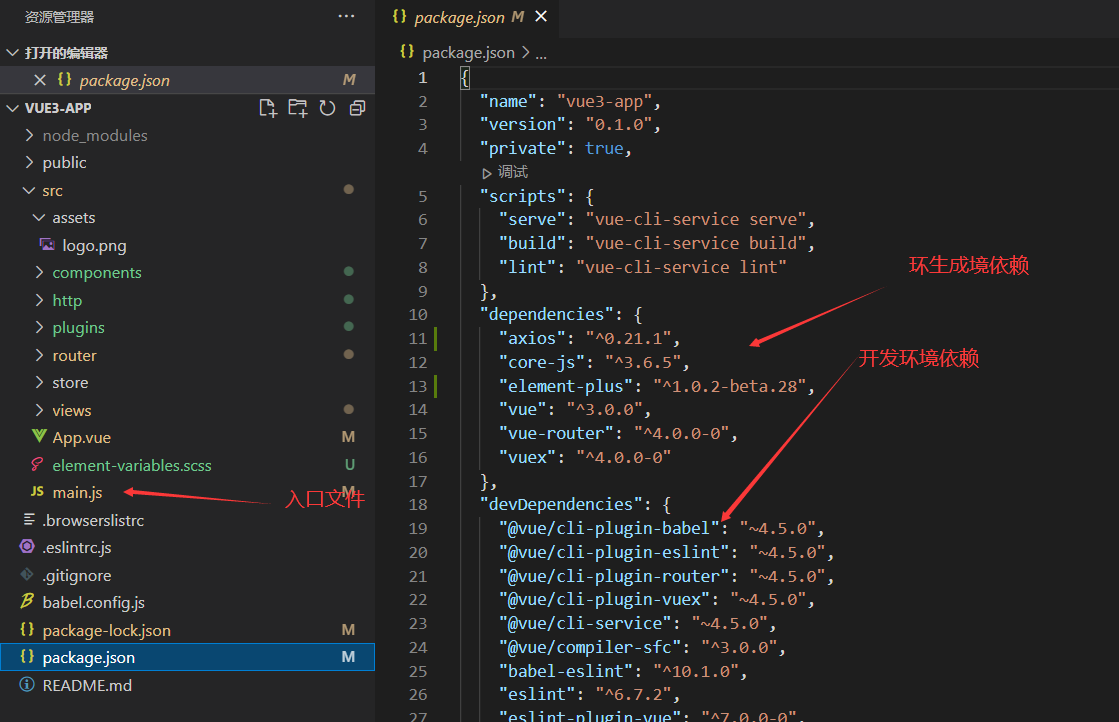
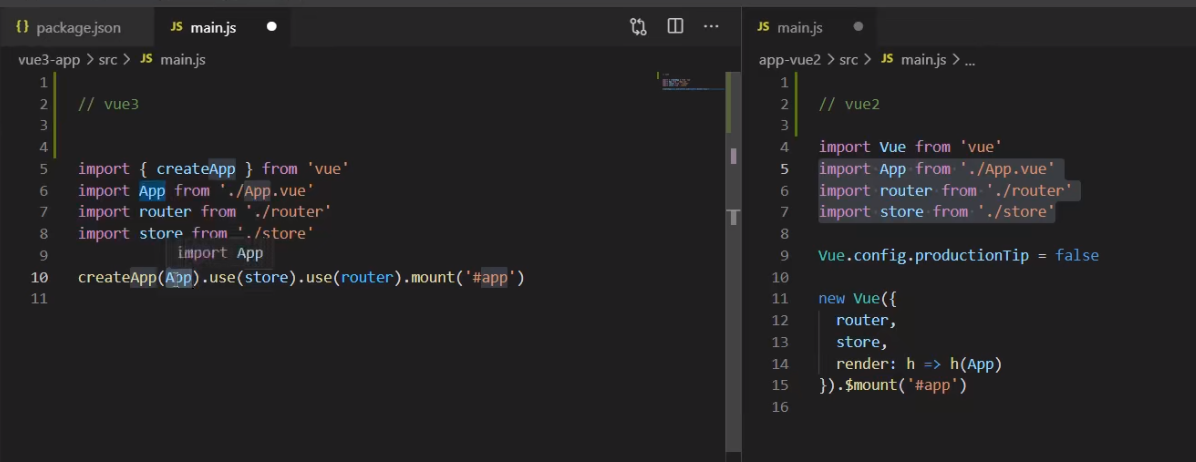
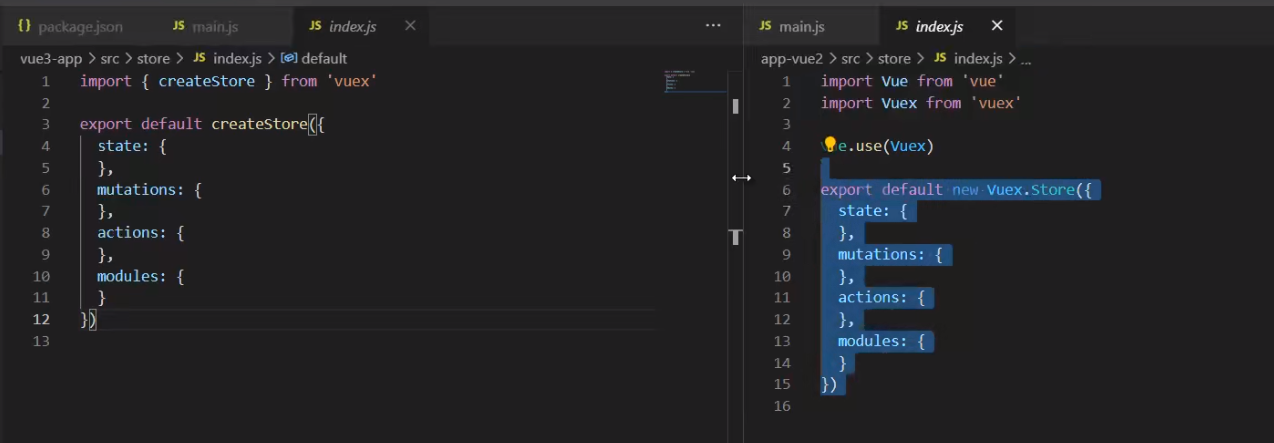
Vi Vue3 and vue2 main JS comparison
VII Vue3 lifecycle changes and setup functions
And 2 Composite API corresponding to version x life cycle
1. Beforecreate - > use setup()
2. Created - > use setup()
3.beforeMount -> onBeforeMount
4.mounted -> onMounted
5.beforeUpdate -> onBeforeUpdate
6.updated -> onUpdated
7.beforeDestroy -> onBeforeUnmount
8.destroyed -> onUnmounted
9.errorCaptured -> onErrorCaptured
onRenderTracked check dependency is tracked. When the render function is called, it will check which responsive data is collected and depends on onrendertrigged. When the update operation is performed, it will check which responsive data causes the component to re render.
setup is the entry of composite API in Vue3
beforeCreate and created will be executed in setup
Unable to use this to get the relevant data of the current component. setup can only be executed synchronously, not asynchronously
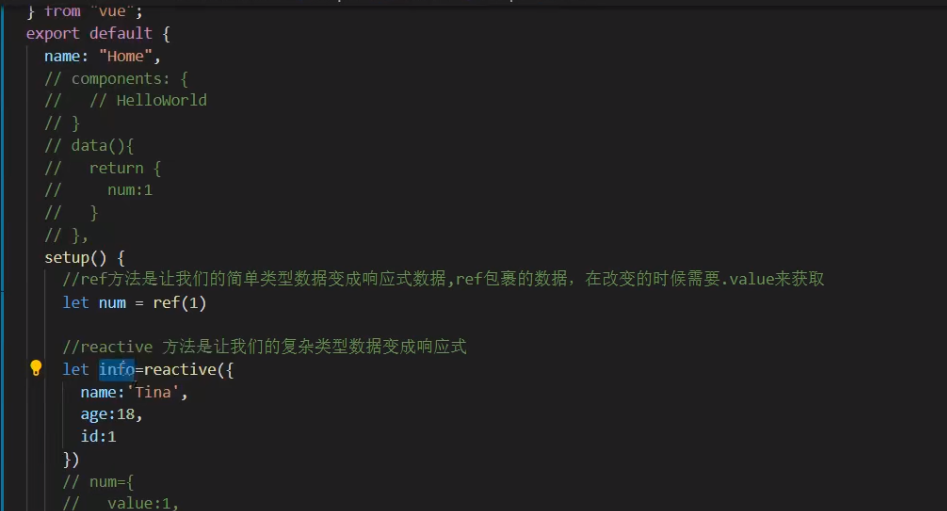
VIII ref,reactive, responsive api
reactive and ref
Only the data marked by the responsive api can become responsive data
ref – used to mark simple type data
reactive -- Mark complex type data (deep response)
If you use ref object / array, the object / array will be automatically converted to a reactive proxy object
ref data operation: in js, you need to value, not required in the template (internal parsing will automatically add. value)
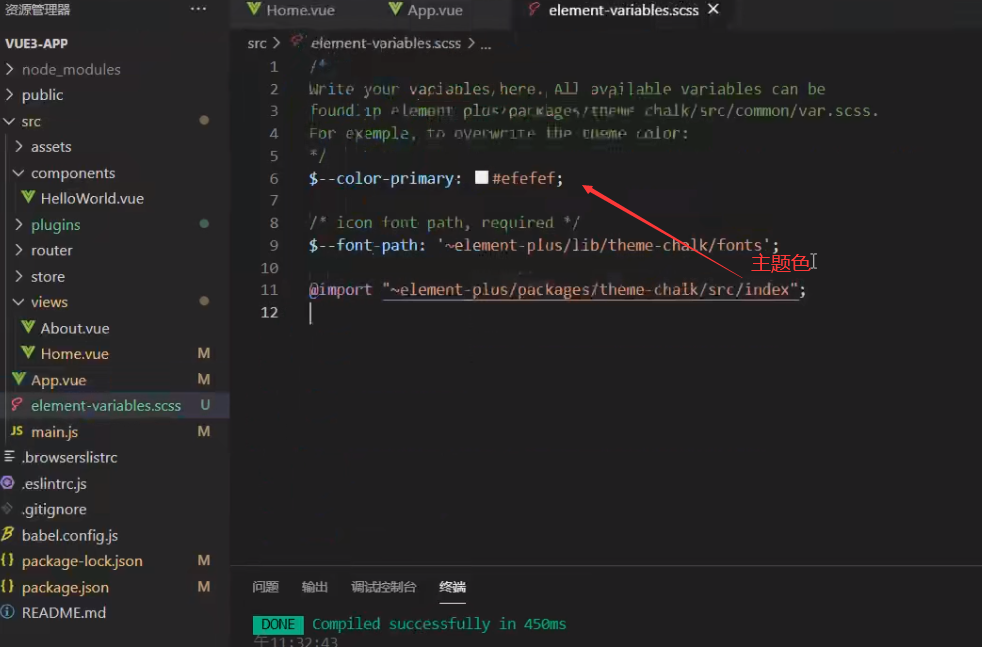
IX Element plus introduction
Installing Vue add element plus using cli
Element Plus - The world's most popular Vue 3 UI framework
?https://element-plus.gitee.io/#/zh-CN
Component | Element https://element-plus.gitee.io/#/zh-CN/component/installation
X Introducing http request framework axios
Install axios http request framework npm install axios
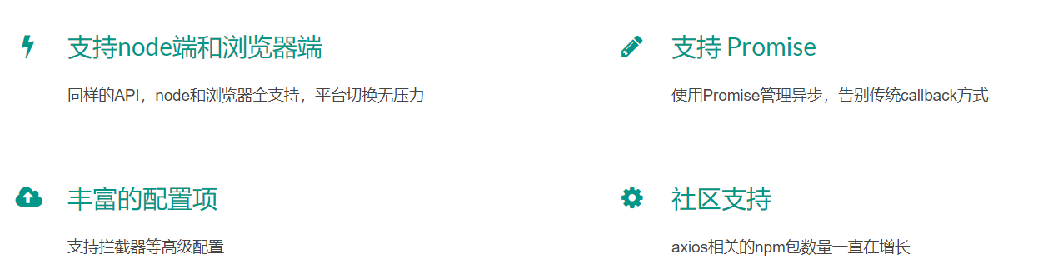
Basic usage of axios:
Xi Encapsulating axios
1. Use of Axios Foundation
Basic usage of axios:
axios.create({config}) / / create an Axios instance
axios.get(url,{config}) //get request
axios.post(url, data,{config}) //post request
axios.interceptors.request.use() / / request interceptor
axios.interceptors.response.use() / / request interceptor
See the following documents for details
Axios Chinese document | Axios Chinese website | axios http://www.axios-js.com/zh-cn/docs/
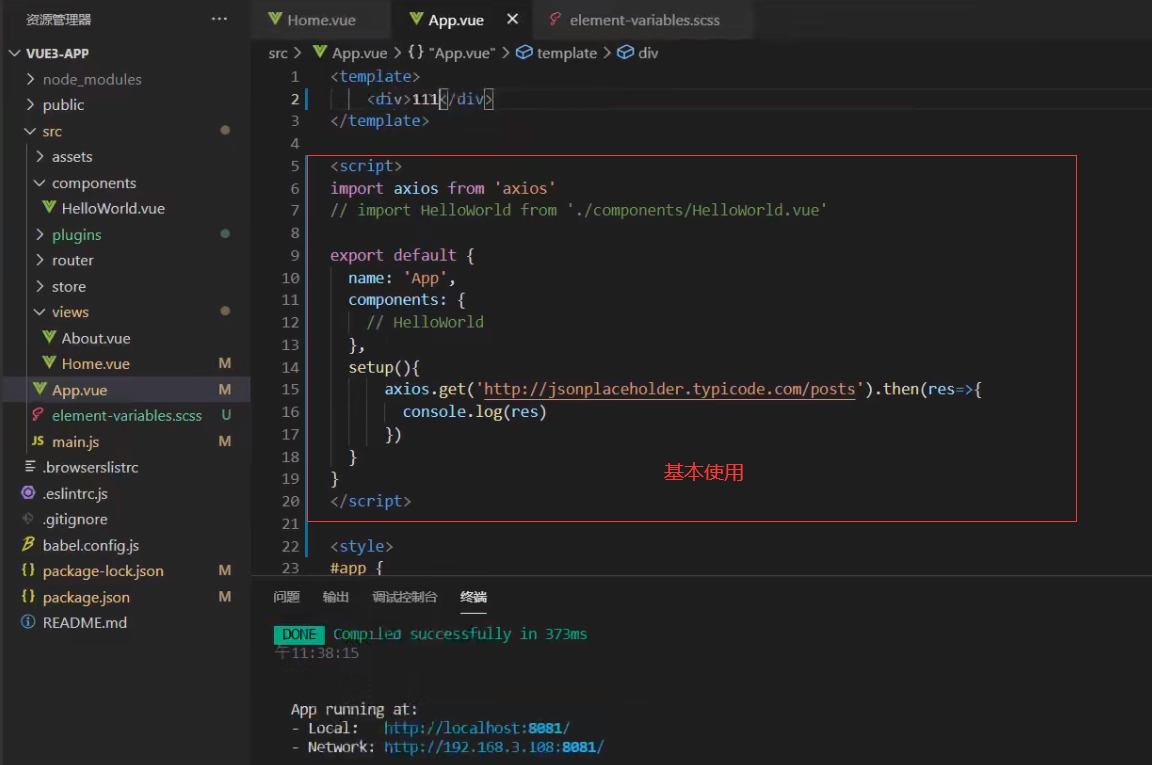
http/index.js
import axios from 'axios'
//axios.create creates an Axios instance. We write a configuration for this instance. All subsequent requests sent through the instance are subject to the current configuration
const $http = axios.create({
    baseURL: '',
    timeout: 1000,
    // headers: {'X-Custom-Header': 'foobar'}
  });

  // Add request interceptor
  $http.interceptors.request.use(function (config) {
    // What to do before sending the request
    config.headers.token='123123123'
    return config;
  }, function (error) {
    // What to do about request errors
    return Promise.reject(error);
  });

// Add response interceptor
$http.interceptors.response.use(function (response) {
    // Do something about the response data
    let data=response.data;

    return data;
  }, function (error) {
    // Do something about response errors
    return Promise.reject(error);
  });

  export default $http
http/api.js
import $http from './index.js'

export const getCourseList= (data)=>{
    return $http.get('http://jsonplaceholder.typicode.com/posts',data)
}

export const login=(data)=>{
    return $http.get('http://jsonplaceholder.typicode.com/posts',data)
}
//views/login.vue call
<template>
  <div class="login">
    <h4>Day and night background management system</h4>
    <el-form
      label-width="80px"
      :model="loginData"
    >
      <el-form-item label="account number">
        <el-input placeholder="Please enter the account number" v-model="loginData.name"></el-input>
      </el-form-item>
      <el-form-item label="password">
        <el-input placeholder="Please input a password" v-model="loginData.password" show-password></el-input>
      </el-form-item>
       <el-form-item>
          <el-button @click="subFun" class="sub-btn" type="primary">Sign in</el-button>
      </el-form-item>
    </el-form>
  </div>
</template>
<script>
import {reactive } from 'vue'
 import { ElMessage } from 'element-plus'
 import {login} from '../http/api.js'
 import router from '../router/index.js'
export default {
  name: "Login",
  setup() {
      let loginData=reactive({
        name:'',
        password:''
      })

      let subFun =()=>{
        //First judge whether the account and password have been filled in
          if(!loginData.name||!loginData.password){
              ElMessage.error('Please fill in the account number and password first');
              return
          }

          login(loginData).then(res=>{
            console.log(res)
            router.push('/Home')
          })

      }
      return{
        loginData,
        subFun
      }
  },
};
</script>
<style scoped>
.login{
  width: 500px;
  margin: 150px auto;
  border:1px solid #efefef;
  border-radius: 10px;
  padding:20px
}
h4{
  text-align: center;
}
.sub-btn{
  width: 100%;
}
</style>
2.axios cross domain processing
What is cross domain
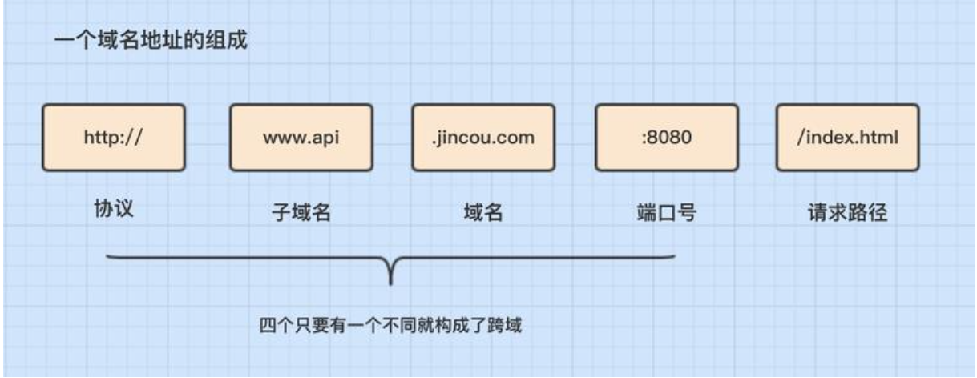
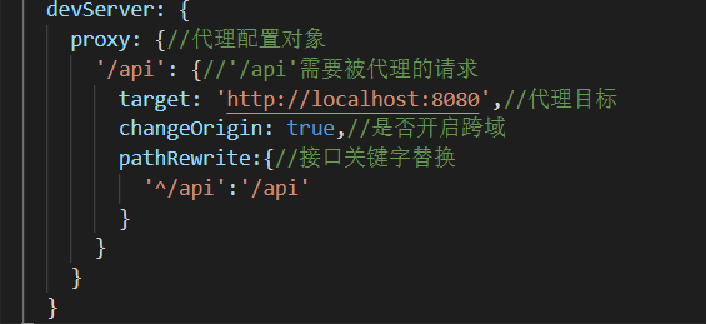
Configure cross domain requests
① Create Vue. From the project root directory config. js
② Write devServe configuration
③ Resolve devServe configuration
XII Vue routing
1.1 front end routing
Routing is the path manager of SPA (single page application), which establishes the mapping relationship between url and page
Front end routing mode
① The hash mode simulates a complete URL through the hash of the URL, so when the URL changes, the page will not be reloaded. ② the History mode uses the pushState() and replaceState() added in the HTML5 History Interface to modify the browser's History stack
1.2 Vue router routing configuration
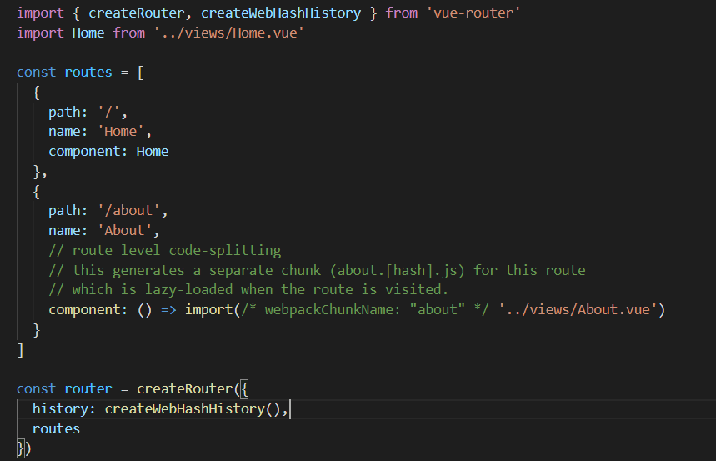
1.3 sub routing
import { createRouter, createWebHashHistory } from 'vue-router'
import Home from '../views/Home.vue'
import Login from '../views/login.vue'
const routes = [
{
path: '/Home',
name: 'Home',
component: Home,
meta:{
isShow:false,
},
children:[
{
path: '/courseList',
name: 'CourseListin',
meta:{
isShow:true,
title:'Course list'
},
component: () => import(/* webpackChunkName: "login" */ '../views/courseList.vue')
},
{
path: '/teacherList',
name: 'TeacherList',
meta:{
isShow:true,
title:'Instructor list'
},
component: () => import(/* webpackChunkName: "login" */ '../views/teacherList.vue')
},
{
path: '/personal',
name: 'Personal',
meta:{
isShow:true,
title:'Personal Center'
},
component: () => import(/* webpackChunkName: "login" */ '../views/personal.vue')
}
]
},
{
path: '/',
name: 'Login',
component: Login,
meta:{
isShow:false,
}
},
]
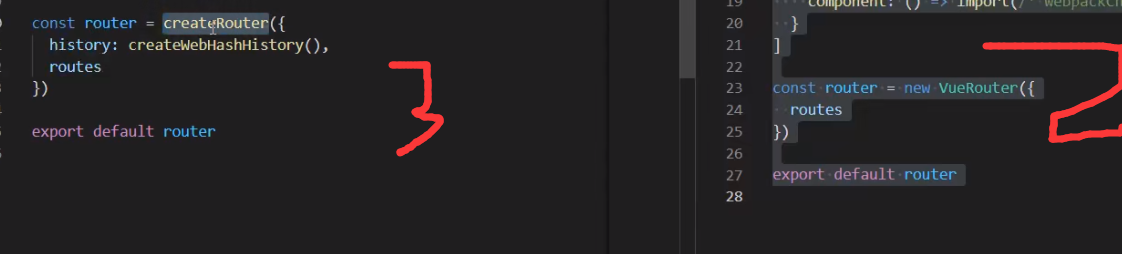
const router = createRouter({
history: createWebHashHistory(),
routes
})
export default router
1.4 route tuning
Routing optimization scheme
① The size of the route splitting project becomes larger, the route is bloated and the readability is poor. The coupling is reduced and the maintainability is improved according to the service splitting
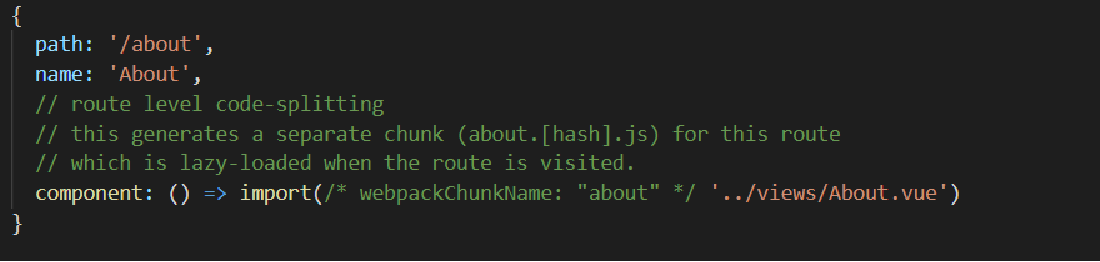
② Route lazy loading reduces the compilation volume and increases the running speed of the page
Route splitting
1. Split routing by service
2. Create multiple routing data sources according to the split
3. In index JS page for routing integration
Significance of routing lazy loading
At the end of Vue project compilation, there is an html blank page and several js files. Route splitting divides the js files of the development environment into multiple js files. Lazy loading divides the compiled route files into multiple js files and loads them on demand.
① Change routing configuration mode
② Resolution configuration
1.5 routing parameters
Through label
valueString //$route.params.key
url parameters
path:'/params/:newsId/:newsTitle', //$route.params.newsId
query parameters
{ name:'xxx',query: { queryId: status }} //$route.query.queryId
XIII Vuex global status
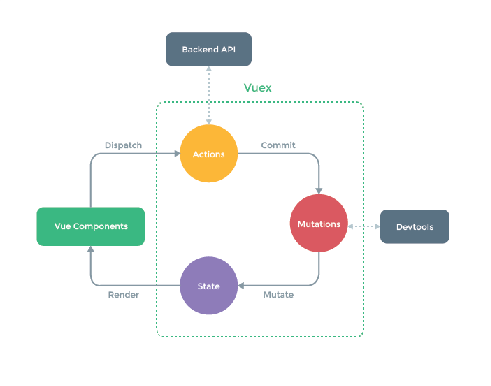
Vuex
Is a special for Vue JS application development state management mode. It uses centralized storage to manage the state of all components of the application, and uses corresponding rules to ensure that the state changes in a predictable way
Significance of state management
- Ensure a single data source for objects
- Data remains as responsive as Vue
- Data operation isolation to ensure data security
- Global data sharing ensures data dissemination
Vuex data operation process
1. The state of the state application level should be concentrated in a single store object
2. mutation is the only way to change the state, and the process is synchronous
3. action asynchronous logic should be encapsulated in action
XIV Vue3 vs Vue2
- 1.5-2 times faster, 1.1 times faster, 1.2 times faster, 1.3 times faster, and 1.1 times faster
- Volume reduction volume reduction tree shaking webpack plug-in vue2 130.01k vue3 113.37k
- Easier to maintain composition API (added)

- With higher native support, Proxy (object interception) is used instead of object Defineproperty Proxy: ES6 native syntax


XV Home page layout implementation
Refer to the official website of Element
<template>
  <div class="home">
    <el-container>
      <el-header class="top-box">
          <el-row :gutter="24">
          <el-col :span="18">
              <img class="logo" src="../assets/logo.png" alt="">
          </el-col>
          <el-col :span="6">
            <div class="info-box">
              <span>Tina</span>
              <el-button class="out-btn" type="text">sign out</el-button>
            </div>
          </el-col>
        </el-row>
        </el-header>
      <el-container>
        <el-aside width="200px">
            <el-menu
             router='true'
              class="el-menu-vertical-demo">
              <el-menu-item :route="i.path" v-for="i in tabList" :key="i.name" :index="i.name">
                <!-- <i class="el-icon-document"></i> -->
                <template #title>{{i.meta.title}}</template>
              </el-menu-item>

            </el-menu>
        </el-aside>
        <el-main>
          <div class="content-box">
            <router-view/>
          </div>
        </el-main>
      </el-container>
    </el-container>
  </div>
</template>

<script>
// @ is an alias to /src
// import {reactive} from "vue";
import router from "../router/index";
export default {
  name: "Home",
  setup() {
    let tabList = router.options.routes[0].children;
    return {
      tabList,
    };
  },
};
</script>
<style lang="scss" scoped>
.top-box {
  background: #efefef;
  padding: 5px;
  .logo {
    width: 50px;
  }
  .info-box {
    text-align: right;
  }
  .out-btn {
    margin-left: 10px;
  }
}
.content-box{
  padding:20px;
}
</style>
XVI Course list and pagination
<template>
  <div class="select-box">
    <div>
      <span>id:</span>
      <el-select v-model="option.id" placeholder="Please select id">
        <el-option
          v-for="item in [1,2,3,4,5,6,7]"
          :key="item"
          :label="item"
          :value="item"
        >
        </el-option>
      </el-select>
    </div>
    <div>
      <span>title:</span>
     <el-input v-model="option.title" placeholder="Please enter a title"></el-input>
    </div>
     <div>
    <el-button @click="getTabList" type="primary">query</el-button>
  </div>
  </div>

  <el-table border :data="data.table[option.page]" style="width: 100%">
    <el-table-column prop="title" label="title"> </el-table-column>
    <el-table-column prop="body" label="content"> </el-table-column>
    <el-table-column prop="id" label="id"> </el-table-column>
  </el-table>
  <el-pagination
    @current-change="handleCurrentChange"
    :current-page="data.page"
    layout="total, prev, pager, next, jumper"
    :total="data.total"
  >
  </el-pagination>
</template>

<script>
import { reactive } from "vue";
import { getCourseList } from "../http/api";
export default {
  name: "CourseList",
  setup() {
    let data = reactive({
      table: [],
      psages: 0,
      total: 0,
    });

  let option=reactive({
    id:'',
    title:'',
    page: 0,

  })

    let getCourseListFun = async (obj) => {
      let arr = await getCourseList(obj),
        newArr = [];
      data.total = arr.length;
      //   [1,2,3,4,5,6,7]   [10,11,12----100]
      //   [[1,2],[3,4],[5,6],[7]]
      //split(index,10)==[0-10]
      for (let index = 0; index < arr.length; index++) {
        let obj = arr.splice(index, 10);
        newArr.push(obj);
        index += 10;
      }
      data.table = newArr;
    };
    getCourseListFun();

    let handleCurrentChange = (index) => {
      option.page = index;
      // getCourseListFun({page:data.page})
    };

    let getTabList=()=>{
         console.log(option)
    }

    return {
      data,
      handleCurrentChange,
      getTabList,
      option
    };
  },
};
</script>
<style lang="scss" scoped>
  .select-box{
       display: flex;
      align-items: center;
      width: 100%;
      margin-bottom: 10px;
    >div{
      margin-right: 10px;
      width: 30%;
      display: flex;
      align-items: center;
      span{
        width: 50px;
      }

    }
  }
</style>