At present, the web cloud function does not give a separate custom runtime. Here we use the Go1 environment for deployment. In theory, we can use any environment This method is also applicable to other compilation languages
The deployment is mainly divided into two steps
- Build deployment file
- Deploy applications through yml
Here we demonstrate through an existing project Identity digital control platform
https://github.com/VineFiner/ciam-hello.git
Create deployment file
The overall meaning here is to get the binary file to be deployed
You can write your own deployment language to build Dockerfile
# Build,# Build image
docker build -t scf_app . -f ./SCF/CustomRuntime/Dockerfile.build
# Create, extract container
docker create --name extract scf_app
# Copy, in container, content
docker cp extract:/staging ./install
# Delete, extract container
docker rm -f extract
# delete mirror
# docker image rm scf_app
Here we use Docker to build the deployment file
- First, build the image.
docker build -t scf_app . -f ./SCF/CustomRuntime/Dockerfile.build
Specify the mirror name scf_app, specify the Dockerfile file path
- Create container
docker create --name extract scf_app
Specify the container name extract
- Copy the constructed files in the container to the local install directory
docker cp extract:/staging ./install
- see file
cd install
[vine@VM-8-15-centos install]$ ls
libBlocksRuntime.so    libicuucswift.so.65      Public
libdispatch.so         libswift_Concurrency.so  Resources
libFoundation.so       libswiftCore.so          Run
libicudataswift.so.65  libswiftDispatch.so
libicui18nswift.so.65  libswiftGlibc.so
[vine@VM-8-15-centos install]$
Deployment through Serverless Framework
- install Serverless Framework
Now let's deploy the content built in the previous step to the cloud function
######### Function deployment ###############
# Create startup file
touch ./install/scf_bootstrap && chmod +x ./install/scf_bootstrap

# Write startup content
cat > ./install/scf_bootstrap<<EOF
#!/usr/bin/env bash
# export LD_LIBRARY_PATH=/opt/swift/usr/lib:${LD_LIBRARY_PATH}
./Run serve --env production --hostname 0.0.0.0 --port 9000
EOF

# Compressed folder
# zip --symlinks -r app-0.0.1.zip ./install/*

# Delete yaml file
rm -rf serverless.yml

# Create yaml file
slsplus parse --output --auto-create --sls-options='{"component":"scf","name":"${env:INSTANCE_NAME}","org":"${env:TENCENT_APP_ID}","app":"${env:APP_NAME}","inputs":{"name":"${env:APP_NAME}","region":"${env:REGION}","runtime":"${env:RUNTIME}","type":"web","src":{"src":"./install","exclude":[".env"]},"memorySize":64,"environment":{"variables":{"CIAM_CLIENTID":"${env:CIAM_CLIENTID}","CIAM_CLIENTSECRET":"${env:CIAM_CLIENTSECRET}","CIAM_USERDOMAMIN":"${env:CIAM_USERDOMAMIN}","CIAM_REDIRECTURI":"${env:CIAM_REDIRECTURI}","CAIM_LOGOUTREDIRECTURL":"${env:CAIM_LOGOUTREDIRECTURL}"}},"events":[{"apigw":{"parameters":{"serviceName":"ciam_hello_serverless","description":"ciam hello","endpoints":[{"function":{"isIntegratedResponse":true},"method":"ANY","path":"/"}],"protocols":["http","https"],"environment":"release"}}}]}}' && cat serverless.yml

# Add environment variable
# cp SCF/Template/env .env

# deploy
sls deploy --force --debug

# END
First, we need to create a startup file
# Create startup file
touch ./install/scf_bootstrap && chmod +x ./install/scf_bootstrap

# Write startup content
cat > ./install/scf_bootstrap<<EOF
#!/usr/bin/env bash
# export LD_LIBRARY_PATH=/opt/swift/usr/lib:${LD_LIBRARY_PATH}
./Run serve --env production --hostname 0.0.0.0 --port 9000
EOF
View the file as follows
[vine@VM-8-15-centos install]$ ls
libBlocksRuntime.so    libicuucswift.so.65      Public
libdispatch.so         libswift_Concurrency.so  Resources
libFoundation.so       libswiftCore.so          Run
libicudataswift.so.65  libswiftDispatch.so      scf_bootstrap
libicui18nswift.so.65  libswiftGlibc.so
[vine@VM-8-15-centos install]$
Then create the yml file
For yml file configuration information, we can view
https://github.com/serverless-components/tencent-scf/blob/master/docs/configure.md
- Install serverless environment
pnpm install -g serverless
Because Xcode is not very friendly to yml editing, the format of the created yml file is wrong. This caused the deployment to fail Here we use slsplus for creation I personally recommend that you use this method to create, and there will be no inexplicable errors
- The installation method is as follows:
npm install -g @slsplus/cli
- The comparison between json and yml is shown below
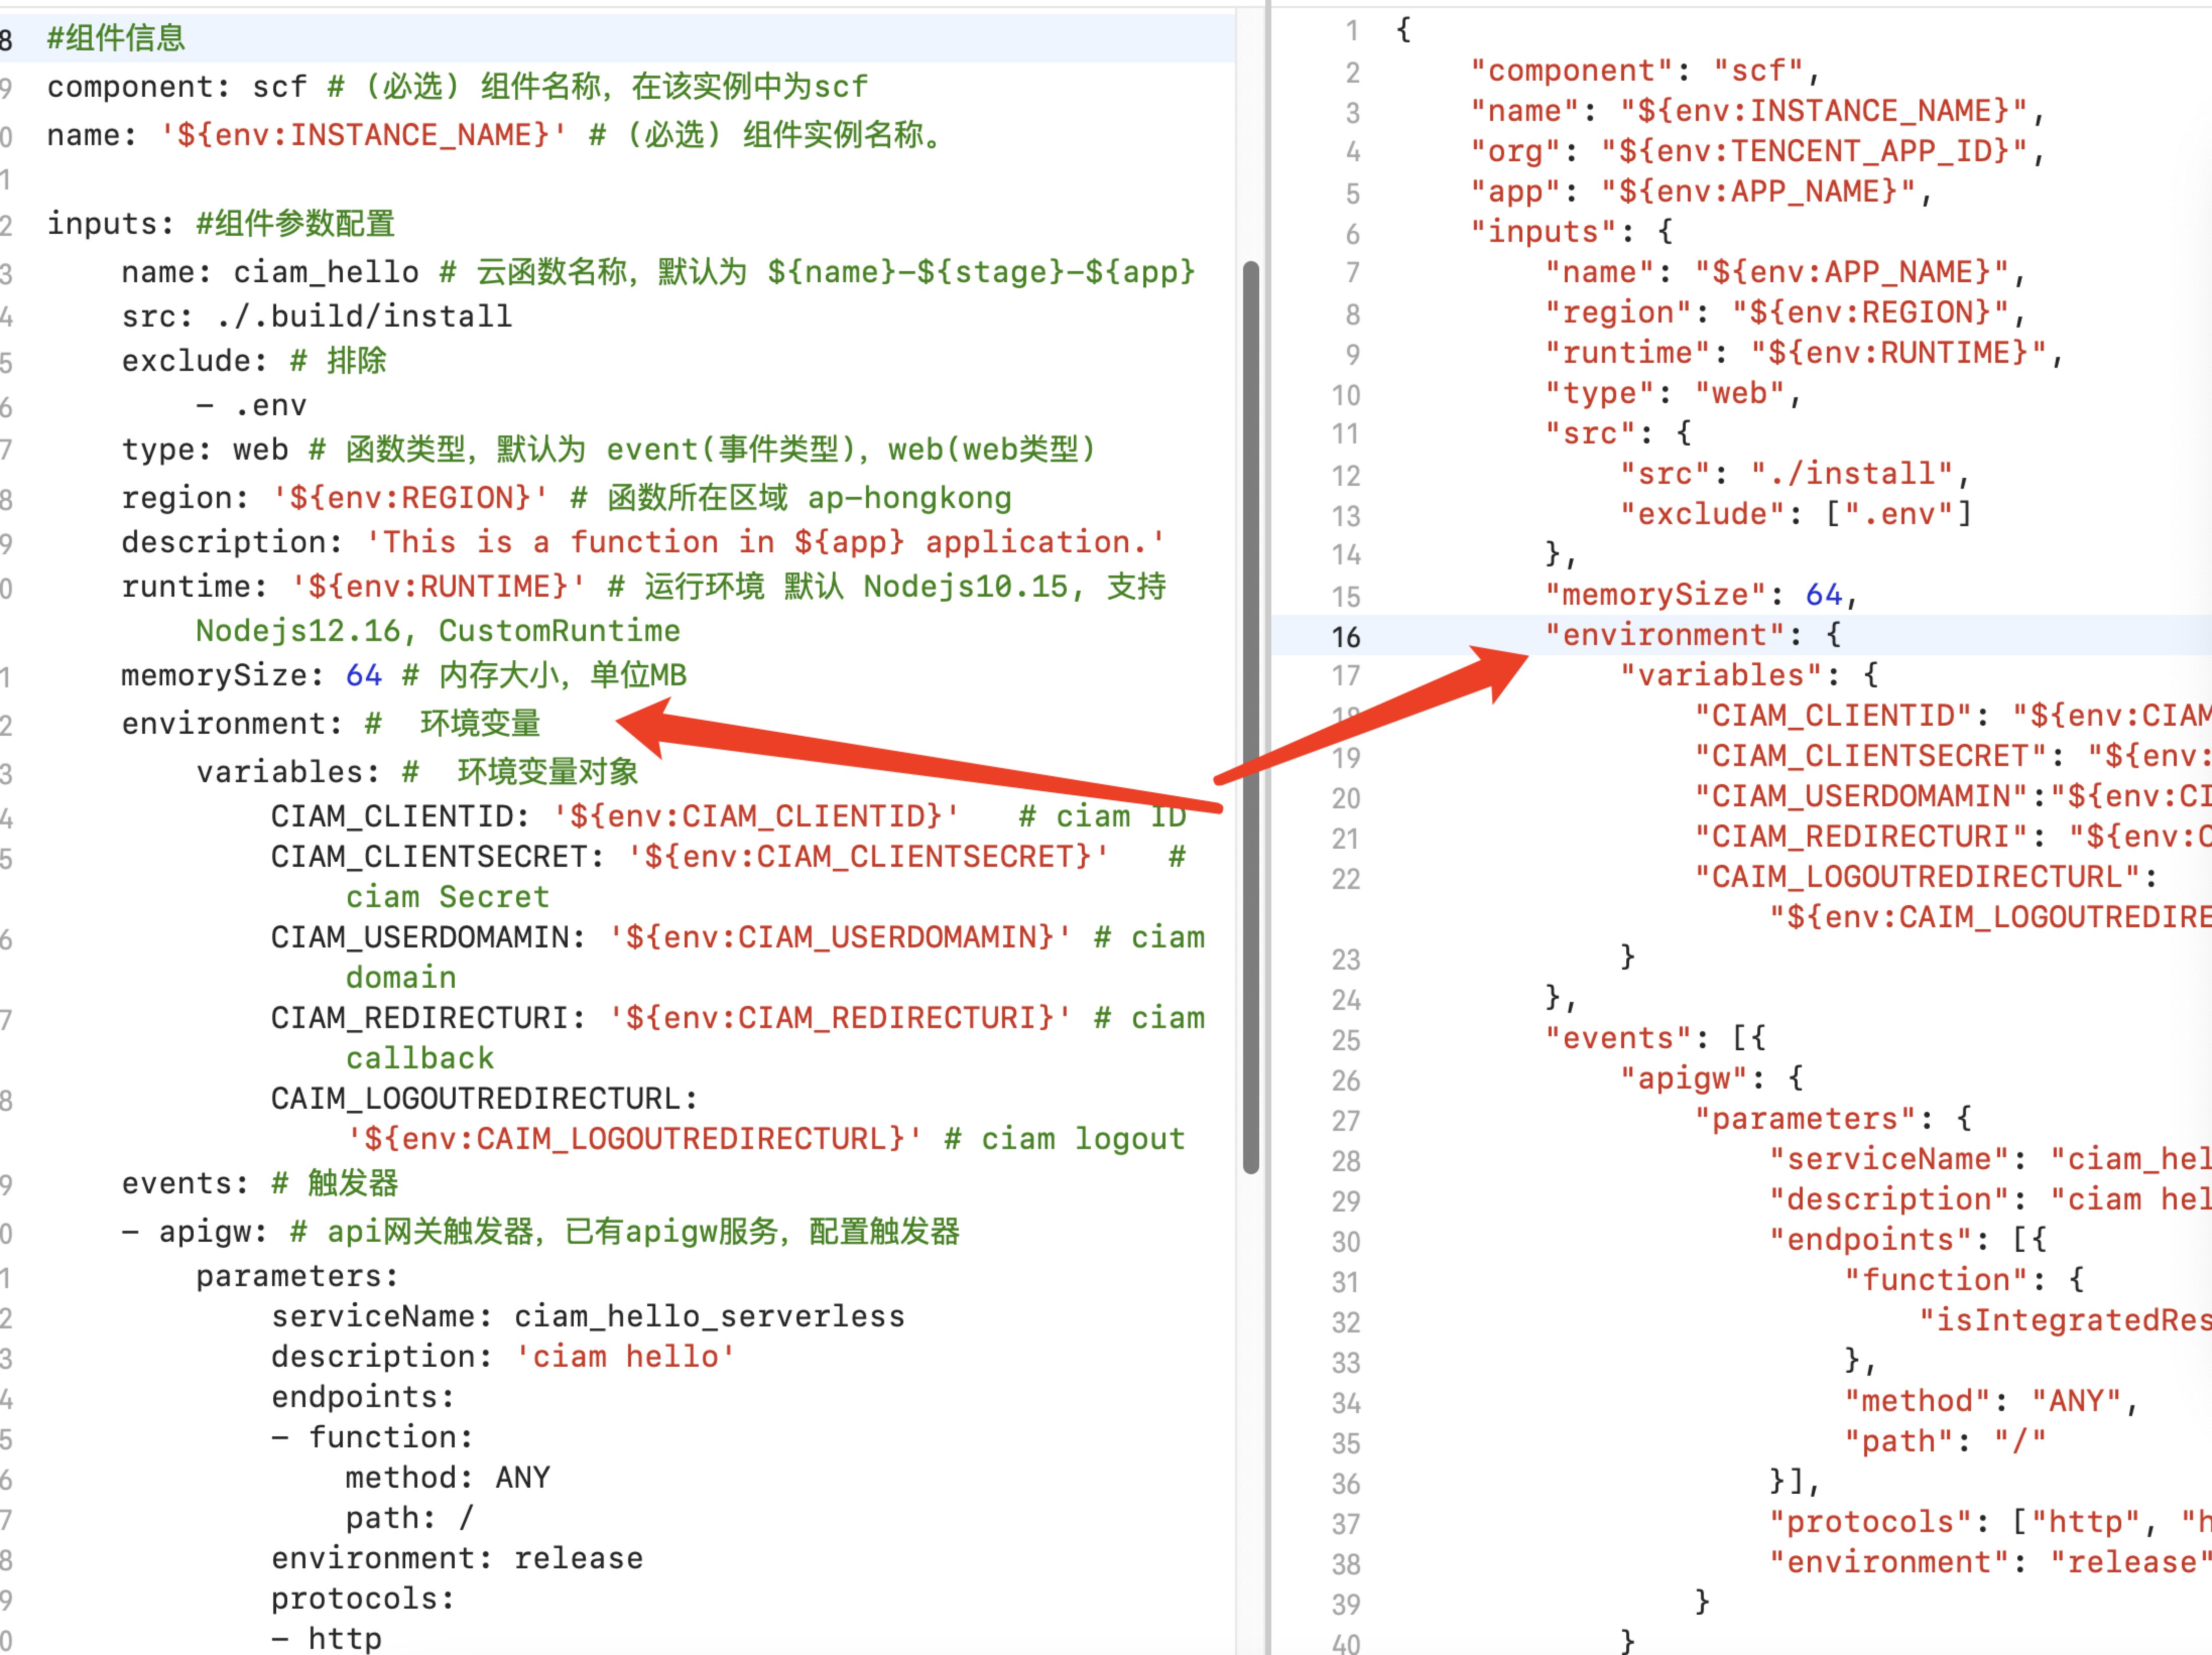
- Create using slsplus
# Create yaml file
slsplus parse --output --auto-create --sls-options='{"component":"scf","name":"${env:INSTANCE_NAME}","org":"${env:TENCENT_APP_ID}","app":"${env:APP_NAME}","inputs":{"name":"${env:APP_NAME}","region":"${env:REGION}","runtime":"${env:RUNTIME}","type":"web","src":{"src":"./install","exclude":[".env"]},"memorySize":64,"environment":{"variables":{"CIAM_CLIENTID":"${env:CIAM_CLIENTID}","CIAM_CLIENTSECRET":"${env:CIAM_CLIENTSECRET}","CIAM_USERDOMAMIN":"${env:CIAM_USERDOMAMIN}","CIAM_REDIRECTURI":"${env:CIAM_REDIRECTURI}","CAIM_LOGOUTREDIRECTURL":"${env:CAIM_LOGOUTREDIRECTURL}"}},"events":[{"apigw":{"parameters":{"serviceName":"ciam_hello_serverless","description":"ciam hello","endpoints":[{"function":{"isIntegratedResponse":true},"method":"ANY","path":"/"}],"protocols":["http","https"],"environment":"release"}}}]}}' && cat serverless.yml
When finished, we can see the serverless YML file
Finally, deploy
# Add environment variable
# cp SCF/Template/env .env

# deploy
sls deploy --force --debug

# END
- Because some of our yml files need to be configured, we use env for configuration here
cp SCF/Template/env .env
- For folder deployment, permissions will be lost when there is time. Here we add the parameter force
# deploy
sls deploy --force --debug